NewLine BNL16X5 User manual

Collaboration Touch Screen
User Manual
Newline Interactive Inc.
www.newline-interactive.com

Welcome to the world of TruTouch.
Thank you for choosing TruTouch Xseries Collaboration Touch Screen. Please use this
document to maximize your user experience.
This device complies with part 15 of the FCC Rules. Operation is subject to the following two
conditions: (1) This device may not cause harmful interference, and (2) this device must
accept any interference received, including interference that may cause undesired operation.
NOTE 1: This equipment has been tested and found to comply with the limits for a Class B
digital device, pursuant to part 15 of the FCC Rules. These limits are designed to provide
reasonable protection against harmful interference in a residential installation. This equipment
generates uses and can radiate radio frequency energy and, if not installed and used in
accordance with the instructions, may cause harmful interference to radio communications.
However, there is no guarantee that interference will not occur in a particular installation. If
this equipment does cause harmful interference to radio or television reception, which can be
determined by turning the equipment off and on, the user is encouraged to try to correct the
interference by one or more of the following measures:
Reorient or relocate the receiving antenna.
Increase the separation between the equipment and receiver.
Connect the equipment into an outlet on a circuit different from that to which the
receiver is connected.
Consult the dealer or an experienced radio/ TV technician for help.
NOTE 2: Any changes or modifications to this unit not expressly approved by the party
responsible for compliance could void the user’s authority to operate the equipment.
The symbol of the crossed out wheeled bin indicates this product should not be placed in
municipal waste. Instead, you need to dispose of the waste equipment by handing it over to a
designated collection point for the recycling of waste electrical and electronic equipment.

2
Contents
Safety Instruction.............................................................................................................................3
1 Overview.........................................................................................................................................7
1.1 Introduction .................................................................................................................................................................. 7
1.2 Parts .............................................................................................................................................................................. 7
1.3 Ports .............................................................................................................................................................................. 9
1.4 Remote Control ........................................................................................................................................................... 12
2 Installation Guide.......................................................................................................................14
2.1 Safety Precautions ...................................................................................................................................................... 14
2.2 Installation Precautions ............................................................................................................................................... 15
2.3 Installation .................................................................................................................................................................. 16
3 Getting Started.............................................................................................................................18
3.1 Power On .................................................................................................................................................................... 18
3.2 Power Off ................................................................................................................................................................... 18
3.3 Positioning .................................................................................................................................................................. 20
4 Operating the Touch Screen .....................................................................................................23
4.1 Home Page .................................................................................................................................................................. 23
4.2 Assistant Meeting........................................................................................................................................................ 25
4.2.1 Newline Assistant .................................................................................................................................................... 25
4.2.2 Switch Applications ................................................................................................................................................. 25
4.2.3 Add or Delete Applications ...................................................................................................................................... 25
4.3 Whiteboard ................................................................................................................................................................. 30
4.3.1 Whiteboard Functions .............................................................................................................................................. 31
4.3.2 Slide Operations....................................................................................................................................................... 36
4.4 Signal Source .............................................................................................................................................................. 37
4.5 External Storage .......................................................................................................................................................... 38
4.5.1 External Storage Page .............................................................................................................................................. 38
4.5.2 File Preview ............................................................................................................................................................. 39
4.5.3 File Filtering ............................................................................................................................................................ 39
4.5.4 File Search ............................................................................................................................................................... 40
4.5.5 File Operations......................................................................................................................................................... 41
4.6 End Meeting ............................................................................................................................................................... 42

3
4.6.1 Manually End Meeting ............................................................................................................................................ 42
4.6.2 Automatically End Meeting ..................................................................................................................................... 43
4.7 Shortcut Settings and Applications ............................................................................................................................. 44
4.7.1 Shortcut Settings ...................................................................................................................................................... 45
4.7.2 Applications ............................................................................................................................................................. 49
5 Serial Port Control ......................................................................................................................50
6 Specifications...............................................................................................................................54
7 More Information........................................................................................................................58
Safety Instruction
For your safety, please read the following instruction before you use the product. Serious injury or property loss
may be caused by improper operations. Do not try to repair the product by your own.
Disconnect the product from power supply immediately if major failures occur.
The major failures include the following:
Smoke, peculiar smell or abnormal sound is discharged from the product.
No image or sound is displayed, or the image error occurs.
Where the mains plug or an appliance coupler is used as the disconnect device the disconnect
device shall remain readily operable.
In the preceding scenarios, do not continue to use the product, disconnect power supply
immediately and contact professional staff for troubleshooting.
Do not drop liquid, metal or combustible into the product.
If any liquid or metal is dropped into the product, power off the product and disconnect
power supply, then contact professional staff for solutions.
Pay attention to the children when they are close to the product.
Do not damage the power cable.
Do not damage, change, wind, bend, heat or drag the power cable forcibly.
Do not put weights (such as the product itself) on the power cable.
Do not drag the cable forcibly when you pull out the power plug. If the power cable is
damaged, please contact the local distributor to repair or replace it.
The power cable in the accessory box is for this product only. Don't use it on other devices.

4
Put the product on a stable surface.
An unstable surface includes and does not limited to an inclined plane, a shaky stand, desk or
platform, which might cause the turnover and damage.
Use the battery correctly.
Galvanic corrosion, electric leakage and even fire may be caused by improper battery usage.
It is recommended to use the designated type of battery and install the battery by correct
electrodes (positive and negative electrodes).
Do not install and use new battery with the used one.
Take out the battery if the remote control is not used for a long period.
Do not expose the battery under overheated environments such as sunlight and firing.
Dump the used battery based on local regulations.
Do not open the cover or change the product by your own.
High voltage components are installed in the product. When you open the cover, high voltage,
electric shock or other dangerous situations may occur. If inspection, adjustment or maintenance
is required, contact the local distributor for help.
Use the specified power supply.
Do not use any types of power cables other than the one provided with the product to prevent
the product from being damaged.
Use a three-wire socket and ensure that it is properly grounded.
Pull out the power plug from the socket if the product is not used for a long period.
Before you move the product, disconnect all external connections and separate all toppling
preventing devices.
Move the product carefully to prevent it from being hit or squeezed, especially the screen, which
may cause injury if broken.
Clean the dust and metal on the power plug regularly.
When you are cleaning, fire or electric shock may be caused if the product is powered on.
Keep in mind to pull out the power plug before cleaning it by using a dried cloth.
Do not put items on the top of the product.
Do not put items, such as a container for liquid (a vase, flowerpot, cosmetics or liquid
medicine), on the top of the product.
If any water or liquid is spilled on the product, short circuit may occur and cause fire or
electric shock.
Do not tread on the product or hang any items on the product.
Do not install the product in an improper place.
Do not install the product in humid places, such as the bathroom, the shower room, the place
near windows or outdoor environments where experience rain, snow or other harsh weather.
The product installation is also required to avoid a place around by hot spring vapor. The
preceding environments may cause faults or electric shock under extreme conditions.
Do not put exposed fire source, such as an ignited candle, on the product.

5
Pull out the power plug during thunderstorms.
Do not touch the product when lighting to avoid electric shock.
Install or place components which power supply voltage is high enough to cause personal
injury in places out of the reach of children.
Do not cover or block up any vents on the product.
The overheated components may cause fire, damage the product and shorten the service life.
Do not put the venting surface of the product facedown.
Do not install the product on a carpet or bed clothes.
Do not use a cloth such as table cloth to cover the product.
Do not touch the power cable with wet hands to avoid electric shock.
Do not install the product in high temperature environments.
Do not install the product near heat source, such as the radiator, the heat reservoir, the stove
or other heating devices.
Do not expose the product under sunlight, which may cause high temperature and subsequent
faults in the product.
For transport:
Pack the product for mobility or maintenance by using the cartons and cushioning material
provided with the product.
Vertically move the product during transport. The screen or other components are easily
broken if the product is moved by an improper way.
Keep away from the product when you use a radio.
The product design to prevent radio interference complies with the international EMI standard.
However, the interference still exists and causes noise in the radio.
If noise occurs in the radio, try the following solutions.
Adjust the direction of the radio antenna to avoid the interference from the product.
Keep the radio away from the product.

6
Advice for watching:
Use the product in an environment with comfortable light. It is harmful to your eyes to watch
in a too bright or too dark environment.
Relax your eyes after a period of time for watching.
When you are watching, the distance which is 3 to 7 times of the screen height should be
kept, and it is the best distance to protect eyes and prevent eyestrain.
Adjust the volume to an appropriate level, especially at night.
Use amplifier equipment as the audio input source with caution. If you must use amplifier
equipment, the input power should not exceed the maximum of speaker power. Otherwise,
problems occur, such as the speaker is overpowered and damaged.

7
1 Overview
1.1 Introduction
The Collaboration Touch Screen adopts the advanced capacitive touch technology and All in
One design, and integrates video, audio, touch, writing, and multi-media presentation
functions. This product does not need additional devices, installation and wiring, and
commissioning and maintenance.
Dedicated software is customized for the assistant meeting. It can meet requirements of
various meeting modes, implementing convenient comments on local documents, viewing
multi-media files, conducting multiparty remote video and audio meetings, managing local
files, and improving meeting experience and work efficiency.
1.2 Parts
Front Elevation

8
The top and bottom cameras cannot be used at the same time.
The indicators of the top and bottom cameras are turning white when in use and off when not in use.
Rear Elevation
9
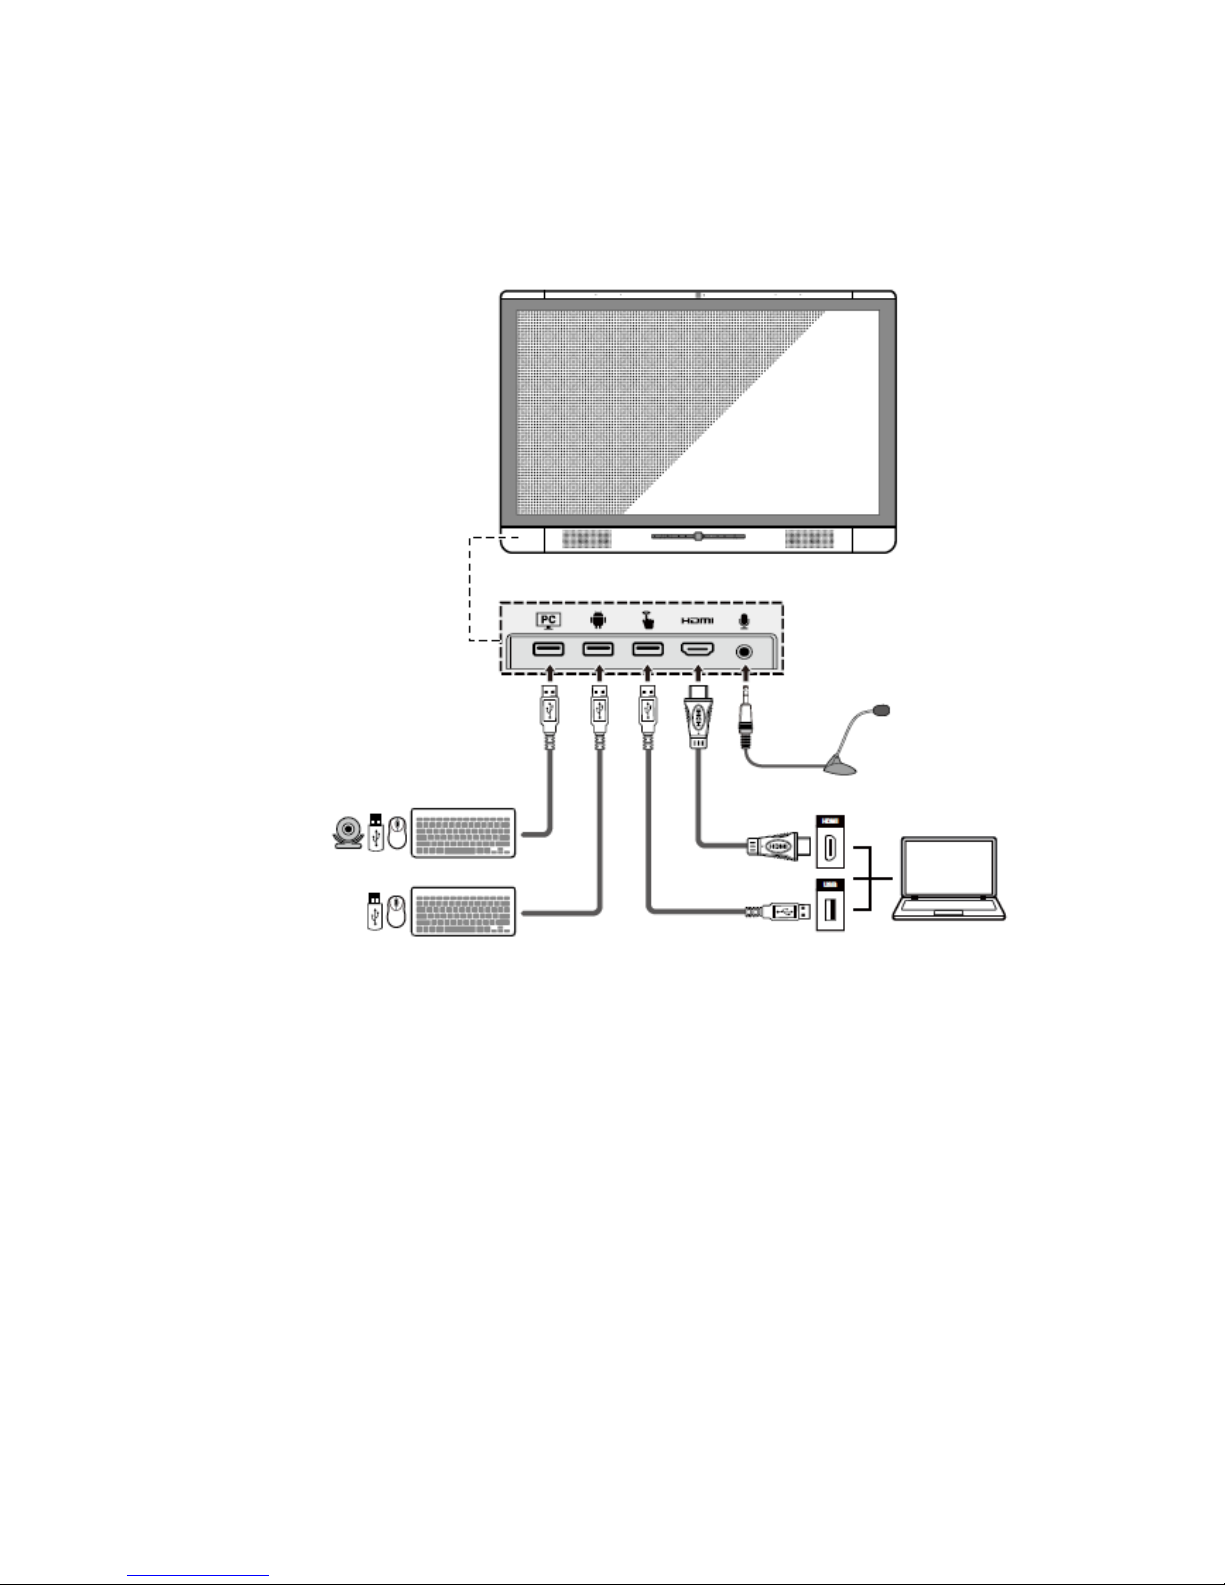
1.3 Ports
Front Ports

10
Rear Ports
Front Buttons

11
Buttons Operations Functions
Short press Power on/off
Short press Decrease volume
Long press for more than
1 second
Decrease volume continuously
Short press Increase volume
Long press for more than
1 second
Increase volume continuously
Short press Open the menu
Short press Return to the last menu/Exit
Short press Go to the home page

12
1.4 Remote Control
Buttons Functions
Power On/Off
Start the Default UC Programs
Mute
Microphone Mute
Up/Down/Left/Right
Confirm/OK

13
Buttons Functions
Return to Previous/Exit
Go to the Home Page
Open the Menu
Switch to Top Camera
Switch to Bottom Camera
Increase Volume
Decrease Volume
Settings
Switch Source to HDMI Front
Switch Source to HDMI Rear
Switch Source to VGA
Switch Source to Internal PC
Page Up
Page Down
Toggle Display Mode
Zoom Out (PC)
Zoom In (PC)

14
2 Installation Guide
2.1 Safety Precautions
Installation Environment

15
Installation Direction
Installation Height
2.2 Installation Precautions
Weight Loading
The back of the panel is equipped with holes in VESA standard. Please use a VESA
standard mounting system.
When using a mobile cart, please ensure the mobile cart has no less than 60kg loading
capacity.
Weight of the unit: 79.4 lb/36kg

16
When using wall-mount bracket, please ensure the wall can support the weight of the
unit. We recommend that the wall surface is reinforced, and have a loading capacity
twice the weight of the unit. Please consult a professional installer for wall-mount
installation.
Do not install the unit where it might be hit by a door.
Ventilation
Ensure adequate ventilation and/or air conditioning environment. We recommend to keep
certain distance from the side of the unit to the wall or panels. Ventilation requirement is
showed in following figure.
2.3 Installation
The dimensions of the 4 bracket mounting holes in the back panel is VESA MIS-F compliant
(400 x 400mm). Please use the metric M8 screws with length of 10 to15mm to secure the
touch screen with the mounting system. Dimensions of the mounting holes in the back panel
is shown in the following figure.
Please have a professional installer to install the display unit.

17

18
3 Getting Started
3.1 Power On
Step 1 Plug in the power plug to the power outlet, and plug in the power connector to the side of the
unit. Please ensure the power is in the range of 100V- 240Vwith frequency at 50Hz/60Hz
±5%. The power current must be grounded.
Step 2 Turn on the general power switch located on the side of the unit.
3.2 Power Off
Step 1 Press the power button on the front panel or the power button on the remote control.
The Save meeting discussion page is displayed as follows.

19
Step 2 Press the power button on the front panel or the power button on the remote control
again. The Really end your meeting dialog box is displayed as follows.
Step 3 In the Really end your meeting dialog box, click Yes. The meeting start page is displayed as
follows.
Table of contents
Other NewLine Touch Panel manuals

NewLine
NewLine TRUTOUCH RS Series User manual

NewLine
NewLine TRUTOUCH UB Series User manual

NewLine
NewLine TRUTOUCH X9 User manual

NewLine
NewLine ER Series User manual

NewLine
NewLine HO Series User manual

NewLine
NewLine TRUTOUCH TT-6516UB User manual

NewLine
NewLine Trutouch X5 User manual

NewLine
NewLine Collaboration HO Series User manual

NewLine
NewLine Trutouch X7 User manual


