Newwave 5-in-1 Multi-Cooker User manual
5-in-1 Multi-Cooker
Instruction Manual

wildappetite.co.nz
Introduction
Important Safeguards
Using your Multi-Cooker
Product Structure
Assembling Instructions
Quick Guide to Using your 5-in-1 Multi-Cooker
Beginners Guide to Slow Cooking
Beginners Guide to Pressure Cooking
Beginners Guide to Soup Making
Beginners Guide to Steaming
Beginners Guide to Rice Cooking
Warranty
Care and Cleaning Instructions
Recipes
After Sales Service
Wild Appetite Contact Details
Contents

wildappetite.co.nz
We hope that you enjoy your new 5-in-1 Multi-Cooker. Please find below
important information about your new appliance.
Characteristics
• 5 in 1 Multi-Cooker
• NW 700
• Voltage: 220-240V 50Hz
• Power consumption: 900W
Description
• 5 cooking appliances in 1 :
Pressure Cooker
Slow Cooker
Rice Cooker
Steamer
Soup/Saute
• 7 Safety Protection measures
• 6L capacity
• 2 pressure levels, high and low
• Stainless steel finish
• Non-stick removable inner bowl
• Digital timer with countdown
• Slow cook times in hours
• Fast cook times in minutes
• Automatic keep warm setting
• 12monthwarranty
Introduction
Other items in the Newwave
Kitchen Appliances range

wildappetite.co.nz
When using electrical appliances, basic safety precautions should always be
followed. Please read the safeguards below before using your Multi-Cooker.
• Read all instructions before operating and keep
them for future reference.
• Remove any promotional stickers or labels
before using the appliance for the first time.
• Always make sure your appliance is assembled
before use.
• Do not touch hot surfaces. Use the handles to
move the appliance.
• Do not place the appliance near the edge of a
bench or table during operation. Ensure the
surface is level, clean and free of water.
• The appliance is not to be used by children
or persons with reduced physical, sensory
or mental capabilities, or lack of experience
and knowledge, unless they have been given
supervision or instruction
• Children being supervised should not to play
with the appliance
• Close supervision is necessary when any
appliance is used by or near children.
• Do not place the appliance on or near a hot gas
or electric burner, or where it can touch a heated
oven. Keep away from walls.
• Always provide adequate space above and on
all sides for air circulation.
• Always switch the appliance off at the wall, then
unplug and allow to cool before cleaning and
attempting to move the appliance for storage.
• This appliance requires cleaning after use and
not to be immersed in water for cleaning.
• Unwind the cord before use.
• Do not immerse cord, plug or appliance in
water or any other liquid.
• Do not let the cord hang over the edge of a
table or counter, touch hot surfaces, or become
knotted.
• Do not use the appliance if the power supply
cord, plug or appliance becomes damaged in
anyway. Return the appliance to an authorised
service centre for examination and or repair.
• Any maintenance, other than cleaning, should
be performed at an authorised service centre.
• This appliance is intended to be used in
households and similar applications such as:
- staff kitchen areas in shops, offices and other
working environments
- farm houses
- by clients in hotels, motels and other residential
type environments
- bed and breakfast type environments
• This appliance is for household use only. Do
not use this appliance for anything other than its
intended use.
• Do not use in moving vehicles or boats.
• Do not damage the seal belt and do not replace
it with any other rubber belly or tensile belt.
• Please ensure that the ducts in the pressure
regulator allowing the escape of steam are
checked regularly to ensure that there are no
blockages
• The lid must not be opened until the pressure
has decreased sufficiently .
• Please turn the lid left after the pressure has
released to ensure safety when opening the lid.
• Do not move the seal ring in the lid with any
tools or external forces. If the ring breaks off the
lid, stop using the cooker and replace the whole
lid with a new one.
• Clean the filter regularly to keep the cooker
clean.
• Do not open the lid with external force when the
floating valve has not sunk.
• Never add any additional weight on the Pressure
Limiting valve or replace the Pressure Limiting
valve with another object.
• Never use the inner bowl if damaged as this will
cause air leakage.
• Food should not be kept warm for more than
12 hours.
• If steam is released around the lid during the
cooking process, please stop using the device
and contact an authorised repair centre.
• Never plug in or switch on your appliance
without the inner bowl placed inside the cooker.
• Only use the removable inner bowl supplied. Do
not use any other bowl inside the cooker.
• Never operate the cooker without food or water
in the inner bowl.
• Do not place the removable inner bowl when hot
on any surface that may be affected by heat.
• Avoid scalding from escaping steam when
opening the lid.
• Do not place the inner bowl in the dishwasher.
Important Safeguards

wildappetite.co.nz
First time use
When using your Multi-Cooker for the first time, please read the instructions contained in this
manual.
Make sure you remove all promotional stickers and labels and that the outside of
the inner bowl is clean and is not damaged.
Check to see if the outer pot is free from any objects prior to inserting the inner pot.
When adding any food into the inner pot make sure that the food is spread evenly across the
bottom of the bowl and not heaped on one side.
Select the required cooking function and revert to the appropriate recipe guide.
When preparing meat and poultry, try to select the leaner cuts of meat and trim off any visible
fat as this will reduce any excess liquid. Vegetables should be cut into small, even-sized
pieces to ensure even cooking. When cooking meat and vegetables together, it is important to
remember that meat cooks at a slower rate than vegetables.
Please be careful if you have cooked with the lid closed to avoid any scalding
from escaping steam. Lift the lid carefully and keep your face clear when
opening.
Using Your Multi-Cooker
wildappetite.co.nz
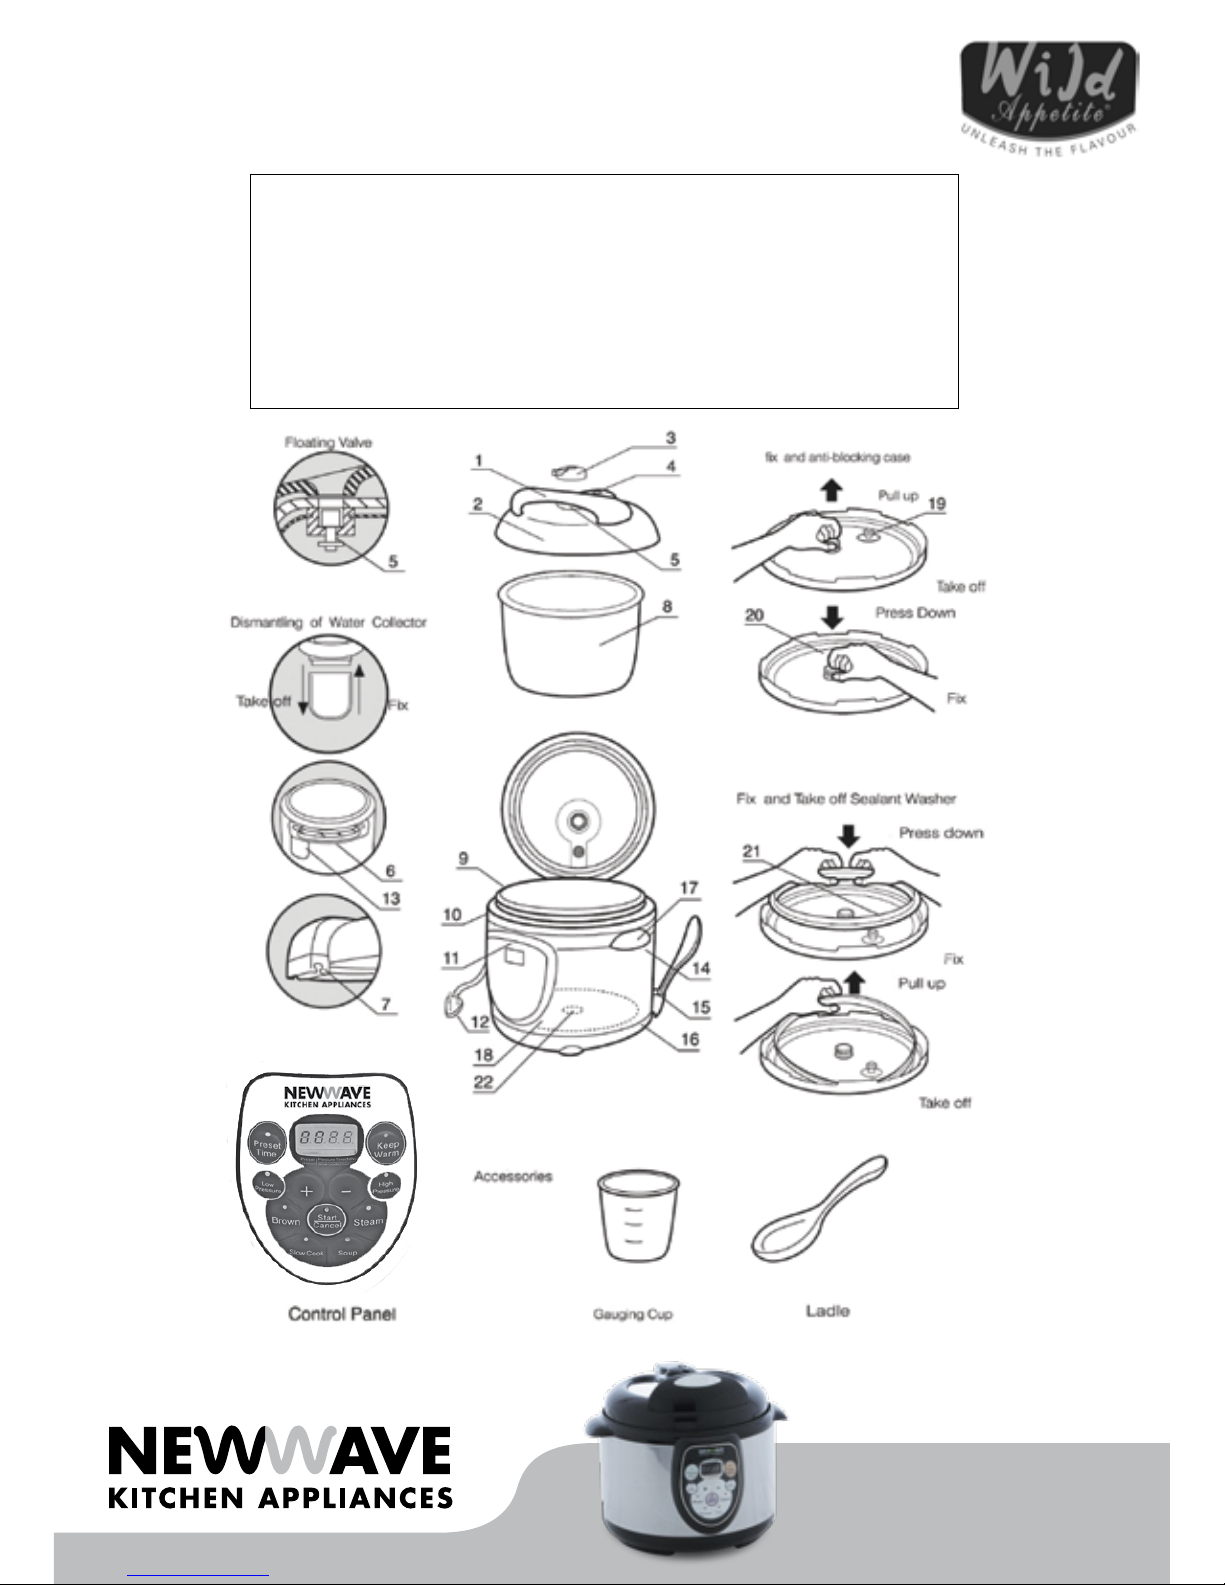
Product Structure
1. Handle
2. Lid
3. Pressure Limiting Valve
4. Floating Valve
5. Floater
6. Slideway
7. Sliding Valve
8. Inner Pot
9. Outer Pot
10. Upper Body
11. Control Panel
12. Power Cable
13. Steam Water Storage
14. Body Cover/Structure
15. Detachable Spoon/Ladle Holder
16. Lower Body
17. Side Handle
18. Electronic Heater
19. Seal Ring for Floating
Valve
20. Filter
21. Seal Belt
22 Sensor
wildappetite.co.nz
Assembling Instructions

wildappetite.co.nz
Assembling Instructions

wildappetite.co.nz
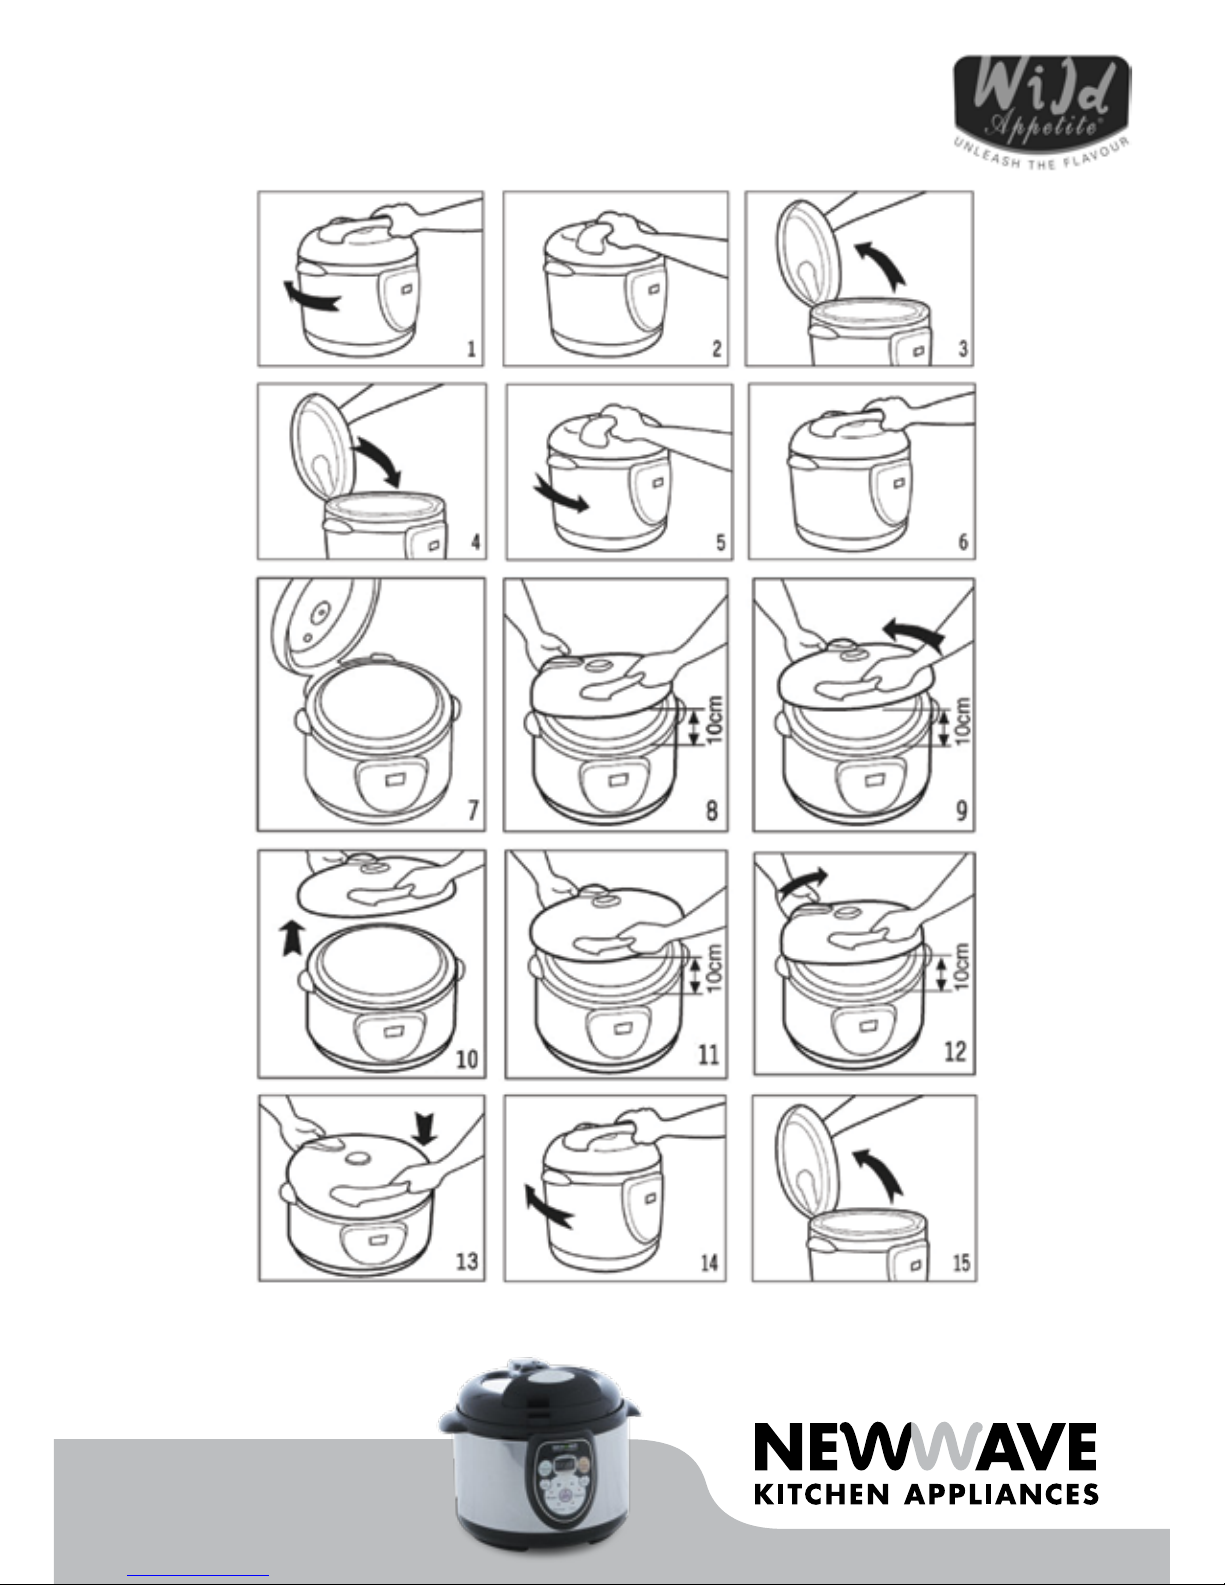
Assembling Instructions :
1. To open the lid - When the lid is closed, hold
the handle and turn in an clockwise direction
until the lid can be lifted up. See figures 1-3.
2. To close the lid - When the lid is open, hold
the handle and pull down. Once down, turn
anti-clockwise until the lid reaches the closed
position. See figures 4-6.
3. To dismantle the lid - When the lid is
open, hold the lid with both hands and adjust
the height between the lid and the upper edge
of the cooker to around 10cm. Then, turn
anti-clockwise until the lid reaches the closed
position. See figures 7-10.
4. How to install the lid - Hold the lid with both
hands at the closed position and pull upwards
until there is around 10cm between the lid and
the upper edge of the cooker. Buckle the lid’s
sliding valve to the cooker’s sideways and turn
clockwise until you reach the opened lid position.
See figures 11-13.
5. Pressure Limiting Valve - this valve is
designed to sit loosely on the lid of your 5 in 1
appliance. It will rotate 360deg and will not lock
into place when placed into position. The valve
will tighten during the cooking process and then
once released will return to a loose valve fitting.
Usage Instructions :
To open the lid - When the lid is closed, hold
the handle and turn in an clockwise direction
until the lid can be lifted up. See figures 14-15.
Adding the food - Take out the inner bowl and
place in the food and water. The amount of food
and water should not exceed 4/5 of the height
of the inner bowl. For food that will expand, the
level should not exceed 3/5 of the inner bowl.
The minimum allowable level is 1/5 of the bowl.
See figures 16-17.
Clean the outer pot - Before placing the inner
pot inside the outer bowl, make sure to wipe
clean the outer surface of the inner bowl and the
surface of the electronics heater. Once clean,
turn the inner bowl left and right inside the outer
bowl to ensure a firm contact between the inner
bowl and the Electronics heater. See figure 19.
Close the lid - Ensure the seal belt is fitted into
the inner part of the lid. Follow the assembly
instructions for details. See figures 20-21.
Adjust the Pressure Limiting Valve -Adjust to the
Airtight position and ensure that the floater sinks.
See figures 22a - 23b.
Turn on the power supply - Once the power
is turned on, the LCD Screen will display “0000”.
The first red digit indicates the time of the Preset
Timer, while the first two red digits show the self
selected Pressurized Cooking Time.
Configure the parameters and Start the
heating process - Set the Preset Time. Press
Timer once to increase the timer by one hour.
The maximum preset timer period is 9.5 hours.
After 9.5 hours, the timer will start a new cycle
again.
Assembling Instructions

wildappetite.co.nz
Quick User Guide To Using
Your 5-In-1 Multi-Cooker
Brown
This function is ideal for starting your recipes when sautéing, browning or frying is required. For
example, when making a Bolognese sauce you can sauté your onion, celery and carrot as well as
brown your meat. Once ready you can then choose
your Slow Cook or Pressure cook function.
- Always Brown with the lid open.
- There is no time feature available when using this function.
- The temperature range for this function is 160°C to 180°C.
- The Browning function will turn off if there is too little food in the bowl.
• Plug the unit in
• Press the Brown button
• Press the Start button
• The unit will start heating to the desired temperature range
• When Browning is complete, press cancel
Slow Cook
The Slow cook function has a delayed timing start of up to 9.5 hours and a slow cooking time
of up to 9 hours. The slow cooking timer is in 30 minute intervals e.g. 1.5 is 1 hours. The
temperature range for this feature is 95°C to 100°C. As a safety precaution, when cooking with the
lid closed, you will need to lower the heat once the food is cooked before the lid can open.
• Plug the unit in
• Select the Delay cooking time if required
• Select the Brown button if required
• Press Cancel once the Browning has finished
• Press the Slow button
• Adjust the slow cooking time in 30 minute intervals
• Press the Start button
• Cook with the lid closed but keep the exhaust valve open
• The Keep Warm function will automatically activate once the allotted
cooking time is completed

wildappetite.co.nz
Soup
The Soup function has a timer that will default to 25 minutes, which is ideal for cooking watery
soups. You have a delayed timing start of up to 9.5 hours and a cooking timer of up to 99 minutes.
The temperature range on this setting is 110°C
to 121oC. You can adjust the cooking time to suit your recipe.
• Plug the unit in
• Select the Delay cooking time if required
• Press the Soup button
• Adjust the cooking time in minutes by pressing the + and - buttons
• Press the Start button
• Cook with the lid closed and keep valve closed or airtight
• The Keep Warm function will automatically activate once the allotted
cooking time is completed
Steam/Rice
This feature allows you to cook rice or steam food by adding the steam rack/tray and/or steam
basket into the Multi-Cooker. You have a delayed timing start of up to 9.5 hours and a cooking timer
of up to 99 minutes. The temperature range on this setting is 103°C. You can adjust the cooking
time to suit your recipe.
• Plug unit in
• Select the Delay cooking time if required
• Press the Steam button
• Adjust the cooking time in minutes by pressing the + and - buttons
• Press the Start button
• Cook with the lid closed and keep the exhaust valve open
• The Keep Warm function will automatically activate once the
allotted cooking time is completed
Quick User Guide To Using
Your 5-In-1 Multi-Cooker

wildappetite.co.nz
Quick User Guide To Using
Your 5-In-1 Multi-Cooker
Pressure Cooking
With the Pressure feature on your new Multi-Cooker, you are able to use low and high pressure
cooking. The psi for low pressure cooking is 7psi and 13psi for High pressure cooking. If you
decide to cook using the Pressure Cooker function it is recommended that you use one of the other
functions first e.g. Brown to start off your recipe, as this will allow the Multi-Cooker to heat the food
throughout and will speed up the pressure cooking time.
Before using this function make sure you have read the pressure valve function.
Please refer to the food and cooking chart.
• Plug the unit in
• Use Brown function to start off your recipe.
• Once the recipe is ready to be pressure cooked, close the lid
• Turn the pressure valve on top of the lid to air tight
• Press the desired Pressure cooking button
• Adjust the cooking time in minutes by pressing the + and - buttons
• Press the Start button
• The red light on the left will indicate when the pressure is at the correct level
• Once timer has finished turn valve to Exhaust, this will release pressure.
• This will take a few minutes for the pressure to reduce.
• Once pressure is fully released you may open the lid.
• The Keep Warm function will activate once cooking time is completed
• Please note, as a safety precaution the lid will not open until the pressure
is fully released

wildappetite.co.nz
Unlike other cooking methods, slow cooking allows you to cook delicious meals with simple and
easy preparation. By simply leaving even the toughest cuts of meat to cook with seasoned liquid,
the slow cooker requires minimal involvement from the cook apart from the initial preparation.
The main benefits of slow cooking are that it promotes tenderness, concentrates flavours, is
convenient and can also be economical.
With this great function, poultry pieces will absorb and flavour the liquids surrounding them and
the meat will fall off the bone at a mere touch of a fork. Vegetable flavours intensify and become
delicate, even beans will stay whole while becoming smooth and rich.
Handy Tips
• When food is cooked using the Slow Cook function, most of the moisture is retained. As
a precaution, when using traditional recipes it is advised to use less liquid. However, after
cooking, if the liquid quantity is excessive, open the lid and continue cooking further until the
liquid reduces to the desired amount.
• Stirring the food as little as possible or even not stirring at all is best when slow cooking.
Make sure you adapt your cooking times to suit the slower method of cooking. Use the table below
as a guide. Please note that these times are approximate and can vary depending on ingredients
and quantities.
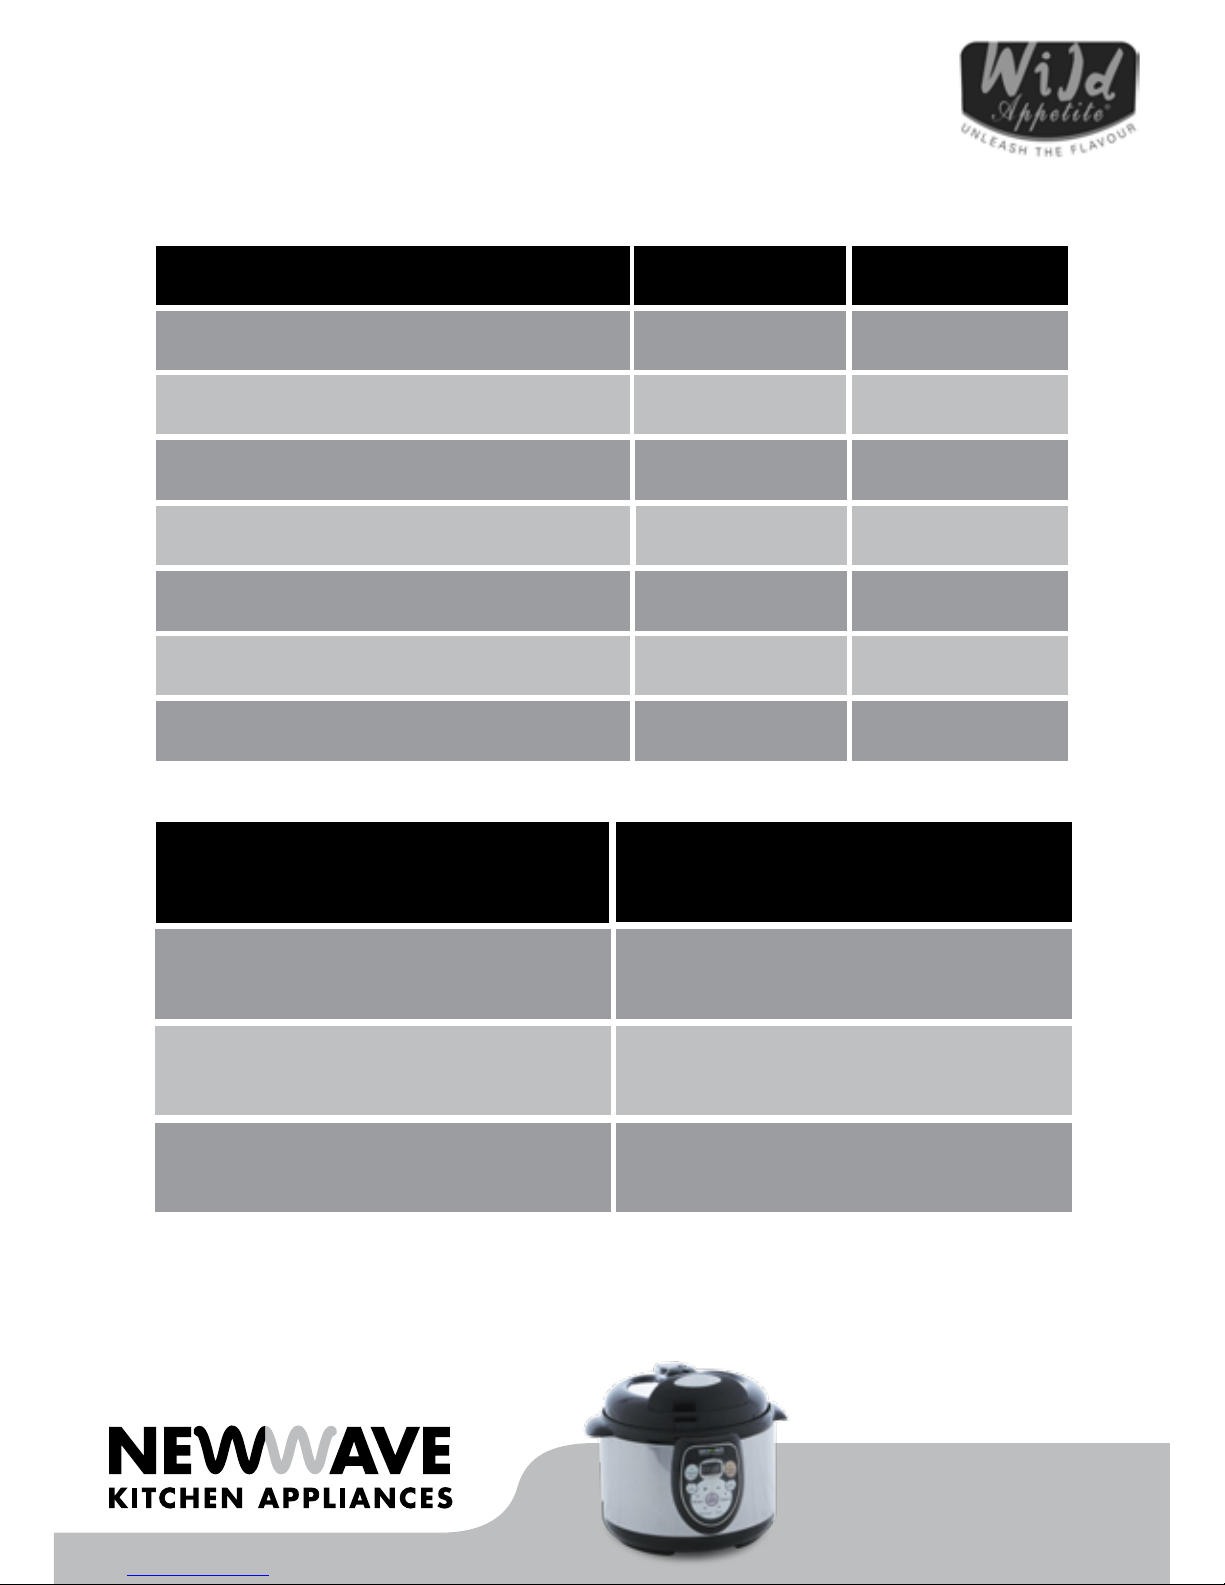
A Beginners Guide
To Slow Cooking
Traditional recipe times
15 - 30 minutes
60 minutes
1 - 3 hours
Slow Cook recipe times
2 - 3 hours
4 - 6 hours
6 - 8 hours
wildappetite.co.nz
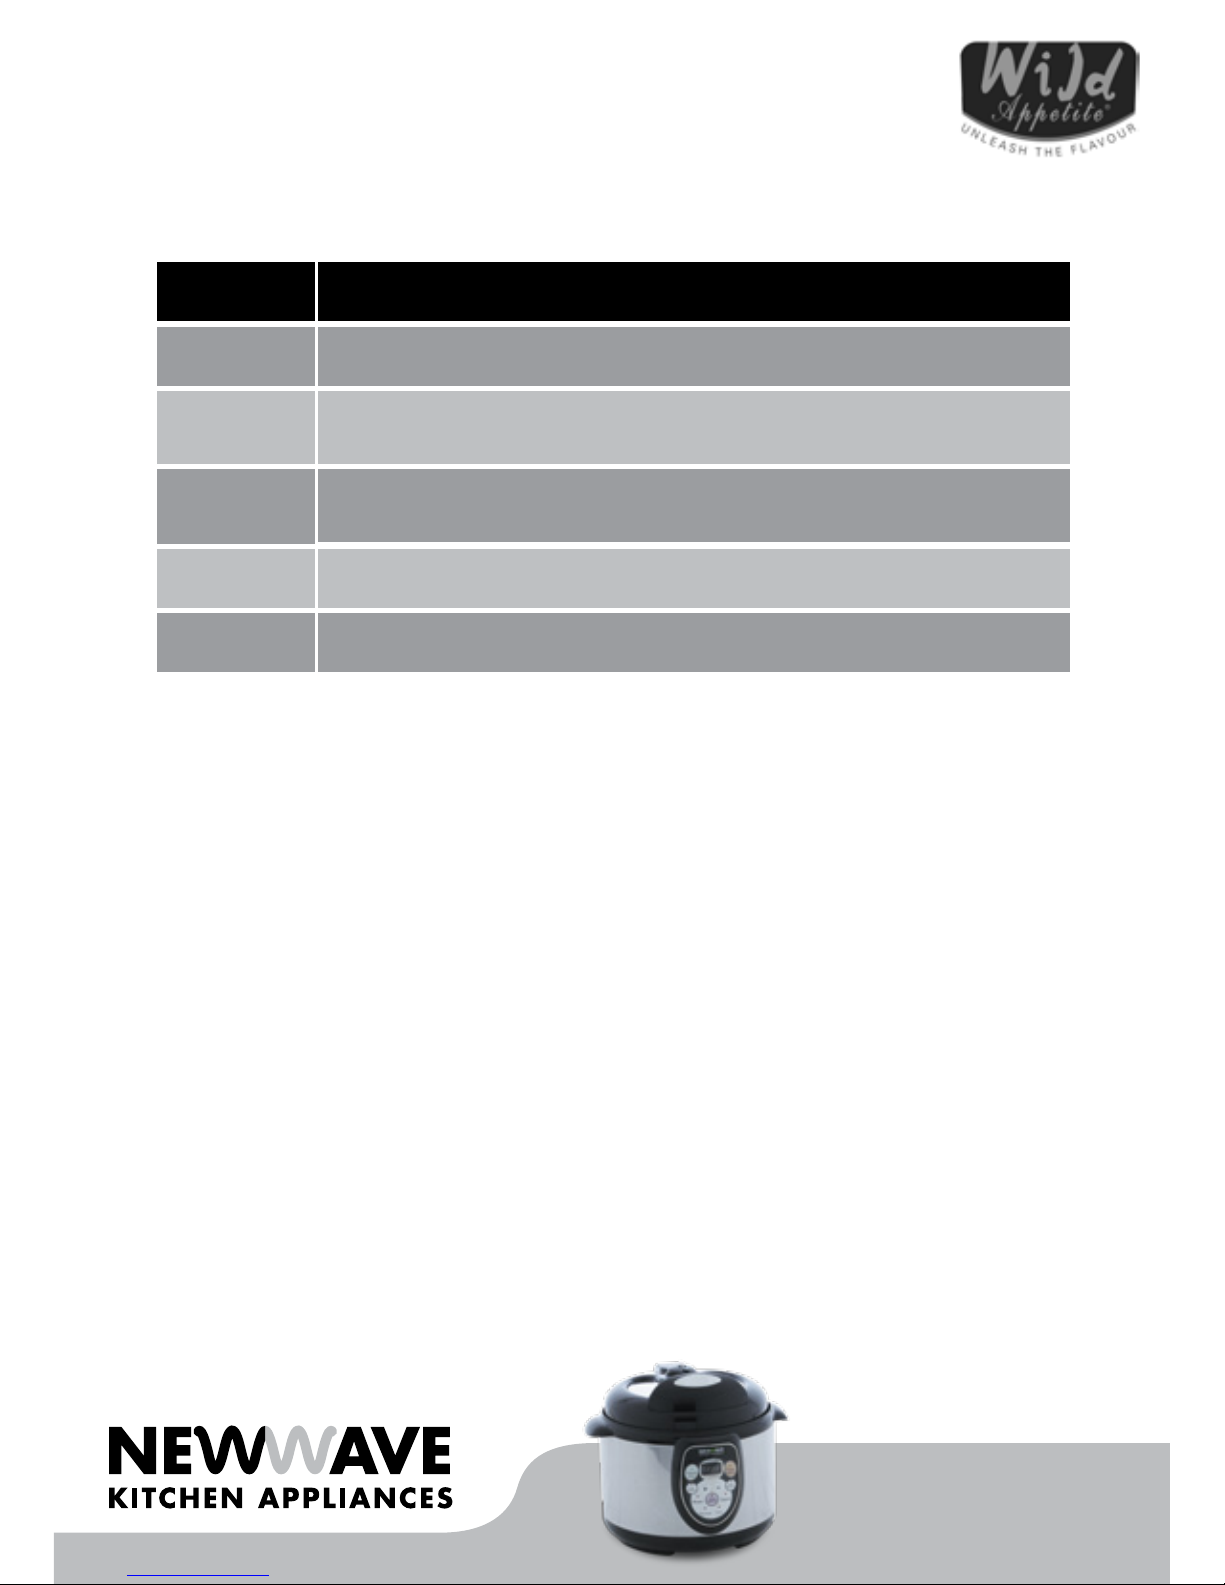
Suitable Meat Cuts
For Slow Cooking
Browning Before Slow Cooking
Pre-browning meat and poultry prior to slow cooking seals in the moisture, intensifies the flavours
and provides tender results, whilst also producing richer flavors in the other ingredients such as
onions, capsicum etc.
Pot Roasting
Additional liquid is required for pot roasting. Ensure there is sufficient liquid into the cooking pot
to cover roughly 1/3 of the meat. Remember that the meat will not brown during the pot roasting
process. For browner results use the brown function to seal the roast dish, before cooking.
Suitable
Beef
Lamb
Veal
Pork
Poultry
Meat cut for Slow Cooking
Chuck, skirt, round steak, shin or gravy, Osso Bucco
Leg steaks, diced belly, diced shoulder, boneless loin chops
Skinless pieces such as thighs and breasts
Lamb shanks, drumsticks, chops, neck chops, boned-out,
forequarter or shoulder
Diced leg, shoulder/forequarter chops and steak, neck chops,
knuckle (Osso Bucco)

wildappetite.co.nz
A Beginners Guide To
Pressure Cooking
Pressure Cookers have been around for years and have become popular again due
to greater work commitments and busier schedules. By using steam under pressure,
temperature is produced which is considerably greater than a conventional oven.
This ensures decreased cooking times without sacrificing the great taste and flavour. Aside
from these great benefits, Pressure Cookers also ensure vegetables retain more vitamins
and minerals.
Handy Tips
• Far less liquid is needed than for traditional cooking methods.
• Never exceed the maximum fill amount of the pressure cooker 4/5 high on your pot.
• If starting with cold food, it will take longer for the pressure count down
timer to start.
• When the cooking time is complete and quick pressure release is required, make sure
you turn the valve to exhaust immediately, otherwise foods will continue to cook and
may overcook.
• Use the High Pressure setting when cooking meat.
• When cooking just vegetables or beans use the Low Pressure setting.
The general rule is that you use half the liquid used in slow cooking recipes. You may need
to play with your recipe to get it right.
Cooking Times
Cooking times may vary slightly due to your cut of meat and whether you have either
chunks, slices etc,. Use the table on the next page as a guide. Please note that these
times are approximations and can vary depending on ingredients and quantities.
wildappetite.co.nz
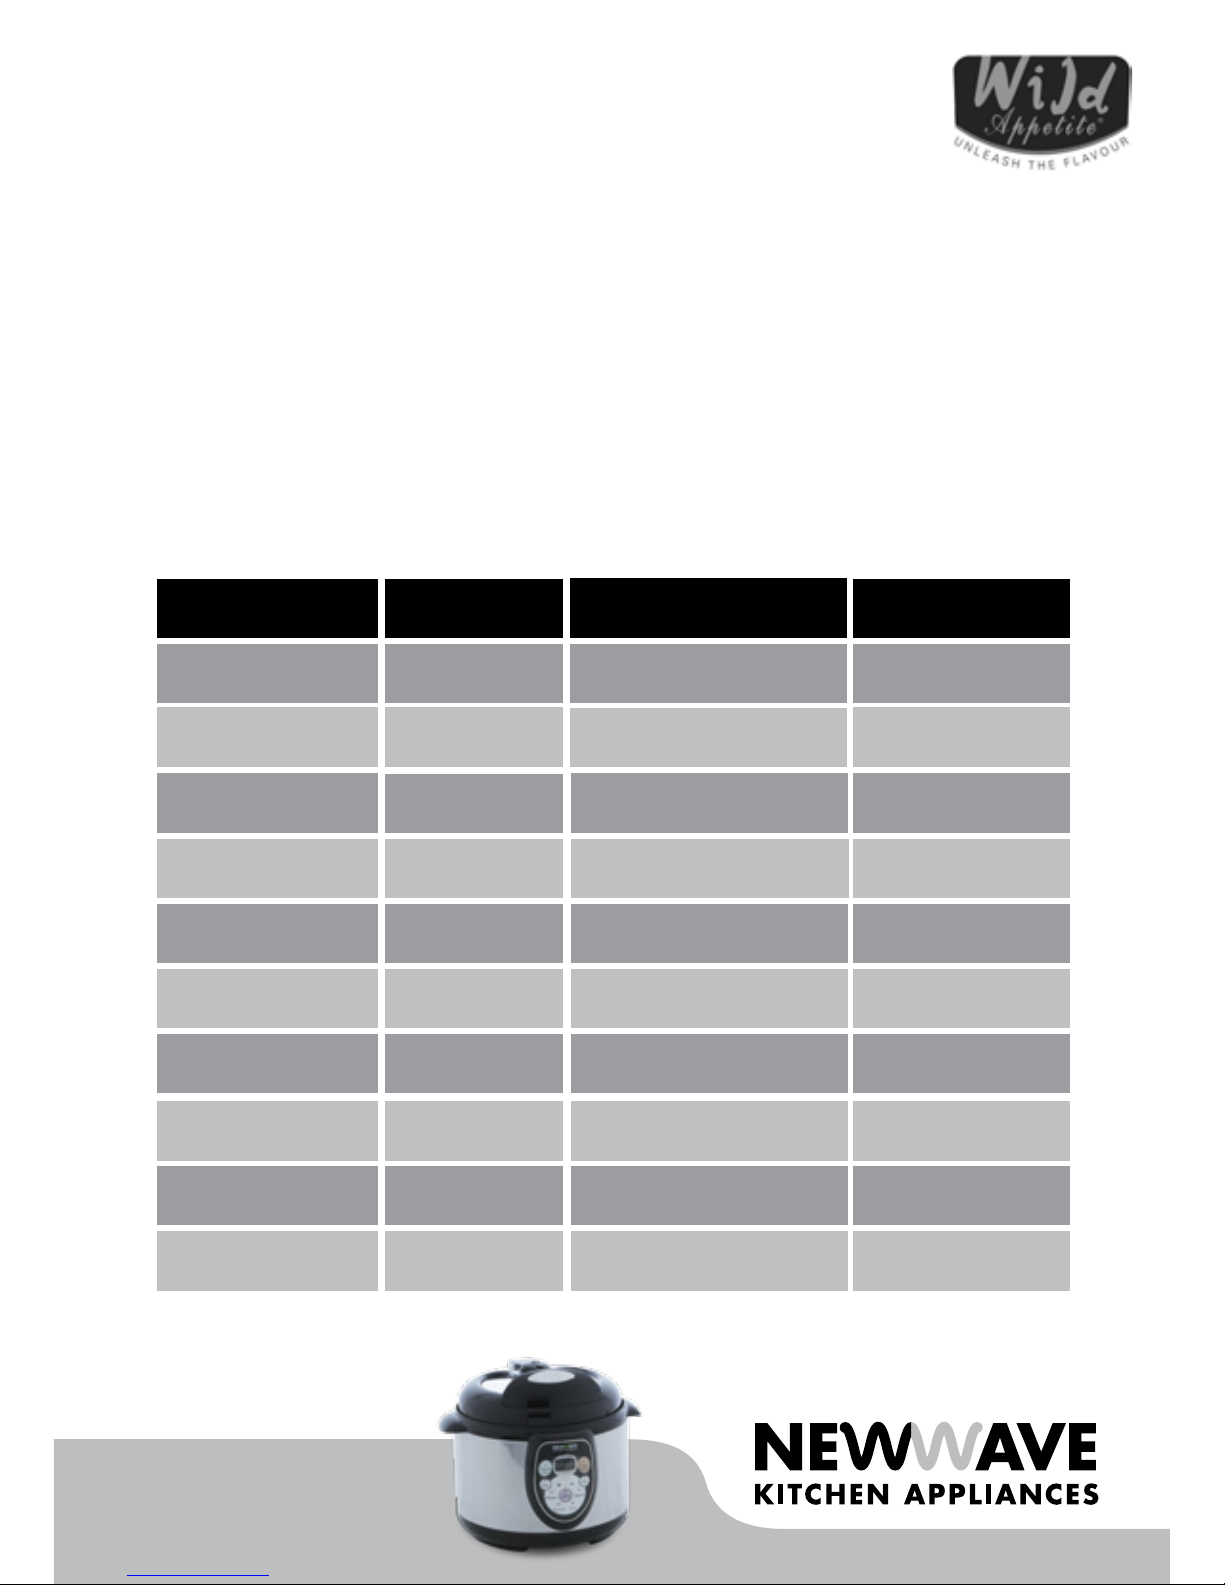
Suitable Meat Cuts
For Pressure Cooking
Cooking Time in Minutes Pressure Function
24-28 / 5-6 / 9-12 / 8-10
35-40 / 25-30 / 10-14
25-30 / 20-25
10 per shoulder / 40
9-11 / 18-22 / 40
Food
Chicken - whole / breast / thighs / leg
Beef - pot roast / shanks / stew
Lamb - shanks / shoulder
Veal - shoulder / osso bucco
Pork - chops / ribs / roast
Vegetables - broccoli / potatoes / beans / carrots
Rice - arborio / white / soaked beans / lentils
Traditional recipe times
15 - 30 minutes
60 minutes
1 - 3 hours
Pressure recipe times
7 - 15 minutes
15 - 25 minutes
25 - 40 minutes
3-4 / 6-8 / 2-3 / 4-5
6-8 / 7-8 / 28-35 / 6-8
High pressure
High pressure
High pressure
High pressure
High pressure
High pressure
High pressure

wildappetite.co.nz
A Beginners Guide
To Soup Making
Soups are a delicious meal option as either a starter or as a meal in itself. They are easy to make,
retain most the essential minerals and vitamins found in the ingredients and ensure a nourishing and
healthy meal. Soup generally involves cooking/boiling meat or vegetables in water or broth. The soup
function is ideal for making clear and thick style soups.
Handy Tips
• When sautéing is required by the recipe use the Brown function.
• The lid must be closed when using the Soup function and the keep valve closed or airtight.
• The Soup function works similarly to the low pressure function. The cooking timer will start
when the internal temperature has reached the automatic setting level.
• The timer defaults to 25 minutes which is suitable for most clear soup recipes. Thicker style
soups many need around 35 minutes to cook. Please note these cooking times are only an
indication and that times may vary according ingredients etc.
• Make sure that you do not overfill the inner cooking pot.
• The maximum level when making a soup should be level 3/5 in your pot.
Cooking Times
Make sure you adapt your cooking times to suit the slower method of cooking.
Use the table below as a guide. Please note that these times are only approximate and can vary
depending on ingredients and quantities.
Soup style
Clear soup
Vegetable minestone soup
Thicker style soup
Cooking time
15 - 20 minutes
25 minutes
30 minutes

wildappetite.co.nz
A Beginners Guide
To Steaming
Steaming can be used for most foods and a surprising variety of recipes, and has great advantages
over other cooking methods. Steaming does not immerse foods in water into which nutrients,
particularly in vegetables, can escape. Therefore a far higher level of nutrients, vitamins and minerals
are retained than by other cooking methods. Steaming reduces Vitamin C in vegetables by 40%
whereas boiling reduces it by 70% because of the loss in the cooking water.
There are two main methods of steaming :
1. By suspending the exposed food over boiling water in a closed container.
2. A longer method of wrapping the food in a parcel e.g. foil and placed over boiling water.
Handy Tips
• Cut across the grain for extra tenderness.
• Never allow the liquid to touch the food or the food will boil and not steam.
• Liquid levels in the base should be maintained for constant cooking.
• Arrange food in a single layer or adjust cooking times accordingly.
• Arrange food on the steaming rack and/or steaming basket with space in between to allow
steam to circulate and cook more efficiently.
• Always defrost frozen meats, fish and poultry before steaming.
• When serving, steamed vegetables they can be drizzled with a light sauce of butter or olive oil
to compliment the tender nature of the vegetables.
They can also be sprinkled with lemon juice or balsamic vinegar for a tangy twist.
wildappetite.co.nz
Slicing Cooking TimeFood Weight
Whole
35-50mm floweretts half lengthwise
6mm slices
Whole
Whole
Season as desired
Quarter
Wrapped in a parcel
Similar size pieces
Wrapped in a parcel
9-11 minutesAsparagus 240g
15 minutesCarrots 240g
11 minutes
10-15 minutes
Snow peas
Scallops
120g
Up to 500g
11 minutesBroccoli/zucchini 240g
8-9 minutesGreen beans 120g
24 minutes
10-15 minutes
Potatoes
Fish fillets
240g
Up to 500g
15-20 minutes
15-25 minutes
Chicken
Whole fish
240-450g
Up to 500g
A Beginners Guide
To Steaming
Cooking Times
Place the indicated amount of water into the inner cooking pot. The amount needed will vary
according to the type and method of food being cooked. More time will
be needed for tender/softer vegetables and less time for crispier vegetables.
Always cook with the lid closed and ensure the exhaust valve is always in the
open position. For all food items start with 2 cups of water in the bottom of the
inner cooking pot.

wildappetite.co.nz
A Beginners Guide To
Rice Cooking
Handy Tips
• Measure out the rice and rinse it thoroughly under running water in a sieve until the run off
water becomes clear. (Do not rinse Arborio rice).
• Always add the rice first then add in the water.
• Then place the rice into the bowl before adding cold water.
• Make sure the rice is distributed around the whole surface of the bowl, in order to allow even
cooking.
• Add salt if required. Allow about half a teaspoon of salt for 4 cups of rice.
• Stock may be substituted for water if desired.
• Make sure the lid is closed and that the exhaust valve is set to the open position.
• Press the Steam button.
• On completion of cooking, select the Keep Warm function, open the lid and stir the rice and
leave it for a few minutes longer in order to get perfect rice.
Measuring And Maximum Capacity
The graduated markings on the inside of the inner bowl are given in litres and cups and are used for
measuring the amount of water when cooking rice.
• The plastic cup provided can also be used to measure rice.
• The table above states the approximate quantity of rice required for the number of servings.
(1 cup is approximately 150g)
• For 1 cup of rice add 1 measuring cup of water.
• Make sure that the total rice and water level does not exceed the 3/5 level.
*For smaller quantities of rice (for example 2 cups or less) white rice can be cooked under
high pressure for 7-8 minutes.
For white rice - Long grain, basmati, thai
2300g 2 cup mark 3-4 10-14 minutes
20-25 minutes
23-27 minutes
25-30 minutes
35-40 minutes
40 minutes
14-23 minutes
5-6
8-10
11-14
5-6
4-5
4
4 cup mark
6 cup mark
8 cup mark
4.5 cup mark
3.5 cup mark
4 cup mark
600g
600g
400g
600g
900g
1200g
Cups Weight Water level (+rice) Serves Cooking Time
4
4
6
Brown Rice
4
Wild Rice
4
Risotto rice/ arborio
4
This manual suits for next models
1
Table of contents
Other Newwave Kitchen Appliance manuals


