NexSens Technology WQ-DO User manual

For Sales & Service Contact
2650 E. 40th Ave. • Denver, CO 80205
Phone 303-320-4764 • Fax 303-322-7242
1-800-833-7958
www.geotechenv.com

NexSens Technology, Inc.
WQSensors User’s Manual 2
TABLE OF CONTENTS
1Sensor Operation................................................................................................................3
1.1 Dissolved Oxygen & Temperature Sensors..................................................................3
1.1.1 WQ-DO – Dissolved Oxygen & Temperature Sensor.......................................................................3
1.1.2 Making DO Sensor Measurements...................................................................................................4
1.1.3 Maintenance and Care ...................................................................................................................10
1.1.4 Dissolved Oxygen Troubleshooting Guide.....................................................................................12
2Software Operation...........................................................................................................13
2.1 Working with Data ....................................................................................................13
2.2 Data Validation and Review ......................................................................................17
2.3 Changing Software Settings.......................................................................................19
2.4 Science Library..........................................................................................................21
2.5 Help and Support.......................................................................................................22
2.6 Working with Project Files ........................................................................................23
Appendix ..................................................................................................................................25
Appendix A: Material Safety Data Sheets..............................................................................25
Appendix B: Warranty and Service .......................................................................................25
Appendix C: Computer Requirements...................................................................................26
Appendix D: Step-by-Step Driver Installation .......................................................................26
What is a WQSensor?
WQSensors offer the latest in smart sensor technology with direct computer interface. An
integral USB connector offers a simple, hassle-free connection without meters, batteries, or
power supplies - displaying the data in real-time directly onto the PC. Common water
quality parameters include: temperature, dissolved oxygen, pH, ORP, NO3, NH4, and Cl.
Every sensor ships with WQSensor Software, which offers a simple graphical interface to the
smart sensors. The software includes the popular NexSens SCIENCE LIBRARY with an
interactive periodic table, unit converter, and other useful science utilities. Download a FREE
copy today!
Software Installation
WQSensor Software is distributed on CD-ROM. The setup program starts automatically when
the CD is inserted. If the program does not load automatically, you can manually start the setup
process by running Setup.exe from the CD ROM drive. We suggest that you accept the default
options presented by the WQSensor Software setup program.
Uninstalling WQSensors Software
If you need to uninstall WQSensor Software, click Settings in the Start Menu. Select Control
Panel, followed by Add / Remove Programs. Follow the step-by-step instructions to remove
WQSensor Software and all associated files.

NexSens Technology, Inc.
WQSensors User’s Manual 3
1Sensor Operation
1.1Dissolved Oxygen & Temperature Sensors
1.1.1 WQ-DO – Dissolved Oxygen & Temperature Sensor
WQSensor probes come ready to go out of the box. Accessories and maintenance items may be
purchased from a NexSens Technology dealer:
http://www.nexsens.com/company/where_to_buy.htm
WQ-DO Sensor
Based on the US EPA approved method (360.1), this
polarographic WQSensor is designed for laboratory accuracy.
Probe maintenance is minimal and simple with a screw-on cap
membrane. An integral temperature sensor automatically
compensates dissolved oxygen readings for sample temperature.
An internally stored unique ID and GLP file ensures quality data
and tracks calibration and sensor status.
Dissolved Oxygen Package Includes:
WQ-DO: Dissolved oxygen & temperature sensor with
6 feet of cable and integral USB connector
Dissolved Oxygen storage bottle
Electrolyte Filling Solution
Polishing Strips
Membrane Cap
WQSensor Software & Knowledge Library CD
WQSensor Quick Start Guide
WQ-DO Sensor Specifications
Concentration Range 0% to 200% (0-20mg/L) O2
Temperature Range 0 to 50°C
Temperature Accuracy ± 0.2°C
DO Response Time 98% of full response in 60 seconds
at 25°C
DO Reproducibility ±2%
Electrode length 150 mm
Body Diameter 12 mm
Cap Membrane 16 mm OD x
30 mm L
Size:
Cable Length 6 ft.

NexSens Technology, Inc.
WQSensors User’s Manual 4
1.1.2 Making DO Sensor Measurements
Preparing DO Sensors for Measurements
Note: When preparing the sensor, be careful not to touch the membrane with your fingers.
The oils on your skin can affect the dissolution of oxygen through the membrane and in turn
affect the readings of the sensor.
1. Unscrew Membrane Cartridge at the bottom of the electrode.
2. Rinse the Membrane Cartridge with distilled water; blot dry.
3. Rinse the internal anode/cathode element with distilled water, blot dry.
4. Fill Membrane Cartridge with the provided DO Electrolyte solution
5. Replace the filled Membrane Cartridge. Finger-tighten until snug. Do not over tighten.
Rinse the assembled electrode with distilled water.
6. Place the electrode in the electrode holder. Immerse the tip of the electrode in de-ionized
water and stir the water for 5 minutes. This will properly clean the electrode

NexSens Technology, Inc.
WQSensors User’s Manual 5
Making Dissolved Oxygen Measurements
The quality of results depends on the quality and accuracy of the measurement technique and
standards used. The following guidelines are recommended.
1. After plugging the sensor in, allow the probe at least 15 to 30 minutes before calibrating
or measuring. Polarographic probes, such as the WQ-DO sensor, need time to warm up
to ensure proper polarization of the electrodes.
2. To ensure that the membrane has no air bubbles in the electrolyte solution, always
prepare the sensor as stated in the preparation section above. The membrane caps are
designed to release all air while the module is being installed.
3. Do not allow any air bubbles to be trapped on the exterior membrane surface, as it will
read an air bubble as an oxygen-saturated sample.
4. Calibrate your electrode at temperatures close to the sample temperature even though
automatic temperature compensation (ATC) is used. The temperature sensor on the side
of the sensor, if submerged, can be used to the sample temperature. This will reduce the
error margin.
5. It is important during measurement to stir the solution, as oxygen consumption by the
probe can momentarily reduce the oxygen concentration at the probe surface. Stirring
can be done manually or with a stir plate. The Micro-stirrer (WQ-STIR) snaps onto any
WQ-sensor and is a convenient way to provide motion near the probe surface.
6. Membranes wear out over time. The life of the membrane will depend on the
environment in which it is used. Check regularly for any punctures, tears, or fouling
residue.

NexSens Technology, Inc.
WQSensors User’s Manual 6

NexSens Technology, Inc.
WQ Sensor User’s Manual 7
Calibrating Dissolved Oxygen Sensors
The WQ-DO sensor requires only a 1-point calibration. Calibration is performed in a 100%
saturated dissolved oxygen environment (Air Calibration) or in a known dissolved oxygen
concentration solution (In-Situ Calibration). In order to ensure proper polarization of the
electrodes, the probe must warm up for 15-30 minutes before calibrating. 30 minutes is
recommended.
The dissolved oxygen sensor should be calibrated as often as possible. Each day before use is
recommended. Calibration drift can be checked by immersing the probe in a 100% saturated
environment. If the value has changed significantly since calibration, recalibrate.
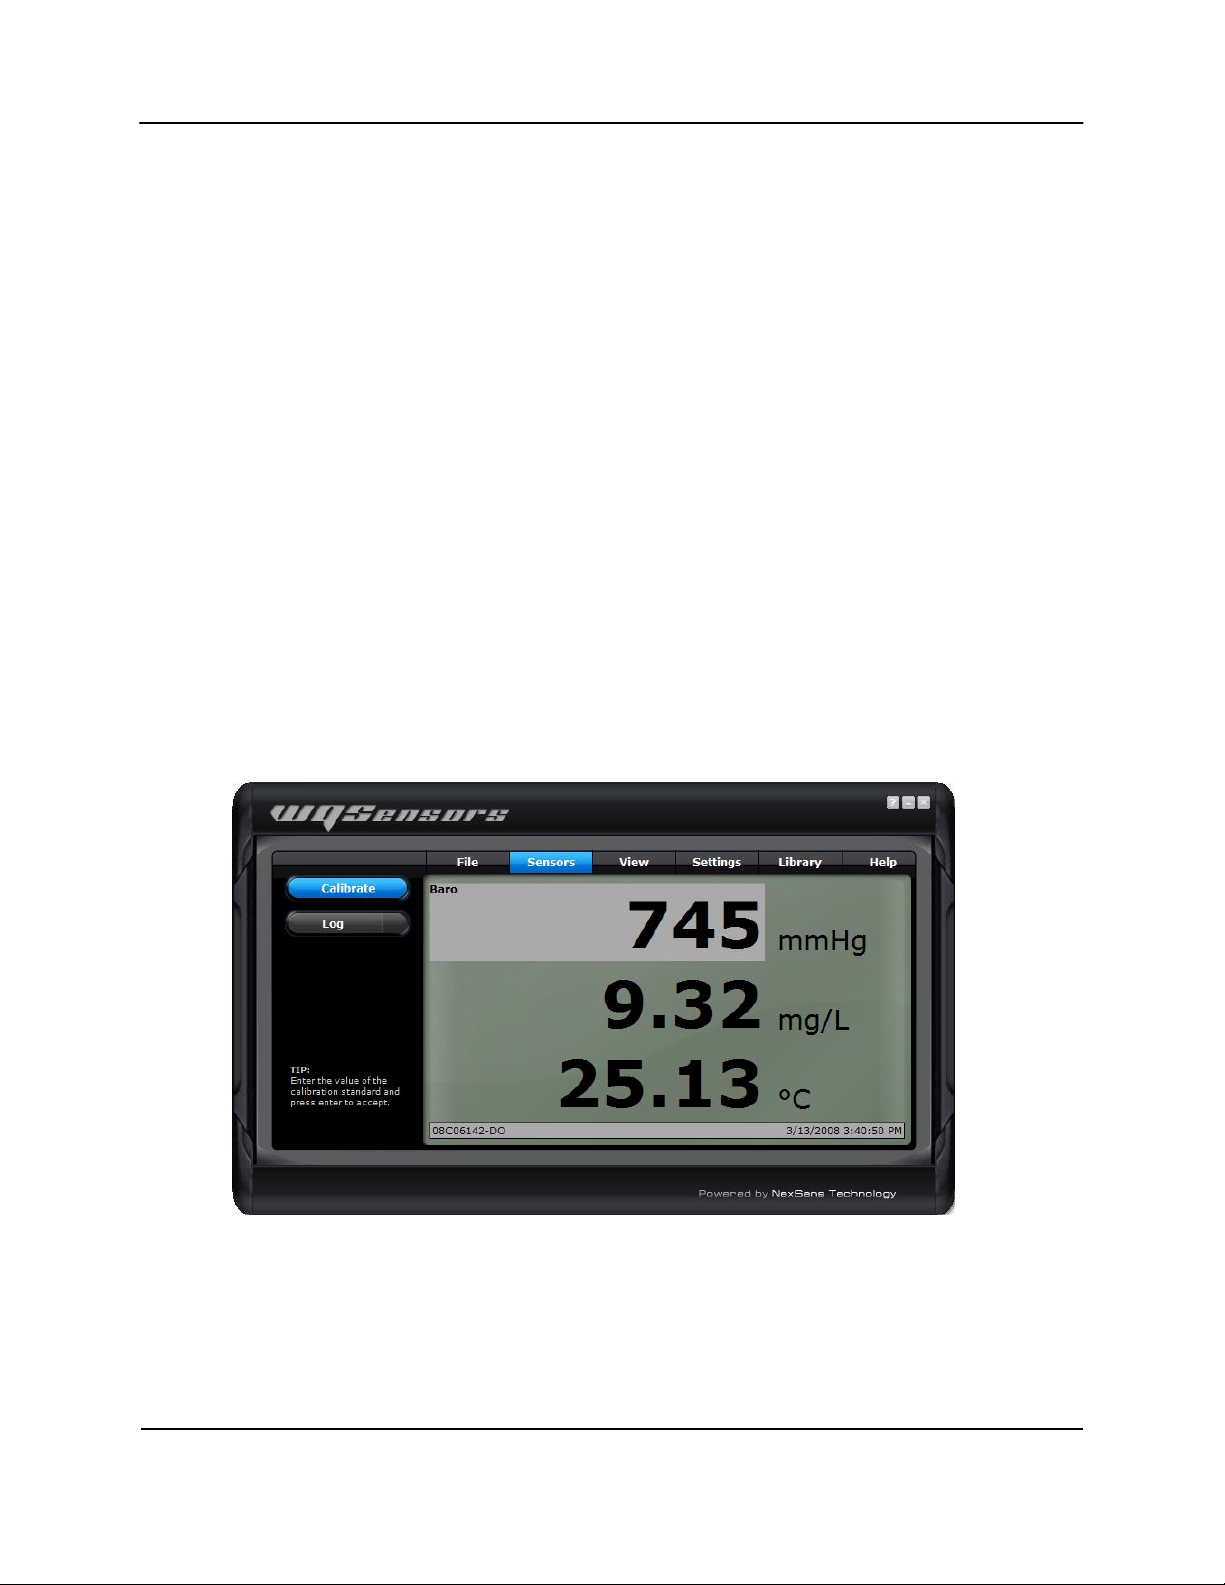
During air calibrations, you will see your 100% saturation value change according to your
corresponding barometric pressure and salinity values. The saturation value falls below 100% at
lower barometric pressures and higher salinities. For instance, when the barometric pressure
drops to 745 mmHg, the “100% saturation value” will drop to around 98%. For the most
accurate readings, salinity and barometric pressure readings can set in the Settings menu.
To see how salinity and temperature affect the Dissolved Oxygen reading, click on the Library
menu, select Environmental and then Dissolved Oxygen Solubility. As you can see, at 25
degrees Celsius the difference of Oxygen in mg/L can differ as much as 1.5mg/L from freshwater
(0 ppt salinity) to salt water (~35 ppt salinity).
NexSens Technology, Inc.
WQ Sensor User’s Manual 8
Air Calibration
The two methods described below may be used to achieve a 100% air-saturated
environment:
Method 1: Fill a clean beaker with distilled water. Bubble air through the water while stirring for
20 minutes. This will saturate the water with air.
Method 2: Place a small amount of distilled water in the calibration bottle. Insert the electrode
into the cap of the bottle. Place the cap on calibration bottle loosely so that it remains vented to
the atmosphere. Allow the electrode to sit in the calibration bottle for 20 minutes. The air in the
bottle will be saturated with water.
Use either Method 1 or 2 to obtain a 100% air-saturated environment for the WQ-DO calibration.
1.) Connect the dissolved oxygen probe to the PC via the USB connector.
2.) Let the dissolved oxygen probe warm up for 15-30 minutes before calibration.
During the warm-up time, place the dissolved oxygen probe in a 100% air-saturated
environment (Method 1 or 2 above).
3.) After the probe has warmed up for 15-30 minutes in a 100% air-saturated
environment, click the Calibrate button and click on the DO Saturation reading.
4.) Enter the barometric pressure reading and click OK to calibrate.

NexSens Technology, Inc.
WQ Sensor User’s Manual 9
In-Situ Calibration
If you have a solution of known dissolved oxygen concentration reading, verified with another
calibrated meter or WQ-DO Sensor, you can calibrate per the mg/L:
1.) Connect the dissolved oxygen probe to the PC via the USB connector.
2.) Let the dissolved oxygen probe warm up for 15-30 minutes before calibration. During
the warm-up time, place the sensor into the known solution and allow the probe to
stabilize.
3.) After the readings are stable, press the ‘Calibrate’ button and click on the mg/L reading.
4.) Enter the known mg/L reading and click the ‘Calibrate’ button again.
If measuring dissolved oxygen in solutions that contain amounts of salinity such as salt water,
make sure the salinity setting is changed in the Settings menu.

NexSens Technology, Inc.
WQ Sensor User’s Manual 10
1.1.3 Maintenance and Care
Sensing Module Assembly
Sensor Storage
Short Term (1-3 days)
The assembled electrode should be stored in a moist environment, such as in the
provided calibration/storage bottle cup or in a beaker of water. When storing in
calibration/storage cup, place a small piece of sponge inside. Moisten sponge with
distilled or de-ionized water.
Long Term:
Completely disassemble the electrode. Rinse the anode/ cathode element and Membrane
Cap with distilled or de-ionized water. Blot dry all of the parts. The Membrane Cap may
be placed on the electrode, but do not tighten. Store all parts securely in the original box.
When ready to use the probe again, follow the instructions in the “Preparing DO Sensors
for Measurement” section.

NexSens Technology, Inc.
WQ Sensor User’s Manual 11
Cleaning and Reconditioning
Over time, deposits will develop on the silver anode and platinum cathode due to the
reduction of oxygen. These deposits are easily removed with the polishing strips supplied in
your WQ-DO sensor package.
1. Unscrew Membrane Cap at the bottom of the electrode.
2. Rinse the internal anode/cathode element with distilled water, blot dry.
3. Use the polishing strips provided with your sensor to polish the platinum cathode and
silver anode.
Platinum cathode: Place polishing strip on tip of sensor, apply light finger
pressure, and twist in a circular motion.
Silver anode: Wrap the polishing strip around anode and twist in a circular
motion.
4. After polishing, thoroughly rinse with distilled or de-ionized water and blot dry.
5. Replace the Membrane Cap and fill the new one with DO electrolyte. Finger-tighten
until snug. Do not over tighten. Rinse the assembled electrode with distilled water.

NexSens Technology, Inc.
WQ Sensor User’s Manual 12
1.1.4 Dissolved Oxygen Troubleshooting Guide
Problems may arise due to errors with:
Electrode function
Technique
Follow the steps below to isolate the source of the problem.
Electrode Function
Electrode function can be verified by testing the probe in an oxygen-free environment and a
100% air-saturated environment. The two methods described below may be used to prepare an
oxygen-free solution.
Method 1: Fill a clean beaker with distilled water. Bubble nitrogen gas through the water for 20
minutes. This will remove all oxygen from the water.
Method 2: Fill a clean beaker with distilled water. Add sodium sulfite to the water while stirring
until no more of the compound dissolves. This will remove the oxygen from the water.
Prepare an oxygen-free solution, and a 100% air-saturated environment (described in the
Calibration section). Then follow the procedure below.
1.) Connect the dissolved oxygen probe to the PC via the USB connector.
2.) Let the dissolved oxygen probe warm up for 15-30 minutes.
3.) During the warm-up time in step 2, place the dissolved oxygen probe in the oxygen-
free solution (Method 1 or 2 above).
4.) After the probe has warmed up for 15-30 minutes in the oxygen-free solution, record
the % saturation value.
5.) Place the probe in a 100% oxygen-saturated environment (described in the Calibration
section).
6.) Wait for the readings to stabilize, and record the % saturation value.
The accuracy of this probe has been established at 2% in perfect conditions including flawless
calibrating standards, barometric pressure and salinity. In typical laboratory settings the
accuracy may be as low as 4%.
If the electrode does not read near 0% or near 100% in the respective solutions, polish the
electrode following the instructions in the “Cleaning and Reconditioning” section. Prepare new
solutions, and repeat the test.
If the electrode percentages are still outside the normal range after this procedure, the probe
may need to be sent in for assessment.

NexSens Technology, Inc.
WQ Sensor User’s Manual 13
Technique
1. Closely follow the methods described in the “Making DO Sensor Measurements” section.
2. Closely inspect the membrane for any punctures, tears, or fouling.
3. Replace DO electrolyte solution in cap with new solution.
4. Check for deposits on silver anode or platinum cathode. Polish following the instructions
in the “Cleaning and Reconditioning” section.
5. Recalibrate. Calibrate at a temperature within 10º C of the sample temperature. Make
sure the correct barometric pressure is entered. Adjust salinity value as needed.
6. Make sure to stir the probe continuously to provide fresh oxygen to the probe surface.
2Software Operation
2.1 Working with Data
After running WQSensors software and connecting a WQSensor, real time data can be viewed in
the Sensors menu. When a single sensor is connected it will be displayed as shown. The serial
number of the sensor, as well as the time of last obtained reading, is displayed on the bottom of
the screen.
If multiple sensors are connected, they will be displayed in a tabular format as shown. Numerical
buttons on the bottom of the screen allow scrolling through each panel of four sensors.

NexSens Technology, Inc.
WQ Sensor User’s Manual 14

NexSens Technology, Inc.
WQ Sensor User’s Manual 15
Logging Data
Data can be logged either as single measurements or as a stream of measurements over user-
specified time intervals. This interval can be specified by clicking the Interval button in the
Settings menu. Logged data can be viewed by clicking the Report button in the View menu.
To log a single data point, click on the left hand side of the Log button. The left side of the
button will turn blue and a short animation with the letter Lwill display on the bottom left hand
corner of the screen.
To start logging continuous measurements at the user defined interval, click on the right hand
side of the Log button. The entire button will turn blue and at the log interval, a short animation
with the letter Lwill display on the bottom left hand corner of the screen.

NexSens Technology, Inc.
WQ Sensor User’s Manual 16
Calibrating Sensor Readings
To calibrate Sensor Readings:
1. Click on the Calibrate button
2. Select the parameter reading to calibrate as shown below
3. Enter the calibrated value
4. Click the Calibrate button again to complete the change
A short animation with the letter Cwill display on the bottom left hand corner of the screen.
Temperature and mV values cannot be calibrated (except for calibration of ORP). This calibration
is stored on the sensor, which means that the sensor can be calibrated on one computer and still
returned calibrated results no matter which other computers it is used on.
Refer to the calibration guidelines in the sensor sections earlier in this manual for information on
when and what values to calibrate with.

NexSens Technology, Inc.
WQ Sensor User’s Manual 17
2.2 Data Validation and Review
Good Laboratory Practice Files
WQSensors software automatically records every calibration to a Good Laboratory Practice (GLP)
file. The GLP file will include the time, data, sample readings, and diagnostic data for each
calibration. This file is stored on the sensor and will carry over from PC to PC.

NexSens Technology, Inc.
WQ Sensor User’s Manual 18
Data Reports
Data is stored inside WQSensors software project files and can be viewed in graphical, statistical,
and tabular formats. To view this data click the View button, then click the Report button.
Select the desired report options and then click Generate.
From the report tool bar data can be saved, printed, or exported to Microsoft Excel ©.

NexSens Technology, Inc.
WQ Sensor User’s Manual 19
2.3 Changing Software Settings
Customizable options are available in WQSensors software in the Application Settings menu.
Show introduction animation?
This option specifies whether to display the opening animation that plays each time WQSensors
software is started. Un-checking this box will disable the software from playing the animation
each time.
Remember last menu location?
This option specifies whether the WQSensors software should reload the last menu opened each
time the WQSensors software starts. Un-checking this box will make the Sensors menu the
default page when starting WQSensors software. This feature is useful if a specific Library menu
table or formula is used often.
Convert Celsius to Fahrenheit?
This option specifies whether to display temperature values in Celsius or Fahrenheit.
Un-checking this box will display all temperature readings in degrees Fahrenheit.
Show mV values?
This option specifies whether the Sensors menu should display the mV readings from the
sensors. Un-checking this box will disable the display of mV values. mV readings are diagnostic
information and are not required to take measurements. They are useful, however, in
determining sensor performance and calibration.

NexSens Technology, Inc.
WQ Sensor User’s Manual 20
Changing Log Interval
The intervals at which the sensor logs data can be changed in the Software Logging Interval
menu. Clicking the Interval button on the Settings menu displays the current log interval in
seconds. To change the interval, enter a new value and click Apply.
Please see the Logging Data section for starting and stopping this feature.
Table of contents
Popular Measuring Instrument manuals by other brands

Meganex
Meganex MEGL006 instruction manual

Trotec
Trotec BE 38 operating manual

Meter-Master
Meter-Master 100EL Quick reference guide

Extech Instruments
Extech Instruments HD750 user guide

PCB Piezotronics
PCB Piezotronics 352C15 Installation and operating manual

Sensus
Sensus PolluStat E Installation and operating instructions

Velleman
Velleman DVM8681 user manual

Sigma Metalytics
Sigma Metalytics Precious Metal Verifier quick start guide

PT
PT W89730 owner's manual

Pfeiffer Vacuum
Pfeiffer Vacuum TTR 91 operating instructions

Copper Mountain Technologies
Copper Mountain Technologies PLANAR TR1300/1 operating manual

ThermoFisher Scientific
ThermoFisher Scientific Orion Lab Star PH111 Operation manual


