Sigma Metalytics Precious Metal Verifier User manual

User Manual

ATTENTION
The Precious Metal Verifier is a scientific instrument.
There are important conditions to consider when
using the device which can impact your results. To
get proper readings from your device, please review
this manual carefully.
You can find more information on our website at www.sigmametalytics.com
Sigma Metalytics and the Precious Metal Verifier make no claim,
guarantee, or promise that measurements made by the Precious
Metal Verifier indicate any sample is or is not the selected metal
or alloy, whether the reading is within or is not within the bounds
consistent with the selected metal or alloy. To ensure accuracy,
read the instructions and special conditions which can alter the
reading from outside to within the expected bounds or from
within to outside the expected bounds. The readings given by
the Precious Metal Verifier are INFORMATIONAL ONLY and any
judgment about or action taken on any sample is entirely the
responsibility of the user.

CONTENTS
DeviceDiagram........................................2
Instructions..............................................3
Alloy Explanations
Gold................................................4
Silver................................................5
Other&Bullion....................................6
ResultsInterpretations................................7
Sensor Selection. . . . . . . . . . . . . . . . . . . . . . . . . . . . . . . . . . . . .8
ImportantNotesfor Testing..... ..... ..... ..... ...10
Battery Charging & Power Management. . . . . 12
Measurement Mode . . . . . . . . . . . . . . . . . . . . . . . . . . . . . 13
Usage Considerations . . . . . . . . . . . . . . . . . . . . . . . . . 14
2
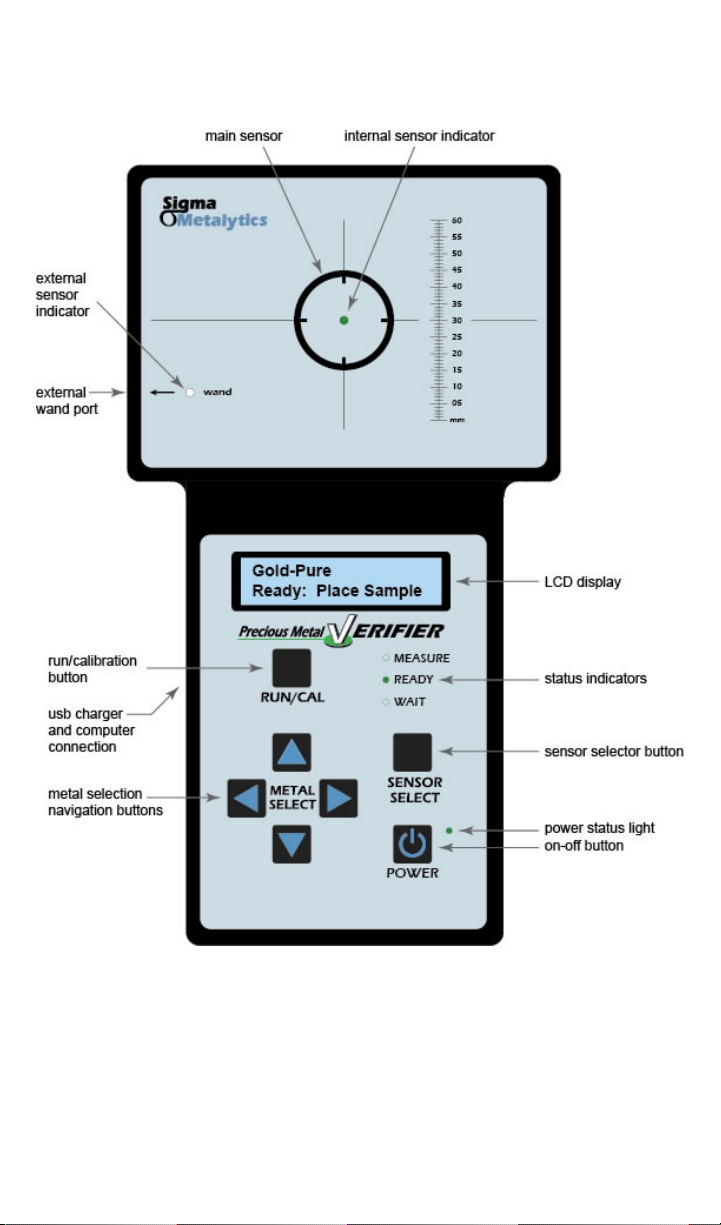
DEVICE DIAGRAM
NOTE
The sample must entirely cover the black circle on the face of
the device for reliable onboard readings. When using a Wand,
the sample must entirely cover the face of the Wand.

3
Instructions
1. Press POWER to turn on the device. Wait until the display reads:
Remove Sample
Push RUN/CAL →Start
If you are using a Wand, connect it now. The green LED on the testing
platform will illuminate to indicate which sensor is in use. Press SENSOR
SELECT to switch between the Wand and the Onboard Sensor.
2. Clear all samples from the device. Press RUN/CAL to calibrate the
device. Ensure there are no samples on the device when you press
RUN/CAL. If you have a Wand plugged in, ensure the face of the Wand
is at least 1 inch away from any metal. Wait until the display reads:
Ready: Place Sample
3.Select the alloy type you would like to test. Use the UP ARROW and
DOWN ARROW buttons to select different categories of alloys and the
LEFT ARROW and RIGHT ARROW buttons to select specific alloys within
a category. See the chart below for the menu layout.
Gold ◄►
Pure .999+, 91.7% 22K bal Cu, 90% bal Cu, American Eagle, Krugerrand,
98.6%, Britannia 90-12
▲▼
Silver ◄►
99.99% Pure, 99.9% Pure, 92.5% Sterling, 90% US pre 1900, 90% US pre
1945, 90% US Coin 1960, 96% Britannia, 80% Canadian
▲▼
Other ◄►
Platinum, Palladium, Rhodium, Copper, Calibrator
▲▼
Bullion ◄►
Silver .9999, Gold .9999, Platinum, Palladium
4.Once the desired alloy is selected, press the RUN/CAL button. Ensure
there are no samples on the device when you press the RUN/CAL
button. The display will then read:
Ready: Place Sample
5.Place your sample on the sensor or touch the Wand to the sample
if using the Wand. Make sure your sample meets the minimum
requirements to get an accurate test (Page 8). The device will display
the results of the test. See Page 7 for interpreting the results.

4
Alloy Explanations
Gold
Gold-Pure .999+
Gold samples that are 99.9% or higher purity. This includes 99.99%
and 99.999%. These purities are sometimes written as .999, .9999, and
.99999.
Gold-91.7% 22K balCu
Gold samples that are 91.7% gold with balance copper. These samples
are sometimes advertised as 91.67% gold or 22k gold. Balance copper
means that the other 8.33% in the sample is copper.
Gold-90% bal Cu
Gold samples that are 90% gold with balance copper. Balance copper
means that the other 10% in the sample is copper.
Gold-American Eagle
American Gold Eagles are 91.67% gold, 3% silver, and 5.33% copper. The
American Gold Eagle has a very specific alloy used only in this type of
coin. Even though American Gold Eagles have 1 ozt of gold in them, they
are actually 91.67% gold with silver and copper as the balance metals,
which is why they weigh more than 1 ozt in total.
Gold-Krugerrand
Gold Krugerrands are 91.67% gold and 8.33% copper. While this is
technically the same setting as the 91.7% 22K balCu setting, we added
a second option for ease of use because gold Krugerrands are very
popular on the market.
Gold-Britannia 90-12
Between 1990 and 2012, Gold Britannia coins were minted with a 91.7%
gold and 8.3% silver alloy. Gold Britannia coins in 1987-1989 used a
91.67% gold and 8.33% copper alloy and can be tested with 91.7% 22K
balCu setting. Gold Britannia coins from 2013 to present are minted as
99.99% pure gold and can be tested with the Pure .999+ setting.

5
Alloy Explanations
Silver
Silver-99.99% Pure
Silver samples that are 99.99% purity. This includes 99.99% and 99.999%.
These purities are sometimes written as .9999 and .99999.
Silver-99.9% Pure
Silver samples that are 99.9% purity. This is only 99.9%, and higher
purity samples should be read on the higher purity setting. This purity
is sometimes written as .999.
Silver-92.5%Sterling
Silver samples that are 92.5% silver with balance copper. Balance
copper means that the other 7.5% in the sample is copper.
Silver-90%US pre1900
The U.S. government used to mint coinage in 90% silver and 10%
copper alloys. The pre-1900 setting takes into account impurities and
contamination present in older coins that the mint was either unable to
remove or unaware existed at the time of minting. 90% silver samples
that were minted before 1900 should be tested on this setting.
Silver-90%US pre1945
The U.S. government used to mint coinage in 90% silver and 10%
copper alloys. The pre-1945 setting takes into account impurities and
contamination present in older coins that the mint was either unable to
remove or unaware existed at the time of minting. 90% silver samples
that were minted between 1900 and 1945 should be tested on this
setting.
Silver-90% Coin 1960
The U.S. government used to mint coinage in 90% silver and 10% copper
alloys. The coin 1960 setting takes is designed for 90% silver, 10% copper
coins minted from 1946 to present day. 90% silver samples that were
minted between 1946 and present day should be tested on this setting.
Silver-96% Britannia
Between 1997 and 2012, Silver Britannia coins were minted with a 95.8%
silver and 4.2% copper alloy. Silver Britannia coins from this era should
be tested on this setting. Silver Britannia coins from 2013 to present day
are minted from 99.9% pure silver alloy.
Silver-80% Canadian
Certain Canadian silver dollars and commemorative coins were
minted with an 80% silver and 20% copper alloy. Coins with that alloy
can be tested on this setting. Note that not all Canadian silver coins
were minted with this alloy.

6
Alloy Explanations
Other & Bullion
Other-Platinum
Platinum samples that are 99.9% or higher purity. This includes 99.99%
and 99.999%. These purities are sometimes written as .999, .9999, and
.99999.
Other-Palladium
Palladium samples that are 99.9% or higher purity. This includes 99.99%
and 99.999%. These purities are sometimes written as .999, .9999, and
.99999.
Other-Rhodium
Rhodium samples that are 99.9% or higher purity. This includes 99.99%
and 99.999%. These purities are sometimes written as .999, .9999, and
.99999.
Other-Copper
Copper samples that are 99.9% or higher purity. This includes 99.99%
and 99.999%. These purities are sometimes written as .999, .9999, and
.99999.
Other-Calibrator
If you would like to check if your device is properly calibrated and
providing accurate results, select this setting and place the aluminum
Calibration Disk (included with your device) on any Wand or the
onboard sensor. The result should come up in the brackets. If it does
not, please contact us to troubleshoot and setup and repair and
recalibration if necessary. Your calibration disk made read one or two
steps away from the center, that is normal.
Bullion-Silver 99.99%
Large Silver samples (20 ozt or greater) that are 99.99% or higher
purity. This includes 99.99% and 99.999%. Use the Bullion Wand with
this setting.
Bullion-Gold 99.99%
Large Gold samples (20 ozt or greater) that are 99.99% or higher purity.
This includes 99.99% and 99.999%. Use the Bullion Wand with this
setting.
Bullion-Platinum 99.99%
Large Platinum samples (20 ozt or greater) that are 99.99% or higher
purity. This includes 99.99% and 99.999%. Use the Bullion Wand with this
setting.
Bullion-Palladium 99.99%
Large Platinum samples that are 99.99% or higher purity. This includes
99.99% and 99.999%. Use the Bullion Wand with this setting.

7
Results Interpretation
When testing a sample, brackets will be displayed. The location of the box cursor
relative to the brackets indicate the results of the test.
Sample is consistent with the selected alloy type
The box cursor will fall anywhere inside of the brackets if the sample’s characteristic
resistivity is consistent with the selected alloy type. The box cursor may not be in
the exact center of the brackets. That is okay. A result anywhere in the brackets
means the sample is consistent with the selected alloy type. Even on a good
result, test the size and weight of the sample to confirm it is the right density.
Sample is slightly inconsistent with the selected alloy type
If the box cursor falls outside of the brackets, to either the right or to the left, that
indicates that the sample is slightly inconsistent with the selected alloy type. There
could be reasons for a genuine sample to read outside of the brackets, including
but not limited to the sample being:
• Embossed or has high relief or design
• Very cold or very warm relative to the temperature of the device
• Too far away from the sensor
• Too thin or too small for the current sensor (see sensor selection)
• Off center from the sensor
• Very slightly impure, like higher than usual iron content
Confirm that the test is being performed properly. If everything is correct, this is a
questionable sample.
Sample is inconsistent with the selected alloy type
The further the box cursor is outside of the brackets, the less consistent the
sample’s characteristic resistivity is with the selected alloy type and the more
questionable the sample is. Further testing, more research, and analysis by other
non-destructive methods is highly recommended.
An arrow indicates that a sample is off the scale in that direction. This indicates
the sample is highly inconsistent with the selected alloy type.

8
Sensor Selection
Samples must be tested using the appropriate sensor to get reliable
results. Using an incorrect sensor can lead to false negatives and false
positives. Use the specifications below to choose the correct sensor for
your sample.
Placing the included calibration disk behind the sample during testing
can enhance the reliability and allows the sensor to test thinner samples.
The column indicating “with Cal Disk” is the minimum testable thickness
when using testing with the calibration disk behind the sample.
Onboard Sensor
Category Min. Diameter Min. Thickness Min. Thickness
(with Cal Disk)
Gold 99.9%+
24.0 mm
1.1 mm 0.8 mm
Gold Alloys 2.4 mm 1.7 mm
Silver 99.9%+ 1.0 mm 0.8 mm
Silver Alloys 1.1 mm 0.8 mm
Platinum 2.4 mm 1.7 mm
Palladium 2.4 mm 1.7 mm
Rhodium 1.6 mm 0.9 mm
Small Wand
Category Min. Diameter Min. Thickness Min. Thickness
(with Cal Disk)
Gold 99.9%+
8.0 mm
0.8 mm 0.4 mm
Gold Alloys 1.7 mm 1.0 mm
Silver 99.9%+ 0.8 mm 0.4 mm
Silver Alloys 0.8 mm 0.4 mm
Platinum 1.7 mm 1.0 mm
Palladium 1.7 mm 1.0 mm
Rhodium 1.1 mm 1.0 mm
9
Sensor Selection, Continued
If a sample is providing odd or unreliable test results with a certain sensor,
trying testing with one sensor smaller. This can sometimes provide more
reliable results.
Small samples can warm up very quickly with handling which may
interfere with testing results. If a sample is a different temperature than
the device, place both the sample and the device on the same counter
and let them come to room temperature for about 10 minutes before
testing again.
Large Wand
Category Min. Diameter Min. Thickness Min. Thickness
(with Cal Disk)
Gold 99.9%+
18.0 mm
0.8 mm 0.4 mm
Gold Alloys 1.7 mm 1.0 mm
Silver 99.9%+ 0.8 mm 0.4 mm
Silver Alloys 0.8 mm 0.4 mm
Platinum 1.7 mm 1.0 mm
Palladium 1.7 mm 1.0 mm
Rhodium 1.1 mm 1.0 mm
Bullion Wand
Category Min. Diameter Min. Thickness Min. Thickness
(with Cal Disk)
Gold 99.9%+
24.0 mm
4.5 mm 3.3 mm
Gold Alloys 7.0 mm 6.5 mm
Silver 99.9%+ 4.0 mm 3.3 mm
Silver Alloys 4.5 mm 3.3 mm
Platinum 7.0 mm 6.5 mm
Palladium 7.0 mm 6.5 mm
Rhodium 6.3 mm 3.7 mm

10
Important Notes for Testing
Density Testing
It is critically important to confirm a sample’s density in addition
to testing its resistivity. Every precious metal alloy has a unique
combination of density and resistivity; by only testing one aspect, the
sample is only partially confirmed to be consistent with the genuine
alloy. The PMV Original is only testing resistivity and it is up to the user
to confirm density separately.
There are many ways to confirm a sample’s density is correct.
Whatever method you use, the sample should be the right weight and
the right size for the alloy. If your sample has published specifications,
the simplest way to confirm density is to weigh it and size it (measure
thickness and diameter or length and width) and confirm that your
sample matches the published specifications.
Correct Alloy Setting
Some alloys are unique to specific types of coins, and it is important to
test a sample on the correct alloy setting. For example, the American
Gold Eagle has a unique alloy of 91.67% gold, 3% silver, and 5.33%
copper. It will only test properly on the American Gold Eagle setting, not
the other 91.67% gold settings.
Modern Sandwich Coins on 90% Silver Settings
Modern sandwich coinage will read within the acceptable range on
the 90% Silver Bal Cu setting. Modern coinage is designed to have
the same resistivity to ensure they work in coin machines with older
coinage. The best way to ensure your quarters are 90% silver is to check
their density (weight and size) in addition to the resistivity test. Below
are the specifications for both modern and pre-1965 quarters.
Checking Calibration
If the PMV is giving inconsistent results or odd readings, and the tests
are being performed correctly (on the correct alloy setting, using
the correct sensor, sample is within minimums, etc.), then check the
device’s calibration (Page 6). If the device’s calibration is not correct,
then contact us immediately for service. If the device’s calibration is
correct, then the sample is highly questionable.
Magnetic Samples
Samples that are highly magnetic will cause the device to enter a
constant re-calibration state when placed on the sensor. If the device
is repeatedly asking for recalibration when a sample is placed on the
sensor, then use a magnet check if the sample is magnetic. Genuine
precious metal pieces are not magnetic.

11
Conditions that Affect Readings
Thin Samples
The sensor’s signal may over-penetrate very thin samples and cause
inaccurate readings. Refer to the minimum thicknesses information
to make sure the sample meets the minimums for the sensor in use.
Place the calibration disk behind the sample and/or switch to a smaller
sensor if necessary.
Small Samples
It is important to use the correct sensor size for the sample size. If the
sample does not meet the minimum requirements for a sensor, the
device will not provide accurate readings.
Samples with High Relief
Samples with very deep stamping, molded samples with large designs,
and other high-relief samples may cause inaccurate readings. Try
to take a reading from a flat area of the sample to ensure the test is
accurate. Most coins and bars will not have this problem.
Bars
Some bars may only partially meet the minimum requirements for
the sensors. For example, a long, narrow bar may be longer than the
sensor minimum, but may not be wide enough for accurate testing. A
bar must meet the sensor minimums in width and length in order to be
accurately tested.
Cases
Cases made of plastic and/or cardboard should not affect the test
results. However, cases with metal in them will interfere with the testing
results.
Similarly, very thick cases may also cause the device to not read the
sample if the sample is too far away from the sensor. This is more
common in cases with a small or thin sample in a thick case. For
example, a 1/4 oz gold piece in a case that normally holds a 1 oz gold
piece may be difficult to read due to the case size.

12
Battery Charging
The PMV contains a rechargeable lithium-ion battery. The battery is
high-capacity and the devices uses a battery management system to
protect the health of the battery and the device.
When the battery is low, the green LED next to the POWER button will blink
slowly.
To charge the unit, connect the included USB cable to the USB port on the
side of the PMV (see Device Diagram). The device can also be charged
by plugging the USB cable directly into a computer.
The PMV will still charge when powered off. Whether the PMV is off, the LED
will not illuminate while charging. When the PMV is on, the LED will blink
and stop blinking when it is fully charged.
If the PMV has not been used for a while, it can take up to 12 hours to fully
charge the battery. If the device has been unused for a long period of
time, plug it in and charge it overnight before using it.
The charger connector may not appear to be fully “seated” or sit flush
with the device. This is normal. As long as a firm connection is made,
the device will charge. Do not over-press the charger port, as this may
cause damage to the internal circuitry.
Power Management
The PMV has built-in features to improve battery life and protect the
health of the device.
The device’s display will dim after one minute of no use. Placing a coin on
the sensor or pushing any button will restore the backlight.
The device will automatically turn off after five minutes of no use. Power
on the device like normal to get back to testing.
When the device powers on, it will check the battery’s charge level. If the
charge level is below a certain percent, the battery management system
will turn the device off to protect the microprocessor. If this happens, plug
the device in to charge for at least 6 hours.

13
Measurement Mode
The PMV Measurement Mode allows the user to see the mathematical
result of the resistivity test for a sample rather than the box and bracket
result. The result is close to the resistivity value of metal being tested, but
slightly different. Identical metals will have identical values, which allows
unknown alloys or samples to be categorized as similar or different.
To enable Measurement Mode:
1. Turn off the PMV. Press and hold the SENSOR SELECT button. While
holding this button, press the POWER button. The display will then read:
Remove Sample
Push RUN/CAL →Start
2. Release the SENSOR SELECT button. Make sure the device is clear of any
samples and press the RUN/CAL button. The display will then read:
Measurement Mode
Ready: Place Sample
3.Place the sample on the sensor. Instead of the normal box and bracket
results, the PMV will display, with the sample’s results displayed:
Measurement Mode
Value =
4.To return to normal operation, power off the device and power on
again without holding down any button.

14
Use Considerations
USE WITH CAUTION
It is not our recommendation or intention for the Precious Metal Verifier
(PMV) to be the sole means for identification of counterfeit coins and bars.
Our measurement of a material’s electrical characteristic (resistivity or
conductivity) is necessary, but not by itself sufficient for such a purpose.
We recommend that you check the item being measured against its
specified weight, and size along with the resistivity measurement. You
should use your normal visual checks of the material as well.
Other materials have the same resistivity as pure gold, and as such
can look like gold on the PMV. These materials will be less dense than
gold, so they will be larger or weigh less than the specified value. If you
check material that looks good on the PMV, but has the wrong weight or
dimensions, then you should not accept the material as consistent with
the correct metal.
Do not try to use the PMV to determine what a material is. The PMV will
only provide the electrical characteristic (resistivity or conductivity) of
the metal, not the atomic structure. Correct use is to have an expectation
of the material type (gold, silver, platinum, etc.), and alloy content (22K,
coin silver, sterling, .999 pure, etc.), and to verify that the material being
tested is consistent with your expectation.
Used in this way, the PMV is a great asset in avoiding counterfeit products
Table of contents
Other Sigma Metalytics Measuring Instrument manuals


Popular Measuring Instrument manuals by other brands


MPFiltri
MPFiltri LPA2 user guide

Kyoritsu Electrical Instruments Works, Ltd.
Kyoritsu Electrical Instruments Works, Ltd. 5000 instruction manual

parktool
parktool TM-1 instructions

Promax
Promax HD Ranger + user manual

PerkinElmer
PerkinElmer QuantaSmart 1694267 Reference manual

B+K precision
B+K precision 889B manual


