Nextav NX-H100 User manual

NX-H100 Manual

2
The NEXTAV WIFI Drive allows to wirelessly access
your music, videos, photos, data and stream it to
your iPad®, iPhone®, tablets, smartphones, and
notebooks – no cords or cables to tangle. With the
internal hard drive storage, there is no need to worry
about running out of space on your mobile devices
and the built-in USB 3.0 port makes the file transfer
easier and much faster.
For maximum portability, the NEXTAVTM WIFI Drive
device has a built-in rechargeable battery. Simply
plug it into any available USB port on your computer
to charge and copy your files. As simple as 1-2-3,
you are ready to enjoy your device and no waiting
needed. The portable WIFI Drive can be accessed
while the battery is charging.
Product Features
• Stream media over Wi-Fi enabled devices up to 5
users simultaneously
• Access and stream your music, videos, photos and
data using the free custom mobile app supporting
iOS and Android operating systems
• Up to 5 Hours of continuous battery life*
• Search function to locate and access your le much
faster.
• Internet access capability via the RJ45 or wireless,
supporting 802.11 b/g/n speeds
• Supports 2.5” SATA Hard Disk Drive, 9.5mm. HDD
spins down after 5 minutes of no data transfer or

3
activity. Also supports SATA SSD.
• Supports NTFS, FAT and FAT32
• Supports LAN data-shares and cross-platforms
including Windows, Mac, Linux, iOS and Android.
• Support multiple NSA, including Samba / WebDAV
• Support multiple platform client tools, including
Windows, Mac, Linux, iOS, and Android
*Battery life subject to normal usage conditions and congurations.
To function as an external hard drive, simply connect
the WIFI Drive into the computer’s available USB
port. The WIFI Drive will automatically mount on your
desktop or inside the “My Computer”.
The WIFI Drive works as an external hard drive and
charges the internal battery.
Wired mode. Connect the WIFI Drive using the RJ45
cable into the available port on the back of your
router to function as a wired Internet pass-through,
the DHCP feature of the WIFI Drive will automatically
assign an IP address to have access to the internet.

4
Wireless Mode. Wirelessly connect the WIFI Drive to
your existing wireless router to function as a wireless
Internet pass-through to have access to the internet
as illustrated below.
1. Hardware and Accessories
The NEXTAV WIFI Storage
kit includes the
following:

5
2 Product Parameters
2.1 Product Dimensions
Dimension: 127.7mm (L) X 82mm (W) X 25mm (H)
Color: Black color on body and frame.
2.2. Product Specification
CPU: Model: Ralink RT5350
Frequency: MIPS24KEc 360MHZ
Wi-Fi: Standard: 802.11 b/g/n,
Frequency: 2.4 GHZ
Speed: 72Mbps at 20MHz
150Mbps at 40MHz
Network Interface:
100Mbps Ethernet RJ45
USB Interface: Micro USB 3.0, for data
transfer and charging
Battery Capacity: 3000mAh
Power consumption:
A) Maximum (reading and writing data: 3.7W
B) Stand-by (HDD Spinning, no activity): 2.5
C) Stand-by (HDD Sleep Mode): 2.1W
2.3. Operating Temperature
The normal operating temperature of the device is
between 5-35 Degrees Celsius.
3. Minimum Hardware Requirements
• Internet Connection
• PC Operating System Requirements
Windows: XP/Vista/Windows 7

6
Mac: OS X 10.6.0 and later
Others: Fedora 12 (Linux) and late
• PC Web Browser
Windows: Supports Internet Explorer 7.0
and higher version
Mac: Supports Safari 3.0 and higher version
Others: Firefox 3.5 and higher version
• iOS: 4.0 and above
• Android: 2.3 and above
• Router or Switch
4. Product View
5. Interface
5.1. RJ45 WAN Port
A. Router/Access Point. The WIFI Drive will serve as
host. With the built-in DHCP function, it can assign
IP address to connect two or more devices through
Wi-Fi.
B. Repeater/Access Point. Allows two or more
wireless devices to communicate with each other.

7
5.2. Micro USB 3.0 Interface
The built-in Micro USB 3.0 is for faster data transfer
and charging the internal battery when connected di-
rectly into the computer’s USB port or wall chargers.
5.3. LED Panel
Power LED:
LED Off: The device is switched-off or no power
Green Color
Steady Light: Battery is fully charged
Slowly Blinking: Battery charging
Blinking Fast: Device Shutting-Down
Red Color:
Steady Light: Less than 30% available power
Blinking Fast: Will soon shut-down, must be charged
immediately
HDD LED:
LED Off: The device is switched-off or no power.
White LED:
Steady Light: Ready to use
Connected into USB 2.0 Port
Blinking: Read/Write activities
Blue LED:
Steady Light: Ready to use
Connected into USB 3.0 Port
Blinking: Read/Write activities

8
Wi-Fi LED:
Blue Color:
Flashing: Starts the Initialization process
Steady Light: Initialization process completed
Ready to use Wi-Fi signal is normal
LED Off: The device is switched-off or no power
Internet LED:
Router Mode:
Blue Color: Good signal
No LED: No connection established
Bridge Mode:
Blue Color: Good signal
No LED: No connection established
6. Hardware Installation
The Wi-Fi enclosures are shipped from our factory
without the internal hard drives included. You must
purchase and install the internal hard drive yourself.
Please follow the step-by-step 2.5” SATA hard drive
installation:
1. Open the back cover of the device.
2. Carefully install the included screws together with
the rubber shock mounts in the screw holes of the
internal hard drive as seen on the images below.

9
3. After installing the screws together with the rubber
shock mounts, carefully align and slide the hard drive
in an angle into the SATA connector. Push the hard
drive all the way in to properly secure it in place. See
the image below.
4. The screws should properly align and seated on
the screw mounts on the bottom of the enclosure.
5. Align the top cover into the grooves of the bottom
enclosure and snap it in place. Please see the image
below.

10
6. Congratulations. You may now use the device as
an external hard drive when connected directly into
the computer’s USB Port.
7. PC Client Software Installation
DOWNLOAD OUR SOFTWARE Directly from http://
www.NEXTAV.ca
Our included Client Utility software is the only
software that you will need to copy on your computer.
This software utility allows you to easily search and
look for your WIFI Drive that is connected from your
home network.
1. Copy the “NEXTAV WIFI Drive” executable le on
your PC and follow the on-screen instructions.
2. Once the copy is complete, double-click on the
“NEXTAV WIFI Drive” icon on your desktop to launch
the software utility.

11
8. Using Personal Computer
8.1. Connecting Wirelessly to PC
Switch-on the WIFI Drive by pressing the power but-
ton at the front panel. Wait for few minutes until the
Wireless LED remain lit. Enable the Wi-Fi feature on
your PC and open the Wireless Network Connection.
Select the NEXTAV-XXXX wireless connection (default
wireless SSID: NEXTAV-XXXX) and enter the default
password as 11111111. Once you have successfully
connected to your WIFI Drive, you may now run the
“NEXTAV WIFI Drive” to search for your device and
complete the configuration process.
8.2. PC Client Login Utility
Double-click the “NEXTAV WIFI Drive” icon on your
desktop. The software utility will search all the
connected devices in your network as seen on the
screenshot below.
If you do not find the WiFiDisk on the list of devices
connected in your network, click on the “Refresh”
button to refresh the device list.
Select the WiFiDisk on the list, then click on the “Log
In” button to enter the web interface as seen on the
image.

12
Type the default User Name as admin and leave the
User Password as blank. Click on the “Log In” button
to access the Web Management Interface.
If you choose to click on the “My Storage” button,
enter the admin login name and password to gain ac-
cess to the WIFI Drive. Once successfully logged-in,
it automatically mount the storage area of the WIFI
Drive onto your desktop
8.3. WIFI Drive Configuration using PC
Once your Wi-Fi enabled-PC is successfully connect
to the WIFI Drive, using the “NEXTAV WIFI Drive” will
allow you to access our built-in Web Management
Interface and configure your device.
1. During the initial setup, our Wizard will automati-
cally run and will guide you through the step-by-step
process on configuring the WIFI Drive as seen on
the screenshot below. You may cancel this process
by clicking on the “X” at the top right corner of the
window. If you cancel the Wizard, it will keep the fac-
tory default settings of your WIFI Drive.
2. Click on the “Next” button. By default, the Wired
Access is selected.

13
There are two available Internet Access options –
A. Wireless Access. Connecting the WIFI Drive to
another wireless device to have the internet access.
B. Wired Access. Directly connecting the WIFI Drive to
the available port on the back the router.
Selecting the Wireless Access
1. SSID. Enter the SSID name or click on the “Res-
can” button to automatically search for the available
wireless network connections.
2. Password. Enter the correct password to join the
wireless network connection selected.
3. IP Address. Select either DHCP or Manually assign
an IP address
a. By selecting DHCP, the host will provide an IP ad-
dress automatically to connect to the internet
b. By selecting Manual, you have to manually assign
an IP address to connect to the internet
14
Selecting the Wired Access Option
By selecting the Wired Access option, the Dynamic IP
is selected as the default setting. You can manually
assign your own IP address by clicking on the green
arrow and select the Static IP option.Click on the “X”
button if you wish to cancel and exit this window.
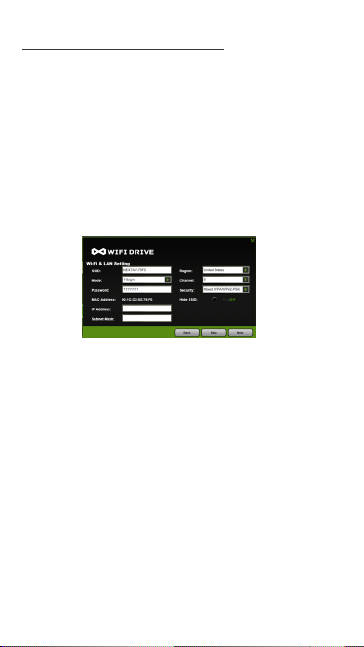
3. Click on the “Next” button. The next step is to
configure the Wi-Fi Disk.
• SSID: Enter the combination of letters and numbers
only. 32 characters is the maximum allowable SSID
length
• Channel: The default setting is set to Auto. There
are 14 available channels to choose from.
• Modes: The default setting is 11b/g/n. You can
also manually set the modes to 11Mbps (802.11b),
54MBPS (802.11G), and 150Mbps (802.11n).
• Security:The default setting is Mixed WPA/WPA2-
PSK. WPA-PSK and WPA2-PSK are also available.
• Password: The default password is set to
11111111.
• IP Address: The default IP address is set to

15
10.10.10.254 with subnet mask of 255.255.255.0.
The IP address can be changed.
4. Click on the “Next” button. The next step is to
change the admin default password. Click on the
“Next” button once the password has been modi-
ed. You may click on the “Skip” button to keep the
default password.
5. Click on the “Finish” button to complete and save
the changes made.
The system will start rebooting. This process will
take approximately 5 minutes as seen on the image
below.
The step-by-step wizard can be canceled at anytime.
Click on the “X” located at the top right of the win-
dow as seen on the image below. Click on the “OK”
button to exit or “Cancel”.

16
9. Using Mobile Devices
9.1. iOS Client App Installation
DOWNLOAD OUR APP Directly from http://www.
NEXTAV.ca
1. Click on the “App Store” icon on the desktop as
seen on the image below. Search and locate the free
“NEXTAV WIFI Drive” app and follow the on-screen
installation instructions.
2. Once the installation process has been completed,
the “NEXTAV WIFI Drive” app can be found on the
desktop as seen on the image below.

17
9.2. Wirelessly connecting your iPhone/iPad
1. Turn-on the WIFI Drive. Wait for few minutes to
complete the initialization process. The blue Wi-Fi
LED on the device should remain solid indicating that
the initialization process has been completed.
2. Click on the “Settings” icon on the desktop as seen
on the screenshot below.
3. Click on the “Wi-Fi”. Inside the Wi-Fi Networks,
the “NEXTAV-XXXX” should appear on the list. Click
on the “NEXTAV-XXXX” as seen on the image below.
The “XXXX” part of the SSID is the last 4 digits of
the device MAC Address. Enter the default password
(11111111) and click on the “Join” button.

18
Once the “NEXTAV-XXXX” is selected, a check mark
will appear before the SSID and the Wi-Fi logo will
appear after the device name on the top left of the
display.
9.3. iOS User Login
1. Click on the “NEXTAV WIFI Drive” icon to launch the
app as seen on the image below.
2. Enter admin as the user name and the password
that you assigned during the configuration process.
The password is only required during the first login.
The device remembers the password and there is no
need to enter it again the second time you login.
3. Once the password has been entered correctly, you
will be automatically connected into the “My WiDisk”.
The “My WiDisk” is the WIFI Drive Storage.

19
9.4. Android Client App Installation
DOWNLOAD OUR APP Directly from http://www.
NEXTAV.ca
1. Click on the “Play Store” icon on the desktop as
seen on the image below. Search and locate the free
“NEXTAV WIFI Drive” app and follow the on-screen
installation instructions.
2. Once the installation process has been completed,
the “NEXTAV WIFI Drive” app can be found on the
desktop as seen on the image below.

20
9.5. Wirelessly connecting your Android devices
1. Turn-on the WIFI Drive. Wait for few minutes to
complete the initialization process. The blue Wi-Fi
LED on the device should remain solid indicating that
the initialization process has been completed.
2. Click on the “Settings” icon on your desktop as
seen on the screenshot below.
3. Switch the Wi-Fi to ON position. Inside the Wi-Fi
networks, the “NEXTAV-XXXX” should appear on the
list. Click on the “NEXTAV-XXXX” as seen on the im-
age below. The “XXXX” part of the SSID is the last
Table of contents
Other Nextav DC Drive manuals

Popular DC Drive manuals by other brands

Pfeiffer Vacuum
Pfeiffer Vacuum TC 120 operating instructions

Leadshine Technology
Leadshine Technology M542T user manual

Siemens
Siemens SED2 VFD operating instructions

SYNAPTICON
SYNAPTICON SOMANET Circulo Series manual

Lenze
Lenze L-force 9400 Mounting instructions

PR electronics
PR electronics 9203 Series product manual


