NextWave Digital THD-5150 User manual
Dual View HDTV Receiver
THD-5150
Operating Instructions
2
Safety Instructions
Please read the following safety instructions carefully.
♦ Do not overload wall outlets, extension cords or integral convenience receptacles as this can
result in a risk of fi re or electrical shock.
♦ Never allow liquids, spray or other materials to come into contact with the inside of the STB.
♦ Unplug the STB from the wall outlet before cleaning.
♦ Use a soft cloth to clean the exterior of the STB.
♦ Allow clear space around the STB for suffi cient ventilation.
♦ Do not use the STB where it is exposed to direct sunlight or near a heater.
♦ Never stack other electronic equipment on top of the STB.
♦ Do not place the STB outdoors. Keep out of direct sunlight.
♦ Do not connect or modify cables when the STB is plugged in.
♦ Do not cover the STB or place it on a unit that emits heat.
WARNING
RISK OF ELECTRIC SHOCK
DO NOT OPEN
TO REDUCE THE RISK OF ELECTRIC SHOCK, DO NOT REMOVE
COVER (OR BACK). NO USER SERVICEABLE PARTS INSIDE.
REFER SERVICING TO QUALIFIED SERVICE PERSONNEL.
This symbol indicates “dangerous voltage”
inside the product that presents a risk of
electric shock or personal injury
This symbol indicates important instructions
accompanying product.
Never stack other electronic equipment on top of the STB. The STB requires
suffi cient ventilation space to prevent overheating. Failure to provide adequate
ventilation could result in poor performance of the STB.
!

3
3
3
Contents
Quick-Start Guide 4
Introduction & Front & Rear Panels 6
Introduction
........................................................................................................................................................................
6
Front Panel
........................................................................................................................................................................
6
Rear Panel
.........................................................................................................................................................................
7
Remote Control 8
Connection Options 10
Connecting the Antenna
..................................................................................................................................................
10
TV Format switch
............................................................................................................................................................
10
Connecting to a High Defi nition Capable Display (Component & RGB)
......................................................................
10
Connecting to an Standard Defi nition TV (S-video & Composite)
................................................................................
1
2
Connecting to an Audio Processor or Hi-Fi (Digital Audio & Left/Right)
.......................................................................
1
3
Connecting to a VCR or Secondary Display (Secondary Composite Outputs)
...........................................................
1
4
Menu Overview 15
Main Menu
.......................................................................................................................................................................
1
5
N
avigation
........................................................................................................................................................................
1
5
Main Menu 16
Quick Search
...................................................................................................................................................................
1
6
Auto Search
.....................................................................................................................................................................
1
6
Manual Search
................................................................................................................................................................
1
7
Restore Defaults
..............................................................................................................................................................
1
7
Information
.......................................................................................................................................................................
1
8
Rating Control
..................................................................................................................................................................
1
8
Password Setup
..............................................................................................................................................................
1
9
Clear Password
...............................................................................................................................................................
1
9
Timezone
.........................................................................................................................................................................
20
Main Display User Functions 21
Aspect Ratios
...................................................................................................................................................................
21
Audio Menu
......................................................................................................................................................................
21
Altering
the volume of the
Main Ouput
...........................................................................................................................
Main Ouput ...........................................................................................................................Main Ouput
2
2
Program List
....................................................................................................................................................................
Program List ....................................................................................................................................................................Program List
2
2
Information Banner
..........................................................................................................................................................
Information Banner ..........................................................................................................................................................Information Banner
2
3
Signal Strength
................................................................................................................................................................
2
3
EPG
..................................................................................................................................................................................
2
4
Teletext and Closed Captions
.........................................................................................................................................
2
4
Dual View Functions 25
Dual View Features
.........................................................................................................................................................
2
5
Remote Keys controlling PiP functionality
......................................................................................................................
Remote Keys controlling PiP functionality ......................................................................................................................Remote Keys controlling PiP functionality
2
5
Switching between PiP or Secondary Output
................................................................................................................
Switching between PiP or Secondary Output ................................................................................................................Switching between PiP or Secondary Output
2
6
Picture in Picture (PiP)
....................................................................................................................................................
2
6
S
econdary Output (VCR/DVD Recorder or SD TV)
......................................................................................................
2
6
Please add “Program List for PIP or secondary output
.................................................................................................
Please add “Program List for PIP or secondary output .................................................................................................Please add “Program List for PIP or secondary output
2
7
Selecting PiP & VCR Aspect Ratio
s
...............................................................................................................................
2
7
Changing the volume of the secondary output (VCR/DVD Recorder or SDTV)
..........................................................
2
7
Bringing up the Electronic Program Guide (EPG) for PiP or Secondary Output
.........................................................
Bringing up the Electronic Program Guide (EPG) for PiP or Secondary Output .........................................................Bringing up the Electronic Program Guide (EPG) for PiP or Secondary Output
2
7
Appendix 28
Troubleshooting
...............................................................................................................................................................
2
8
Specifi cations
...................................................................................................................................................................
2
9
Glossary
...........................................................................................................................................................................
Glossary ...........................................................................................................................................................................Glossary
30
Safety Instructions 2
4
Quick-Start Guide
If you wish to operate the NextWave HDTV STB (Set Top Box) before reading the rest of this manual, use the following
steps to get started quickly.
Step
1
Connect antenna feed cable to the RF IN socket on the STB (Set Top Box)
Step
2
Check your display documentation for the optimum settings
Step Set STB output to optimal mode for the display device
3
Step Connect video leads to display
4
It is important to check your display device documentation for the recommended HDTV
resolution and connection method for your display.
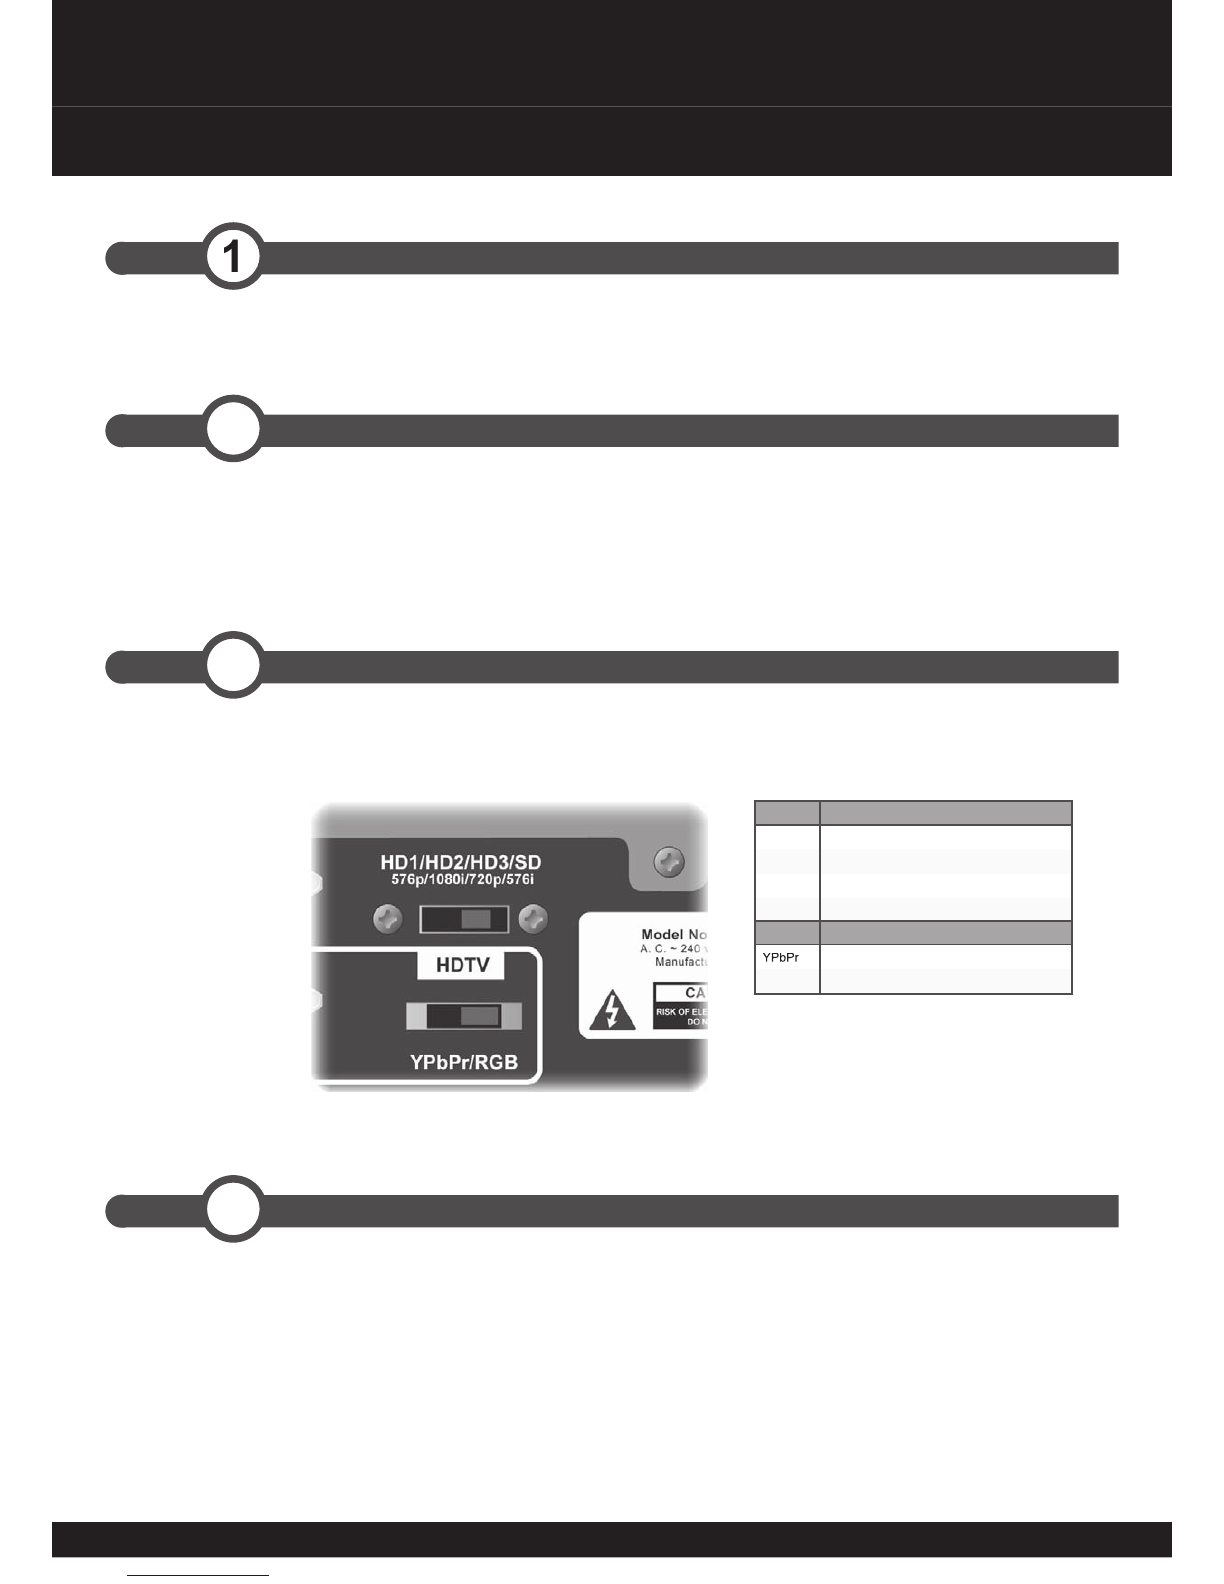
Having established the optimal display mode for your device, move the selector switch for the
resolution display mode to the appropriate setting.
Please Note: The STB must be turned
off on the front panel and on each time
you make a change to the output setting
via the switch.
Switch Setting
HD1
576p (720 x 576 progressive scan)
HD2
1080i (1920 x 1080 interlaced scan)
HD3
720p (1280 x 720 progressive scan)
SD
576i (720 x 576 interlaced scan)
Switch Setting
YPbPr
For component video connections
RGB
for D-SUB RGB connections
For information about what resolutions are broadcast in Australia, see the “Picture Resolution”
section @ www.dba.org.au (http://www.dba.org.au/index.asp?sectionID=15).
Connect the Component video leads (supplied), RGBHV lead, S-Video lead or Composite video
lead between the STB and your display.
Ensure that your display device is set correctly or automatically detects this input.

5
5
5
Step Select appropriate audio and video display settings
8
Step
7
Select channel scanning method and perform scan
Step
6
Connect AV leads to recording device or secondary display - VCR Output
Step Connect audio leads to display and/or audio processor - MAIN Output
5
Connect the main L & R outputs (
1
16
1
17
) to the L & R inputs of your display or Hifi amplifi er using
the supplied audio leads.
If you use a digital surround sound processor, you can also use the optical or coaxial digital
audio leads to connect to the appropriate inputs of your processor.
Connect the Composite video ( ) and L & R ( ) audio leads (supplied) between your STB
and your VCR or other recording device. This will allow you to record from the secondary (VCR)
output of the STB.
Power up STB with mains power lead and press main power button to ON. The STB will boot up
to a channel or to a blank screen if channels have not been scanned.
Press MENU. Select PROGRAM from the menu. Select Quick Search from the sub-menu.
Select your location from the list and press ENTER on the remote control.
If your location is
not
included in the quick search then
perform an Auto Search
.
The Set Top Box will begin searching for all available digital channels.
After scanning the channels found by the STB the scanned programs will be available for
viewing. Programs may be selected by pressing the LIST button on the remote control.
Use the ASPECT button on the remote control to adjust the aspect ratio of the main display.
The AUDIO button selects the audio format of the broadcast. Depending on the broadcaster and
your equipment you may choose MPEG or AC3 digital formats.
Connect the Composite video ( ) and L & R ( ) audio leads (supplied) between your STB
Connect the Composite video ( ) and L & R ( ) audio leads (supplied) between your STB
1
Connect the Composite video ( ) and L & R ( ) audio leads (supplied) between your STB
13
Connect the Composite video ( ) and L & R ( ) audio leads (supplied) between your STB
Connect the Composite video ( ) and L & R ( ) audio leads (supplied) between your STB
1
Connect the Composite video ( ) and L & R ( ) audio leads (supplied) between your STB
11
Connect the Composite video ( ) and L & R ( ) audio leads (supplied) between your STB
Connect the Composite video ( ) and L & R ( ) audio leads (supplied) between your STB
1
Connect the Composite video ( ) and L & R ( ) audio leads (supplied) between your STB
12

6
1
1
Power Switch.
1
2
4 Digit Display
Displays channel number.
1
3
Menu
Display Main Menu.
1
4
1. Change volume up and down.
2. Navigate left and right through the main menu, Channel list and EPG.
1
5
1. Change channels up and down.
2. Navigate up and down through the main menu, Channel list and EPG.
1
6
ENTER
1. Confi rm selection of a highlighted item in the menu and to go to the next step.
Congratulations on purchasing the NextWave THD-5150 High Defi nition Dual View digital TV receiver. The distinctive
feature of this receiver is its ability to decode two digital channels simultaneously. This manual will guide users through a
variety of representative installation setups and discuss the various features and functions required to make full use of the
capabilities of this unit.
The “Quick-Start Guide” beginning at page 4 should guide the user through the initial setup of this unit in a simple
installation. Pointers to other sections of this manual are given where more detailed information is available. Maps of
buttons and outputs are followed by a more detailed installation guide with diagrams. Navigation and use of the On-
Screen Menu system is covered in detail, followed by troubleshooting and other useful appendices.
Introduction & Front & Rear Panels
Front Panel
Introduction
1
1
1
2
1
3
1
4
1
5
1
6

7
7
7
Your NextWave THD-5150 High Defi niton Digital TV receiver contains a wealth of connection options. The following
diagram illustrates and describes the connection options on the rear panel.
1
7
RF IN
Terrestrial (conventional) TV aerial input.
1
8
RF OUT
TV Aerial output for feeding to other devices (eg: TV/VCR).
1
9
S/PDIF Optical
(TOSLINK)
Optical Audio Output. Connect to AV Processor or Audio Amplifi er.
1
10
S/PDIF Coaxial
(RCA)
Coaxial Audio Output. Connect to AV Processor or Audio Amplifi er.
1
11
1
12
Audio Left/Right (2nd)
Stereo Output for connection to a Hi-Fi system or TV set.
1
13
VIDEO OUT (2nd)
CVBS (Composite) video output. Connect to TV/VCR.
1
14
S-Video
Connect to TV/VCR through S-Video cable.
1
15
VIDEO OUT
CVBS (Composite) video output. Connect to TV/VCR.
1
16
1
17
Audio Left/Right
Stereo Output for connection to a Hi-Fi system or TV set.
1
18
1
19
1
20
Component Video
Connect to High Defi nition capable display.
1
21
RS232 Data Port
For Software Upgrades.
1
22
RGB (D-SUB)
RGBHV connector for High Defi nition capable and other VGA displays.
1
23
Display mode switch
Selects the HDTV display mode and resolution (576p, 1080i, 720p, 576i).
1
24
HDTV connector switch
Select the connector type (YPbPr, RGB).
1
25
Power Lead
Connect to 240VAC mains supply.
Rear Panel
Rear Panel
1
9
1
24
1
22
1
20
1
19
1
18
1
14
1
12
1
11
1
25
1
23
1
21
1
17
1
16
1
15
1
13
1
10
1
8
1
7
8
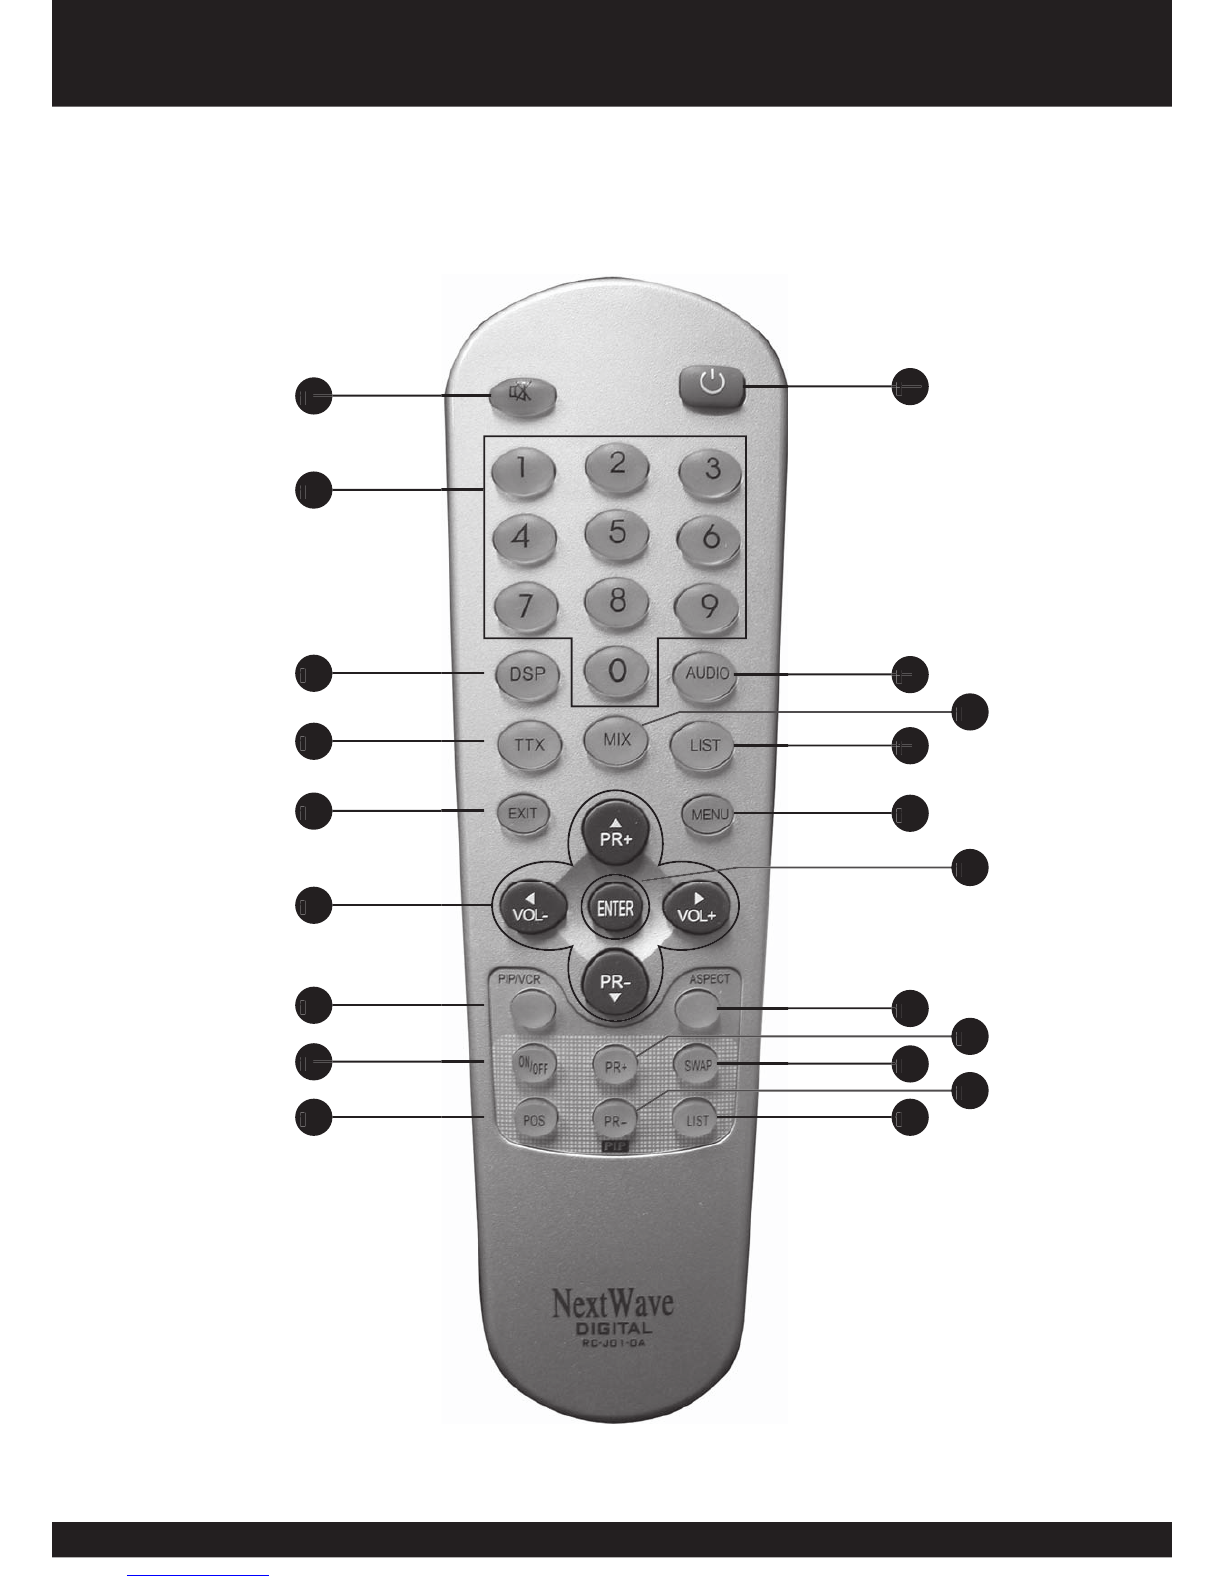
You can operate every function of the NextWave digital decoder using the buttons on the remote control handset. Please
read this section to help your understanding of each function.
Remote Control
1
26
1
1
27
1
28
1
29
1
31
1
34
1
37
1
38
1
40
1
43
1
1
33
1
1
35
1
39
1
42
1
45
1
1
30
1
36
1
32
1
44
1
41
9
9
9
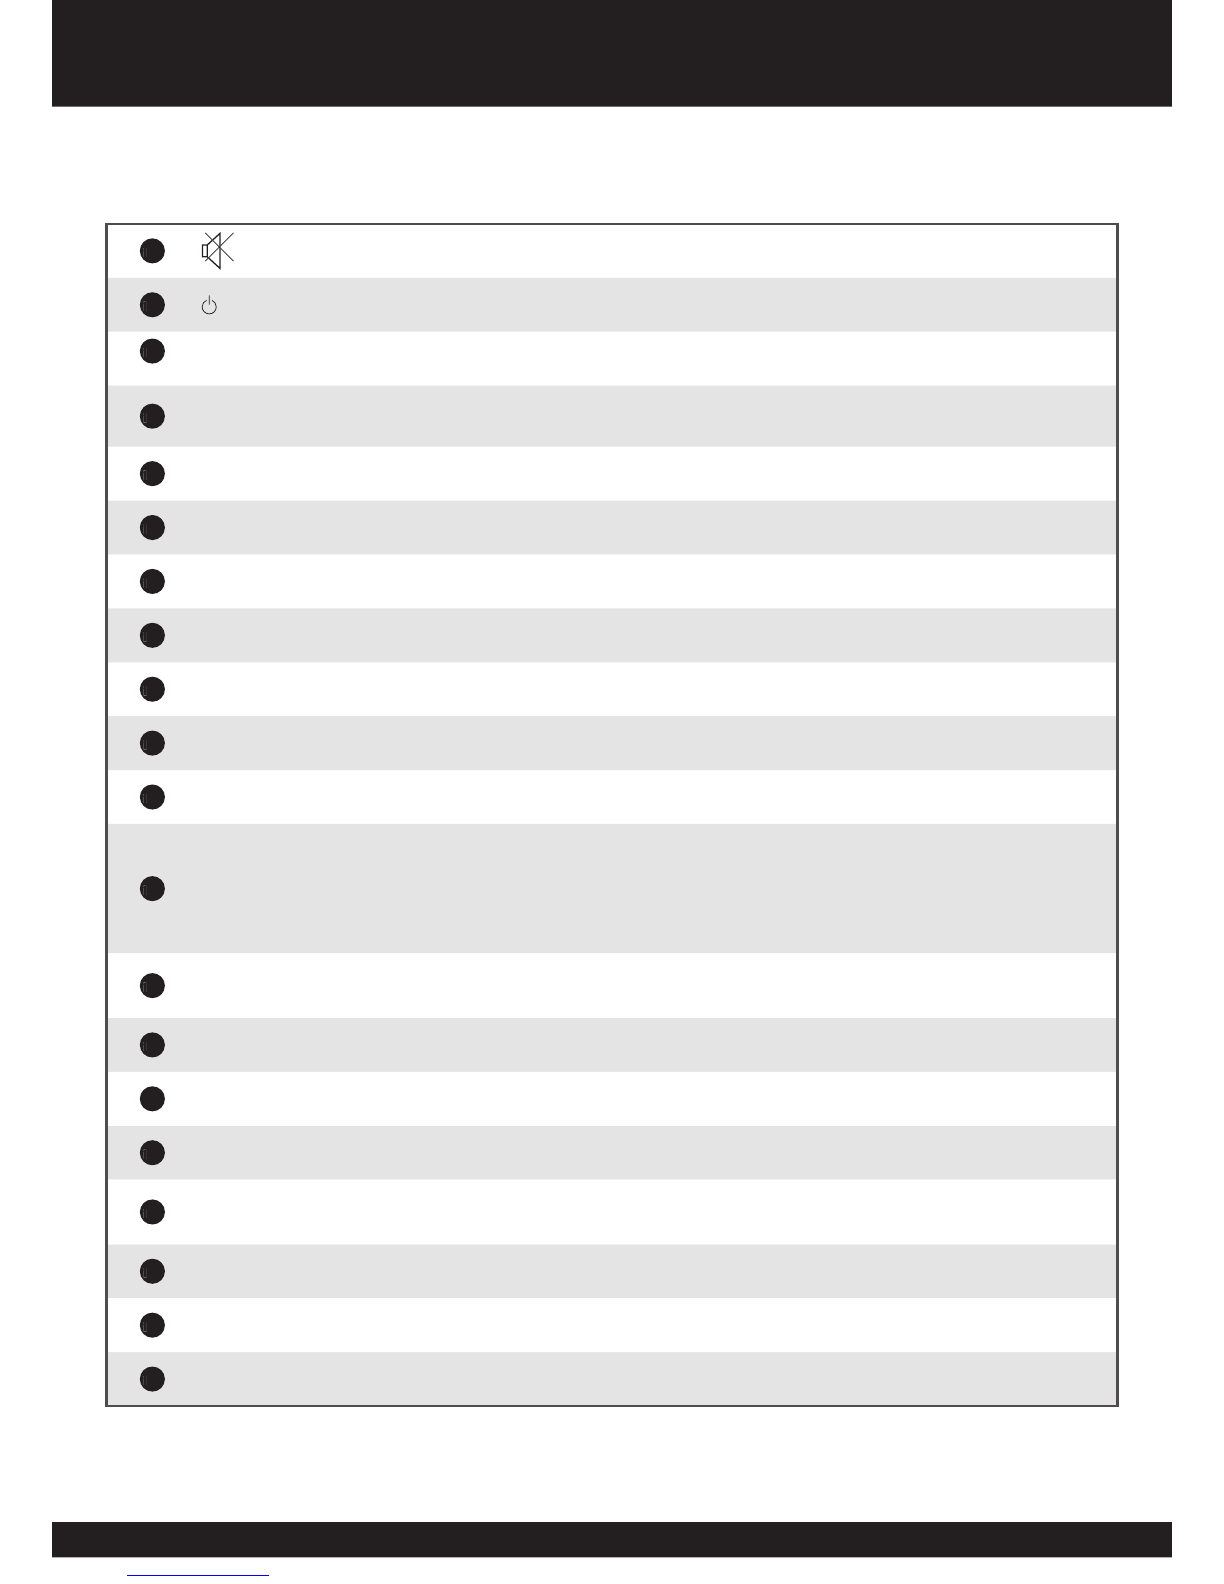
Remote Control
1
26
Turn the sound on / off (mute).
1
27
Standby. Puts the STB in or out of standby mode.
1
28
0 ~ 9
Change channels.
1
29
DSP
Displays program information banner. Pressing the button twice brings up the Electronic Program
Guide (EPG).
1
30
AUDIO
Allows selection of MPEG or AC3 audio.
1
31
TTX
Access on-screen teletext and subtitles.
1
32
MIX
Press to overlay subtitles on picture.
1
33
LIST
Displays main channel list.
1
34
EXIT
Exit from menu.
1
35
MENU
Displays the main menu.
1
36
ENTER
Confi rm selection of a highlighted item in the menu and to go to the next step.
1
37
PR+
PR-
1. Change channels up and down.
2. Navigate up and down the main menu, Channel list and EPG.
VOL+
VOL-
1. increase or decrease the volume.
2. Navigate left and right the main menu, Channel list and EPG.
1
38
PiP/VCR
1. Sends PiP signal to another device via the secondary RCA outputs.
2. Switches PiP signal inset into main display.
1
39
ASPECT
Adjust aspect ratio for widescreen (16:9) display or ‘Letterbox’ for a 4:3 TV.
40
ON/OFF
Turns PiP on and off.
1
41
PR+
Change the Picture in Picture channel up.
1
42
SWAP
1. Swap the Picture in Picture and Main display when in PiP mode.
2. Swap the secondary (VCR) output and Main display when in VCR mode.
1
43
POS
Position the Picture in Picture window within the Main display.
1
44
PR-
Change the Picture in Picture channel down.
1
45
LIST
Displays PiP channel list.

10
The Set Top Box (STB) only outputs one High Defi nition signal at a time. If you are choosing to use the High Defi ntion
(
1
18
1
19
1
20
1
22
) outputs, your Standard Defi nition outputs (
1
14
1
15
) are disabled.
The main Standard Defi nition output (
1
14
1
15
) is only available when the TV Format switch (
1
23
) is set to SD. The
secondary Standard Defi nition output (
1
11
1
12
1
13
) is available at all times provided the signal has been switched via the
remote control using the PIP/VCR button (
1
38
).
Connecting the Antenna
Please Note: If you would like to receive either
community television channels or original
analogue programming, you may use the RF output
signal to connect your VCR or TV receiver to it.
(This signal carries the same signal that is received
by the antenna and is not processed by the STB).
Connection Options
Connecting the Antenna
Connect the coaxial cable from the VHF/UHF Antenna to the RF IN
Connect the coaxial cable from the VHF/UHF Antenna to the RF IN
(
1
7
) socket on the rear panel of the STB.
TV Format switch
Having established the optimal display mode for
your device, move the selector switch (
1
23
) to the
appropriate resolution display mode.
Switch Setting
HD1
576p (720 x 576 progressive scan)
HD2
1080i (1920 x 1080 interlaced scan)
HD3
720p (1280 x 720 progressive scan)
SD
576i (720 x 576 interlaced scan)
The STB outputs four differents formats of TV signals and the TV Format Switch selects which format is sent to your
display. The table below shows the resolutions for each setting.
Please Note: The STB must be turned off and on
(
1
1
) each time you make a change to the output
setting via the switch.
11
11
11
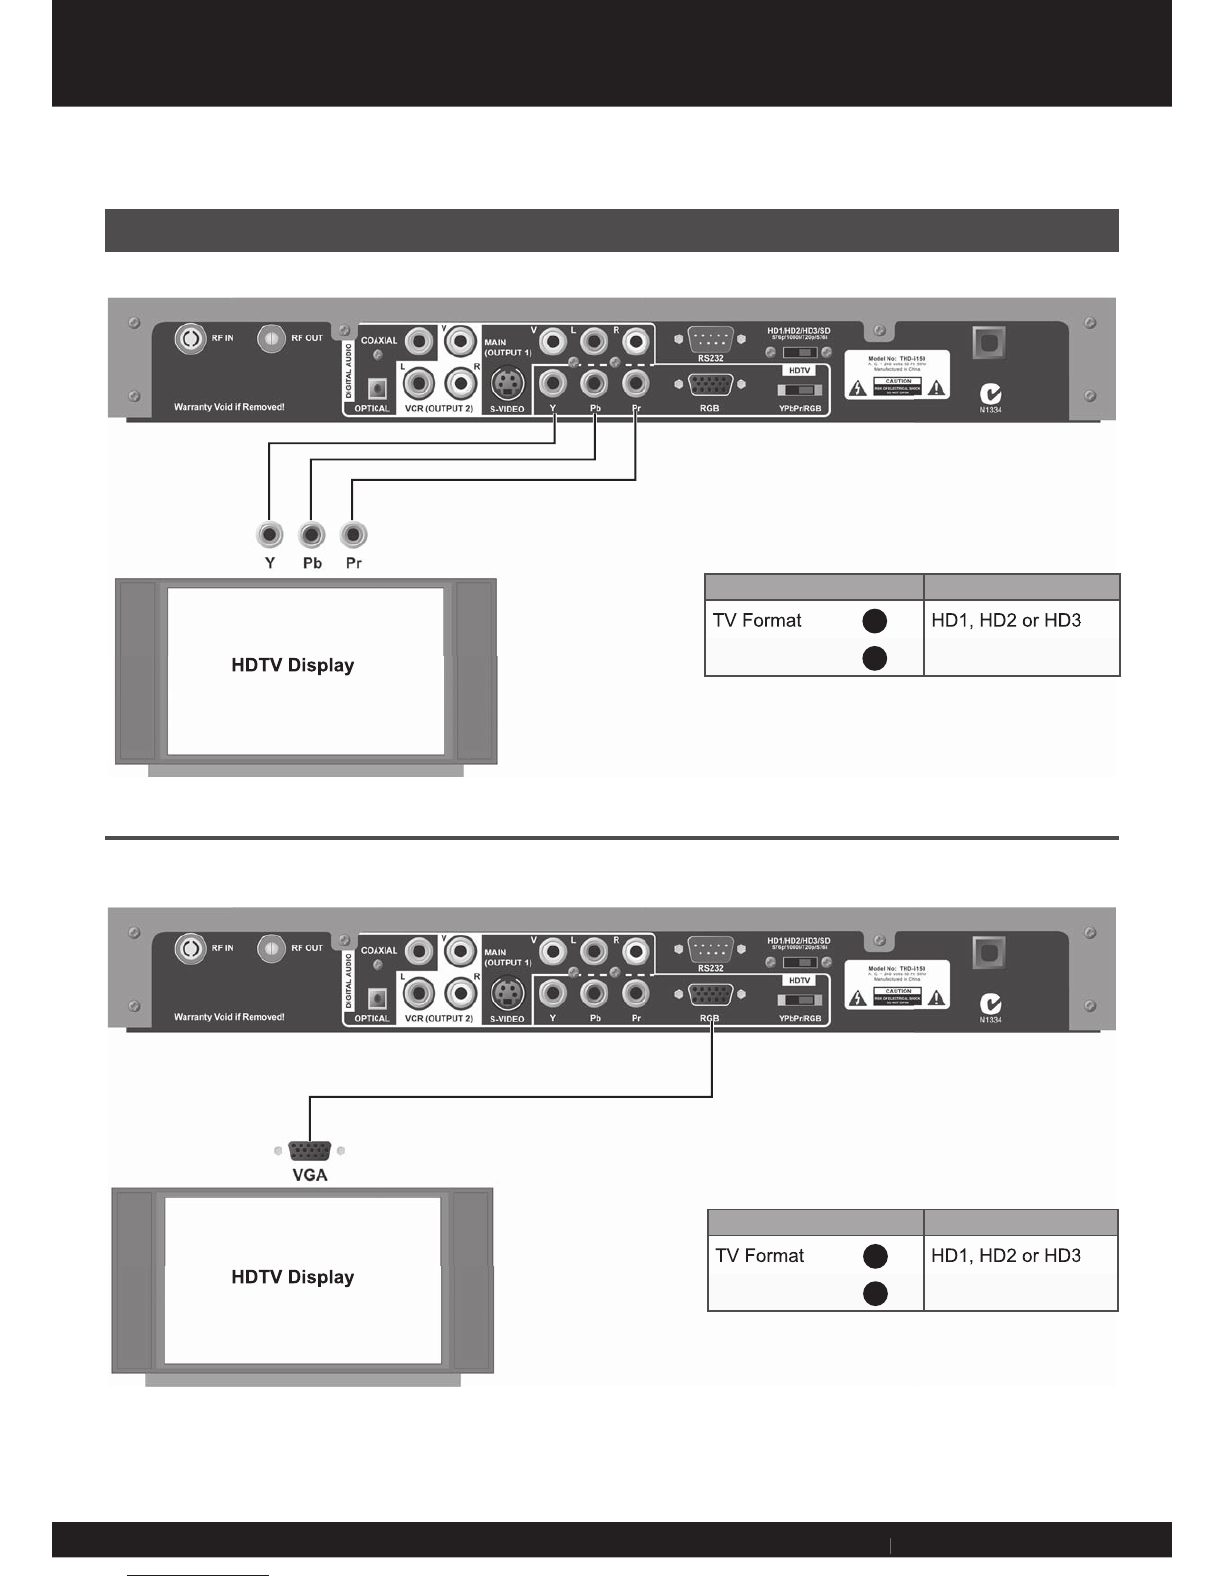
The following diagrams detail the most common ways of connecting the STB to your equipment.
Connecting to a High Defi nition Capable Display (Component & RGB)
HDTV Display
HDTV Display
Connection Options
Switch Setting
TV Format
23
HD1, HD2 or HD3
Output Type
24
YPbPr
Switch Setting
TV Format
23
HD1, HD2 or HD3
Output Type
24
RGB

12
Connecting to an Standard Defi nition TV (S-video & Composite)
Standard Defi nition TV
Standard Defi nition TV
Connection Options
Switch Setting
TV Format
23
SD
Output Type
24
Not Used
Switch Setting
TV Format
23
SD
Output Type
24
Not Used

13
13
13
Connecting to an Audio or AV Processor or Hi-Fi (Digital Audio & Left/Right)
Connection Options
14
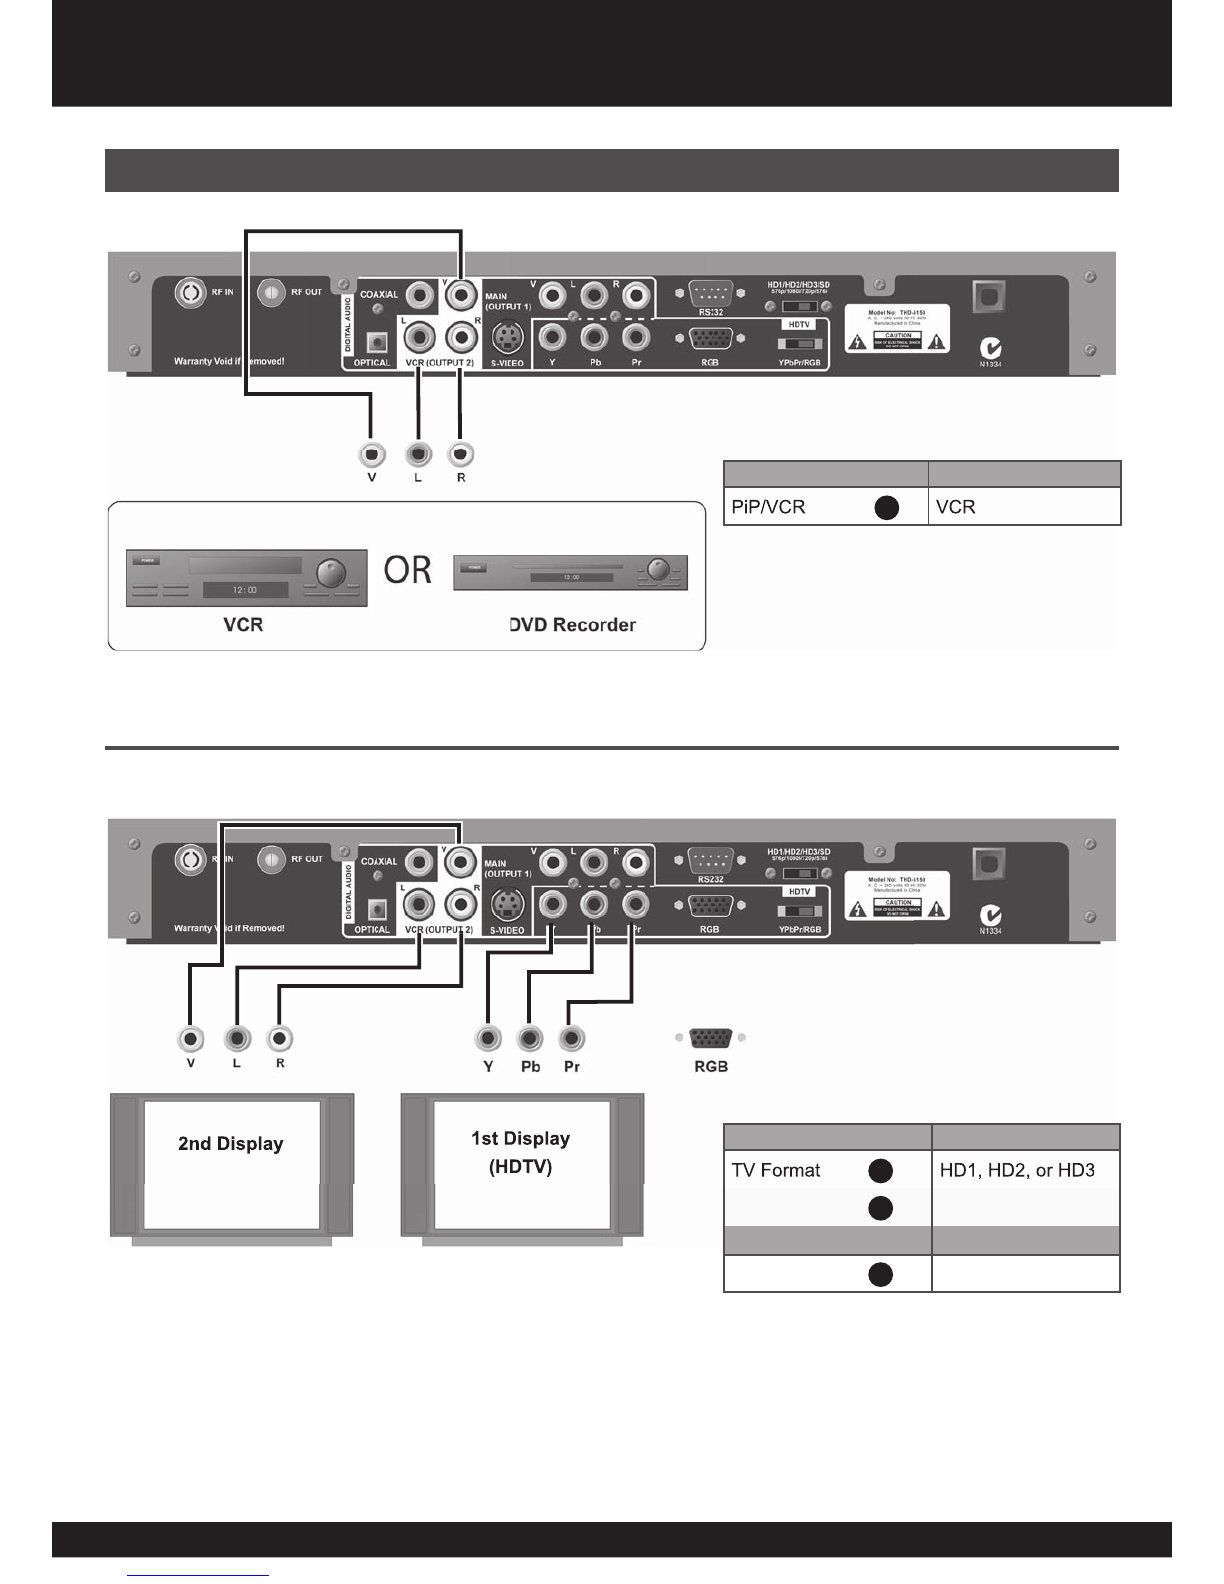
Connecting to a VCR or Secondary Display (Secondary Composite Outputs)
2nd Display
1st Display
(HDTV)
Connection Options
Remote Control Button Setting
PiP/VCR
38
VCR
Switch Setting
TV Format
23
HD1, HD2, or HD3
Output Type
24
YPbPr or RGB
Remote Control Button
PiP/VCR
38
VCR
15
15
15
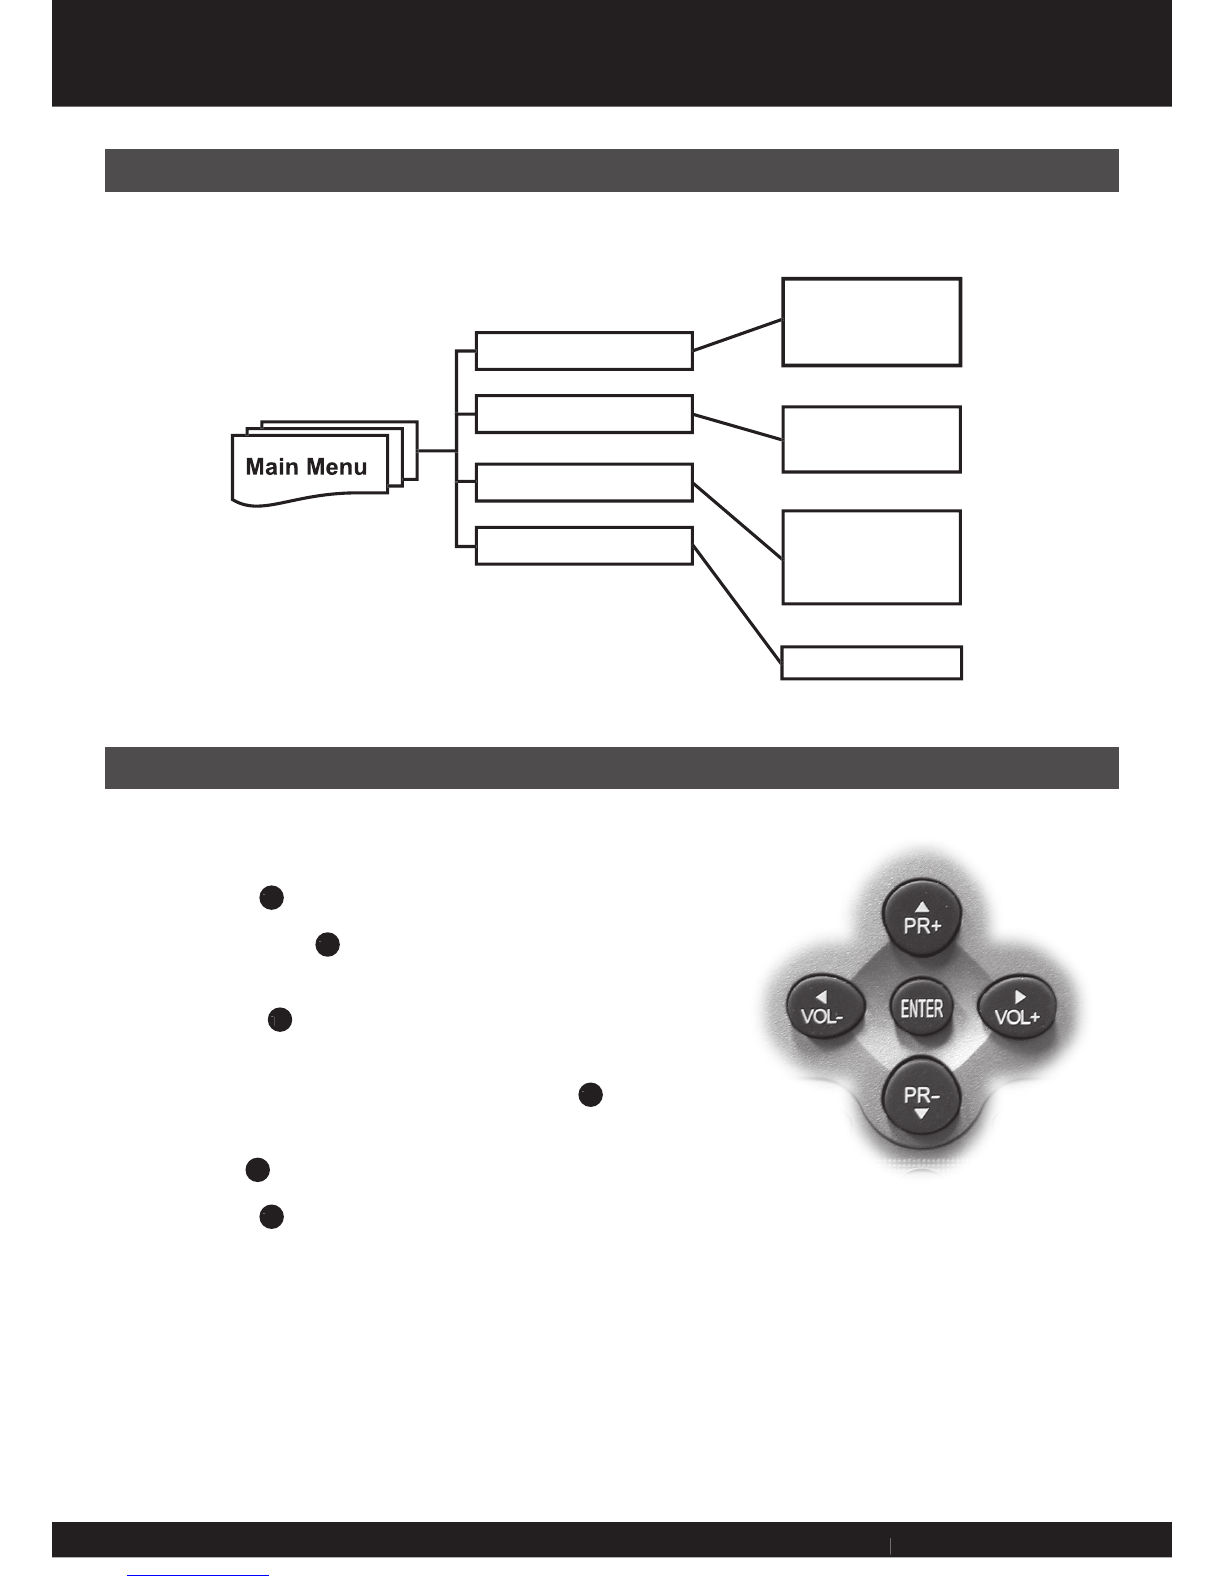
Menu Overview
Program
System
Password
Time
Quick Search
Auto Search
Manual Search
Default
Information
Rating Control
Password Setup
Clear Password
Time Zone
Main Menu
Navigation
Navigate the main menu using the remote control:
Press MENU (
1
35
) button to access the main menu.
Press PR+ and PR- (
1
37
) buttons to move the highlight upward or
downward.
Press ENTER (
1
36
) button to confi rm a selection or enter a sub-
menu.
Within a sub-menu, use PR+, PR- and VOL+, VOL- (
1
37
) to
navigate. Press ENTER to activate the selected menu item.
Press EXIT (
1
34
) button to return to the previous level menu.
Press MENU (
1
35
) button to exit the main menu and return to your
program.
1.
2.
3.
4.
5.
6.
16
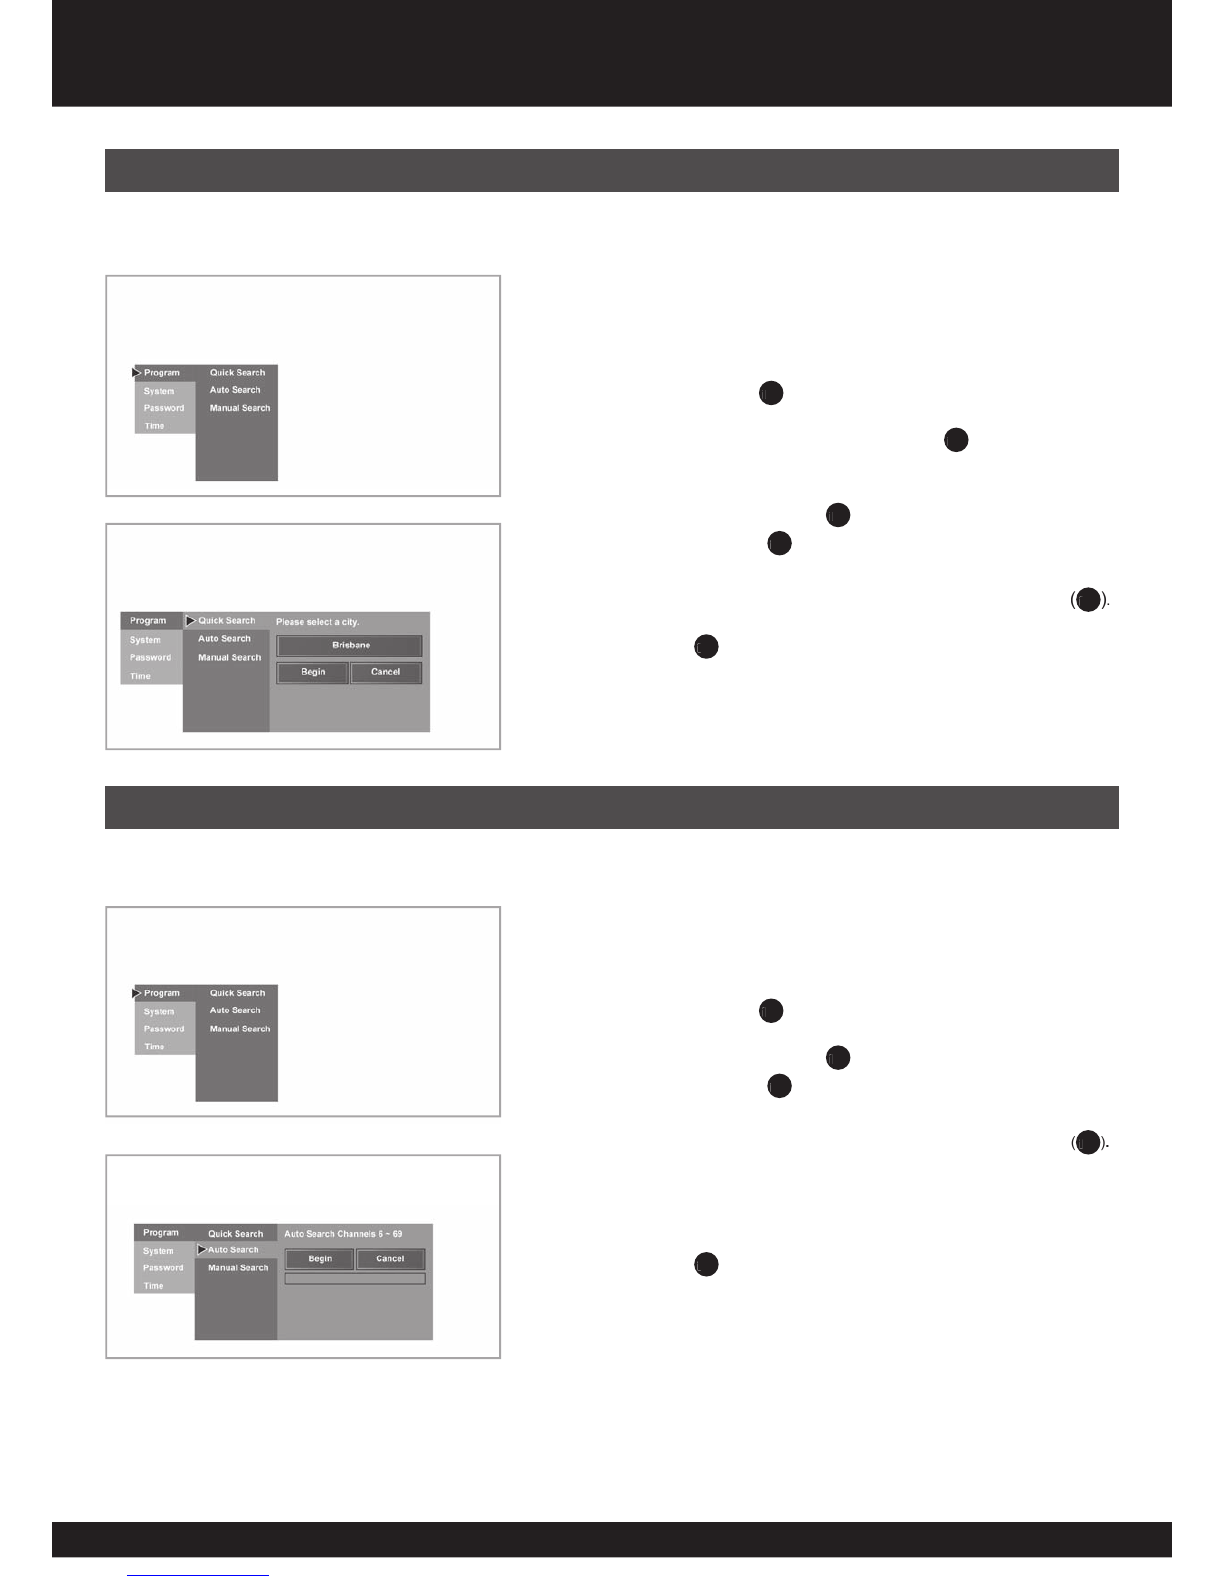
Auto Search scans for the digital channels available through the
antenna inputs, storing active channels in the channel list.
Navigate (page 15) to the ‘Program’ sub-menu and highlight ‘Auto
Search’. Press ENTER (
1
36
) to open ‘Auto Search’ sub-menu.
Use the PR+, PR-, VOL+, VOL- (
1
37
) buttons to move the highlight
to ‘Begin’. Press ENTER (
1
36
) to start searching.
To cancel searching after it has begun, select ‘Cancel’ and press ENTER
(
1
36
)
.
When the Auto Search is complete, the lowest channel number
discovered appears on the TV screen.
Press the Menu (
1
35
) button to return to your program.
1.
2.
3.
4.
Auto Search
Quick Search will confi gure the Set Top Box based upon stored values
for major metropolitan cities.
Navigate (page 15) to the ‘Program’ sub-menu and highlight ‘Quick
Search’. Press ENTER (
1
36
) to open ‘Quick Search’ sub-menu.
Highlight the fi rst menu bar and press ENTER (
1
36
) to scroll through
the list of cities available via Quick Search.
Use the PR+, PR-, VOL+, VOL- (
1
37
) buttons to move the highlight
to ‘Begin’. Press ENTER (
1
36
) to start searching.
To cancel searching after it has begun, select ‘Cancel’ and press ENTER
(
1
36
)
.
Press the Menu (
1
35
) button to return to your program.
1.
2.
3.
4.
Quick Search
Main Menu

17
17
17
Main Menu
If quick Search and Auto Search have failed Manual Search can be
used to manually enter the channel numbers and frequencies.
Navigate (page 15) to the ‘Program’ sub-menu and highlight
‘Manual Search’. Press ENTER (
1
36
) to open ‘Manual Search’ sub-
menu.
Highlight ‘Channel No.’ and press ENTER (
1
36
). Use VOL+/-
(
1
37
) buttons to move the cursor rightward or leftward and use PR+/-
(
1
37
) buttons to select number (or directly input the number by digit
buttons), then press ENTER (
1
36
) . Be sure you know the channel
number.
Use the PR+, PR-, VOL+, VOL- (
1
37
) buttons to move the highlight
to ‘Begin’. Press ENTER (
1
36
) to start searching.
To cancel searching after it has begun, select ‘Cancel’ and press ENTER
(
1
36
)
.
Press the Menu (
1
35
) button to return to your program.
Note: Normally it is unnecessary to input the frequency value. However, if you
want to input the frequency, you can highlight Frequency Then make use of
ENTER, PR+/-, VOL+/- button to input.
1.
2.
3.
4.
Manual Search
The Set Top Box can be reset to its original factory condition by
completing the following steps:
Navigate (page 15) to the ‘System’ sub-menu and highlight
‘Defaults’. Press ENTER (
1
36
) to open ‘Defaults’ sub-menu.
Highlight ‘Factory Defaults’ and press ENTER (
1
36
) to reset the Set
Top Box to factory defaults.
A dialogue box will appear to confi rm whether you really want to
restore factory settings. Select “Yes” to restore factory settings or
“No” to cancel the reset function.
Press the Menu (
1
35
) button to exit the main menu or navigate to the
‘Program’ sub-menu and search for digital channels.
Please Note: A factory defaults reset will wipe all of the channel information
from the Set Top Box. After a reset a Quick, Auto or Manual Search will need
to be completed to view available digital channels.
1.
2.
3.
4.
Restore Defaults

18
The information menu displays data about the model number, software
version and the address of the internet support site. This information
may be of use for diagnosing possible problems.
Navigate (page 15) to the ‘System’ sub-menu and highlight
‘Information’. Press ENTER (
1
36
) to open ‘Information’ sub-menu.
The system information (e.g. software version) is displayed.
Press the Menu (
1
35
) button to return to your program.
1.
2.
3.
Information
Rating Control blocks programs according to their classifi cation so that
children can not view certain programs. Parents can set the ratings limit
in the Ratings Control sub-menu.
Navigate (page 15) to the ‘Password’ sub-menu and highlight
‘Rating Control’. Press ENTER (
1
36
) to open ‘Rating Control’ sub-
menu.
If a system password has been set (see page 19) you will be
required to enter it now using the numeric (
1
28
) buttons. If the
correct password is provided the ‘Rating Control’ sub-menu will be
accessable.
Press PR+/- to move the highlight upward or downward and press
ENTER to either block or unblock a rating.
Use the ‘Block All’ setting to completely block all viewing. The menu can still be accessed to unblock all
programs.
Press the Menu (
1
35
) button to return to your program.
1.
2.
3.
4.
Rating Control
Main Menu

19
19
19
Main Menu
The Password Setup menu is used to set a new system password or to
change an existing system password. By default, no system password
is set. A password may be set if desired to prevent unintended
alterations to the system confi guration.
To set a new password:
Navigate (page 15) to the ‘Password’ sub-menu and highlight
‘Password Setup’. Press ENTER (
1
36
) to open ‘Password Setup’
sub-menu.
Use the numeric (
1
28
) buttons to enter a new four digit system
password. Confi rm the new password using the numeric buttons.
Press the Menu (
1
35
) button to return to your program.
To change an existing system password:
Navigate (page 13) to the ‘Password’ sub-menu and highlight ‘Password Setup’. Press ENTER (
1
36
) to open
‘Password Setup’ sub-menu.
Use the numeric (
1
28
) buttons to enter the old password.
Use the numeric (
1
28
) buttons to enter a new four digit system password. Confi rm the new password using the
numeric buttons.
Press the Menu (
1
35
) button to return to your program.
1.
2.
3.
1.
2.
3.
4.
To clear a system password complete the following steps:
Navigate (page 15) to the ‘Password’ sub-menu and highlight ‘Clear
Password’. Press ENTER (
1
36
) to open ‘Clear Password’ sub-
menu.
Use the numeric (
1
28
) buttons to enter the old password.
A dialogue box will ask ‘’Sure to clear password?’’.
Select Yes and press ENTER (
1
36
).
The system password is now cleared.
Press the Menu (
1
35
) button to return to your program.
1.
2.
3.
4.
5.
Clear Password
Password Setup

20
Navigate (page 15) to the ‘Time’ sub-menu and highlight ‘Select
Timezone’. Press ENTER (
1
36
) to open ‘Select Timezone’ sub-
menu.
Use PR+ PR- (
1
37
) buttons to highlight your state. Press ENTER
(
1
36
) to select the appropriate time zone.
Press the Menu (
1
35
) button to return to your program.
1.
2.
3.
Timezone
Main Menu
Table of contents
Other NextWave Digital TV Receiver manuals


