NexxTech 8032116 User manual
32-65” Curved TV Mount –
Full Motion
INSTALLATION GUIDE
8032116
• TVSizeRange:32"to 65"
• MaximumWeightCapacity:
45kg/99lbs
• Integratedcablemanagement
• VESA:
200mmx200mmto600mmx400mm
• DistancetotheWall:74mm–514mm
• Inclination:-2°–12°
Thisproductwasdesignedtobeinstalledonwoodstudwallsandsolidconcretewalls.
Beforeinstallingmakesurethesupportingsurfacewillsupportthecombinedloadofthe
equipmentandhardware.NeverexceedtheMaximumLoadCapacity.Thisproductis
intendedforindooruseonly.Useofthisproductoutdoorscouldleadtoproductfailureor
personalinjury.
CAUTION :

1
Hardware kit included:
I.D. QTY.DESCRIPTION
1 1 Wall plate
2 2 Plastic cover
3 1
TV plate
4 2
M8 Washer
5 2
M8 nut
6 4
M8 x 12 bolt
72
Bracket
8 1
Decorative cap
91
Magnetic removable
bubble level
10 1
M6 box wrench
11 1
M8 box wrench
12 1
5x5 allen key
I.D. QTY.DESCRIPTION
A1 4M4x25mm bolt
A2 4M5x25mm bolt
A3 4M6x25mm bolt
A4 4M8x25mm bolt
A5 4
Spacer
A6 4
Square washer
B1 6
Long bolt
B2 6
Wall anchor
B3 6
Long bolt washer

2
Usewallplate(1)asatemplate,ensureitislevel,andmarkfourmountingholes
onthewoodstuds.Drillfour5mm(3/16")diameterholes60mmdeep.Levelthe
wallplate(1)andsecuretothewallusingfourlongbolts(B1)andfourwashers(B3)
supplied.Tightenthescrewsrmly.Donotovertighten.
Part 1a - WoodStudMounting
60mm
5mm(3/16")
Woodstud
Magnetic,removable
bubblelevel
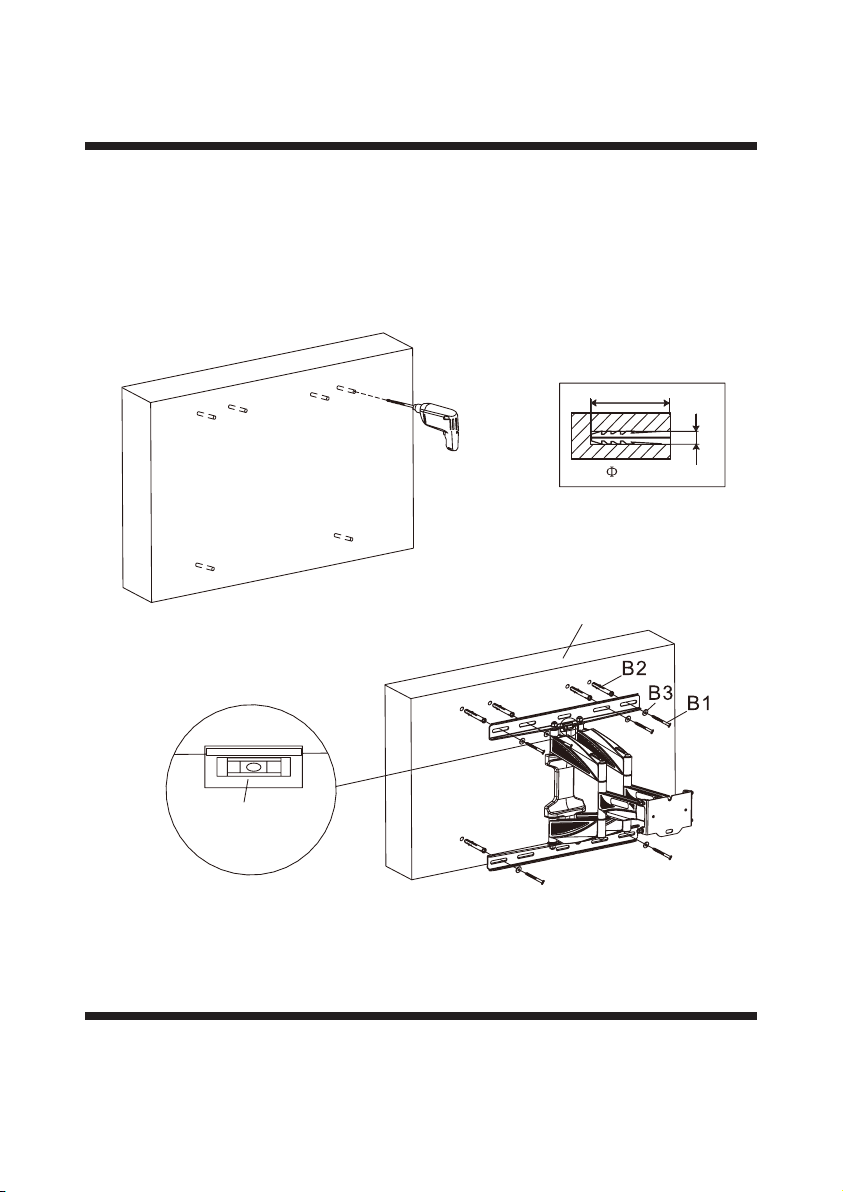
3
Withthewallplate(1)asatemplate,ensureitislevel,andmarkthesixmounting
holes.Drillsix10mm(3/8")diameterholes60mmdeep.Insertthesixanchors(B2)
intotheholesandsecurethewallplateusingthesixlongbolts(B1)andsixwashers
(B3)supplied.Tightenthescrewsrmly.Donotovertighten.
Part 1b - ConcreteWallMounting
60mm
10mm(3/8")
ConcreteWall
Magnetic,removable
bubblelevel
4
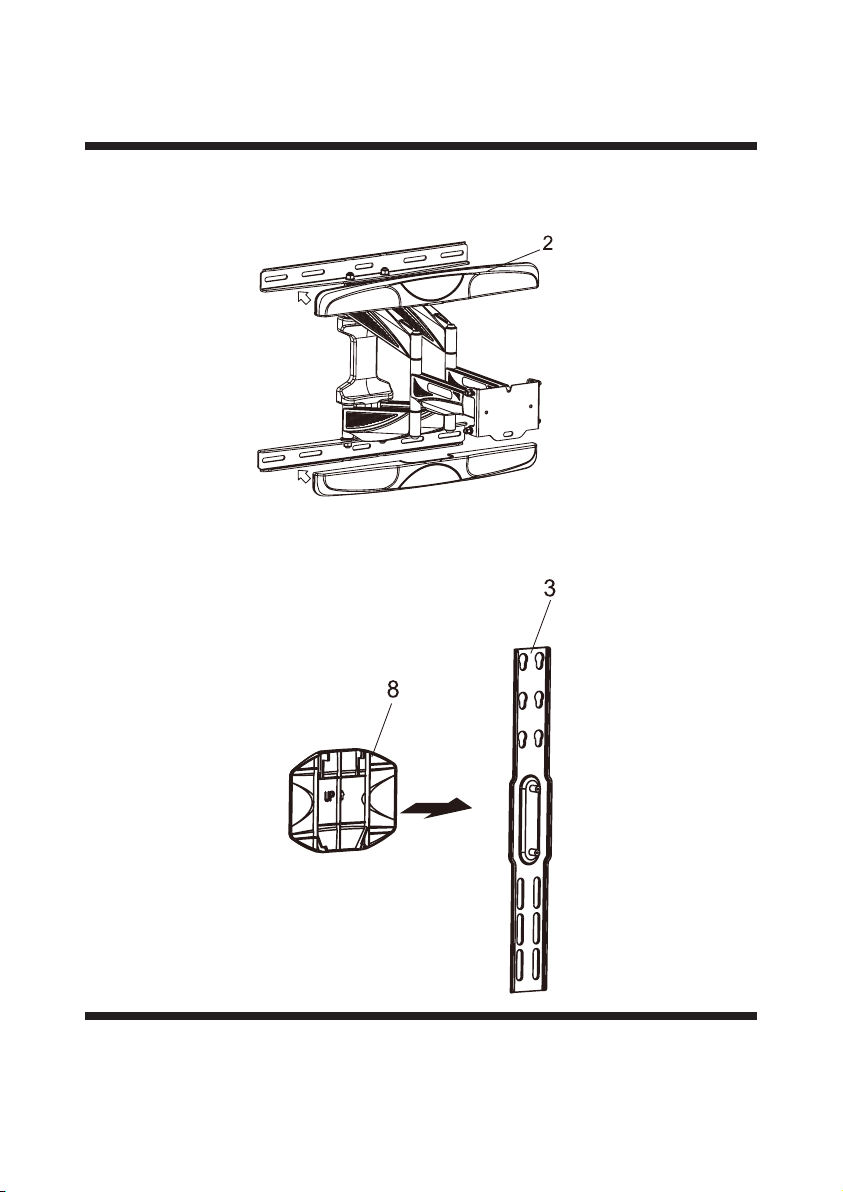
Secureplasticcovers(2)overwallplatebypushingthemtowardeachotheruntil
theylockinplace.
Part 2 - Attachingplasticcoverstowallplate
Part 3 - AttachingdecorativecaptoTVplate

5
AttachTVplate(3)tobrackets(7)usingfourbolts(6)atthetopandbottomofthe
TVplate.Useallenkey(12)totightenscrewsrmly.Donotovertighten.
Part 4 - AttachingTVplatetothebrackets

6
CenterbracketshorizontallyonthebackoftheTV.Selectthesmall(A1),medium
(A2orA3)orlarge(A4)screws.AttachbracketstotheTVusingfourselected
screws,foursquarewashers(A6)andfourspacers(A5)atthetopandbottomof
eachbracket.Tightenscrewsrmly.Donotovertighten.
Part 5 - AttachingbracketstoTV
Squarewasher(A6)
Largeholefor
M8screws
Mediumhole
forM5andM6
screws
Smallholefor
M4screws

7
BeforeattachingtheTVplatetothewallplate,tightenthetopscrewnutincasethe
TVslidesoffduringinstallation.
Tightenorloosenthescrewnutsontheheadofthewallplatetoadjustthetilting
function.Tightenorloosenthescrewnuts(M6)ontheheadofthewallplatetolevel
theTV(±3°).
Part 6 - HangtheTVontothewallplate

8
Routecordsalongarticulatingarmsusingcordmanagementclip.Articulatingarms
canbeadjustedtopositiondisplayintodesiredlocation.Useallenkey(12)totighten
andloosenthetensionscrew.Donotovertightenanddonotloosentothepointthe
screwscomeout.
Part 7 - Adjustingdisplayandusingcordmanagement
Cable
Tensionscrew TV
Cablemanagementclip
Cableroutingaccesspoints
9
Please Recycle
Thisproductcontainssmallitemsthatcouldbeachokinghazardifswallowed.Keep
theseitemsawayfromyoungchildren!
1. Makesuretheseinstructionsarereadandcompletelyunderstoodbeforeattempting
installation.Ifyouareunsureofanypartofthisinstallation,contactaprofessional
installerforassistance.
2. Thewallormountingsurfacemustbecapableofsupportingthecombinedweightof
themountandthedisplay;otherwisethestructuremustbereinforced.
3. Safetygearandpropertoolsmustbeused.Aminimumoftwopeoplearerequired
forthisinstallation.Failuretousesafetygearcanresultinpropertydamage,serious
injuryordeath.
WARNING
The Source warrants that this product will be free from defects in materials and workmanship for a
period of one (1) year from the date of purchase. Within this period, simply take the product and your
proof of purchase to any The Source store or participating dealer and the product will be replaced
(where available) without charge. Any product which has been subject to misuse or accidental damage is
excluded from this warranty.
This warranty is only applicable to a product purchased through The Source company-owned stores or
participating dealers in Canada where the warranty is included with the product. While this warranty
does not confer any legal rights other than those set out above, you may have additional statutory
rights which will vary under the laws of the various countries, states, provinces and other governmental
entities in which The Source operates. This warranty is subject to all statutory rights you may have in
Canada.
THE SOURCE – WARRANTY
©2015TheSource
Allrightsreserved.
Importedby:
TheSource,
Barrie,Ontario,Canada,L4M4W5
ManufacturedinChina
Forproductsupportpleasevisit
www.thesource.ca
Popular TV Mount manuals by other brands


Mounting Dream
Mounting Dream MD2501 Installation instruction

FONESTAR
FONESTAR STV-7384N instruction manual

Shakespeare Electronic
Shakespeare Electronic Style 408-R installation instructions

Crestron
Crestron UC-BRKT-150-ASSY quick start

Panasonic
Panasonic TY-WK42PV3U Service manual

Velleman
Velleman WB051 installation manual