NGM Voyager User instructions

Seng up
Installing the SIM card
The SIM card stores informaons as your personal phone number, PIN code,
carrier services numbers, contacts and other important details.
Both SIM cards must be inserted in the slots placed on the back side of the
phone. In order to access this area, the phone must be powered o; loose
the screws rst, then remove the rear cover and the baery. SIM cards must
be inserted with the gold contacts facing down. See the diagram below:
Installing the Memory card
MicroSD card must be inserted, as for the SIM cards, in the back side of the
phone, aer powering o the phone and removing the baery. A dedicated
slot fort the memory card is placed beside SIM cards. Unlock the memory
card slot by pushing the metal harness toward the “Unlock” posion, then
open the harness and slide the memory card into the harness, with the gold
contacts facing down. Then close and lock the harness. See the diagram
below:

Charging the baery
Please charge completely the baery before starng to use the
device. Use the USB cable provided; the USB connector is placed on
the right side of the phone.
When baery is charging, an animated icon on screen will show the
charging progress. Once the progress bar is completed phone can be
disconnected from the grid.
The baery charging process involves the following three steps, that
must be run in correct order:
• connect the charger to the grid
• then, connect one end of the USB cable provided to the charger
• nally, connect the other end of the USB cable to the phone.
The USB cable can also connect to your computer via a USB
connecon, to transfer les as well as to charge the baery. Please
follow the same procedure also when charging from a PC: NEVER
connect the phone to a turned o computer, or to a boong
computer.
By following these basic rules, you will guarantee a longer operang
life to the baery.
Note: Use only the provided USB cable for recharging the device,
Charge the baery indoors in a dry and favourable environment.
It’s normal for the baery to get slightly warm during the charging
process. The baery will not reach the full capacity unl cycled
several mes.
Inserng the baery
Your device is provided with a lithium-ion baery and is designed to
be used exclusively with original NGM baeries and chargers. Baery
must be inserted from the backside of the phone. Align the baery
contacts with the phone connector inside the dedicated slot, and let
it slide down in posion. Once the baery is inserted, close the rear
cover by gently pushing it in posion. Please refer to the following
images:

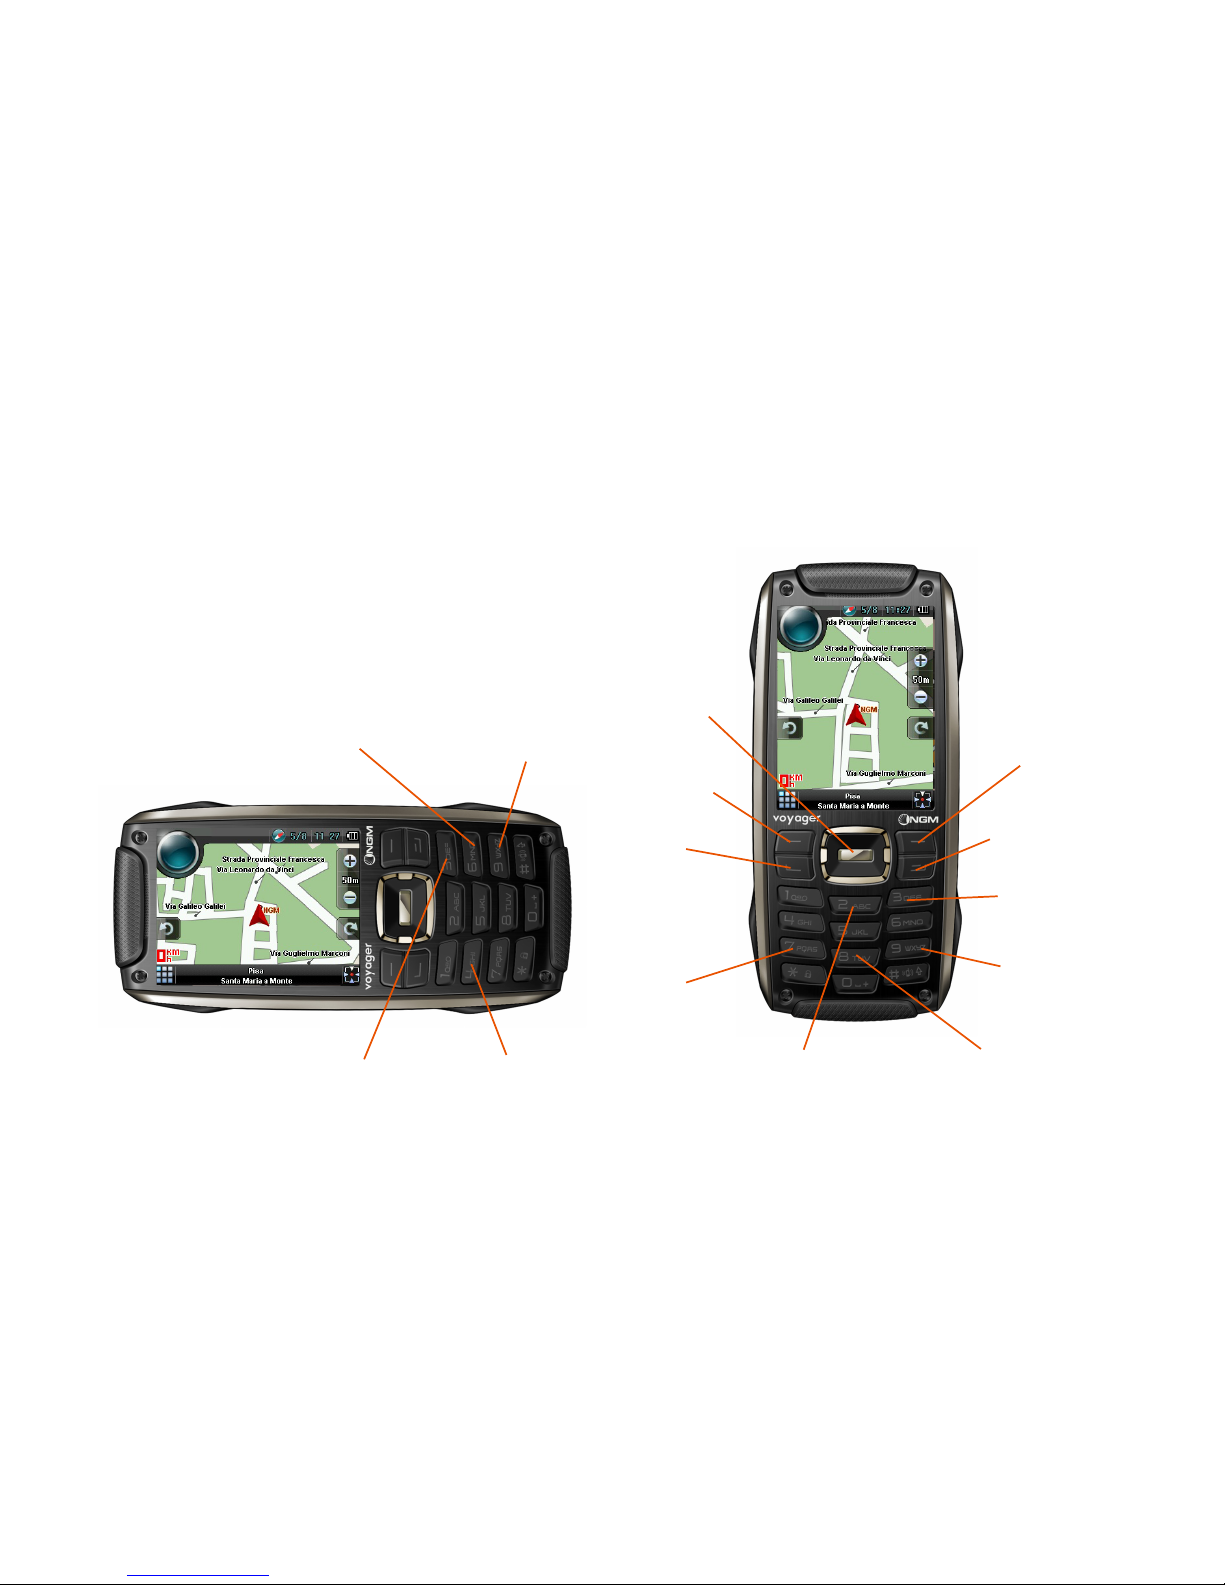
Main funcons
SIM1 CALL KEY
CAMERA SPEAKEREARPIECE
LCD
SIM2 CALL KEY
OK KEY
NAVIGATION
KEY
BACK KEY
END KEY
(POWER ON/OFF)
STANDARD
KEYBOARD
SUBSCREEN

FLASHLIGHT
BUTTON
MFD BUTTON
(subscreen)
Main screens
What you nd on main screen
NOTIFICATIONS BATTERYSIGNAL STRENGHT
MAIN MENU
CALLS PHONEBOOK
GPS BUTTON
USB
CONNECTOR
CAMERA
BUTTON
LED
FLASHLIGHT HAND STRAP HOLE
use the navigaon key (le/right) to visualize the screens sequenally
LED SIGNAL
LIGHTS

Main menu
What you nd on main menu
MENU 1 - PHONE MENU 2 - FUN

MENU 3 - SPORT
use the navigaon key (le/right) to visualize the screens sequenally (up/down) to visualize the screens sequenally

Making a call
Making a voice call
1. From main screen, digit the phone number using the virtual
number keyboard.
2. Select the SIM card to use for the call (SIM1 or SIM2 keys).
3. For closing the call, press the END key.
Managing contacts
Add a new contact
1. From PHONE menu, select the PHONEBOOK icon.
2. Select the opon Add new contact and choose which storage
locaon to use for saving the contact informaon (SIM or Phone)
3. Input the Contact’s Name and Number, and any other details
(details are available only if you save to Phone).
4. Conrm saving. If SIM card is selected as storage, one more step is
necessary to conrm to which SIM you want to save the contact.
Adding new contacts from Call list
1. From PHONE screen, press SIM1 or SIM2 call key to open the
corresponding CALL HISTORY.
2. Select the number to save (in All calls, Missed calls, Dialled calls or
Received calls).
3. Select Opons and then Save to Phonebook > Add new contact.
4. Conrm the saving.
Seng ringtones
Select a ringtone
1. From PHONE menu, , select USER PROFILES.
2. Select General, then select Custom > Tone setup > Incoming call
(SIM1 or SIM2).
3. Select the desired ringtone from the list, then press OK key.
4. It is possible to add a customized ringtone by selecng an empty
slot in the ringtones list and choosing Opons > Replace, then select
an audio le to be used as ringtone.
Note: It is possible to use les in .mid, .wav or .mp3 format. With the
same procedure is possible to customize the other proles in USER
PROFILES menu.
Answering a call
How to answer a call
1. When there is an incoming call, press OK key to answer.
2. To refuse a call, press END key.

Shortcuts and keyboard lock
Last call redial
1. From main screen (PHONE, FUN or SPORT) press the call key SIM1
or SIM2 to access the corresponding CALL HISTORY.
2. Select Dialled Calls.
2. Select a contact or number from the list and choose Call.
How to enable or disable vibraon
1. From main screen, hold the # key to switch to Vibraon prole,
turning o the ringtones.
2. By holding the # key again, the previous user prole will be
restored.
Locking the keyboard
1. From main screen, press and hold the main key (OK)for 3 seconds.
2. This will lock immediately the keyboard.
3. To unlock, briey press “Unlock” (SIM1 call key), and then the “* “
key.
SIM cards conguraon
Disabling one of the two SIM cards
1. From PHONE menu, select Sengs.
2. Select Dual SIM Sengs.
3. Select SIM1 or SIM2 and conrm.
Text input
T9 text input
T9 is a predicve text entry method; when wring SMS messages,
this method suggests the more oen used words. T9 mode is set by
default, and it is possible to customize the system integrated dicon-
ary by adding new words in it.
If you don’t want use T9 as default, you can disable the predicve text
system selecng Opons > Wring opons> Set T9 > O.
To change the text input mode, from MESSAGES > Write message
press repeatedly the text mode key (# ).

Sending and reading messages
Sending SMS and MMS
1. From PHONE menu, select Messages to directly access the
Write Message menu.
2. Insert text using the standard keyboard.
3. Once the message is ready, press OK key, then select to choose a
contact from Phonebook or input the number manually.
4. Select which of two SIMs will be used for sending out the message.
Sending Opons
1. From PHONE menu, select NGM Special funcons.
2. Select SMS delayed sending, then Edit in the list of scheduled
sendings.
3. Insert Date and Time for the scheduled sending (or just the Time
opon, in case the sending is scheduled within the current day), then
insert message text, receiver numbers, and SIM card used for send-
ing.
4. Select Save. The message will be saved in the Task List, and sent
out at scheduled me. Aer being sent, the message will be moved
to Outbox folder.
Web surng
Connecng to the Internet
From PHONE menu, select Opera Mini. Open the web browser
applicaon and access to the web sites, following the instrucons on
screen.
Note: please test your setup on before connecng, using Connecvity
> WAP > Sengs.
Sending Email
1. From PHONE menu, select Messages.
2. Select Email; check rst your account sengs in Email Account.
3. Select Write Email and insert one or more receivers (using To:, CC:
and CCN:).
4. Enter the text in the Subject eld.
5. Insert an eventual le aachment.
6. Once the message is completed, select Done and then Send to
send the message out, or Save as dra to send later.

How to use Bluetooth
Connecng to a Bluetooth device
1. Turn on the Bluetooth device to which you want to connect.
Where necessary, refer to the documentaon of the device..
2. From PHONE menu, select Bluetooth.
3. Acvate the Bluetooth state by choosing Status, and selecng On.
4. Select Device list > Search new device to start searching for
Bluetooth devices.
5. If you want to connect to a Bluetooth audio device (headphones,
car kits, etc.), select Search audio devices.
6. Select the name of the device to pair, then select Pair. The phone
will try to connect to the device, and asking for the pairing code.
NGM special funcons
Black List
White List
This feature allows you to set up a list of callers that are the only
ones to be allowed (either by voice call or SMS). When the funcon
is acvated, all the callers not included in the White List will hear the
tone of “congested line” (network error) and you will receive one
SMS from your operator nocatng you of the phone number of
the caller . Text messages from those callers will be automatcally
transferred to the Junkmail folder .. Get access to the White List
through NGM Special Funcons > Calls & SMS Firewall > SIM1 or
SIM2 > Calls or SMS.
Anonymous call rejecon
When acvated, incoming calls from anonymous users (hidden ID)
will automacally be rejected. Therefore, those callers will hear the
tone of “congested line”.
Get access to the funcon through NGM Special Funcons > Calls &
SMS Firewall > SIM1 or SIM2 > Calls > Sengs.
Rejecng unknown numbers
When acvated, incoming calls from phone numbers not previously
stored in the phone book (SIM contacts included) will automacally
be rejected. Therefore, those callers will hear the tone of “congested
line”. Get access to the funcon through NGM Special Funcons >
Calls & SMS Firewall > SIM1 or SIM2 > Calls > Sengs.
This opon allows you to set up a list of phone numbers (contacts)
you want to be blocked (either by voice call or SMS). If the funcon
is acvated, the black -listed caller will hear the tone of “congested
line” (network error) and you will receive one SMS from your
operator nocang you of the phone number of the black-listed
caller. Blacklisted text messages will be automacally transferred to
the Junkmail folder. Get access to the Black List through NGM Special
Funcons > Calls & SMS Firewall > SIM1 or SIM2 > Calls or SMS.

Phone Control
Phone Control is a funcon that has been designed to improve
mobile device users’ privacy and security. It is composed of three
applicaons (SIM binding, Remote Control and Track posion),
allowing user to manage security in dierent modes and with varying
levels of security strength. Get access to the funcon through NGM
Special funcons > Phone control.
Answering machine
The telephone answering machine is a device designed to record
audio messages directly on its local memory without connecng to a
server to listen the recordings, thus avoiding the relave charges.
Moreover, you can customize your answering machine message,
using the phone’s microphone. The answering machine will turn on
aer a preset number of rings, or can be operated manually as
answer opon. Get access to the funcon through NGM Special
funcons > Answering machine.
Background sounds
Background sounds help to recreate the realisc ambient sounds
during a parcular call (i.e. “plaorm” “airport”, “staon”,
“restaurant” and other user-recordable sounds). This opon can be
selected by default or can be set just in me when there is an
incoming call. Get access to the funcon through NGM Special
funcons > Background sounds.
Sending SMS with Time Shiing
This opon allows you to send a text message, scheduling later me
delivery. Please refer to Sending and reading messages - Sending
Opons for further details.
Coer
Coer is an hidden area, accessible only by entering a password,
where you can insert and manage your private contacts. The
contacts can be saved with their real names and real phone number,
and, simultaneously, with nicknames and fake numbers. When
receiving a call from a number inserted in this area,the phone will
show the nickname of the caller, and his/her fake number.If you
receive text messages, they will be reported in an unobtrusive
manner. All messages and calls made or received inside the Coer
will be saved only in this private area. This feature is not accessible
to third pares because, once you have changed the login password,
if someone tries to digit the default password “0000”will be
addressed to another “fake” coer area, absolutely empty.
Warning: this “fake” Coer area should not be used, because it
could lead to the loss of data.
GPS
Global Posioning System (GPS) is a global navigaon satellite system,
that provides locaon and me informaon anywhere on Earth.
When GPS is enabled, the phone starts to gather the available
satellite data and obtain its current locaon. If the AGPS (Assisted
GPS) opon is enabled, the phone can obtain help in determining
locaon through the GPRS network.
Just press the buon on the lower le side of the phone to quickly
access the GPS funcon.
Some funcons associated to the keys can vary depending on
whether the phone is horizontally or vercally oriented:
ZOOM OUT
ZOOM IN
POSITION
OPTIONS
MAIN MENU
CALLS EXIT
DISTANCE
REFERENCE
ROTATE RIGHT
ZOOM OUT
ZOOM IN
ROTATE LEFT
ROTATE
RIGHT
ROTATE LEFT

Barometer
Entering Barometer the screen will display the temperature (in
Celsius), pressure (in hectopascal), and altude (in meters) of your
current locaon.
Select Sengs (SIM 1 key) to enter the correct elevaon of your
locaon when using the funcon for the rst me.
UV Sensor
Entering UV Sensor, select Ultraviolet Measure (ultraviolet radiaon
from the sun), or Ultraviolet Explanaon to read some suggesons
on how to use this funcon.
Using a sensor located in the vicinity of the LED ashlight, the phone
can actually check the UV radiaon intensity and oer advice and
guidance for sun exposure from me to me.
Ecompass
Entering Ecompass, you should be requested to calibrate the device
rst: please follow the on-screen instrucons, then press the SIM
1 key to start the calibraon procedure. If calibraon completes
successfully, the compass pointer will align itself with Earth’s north
magnec pole, and you will be able to verify your current direcon of
travel or heading.
Pedometer
Entering Pedometer, select Start pedometer: the count will show a
gradual increase as you move along at a regular pace; your total steps
will be converted in meters (the calculaon is based on stride length,
that you can set to match your own). When using Pedometer, please
hold the phone in your hand, and make sure your arm swings during
natural walking. Use Set stride length opon to x your average stride
length when you walk (in cm.); you can also save the Pedometer data
and scan through them using the opon View history.
Sunrise and sunset
Entering Sunrise and sunset, the screen will display the me of
sunrise and sunset, based on current latude and longitude and the
me of year. Use Sengs opon to insert current date and posion.
The geographic locaon can be specied in three ways: selecng one
city from the list, using GPS (GPS Fix) to determine your locaon, or
manually inserng your coordinates (Custom).
During Daylight Saving Time period, set Solar me and then enable
this opon.
How to navigate to your desnaon
1. Open main menu and select Find > Find road. Select region,
province or town you want from the list of matching names; you’ll
be required to enter the street name (if the street name is unknown,
browse the proposed list of streets ans places).
Aer conrmaon, you’ll get the map with the cursor posioned on
target. Selecng Opons, you can choose Set as Desnaon.
2. Alternavely, you can move the cursor on the map unl the
desnaon required is displayed; then open Opons menu, and
choose Set as Desnaon. The system can calculate the route by
using three dierent methods (fastest / shortest / fastest avoiding
toll roads). Select the desired method.

Cercaons
Declaraon of Conformity (R&TTE)
We, NGM Italia
declare under our sole responsibility that the product idened as:
GSM Mobile Phone: Voyager
conforms to the following standards and specicaons:
Health EN 50360, EN 62209-1
Safety EN 60950-1+A11
EMC EN 301 489-1/-7/-17
Radio EN 301 511
EN 300 328
We declare that [all the series of fundamental radio test have been conducted and
that] the aforesaid product meets all the essenal requirements of the Direcve
1999/5/EC.
The conformity assessment procedure referred to in Arcle 10 and detailed in Annex
IV of Direcve 1999/5/EC has been followed with the involvement of the following
noed bodies:
EMCCert DR. RAŠEK GmbH
Stoernhofer Berg 15,
D-91364 Unterleinleiter, Germany
All technical documents conserved at NGM Italia S.r.l.
Available on request.
(UE Authorized Representave)
NGM Italia S.r.l.
Via L. Da Vinci, 7 – Poncelli
56020 Santa Maria a Monte (Pi)
S.A.R. (Specic Absorpon Rate)
SAR cercaon informaon (Specic Absorpon Rate)
This phone meets European Union (EU) requirements concerning exposure to radio
waves coming from telecommunicaon and radio devices. The exposure standard for
mobile phones employs a unit of measurement known as SAR (Specic Absorpon
Rate).
The SAR limit recommended by the EU Council is 2.0 W/kg averaged over ten grams
of body ssue.
The highest SAR value for this model phone when tested for use at the ear was 1,19
wa /kg. Although the SAR is determined at the highest cered power level, the
actual SAR of the phone while operang can be well below the maximum value. This
is becausethe phone is designed to operate at mulple power levels so as to use only
the power required to reach the network. In general, the closer you are to a base
staon, the lower the power output of the phone. The Declaraon of Conformity
here above provesthat the designated product is in compliance with the essenal
requirements and other relevant provisions of the R&TTE - Direcve (European Radio
& Terminal Telecommunicaons Equipment)1999/5/EC.

Table of contents
Other NGM Cell Phone manuals


