NGM You Color E501 User manual


Deutsch - Kurzanleitung Dual SIM �������������� 4
English - Quick Guide Dual SIM ������������������ 9
Español - Guía Rápida Dual SIM ��������������� 14
Français - Guide Rapide Dual SIM������������� 19
Italiano - Guida Rapida Dual SIM�������������� 24

4DEUTSCH
Herzlich willkommen in der Welt von NGM Dual SIM. Mit
Ihrem neuen NGM E501 YouColor Smartphone genießen
Sie den Komfort des Dual SIM, dank dem Sie zwei SIM
Karten und somit zwei Telefonnummern mit einem
einzigen Gerät verwalten können. Entdecken Sie nützliche
Funktionen wie die Einstellung der SIM-Karte für Anrufe,
Nachrichten und Datenverbindung und die Möglichkeit,
die Datenverbindung und automatisch das 3G von einer
SIM-Karte auf die andere schnell zu verschieben ohne sie physisch austauschen
zu müssen. Jederzeit können Sie Klingeltöne und Benachrichtigungen für jede
SIM separat verwalten, als ob Sie zwei Geräte hätten.
Copyright © 2015 NGM Italia
Kein Teil dieser Anleitung darf reproduziert, verbreitet, übersetzt oder übermittelt werden, in
keinerlei Form und mit keinerlei elektronischen oder mechanischen Mitteln oder durch
Fotokopierung, Aufnahme oder Speicherung in Informations-
Archiven oder
Wied
erherstellungssystemen ohne vorherige schriftliche Genehmigung von NGM Italia
erhalten zu haben.
Bluetooth® ist ein kommerzieller Brand, in der ganzen Welt registriert von Bluetooth SIG,
Inc.
Wi-Fi® und das Wi-Fi Logo sind von Wi-Fi Alliance registrierte kommerzielle Brands.
5
DEUTSCH
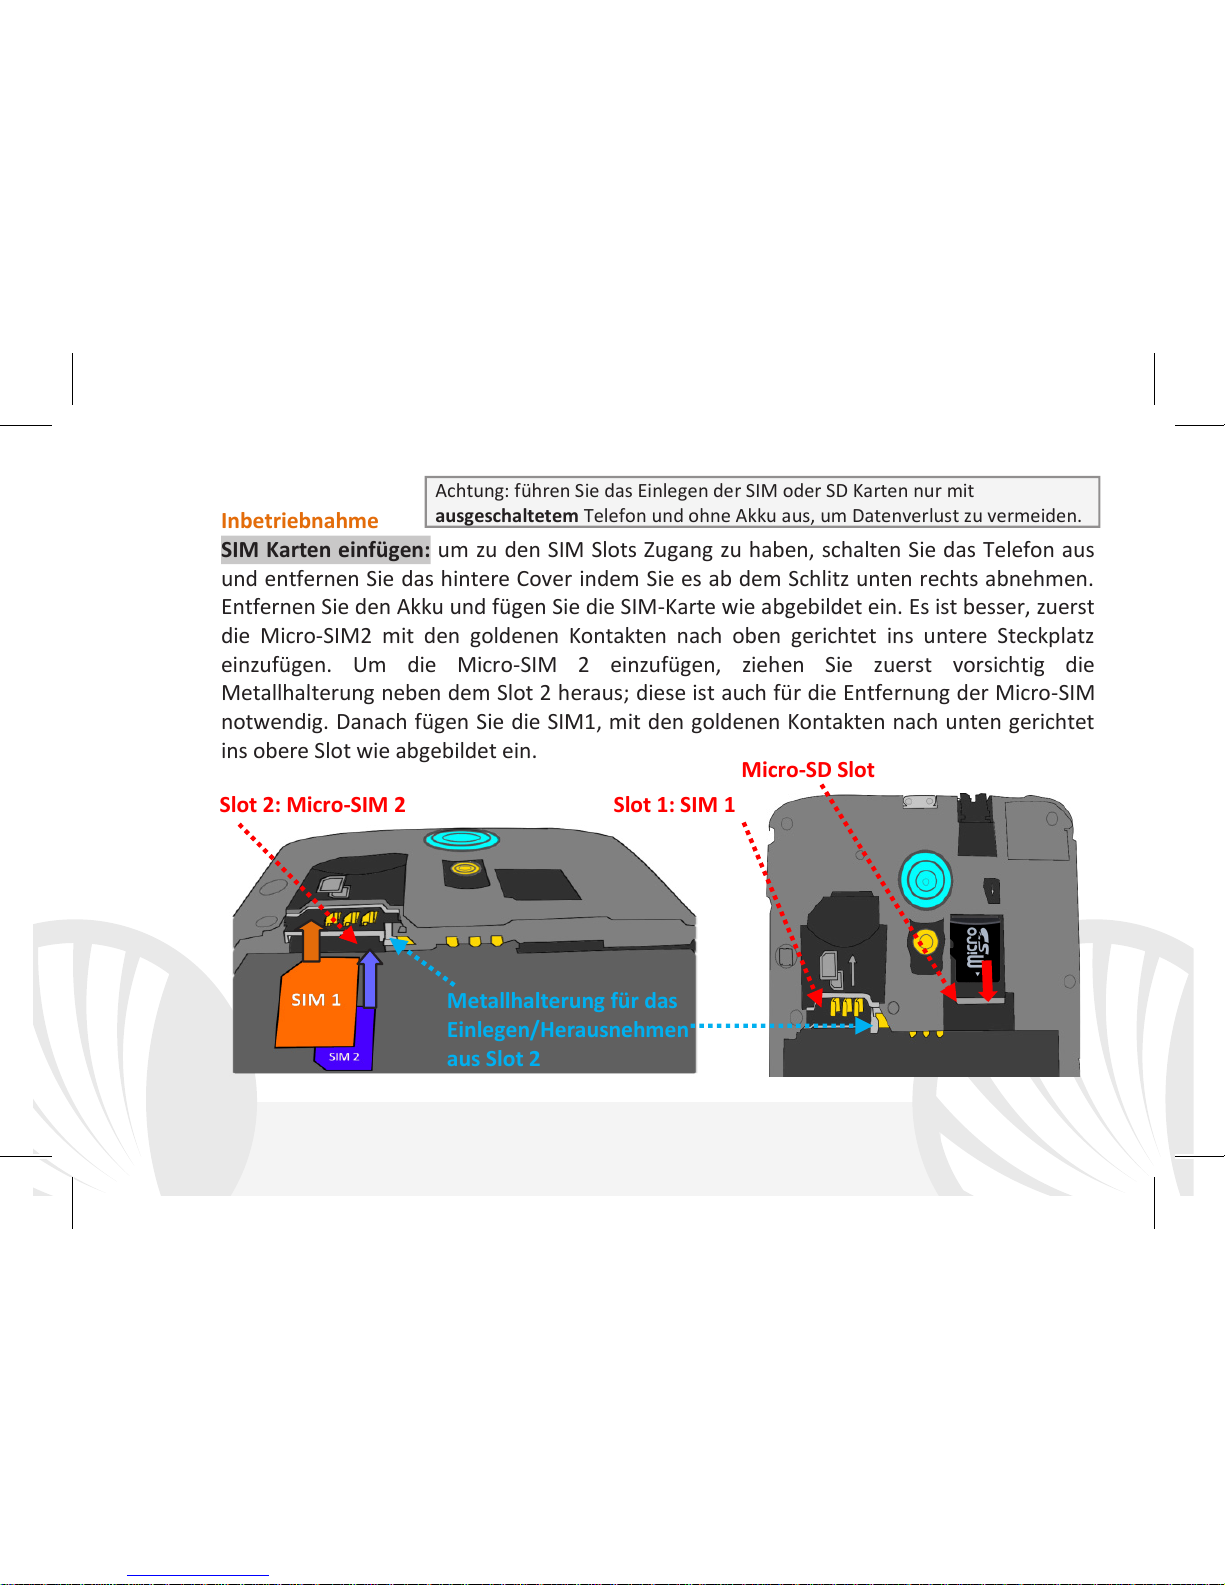
Inbetriebnahme
SIM Karten einfügen: um zu den SIM Slots Zugang zu haben, schalten Sie das Telefon aus
und entfernen Sie das hintere Cover indem Sie es ab dem Schlitz unten rechts abnehmen.
Entfernen Sie den Akku und fügen Sie die SIM-Karte wie abgebildet ein. Es ist besser, zuerst
die Micro-SIM2 mit den goldenen Kontakten nach oben gerichtet ins untere Steckplatz
einzufügen. Um die Micro-SIM 2 einzufügen, ziehen Sie zuerst vorsichtig die
Metallhalterung neben dem Slot 2 heraus; diese ist auch für die Entfernung der Micro-SIM
notwendig. Danach fügen Sie die SIM1, mit den goldenen Kontakten nach unten gerichtet
ins obere Slot wie abgebildet ein.
Achtung: führen Sie das Einlegen der SIM oder SD Karten nur mit
ausgeschaltetem Telefon und ohne Akku aus, um Datenverlust zu vermeiden.
Micro-SD Slot
Slot 1: SIM 1
Slot 2: Micro-SIM 2
Metallhalterung für das
Einlegen/Herausnehmen
aus Slot 2
6DEUTSCH
Doppelte SIM Verwaltung: aus dem Hauptmenü wählen Sie Einstellungen > SIM-
Verwaltung. Um in jedem Moment beliebig die SIM Karten zu aktivieren oder zu
deaktivieren, wählen Sie die Ein/Aus Schalter neben der gewünschten SIM Karte aus. Aus
diesem Menü aus können auch die Farbe und den Namen für jede SIM entscheiden, eine
der beiden als Standard für Anrufe, Nachrichten und Datenverbindung einstellen oder
"immer fragen" wenn Sie keine Standard SIM einstellen möchten. Wenn Sie eine SIM-Karte
für die Datenverbindung auswählen, wird automatisch das 3G-Service auf dieser SIM
aktiviert. So können Sie einfach die Datenverbindung (die normalerweise nur auf Slot SIM1
verfügbar ist) umschalten ohne physisch die SIM Karten austauschen zu müssen.
KLINGELTÖNE MIT DUAL-SIM EINSTELLEN
Mit dem Dual SIM-Management können Sie einen verschiedenen Klingelton für jede SIM-
Karte festlegen.
Aus dem Hauptmenü wählen Sie Einstellungen > Klingeltöne und Benachrichtigungen >
Allgemein.
Wählen Sie Sprachanruf Klingelton > SIM1 oder SIM2 und wählen Sie den gewünschten
Klingelton für jede SIM aus. Für benutzerdefinierte Klingeltöne: in Musik wählen Sie das
gewünschte Stück mit einem langen Tastendruck aus und wählen Sie Klingelton im
Kontextmenü. Das Musikstück wird danach unter den Klingeltönen verfügbar sein.

7
DEUTSCH
MIT DUAL-SIM ANRUFEN
Aus dem Hauptbildschirm wählen Sie das Telefon-Icon und geben Sie die gewünschte
Nummer mit der virtuellen Tastatur ein (öffnen Sie sie mit der Taste).
Drücken Sie auf das Telefon Symbol und dann auf die gewünschte SIM.
Um einen Anruf zu beenden, drücken Sie auf das rote Ende-Icon.
Um einen Anruf anzunehmen, wählen Sie die Antworten-Taste auf dem Bildschirm-
Popup das auf dem oberen Rand des Bildschirms erscheint oder tippen Sie auf dem
Popup um die Anruf-Anwendung anzuzeigen. Schieben Sie das mittlere Telefon-Symbol
nach rechts auf das blaue Telefon um zu antworten; um den Anruf abzulehnen schieben
Sie das Telefon-Symbol nach links auf das rote Telefon; um mit einer SMS Nachricht
abzulehnen schieben Sie das Telefon-Symbol nach oben. Um einen eingehenden Anruf
stumm zu stellen, drücken Sie kurz auf eine der Lautstärke “+” oder “–“ Tasten (auf der
rechten Seite des Telefons).
Eine Nummer aus den Anrufprotokollen zurückrufen
Aus dem Hauptmenü, öffnen Sie das Telefon-Menü und wählen Sie Telefon
Anrufprotokolle aus dem Kontextmenü aus (zuerst müssen Sie die virtuelle Tastatur
verstecken); Sie werden alle verpassten, angenommenen und ausgehenden Anrufe
finden.
Wählen Sie die gewünschte Nummer und die SIM mit der Sie anrufen möchten falls Sie
keine Standard SIM für Anrufe eingestellt haben und wählen Sie Rückruf.

8DEUTSCH
SMS und MMS mit dem Dual-SIM senden: aus dem Hauptmenü, wählen Sie Nachrichten
und dann das Icon oben. Geben Sie die ersten Buchstaben eines Namens ins
Empfängerfeld ein und wählen Sie aus der Popup-Liste direkt die Nummer des Empfängers
aus, oder wählen Sie das Symbol und markieren Sie den/die Empfänger. Geben Sie den
Text in das dedizierte Feld mit der virtuellen Tastatur ein. Wählen Sie das "+" Icon um
eventuelle Multimedia-Dateien einzufügen (die Nachricht wird automatisch in MMS
verwandelt) und wählen Sie und die gewünschte SIM.
Standard SIM für die Datenverbindung einstellen: zur besseren Nutzung des Telefon-
Potenzials und des Betriebssystems, müssen Sie über einer aktiven Datenverbindung
verfügen; die Datenverbindung von NGM YouColor E501 ist zum Zeitpunkt der ersten
Einschaltung auf dem Handy aktiv. Falls Ihr Telefonvertrag keine Datenverbindung vorsieht,
könnten zusätzliche Kosten auftreten; es ist daher ratsam eine WiFi Internetverbindung zu
konfigurieren. Um den Datenverkehr auf einer der SIM-Karten zu aktivieren, wählen Sie
Einstellungen > SIM Verwaltung > Datenverbindung und wählen Sie die SIM Karte für die
automatische 3G Verbindung aus;aktivieren Sie sie über die Abkürzung in der Hinweistafel.
Hinweis: die Formatierung und Ausgabe dieser Anleitung ist vom AndroidTM Betriebssystemen abhängig;
der Hersteller übernimmt keine Verantwortung für die Nicht-Einhaltung der angegebenen Richtlinien
oder den nicht ordnungsgemäßen Gebrauch des Mobiltelefons. NGM behält sich das Recht vor,
Änderungen am Inhalt dieser Bedienungsanleitung auch ohne öffentliche Bekanntgabe vorzunehmen.
Der Inhalt dieser Anleitung kann vom tatsächlichen, im Mobiltelefon angezeigten, Inhalt abweichen. In
diesem Fall gilt das, was im Mobiltelefon angezeigt ist.

9
ENGLISH
Welcome to the NGM AndroidTM Dual SIM world. With
your new smartphone NGM YouColor E501 you will enjoy
the convenience of Dual SIM, that is the ability to handle
two SIM cards and consequently two telephone numbers
with a single device. You will discover useful features such
as setting the preferred SIM for calls, messages and data
connection and the possibility to quickly move the data
connection, and automatically the 3G, from one SIM to
the other without physically having to exchange them. At any time you can
manage ringtones and notifications for each SIM card independently, exactly as if
you had two separate devices.
Copyright © 2015 NGM Italia
No part of this manual may be reproduced, distributed, translated, or transmitted in any form or by
any means, electronic or mechanical, including photocopying, recording, or storing in any
information storage and retrieval system, without the prior written permission of NGM Italia.
Bluetooth® is a registered trademark of the Bluetooth SIG, Inc. worldwide.
Wi-Fi® and the Wi-Fi logo are registered trademarks of the Wi-Fi Alliance.
10 ENGLISH
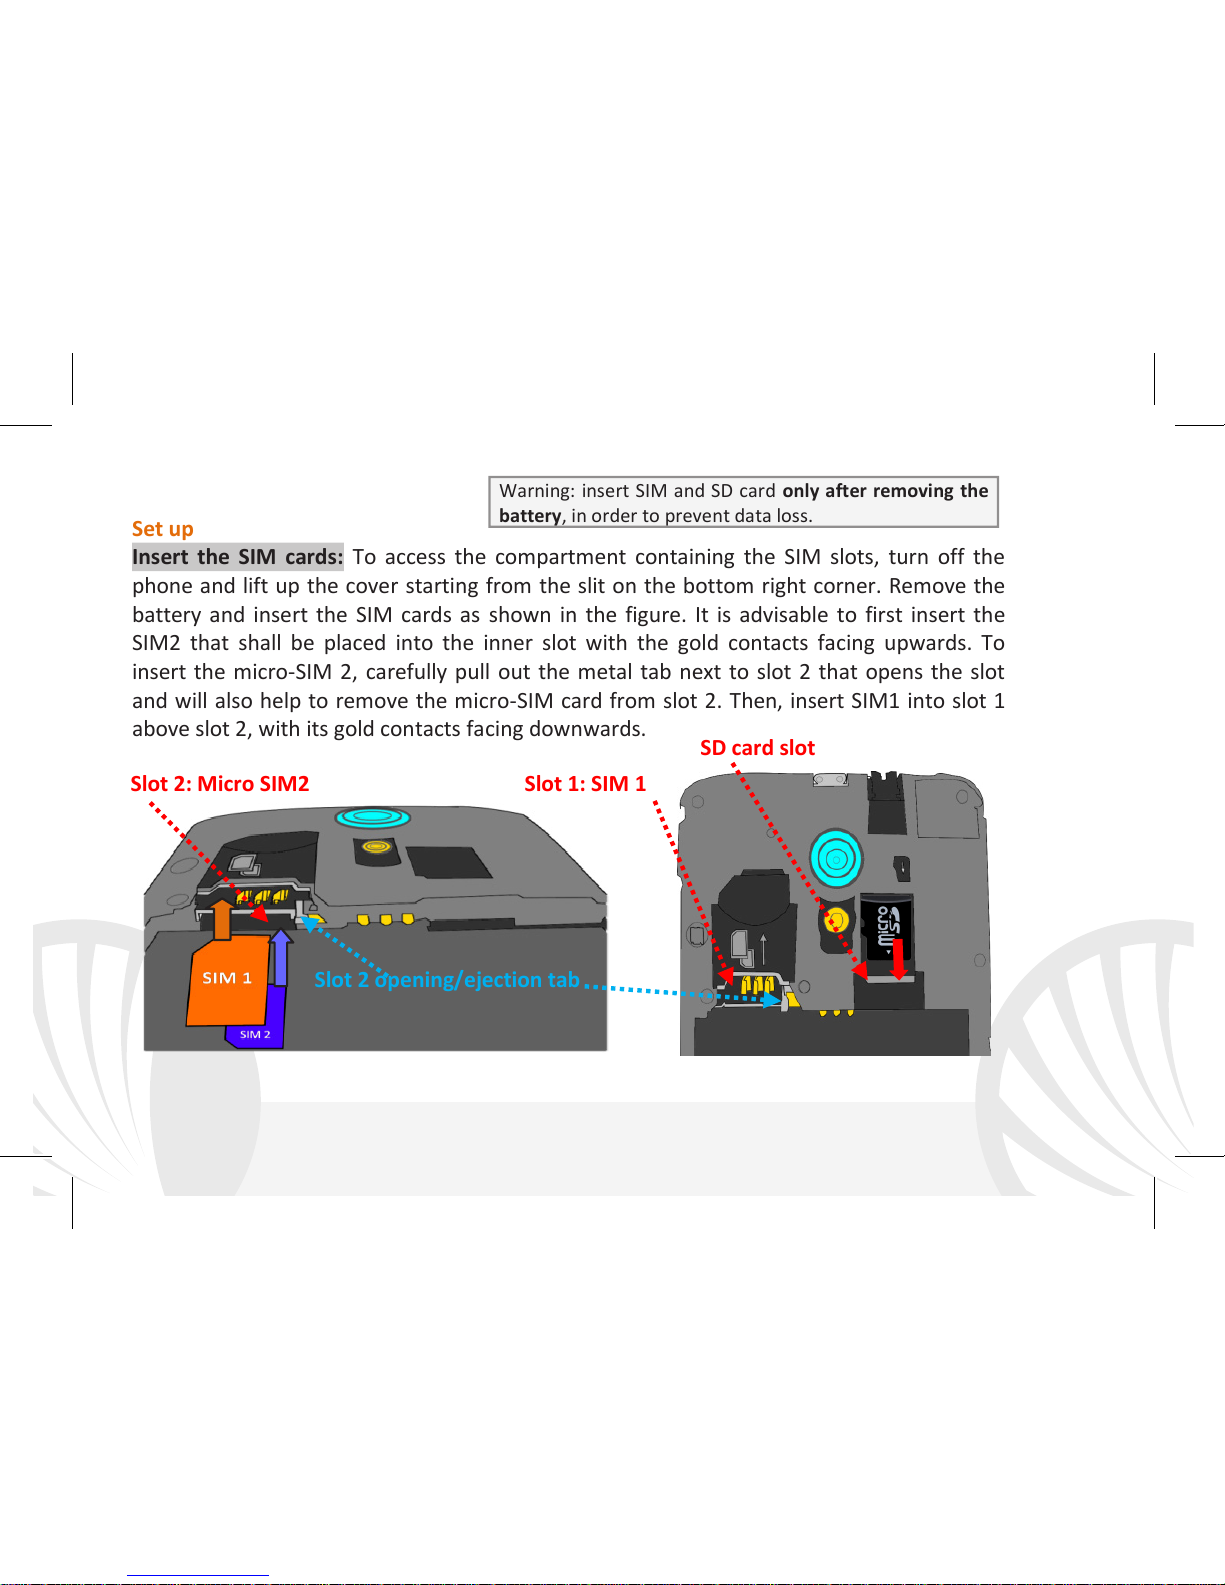
Set up
Insert the SIM cards: To access the compartment containing the SIM slots, turn off the
phone and lift up the cover starting from the slit on the bottom right corner. Remove the
battery and insert the SIM cards as shown in the figure. It is advisable to first insert the
SIM2 that shall be placed into the inner slot with the gold contacts facing upwards. To
insert the micro-SIM 2, carefully pull out the metal tab next to slot 2 that opens the slot
and will also help to remove the micro-SIM card from slot 2. Then, insert SIM1 into slot 1
above slot 2, with its gold contacts facing downwards.
Warning: insert SIM and SD card only after removing the
battery, in order to prevent data loss.
SD card slot
Slot 1: SIM 1
Slot 2: Micro SIM2
Slot 2 opening/ejection tab

11
ENGLISH
Managing the two SIM cards: from the main menu, select Settings > SIM Management.
Select the on/off keys next to the phone operators corresponding to "SIM1" and "SIM2" to
activate or deactivate selectively the SIM at any time. From this menu you can also
customize the color and name for each SIM icon and decide which SIM to use as default for
calls, messages and data connection or choose "always ask" if you don't want to set a SIM
card as default. By selecting a SIM for data connection, the 3G service will be automatically
activated on the same SIM. This allows you to move the 3G connection (normally available
on slot1 only) from one SIM to the other without physically exchanging them.
SET RINGTONES WITH DUAL SIM
The Dual SIM management allows you to set a different ringtone for each SIM.
From the main menu, select Settings > Sound and Notification > General.
Select Voice call ringtone > SIM1 or SIM2 and choose the desired ringtone for each SIM
card. If you want to set a custom ringtone: in Music, select the desired audio track and
choose Use as Ringtone in the contextual menu. The audio file will be added to the
available ringtones list.

12 ENGLISH
MANAGE CALLS WITH DUAL SIM
From the main screen touch the Phone icon; use the virtual keypad to enter the desired
phone number (select icon to display the virtual keypad)
Press the handset icon and choose the desired SIM to call with.
To end the call press the red end call key.
To answer a call, select Reply on the popup that appears at the top of the screen, or tap
the pop-up itself to display the call screen. Now drag the phone icon to the right onto the
blue handset to answer the call; to reject it, drag it to the left onto the red handset, to
reject with a message drag the phone icon upwards. To silence an incoming call, press
Volume "+" or "-" (on the right side of the phone).
Call a number from the call log
From the main menu, first select the Phone App and then select Call Log from the
contextual menu (hide the virtual keypad first); this will display the call logs with the
missed, received and outgoing calls.
Select the desired number and then Call back. In case no default SIM has been set
choose which SIM to call with.

13
ENGLISH
Send SMS and MMS with Dual SIM: from the main menu, choose Messaging and then the
icon on the top. Type the first letters of a name into the recipients field to search for a
contact and select it from the pop-up or directly enter the phone number; otherwise select
the icon next to the field and select the recipient(s) from the contacts. Write the text
into the dedicated space with the virtual keypad. Select the "+" icon to insert multimedia
files (the message will automatically be converted into MMS) and press key, selecting
the SIM you want to use.
Choose the preferred SIM for data connection: to better use the potentiality provided by
the device and its operating system, you must have an active data connection; data
connection of NGM YouColor E501 is active when you first power ON the phone. If it is not
included into your mobile phone plan, data traffic may cause you extra costs, so it is
recommended to configure an Internet connection via WiFi. To enable data traffic on one
of the SIM cards, select Settings > SIM Settings > Data connection, and choose the SIM on
which activate data connection and automatically the 3G service, then activate it from the
Quick Setup buttons in the notifications panel.
Warning: formatting and delivery of this user manual is based on the Android TM operating system
, NGM Italia will not bear responsibility for any incompliance with the above guidelines or
improper use of the mobile phone. NGM reserves the right to modify any of the content in this
user guide without previous public announcement. The content of this manual may vary from the
actual content displayed in the mobile phone. In that case, the latter shall govern.
14 ESPAÑOL
Bienvenido al mundo NGM Dual SIM.Con su nuevo
smartphone NGM YouColor E501 podrá disfrutar de toda
la comodidad del Dual SIM, es decir, la posibilidad de
gestionar dos SIMs y por lo tanto dos números de
teléfono con un único dispositivo. Descubrirá las
funciones útiles como la configuración de la SIM preferida
para las llamadas, mensajes y conexiones datos y la
posibilidad de cambiar la conexión datos, y
automáticamente el 3G, de una SIM a otra rápidamente sin tener que invertir
físicamente las dos tarjetas. En cualquier momento podrá gestionar melodías y
notificaciones por cada SIM independientemente, como si tuviera dos
dispositivos.
Copyright © 2015 NGM Italia
Ninguna parte de esta publicación puede ser reproducida, distribuida, traducida, transmitida en
cualquier forma o por cualquier medio, electrónico o mecánico, incluyendo fotocopia, grabación o
almacenamiento en cualquier sistema de almacenamiento de inform
ación o de recuperación de
información, sin el consentimiento previo por escrito de NGM Italia .
Bluetooth® es una marca comercial registrada en todo el mundo del Bluetooth SIG, Inc.
Wi-Fi® y el logo Wi-Fi son marcas comerciales registradas de Wi-Fi Alliance.

15
ESPAÑOL
Montaje
Introducir la tarjeta SIM: para acceder al compartimento de las tarjetas SIM, apagar el
teléfono y elevar la carcasa a partir de la ranura situada en la esquina inferior a la derecha.
Quitar la batería e introducir las tarjetas SIMs como se muestra en la figura. Se aconseja de
introducir primero la micro-SIM2 que se colocará en el slot interior con los contactos
dorados hacia arriba, después de haber quitado con cuidado la lengüeta de metal
adyacente al Slot 2. A continuación introducir la SIM1 en el slot situado encima del slot
SIM2, con los contactos dorados girados hacia abajo.
Atención: realizar todas las operaciones de introducción tarjetas SIMs y tarjeta de
memoria sólo después de haber quitado la batería para no provocar pérdidas de datos.
Slot micro SD
Slot 2: Micro-SIM 2
Slot 1: SIM 1
lengüeta
entrada/salida
Slot 2

16 ESPAÑOL
Gestionar las dos tarjetas SIMs: desde el menú principal, seleccionar Configuraciones >
Configuraciones Dual SIM. Seleccionar el interruptor al lado de los operadores telefónicos
correspondientes a “SIM1” y “SIM2” para activar o desactivar selectivamente las SIMs en
cualquier momento. Desde este menú se puede personalizar el color y nombre del icono de
cada SIM y decidir qué SIM usar como predefinida para llamadas, mensajes y conexión
datos, o eligiendo "preguntar siempre" si no se quiere configurar una SIM predefinida.
Seleccionando una SIM en donde activar los datos, se activará automáticamente también el
servicio 3G en la misma SIM. Esto permite cambiar fácilmente el 3G de una SIM a otra,
generalmente asignado al slot 1, sin invertir físicamente las tarjetas SIM.
CONFIGURAR LAS MELODÍAS CON EL DUAL SIM
La gestión del Dual SIM le permite configurar una melodía distinta para cada SIM.
Desde el menú principal, seleccionar primero Configuraciones > Sonar y notificaciones >
General.
Seleccionar Melodía Teléfono > SIM1 o SIM2 y elegir la melodía deseada para cada SIM. Si
se desea establecer una melodía personalizada: en Música seleccionar la pista de audio
deseada pulsando prolongadamente y seleccionar Usar como Melodía en el menú
contextual. El archivo audio será introducido en la lista de las melodías disponibles.
17
ESPAÑOL
CONFIGURAR LAS MELODÍAS CON EL DUAL SIM
Desde la pantalla principal, tocar el icono Teléfono; digitar el número telefónico a llamar
usando el teclado virtual (para visualizarla seleccionar el icono )
Pulsar el icono con el teléfono y luego la SIM deseada.
Para terminar, tocar el icono rojo de fin llamada.
Para responder a una llamada, seleccionar Responder en el popup que aparece en la
parte alta de la pantallla, o tocar el popup para visualizar la pantalla de llamada. Ahora
arrastrar el icono central hacia la derecha sobre el icono azul para responder; para
rechazar la llamada arrastrarlo hacia la izquierda sobre el icono rojo, para rechazarla
mediante un mensaje desplazar el icono hacia arriba. Para silenciar una llamada, tocar la
tecla Volumen “+” o “–“ (en el lado derecho del teléfono).
Llamar un número del registro llamadas
Desde el menú principal, entrar en el menú Teléfono y seleccionar Cronología llamadas
desde el menú contextual (primero esconder el teclado virtual); se visualizará el registro
llamadas con las llamadas perdidas, recibidas y realizadas.
Seleccionar el número deseado y luego Llamar. Elegir con qué SIM iniciar la llamada en el
caso en el que no se haya configurado una SIM predefinida.

18 ESPAÑOL
Inviar SMS y MMS con el Dual SIM: desde el menú principal, seleccionar Mensajes y luego
el icono en la parte superior. Digitar las primeras letras de un nombre en el campo
destinatario para encontrar un contacto y seleccionarlo desde la lista pop-up o introducir
directamente el número del destinatario, o seleccionar el icono y señalar el/los
destinatarios. Introducir el texto en su correspondiente espacio con el teclado virtual.
Seleccionar "+" para incluir adjuntos multimediales (el mensaje se convertirá en MMS) y
pulsar eligiendo la SIM deseada.
Elegir la SIM predefinida para la conexión datos: para utilizar mejor la potencialidad
ofrecida por el terminal y su sistema operativo, es necesario tener una conexión datos
activa; la conexión Datos de NGM You Color E501 se activa en el momento que se enciende
el teléfono la primera vez. Si no se ha realizado un contrato, el tráfico datos implicará
gastos, se recomienda, en este caso, configurar el acceso a Internet trámite WiFi. Para
habilitar el tráfico datos sobre una de las SIMs, seleccionar Configuraciones >
Configuraciones Dual SIM > Conexión de datos y elegir la SIM en donde activar la conexión
datos y en donde configurar automáticamente el 3G.
Atención: el formato y la entrega de este manual se basa en el sistema operativo AndroidTM; el
fabricante no asume ninguna responsabilidad por cualquier incumplimiento de las directrices
establecidas anteriormente o cualquier uso inapropiado del teléfono. El fabricante se reserva el
derecho de modificar sin previo aviso la información contenida en este manual. El contenido de
este manual podría cambiar con respecto al contenido mostrado por el teléfono. En tal caso,
prevalece el contenido mostrado por el teléfono.
19
FRANÇAIS
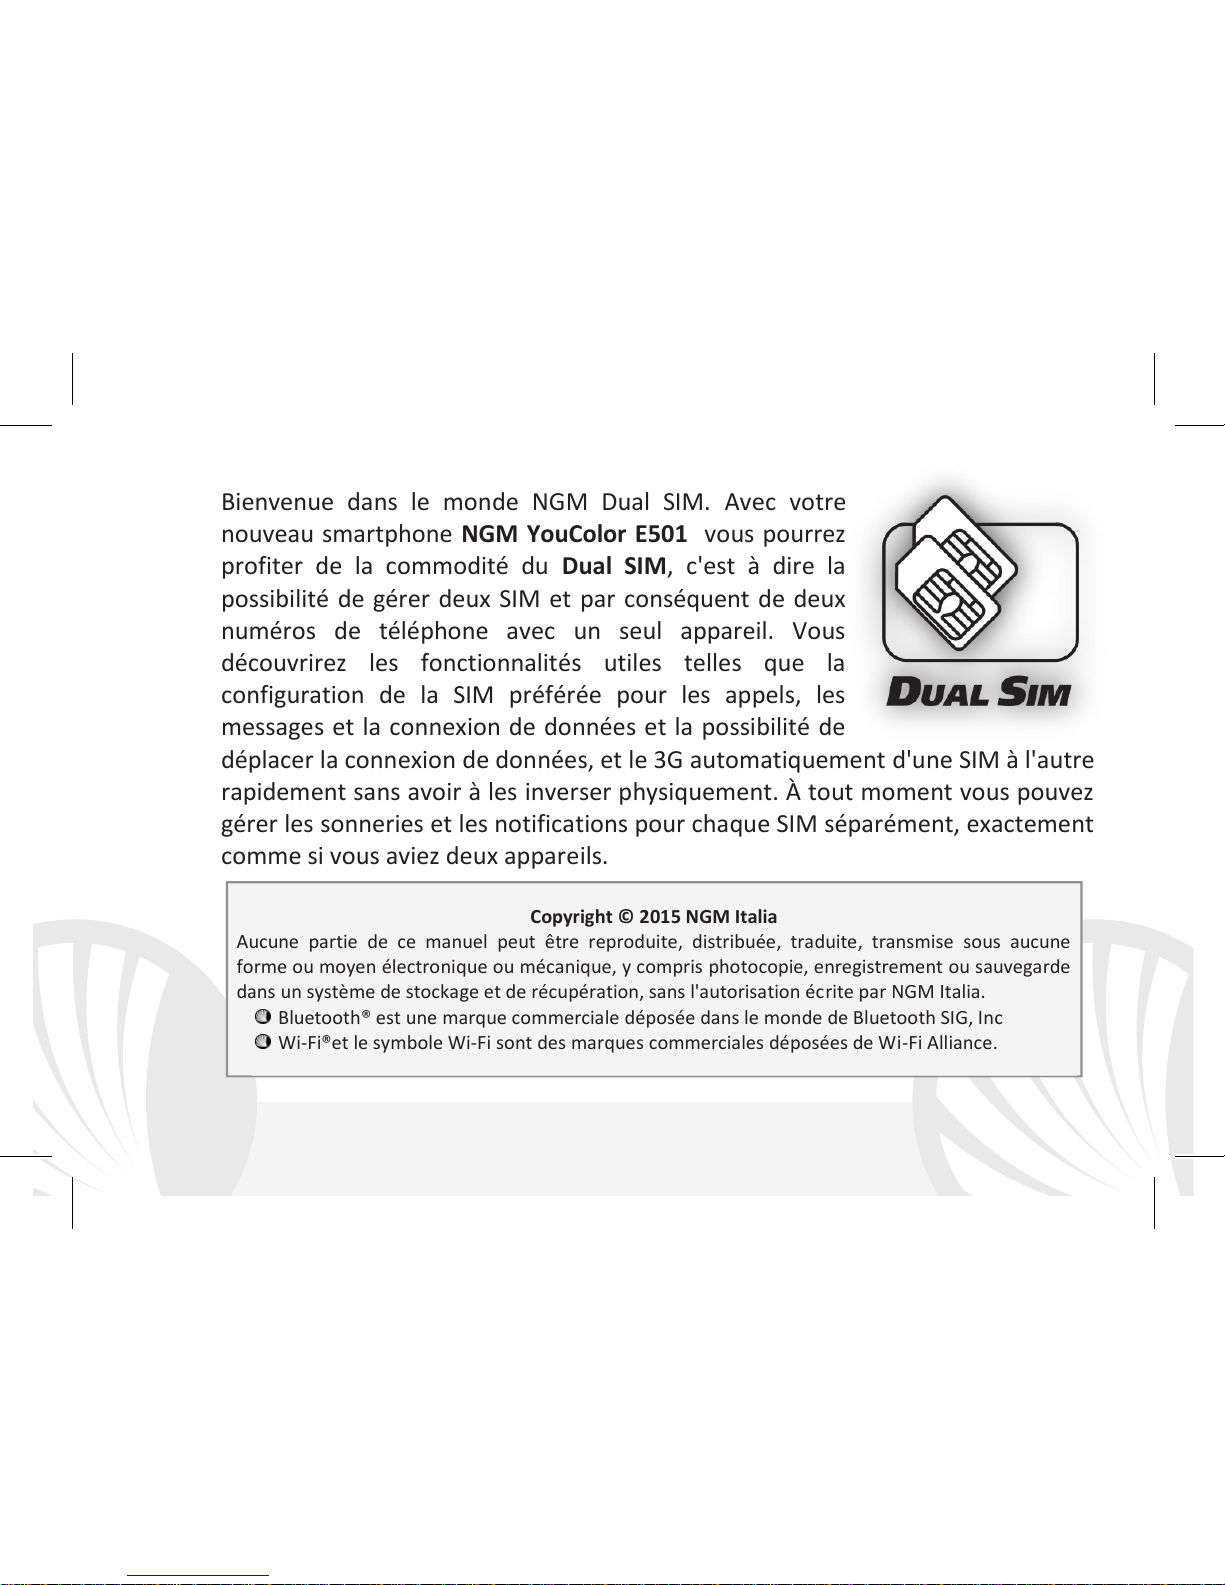
Bienvenue dans le monde NGM Dual SIM. Avec votre
nouveau smartphone NGM YouColor E501 vous pourrez
profiter de la commodité du Dual SIM, c'est à dire la
possibilité de gérer deux SIM et par conséquent de deux
numéros de téléphone avec un seul appareil. Vous
découvrirez les fonctionnalités utiles telles que la
configuration de la SIM préférée pour les appels, les
messages et la connexion de données et la possibilité de
déplacer la connexion de données, et le 3G automatiquement d'une SIM à l'autre
rapidement sans avoir à les inverser physiquement. À tout moment vous pouvez
gérer les sonneries et les notifications pour chaque SIM séparément, exactement
comme si vous aviez deux appareils.
Copyright © 2015 NGM Italia
Aucune partie de ce manuel peut être reproduite, distribuée, traduite, transmise sous aucune
forme ou moyen électronique ou mécanique, y compris photocopie, enregistrement ou sauvegarde
dans un système de stockage et de récupération, sans l'autorisation écrite par NGM Italia.
Bluetooth® est une marque commerciale déposée dans le monde de Bluetooth SIG, Inc
Wi-Fi®et le symbole Wi-Fi sont des marques commerciales déposées de Wi-Fi Alliance.
20 FRANÇAIS
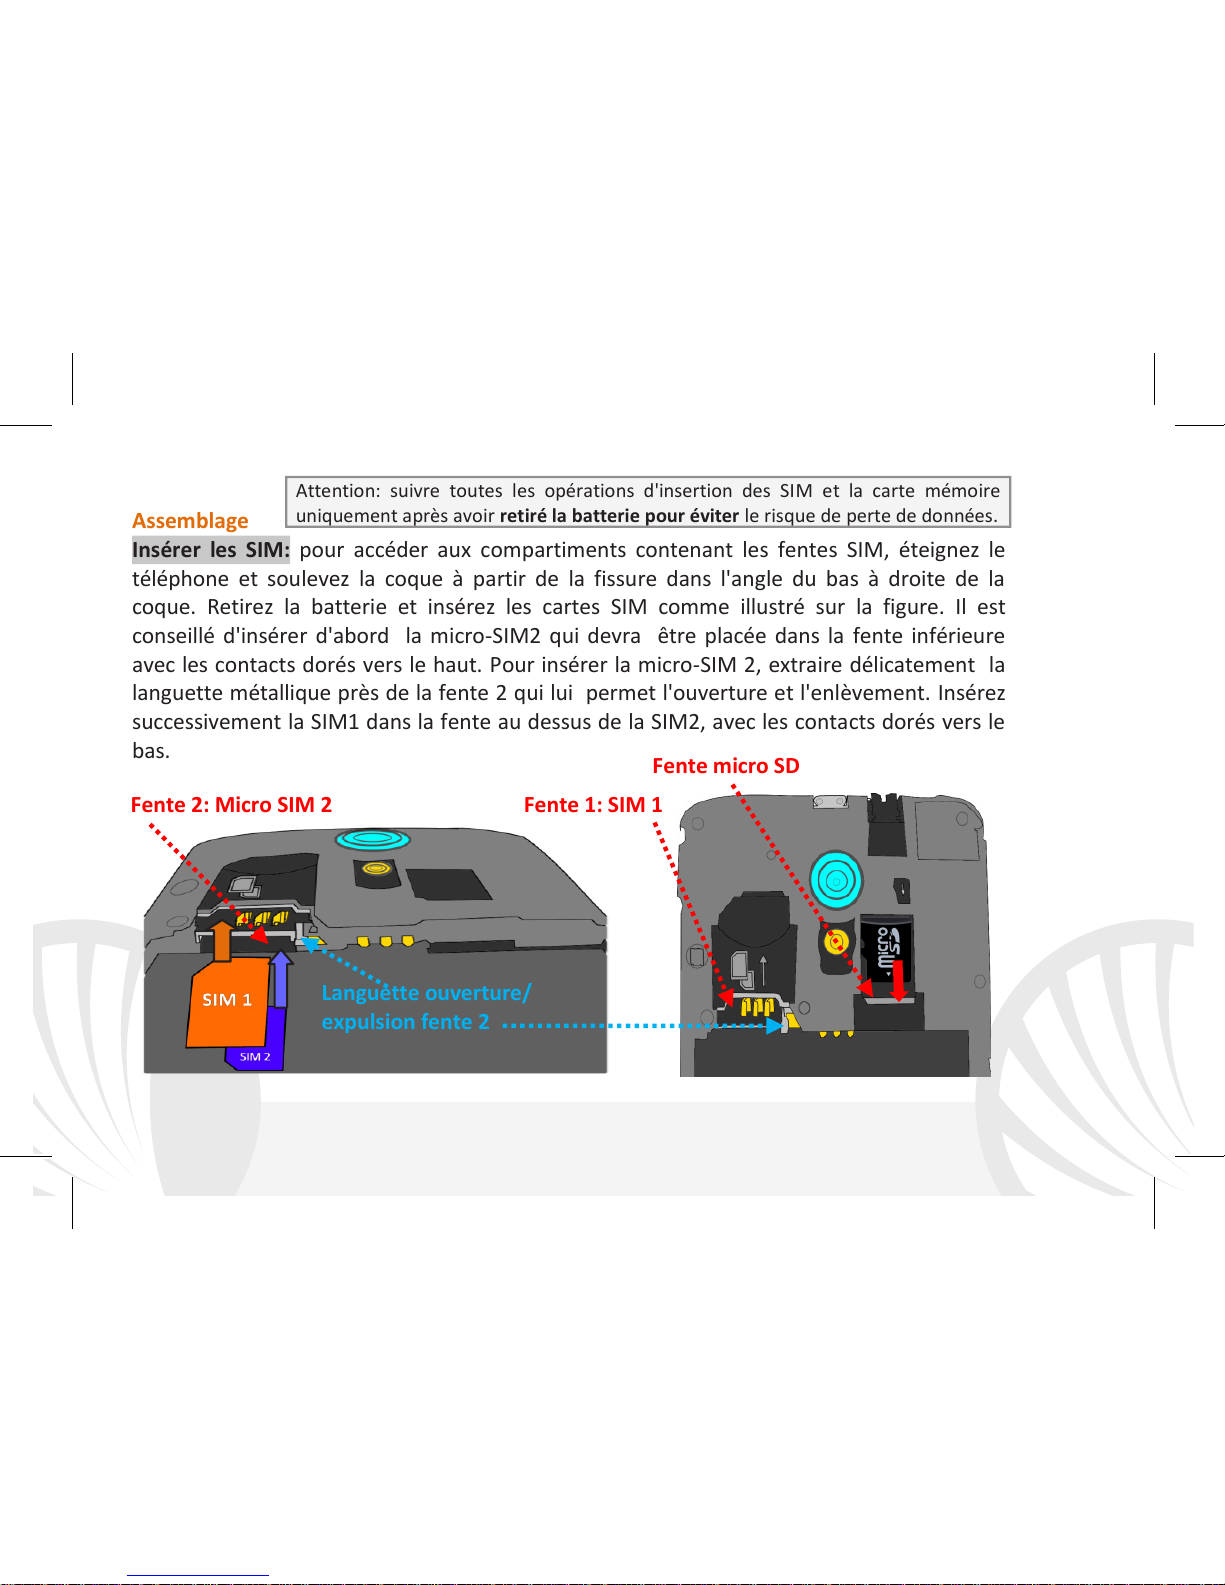
Assemblage
Insérer les SIM: pour accéder aux compartiments contenant les fentes SIM, éteignez le
téléphone et soulevez la coque à partir de la fissure dans l'angle du bas à droite de la
coque. Retirez la batterie et insérez les cartes SIM comme illustré sur la figure. Il est
conseillé d'insérer d'abord la micro-SIM2 qui devra être placée dans la fente inférieure
avec les contacts dorés vers le haut. Pour insérer la micro-SIM 2, extraire délicatement la
languette métallique près de la fente 2 qui lui permet l'ouverture et l'enlèvement. Insérez
successivement la SIM1 dans la fente au dessus de la SIM2, avec les contacts dorés vers le
bas.
Attention: suivre toutes les opérations d'insertion des SIM et la carte mémoire
uniquement après avoir retiré la batterie pour éviter le risque de perte de données.
Fente micro SD
Fente 1: SIM 1
Fente 2: Micro SIM 2
Languette ouverture/
expulsion fente 2
Table of contents
Languages:
Other NGM Cell Phone manuals


NGM
NGM YouColor M500 User manual

NGM
NGM harley-davidson User manual

NGM
NGM Forward Zero User manual

NGM
NGM YOU COLOR P551 User manual

NGM
NGM You Color M502 User manual

NGM
NGM C3 User manual

NGM
NGM Vanity touch User manual

NGM
NGM FACILE LOOP User manual

NGM
NGM ROMEO User manual

NGM
NGM YOU COLOR P503 User manual


