Niagara Video GoStream Mini 100 User manual

1 |P a g e
GoStream Mini 100
GSM 100
User GuideV3
1/10/2017

2
Contents
1. GSM 100 Overview ..........................................................................................................3
2. IP Finder ..........................................................................................................................4
3. Responsive Bootstrap ......................................................................................................5
4. GSM 100 Log in................................................................................................................5
5. Network Setup.................................................................................................................6
6. Stream Server..................................................................................................................7
7. Video Tuning .................................................................................................................13
8. Encoder Setup ...............................................................................................................13
9. Volume Tuning ..............................................................................................................15
10. Record Stream ...........................................................................................................16
11. Firmware Update.......................................................................................................17
12. Account Setup ...........................................................................................................17
13. Reset to Default.........................................................................................................19
14. RS485.........................................................................................................................20
Appendix ...........................................................................................................................23
3
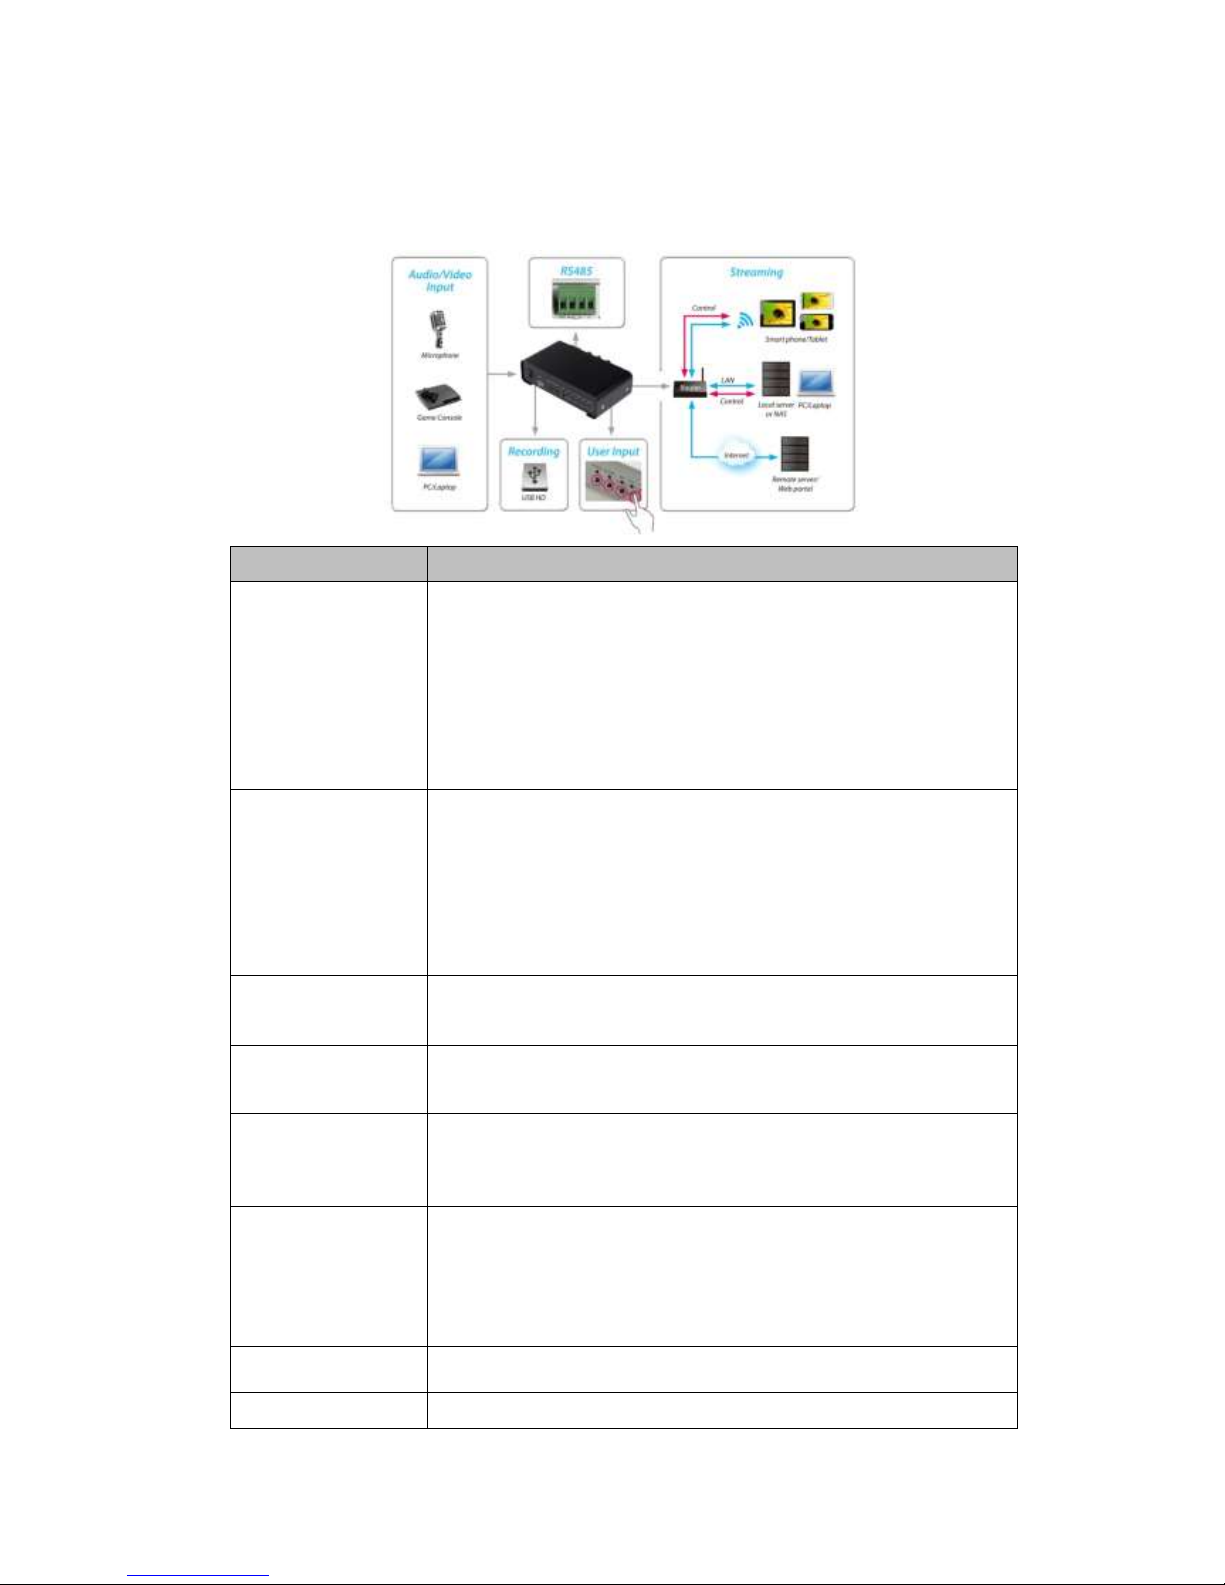
1. GSM 100 Overview
Item
Description
Input
Interfaces
Video
1x BNC for 3G / HD / SD-SDI
1x HDMI, 1x DVI-I for DVI-D/HDMI and DVI-A/ VGA
3xBNC for YPbPr/CVBS/S-Video
Audio
1xStereo audio through
1xRCA for Analog L/R audio
SDI/HDMI/DVI-D embedded audio
1x3.5 mm phone jack
Video
Specs
H.264/AVC , Main / High Profile
Configurable bit rate up to 10Mbps
Supported input /output resolutions
1080@50p / 60p (1080p25 / 30p output)
1080@50i / 59.94i / 60i
720p@50p / 59.94p / 60p
576@50p / [email protected]
576@50i /[email protected]
Audio
Specs
AAC-LC
Configurable bit rate range from 32Kbps to 384Kbps
Sample rate : 48KHz, 16bit
Network
Specs
1x RJ45 for 10/100Mbps Ethernet
DHCP client
Supported Streaming
Protocols
TS over TCP/UDP (unicast & multicast)
RTSP over HTTP/TCP/UDP (RTSP Elementary Stream)
RTMP (Local & Publish)
HLS
Misc.
Features
RS-485
1x USB 2.0 Host for USB storage
Web UI for system configuration
Firmware upgradable
LED indicator
Auto Signal Detection
Record Format
MP4
TS
Power Supply
DC 12V (With DV Adapter)

4
2. IP Finder
a. The GSM 100 is shipped with a static IP address of 192.168.1.20. Set your
computer address to an address in the same domain, 192.168.1.3 for example or if
you have a spare router you can also set that to 192.168.1.1
b. Start the IP Finder.exe .
i. If the network is available,
the local IP Address is shown.
You can double click on it to
go directly to the encoder.
Figure 1
ii.If the network is NOT
available, then No GSM 100
found is shown
Figure 2
Tip:You can double click the column of IP address or MAC address, and the home page of the
encoder will appear.
5
3. Responsive Bootstrap
If the screen resolution of the
browser is less than 1024x768,
the menu bar does not appear,
you can access the full menu by
clicking on the icon in the upper
right.
Figure 3 –main interface
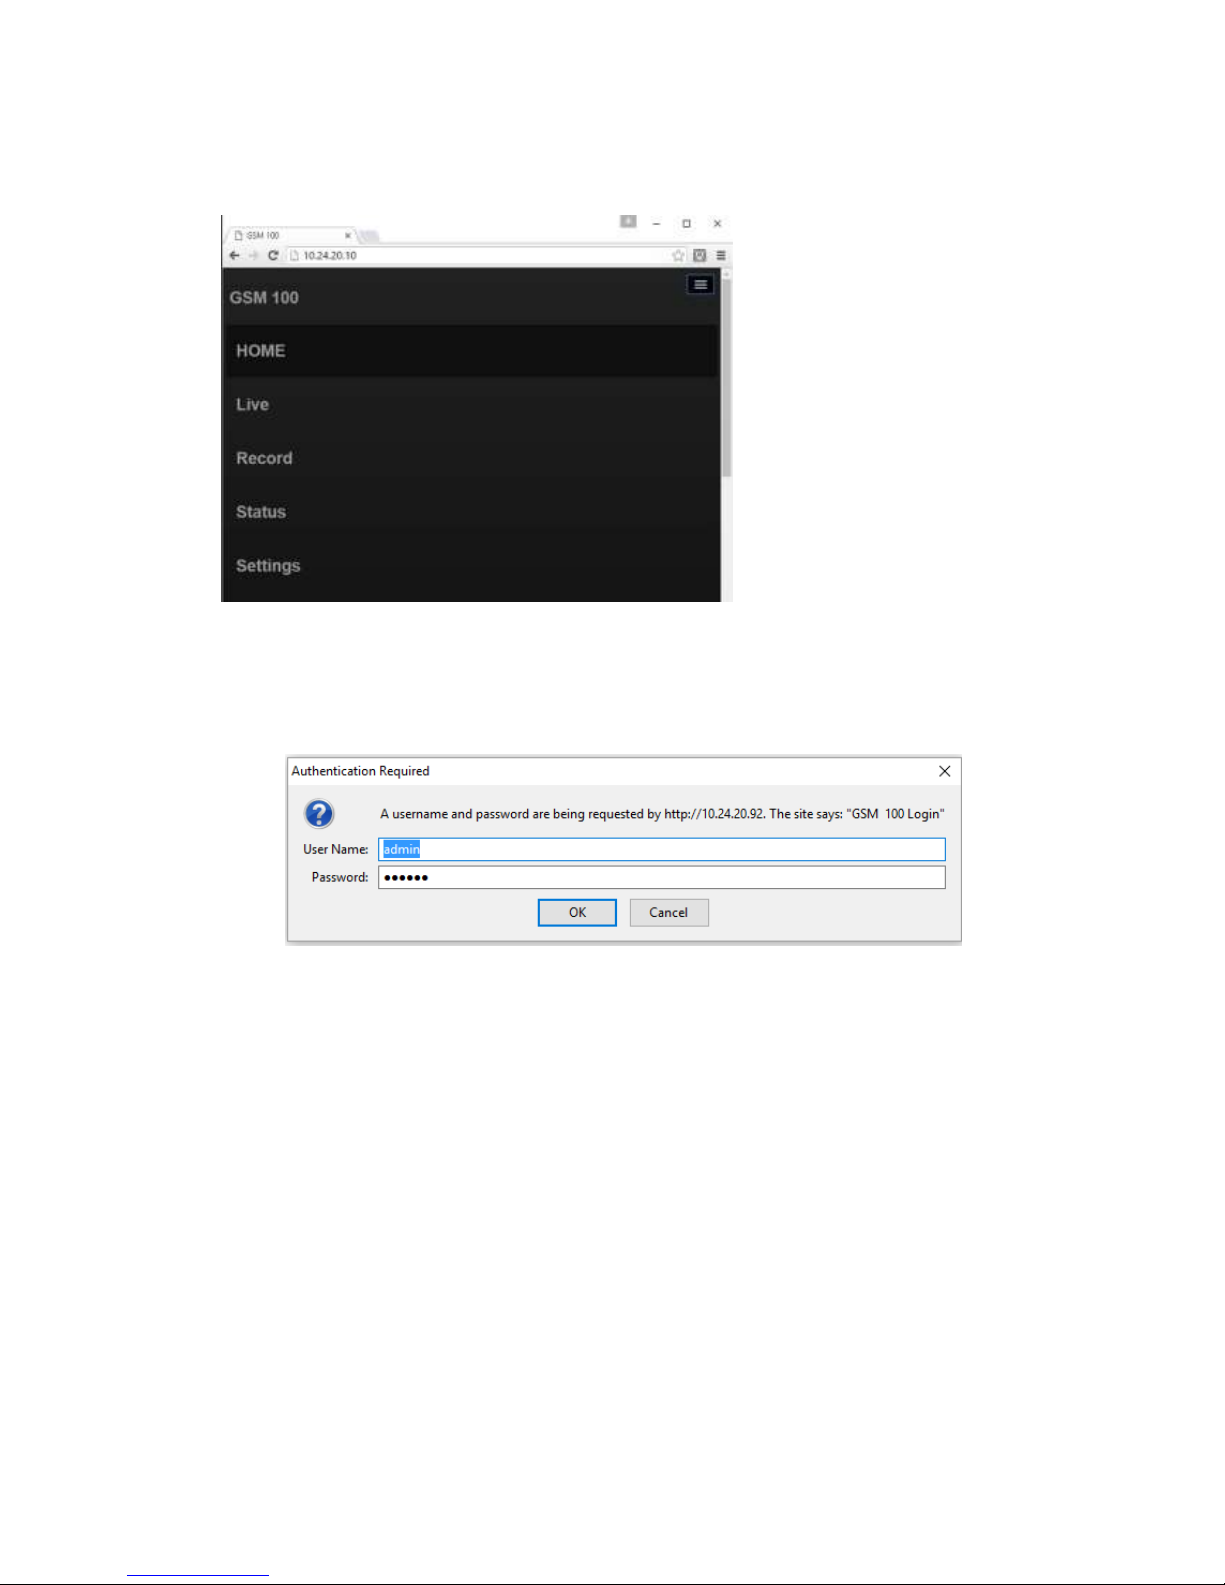
4. GSM 100 Log in
Figure 4 –Main Log in
Defaults
Username: admin
Password: 000000 (6 zeros)
6
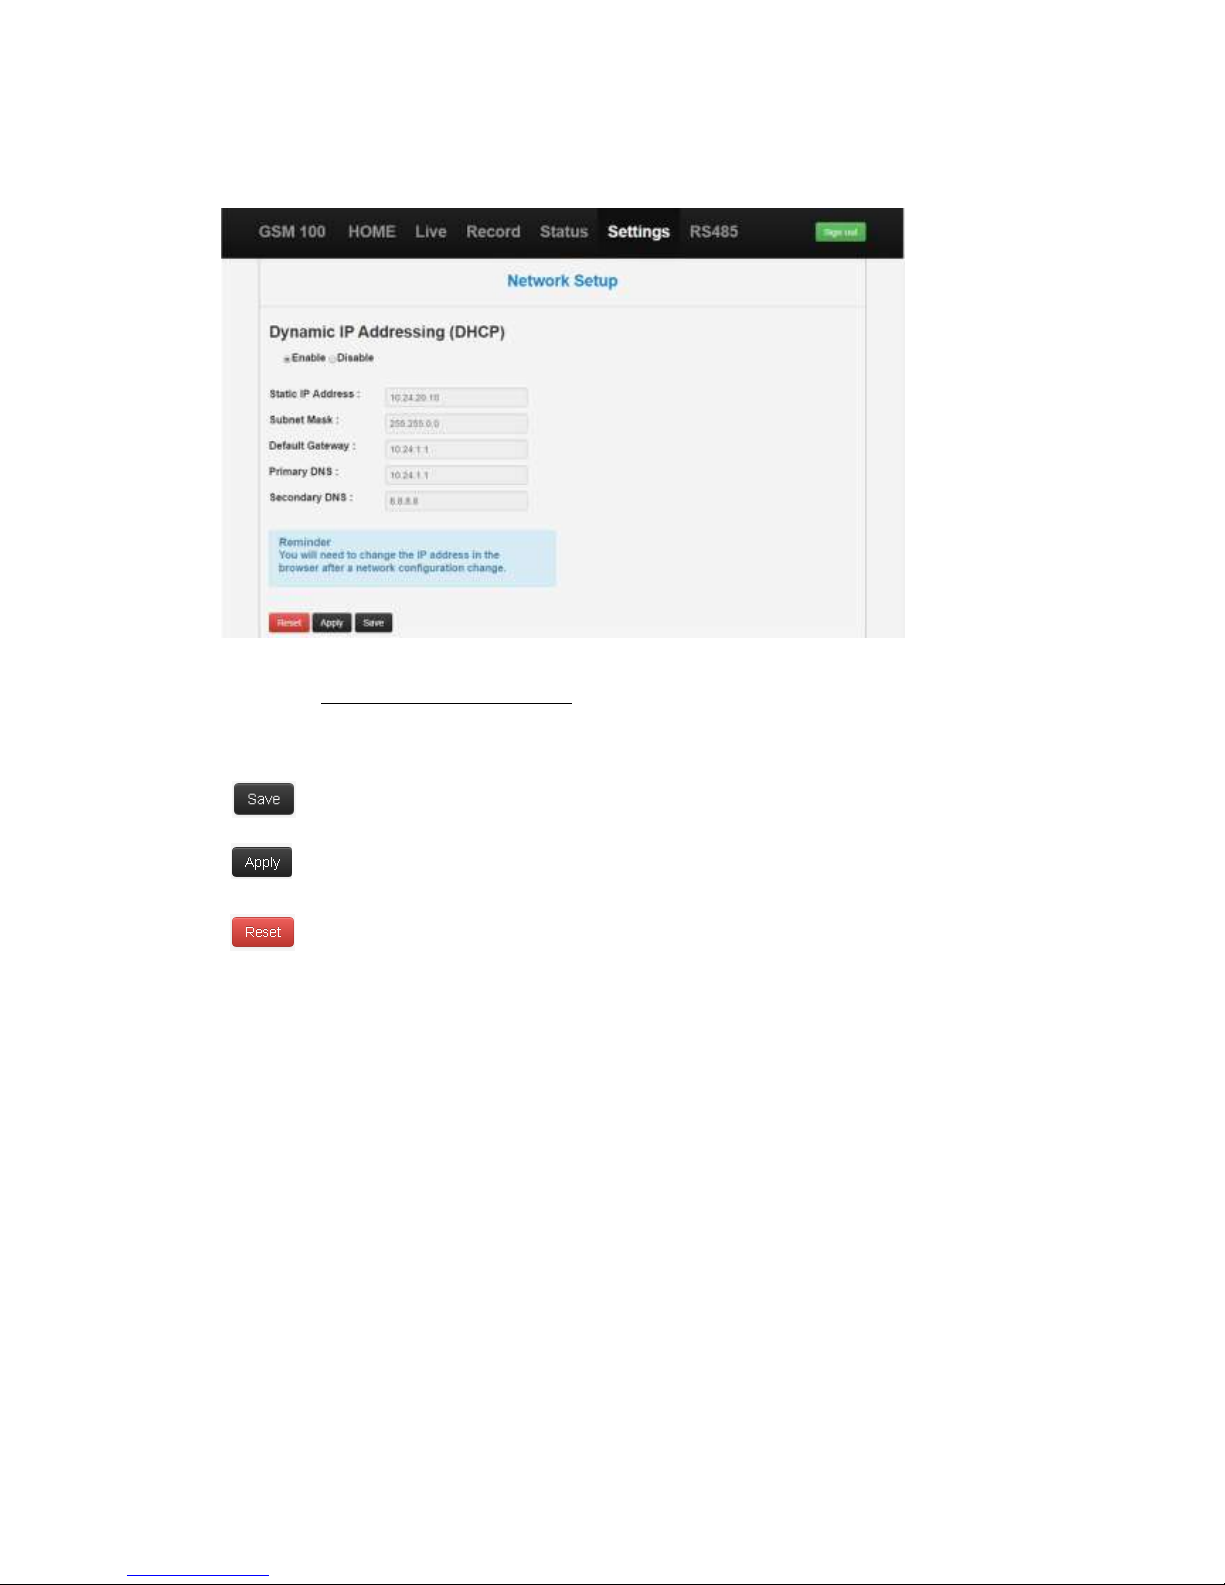
5. Network Setup
Figure 5
Select Settings Network Setup, as above.
There are two IP Address modes, Dynamic (DHCP) and Static (fixed).
This button will save the network configuration.
The Apply button will change the configuration immediately but will not be saved.
Clear all values of current input back to what they were when you started.
After Enabling DHCP, please use the IP Finder to get the dynamic IP address and login again.
7
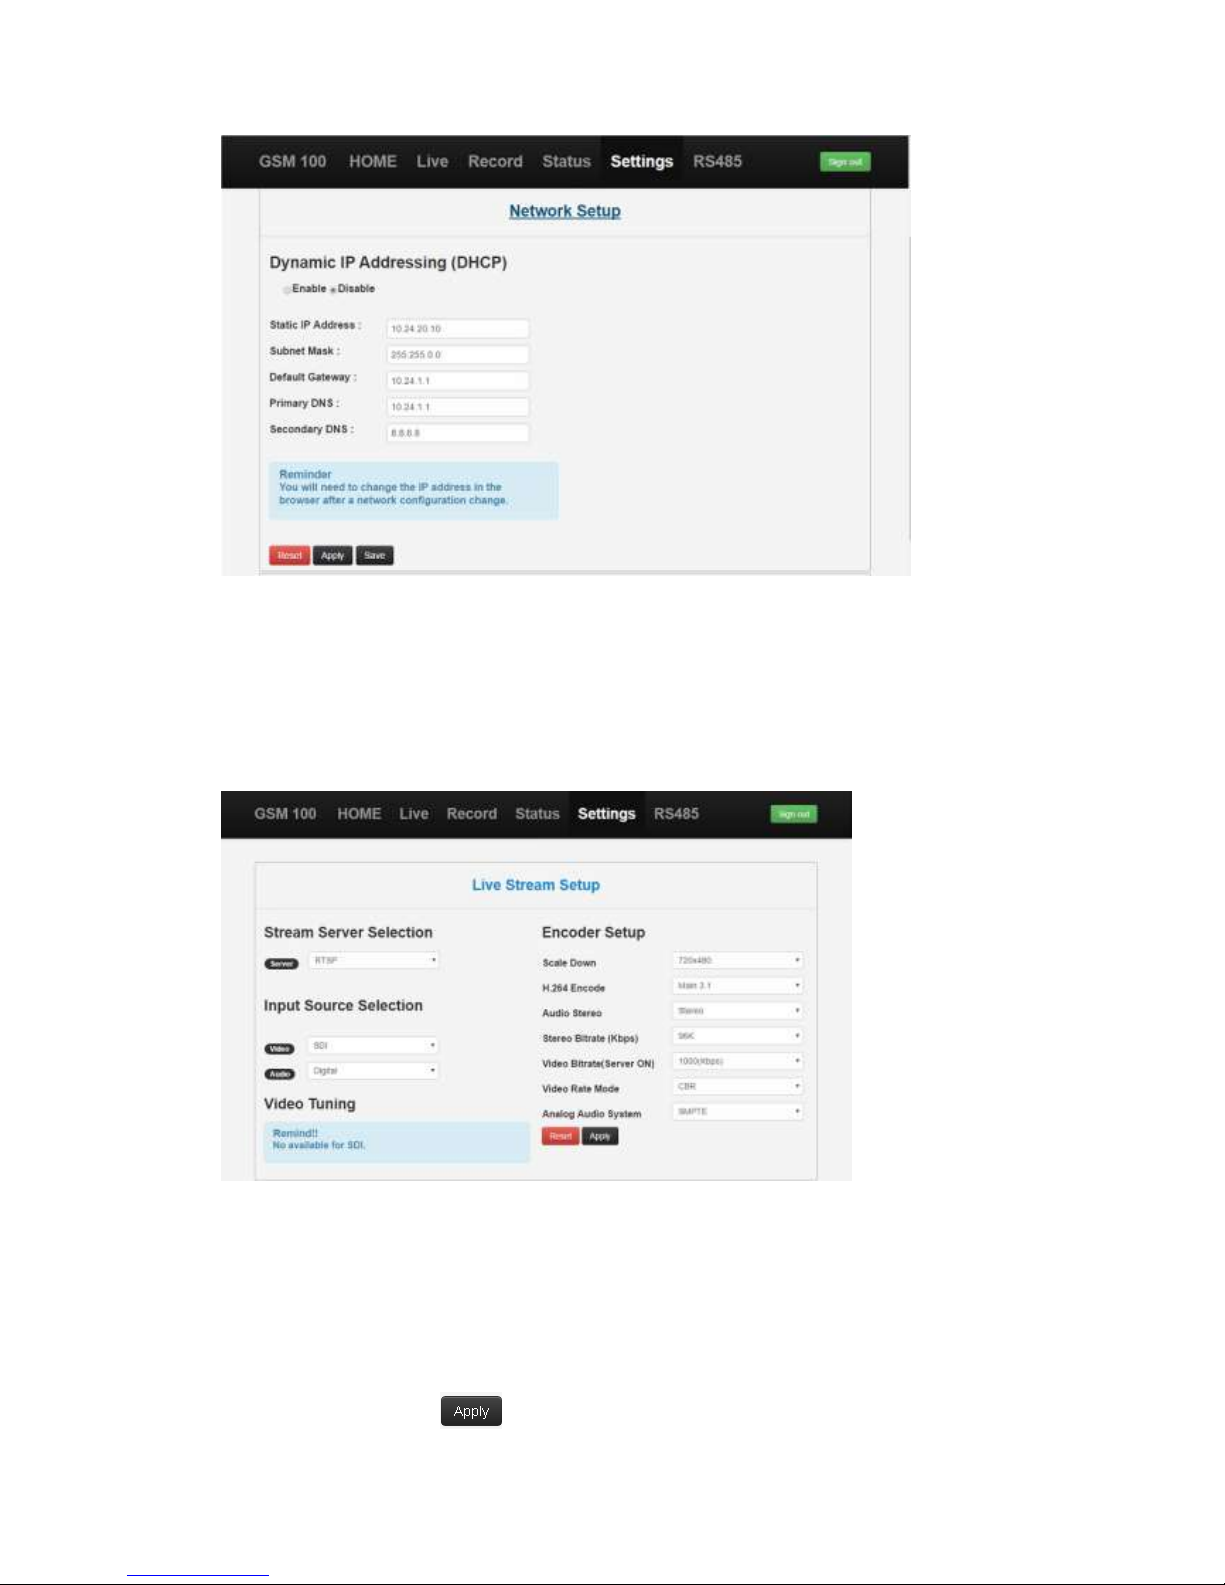
Figure 6
To set a static IP address first Disable DHCP and then configure the fields.You will have to log in
again to the encoder.
6. Stream Server
General settings
Figure 7
1. Select source first. (HDMI, DVI, DVI_A, CVBS, S-Video, YPbPr, SDI)
2. Then select server and click on desired stream protocol. (RTSP, RTMP, HLS,
RTMP_Publish, RTSP_ES or Raw UDP) In this case it will be RTSP.
3. Press the Apply button and wait for the encoder to finish loading.

8
4. The RTSP URL will be shown.
(Tip: HLS can only be received on the devices which are produced by Apple or the VLC player)
(Tip: Press the Reset button to initialize the status of Live Stream Setup.)
RTSP
Figure 8
1. Select RTSP and the other settings you want. (Fig 8)
2. Start the VLC media player, select Open Network Stream.
3. Copy the RTSP URL to VLC.
4. Click Play.
RTSP_ES
Figure 9

9
1. Select RTSP_ES and other settings you want to use. (Fig. 9.)
2. Start the VLC media player, select Open Network Stream.
3. Copy the RTSP URL to VLC.
4. Click Play.
RTMP
This is used for monitoring purposes.The encoder has an RTMP server.
Figure 10
1. Select RTMP from the Server menu drop down.
2. After the encoder is running, click on Live in the menu bar. Click the play button to see the
video.
RTMP Publish
This setting is used to stream to a CDN (UStream, YouTube Live, etc.) or to a media server
(Wowza, Adobe Media Server, etc.)

10
Figure 11
1. Select RTMP_Publish for the server entry
2. Enter the complete URL in the RTMP Publish URL section
3. Apply setting.
4. Go to your channel and watch the live streaming.
RTMP Publish Authentication
Figure 11

11
RTMP authentication is only valid on publishing to Adobe Flash Media Server &
Wowza Server. User can set multiple sets of account information on Adobe Flash Media Server.
HLS
Figure 12
For Apple devices, such as iPad or iPhone, log in to the GSM 100 with a Safari browser.
(Tips: GSM 100 supports live streaming to the internet via “Wowza Server”,”Adobe
FMS”,“Ustream”,”Twitch”, “FaceBook Live” and “Youtube Live”.)
12
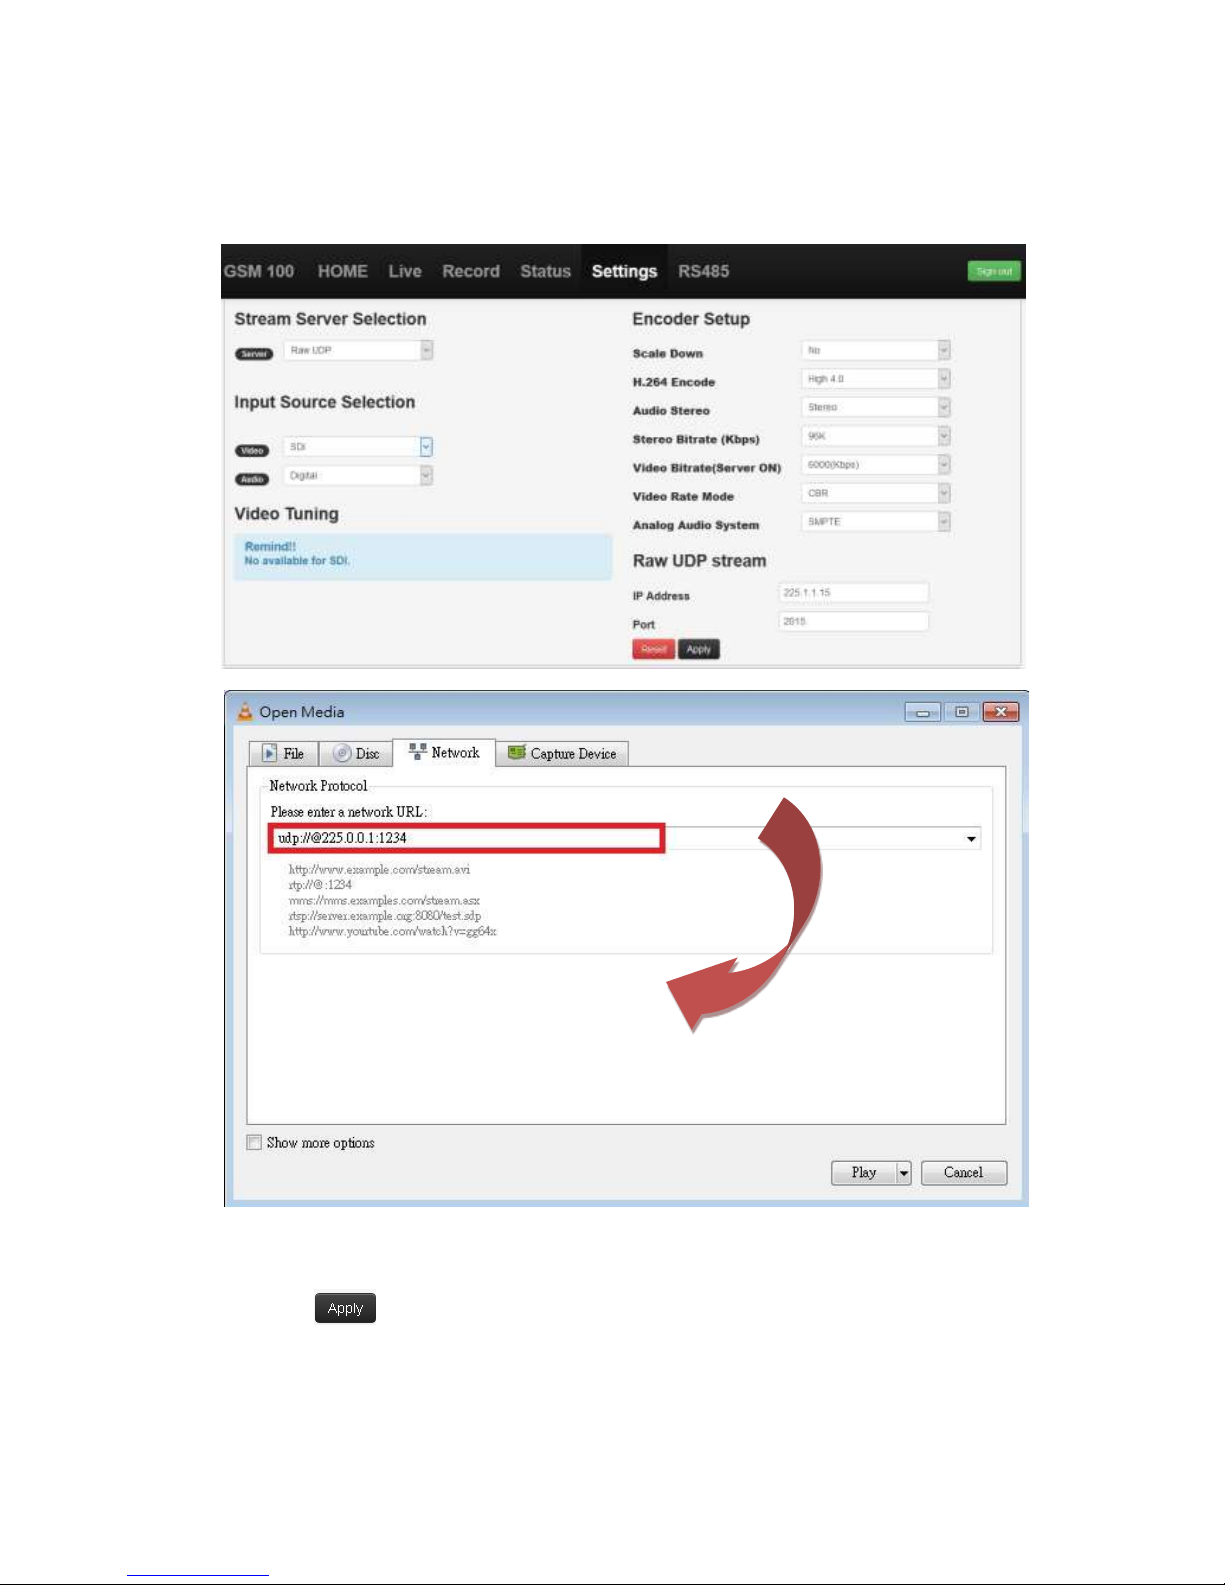
Raw UDP
This protocol is used for distributing streaming video over a LAN to set top boxes and to PCs
runningVLC.
(Pic 16-1.)
1. Enter a multicast IP address (in the range of 224.0.0.0 to 239.255.255.255) and Port number
2. Click
3. Start VLC, Open Network Stream and enter udp with the multi-cast address with the port
number preceded by an @ symbol. For example: udp://@225.1.1.10:2010.
4. Click Play

13
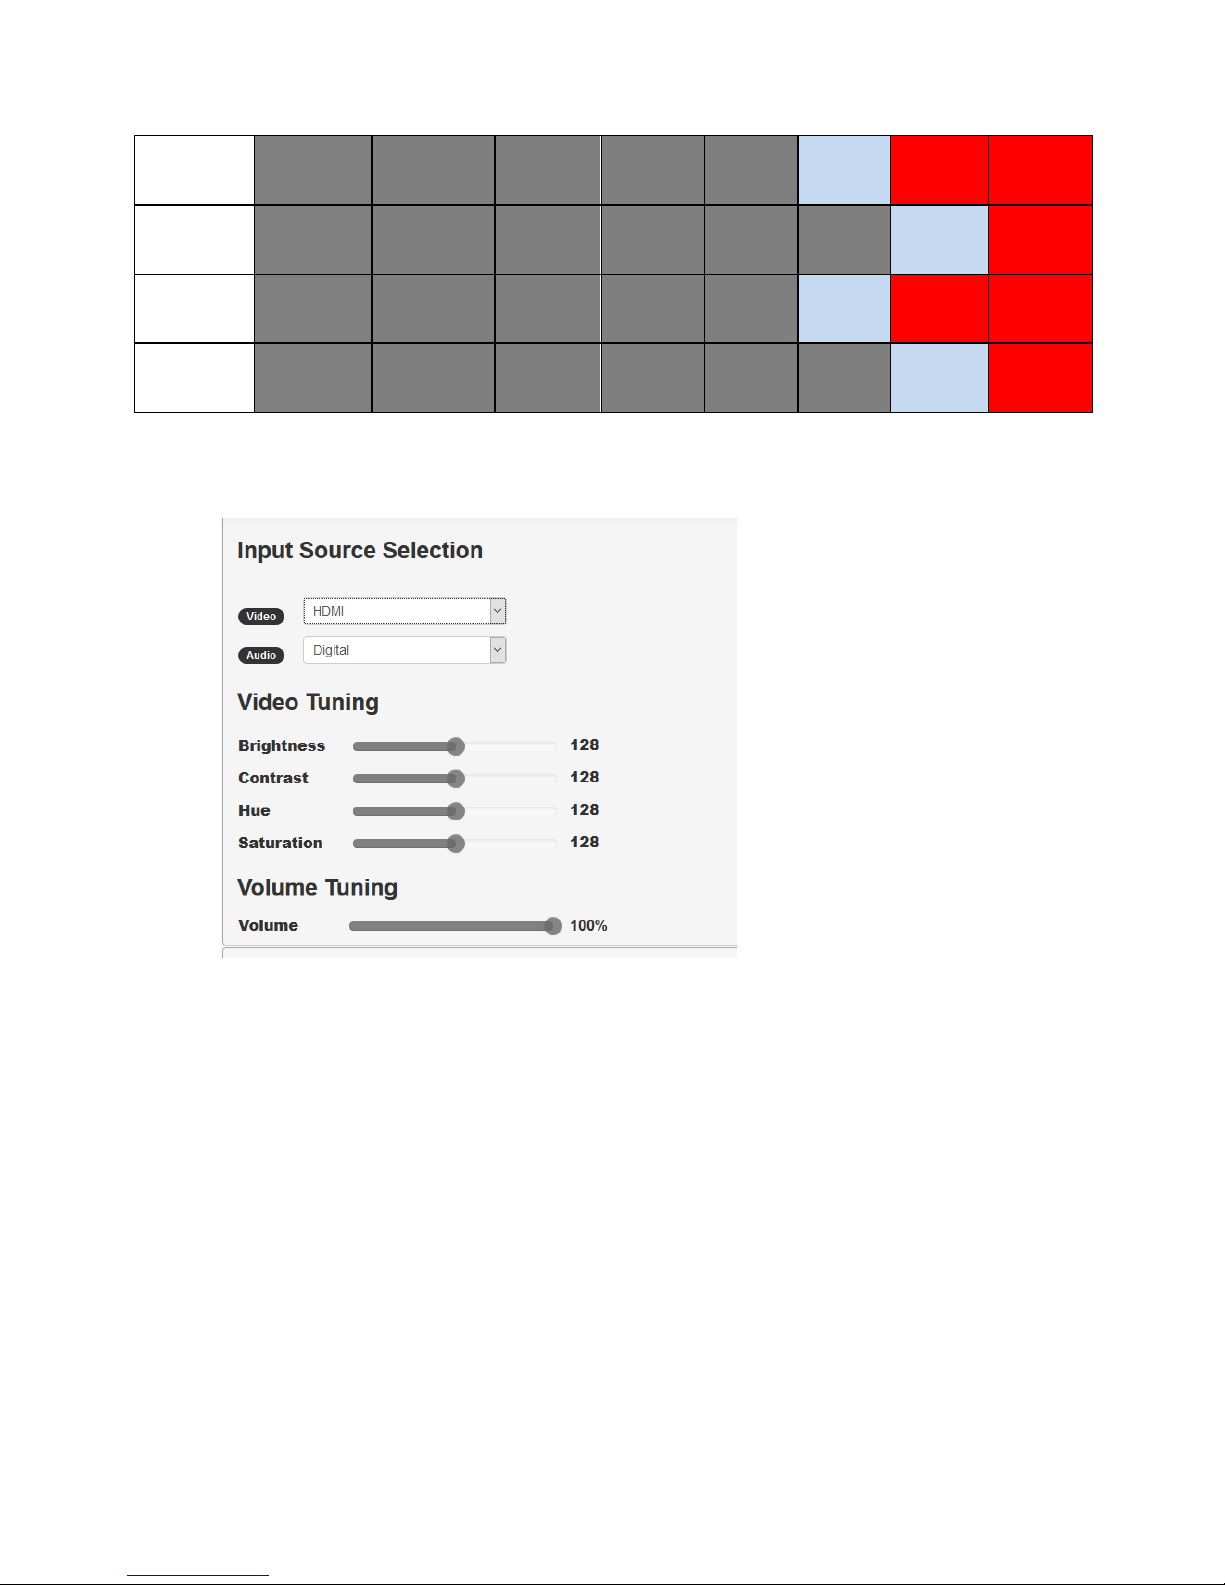
7. Video Tuning
(Pic 17.)
User can adjust these parameters while streaming.The extra function of CVBS and S-Video is
Sharpness.When the user is doing video tuning, the streaming server will not be terminated or
restarted. (Tip:There is no video tuning option for an SDI input source.)
8. Encoder Setup
(Pic 18.)
14
1. Down Scaling
(Table 2.)
2. H.264 Encoder:
Main3.0,Main3.1 and High4.0
3. Audio Stereo:
Select (Stereo) or (Mono)
4. Stereo Bitrate:
From 32(Kbps) to 384(Kbps)
5.Video Bitrate(Server OFF):
Record Only Up to 16000 Kbps
Video Bitrate(Server ON):
Streaming Only. Up to 12000 Kbps
Record+stream: Up to 6000 Kbps
6.Video Rate Mode:
VBR or CBR
7. Audio Source:
Only HDMI and DVI and SDI Supports Digital Input
8. Analog Audio System:
EBU or SMPTE
(Table 1.)
(Tips:When video bitrates are higher than 6000kbps and doing recording at the same time, the GSM 100 does not guarantee the
quality in the status.)
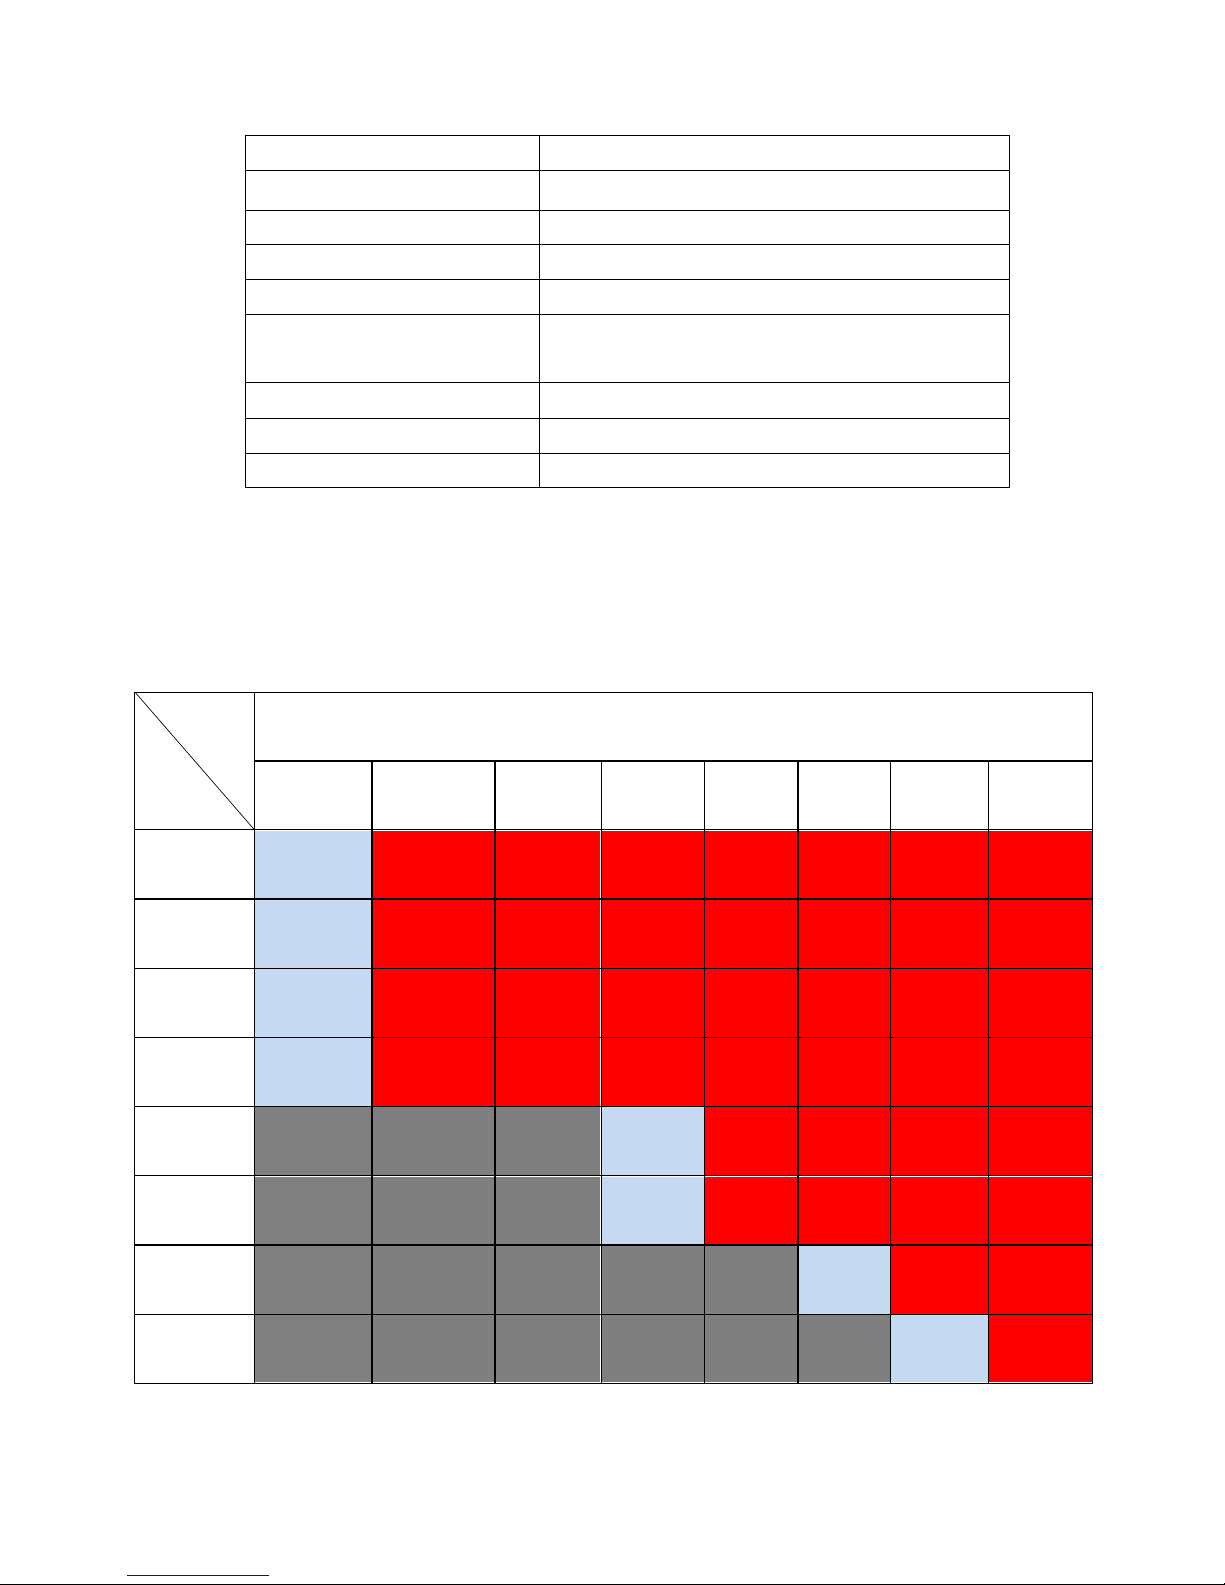
*Supported downscaling
Output
Input
Output
1920x1080
1440x1080
1440x900
1280x720
960x540
720x576
720x480
320x240
1080p60
(to p30)
O
Down
Down
Down
Down
Down
Down
Down
1080i60
O
Down
Down
Down
Down
Down
Down
Down
1080p50
(to p25)
O
Down
Down
Down
Down
Down
Down
Down
1080i50
O
Down
Down
Down
Down
Down
Down
Down
720p60
N/A
N/A
N/A
O
Down
Down
Down
Down
720p50
N/A
N/A
N/A
O
Down
Down
Down
Down
576p60
N/A
N/A
N/A
N/A
N/A
O
Down
Down
480p60
N/A
N/A
N/A
N/A
N/A
N/A
O
Down
15
PAL
(digital)
N/A
N/A
N/A
N/A
N/A
O
Down
Down
NTSC
(digital)
N/A
N/A
N/A
N/A
N/A
N/A
O
Down
PAL
(analog)
N/A
N/A
N/A
N/A
N/A
O
Down
Down
NTSC
(analog)
N/A
N/A
N/A
N/A
N/A
N/A
O
Down
(Table 2.)
9. Volume Tuning
(Pic 19.)
For HDMI and DVI inputs the audio volume can be adjusted.

16
10. Record Stream
(Pic 22.)
1. Click Record button on the menu bar.
2. Start Record.
3. Click the USB icon to see the recorded files in the USB storage.
4. You can now also record to an FTP location.
17
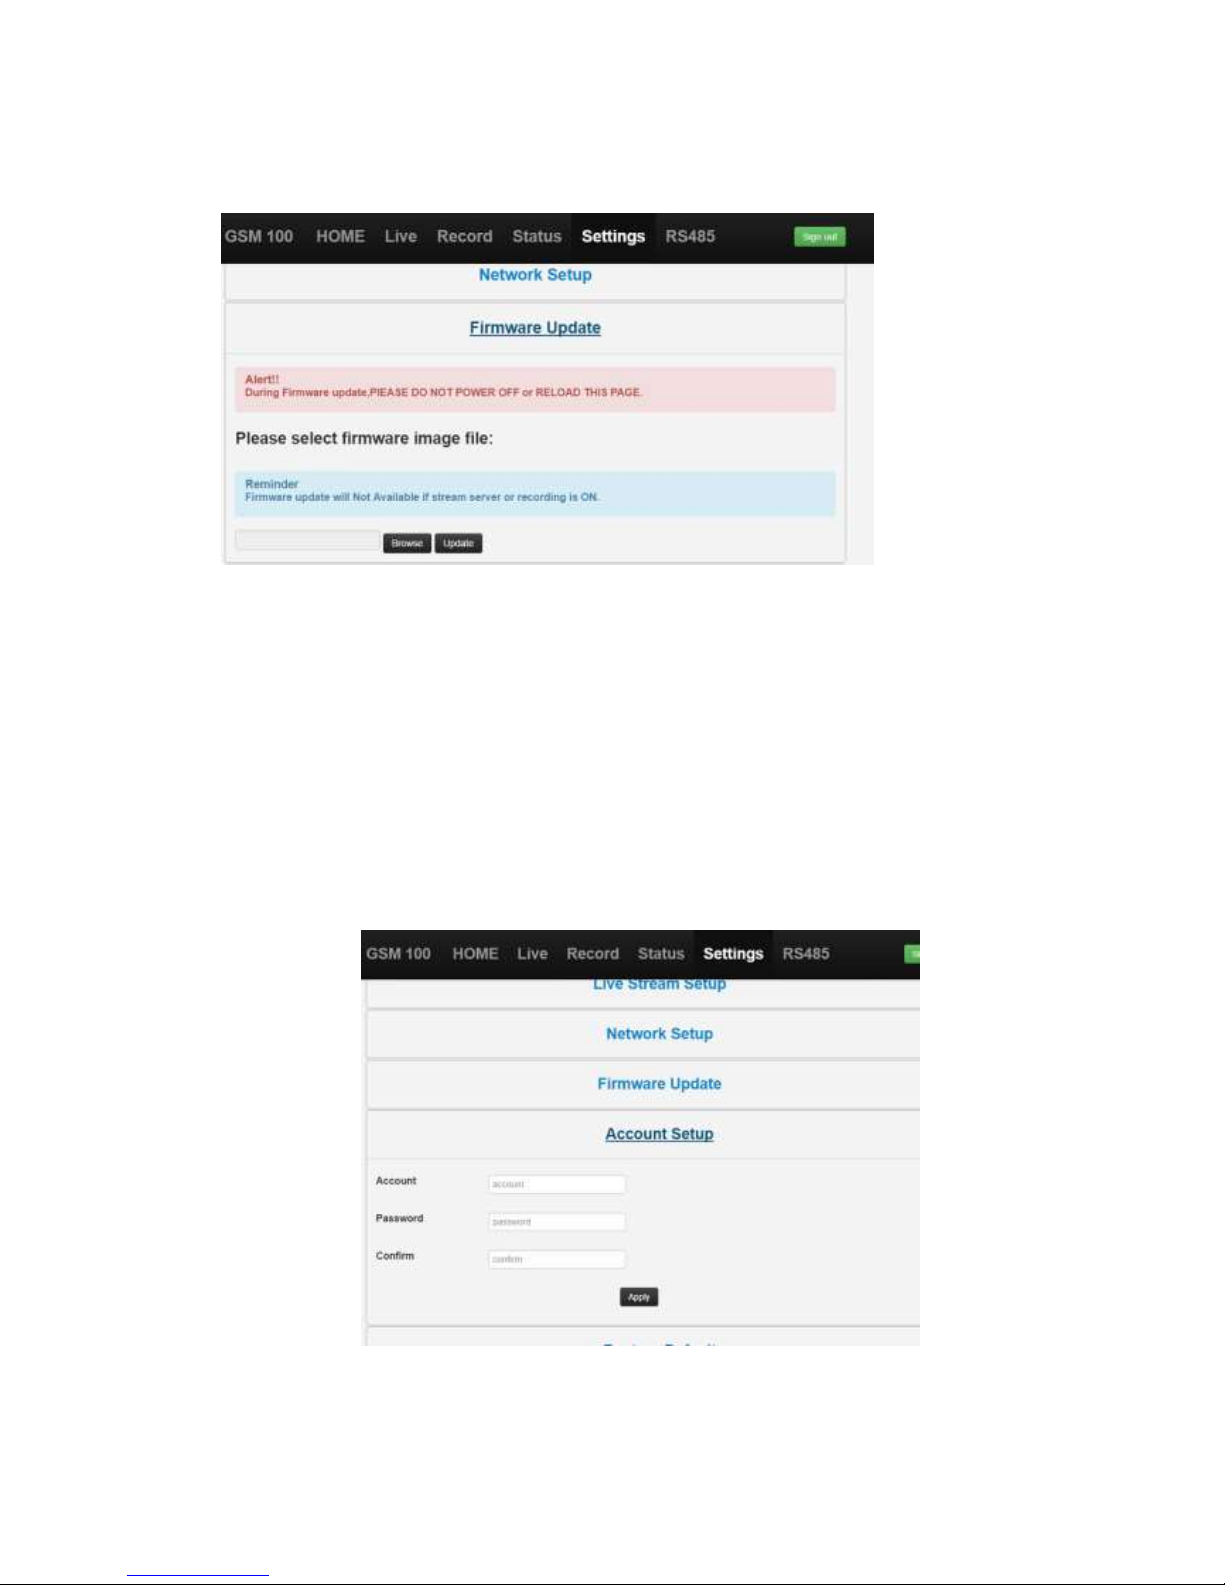
11. Firmware Update
(Pic 24.)
1. Click Browse Button to find the newest GSM 100 firmware in your computer.
2. Update the Pack A and wait for the words of “update successful”.
3.Then update the Pack B and wait for the words of “Please reboot”
4. After the firmware update is successful, reboot GSM 100.
Tip: If you don’t see “update successful”, don’t try to update or re-boot.
12. Account Setup
(Pic 25.)

18
Before setting a new username and password, the user has to input the original user name
and password. If this is the first time then the user just types the default username and password.
If this info is correct then you will see the screen below:
(Pic 26.)
Reset a newer username and password.Then apply change.
If account information was forgotten, we can use USB disk to do a factory
restore.
USB disk must be FAT32 format.
19
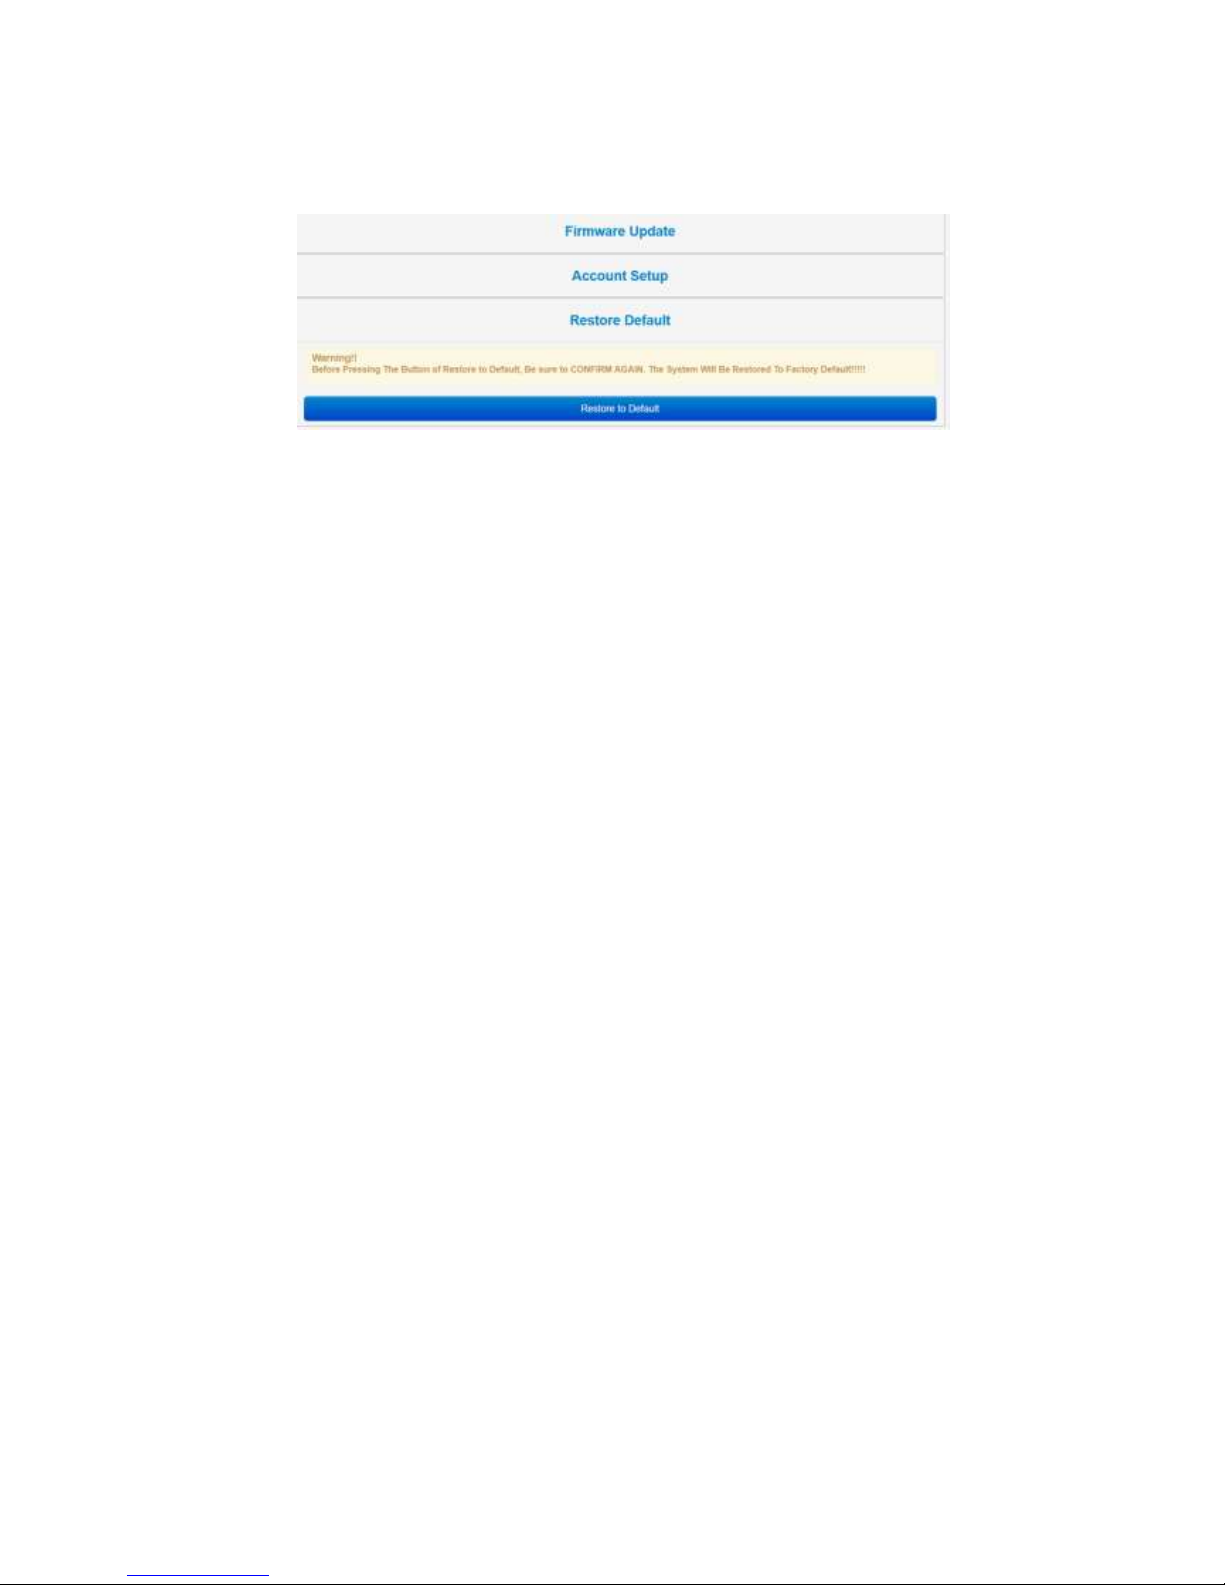
13. Restore to Default
(Pic 27.)
If the system is showing repeated errors or boot fail, the function of “Restore to default”can
help GSM 100 reset to the “Factory Default”. If the function is also not work, user can try to use
the File of “Restore System”to restore GSM 100 by USB disk.
20
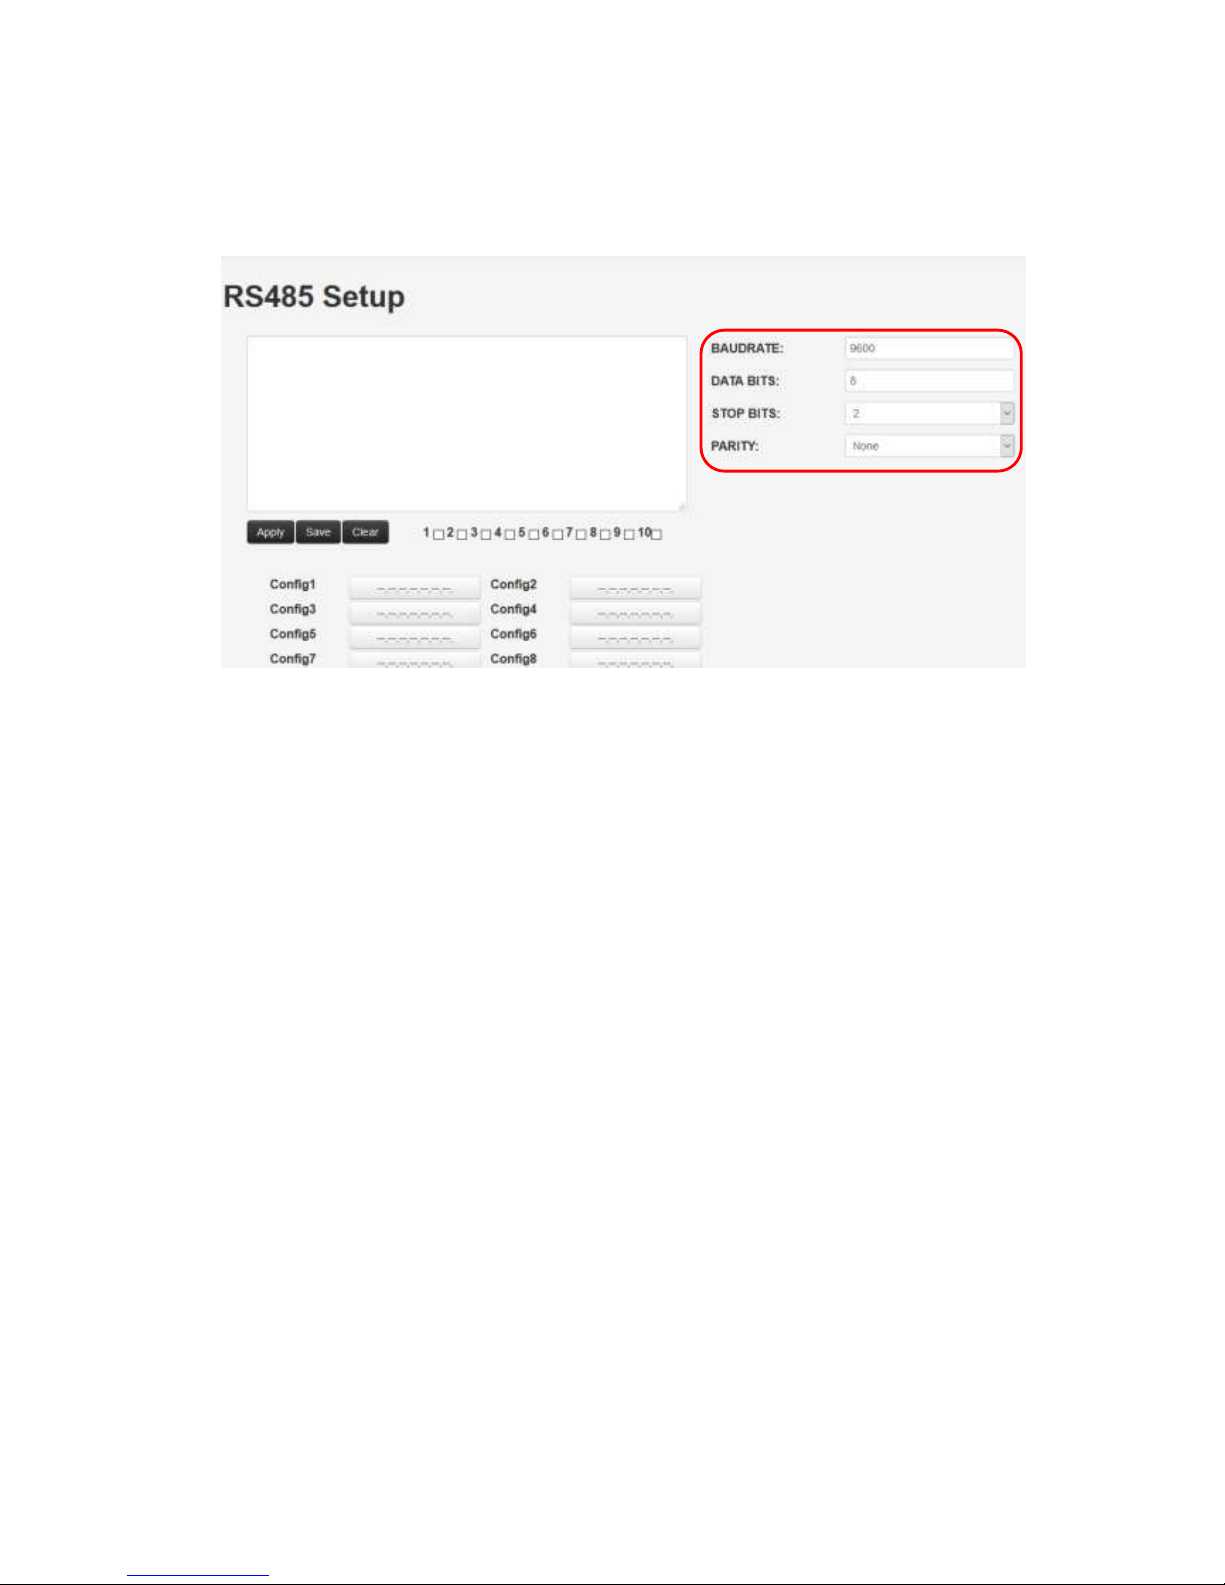
14. RS485 –Future use
I. Configure Serial Lines
Configure BAUDRATE, DATA BIT,STOP BITS and PARITY to correspond with serial lines.
The BAUDRATE can be set as following values: 50, 75, 110, 134, 150, 200, 300, 600, 1200,
1800, 2400, 4800, 9600, 19200, 38400, 115200
This manual suits for next models
1
Table of contents


