NicePhoto TTL-480C User manual

TTL
TTL
Thank you for using TTL Wireless studio flash.
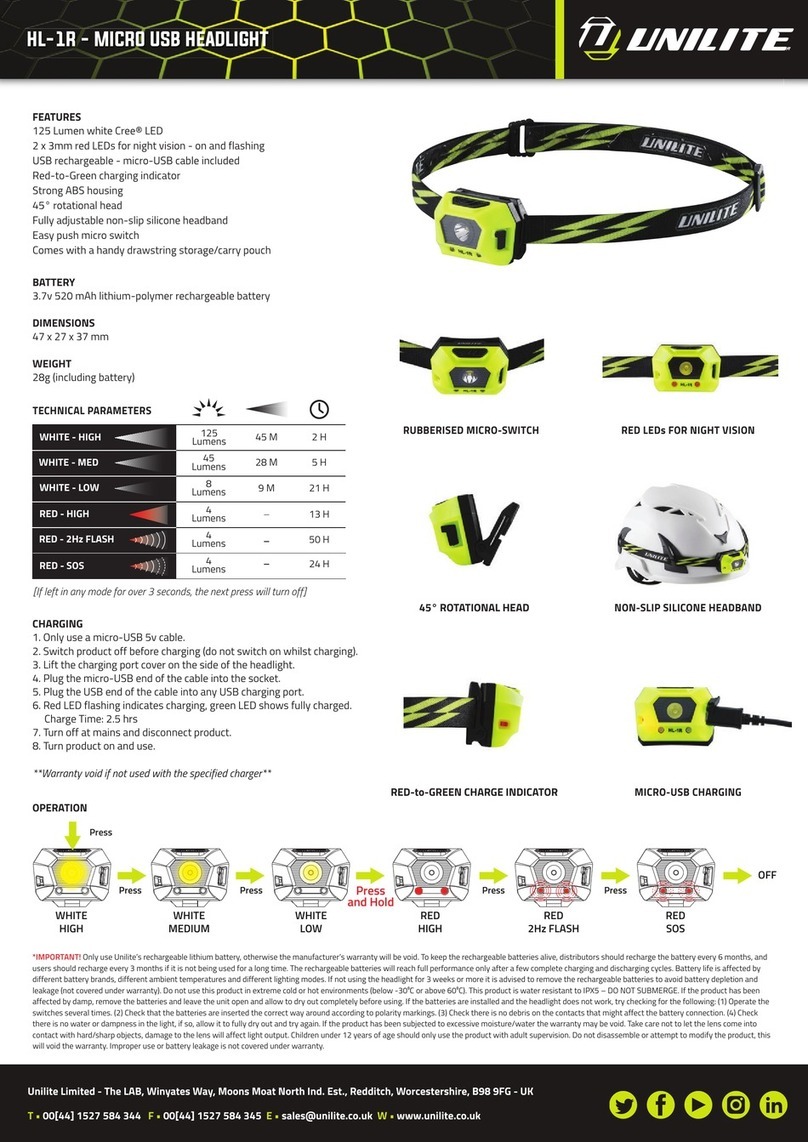
is the world’s FIRST outdoor flash with built-in Li-ion battery and high power.
It changes the traditional outdoor flash which contains power cable and power box, brings
various users to a new wireless period. Without the chain of power cable and power box, and
easy to carry, easy to operate, it saves you 50% labor. From now on the photography is freer,
and higher efficiency.
What the TTL Wireless studio flash brings to you?
TTL Wireless studio flash not only supports TTL f , but also supports high speed lash
sync at full power range. Before this, many outdoor photographers suffered from no TTL of
traditional outdoor flash, and small power of speedlite. Now the TTL wireless studio flash will
help you to achieve your unlimited creativity.
Warm tips, please read the manual carefully before operation.
As the product update continuously, there may be some differences between different batches, all in kind prevail. Please note.
Instruction Manual
Wireless Studio Flash
* All the trademarks in this manual are owned by the owner.
* Some models of cameras’ max sync speed is only 1/4000s.
If using the cameras which don’t support high speed sync, the max syn speed is 1/125s or slower.

8 eatures:F
1 2
3 5
6
7 8
CONTENTS
◆
◆
◆
◆
◆
◆
◆
◆◆
◆
◆
◆
±0.3
Support TTL flash High speed sync
Support remote control 5 stops high speed flash
duration to capture
So many functions built-in one, let your inspiration fly.
Wide power range
1/1-1/128(±0.3 step)
Support AC power supply
◆
◆Multi flash
Support first-curtain and
second-curtain sync
I. lash unit introdutionF
II. nstructionTransmitter i
III. How to set the channel and group
IV.Configuration list
V.Operating Instructions
VI. How to remote control the flash unit by transmitter
VII.Remote control creative lighting through mix
groups setting
VIII.Camera setting
X.Warm tips XI.Repair & Maintenance
XII.Specifications XIII.Warning
XIV.How to solve the common faults
◆
◆

MFP
MULTI
MODEL
GP
CH
A
A
B
B
C
C
AB
A、B
AC
A、C
BC
B、C
ABC
A、B、C
II. Transmitter instruction
1.Function selecting button “+”
2.RST reset button
3.Function selecting button “-”
4.Menu button
5.Test button
6.Fn submenu button
7.Power indicator
8.LCD
9.Power switch
10.Battery compartment
11.Hot shoe lock
12.Hot shoe block
13.USB socket (For software upgrade)
Menu--the main function button can control the following functions in order:
Manual mode
(1/1-1/128)
*Long press the MENU button for 2s to turn ON/OFF the modeling light.
Fn -- Submenu button:
Group setting (7 group modes) Optical slave switch (ON/OFF)
Channel setting (16 channels) Buzz (ON/OFF)
III. How to set the channel and group
The TTL wireless studio flash built-in 2.4G wireless receiver. Using the transmitter
TX-C01(short for TX-C01) can remote control all the function of flash unit(except channels
and group). Firstly you need to set the channel and group of TX-C01 same as the flash unit,
then you can use TX-C01 to remote control the flash unit.
Note: when the camera is on ETTL mode, the group setting is controlled by camera.
1.Set the group of the flash unit/transmitter TX-C01
Press Fn button until the “GP” flickers, then rotate the selection knob/press the function
selecting button “+” or “-” to set the group (There are A,B,C groups of flash unit to select, and
A,B,C,AB,AC,BC,ABC groups of TX-C01).
Transmitter
Flash unit
2.Set the channels of the flash unit/TX-C01 transmitter
3.Caution
Press the Fn button until the “CH” flickers, then rotate the selection knob/press the
function selecting button “+” or “-” to set the channels (16 channels for selecting).
Only when TX-C01 channel setting is the same as the flash unit’s, and the TX-C01 group
setting includes the flash unit’s group, could the TX-C01 remote control the flash unit.
Table 1
High speed flash mode Multi-flash mode
Groups setting list (Mixed groups of the transmitter TX-C01 are available)
MFP
GP
CH
MULTI
I. I. Flash unit introdution
Buzz (ON/OFF)
1.Power switch:ON-OFF
2.Menu --the main function button can control the following functions in order.
Manual mode Multi-flash mode
(Power range:1/1-1/128) High speed flash mode
3.Selection knob: select the parameters of the function.
4.Fn -- submenu button.
Group setting (A,B,C groups) Optical slave switch (ON/OFF)
Channel setting (16 channels)
5.MODEL: modeling light switch.
6.TEST: test button.
7.RESET: reset button, use to reset the flash unit to factory default setting.
9.Optical slave receiver (when turn on the optical slave, it can be triggered by flash light).
11.USB socket: use for upgrading the software.
12.Sync socket: use for external wireless flash trigger.
1 2
10.Li-ion battery 11.1V-6600mAh.
13.Elastic standard reflector
8.LCD display.
Hardened explosion-proof pressure resistance materials
10 meters high altitude fall not burst
Under 10kg weight pressure not deformation
Special design for durable use.
1
9
10
7
11 12
13
2
3
4
56
81 4
9
10
11
12
13
25
3 6
7
8
Fn

FP
F2
F3
F4
F5
1/20000s
1/15000s
1/10000s
1/8000s
1/5000s
IV.Configuration list
Professional Al-case
V.Operating Instructions
1. How to install and use the flash unit
Take out the battery: press the
battery lock like the above
guide photo, then the battery
will eject itself.
Install the battery needs to make
sure the direction is correct first,
then press it into the compartment
to be locked.
Turn . ON the flash unit Flash mode: press “MENU” to
shift different flash modes: M/
FP/MULTI modes, rotate the
selection knob to operate.
Press the “Fn” button can shift
from buzz, group, channel and
optical slave, rotate the knob
can turn ON OFFor .
Afte r sett i n g , yo u can press
“TEST” to flash; when the indicator
does not flickers, the flash is
ready for next flash.
Press “MODEL” to turn ON/OFF
the modeling light. Rotate the
selection knob to adjust the
brightness.
If need the optical sensor as slave
flash, please rotate the white side to
the other flash direction and turn on the
optical slave switch,this flash will follow
other flash works.
Install the reflector: push the
lock back, rotate the reflector
anti-clockwise then can take it
out; rotate clockwise then can
install on the flash head.
2.How to install the transmitter TX-C01
2-1: Install the batteries
Open the battery compartment cover, ensure the correct positive“+” and negative“-” and
install two AA batteries.
1) when the transmitter works unstable and battery indicator
flickers, please replace new batteries.
2) Please take batteries out if no use for long time.
3) Do not mix new and used batteries.
1) Ensure the transmitter is power “OFF” before installing.
2) Firstly loose the transmitter hotshoe lock.
3) Then make the transmitter hotshoe install on the camera
hotshoe in right position.
4) Lastly fasten the transmitter hotshoe lock, make sure it won’t drop.
2-2: Install transmitter TX-C01 on camera hotshoe
VI. How to remote control the flash unit by transmitter
Note: Before remote control the flash unit by transmitter, it needs to set the transmitter and
flash unit at the same channel and group. Please refer to the III about how to set the
channel and group.
Press the “MENU” button until the “M” flickers in the transmitter LCD display, then press
the function selecting button“+” or “-” to set power output.
1. Power output adjustment
Power range:1/1—1/128 with ±0.3 step.
2. FP high speed flash setting
Press the “MENU” button until the “FP” flickers in the transmitter LCD display, then press
function selecting button “+” or “-” to set FP mode.
Flash duration
FP mode has 5yyyygtyu7666 levels: FP, F2, F3, F4 and F5
FP mode
Warm tips
High speed flash is suitable for close-shot, together with camera
high speed continuous shot, it can capture the fast moving
subject with different flash duration (FP, F2, F3, F4, F5).
*The LCD of transmitter and flash unit display the same data.
Note: When the camera is on “M” mode,the max. sync speed is1/200s~1/250s
(depend on your camera’s max flash sync speed).
34
1 2 3
4 5 6
7 8 9
Fn
1set
1pc1pc1pc1pc
Flash unit
(inc. standard reflector
and diffuser )
Transmitter TX-C01 Li-ion battery
11.1V-6 600mA h
(Ins ide t he fl ash unit)
Battery charger Al-case strap
n flash private strap
1set

MULTI
MULTI
MULTI
Press the “MENU” one more time, when the disappear,then press the function MULTI
selecting button“+”or””-” to operate, you can choose 1Hz,2Hz...10Hz flash frequency.
3.Multi-flash
Enter the mode by pressing the main “MENU” button, and press the function
selecting button “+” or “-” to operate, you can choose 5,10,15,20,25 different flash times.
Once disappear
can set the flash frequency
The flash can operate series of multi flash after receiving the camera’s
shutter signal, which is single shot of the moving object with different
actions, so as to achieve making multiple pictures into one.
For the high-quality shooting, when using multi flash, it is possible to
count the camera shutter speed according to the frequency(Hz). For example, when
10Hz,25 times, the shutter speed is 2.5s
Warm tips
Press “MENU”for 2s until the “MODEL” flickers, then
press the function selecting button”+”or “-” to adjust the brightness
higher or lower between 20%-100%,10% as a step up or down.
Press the “MENU” button 2s again, the model light will be off.
4.Modeling light
Press “Fn” button until the flickers, then press the function selecting button “+”
or “-” to operate, you can turn on or off the optical slave receiver.
5.Optical slave
5.Buzz
turn ON turn OFF
Press “Fn” button until the flickers, then press the function selecting button “+”or “-”
to operate, you can turn on or off the buzz.
turn ON turn OFF
Note: The Multi-flash is only available on M mode.
Shooting photo
VII.Remote control creative lighting through mix groups setting
1. Ensure all flashes channel settings are same, for
example all channel setting is channel 01.
2. Separate the flashes to be with different group
settings (Total A,B,C three groups).
3. Set the transmitter channels to be the same as
the flash unit.
4. After finishing setting, if you need to test one or more
different groups,you need to set the transmitter group
to be corresponding group.
5. If one group setting need to be changed, the transmitter has to be set
to the single corresponding group first, then change the setting.
Note:1. Only one by one corresponding the flash group can be
controlled by transmitter, mix group cannot control.
2. Under the mix group remote mode, the transmitter screen only
shows the first group flash setting. (For example, when the mix group is AB, the
transmitter will show the group A setting only; when the mix group is BC, the
transmitter will show the group B setting only.)
VIII.Camera setting
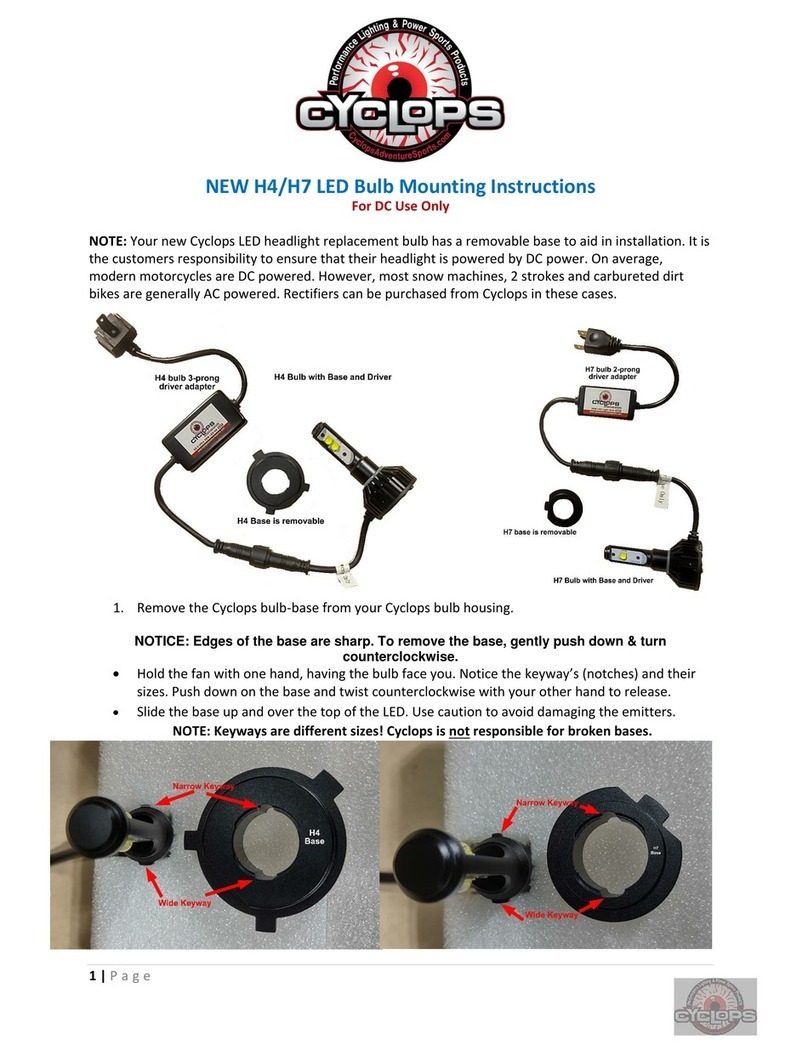
1) Install the transmitter (TX-C01)to the camera
hot shoe
2) Choose the camera flash mode “ETTL”
3) The LCD screen will indicate “ETTL” on upper
left corner, and also indicate camera’s zoom
and F-stop according to the current status.
1.How to proceed TTL sync flash
Note: when the camera is on ETTL mode, the flash group is controlled by the camera, it is not
available to control the flash ratio.
2.How to proceed high speed sync flash
This flash supports high speed sync at the whole power output,the following example
instruction is based on the Canon cameras.
2) When the camera flash mode is “ETTL” mode, no matter ant flash unit setting, it supports
high speed sync at the whole power output.
3) When the camera flash mode is “M”,only supports high speed sync when the flash unit
setting is on “M” mode( 1/1-1/128).
Flash LCD display
Enter “External speedlite control”,Turn off
the “Wireless functions”, then can set the shutter
sync to be first-curtain or second-curtain sync.
3.Select the first-curtain and second- curtain sync.
(1) (2)
*Tips: The second- curtain should be use under the slow
shutter speed.
1) Choose the camera shutter sync to high speed sync .
(3)
5 6
Group AGroup B
Group C
Fn

LED 5W
!
★ When the red capacity indicator is on, or the recycling time is more than 8s, it means that
the power isn't enough. Please charge in time, or the battery would be damaged, or can't
be charged any more.
★ When charging, plug the DC output end of charger into the battery DC socket, then insert
the charger plug into the AC100-230V power socket.Now the indicator of charger is red.
When fully charged, the indicator will turn green, the charger will be shut off and stop
charging.
★ After many times flash, the flash would stop working for the inner safety protection. At this
time, it needs to be cooled for 30mins, then restart to work. When the battery has fully
charged, the battery needs to be cooled for 30mins for the inner safety protection.
★ If the LCD brightness is very dark or battery power indicator is very low, please change new
batteries in time.
X.Warm tips
Warranty : Our company offer 12 months manufacturer warranty for the flash and 3 months
for the battery.(Battery can be fully charged and discharged for 300 times in theory)
XI.Repair & Maintenance
Preservation method: Please preserve the equipment with this method, so as to ensure its
function and usage stability.
1. After using, please shut off all the switches and power, take out the battery, so as to avoid
electricity leakage or self discharge.
2. Install the reflector on the light head, put all the accessories with poly bags,
and put them back to the Al-case, at last don't forget to place the total equipment at dry &
low temperature environment.
3. If leaving it for long time, please charge it once a month, and make it flash 5-10times. If the
battery hasn't been maintained for long time, is will be unavailable, get wet or cause the
main equipment damaged.
XII.Specifications
Model
GN
Power range (1/128-1/1) 8 f-stops power range with ±0.3th precise intervals
Flash time(full power)
Battery charging time
Color temperature
Recycling time
Protective device Overheating protection
Triggering way
Modeling bulb
Buzz
Power source
Li-ion battery
Battery charging way
Flash channel&group
Transmitter channel&group
Transmitter battery
Built 2.4GHz remote control/Test button/
Sync cable/Optical slave
Yes (ON/OFF)
Interchangeable&memoryless Li-ion battery/AC100-240V
power source(need power adapter)
Plug-in charging type
16 channels, 3groups
16 channels,7 modes of group setting
AA1.5V*2
1. Please don’t disassemble, repair or change the equipment, because there is high voltage
inside. Unauthorized persons shouldn’t repair it. Or it will be treated as giving up the warranty.
2. Don’t put it in 50℃+ place for a long time, don’t let it get wet, as well as avoiding metal pieces
or sand getting into the body.
3. Don’t use it in a damp, frigid or high temperature, as well as inflammable and explosive
environment.
4. Don’t let children play with the equipment, and put it out of children’ s reach for storing.
5. Neither stare at the flash tube, nor touch the flash tube or modeling bulb.
6. After using, please shut off the power switch so as to cut off the power, or take out the battery.
7. When continuously flash many times, as there are self-protection inside, the protection
program will be on, the flash will stop working. It needs to be cooled for about 30
minutes, then it can start to work again.
8. If the battery has just finished charging, for the protection inside the battery, it needs to be
cooled for 30 minutes, then put it into the light body to work.
9. When the LCD brightness is very dark or battery power indicator is very low, please
change new batteries in time to avoid the leakage flash or short trigger distance.
10. Please use the matched flash and transmitter to the camera brand(Don’t use the Canon
transmitter on Nikon cameras).Mixed use may damage the transmitter.
XIII.Warning
Must take out the battery before maintain or cleaning the equipment.
XIV.How to solve the common faults
Fault phenomenon Fault reason How to solve
Flash tube can not flash
Battery power is low Change a new battery or finish
fully charged
Power switch has not turned on
Battery has not been fit well
Flash tube has been damaged
(Note,except the above problems,if the recycling
indicator appears"OK".while press the test button,it
doesn't flash, means the flash tube is damaged)
Turn on power switch
Press the battery downwards until
hearing a sound of “click”
Ask for the help from professional
person to change a new flash tube
Battery cannot output
any power energy
Battery is not fully charged. Check if the charger is in good
condition.(use another good one to check)
Battery can't be charged any more.
Make the battery cool for 30 minutes, and
the temperature sensor switch will be on
automatically ,then start to charge again.
Battery has been damaged. Battery has pasted its lifetime,
should change a new one.
Remote trigger can not
work
(Note: if recycling indicator is ok,
test button can trigger the flash)
Transmitter has not turned on.
Transmitter batteries have used out
Channel and group have not been
set well
Push the transmitter switch to "ON".
Change new remote trigger batteries.
Set the same channel & group of
flash & transmitter
The flash shut off
automatically, or can
not be turned on
The inner protection is on, power
source is cut off automatically.
Battery capacity has run off
Power switch is not turned on
Let the flash body cool down, then
restart the flash
Change a new battery or charge the
battery.
Turn on the power switch
It can not remote control
the flash unit with high
speed sync when the
transmitter is on the
camera.
Turn on the transmitter then keep pressing the “RST” button for 3s until the
indicator is blinking. Then reset the channel and groups of transmitter and
flash unit.
Transmitter is not compatible with the camera,should choose the
corresponding special transmitter for the right camera brand.
11.1V-6600mAh
87
TTL-480C TTL-680C
56 68
5500K±200K
700 500
0.1~4.5s 0.1~5.5s
6 hours(with self-protection)
This manual suits for next models
1
Table of contents


