Nielsen Nave II User manual

Nielsen Audio Video Encoder (NAVE II)
Quick Installation Guide
norpak corporation
Document # 85-10410-01
Revision A


NAVE II Quick Installation Guide
Introduction
Thank you for purchasing the Nielsen Audio Video Encoder - NAVE II. This
document provides a quick reference for installation of the Nielsen Audio Video
Encoder, referred to as the NAVE II. More detailed instructions can be located in
the NAVE II User Manual.
The NAVE II is designed to work with serial digital video (SMPTE 259M or
292M) and with embedded or discrete digital audio (AES).
Package Contents
Check to verify that your NAVE II product contains all of the items listed below.
• The NAVE II unit – part number 93-10321-01
• Power Cord
• Serial Communication Cable (Null Modem Configuration)
part #91-09497-01
• Rack Mount Kit
Quantity Description
2 Rear NAVE brackets, part # 41-10369-01 *
2 Rear rack bracket, part # 41-10346-01
4 Screw, #8 flat head, ⅜"
8 Nut clip, #10
8 Screw, #10 pan head, ½"
4 Screw, #10 pan head, ⅜"
2 Tie-wrap
* If you are using an early model of the chassis, the kit contains 1
each 41-10345-01 and 41-10348-01, instead of the two 41-10369-01
brackets. The 10345 is for the right side of the NAVE, and the 10348
is for the left.
• RJ11 Phone Cable
• NAVE II Documentation CD
Missing or damaged items can be supplied or replaced by contacting Norpak
Corporation or Encoder Support at Nielsen Media Research as noted in the Contact
section at the end of this document.
Questions? Contact Nielsen Media Research Encoder Support at 1-800-537-4872 option 2
85-10410-01 1
NAVE II Quick Installation Guide
Planning
Before installing the NAVE II Unit, determine the:
• Correct feed for the encoder (label on top of unit will have the feed and SID #
this unit has been assigned to)
• Installation Location
• Type of video interface (259M or 292M)
• Video format
• Type of audio interface (AES or SDI embedded)
• Audio groupings (5.1, stereo, or mono), referred to as clusters in the NAVE II
• Assignment of clusters to AES Audio pairs (Discrete AES or SDI embedded
Audio)
Installation
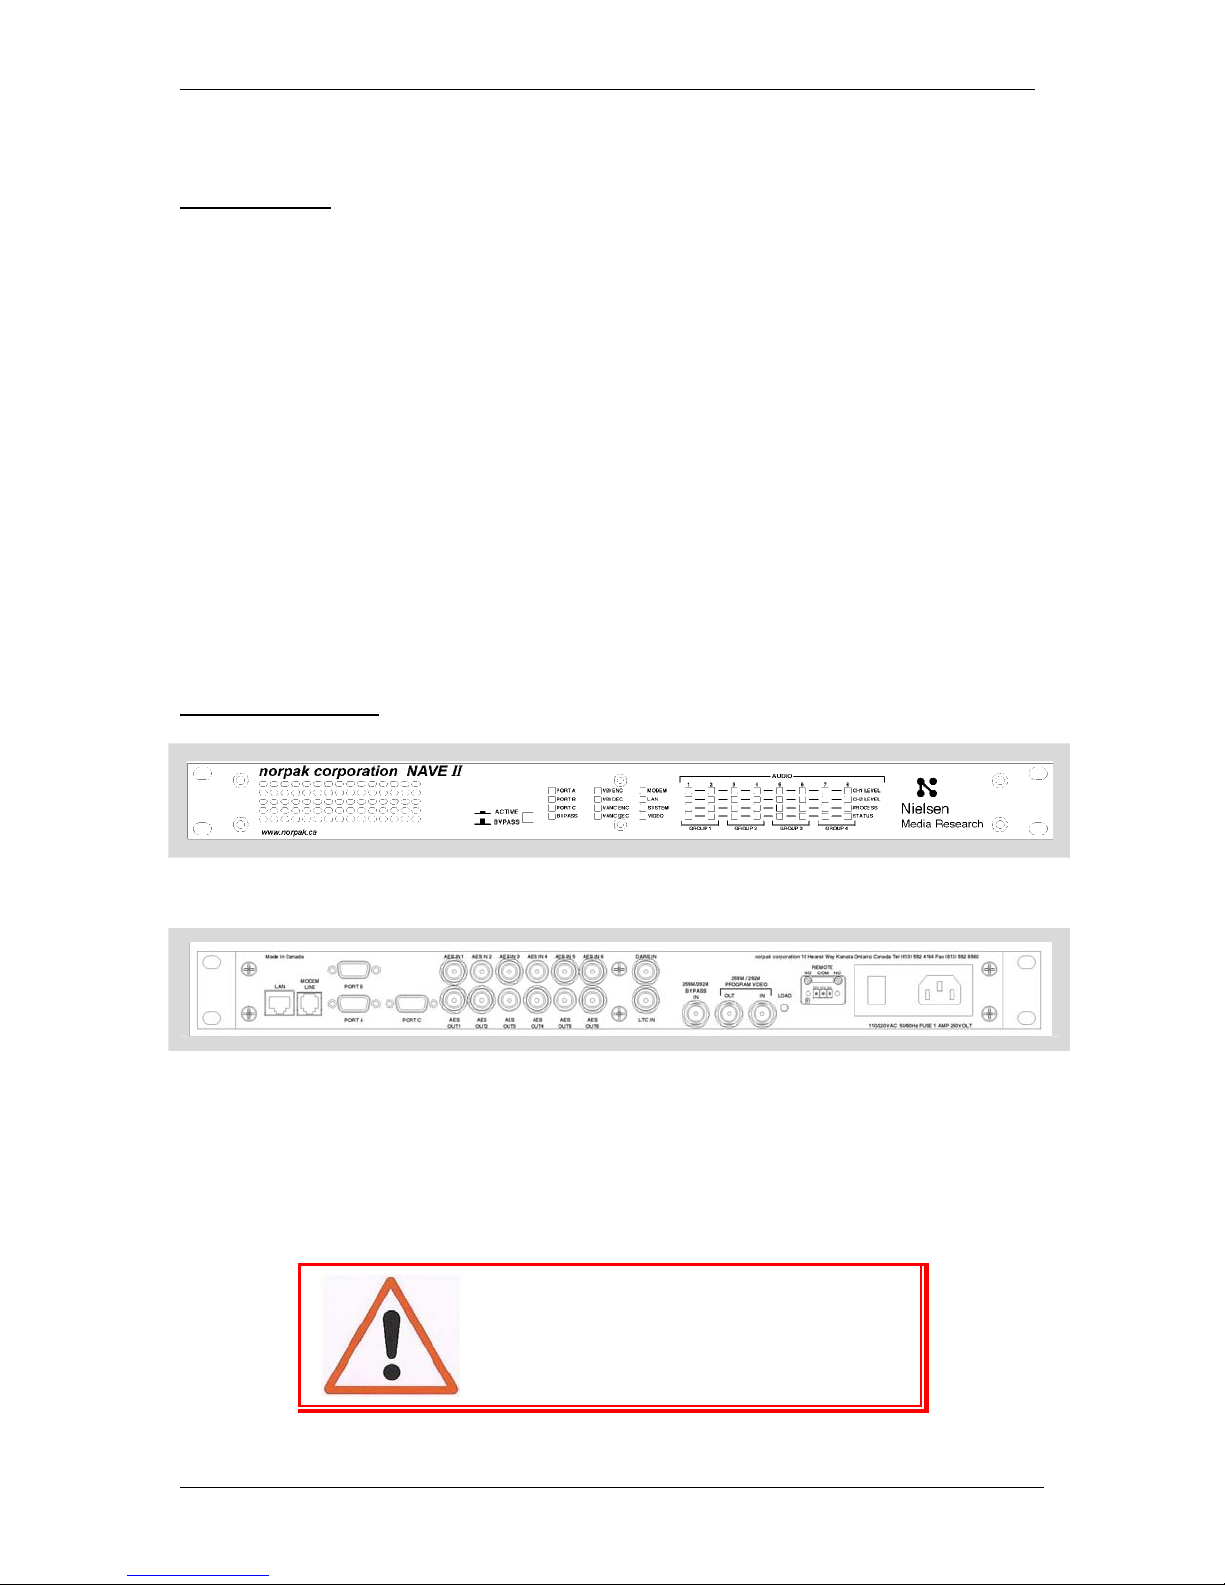
Figure 1 - NAVE II Front Panel
Figure 2 - NAVE II Rear Panel
1 Install NAVE II in rack using the rear support brackets supplied.
2 Connect power cord to 110/120 VAC outlet.
3 Connect incoming video to both Program Video In and Bypass In. Should the
unit switch to bypass, it will internally connect Bypass In to Program Out.
It is imperative that Bypass Video be wired
to the NAVE II. Failure to do so will result
in a loss of video when the unit is manually
or automatically (internal fault detection)
switched to Bypass Mode.
Questions? Contact Nielsen Media Research Encoder Support at 1-800-537-4872 option 2
2 85-10410-01

NAVE II Quick Installation Guide
4 Connect outgoing video to Program Video Out.
5 Connect incoming AES Audio to AES input (if AES audio is used).
6 Connect output AES Audio to AES Output (if AES audio is used).
7 Power up unit
Communications Setup
1 Connect an ASCII terminal or a PC with communications software such as
Windows HyperTerminal to Port A on the rear panel of the Encoder using the
null modem cable provided.
2 Set terminal to VT100 emulation, 9600 baud, 8 bits, no parity, 1 stop bit, and
Xon-Xoff flow control.
3 Press <Enter or CR> to get the login prompt. If there is no login prompt,
check Port A LED to see if it flashes green with each keystroke. If there is no
flash indication on the Port A LED, verify that the RS232 cable is attached to
Port A on the back of the NAVE II unit and/or replace the cable with a serial
communication cable with null modem configuration. To access the main
menu, type “NAVE2” at the login prompt and press <Enter or CR>.
Encoder Configuration
If the default settings on the encoder do not match your requirements, call Nielsen
Encoder Support to verify correct settings for our records.
Verify Video Configuration
1 From Main menu select option 1- Configure the Encoder.
2 From the Configure the Encoder menu select option 1- Show Video
Configuration.
3 Verify that the Encoder is in the correct video format for the input signal. If it
is not correct, you will need to return to the sub-menu and select option 2 - Set
Video Configuration followed by option 1 – Select Video Format to make
the correct changes.
4 For detailed configuration instructions refer to the NAVE II User Manual.
Questions? Contact Nielsen Media Research Encoder Support at 1-800-537-4872 option 2
85-10410-01 3
Table of contents
Other Nielsen Media Converter manuals

Popular Media Converter manuals by other brands


H&B
H&B TX-100 Installation and instruction manual

Bolin Technology
Bolin Technology D Series user manual

IFM Electronic
IFM Electronic Efector 400 RN30 Series Device manual

GRASS VALLEY
GRASS VALLEY KUDOSPRO ULC2000 user manual

Linear Technology
Linear Technology DC1523A Demo Manual

Lika
Lika ROTAPULS I28 Series quick start guide

Weidmuller
Weidmuller IE-MC-VL Series Hardware installation guide

Optical Systems Design
Optical Systems Design OSD2139 Series Operator's manual

Tema Telecomunicazioni
Tema Telecomunicazioni AD615/S product manual

KTI Networks
KTI Networks KGC-352 Series installation guide

Gira
Gira 0588 Series operating instructions

Lika
Lika SFA-5000-FD user guide