NIEUWKOOP EC2620 User manual

USER MANUAL
Testers
EC2620 / EC2630 / EP2000
PH2620 / PH2630 / PH2720

TESTERS
EC2620 / EC2630 / EP2000 / PH2620 / PH2630 / PH2720
_____________________________________________________________________________________________
2
SUMMARY
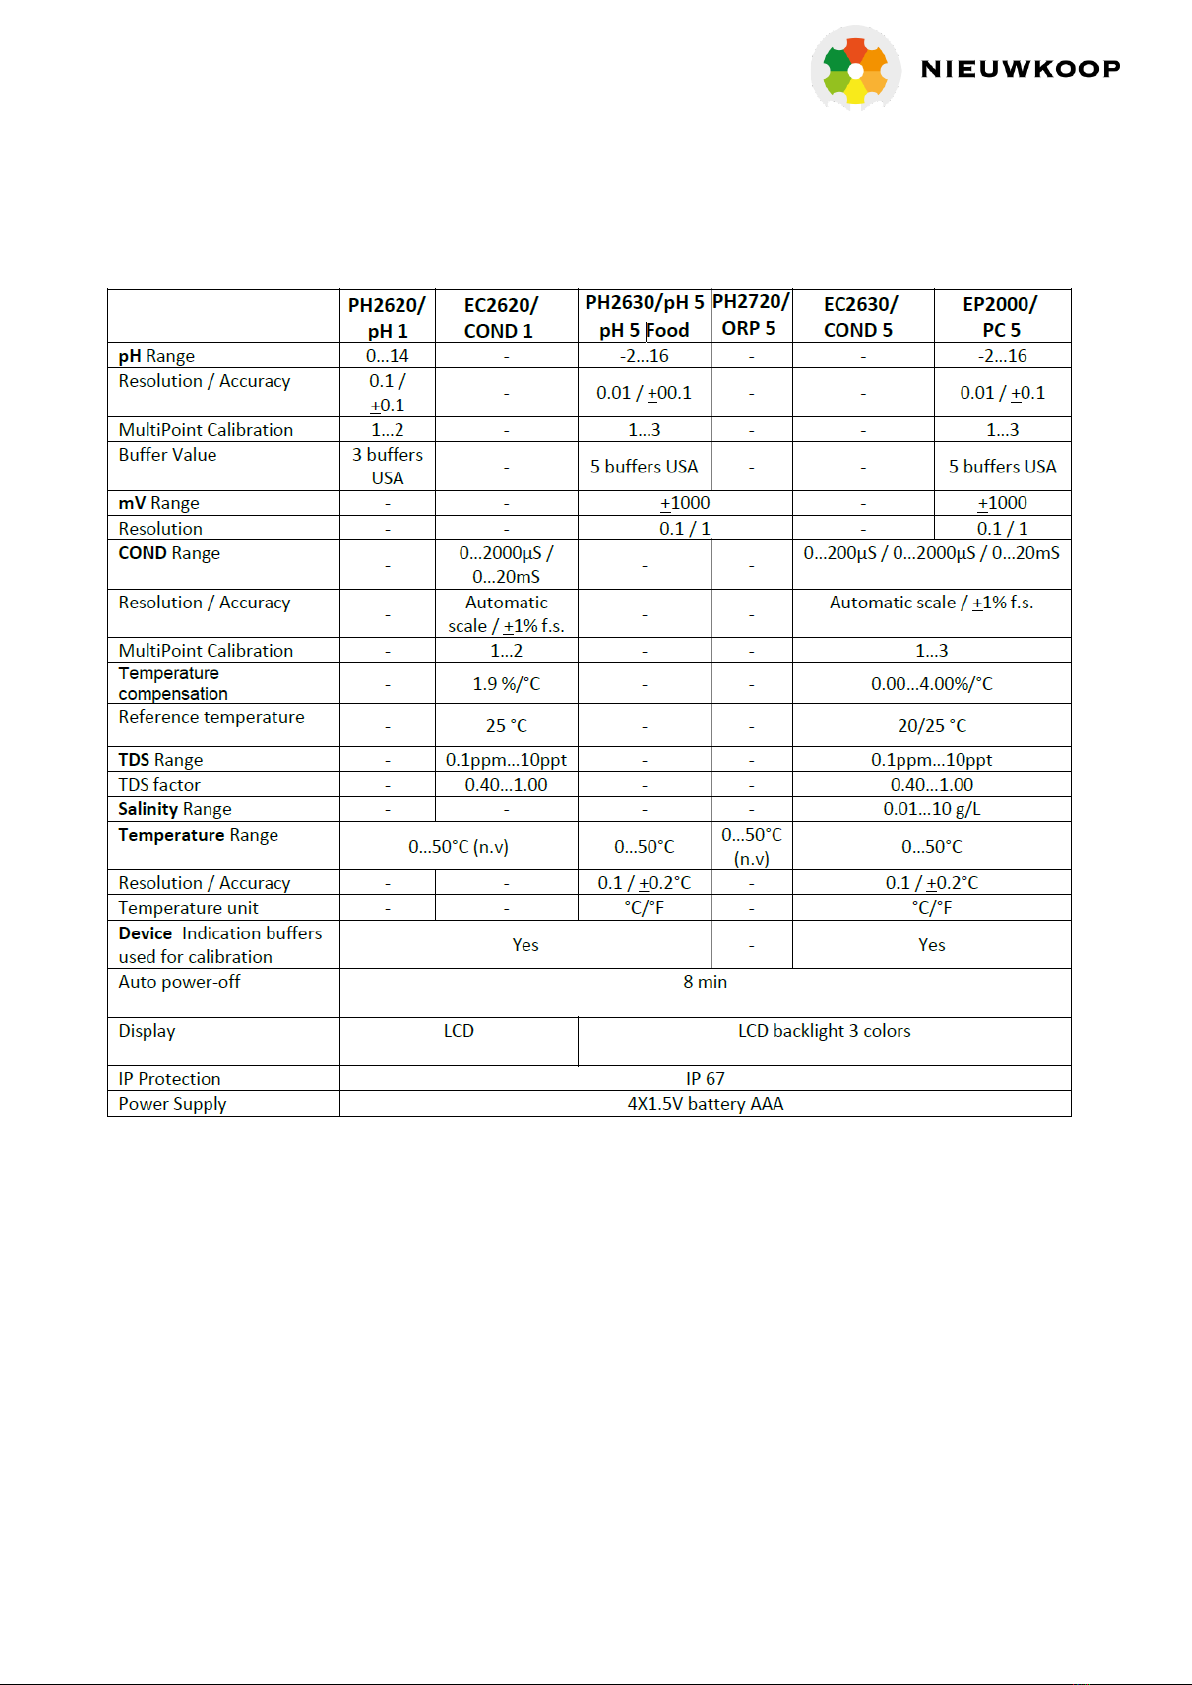
DATA SHEET.................................................................................................................................................................................................................................3
INTRODUCTION........................................................................................................................................................................................................................4
SAFETY INSTRUCTIONS .....................................................................................................................................................................................................4
DISPOSAL OF ELECTRONIC DEVICES....................................................................................................................................................................4
PRODUCT DESCRIPTION..................................................................................................................................................................................................5
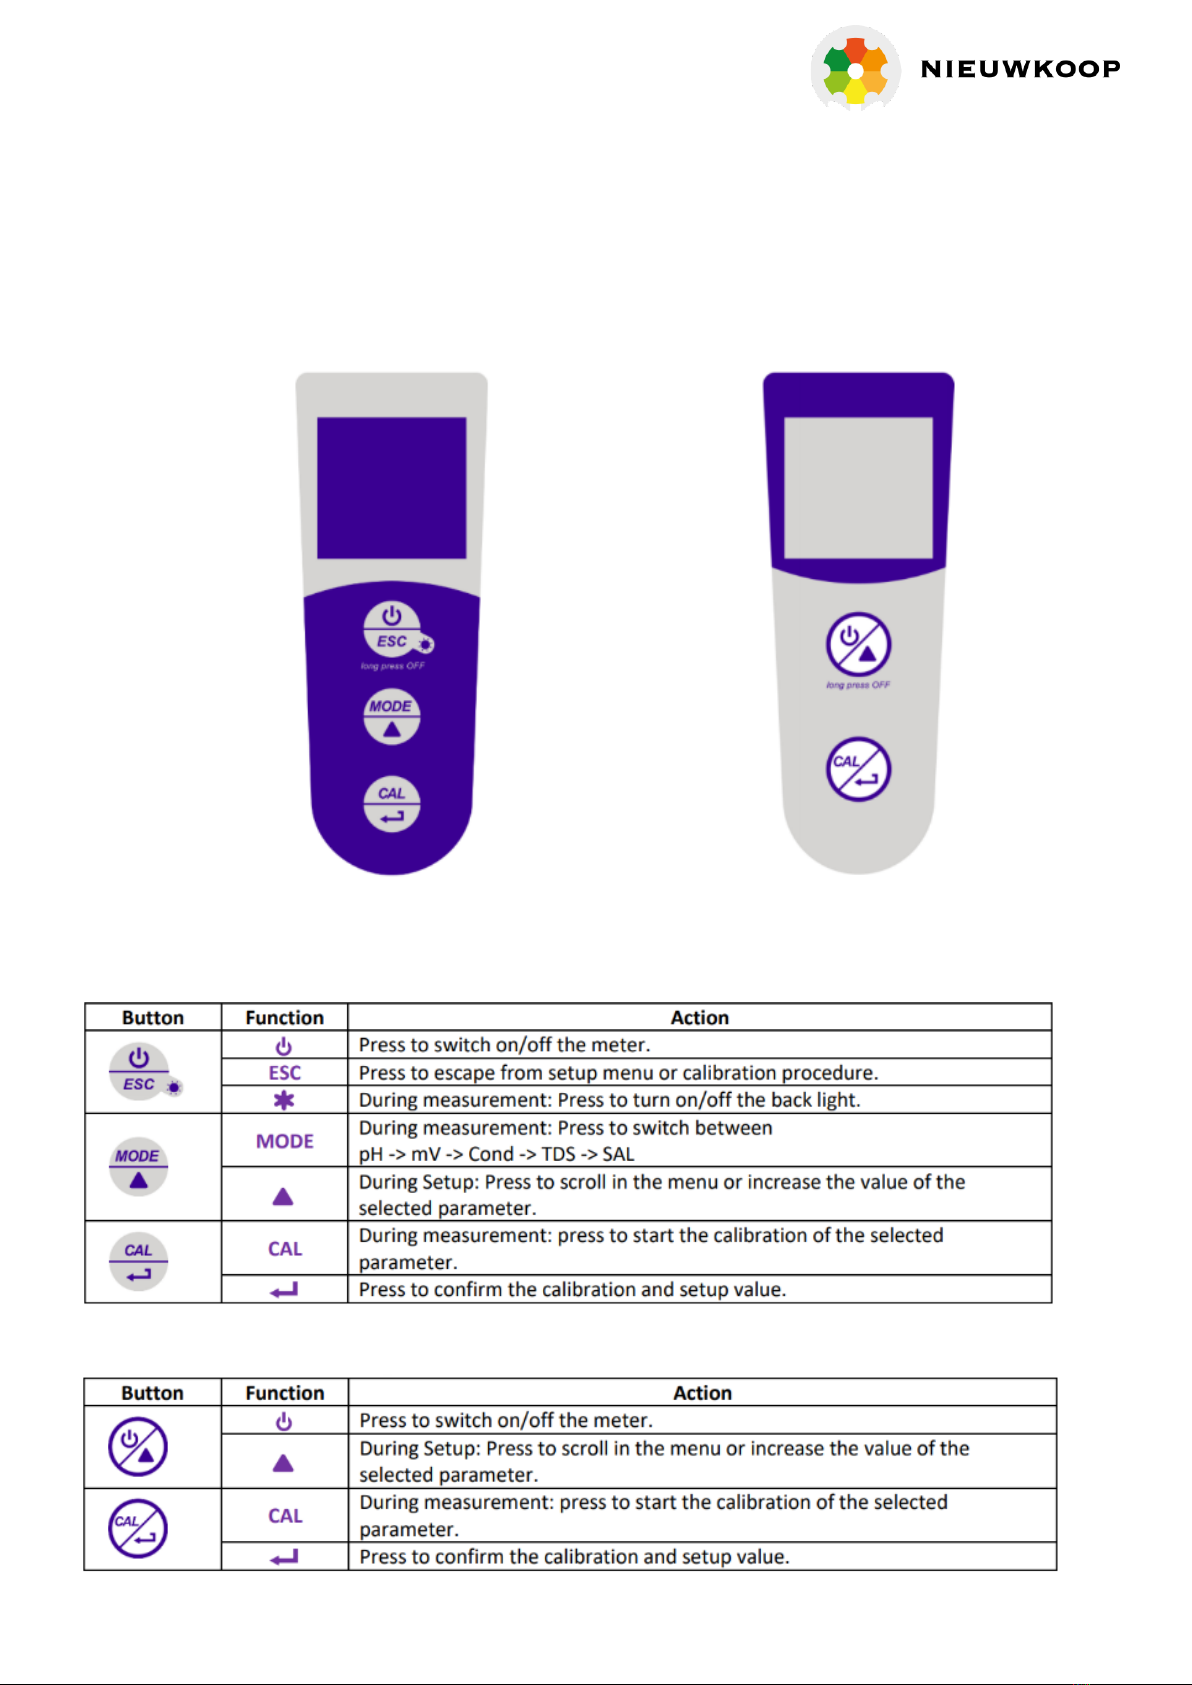
KEYPAD.......................................................................................................................................................................................................................................5
Keypad Functions for Tester PH2630-pH5 / EC2630-Cond5 / EP2000-PC5............................................5
Keypad Functions for Tester PH2620-pH1 en EC2620-Cond1 ................................................................................5
DISPLAY......................................................................................................................................................................................................................................6
CALIBRATION POINTS INDICATOR....................................................................................................................................................................6
POWER SUPPLY...................................................................................................................................................................................................................6
INSTRUCTIONS FOR PH2620-pH1 / EC2620-Cond1 ............................................................................................................................7
POWER ON................................................................................................................................................................................................................................7
POWER OFF..............................................................................................................................................................................................................................7
SETUP MENU for PH2620-pH1 / EC2620-Cond1..................................................................................................................................7
MEASUREMENT .....................................................................................................................................................................................................................7
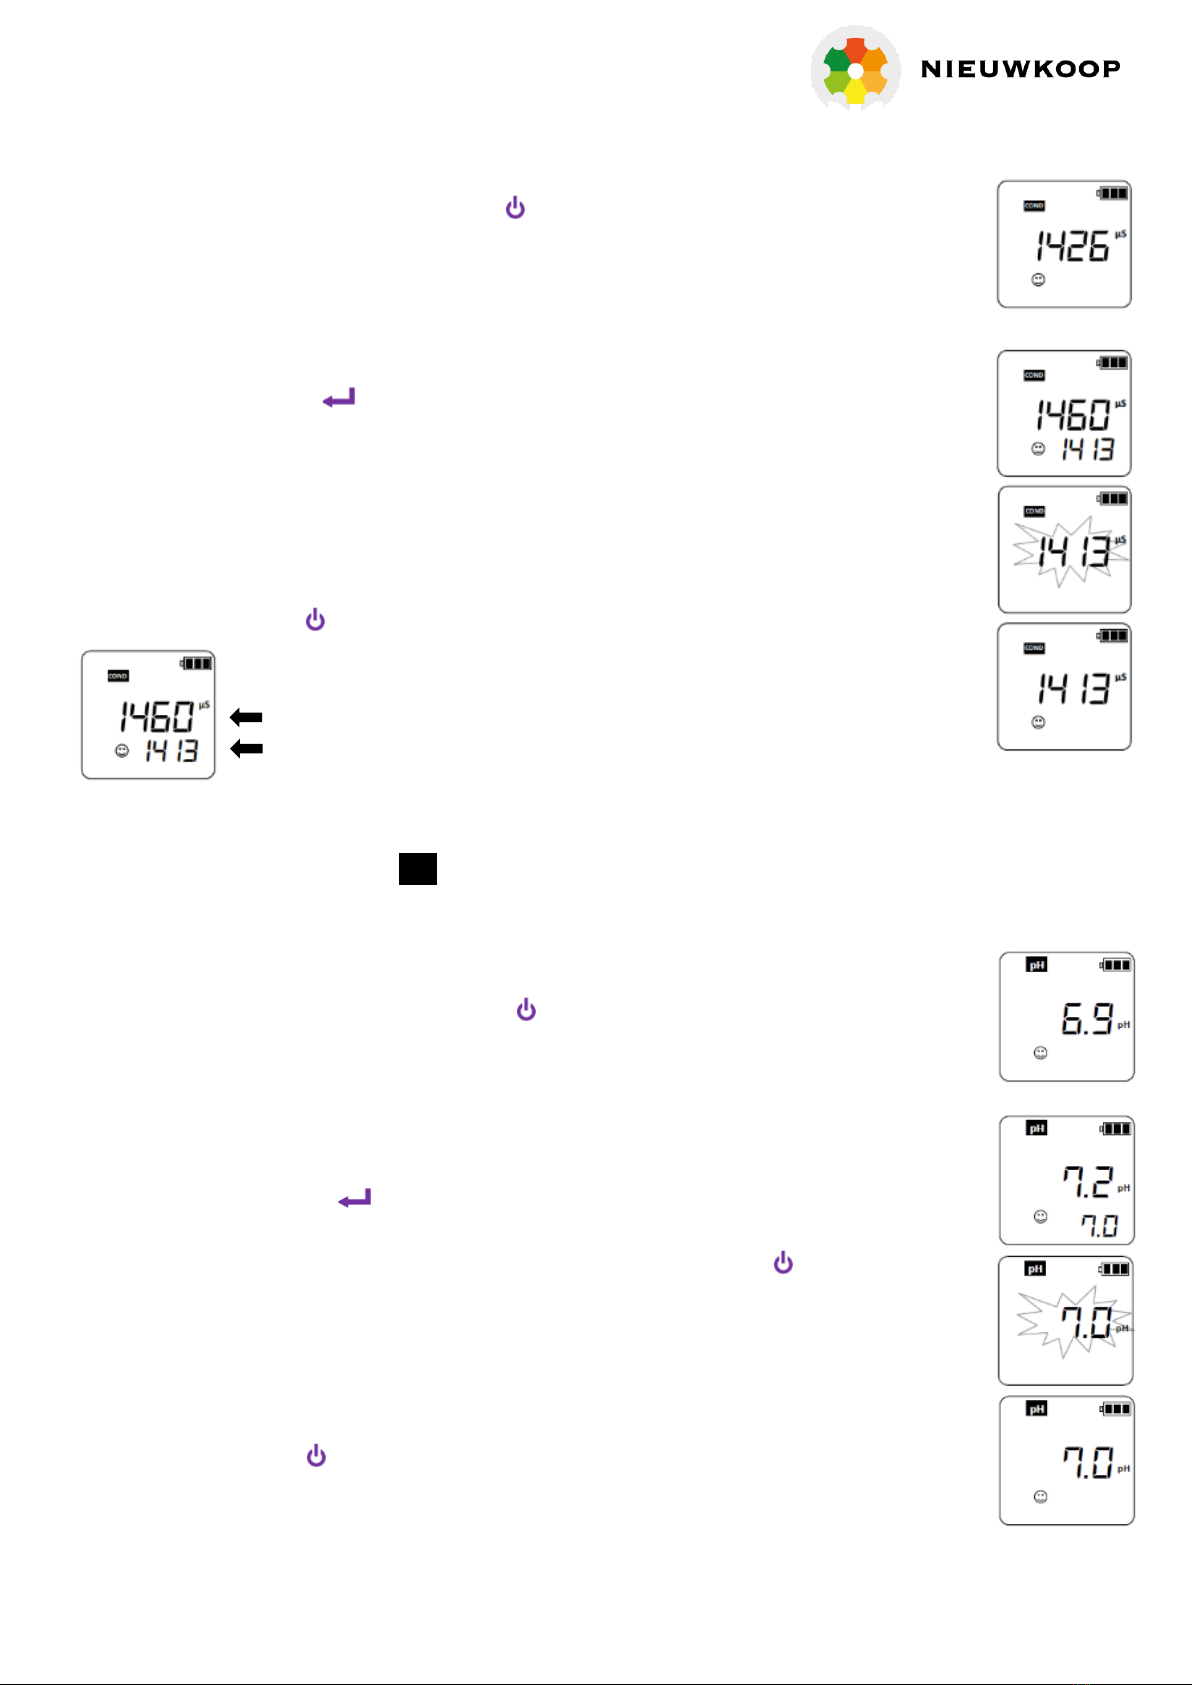
CALIBRATION PROCEDURE FOR CONDUCTIVITY (EC2620-Cond1)..................................................................................8
CALIBRATION PROCEDURE FOR TDS (EC2620-Cond1).................................................................................................................8
CALIBRATION PROCEDURE FOR pH (PH2620-pH1) ...........................................................................................................................8
INSTRUCTIONS FOR PH2630-pH5 / EC2630-Cond5 / EP2000-PC5...................................................................................9
POWER ON................................................................................................................................................................................................................................9
SETUP MENU for PH2630-pH5 / EC2630-Cond5 / EP2000-PC5.......................................................................................9
MEASUREMENT .....................................................................................................................................................................................................................10
CALIBRATION PROCEDURE FOR CONDUCTIVITY (EC2630-Cond5/EP2000-PC5)............................................10
CALIBRATION PROCEDURE FOR pH (PH2630-pH5/EP2000-PC5).....................................................................................10
POWER OFF..............................................................................................................................................................................................................................11
REPLACEMENT OF SENSOR........................................................................................................................................................................................11
SENSOR MAINTENANCE..........................................................................................................................................................................................11
SETUP MENU FUNCTIONS for all Testers.........................................................................................................................................................12
ERROR DESCRIPTION...........................................................................................................................................................................................................12

TESTERS
EC2620 / EC2630 / EP2000 / PH2620 / PH2630 / PH2720
_____________________________________________________________________________________________
3
PRODUCT SPECIFICATIONS

TESTERS
EC2620 / EC2630 / EP2000 / PH2620 / PH2630 / PH2720
_____________________________________________________________________________________________
4
INTRODUCTION
Congratulations for buying one of the most innovative and easy to use Pocket Tester.
Pocket testers series 1 and 5 are very handy for the routine measurements in all applications where
fast indication of measurement is required.
These Testers are specially designed for applications like: Agriculture, water and waste water
treatment, Hydroponics, Aquaculture, Environmental monitoring, Food and beverage
manufacturing, Cooling towers, Printing, Education etc.
Tester series 1 is basic one with fixed sensor and only two keys for all functions.
Tester series 5 is advanced version with replaceable sensor, multicolour backlight display and 3 key
for all functions.
SAFETY INSTRUCTIONS
Read this instruction manual carefully before using your new tester.
The membrane of pH electrode is made of glass and can be danger in case it breaks.
To avoid damage check the electrode tip after each measurements.
Replace all batteries together with the same type.
The manufacturer of these instruments can’t be held responsible for any improper use.
Verification of the measuring results is the responsibility of the operator and the manufacturer
doesn’t respond to any direct of indirect damage occurred while using this instrument.
DISPOSAL OF ELECTRONIC DEVICES
The electrical and electronic equipment marked with this symbol cannot be
disposed of in public landfills.
According to the UE Directive 2002/96/EC, the European users of electrical
and electronic equipment can return it to the dealer or manufacturer upon
purchase of a new one.
The illegal disposal of electrical and electronic equipment is punished with
an administrative fine.

TESTERS
EC2620 / EC2630 / EP2000 / PH2620 / PH2630 / PH2720
_____________________________________________________________________________________________
5
PRODUCT DESCRIPTION
KEYPAD
PH2630-pH5 / EC2630-Cond5 / EP2000-PC5 PH2620-pH1 / EC2620-Cond1
Keypad Functions for Tester PH2630-pH5 / EC2630-Cond5 / EP2000-PC5
Keypad Functions for Tester PH2620-pH1 / EC2620-Cond1

TESTERS
EC2620 / EC2630 / EP2000 / PH2620 / PH2630 / PH2720
_____________________________________________________________________________________________
6
DISPLAY
The device is endowed with LCD display for Series 1 and 3 colors backlight LCD for Series 5
CALIBRATION POINTS INDICATOR
When a calibration is performed these icons indicate the points calibrated and
*First point for pH calibration is always 7.00 pH
POWER SUPPLY
This tester series works with 4x AAA Alkaline or NiMH rechargeable batteries.
Make sure the batteries have correct polarity with positive pole upside.
Dispose of discharge batteries correctly according tot he applicable legislation.
Replace all batteries together with same type.

TESTERS
EC2620 / EC2630 / EP2000 / PH2620 / PH2630 / PH2720
_____________________________________________________________________________________________
7
INSTRUCTIONS FOR PH2620-pH1 / EC2620-Cond1
POWER ON
Press key once, the meter will switch ON and the display will show all the segmetns active for 2
sec. and then i twill display the following:
All segments ON -> model name + software release -> measurement
POWER OFF
To turn off the meter press key for 3 seconds, the meter will switch OFF.
SETUP MENU for PH2620-pH1 / EC2620-Cond1
1. With meter switched off, press and hold CAL key and press key once.
2. The meter will switch on wit hall the segements active, release CAL key, the meter
will go into the Setup Menu.
3. The display will show SLT on primary display with COND flashing (only for EC2620-
Cond1).
4. Press to select the parameter between COND or TDS to be used for
measurements and press to confirm (only for EC2620-Cond1).
o Only if the TDS is selected then the display will show TDS, FCT flashing, press
to change this factor and then press to confirm (only for EC2620-Cond1).
5. The display will show RST (RESET): nO flashing.
6. Press and select YES if a reset of the meter is required and then press
to confirm.
7. At this point the meter finishes SETUP menu and switches off.
NOTE: To skip the changing of the value simply confirm the flashing value with
key, the meter will go tot he next Parameter.
METING
Rinse the electrode with distilled water or sample prior to start measurement.
Fill the measuring cap with sample, switch on the meter with , immerse the Tester in
sample and wait for stability, when stability icon ☺appears on display take the reading.
During measurement make sure that pH electrode membrane is free from air bubbles,
and that there isn’t any air bubble around or between conductivity sensor.

TESTERS
EC2620 / EC2630 / EP2000 / PH2620 / PH2630 / PH2720
_____________________________________________________________________________________________
8
CALIBRATION PROCEDURE FOR CONDUCTIVITY (EC2620-Cond1)
1. Power ON the meter by pressing the key.
2. Rinse the probe with distilled water.
3. Immerse the probe in the calibration solution (1413µS or 12.88 mS), wait for stability ☺
4. Press CAL key.
5. The meter will start calibration procedure and will recognise automatically the
standard used.
6. When stable press to confirm and complete the calibration.
7. The standard value will flash for 3 times and then the meter will go into the
measurement mode.
8. If the 2nd point calibration is required then rinse the probe with distilled water and
immerse in the second standard solution (1413µS or 12.88 mS), wait for stability ☺
9. Repeat the points 4 to 7.
10. The calibration process is completed and the meter is ready to use.
NOTE: Anytime press key to abort and exit from calibration procedure.
Reading based on theoretical cell value C=1
Standard solution
CALIBRATION PROCEDURE FOR TDS (EC2620-Cond1)
When the meter is set to read TDS then the calibration is done on TDS with 1 or 2 points.
The calibration procedure for TDS is same as for Conductivity.
CALIBRATION PROCEDURE FOR pH (PH2620-pH1)
1. Power ON the meter by pressing the key.
2. Rinse the electrode with distilled water.
3. Immerse the electrode in the 1st buffer solution pH7.0 and wait for stability ☺
4. Press CAL key.
5. The meter will start calibration procedure and will recognize automatically the
standard used.
6. When stable press to confirm and complete the calibration.
7. The standard value will flash for 3 times and then the meter will ask for next point
for calibration. If only 1 point calibration is required then press to finish and exit.
8. If the 2nd point calibration is required then rinse the electrode with distilled water
and immerse in pH4.0 or pH10.0, wait for stability ☺
9. Repeat the points 4 to 7.
10. The calibration process is completed and the meter is ready to use.
NOTE: Anytime press key to abort and exit from calibration procedure.
NOTE (2): When the first point calibration is confirmed (point 7) if the sensor is not
removed from the buffer solution, the instrument may give wrong buffer error.

TESTERS
EC2620 / EC2630 / EP2000 / PH2620 / PH2630 / PH2720
_____________________________________________________________________________________________
9
INSTRUCTIONS FOR PH2630-pH5, EC2630-Cond5, EP2000-PC5
POWER ON
Press key once, the meter will switch On and performs a test of 3 colors backlight display and then
show all the segments active for 2 sec. Then it will display the following:
SETUP MENU for PH2630-pH5, EC2630-Cond5, EP2000-PC5
1. With meter switched off, press and hold CAL key and press key once.
2. The meter will switch on with all the segments active, release CAL key, the meter will got into the
Setup Menu. (green backlight during setup).
3. Press key to select the parameter to be changed between:
4. Press to enable the value changing of the selected parameter.
5. The value of selected parameter will start flashing.
6. Press to change the value and then press to confirm.
7. The value stops flashing.
8. Press to select other parameters or press ESC to exit the setup menu.
NOTE: Any time press ESC key to exit from SETUP menu.

TESTERS
EC2620 / EC2630 / EP2000 / PH2620 / PH2630 / PH2720
_____________________________________________________________________________________________
10
MEASUREMENT
Rinse the electrode with distilled water or sample prior to start measurement.
Fill the measuring cap with sample, switch on the meter with and press MODE key to select
desired parameter to be measured (green backlight during measurement).
Immerse the Tester in sample and wait for stability, when stability icon ☺appears on display take
the reading.
During measurement make sure that pH electrode is free from air bubbles, and that there isn’t
any air bubble around or between conductivity sensor.
CALIBRATION PROCEDURE FOR CONDUCTIVITY (EC2630-Cond5/EP2000-PC5)
1. Power ON the meter by pressing the key.
2. Rinse the probe with distilled water.
3. Immerse the probe in the calibration solution (84μs, 1413μS or 12.88 mS), wait for
stability ☺
4. Press CAL key, (blue backlight during calibration).
5. The meter will start calibration procedure and will recognise automatically the
standard used.
6. When stable press to confirm and complete the calibration.
7. The standard value will flash for 3 times and then the meter will go into the
measurement mode.
8. If the 2nd point calibration is required then rinse the electrode with distilled water
and immerse in the 2nd Standard, wait for stability ☺
9. Repeat the points 4 to 7.
10. If the 3rd point calibration is required then rinse the electrode with distilled water
and immerse in the 3rd Standard, wait for stability ☺
11. Repeat the points 4 to 7.
12. The calibration process is completed and the meter is ready to use.
NOTE: Anytime press ESC key to abort and exit from calibration procedure.
NOTE(2): In case multipoint calibration is performed it is better to start from the lower value
standard first and then go increasing.
CALIBRATION PROCEDURE FOR pH (PH2630-pH5, EP2000-PC5)
1. Power ON the meter by pressing the key.
2. Rinse the electrode with distilled water.
3. Immerse the electrode in the 1st buffer solution pH7.00 and wait for stability ☺
4. Press CAL key (blue backlight during calibration).
5. The meter will start calibration procedure and will recognize automatically the
standard used.
6. When stable ☺press to confirm and complete the calibration.
7. The standard value will flash for 3 times and then the meter will ask for next point
for calibration. If only 1 point calibration is required then press to finish and exit.

TESTERS
EC2620 / EC2630 / EP2000 / PH2620 / PH2630 / PH2720
_____________________________________________________________________________________________
11
8. If the 2nd point calibration is required then rinse the electrode with distilled water
and immerse in pH4.01 or pH10.01, wait for stability ☺, otherwise press ESC to finish
and exit.
9. Repeat the points 4 to 7.
10. If the 3rd point calibration is required then rinse the electrode with distilled water and
immerse in the last buffer, wait for stability ☺, otherwise press ESC to finish and exit.
11. Repeat the points 4 to 7.
12. De calibration procedure is completed and the meter is ready to use.
NOTE: Anytime press ESC key to abort and exit from calibration procedure.
POWER OFF
To turn off the meter press key for 3 seconds, the meter will switch off. The instrument can not be
switched off during calibration.
REPLACEMENT OF SENSOR
Tester 5 series has replacement sensors which can be replaced in case it expires of damages.
1) To replace the sensor unscrew the dial in anti-clock wise.
2) Pull out sensor from unit body.
3) Put a new sensor by matching correctly the sign of dent.
4) Be sure that all the gaskets are good and in correct position.
5) Screw the dial tightly.
SENSOR MAINTENANCE
Before first time use or after long time dry storage, leave the probe in tap water or storage solution
for at least 30 minutes to activate the sensor.
EC2620-Cond1 / EC2630-Cond5:
- Rinse the probe with distiller water or sample before use.
- For short time storage use distiller water. For long time store dry.
PH2620-pH1 / PH2630-pH5 pH5 Food / PH2720-ORP5 / EP2000-PC5:
- Rinse the probe with distiller water or sample before use.
- Store the probe in storage solution for regular use. For long time store dry.
- Never store pH sensor in distilled water
Never touch conductivity probe with paper, for cleaning purpose only rinse with distilled water.
If touched the probe may damage.

TESTERS
EC2620 / EC2630 / EP2000 / PH2620 / PH2630 / PH2720
_____________________________________________________________________________________________
12
SETUP MENU FUNCTIES voor alle Testers
ERROR DESCRIPTION
Error
Contents
Checking
Wrong pH buffer solution or the
recognition of calibration solution
out
of range.
1. Check whether buffer solution is correct.
2. Check whether the meter connects the
electrode well.
3. Check whether the electrode is damaged.
Press key when measuring value
is not stable during calibration.
Press key when ☺icon appears.
During calibration, the measuring
value is not stable for ≥3min.
1. Check whether there are bubbles in glass
bulb.
2. Replace with new electrode.
Electrode zero electric potential out
of range (<-60mV or >60mV).
1. Check whether there are bubbles in glass
bulb.
Electrode slope out of range(<85%
or >110%)
2. Check whether pH buffer solution is
correct.
3. Replace with new pH electrode.
pH measuring range out of range
(<0.00 pH or >14.00pH) 1 Series
( <-2.00 pH or >16.00pH ) 5 Series
1. Check whether the electrode is suspended.
2. Check whether the meter connects the
electrode well.
3. Check whether the electrode is damaged

This manual suits for next models
5
Table of contents
Other NIEUWKOOP Test Equipment manuals