Nike HRM2400 User manual

Exhibit K: User Manual 2
FCC ID: QYUHRM2400

1
INDEX
English . . . . . . . . . . . . . . . . . . . . . . . . . . . . . . . . . . . . . . . . . . . . . . . . . . . . . . . . . . . . . . . .2 23
Français . . . . . . . . . . . . . . . . . . . . . . . . . . . . . . . . . . . . . . . . . . . . . . . . . . . . . . . . . . . . . . . 2445
Español . . . . . . . . . . . . . . . . . . . . . . . . . . . . . . . . . . . . . . . . . . . . . . . . . . . . . . . . . . . . . . . 4667
Português . . . . . . . . . . . . . . . . . . . . . . . . . . . . . . . . . . . . . . . . . . . . . . . . . . . . . . . . . . . . . 68 89
Italiano . . . . . . . . . . . . . . . . . . . . . . . . . . . . . . . . . . . . . . . . . . . . . . . . . . . . . . . . . . . . . . . . 90 111
Deutsch . . . . . . . . . . . . . . . . . . . . . . . . . . . . . . . . . . . . . . . . . . . . . . . . . . . . . . . . . . . . . . . 112 133
Nederlands . . . . . . . . . . . . . . . . . . . . . . . . . . . . . . . . . . . . . . . . . . . . . . . . . . . . . . . . . . . 134 155
Dansk . . . . . . . . . . . . . . . . . . . . . . . . . . . . . . . . . . . . . . . . . . . . . . . . . . . . . . . . . . . . . . . . . 156 177
Svenska . . . . . . . . . . . . . . . . . . . . . . . . . . . . . . . . . . . . . . . . . . . . . . . . . . . . . . . . . . . . . . . 178 201
Service Centers . . . . . . . . . . . . . . . . . . . . . . . . . . . . . . . . . . . . . . . . . . . . . . . . . . . . . . . 202
2
Information is Power
By measuring intensity (heart rate /pace) and
duration (time) you can avoid over training,
help prevent injury, and maximize your
chances of achieving your goals.
triax cv10 features
• Accurate heart-rate and pace data
• Digital transmission
• 100 lap memory
• Programmable training zones
• View button for quick access to key info
• Automatic lap measurement
• Data: timing information, time in zone,
average pace and average heart rate
for each lap/run.
• Time /Day /Date/Alarms
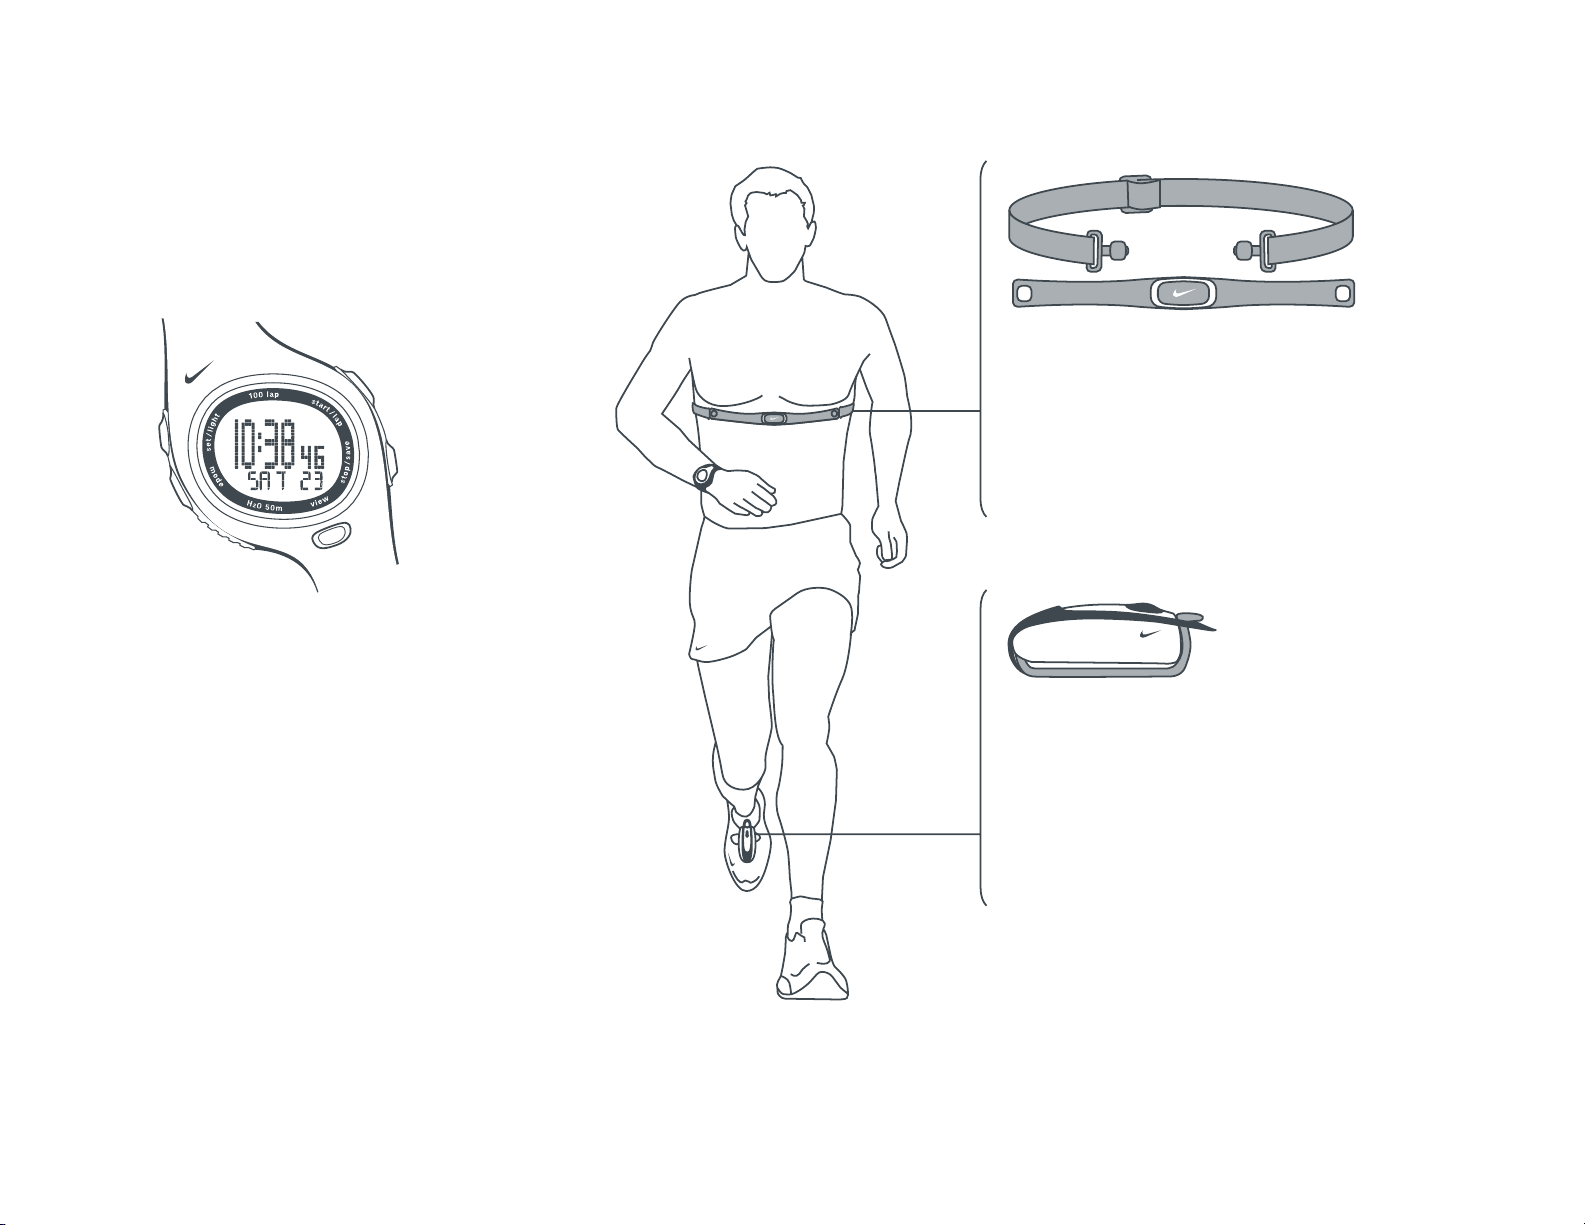
HR transmitter
The Heart-Rate transmitter reads heart-rate
information when worn directly against the
skin and within a few meters of the watch.
The HR transmitter is ergonomically designed
to fit comfortably during all types of exercise.
SDM pod
The SDM (Speed Distance Monitor) pod
measures foot acceleration/deceleration
100 times per second. When properly
calibrated, the pod accurately calculates
speed and distance even if stride length
and running pace changes.
ATTENTION: Anyone beginning an exercise
regimen for the first time (especially users
of pacemakers or other implanted devices)
should consult a physician or health
professional before using the Triax cv10.

3
Contents
Quick Start . . . . . . . . . . . . . . . . . . . . . . . . . . . . . . . . . . . . . . . . . . . . . . . . . . . . . . . . . . . . . . . . . . . . . . . . 4
TIME mode
Set Time . . . . . . . . . . . . . . . . . . . . . . . . . . . . . . . . . . . . . . . . . . . . . . . . . . . . . . . . . . . . . . . . . . . . . . . . . . 6
Set Alarm . . . . . . . . . . . . . . . . . . . . . . . . . . . . . . . . . . . . . . . . . . . . . . . . . . . . . . . . . . . . . . . . . . . . . . . . . 7
RUN mode
Calibrate the SDM Pod . . . . . . . . . . . . . . . . . . . . . . . . . . . . . . . . . . . . . . . . . . . . . . . . . . . . . . . . . . . . . . . 8
Using the Chronograph . . . . . . . . . . . . . . . . . . . . . . . . . . . . . . . . . . . . . . . . . . . . . . . . . . . . . . . . . . . . . . . 10
Setting Training Zones . . . . . . . . . . . . . . . . . . . . . . . . . . . . . . . . . . . . . . . . . . . . . . . . . . . . . . . . . . . . . . . 12
Setting Auto-Lap Feature . . . . . . . . . . . . . . . . . . . . . . . . . . . . . . . . . . . . . . . . . . . . . . . . . . . . . . . . . . . . . 13
Setting “My View” Display . . . . . . . . . . . . . . . . . . . . . . . . . . . . . . . . . . . . . . . . . . . . . . . . . . . . . . . . . . . . . 14
DATA mode
Review Saved Runs . . . . . . . . . . . . . . . . . . . . . . . . . . . . . . . . . . . . . . . . . . . . . . . . . . . . . . . . . . . . . . . . . . 15
Heart Rate Intensity Chart . . . . . . . . . . . . . . . . . . . . . . . . . . . . . . . . . . . . . . . . . . . . . . . . . . . . . . . . . . . . 16
Running Pace Chart . . . . . . . . . . . . . . . . . . . . . . . . . . . . . . . . . . . . . . . . . . . . . . . . . . . . . . . . . . . . . . . . . 17
Linking the Digital Components to the Watch . . . . . . . . . . . . . . . . . . . . . . . . . . . . . . . . . . . . . . . . . . . . . 18
Troubleshooting . . . . . . . . . . . . . . . . . . . . . . . . . . . . . . . . . . . . . . . . . . . . . . . . . . . . . . . . . . . . . . . . . . . . 19
Specifications . . . . . . . . . . . . . . . . . . . . . . . . . . . . . . . . . . . . . . . . . . . . . . . . . . . . . . . . . . . . . . . . . . . . . . 20
FCC Compliance . . . . . . . . . . . . . . . . . . . . . . . . . . . . . . . . . . . . . . . . . . . . . . . . . . . . . . . . . . . . . . . . . . . . 20
CE Compliance . . . . . . . . . . . . . . . . . . . . . . . . . . . . . . . . . . . . . . . . . . . . . . . . . . . . . . . . . . . . . . . . . . . . . 20
Battery . . . . . . . . . . . . . . . . . . . . . . . . . . . . . . . . . . . . . . . . . . . . . . . . . . . . . . . . . . . . . . . . . . . . . . . . . . . . 21
Warranty . . . . . . . . . . . . . . . . . . . . . . . . . . . . . . . . . . . . . . . . . . . . . . . . . . . . . . . . . . . . . . . . . . . . . . . . . . 22
Index . . . . . . . . . . . . . . . . . . . . . . . . . . . . . . . . . . . . . . . . . . . . . . . . . . . . . . . . . . . . . . . . . . . . . . . . . . . . . 23
Service Centers . . . . . . . . . . . . . . . . . . . . . . . . . . . . . . . . . . . . . . . . . . . . . . . . . . . . . . . . . . . . . . . . . . . . . 46
This document with updates is available online at www.nike.com /timing
Printed on Wood Free Paper

4
Quick Start Follow steps through to position the HR transmitter and SDM pod and go for a run.
3
124
3
124
Push tab up through
slot in HR transmitter.
Press down tab
until flush.
Attach other side of HR
transmitter around chest.
Position on rib cage just
below the breast plate.
The transmitter should be
worn directly against skin
and snug enough to stay
in place during workout.
Generously wet both
sensors on the back
of the HR transmitter
to ensure strong
connection between
your pulse and the
transmitter.
Remove the top
strap and unseat
the SDM pod from
the bottom clip.
Loosen shoe laces
and slide pod clip
under laces.
Secure the SDM pod
with black strap.
The pod should rest
just below where
laces tie and be
secure enough to
stay in place
during workout.
Turn SDM pod ON.
Press and hold power
button until LED light
begins to blink.
NOTE: Press and hold
power button again to
turn pod OFF.

5
Scroll to
RUN mode
Start Run
RUN mode views
Chronograph View
Heart-Rate View
My View
See page 14
for setup
or
No Heart Rate or
Pace Displayed
If you see three blinking lines
in the display, the watch is not
receiving transmission from
either the HR transmitter
or the SDM pod.
Run through the Quick Start
again or see page 19
Troubleshooting.
SDM / HRM linking
If you see the SDM LINK or HRM LINK display within
RUN mode, the watch is not recognizing the digital ID
of the components. See page 19, Linking the Digital
Components to the Watch.
Pace View
Distance View

6
Set Time
In TIME mode you can set the time, date and power save option. TIME mode is the only mode in which you can turn
the button chime ON and OFF. Follow steps through to set the time and date.
4
EXIT
3 sec
Scroll to
TIME mode Press button to select
adjustable element.
Switch Time Zones
Hold 1 sec to view
Hold 4 sec to switch.
4 sec
Turn Chime ON/OFF
Chime sounds at the
press of any button.
Electrolight ON
Set Hour Set Minutes Set Seconds Set Day Set Month Set Year Choose 12 or
24 Hour Clock
Power Save (0-24 hrs.)
After X hours with no activity,
watch goes to sleep.
Push any button to wake.
Alarm will still function.

7
Within TIME mode you can set two alarms. Follow steps through to set the alarms.
Set Alarm
EXIT
(Alarm On)
3 sec
Scroll to
TIME mode
Press button to select
adjustable element.
Set Hour Set Minutes
Alarm 1 View Alarm 2 View Time View
Turn Alarm ON/OFF
The alarm icon will
show in the display of
any mode when the
alarm is turned ON.

8
5
6
4
3
Once calibrated, the Speed Distance Monitor (SDM) pod is more than 97% accurate for most runners. Calibrate the SDM
pod by running 400-800 meters on a marked track, then adjust the watch to exact distance. The SDM pod will need to be
calibrated each time you replace the watch battery. Go to a 400-meter marked track and follow steps through to
automatically calibrate the SDM pod.
Turn SDM pod ON by pressing the power button
until LED begins to blink.
Scroll to
RUN mode.
Press several times
to scroll to CALIb.
400 meters
Run at your usual pace on the inside
edge of the track. Complete 1-2 laps
(400-800 meters).
Push START
and begin
running. Push STOP
when finished.
Auto-Calibrate the SDM Pod
3 sec

9
Manually Calibrate the SDM Pod
After calibration, the SDM pod automatically
calculates an offset value. The default value is 1.000.
Change the offset value to make small adjustments to
the calibration. If the SDM pod is slightly under measuring
a known distance, increase the offset value. Different shoe
models may affect the pod calibration. Adjust the offset value
accordingly if you notice differences between shoes.
Follow steps through to fine-tune the offset value.
7
8
2
5
3
4
If you ran 800 meters, adjust displayed
distance to read 800m.
Press several
times to scroll
to OFFSET.
EXIT
Scroll to
RUN mode.
EXAMPLES
1.000 = factory setting
0.990 = 99% of factory setting
1.010 = 101% of factory setting
The offset value is 1.000.
You run 400m. The SDM pod
returns a reading of 380m (5%
under). The offset value should
be adjusted to 1.050 (5% above).
NOTE: Write down and save your
offset value. It will come in handy
if you let friends or family borrow
the Triax CV10 and they
change the calibration setting.
Press to change value.
3 SECS

10
In Chronograph View, you can mark lap times and total
times during your run. Both lap times and total times
are captured simultaneously when you press the
lap button. Average pace and heart rate are captured
for each lap/total period. After you stop the chronograph,
you can save your run information and review it in
DATA mode. See page 15 for DATA mode.
Follow steps through to use your chronograph.
Using the Chronograph
4
Press button to switch views
at any time during your run.
Scroll to
RUN mode
CHRONOGRAPH
View
Heart-Rate
View
Pace View Distance
View
My View
See page 14
for setup
Mark Laps
Lap time is the time required
to go once around a track or
complete a segment of a run.
and
Mark Totals
Total time is the time from
the beginning of the run up
to the point you mark.
Start Run
A blinking
stopwatch
will appear.
LAP 1
TOTAL 1
Mark Lap/Total
You will have 7
seconds to read
your lap and
total time.
Heart rate is
also captured
for each
lap/total period
and can be
viewed in DATA
mode if the run
is saved.
Auto-Lap ON
You cannot manually mark laps if the
Auto-Lap feature is ON. See page 13,
Set the Auto-Lap Feature, to turn
the feature ON/OFF.

11
4 4
... Save or Clear
Run Information
LAP 2
TOTAL 2
Mark
Lap/Total
LAP 3 LAP 4
TOTAL 4TOTAL 3
Mark
Lap/Total
Stop Run
Stopwatch
will disappear.
Save Run
Run information
is saved to DATA
mode.
See Page 15 for
DATA mode.
3 sec
3 sec
Clear Run
Run information
is erased.
12
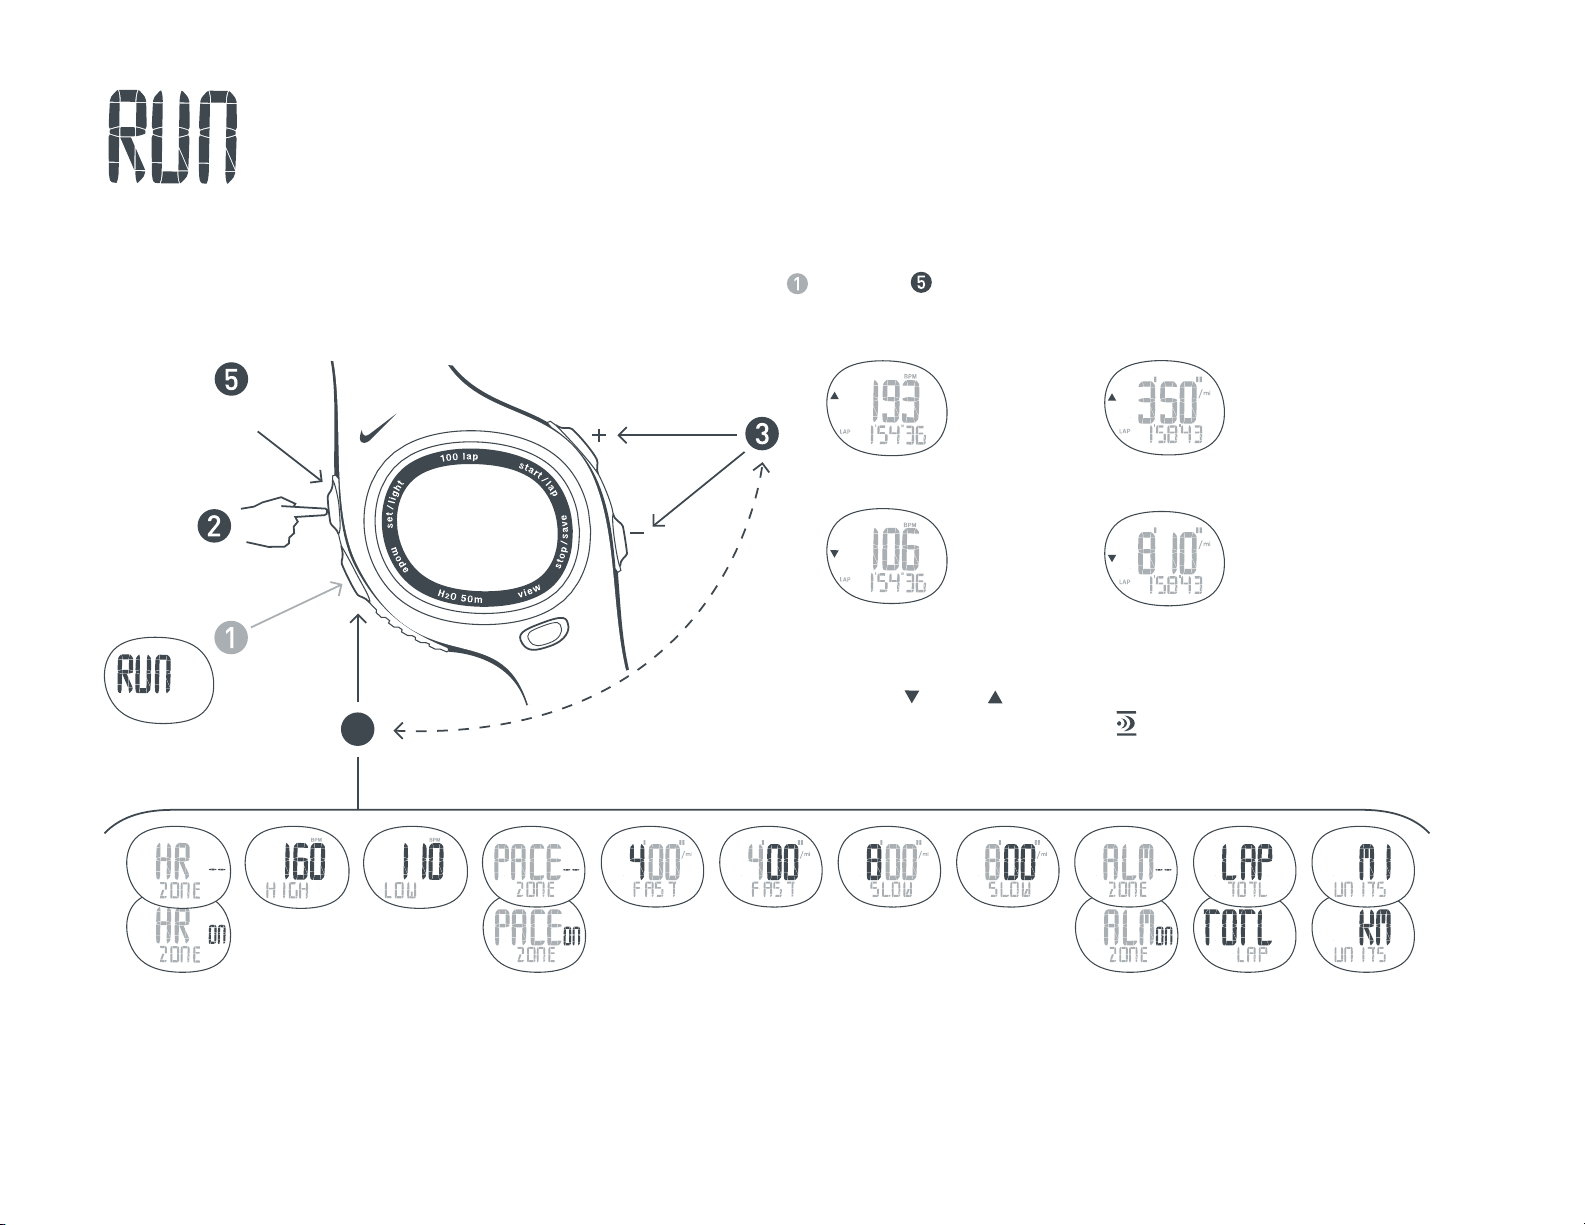
In Run mode you can set a heart-rate and a pace zone. Setting either zone allows you to work within an upper and lower
heart-rate or speed limit. By utilizing the training zones, you can control the intensity of your workout and measure
any improvements in your physical conditioning. Follow steps through to set a target training zone.
Setting Training Zones
4
EXIT
3 sec
Scroll to
RUN mode Press button to select
adjustable element.
Turn
Heart-Rate
Zone ON
Set HIGH
HR Limit
Set LOW
HR Limit
Turn Pace
Zone ON
Set Fast
Pace Limit
Minutes
Set Fast
Pace Limit
Seconds
Set Slow
Pace Limit
Minutes
Set Slow
Pace Limit
Seconds
Turn Audible
Zone Alarm
ON/OFF
Set
Total-Time
or Lap Time
in Primary
Display
Set Units
Above your
training zone.
or
Out-of Zone Indicators
If your heart rate or
pace is out of your zone,
the LO ( ) or HI ( )
arrow indicators will flash
in the display.
0Zone Alarm ON Indicator
If the zone alrm is ON, the watch
will beep as your heart rate or
pace moves out of your zone.
Below your
training zone.
Note:
If both heart rate and
pace zone is ON, the
Out-of-Zone
Indicators
correspond to the
primary display.

13
The chronograph contains an Auto-Lap feature which will automatically mark a lap after a determined distance.
You cannot manually mark laps when Auto-Lap is activated. Follow steps through to set up the Auto-Lap feature.
Set the Auto-Lap Feature
4
5
3
EXIT
3 sec
Scroll to
RUN mode.
Press several times to scroll
to Auto-Lap feature.
Auto-Lap
ON/OFF
Set Auto-Lap
Set lap distance
(example: 1 mile)
Set Auto-Lap
Distance
Start Run
Press START
button
LAP 1
Auto-Lap
Marked
(1 mile)
LAP 2
Auto-Lap
Marked
(2 miles)
14
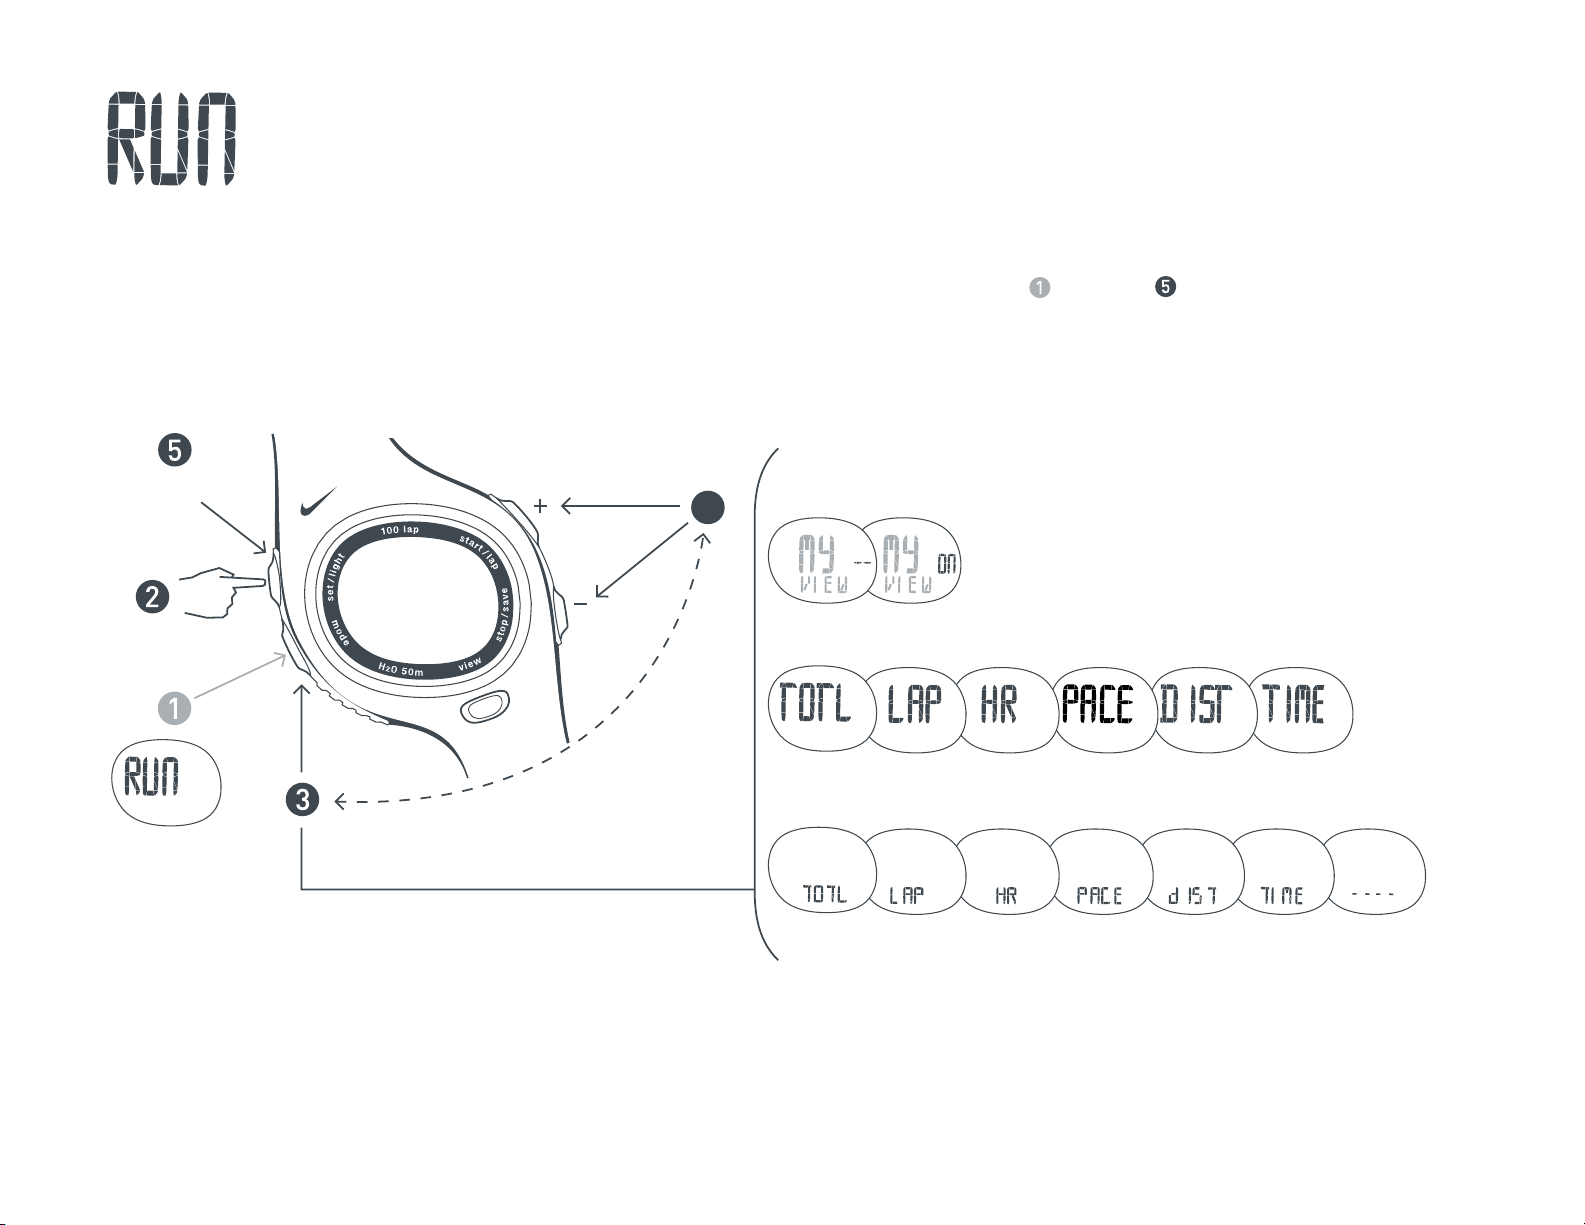
“My View” allows you to create your own view in RUN mode with the information you use the most during your workout.
When activated My View will appear as the first view in RUN mode. This feature allows you to choose which information
appears in the Primary (larger) and the Secondary (smaller) displays. Follow steps through to create your view.
Setting “My View” Display
4
EXIT
3 sec
Scroll to
RUN mode
Press button to scroll to MY VIEW
and select display choice.
Turn MY VIEW ON/OFF
PRIMARY display choices
SECONDARY display choices
Note: Your primary display choice will not
show up in the secondary list of choices.
NO display

15
In DATA mode you can review detailed information about your saved runs. The memory can store multiple runs with up to
100 laps each. See page 11 for saving runs to DATA mode. Follow steps through to view data saved for each run.
Review Saved Runs
4
Scroll to
DATA mode
Select a Run
Press button to view
stats in each category.
Total Time Average Lap HR IN Zone PACE IN Zone Best Lap Lap 1 Lap 2
Average HRDistance
Average Pace
Above Zone
Below Zone
Above Zone
Below Zone
HR and Pace Zones
will not appear if
they are turned OFF
during recording.
Best Pace
Avg. Pace
Distance
Total Time Total Time
Average HR Average HR
Avg. Pace
Distance
3 sec
Clear This Run
5 sec
Clear ALL Runs

16
Heart Rate Intensity Chart
This is another way to gauge your approximate heart rate zones based on sex, age and weight. Starting with your
Max Heart Rate, use the chart to help calculate your zones depending on the intensity of your workout.
Note this formula may not work for everyone.
205 bpm
200
195
190
185
180
175
170
165
160
155
150
123 - 143 bpm
120 - 139
117 - 136
114 - 132
111 - 129
108 - 125
105 - 122
102 - 118
99 - 115
96 - 111
93 - 108
90 - 104
144 - 163 bpm
140 - 159
137 - 155
133 - 151
130 - 147
126 - 143
123 - 139
119 - 135
116 - 131
112 - 127
109 - 123
105 - 119
164 - 184 bpm
160 - 179
156 - 175
152 - 170
148 - 166
144 - 161
140 - 157
136 - 152
132 - 148
128 - 143
124 - 139
120 - 134
184 - 205 bpm
180 - 200
176 - 195
171 - 190
167 - 185
162 - 180
158 - 175
153 - 170
149 - 165
144 - 160
125 - 155
121 - 150
Find your
Max Heart Rate
Determine your Target Heart Rate Zones (Intensities)
210 - (0.7 x age)
Light Intensity
(60-70% of Max HR)
Exercise in this range at the
start of a workout or to recover
from a tough workout or race.
You should be able to easily
maintain a conversation while
exercising at this intensity.
Moderate Intensity
(70-80% of Max HR)
Exercise in this range to develop
endurance and prepare your
muscles to make the transition
from aerobic to anaerobic.
You should be able to maintain
this for a while. You should not
be completely breathless and
this should not hurt.
Heavy Intensity
(80-90% of Max HR)
Exercise in this range
to increase muscle strength
and improve your anaerobic
threshold. This is uncomfortable.
You should be breathing very
heavily. You should only be able
to sustain this for a brief time.
Maximum Intensity
(90-100% of Max HR)
Exercise in this range to increase
mental toughness, Max V02 and
tolerance to lactic acid. This is
very uncomfortable. You can
barely sustain it. You should be
completely breathless. Do not
exercise at this intensity except
on the advice of a trained
medical professional.
Max Heart Rate

17
Running Pace Chart
Use this chart to determine your pace (time per distance) for common races and finishing times.
2 mi 3.2 km
3 mi 4.8 km
3.1 mi 5 km
3.5 mi 5.6 km
5 mi 8.1 km
6 mi 9.7 km
6.2 mi 10 km
9.3 mi 15 km
10 mi 16.1 km
12.4 mi 20 km
1/2-Marathon
13.1 mi 21.1 km
15 mi 24.1km
15.5 mi 25 km
18.6 mi 30 km
20 mi 32.2 km
Marathon*
26.2 mi 42.2 km
*Example: If your goal is to finish a marathon in 3:43:00 you would need a pace
of 8:30/mi. If this is your goal, you might want to train with the pace zone at 8:40/mi
for the slow threshold and 8:20/mi for the fast threshold.
Common Races and Finishing Times
12:00/mi
7:28/km
24:00
36:00
37:17
42:00
1:00:00
1:12:00
1:14:34
1:51:51
2:00:00
2:29:08
2:37:19
3:00:00
3:06:25
3:43:42
4:00:00
5:14:37
11:30/mi
7:09/km
23:00
34:30
35:44
40:15
57:30
1:09:00
1:11:27
1:47:11
1:55:00
2:22:55
2:30:45
2:52:30
2:58:39
3:34:22
3:50:00
5:01:31
11:00/mi
6:50/km
22:00
33:00
34:11
38:30
55:00
1:06:00
1:08:21
1:42:32
1:50:00
2:16:42
2:24:12
2:45:00
2:50:53
3:25:03
3:40:00
4:48:24
10:30/mi
6:31/km
21:00
31:30
32:37
36:45
52:30
1:03:00
1:05:15
1:37:52
1:45:00
2:10:29
2:17:39
2:37:30
2:43:07
3:15:44
3:30:00
4:35:18
10:00/mi
6:13/km
20:00
30:00
31:04
35:00
50:00
1:00:00
1:02:08
1:33:12
1:40:00
2:04:16
2:11:06
2:30:00
2:35:21
3:06:25
3:20:00
4:22:11
9:30/mi
5:54/km
19:00
28:30
29:31
33:15
47:30
57:00
59:02
1:28:33
1:35:00
1:58:04
2:04:32
2:22:30
2:27:35
2:57:05
3:10:00
4:09:05
9:00/mi
5:35/km
18:00
27:00
27:58
31:30
45:00
54:00
55:55
1:23:53
1:30:00
1:51:51
1:57:59
2:15:00
2:19:49
2:47:46
3:00:00
3:55:58
8:30/mi*
5:17/km
17:00
25:30
26:24
29:45
42:30
51:00
52:49
1:19:13
1:25:00
1:45:38
1:51:26
2:07:30
2:12:02
2:38:27
2:50:00
3:42:52*
8:00/mi
4:58/km
16:00
24:00
24:51
28:00
40:00
48:00
49:43
1:14:34
1:20:00
1:39:25
1:44:53
2:00:00
204:16
2:29:08
2:40:00
3:29:45
7:30/mi
4:40/km
15:00
22:30
23:18
26:15
37:30
45:00
46:36
1:09:54
1:15:00
1:33:12
1:38:19
1:52:30
1:56:30
2:19:49
2:30:00
3:16:38
7:00/mi
4:21/km
14:00
21:00
21:45
24:30
35:00
42:00
43:30
1:05:15
1:10:00
1:27:00
1:31:46
1:45:00
1:48:44
2:10:29
2:20:00
3:03:32
6:30/mi
4:02/km
13:00
19:30
20:12
22:45
32:30
39:00
40:23
1:00:35
1:05:00
1:20:47
1:25:13
1:37:30
1:40:58
2:01:10
2:10:00
2:50:25
6:00/mi
3:44/km
12:00
18:00
18:38
21:00
30:00
36:00
37:17
55:55
1:00:00
1:14:34
1:18:39
1:30:00
1:33:12
1:51:51
2:00:00
2:37:19
5:30/mi
3:25/km
11:00
16:30
17:05
19:15
27:30
33:00
34:11
51:16
55:00
1:08:21
1:12:06
1:22:30
1:25:26
1:42:32
1:50:00
2:24:12
5:00/mi
3:06/km
10:00
15:00
15:32
17:30
25:00
30:00
31:04
46:36
50:00
1:02:08
1:05:33
1:15:00
1:17:40
1:33:12
1:40:00
2:11:06
Pace (minutes per mile)
Pace (minutes per kilometer)

Press and hold the power button on the SDM pod for five seconds
until the LED light begins a fast triple-flash. The pod is now in ID
mode, ready to link with the watch. After 10 seconds the pod will
revert to normal operation.
NOTE: If you are unable to enter SDM LINK OK screen before
the 10 seconds expires, turn the pod off and repeat step 3.
Firmly grasp the HR transmitter with both hands, one on
each end, making sure to touch the sensors on the back side
of the transmitter. There is no ON/OFF switch for the transmitter.
It sends a digital signal during the first 10 seconds of connection
with the sensors.
NOTE: If you are unable to enter
HRM LINK OK screen before
the 10 seconds expires, wait two minutes
for the HR transmitter to automatically
turn off and try again.
After a few seconds the watch should display SDM LINK OK
and HRM LINK OK. The watch has located the digital ID of the
HR transmitter and will store the ID until you either change
the watch battery or reset the watch.
18
Linking the Digital Components to the Watch
The HR transmitter and SDM pod have unique digital IDs to avoid crosstalk with other components. Before your
components can communicate properly, the watch must be linked to the transmitter and pod to establish and share
this ID. The original transmitter which came with the watch was linked at the factory. Once linked, the digital IDs are
stored by the watch until you change the watch battery or reset the watch. Follow steps through to re-link
the original or any replacement components to the watch.
2
Scroll to RUN
mode
3
4
5
Press and hold all
four side buttons
simultaneously
until the watch
beeps and all
segments of
the watch LCD
flash in the display
SENSORS

HR transmitter does not link with the watch:
Make sure the watch has assigned a digital ID
to the HR transmitter. See page 18.
Make sure the HR transmitter is ON by placing it on the body.
The unit turns ON when it detects the two electrodes on the
body. It is recommended to wear the transmitter directly
against the skin.
Reposition the HR transmitter slightly.
Try replacing the battery. See page 21.
Check battery placement for correct orientation. See page 21.
Moisten the electrodes with water or gel to make better
contact with the body. If you are wearing the HR transmitter
over clothing, try wetting the clothing.
Heart rate reading on watch is erratic or stops:
You may need to replace the battery in the HR Transmitter.
Sources of electromagnetic fields like appliances,
computers and power lines can cause interference.
Change your location.
This product complies with EN60601-1-2
Watch display is frozen:
The display of your watch may "freeze" due to static
electricity or recent battery replacement. If this occurs,
press and hold all four buttons at the same time.
This will erase the data in the memory and allow you
to reset the watch to the factory settings.
Watch beeps continuously:
If you have the zone alarm on and your heart rate or pace
does not fall within any of your zones, the watch will beep
to indicate you are out of your zones. See page 10 for
instructions on how to turn off the zone alarms.
19
Troubleshooting
SDM pod does not link with watch:
Make sure the watch has assigned a digital ID
to the SDM pod. See page 18.
Be sure the unit is ON by pressing the power switch
on the top of the unit until the LED begins to blink.
Try replacing the battery. See page 21.
Check battery placement for correct orientation. See page 21.
LED light on SDM pod flashes rapidly:
This indicates low battery power.
Replace the AAA battery in the SDM pod.
Cross-talk:
If you receive “cross-talk” from another electronic device,
press the button on the speed sensor. The watch and speed
sensor will begin linking on another channel.
SDM pod attachment to shoe:
Make sure the SDM pod is attached to the laces securely
enough so there is no wobble when running. The pod should
be aligned with the foot and secured well enough that the
alignment does not change during run.
Orthotics:
People who wear orthotics or have extreme pronation or
supination in their stride may experience reduced accuracy.
Re-calibrate for improved accuracy.
Varying paces:
People who run at varying paces within a run
may experience reduced accuracy.
Calibrate at the speed you usually run for improved accuracy.
Press and hold all four side buttons
at the same time to reset
the watch to the factory settings.
Table of contents
Other Nike Heart Rate Monitor manuals

Nike
Nike TRIAX C10 User manual

Nike
Nike TYPHOON User manual

Nike
Nike FuelBand User manual

Nike
Nike TRIAX 300 User manual

Nike
Nike triax pcv10 User manual

Nike
Nike TRIAX C3 User manual

Nike
Nike Sport Pack User manual

Nike
Nike Triax Elite User manual

Nike
Nike Triax C5 User manual

Nike
Nike TRIAX INSPIRE User manual

Nike
Nike Triax C5 User manual

Nike
Nike FuelBand User manual

Nike
Nike TRIAX C8 User manual

Nike
Nike TRIAX CV10 User manual

Nike
Nike TRIAX C8 User manual

Nike
Nike triax c6 User manual

Nike
Nike HRM TRIAX 100 User manual

Nike
Nike Nike+FuelBand SE User manual

Nike
Nike MONSOON User manual

Nike
Nike IMARA HRM User manual


