Nikkei Road X4 User manual

Road X4 Dashcam
USER MANUAL EN
© Elmarc, 19/10

2
Content
1 Intended use 3
2 Safety 4
2.1 Labels in this manual 4
2.2 Generalsafetyinstrucons 4
3 Preparaons for use 6
3.1 Unpacking 6
3.2 Package contents 6
4 Funcons 7
4.1 Main components 7
4.2 Explanaonoftheiconsonthedisplay 8
5 Installaon 9
5.1 Installing the dashboard camera 9
5.1 Memory Card: Placement and access 10
6 Usage 11
6.1 Turningthedashboardcameraonoro 11
6.2 Starngamovierecording 11
6.3 Take a photo 11
6.4 Play 12
6.5 Sengs 12
6.6 ConnecngaUSBtoacomputer 18
7 Manage the dashboard camera via your telephone 19
7.1 Installing the Lerccenker app 19
7.2 Connect with the dashboard camera 19
8 Cleaning and maintenance 20
9 Technical specicaons 21
10 Disposal of used electric and electronic equipment 22

3
1 Intended use
TheRoadX4isanadvanceddashboardcamerawithawideviewing
angle that you mount on the dashboard or the front of your car. The
productrecordsthetracsituaoninphotoandlm,bothduringthe
dayandatnight.Withthehelpofthebuilt-inmoonsensor,theproduct
automacallystartslmingwhenrecordingmoon.Theimagematerial
canbeviewedviathescreen,telephoneoronacomputer.Theproductis
intended for consumer use, not for professional use.

4
2 Safety
2.1 Labels in this manual
6 WARNINGAwarningmeansthatinjuryispossibleiftheinstrucons
are not obeyed.
1CAUTIONAcauonmeansthatdamagetotheequipmentispossible.
5Anotegivesaddionalinformaon,e.g.foraprocedure.
2.2 General safety instrucons
General
6 Topreventdamageormalfuncons:Pleasetakemeandreadthe
generalsafetyinstrucons.Thiswillavoidre,explosions,electric
shocks or other hazards that may result in damage to property and/
orsevereorfatalinjuries.
6 The manufacturer is not liable for cases of material damage or
personal injury caused by incorrect handling or non compliance with
thesafetyinstrucons.Insuchcases,thewarrantywillbevoided.
WARNING
6 Donotoperateoradjusttheproductwhiledriving.Thismaycause
accidents. Stop or park your car in a safe place before installing and
adjusngthedashboardcamera.
6 Do not place the dashboard camera where it may obstruct the
driver'seldofvision.Thismaycauseaccidents.
6 Do not put force on the appliance.
6 Only use original accessories from the manufacturer.
6 Donotspillanyliquidontheappliance.
6 Donotinsertanyobjectsinthevenlaonholes.

5
6 Donotblockthevenlaonholes.
6 Neverleavechildrenunaendedwiththepackagingmaterial.The
packagingmaterialrepresentsadangerofsuocaon.Children
frequentlyunderesmatethedanger.Alwayskeepchildrenaway
from the packaging material.
CAUTION
1Cleantheoutsideoftheappliancewithasocloth.Whenthe
applianceisverydirty,dampentheclothslightlywithwateranda
neutralsoluon.
1Do not put the appliance near a heat source. This could damage the
appliance.
1Check the product, cable and (if applicable) adapter for any damage
beforeuse.Ifthereisanyvisibledamage,strongodour,orexcessive
overheangofcomponents,unplugtheproduct.
1Thecameracontainssensivecomponents,includingthebaery.
Avoidexposingyourcameraandbaerytoverycoldorveryhot
temperatures.Loworhightemperaturecondionsmaytemporarily
shortenthebaerylifeorcausethecameratotemporarilystop
workingproperly.Avoiddramacchangesintemperatureor
humiditywhenusingthecamera,ascondensaonmayformonor
within the camera.
Remarks
6 WARNINGItisnotpermiedtoopentheproductyourselforto
haveitopened,neitherisitpermiedtorepairtheproductyourself
ortohaveitrepaired.Thiswillvoidthewarranes.Pleaseletany
maintenancebecarriedoutbyceredmaintenancepersonnel.

6
3 Preparaons for use
3.1 Unpacking
• Unpack the appliance carefully.
• Check the package contents as described below. If any item is missing,
please contact your reseller.
• We recommend that you retain the original carton and packaging
materialsincaseiteverbecomesnecessarytoreturnyourproduct
forservice.Thisistheonlywaytosafelyprotecttheproduct
against damage in transit. If you do dispose of the carton and the
packaging materials, please remember to recycle with due care to the
environment.
3.2 Package contents
2 x2 x
3M
3M
Thefollowingitemsareincludedinthereceivedpackage:
__
1. Dashboard camera
2. MicroUSBcable
3. Car charger
4. Magnecholder
5. 2x3Mscker
6. Quick start guide
7. Safetyinstrucons
1
34
2 5
7
4 Funcons
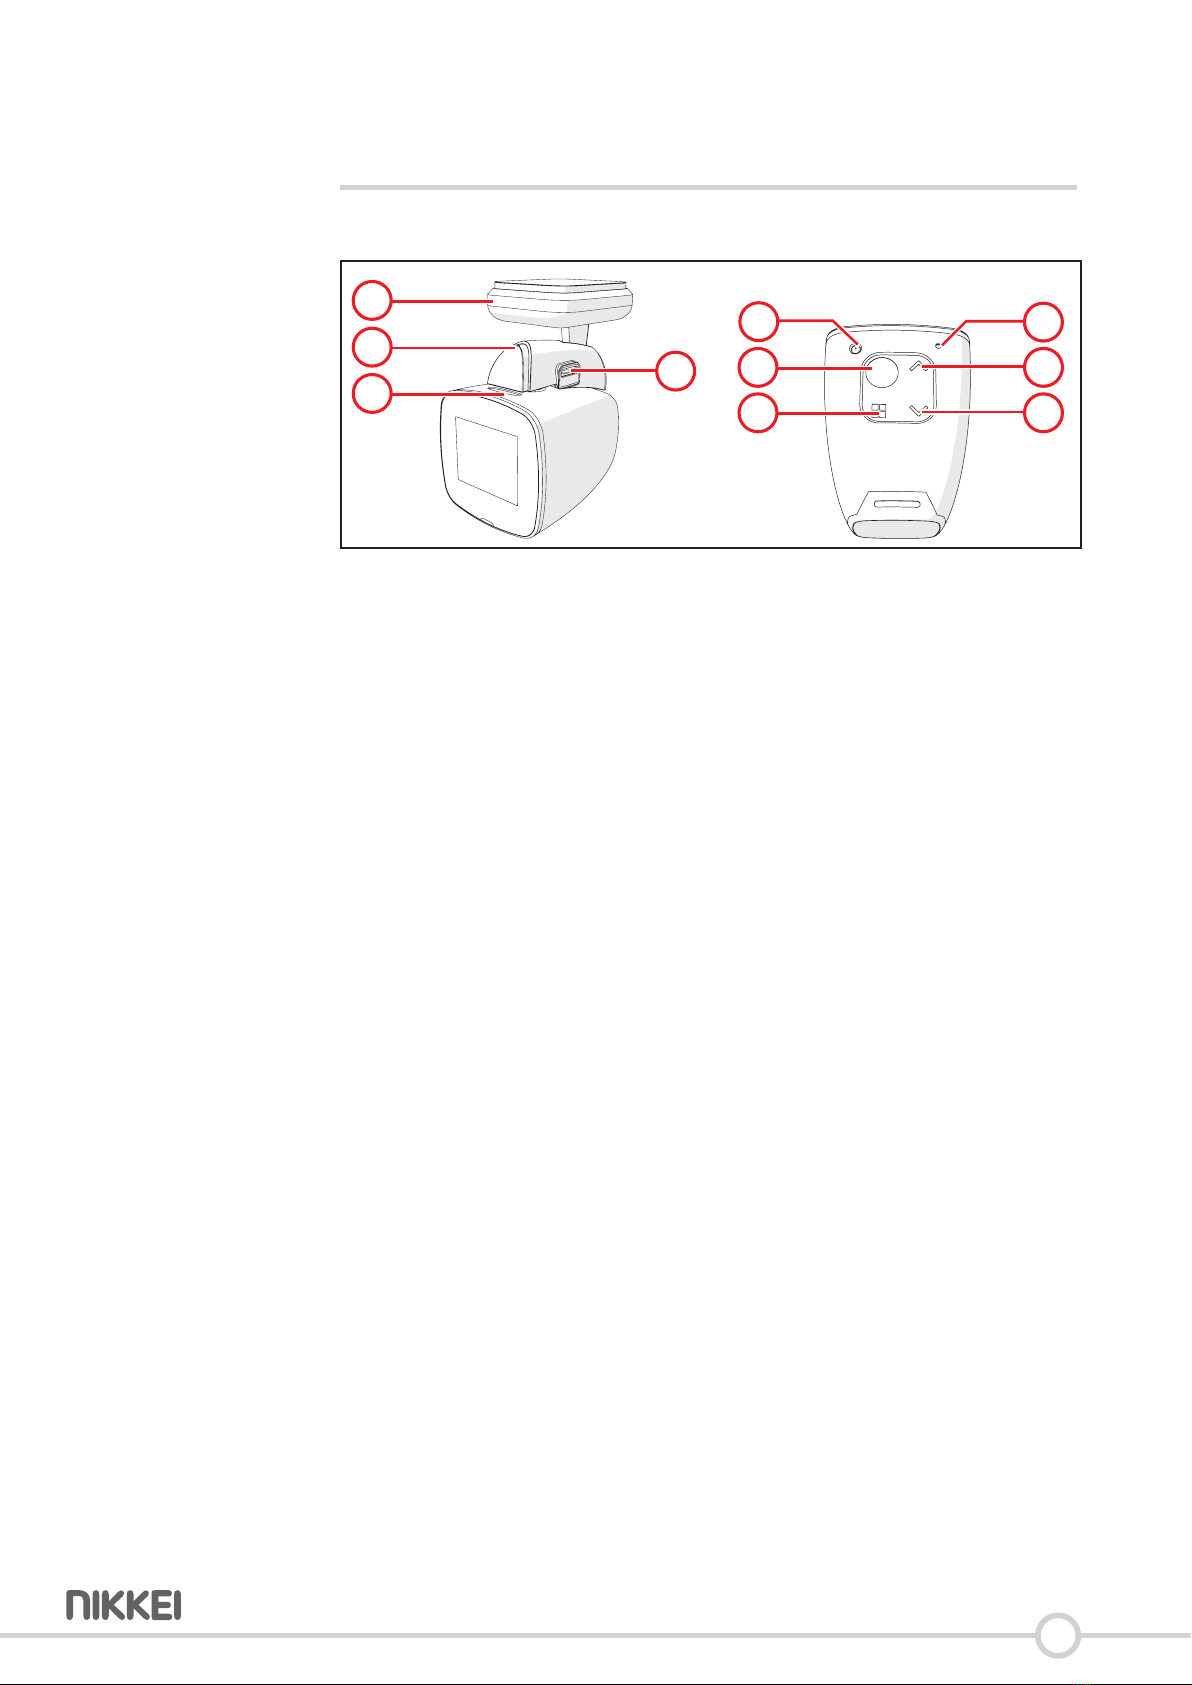
4.1 Main components
4
8
2
1
6
5
7
9
10
3
Dashboard camera
__
1. GPS indicator LED
2. Power indicator LED
3. Slot-in for micro SD card
4. MicroUSBconnecon
5. Resetbuon
6. Mulfunconbuon
7. Menubuon
8. Microphone
9. Upbuon
10. Downbuon
8
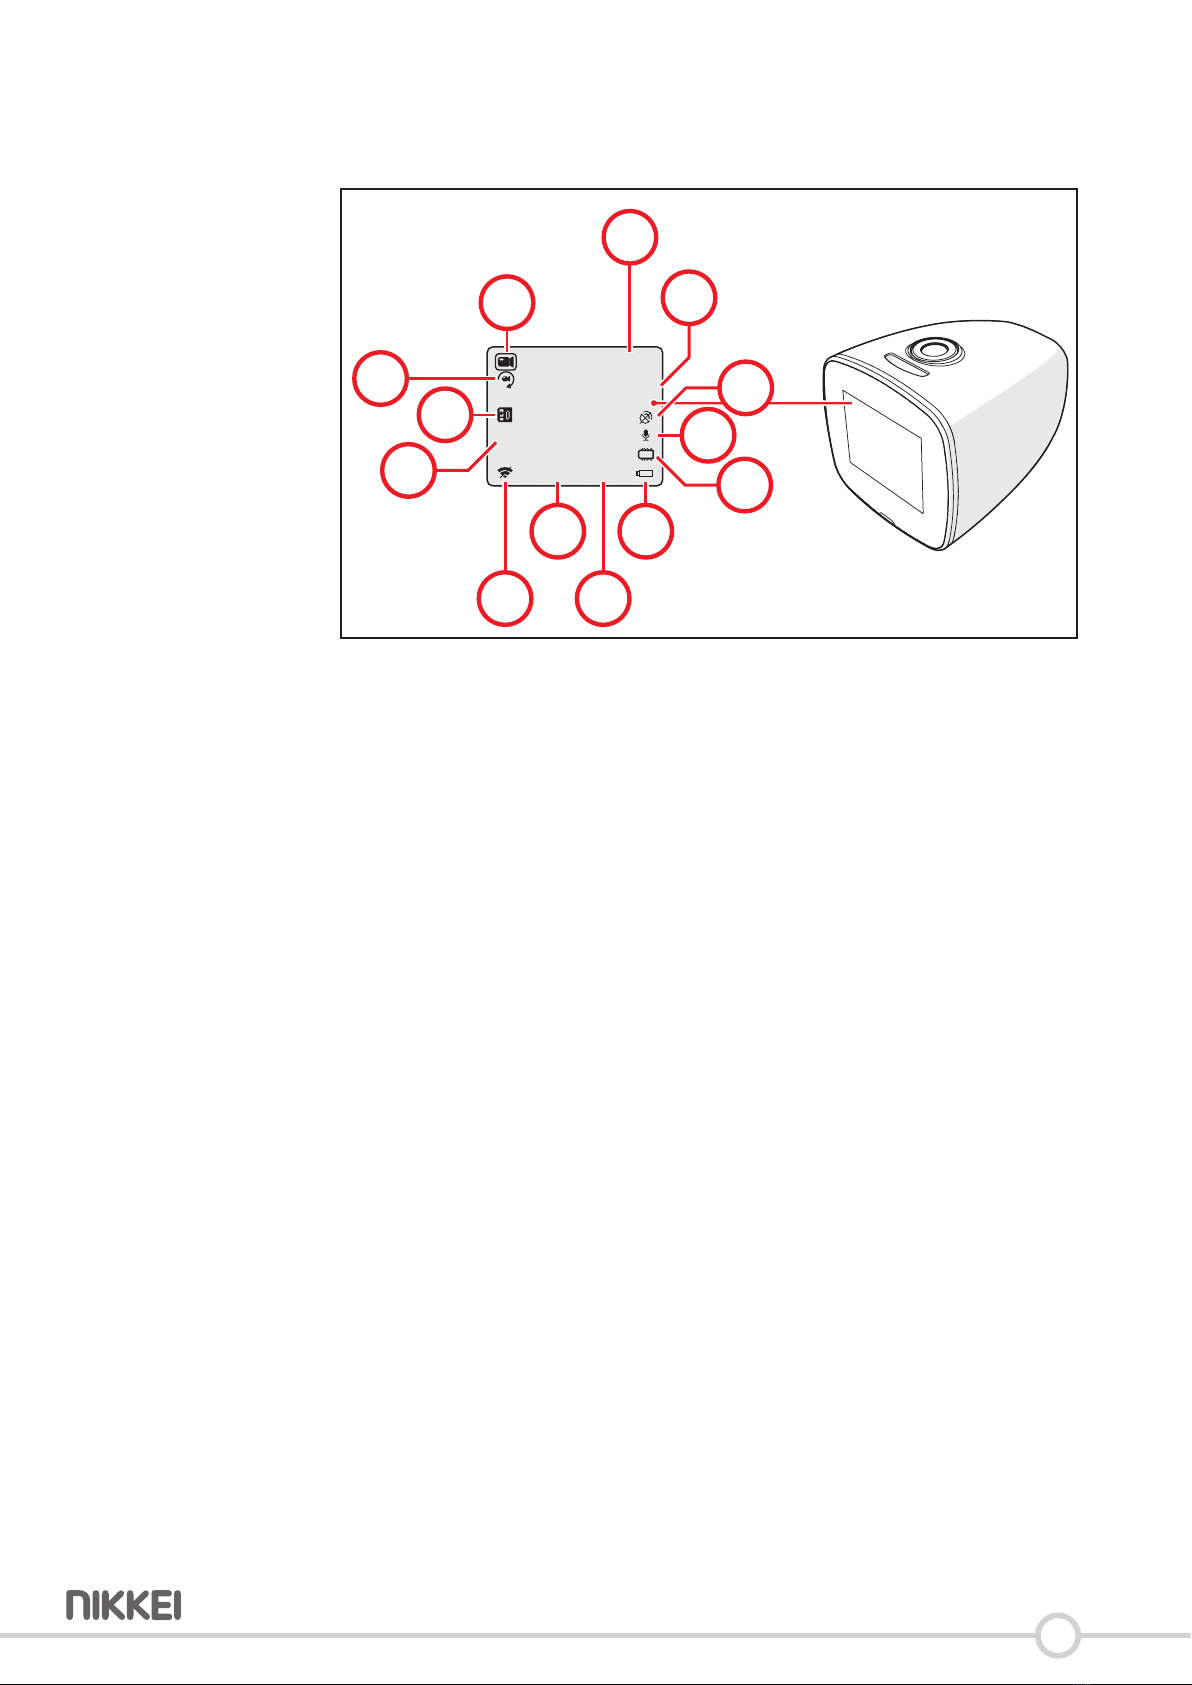
4.2 Explanaon of the icons on the display
You can see the following on the dashboard camera display:
00:00:00
1080P
2018/01/18 23:28:34
INT
WDR
11
22
17
18
20
19
21
12
23 3
13
14
15
16
__
11. Mode: Film, photo or playback
12. Recordingme
13. Recordingresoluon
14. GPSisonoro
15. Microphoneisonoro
16. Status of the micro SD card input
17. Baerystatus
18.Time
19. Date
20. Wiisonoro
21. WDR(WideDynamicRange)isonoro
22. Exposurevalue
23. Looprecordingisonoro

9
5 Installaon
5.1 Installing the dashboard camera
1. Placethemagnecholderwitha3Msckeronthewindshieldofthe
car
6 Do not place the dashboard camera where it may obstruct the
driver'seldofvision.Thismaycauseaccidents.
2. ConnectthemagnecholderonthesideusingthemicroUSBcable
3. InsertthemicroUSBcableintothecigareelightersocket.
4. Placethedashboardcameraonthemagnecholder
6 Donotoperateoradjusttheproductwhiledriving.Thismaycause
accidents. Stop or park your car in a safe place before installing and
adjusngthedashboardcamera.
5UsethecornersofthewindscreennishtoconcealthemicroUSB
cable.
1 2
3 4

10
5.1 Memory Card: Placement and access
5Duetothegreatvarietyofproductswithexternalmemory
connecon(USB,SD/MMC,etc.)andtheirsomemesquite
manufacturer-specicfunconswecanneitherguaranteethatall
deviceswillberecognised,northatalloperangoponsthatare
possible in theory will actually work.
Micro
SD
1. Insert the memory card into the Micro SD card slot.
5Memory card max. 64 Gb.

11
6 Usage
6.1 Turning the dashboard camera on or o
3 Sec.
• KeeptheMulfunconbuonpressedfor3seconds.
• The dashboard camera screen turns on.
• Thedevicehasnowbeenturnedon.
• KeeptheMulfunconbuonpressedforanother3secondstoturn
othedashboardcamera.
5You can rotate the dashboard camera image by holding down the Up
key for 2 seconds.
6.2 Starng a movie recording
5Thedashboardcamerastartsupinamoviemode.
• PressandholdtheMenukeyfor3secondstoswitchmodesunlyou
areinmoviemode.
• PressonMulfunconbuontostartamovierecording.
• UsetheUpandDownbuonstozoominandzoomout.
• PresstheMulfunconbuonagaintostoplming.Themovie
recordinghasnowbeensaved.
6.3 Take a photo
• PressandholdtheMenukeyfor3secondstoswitchmodesunlyou
are in photo mode.
• UsetheUpandDownbuonstozoominandzoomout.
• PressMulfunconbuontotakeaphoto.

12
6.4 Play
• PressandholdtheMenukeyfor3secondstoswitchmodesunlyou
are in play mode.
• UsetheUpandDownbuonstobrowsethroughthemap.
• PresstheMulfunconbuontoplaybackmovierecordingsorview
pictures.
6.5 Sengs
Movie recording sengs
• PressandholdtheMenukeyfor3secondstoswitchmodesunlyou
areinmoviemode.
• PresstheMenubuon.
• UsetheUpandDownbuonstonavigatethroughthemenu.
• PresstheMulfunconbuontoconrmyourselecon.
6.5.1 Resoluon
Selecttheresoluonofthemovierecording."1080FHD"means,for
example,thatthedashboardcameraisrecordinginFullHD.
5Ahighresoluonwillincreasethesizeofthevideoles.
1080 FHD (1920x1080), 720P (1280x720), WVGA (848x480), VGA
(640x480)
6.5.2 Loop recording
Alooprecordingallowsyoutorecordamovieconnuously,butonlysave
themostrecentmovie.
Youcansetthenumberofminutestobesaved.
O, 1 Minute, 3 Minutes or 5 Minutes
6.5.3 WDR
WideDynamicRangeimprovesimagequalitywithlargedierences
between light and dark areas.
On or O

13
6.5.4 Exposure
Theexposurevaluesetstheappropriateexposureleveltoadjustthe
brightness of the image.
+2.0, +5/3, +4/3, +1.0, +2/3, +1/3, +0.0, -1/3, -2/3, -1.0, -4/3, -5/3 or
-2.0
6.5.5 Moon Detecon
Usingthebuilt-inmoonsensor,thedashboardcameraautomacally
startslmingwhenmoonisdetected.
On or O
6.5.6 Record Audio
Turningthemicrophoneonoro.
On or O
6.5.7 Parking Monitor
Thedashboardcameraautomacallystartslmingwhenregistering
unexpectedmovementswhenthecarisparked.
On or O
6.5.8 LDWS
Thelanewarningsystemcanwarnyouwhenyouunintenonallyleave
the lane.
On or O
6.5.9 Date Stamp
Addadatestamptothemovieorphoto.
Date/Time, Date or O
6.5.10 Gsensor
Changethesensivityofthemoonsensor.
O, Low, Medium or High

14
Sengs for photos
• PressandholdtheMenukeyfor3secondstoswitchmodesunlyou
are in photo mode.
• PresstheMenubuon.
• UsetheUpandDownbuonstonavigatethroughthemenu.
• PresstheMulfunconbuontoconrmyourselecon.
6.5.11 Capture Mode
Therearefourdierentrecordingmodes.
Single, 2S Timer, 5S Timer, 10S Timer
6.5.12 Resoluon
Selecttheresoluonoftheimage.
12M (4032x3024), 10M (3648x2736), 8M (3264x2448), 5M
(2592x1944), 3M (2048x1536), 2MHD (1920x1080), 1.3M (1280x960)
6.5.13 Sequence
Thedashboardcameratakesaseriesofvephotos.
On or O
6.5.14 Quality
Selecttheimagequalityoftheimage.
Fine, Normal or Economy
6.5.15 Sharpness
Select the sharpness of the image.
Strong, Normal or So
6.5.16 White Balance
The white balance determines the colour temperature of the picture.
Auto, Daylight, Cloudy, Tungsten or Fluorescent

15
6.5.17 Color
Select the colour of the image.
Normal, Black & White or Sepia
6.5.18 ISO
Thelightsensivitydetermineshowfastthedashboardcamerareactsto
the light that falls on the sensor through the camera lens. Usually, the less
light,thehigherthelightsensivitytotakesharpphotos.
Auto, 100, 200 of 400
6.5.19 Exposure
Theexposurevaluesetstheappropriateexposureleveltoadjustthe
brightness of the image.
+2.0, +5/3, +4/3, +1.0, +2/3, +1/3, +0.0, -1/3, -2/3, -1.0, -4/3, -5/3 or
-2.0
6.5.20 An-Shaking
Setan-shakingtocompensateforunwantedmoonblur.
On or O
6.5.21 Quick Review
Selectthelengthofmetodisplayaphototakenonthedashboard
camera display.
O, 2 Seconds or 5 Seconds
6.5.22 Date Stamp
Addadatestamptothemovieorphoto.
Date/Time, Date or O

16
Playback sengs
• PressandholdtheMenukeyfor3secondstoswitchmodesunlyou
are in play mode.
• PresstheMenubuon.
• UsetheUpandDownbuonstonavigatethroughthemenu.
• PresstheMulfunconbuontoconrmyourselecon.
6.5.23 Delete
To delete a photo or movie recording: use the Up and Down buons to
select a photo or movie recording and press the Menu buon. Use the
Down buon to select opon "Delete current" and conrm with the
Mulfuncon buon.
6.5.24 Protect
Protecng a photo or movie recording: use the Up and Down buons
to select whether you want to protect the current or all photos and
movie recordings. Conrm your selecon with the Mulfuncon
buon.
6.5.25 Slide Show
Start a slide show. You can choose between a 2, 5 or 8 second display.

17
System sengs
5Youcanaccessthesystemsengsfromanymode.
• PresstheMenubuontwice.
• UsetheUpandDownbuonstonavigatethroughthemenu.
• PresstheMulfunconbuontoconrmyourselecon.
6.5.26 WIFI
SwitchWiFionoro.
On or O
6.5.27 Date/Time
Hereyoucansetthedateandme.
Use the Mulfuncon key to navigate within the menu. Use the Up
and Down buons to select a digit or leer. Conrm your selecon
with the Mulfuncon buon.
6.5.28 Beep Sound
Turningthebuonsoundonoro.
On or O
6.5.29 Language
You can set the language here.
English, French, Spanish, German, Russian, Dutch, Italian, Polish.
6.5.30 Frequency
Hereyoucansetthefrequency.
50 Hz or 60 Hz
6.5.31 Screen Saver
Setscreensaver.
O, 1 Minute, 3 Minutes or 5 Minutes

18
6.5.32 Car Plate
Entertheregistraonnumber.
Use the Up and Down keys to select a digit or leer. Conrm the
selecon with the Menu key. Go back by pressing the Mulfuncon
key.
6.5.33 Format
Hereyoucanformatthememorycard.Alldatawillbedeleted.
OK or Cancel
6.5.34 Default Seng
Thecamerasengswillberesettothefactorysengs.
OK or Cancel
6.5.35 Version
Displaystheinstalledsowareversion.
6.6 Connecng a USB to a computer
• PlacetheUSBcableinthemagnecholderandinthecomputer.
• Youcanchoosethefollowingopons:
USB Mode
Viewandexportmovierecordingsandphotos.
PC Camera Mode
Usethedashboardcameraasawebcam(computerand/orsoware-
dependent).

19
7 Manage the dashboard camera via your
telephone
7.1 Installing the Lerccenker app
• DownloadtheLerccenkerappforAndroidofiOSontoyourphonevia
Google Play or the Apple App Store.
7.2 Connect with the dashboard camera
• PresstheMenubuontwice.
• UsetheDownbuontonavigatetoWiFi.
• SwitchonWiFiandconrmwiththeMulfunconkey.
• GototheWi-Fisengsonyourphoneandselectthedashboard
camera.
• Enterthepassword.Thedefaultpasswordis12345678.
• Open the Lerccenker app on your mobile phone.
The dashboard camera is now connected to your phone. You can operate
the dashboard camera with the app.

20
8 Cleaning and maintenance
• Cleanregularlywithaso,clean,drycloth.Avoidabrasivesthatcan
damage the surface.
• Donotuseaggressivechemicalcleaningagentssuchasammonia,acid
or acetone when cleaning the product.
This manual suits for next models
1
Table of contents


