中文版(简体)
FrançaisEnglish
■
Depth of field (Metric)
■
Profondeur de champ
■景深 (m)
• Focus distance
• Distance de mise au point
• 对焦距离
• Depth of eld
• Profondeur de champ
• 景深
• Reproduction ratio
• Rapport de reproduction
• 成像率
f/1.8 f/2.0 f/2.8 f/4 f/5.6 f/8 f/11 f/16
0.23
0.23 – 0.23 0.23 – 0.23 0.23 – 0.23 0.23 – 0.23 0.23 – 0.24 0.22 – 0.24 0.22 – 0.24 0.22 – 0.25 1/4.9
0.3 0.30 – 0.30 0.30 – 0.31 0.29 – 0.31 0.29 – 0.31 0.29 – 0.31 0.28 – 0.32 0.28 – 0.33 0.27 – 0.34 1/7.7
0.5 0.48 – 0.52 0.48 – 0.52 0.48 – 0.53 0.47 – 0.54 0.46 – 0.56 0.44 – 0.59 0.42 – 0.63 0.40 – 0.73
1/15.9
∞9.88 – ∞ 9.20 – ∞ 6.60 – ∞ 4.65 – ∞ 3.35 – ∞ 2.38 – ∞ 1.76 – ∞ 1.25 – ∞ 1/∞
■
Depth of field (Imperial)
(ft)
Focus distance Depth of field Reproduction ratio
f/1.8 f/2.0 f/2.8 f/4 f/5.6 f/8 f/11 f/16
0.8 9 ⁄ in. –
9 ⁄ in.
9 ⁄ in. –
9 ⁄ in.
9 ⁄ in. –
9 ⁄ in.
9 ⁄ in. –
9 ⁄ in.
9 ⁄ in. –
9 ⁄ in.
9 ⁄ in. –
10 in.
9 ⁄ in. –
10 ⁄ in.
8 ⁄ in. –
10 ⁄ in. 1/5.4
1
11 ⁄ in. –
1 ft ⁄ in.
11 ⁄ in. –
1 ft ⁄ in.
11 ⁄ in. –
1 ft ⁄ in.
11 ⁄ in. –
1 ft ⁄ in.
11 ⁄ in. –
1 ft ⁄ in.
11 ⁄ in. –
1 ft ⁄ in.
11 ⁄ in. –
1 ft 1 ⁄ in.
10 ⁄ in. –
1 ft 1 ⁄ in.
1/7.9
1.6
1 ft 6 ⁄ in. –
1 ft 7 ⁄ in.
1 ft 6 ⁄ in.
–
1 ft 7 ⁄ in.
1 ft 6 ⁄ in. –
1 ft 8 ⁄ in.
1 ft 6 in. –
1 ft 8 ⁄ in.
1 ft 5 ⁄ in. –
1 ft 9 ⁄ in.
1 ft 4 ⁄ in. –
1 ft 10 ⁄ in.
1 ft 4 ⁄ in. –
2 ft
1 ft 3 ⁄ in. –
2 ft 3 ⁄ in. 1/15.4
∞
32 ft 5 ⁄ in. –
∞
30 ft 2 ⁄ in. –
∞
21 ft 7 ⁄ in. –
∞
15 ft 3 ⁄ in. –
∞
11 ft ⁄ in. –
∞
7 ft 9 ⁄ in. –
∞
5 ft 9 ⁄ in. –
∞
4 ft ⁄ in. –
∞
1/∞
En
User’s Manual
Fr
Manuel d’utilisation
Sc
使用说明书
Tc
使用說明書
Id
Manual bagi Pengguna
Ar
AF-S NIKKOR 24mm f/1.8G ED
Printed in Japan
SB5D01(6C)
7MA0256C-01
使用产品前请仔细阅读本使用说明书,并请妥善保管。
在使用本产品前,请仔细阅读这些使用说明和照相机的说明书。
注意:
当安装在一台DX 格式数码单镜反光照相机(例如D7200 或
D5500)上时,该镜头的视角为61°且焦距相当于36mm
(35mm
格式)。
安全须知
为预防发生伤害、损失或其他事故,请在使用本产品前仔细阅读
“安全须知”,并以正确的方法使用。请在阅读之后妥善保管本说明
书,以便随时查阅。
A警告
(有可能造成人员死亡或负重伤的事项)
A注意
(有可能造成人身伤害或物品损害的事项)
图示和符号的实例
F禁止
(不允许进行的行为)符号。
C执行(必须进行的行为)符号。
A警告
F禁止 切勿自行拆解、修理或改装。
F
禁止
当产品由于跌落而破损使得内部外露时,切勿用手触碰
外露部分。
否则将会导致触电或受伤。
C
执行
当发现产品变热、冒烟或发出焦味等异常时,请立刻取
出照相机中的电池或切断照相机电源(电源适配器)。
若放任不管,将会导致起火或烫伤。
取出电池或切断电源时,请小心勿被烫伤。
请委托尼康授权的维修服务中心进行修理。
F
禁止
切勿使产品被水淋湿。
勿用湿手触碰。
否则将导致触电或起火。
F
禁止
切勿在有可能起火、爆炸的场所使用。
在液化石油气站、汽油加油站等会产生易燃性气体、粉
尘的场所使用产品,将会导致起火或爆炸。
F
禁止
切勿使用镜头或照相机直接观看太阳或强光。
否则将会导致失明或视觉损伤。
A注意
C
执行
切勿在婴幼儿伸手可及之处保管本产品。
否则将会导致受伤或故障。
C
执行
进行背光拍摄时,务必使太阳充分偏离视角。
不使用时,请盖上镜头盖,或者存放在没有阳光照射处。
阳光会聚焦,并将导致起火。
F
禁止
切勿置于高温的地方(如夏天封闭的车内或直射阳光
下)。
切勿将产品用手帕或毛巾包裹着使用。
否则将会导致故障或起火。
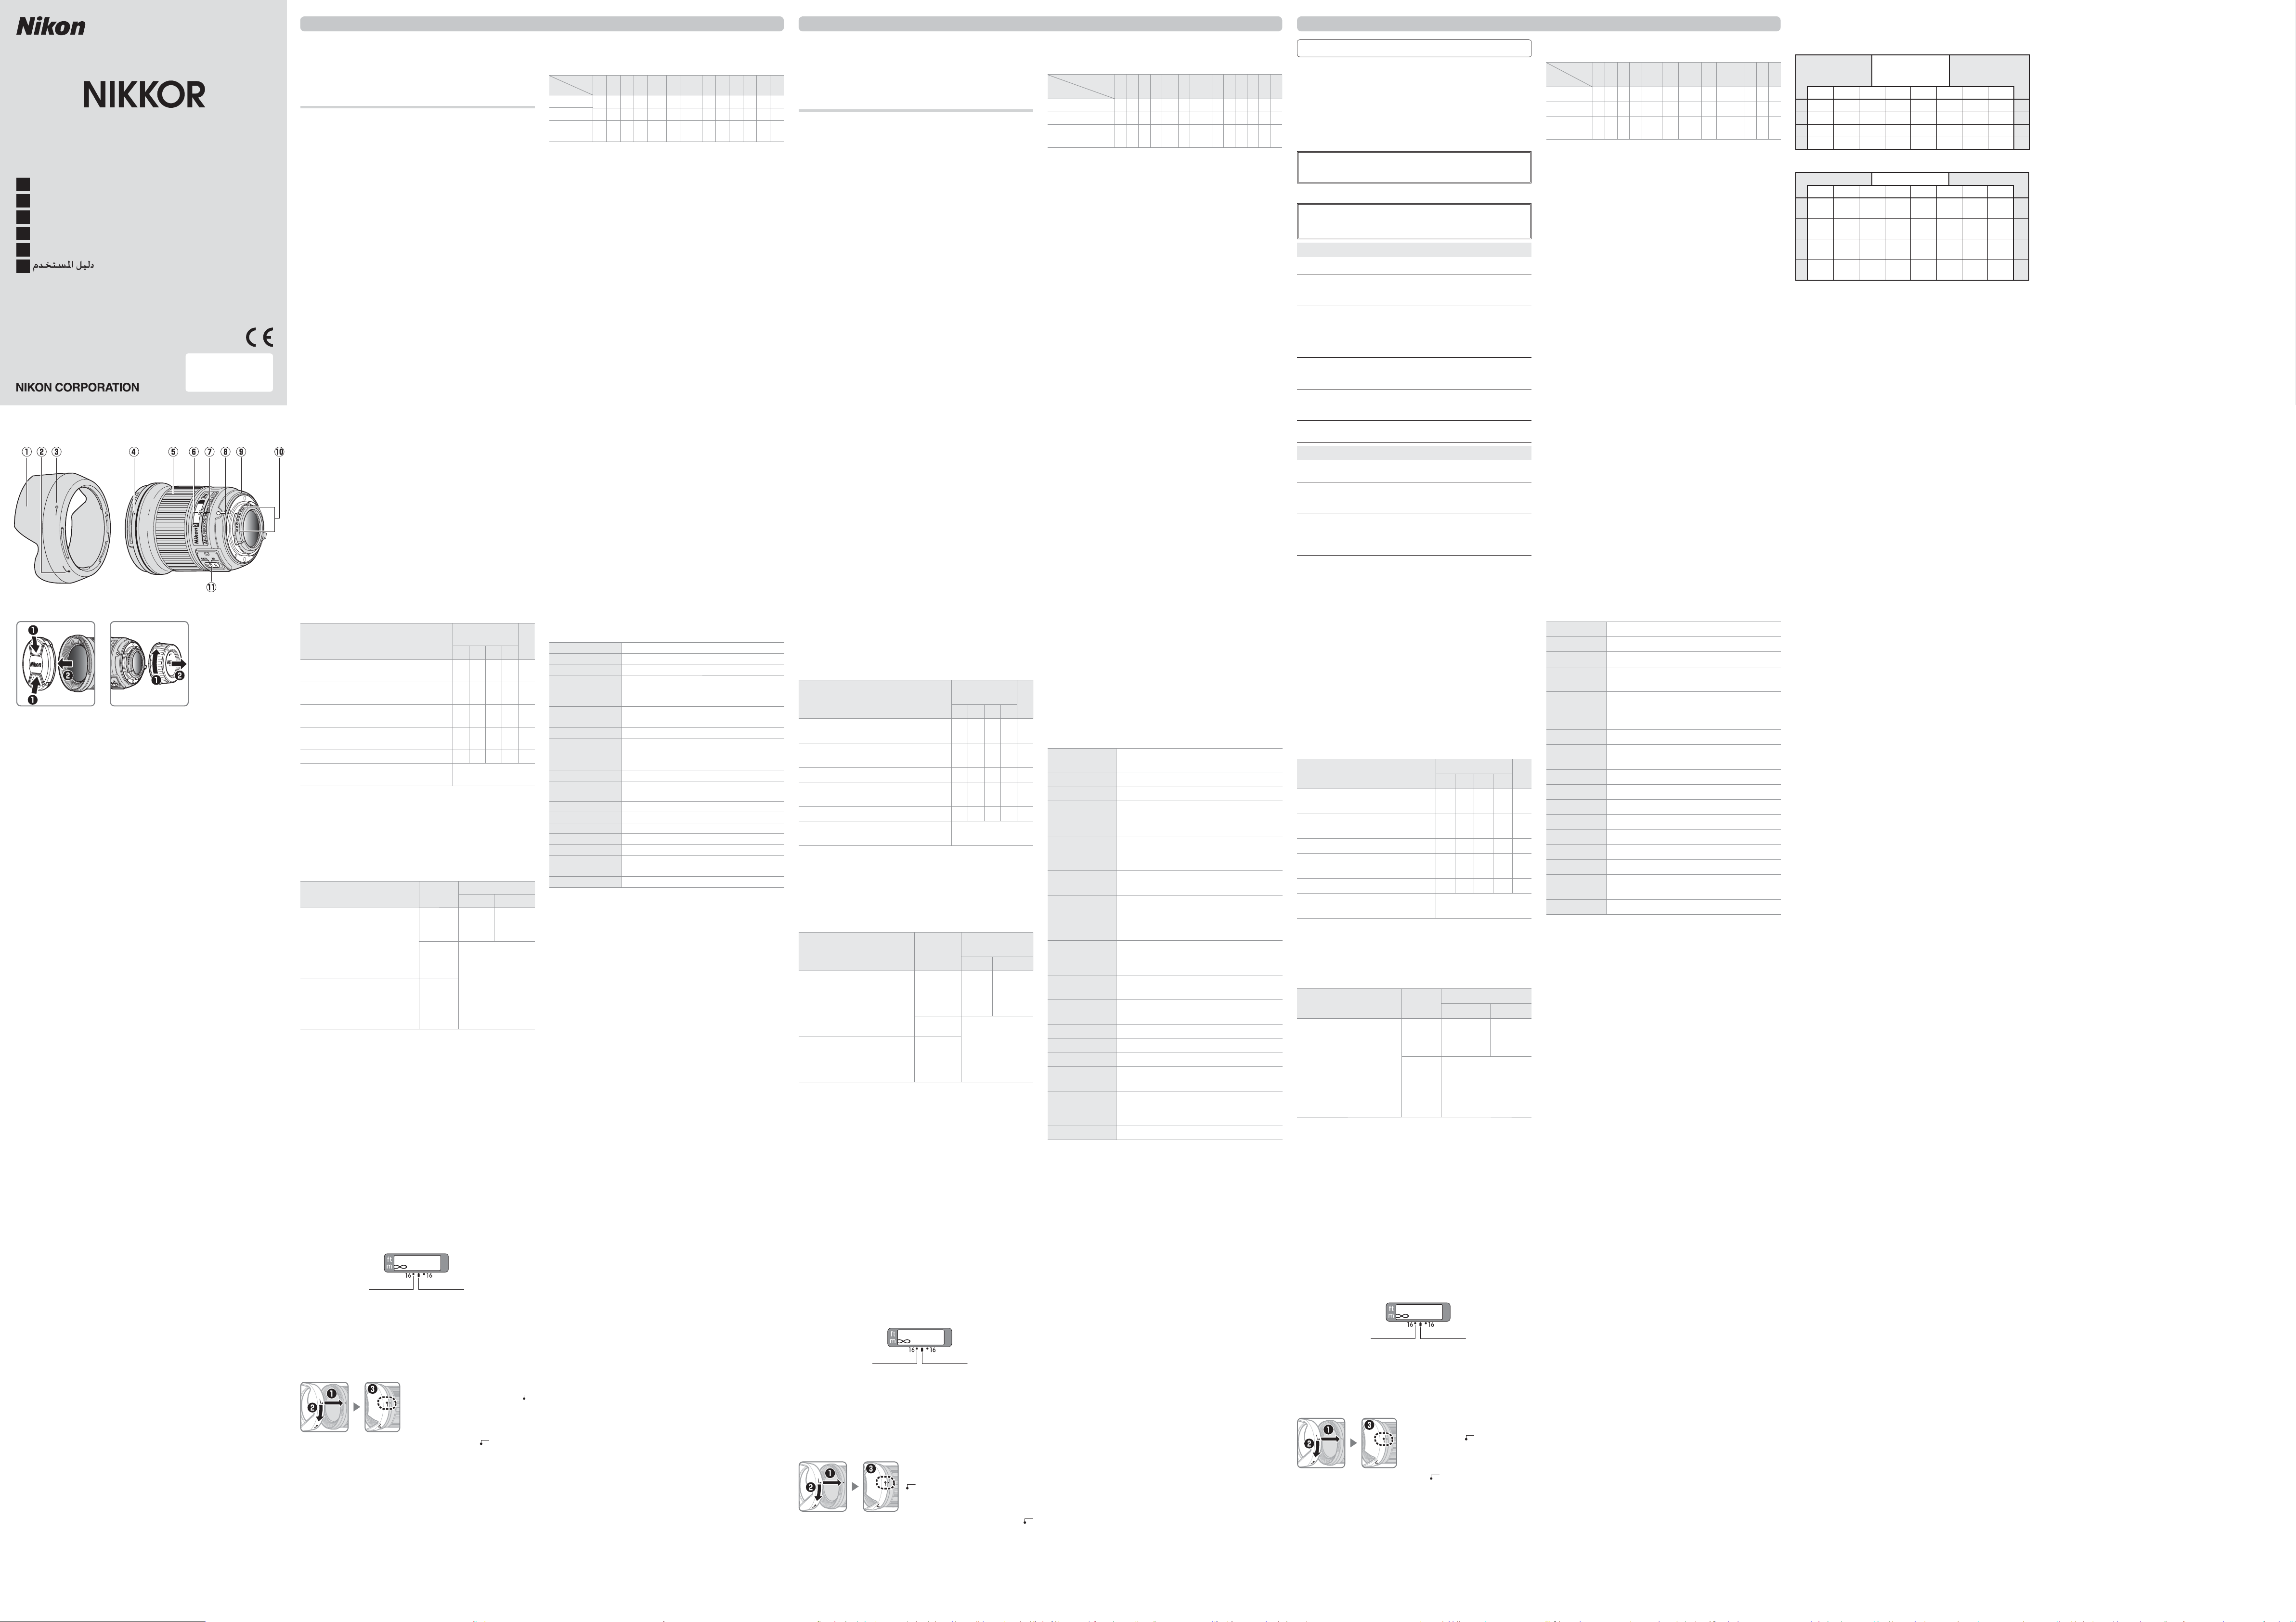
■镜头部件
q镜头遮光罩
w镜头遮光罩对齐标记
e镜头遮光罩锁定标记
r镜头遮光罩安装标记
t对焦环
y对焦距离指示
u对焦距离标记
i镜头安装标记
o
镜头卡口橡胶垫圈
!0
CPU接点
!1
对焦模式切换器
■兼容性
勾选标记(“
✔
”)表示支持的功能,破折号(“—”)表示不支持的
功能。可用功能可能受到一些限制 ;有关详细信息,请参阅照相机
的说明书。
照相机
曝光(拍摄)模式
AF3
P2SAM
尼康FX格式和 DX 格式数码单镜反光
照相机 ✔✔✔✔✔
F6、
F5、
F100、
F80系列、
F75系列、
F65
系列、
Pronea 600i、
Pronea S 1
✔✔✔✔✔
F4系列、
F90X
、
F90系列、
F70系列
✔✔——✔
F60系列、
F55系列、
F50系列、
F-401x
、
F-401s、F-401 ✔✔✔✔—
F-801s、F-801
、F-601M✔✔———
F3AF、
F-601
、
F-501
、尼康 MF照相机
(F-601M除外) —
1 曝光模式M
(手动)不可用。
2 包括自动和场景(数字可变程序)模式。
3 自动对焦。
■对焦
所支持的对焦模式如下表所示
(有关照相机对焦模式的信息,请参
阅照相机的说明书)。
照相机
照相机
对焦模式
镜头对焦模式
M/A M
尼康FX格式和 DX 格式数码
单镜反光照相机、
F6、
F5、
F4
系列、
F100、
F90X
、
F90系列、
F80系列、
F75系列、
F70系列、
F65系列、
Pronea 600i、
Pronea S
AF
手动优先的
自动对焦
带有电子
测距仪的
手动对焦
MF 手动对焦
(除 F-601M以外的
所有照相机均带有
电子测距仪)
F60系列、
F55系列、
F50系列、
F-801s、
F-801
、
F-601M、
F-401x
、
F-401s、
F-401
AF、
MF
M/A
(手动优先的自动对焦)
使用手动优先的自动对焦(M/A
)进行对焦的步骤如下 :
z将镜头对焦模式切换器推至M/A。
x
对焦。
若有需要,您可在半按快门释放按钮期间(或者,若照相机配
备有一个AF-ON 按钮,则在按下AF-ON 按钮期间)旋转镜头
对焦环来使手动对焦优先于自动对焦。若要使用自动对焦以重
新对焦,请再次半按快门释放按钮或再次按下AF-ON按钮。
■景深
镜头上的景深指示表示大致的景深。若照相机支持景深预览(光圈
缩小),则景深还可在取景器中进行预览。有关详细信息,请参阅
景深列表。
注意:
请注意,对焦距离指示仅可作为指南,可能无法准确显示离拍
摄对象的距离,并且由于景深或其他因素的影响,照相机对焦于远距
离物体时可能不会显示
∞
。
0.5
1.6 1
0.3
对焦距离标记景深指示
■光圈
请使用照相机控制调整光圈。
■
镜头遮光罩
镜头遮光罩可保护镜头并阻挡可能导致杂光或鬼影的散射光线。
安装遮光罩
将镜头遮光罩安装标记(
●
)与镜头
遮光罩对齐标记( )对齐,然后旋
转遮光罩(
w
)直至
●
标记与镜头遮
光罩锁定标记(
—
)对齐。
安装或取下遮光罩时,请在其底部的 标记附近将其握住,并避
免握得太紧。若未正确安装好遮光罩,则可能会产生渐晕。
不使用时,可将遮光罩反转并固定在镜头上。
■对焦屏
下列照相机支持用于不同情况下的多种对焦屏。
对焦屏
照相机
ABCE
EC-B
EC-E
G1G2G3G4JLMU
F6——— ———
F5+ DP-30
F5+ DA-30
(+0.5)
: 推荐使用。
: 在取景器中可见渐晕(照片不会受到影响)。
—: 与照相机不兼容。
()
: 括号中的数据是指用于中央重点测光的曝光补偿值。
当调整 F6的曝光补偿时,请在个人设定b6
(“对焦屏
补偿”)中选择“其它对焦屏”;请注意,使用B或E
以外的对焦屏时,即使曝光补偿值为0,也必须选择
“其它对焦屏”。F5的曝光补偿可使用个人设定18 进行
调整 ;有关详细信息,请参阅照相机的说明书。
空白单元格
: 不适用于该镜头。请注意,在放大倍率为1: 1或更高
时, M型屏幕仍可用于显微拍摄和微距拍摄。
注意:
F5仅在使用 A、B、E
、EC-B/EC-E、J和L对焦屏时支持矩阵测光。
■镜头保养
• 拿起或持握镜头或照相机时,切勿仅持拿镜头遮光罩。
•
保持 CPU接点清洁。
•
若镜头卡口橡胶垫圈损坏,请立即停止使用并将镜头送至尼康授
权的维修服务中心进行维修。
• 用吹气球去除镜头表面的灰尘和浮屑。若要去除污点和指纹,可
使用一块滴有少许乙醇或镜头清洁剂的干净软棉布或镜头清洁
纸,以圆周运动方式从里向外进行清洁。注意不要留下污渍,也
不要用手指碰触玻璃。
• 切勿使用涂料稀释剂或苯等有机溶剂清洁镜头。
• 镜头遮光罩或 NC 滤镜可用于保护前部镜头元件。
• 将镜头放入镜头套之前,请盖好镜头前盖和镜头后盖。
• 若在较长时间内不使用镜头,请将其存放在阴凉干燥的地方以防
止发霉和生锈。切不可存放在直射阳光下,也不可与石脑油或樟
脑丸一起存放。
• 保持镜头干燥。内部构造生锈将导致无法挽回的损坏。
• 将镜头放置在过于炎热的地方将会使强化塑料部件受损或变形。
• 运输产品时,请在包装箱内装入足够多的缓冲材料,以减少(避
免) 由 于 冲 击 导 致 产 品 损 坏 。
■随附配件
• 72mm搭扣式镜头前盖LC-72
• 镜头后盖 LF-4
• 卡口式镜头遮光罩 HB-76
• 镜头套 CL-1015
■兼容的配件
• 72mm旋入式滤镜
■技术规格
类型 带内置 CPU和F卡口的 G型AF-S镜头
焦距 24 mm
最大光圈 f/1.8
镜头结构
9组12 片(包括2枚ED 镜片组件、2枚非球面镜片
组件和带纳米结晶涂层的镜片组件)
视角 • 尼康胶卷单镜反光与FX格式数码单镜反光照相
机:
84°
• 尼康DX 格式数码单镜反光照相机 :
61°
距离信息 输出到照相机
对焦 后组对焦(RF)系统(可进行由宁静波动马达控
制的自动对焦,具备用于手动对焦的独立对焦环)
对焦距离指示
0.23m 至无穷远(∞)
最近对焦距离
0.23m
(至焦平面)
光圈叶片 7片(圆形光圈孔)
光圈 全自动
光圈范围 f/1.8– 16
测光 全开光圈测光
滤镜附件尺寸 72 mm
(P= 0.75 mm)
尺寸 约77.5mm
(最大直径)×83.0mm
(从照相机镜头卡口边缘开始的距离)
重量 约355 g
尼康公司保留可随时更改说明书内载之硬件技术规格的权利,而无
须事先通知。
Before using this product, please carefully read both these instructions and
the camera manual.
Note: When mounted on a DX-format digital single-lens reflex camera such
as the D7200 or D5500, this lens has an angle of view of 61° and a focal
length equivalent to 36 mm (35 mm format).
For Your Safety
A
WARNINGS
• Donot disassemble or modify. In the event of malfunction, the product should
be repaired only by a qualified technician. Should the product break open
as the result of a fall or other accident, avoid touching exposed parts. Fail-
ure to observe these precautions could result in electric shock or other
injury.
• Turn the camera o immediately in the event of malfunction. Should you notice
smoke or an unusual smell coming from the equipment, immediately unplug
the AC adapter and remove the camera battery, taking care to avoid burns.
Continued operation could result in fire or injury. After removing the battery,
take the equipment to a Nikon-authorized service center for inspection.
• Keep dry. Do not expose the product to water or handle with wet hands.
Failure to observe this precaution could result in fire or electric shock.
• Do not use in the presence of ammable gas. Operating the equipment at filling
stations or in the presence of propane or other flammable gas or dust
could result in explosion or fire.
• Do not look at the sun through the lens or the camera viewnder. Viewing the sun
or other bright light source through the lens or viewfinder could cause
permanent visual impairment.
A
CAUTIONS
• Keep out of reach of children. Failure to observe this precaution could result in
injury or product malfunction.
• Do not focus sunlight through the lens. Sunlight focused through the lens
could cause fire. When shooting backlit subjects keep the sun well out of
the frame; if the lens will not be used for an extended period, replace the
lens caps and store out of direct sunlight.
• Do not overheat. Do not leave the product in locations exposed to extreme-
ly high temperatures, such as in an enclosed vehicle in direct sunlight,
or wrap the product in a towel or handkerchief or otherwise cover the
product while it is in use. Failure to observe these precautions could result
in fire or product malfunction.
■
Parts of the Lens
qLens hood
wLens hood alignment mark
eLens hood lock mark
rLens hood mounting mark
tFocus ring
yFocus distance indicator
uFocus distance mark
iLens mounting mark
oRubber lens-mount gasket
!0CPU contacts
!1
Focus-mode switch
■
Compatibility
Check marks (“
✔
“) indicate supported features, dashes (“—”) features that are
not supported. Some limitations may apply; see the camera manual for details.
Camera
Exposure (shooting)
mode
AF
5
P
4
S
A
M
Nikon FX-format and DX-format digital single-
lens reflex cameras ✔✔✔✔✔
F6, F5, F100, F/N80-series1, F/N75-series1,
F/N65-series1, Pronea 600i/6i1, Pronea S2 ✔✔✔✔✔
F4-series, F90X/N90s1, F90-series/N901,
F70-series/N701 ✔✔——✔
F60-series/N601, F/N55-series1, F50-series/N501,
F-401x/N50051, F-401s/N4004s1, F-401/N40041 ✔✔✔✔—
F-801s/N8008s1, F-801/N80081, F-601M/N60001 ✔✔———
F3AF, F-601/N60061, F-501/N20203, Nikon
manual focus cameras (excluding F-601M/N60001)—
1. N-series cameras and Pronea 6i sold in U. S. A. only.
2. Exposure mode M (manual) not available.
3. N2020 sold in U. S. A. and Canada only.
4. Includes AUTO and scene (Digital Vari-Program) modes.
5. Autofocus.
■
Focus
Supported focus modes are shown in the following table (for information
on camera focus modes, see the camera manual).
Camera
Camera
focus mode
Lens focus mode
M/A
M
Nikon FX-format and DX-format
digital single-lens reflex cameras,
F6, F5, F4-series, F100, F90X/N90s*,
F90-series/N90*, F/N80-series*,
F/N75-series*, F70-series/N70*,
F/N65-series*, Pronea 600i/6i*,
Pronea S
AF
Autofocus
with manual
override
Manual focus
with electronic
rangender
MF
Manual focus (electronic
rangender available with
all cameras except F-601M/
N6000*)
F60-series/N60*, F/N55-series*,
F50-series/N50*, F-801s/N8008s*,
F-801/N8008*, F-601M/N6000*,
F-401x/N5005*, F-401s/N4004s*,
F-401/N4004*
AF, MF
* N-series cameras and Pronea 6i sold in U. S. A. only.
M/A (Autofocus with Manual Override)
M/A (Autofocus with Manual Override)
To focus using autofocus with manual override (M/A):
z Slide the lens focus-mode switch to M/A.
xFocus.
If desired, autofocus can be over-ridden by rotating the lens
focus ring while the shutter-release button is pressed halfway
(or, if the camera is equipped with an AF-ON button, while the
AF-ON button is pressed). To refocus using autofocus, press the
shutter-release button halfway or press the AF-ON button again.
■
Depth of Field
The depth-of-field indicators on the lens show the approximate depth of
field. If the camera offers depth-of-field preview (stop down), depth of field
can also be previewed in the viewfinder. See the depth of field table for
more information.
Note: Note that the focus distance indicator is intended only as a guide and
may not accurately show the distance to the subject and may, due to depth
of field or other factors, not show ∞ when the camera is focused on a distant
object.
0.5
1.6 1
0.3
Focus distance
mark
Depth-of-eld
indicators
■
Aperture
Aperture is adjusted using camera controls.
■
The Lens Hood
The lens hoods protect the lens and block stray light that would otherwise
cause flare or ghosting.
Attaching the Hood
Align the lens hood mounting mark (●)
with the lens hood alignment mark ( )
and then rotate the hood (w) until the
●mark is aligned with the lens hood
lock mark (—).
When attaching or removing the hood, hold it near the symbol on its
base and avoid gripping it too tightly. Vignetting may occur if the hood is
not correctly attached.
The hood can be reversed and mounted on the lens when not in use.
■
Focusing Screens
The following cameras support a variety of focusing screens for use in dif-
ferent situations.
Screen
Camera
A
B
C
E
EC-B
EC-E
G1
G2
G3
G4
J
L
M
U
F6 ——— — ——
F5+DP-30
F5+DA-30
(+0.5)
: Recommended.
: Vignetting visible in viewfinder (photographs are not affected).
—: Not compatible with camera.
( ): Figures in parentheses give the exposure compensation for cen-
ter-weighted metering. Select “Other screen” for Custom Setting
b6 (“Screen comp.”) when adjusting exposure compensation for
the F6; note that with screens other than B or E, “Other screen”
must be selected even when the value for exposure compensa-
tion is 0. Exposure compensation for the F5 can be adjusted using
Custom Setting 18; see the camera manual for details.
Empty cell: Not suited to use with this lens. Note that type M screens can
however be used for photomicrography and macro photography
at magnifications of 1 : 1 or higher.
Note: The F5 supports matrix metering with A, B, E, EC-B/EC-E, J, and L focusing
screens only.
■
Lens Care
• Do not pick up or hold the lens or camera using only the lens hood.
• Keep the CPU contacts clean.
• Should the rubber lens-mount gasket be damaged, cease use immedi-
ately and take the lens to a Nikon-authorized service center for repair.
• Use a blower to remove dust and lint from the lens surfaces. To remove
smudges and fingerprints, apply a small amount of ethanol or lens cleaner
to a soft, clean cotton cloth or lens-cleaning tissue and clean from the
center outwards using a circular motion, taking care not to leave smears
or touch the glass with your fingers.
• Never use organic solvents such as paint thinner or benzene to clean the
lens.
• The lens hood or NC filters can be used to protect the front lens element.
• Attach the front and rear caps before placing the lens in its lens case.
• If the lens will not be used for an extended period, store it in a cool, dry
location to prevent mold and rust. Do not store in direct sunlight or with
naphtha or camphor moth balls.
• Keep the lens dry. Rusting of the internal mechanism can cause irrepa-
rable damage.
• Leaving the lens in extremely hot locations could damage or warp parts
made from reinforced plastic.
■
Supplied Accessories
• 72 mm snap-on Front Lens Cap LC-72
• Rear Lens Cap LF-4
• Bayonet Hood HB-76
• Lens Case CL-1015
■
Compatible Accessories
• 72 mm screw-on filters
■
Specifications
Type Type G AF-S lens with built-in CPU and F mount
Focal length 24 mm
Maximum aperture f/1.8
Lens construction 12 elements in 9 groups (including 2 ED lens elements, 2
aspherical lens elements, and lens elements with Nano-Crystal
coatings)
Angle of view • Nikon film SLR and FX-format D-SLR cameras: 84°
• Nikon DX-format D-SLR cameras: 61°
Distance information Output to camera
Focusing Rear Focusing (RF) System with autofocus con-
trolled by Silent Wave Motor and separate focus
ring for manual focus
Focus distance indicator 0.23 m to infinity (∞)
Minimum focus
distance 0.23 m (0.75ft) from focal plane
Diaphragm blades 7 (rounded diaphragm opening)
Diaphragm Fully automatic
Aperture range f/1.8–16
Metering Full aperture
Filter-attachment size 72 mm (P = 0.75 mm)
Dimensions Approx. 77.5 mm maximum diameter × 83.0 mm
(distance from camera lens mount ange)
Weight Approx. 355 g (12.6 oz)
Nikon reserves the right to change the specifications of the hardware described
in this manual at any time and without prior notice.
Avant de l’utiliser, veuillez lire attentivement ces instructions et le manuel
de l’appareil photo.
Remarque : lorsqu’il est monté sur un reflex numérique de format DX,
comme le D7200 ou le D5500, cet objectif a un angle de champ de 61° et
une focale équivalente à 36 mm (format 24×36 mm).
Pour votre sécurité
A
AVERTISSEMENTS
• Ne démontez pas ou ne modiez pas le produit. En cas de dysfonctionnement,
ce produit ne doit être réparé que par un technicien qualifié. Si ce produit
se casse suite à une chute ou à un autre accident, évitez de toucher
les parties exposées. Le non-respect de ces consignes de sécurité peut
provoquer un choc électrique ou d’autres blessures.
• En cas de dysfonctionnement, mettez immédiatement l’appareil photo hors tension.
En cas d’apparition de fumée ou d’une odeur inhabituelle provenant
du matériel, débranchez immédiatement l’adaptateur secteur et retirez
l’accumulateur de l’appareil photo, en faisant attention de ne pas vous
brûler. Continuer d’utiliser le matériel risque de provoquer un incendie ou
des blessures. Une fois l’accumulateur retiré, apportez votre matériel à un
centre Nikon agréé pour le faire contrôler.
• Gardez le produit au sec. N’exposez pas ce produit à l’eau ou ne le manipulez
pas avec les mains mouillées. Le non-respect de cette consigne de
sécurité peut provoquer un incendie ou un choc électrique.
• N’utilisez pas le matériel en présence de gaz inammables. La manipulation du
matériel dans des stations-service ou en présence de propane, d’autres gaz
inflammables ou de poussière peut provoquer une explosion ou un incendie.
• Neregardezpaslesoleil à traversl’objectifouleviseurde l’appareilphoto. L’observation
du soleil ou de toute autre source lumineuse puissante à travers l’objectif ou
le viseur peut provoquer des troubles irrémédiables de la vision.
A
MISES EN GARDE
• Conservez hors de portée des enfants. Le non-respect de cette consigne de
sécurité peut provoquer des blessures ou le dysfonctionnement du produit.
• Ne focalisez pas les rayons du soleil à travers l’objectif. Les rayons du soleil
focalisés à travers l’objectif peuvent provoquer un incendie. Lorsque vous
photographiez des sujets à contre-jour, maintenez le soleil loin du cadre ;
si vous n’avez pas l’intention d’utiliser l’objectif avant longtemps, remettez
en place ses bouchons et rangez-le à l’abri de la lumière directe du soleil.
• Ne surchauez pas le produit. Ne laissez pas ce produit dans des lieux exposés
à des températures très élevées, comme dans une voiture fermée en plein
soleil. N’emballez pas ce produit dans une serviette, un mouchoir ou ne
le recouvrez pas de quelque manière que ce soit lorsque vous l’utilisez. Le
non-respect de ces consignes de sécurité peut provoquer un incendie ou
le dysfonctionnement du produit.
■
Parties de l’objectif
qParasoleil
wRepère d’alignement du parasoleil
eRepère de verrouillage du parasoleil
rRepère de montage du parasoleil
tBague de mise au point
yIndicateur de distance de mise au point
uRepère de distance de mise au point
iRepère de montage de l’objectif
oJoint en caoutchouc de la monture d’objectif
!0Contacts du microprocesseur
!1Commutateur du mode de mise au point
■
Compatibilité
Les marques (« ✔») indiquent les fonctions prises en charge, les traits
(« — ») les fonctions non prises en charge. Certaines restrictions peuvent
s’appliquer ; consultez le manuel de l’appareil photo pour plus de détails.
Appareil photo
Mode d’exposition
(prise de vue)
AF
3
P
2
S
A
M
Appareils photo numériques reflex Nikon de
format FX et DX ✔✔✔✔✔
F6, F5, F100, gamme F80, gamme F75,
gamme F65, Pronea 600i, Pronea S1 ✔✔✔✔✔
Gamme F4, F90X, gamme F90, gamme F70 ✔✔——✔
Gamme F60, gamme F55, gamme F50,
F-401x, F-401s, F-401 ✔✔✔✔—
F-801s, F-801, F-601M✔✔———
F3AF, F-601, F-501, appareils MF Nikon (sauf
F-601M)—
1. Mode d’exposition M (manuel) non disponible.
2. Inclut les modes AUTO et scène (Vari-programme).
3. Autofocus.
■
Mise au point
Les modes de mise au point pris en charge sont indiqués dans le tableau
suivant (pour en savoir plus sur les modes de mise au point de l’appareil
photo, consultez le manuel de ce dernier).
Appareil photo
Mode de mise
au point de
l’appareil photo
Mode de mise au point
de l’objectif
M/A
M
Appareils photo numériques reflex
Nikon de format FX et DX, F6, F5,
gamme F4, F100, F90X,
gamme F90, gamme F80,
gammeF75,gammeF70,gammeF65,
Pronea 600i, Pronea S
AF
Autofocus
à priorité
manuelle
Mise au point
manuelle avec
télémètre
électronique
MF Mise au point
manuelle
(télémètre électronique
disponible sur tous les
appareils photo excepté
F-601M)
Gamme F60, gamme F55,
gamme F50, F-801s, F-801,
F-601M, F-401x, F-401s, F-401
AF, MF
M/A (Autofocus à priorité manuelle)
M/A (Autofocus à priorité manuelle)
Pour faire la mise au point en utilisant l’autofocus à priorité manuelle (M/A) :
z Positionnez le commutateur du mode de mise au point de l’objectif
sur M/A.
xEffectuez la mise au point.
Si vous le souhaitez, vous pouvez désactiver l’autofocus en
pivotant labague de mise aupoint de l’objectif avec ledéclencheur
appuyé à mi-course (ou avec la commande AF-ON appuyée, si
l’appareil photo est pourvu d’une commande AF-ON). Pour refaire
la mise au point avec l’autofocus, appuyez à mi-course sur le
déclencheur ou appuyez de nouveau sur la commande AF-ON.
■
Profondeur de champ
Les indicateurs de profondeur de champ visibles sur l’objectif indiquent
la profondeur de champ approximative. Si l’appareil photo dispose d’une
fonction d’aperçu de la profondeur de champ, il est également possible de
prévisualiser cette dernière dans le viseur. Reportez-vous au tableau de la
profondeur de champ pour en savoir plus.
Note: remarquez que la distance affichée par l’indicateur de distance de mise au
point n’est donnée qu’à titre indicatif et peut ne pas correspondre précisément
à la distance réelle du sujet, et peut, en raison de la profondeur de champ ou
d’autres facteurs, ne pas afficher ∞ alors que le sujet mis au point est éloigné.
0.5
1.6 1
0.3
Indicateurs de
profondeur de champ
Repère de distance
de mise au point
■
Ouverture
Pour régler l’ouverture, utilisez les commandes de l’appareil photo.
■
Parasoleil
Le parasoleil protège l’objectif et bloque la lumière diffuse pouvant causer
de la lumière parasite ou une image fantôme.
Fixation du parasoleil
Alignez le repère de montage du parasoleil
(●)surlerepèred’alignementduparasoleil
(), puis tournez le parasoleil (w) jusqu’à
ce que le repère ●soit aligné sur le repère
de verrouillage du parasoleil (—).
Lors de la fixation ou du retrait du parasoleil, tenez-le près du symbole
sur sa base, et évitez de le serrer trop fermement. Un vignettage peut se
produire si le parasoleil n’est pas correctement attaché.
Le parasoleil peut être retourné et monté sur l’objectif lorsqu’il n’est pas utilisé.
■
Verres de visée
Les appareils photo suivants sont compatibles avec un grand nombre de
verres de visée adaptés à différentes situations.
Verre
Appareil photo
A
B
C
E
EC-B
EC-E
G1
G2
G3
G4
J
L
M
U
F6 ——— — ——
F5+DP-30
F5+DA-30
(+0,5)
: Recommandé.
: Vignettage visible dans le viseur (les photos ne sont pas affectées).
— : Non compatible avec l’appareil photo.
( ) : Les chiffres entre parenthèses donnent la correction d’exposition
pour la mesure pondérée centrale. Sélectionnez « Activ.:
autre » pour le Réglage personnalisé b6 (« Plage visée ») lors de
l’ajustement de la correction d’exposition pour l’appareil photo
F6 ; remarquez qu’avec les verres autres que B ou E, « Activ.:
autre » doit être sélectionné, et ce même lorsque la valeur pour
la correction d’exposition est de 0. La correction d’exposition
pour l’appareil photo F5 peut être ajustée en utilisant le Réglage
personnalisé 18 ; consultez le manuel de l’appareil photo pour
plus de détails.
Cellule vide
: L’utilisation ne convient pas avec cet objectif. Veuillez remarquer
cependant que les verres de type M peuvent être utilisés
pour la microphotographie et la macrophotographie avec un
grossissement de 1 : 1 ou plus.
Remarque : l’appareil photo F5 prend en charge la mesure matricielle avec les
verres de visée A, B, E, EC-B/EC-E, J, et L uniquement.
■
Entretien de l’objectif
• Ne prenez pas ou ne tenez pas l’objectif ou l’appareil photo en saisissant
uniquement le parasoleil.
• Maintenez les contacts du microprocesseur propres.
• Si le joint en caoutchouc de la monture d’objectif est endommagé, cessez
immédiatement l’utilisation et confiez l’objectif à un centre Nikon agréé
pour le faire réparer.
• Utilisez une soufflette pour enlever la poussière et les peluches sur
la surface de l’objectif. Pour effacer les taches et les traces de doigt,
imprégnez un morceau de tissu propre en coton avec une petite quantité
d’éthanol ou de nettoyant pour objectif ou utilisez une lingette de
nettoyage d’objectif, et nettoyez avec un mouvement circulaire à partir
du centre vers l’extérieur, tout en prenant soin de ne pas laisser de taches,
ni de toucher le verre avec vos doigts.
• N’utilisez jamais de solvants organiques comme un diluant à peinture ou
du benzène pour nettoyer l’objectif.
• Le parasoleil ou les filtres NC peuvent être utilisés pour protéger la lentille
frontale.
• Fixez les bouchons avant et arrière avant de placer l’objectif dans son étui.
• Si vous n’avez pas l’intention d’utiliser l’objectif pendant une période
prolongée, rangez-le dans un endroit frais et sec pour éviter la moisissure
et la rouille. Ne pas ranger à la lumière directe du soleil ou avec des boules
antimites de naphtaline ou de camphre.
• Tenez l’objectif au sec. La formation de rouille sur le mécanisme interne
peut causer des dégâts irréparables.
• Laisser l’objectif dans des endroits extrêmement chauds peut
endommager ou déformer les éléments composés de plastique renforcé.
■
Accessoires fournis
• Bouchon avant d’objectif encliquetable 72 mm LC-72
• Bouchon arrière d’objectif LF-4
• Parasoleil à baïonnette HB-76
• Étui pour objectif CL-1015
■
Accessoires compatibles
• Filtres à visser 72 mm
■
Caractéristiques
Type Objectif AF-S de type G avec microprocesseur intégré
et monture F
Focale 24 mm
Ouverture maximale f/1.8
Construction optique 12 lentilles en 9 groupes (dont 2 lentilles en verre ED,
2lentilles asphériques et des lentilles bénéciant d’un traitement
nanocristal)
Angle de champ • Reflex numériques Nikon de format FX et reflex
argentiques Nikon : 84°
• Reflex numériques Nikon de format DX : 61°
Information de
distance Communiquée au boîtier de l’appareil photo
Mise au point Système de mise au point arrière (RF, Rear Focusing)
avec autofocus commandé par un moteur
ondulatoire silencieux (SWM) et bague de mise au
point pour mise au point manuelle
Indicateur de
distance de mise au
point
0,23 m à l’infini (∞)
Distance minimale de
mise au point 0,23 m depuis le plan focal
Lamelles de
diaphragme 7 (diaphragme circulaire)
Diaphragme Intégralement automatique
Plage des ouvertures f/1.8– 16
Mesure Pleine ouverture
Diamètre de xation
pour ltre 72 mm (P = 0,75 mm)
Dimensions Environ 77,5 mm de diamètre maximum × 83,0 mm
(distance à partir du plan d’appui de la monture d’objectif de
l’appareil photo)
Poids Environ 355 g
Nikon se réserve le droit de modifier les caractéristiques du matériel décrit dans
ce manuel à tout moment et sans préavis.


