Nikon Speedlight Unit SB-4 User manual


flikon SPEEDLIGHT UNIT
F
)B.4
INSTRUCTION MANUAL

NOMENCLATU RE
Auto/manual selector
Synch socket
Mounting foot
Locking nut
Hot-shoe contact
www.orphancameras.com

Colored exposure
index
Flash-to-su blect
distance scale
(in meters)
F/nu mber scale
Flash-to-su b ject
d istance scale
(in feet)
Calculator disc
Film speed index
Power switch
Ready-light
Open flash button
(Test firing button)
Battery compartment lid

CONTENTS
Foreword..... ... ..... o. 5 Accessories............... .19
Features .... o..... . o . 6 SynchcordSC-8. ........ .19
fnstallingthe batteries . . . . . . . . 7 Flash unitcouplerAs-l. . . . . . .20
Setting-up/ Nikkormataccessoryshoe.. ...20
flash synchronizatioll . . . . . . . . . . 8 Features/specifications . o . . . . . .21
Nikon F2-series and F cameras . . 8 Cam eralspeedlight
Nikkormat ELrFT2and FTr.u . . .10 combination chart. . . . . . . . . . . .22
Nikon Rl 0, R8 Super Zoom . . . .12
Automatic exposure operation. . . . .14 r
Example of automatic
exposure operation . . . . . . . . .,',6
Testfiring/openflash. .. .. .. .'i.7
Manualoverride . . . . . . . . . . .18
Example of manuat override
operation. . . . . . . . . . o . ' . .18
4
www.orphancameras.com

FOREWORD
Nikon Speedlight Unit SB-4 has a built-in
computerized series-control system using
an SCR (silicon control rectifier) which
automatically adjusts light intensity for
effective flash photography at all times.
It is compact and lightweight for greater
convenience. The speedlight can be
mounted directly on a camera which has
a hot-shoe contact'or on a camera with a
standard accessory shoe using a synch
cord. ( For cameralspeedlight combina-
tions, refer to the chart on pp. 22-23.1
5
FEATU RES
Autom atic exposure control
The amount of light output emitted from
the speedlight is automatically controlled
according to the flash-to-subject distance
within a range of 4m to 0.6m; this removes
all worries about exposure calculation.
Compact and lightweight
The SB-4 is designed compact and light-
weight for greater convenience in picture-
taking situations which require quick re-
sponse.
Shortened recycling time and
increased firings
The unit's series-control system reduces re-
cycling time drastically, especially at short
distances. Since the speedlight consumes
only the required amount of power for a
flash assignment and stores excess electric
energy, battery life is extended; consequent-
ly, the number of firings is increased.
www.orphancameras.com
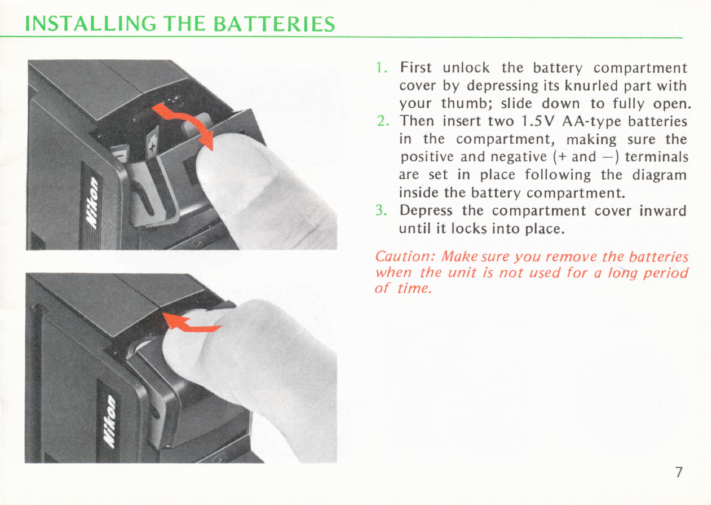
INSTALLING THE BATTERIES
l. First unlock the battery compartment
cover by depressing its knurled part with
your thumb; slide down to fully open.
l. Then insert two 1.5V AA-type batteries
in the compartment, making sure the
positive and negative (+ and -) terminals
are set in place following the diagram
inside the battery compartment.
3. Depress the compartment cover inward
until it locks into place.
CuLttiorr: llluke sure you rcmove the botteries
*,ltert tltc urtit is not used I'or o lonrt period
of time.

SETTI NG-UP/F LASH SYNCH RON IZATION
Attaching the Sts--l ro rhe Nikorr
F2-series and F cameras
First attach the flash unit coupler AS-1
onto the camera's accessory shoe. Then
turn the locking nut on the SB-4's
mounting-foot until it reaches the upper
limit. Slide the mounting foot forward
onto the AS-1's accessory shoe as far as
it will go. Finally, tighten the locking nut
to secure the unit in place and prevent it
from accidentally slipping off.
tt
-
I
www.orphancameras.com
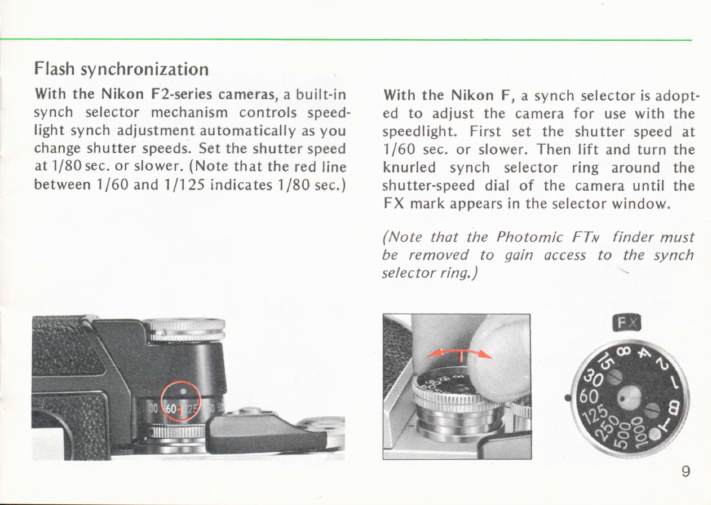
Flash synchronization
With the Nikon F2-series cameras, a built-in
synch selector mechanism controls speed-
light synch adjustment automatically as you
change shutter speeds. Set the shutter speed
at 1/80 sec. or slower. (Note that the red line
between 1/60 and 11125 indicates 1/80 sec.)
With the Nikon F, a synch selector is adopt-
ed to adiust the camera for use with the
speedlight. First set the shutter speed at
1/60 sec. or slower. Then lift and turn the
knurled synch selector ring around the
shutter-speed dial of the camera until the
FX mark appears in the selector window.
(Note thot tlte Photomic FTu finder must
be removed to qoin occess to the synch
se lec tor ring. )C
Table of contents
Other Nikon Camera Flash manuals

Nikon
Nikon SB-5000 User manual

Nikon
Nikon SB-28 User manual

Nikon
Nikon SB600 - SB 600 - Hot-shoe clip-on Flash User manual

Nikon
Nikon Autofocus Speedlight SB-20 User manual

Nikon
Nikon SB-28DX User manual

Nikon
Nikon SB-21 User manual

Nikon
Nikon SB-5000 User manual

Nikon
Nikon SB-800 User manual

Nikon
Nikon autofocus speedlight SB-900 User manual

Nikon
Nikon SB-140 User manual

Nikon
Nikon BC-7 User manual

Nikon
Nikon SB-800 User manual

Nikon
Nikon SB-400 User manual

Nikon
Nikon MACRO COOL-LIGHT SL-1 User manual

Nikon
Nikon SB-N7 User manual

Nikon
Nikon SB-400 User manual

Nikon
Nikon SB-910 User manual

Nikon
Nikon SB-400 User manual

Nikon
Nikon Autofocus Speedlight SB-22 User manual

Nikon
Nikon Speedlight SB-9 User manual


