Ninestars DZT-50-6 User manual
Step 1 - Remove all components
from the box
• Lid
• Liner Ring
• Trash Container
Step 2 - Insert batteries
Locate the battery compartment underneath the
trash can lid. Carefully push the battery cap down
and slide out to remove the cap. Insert four (4)
HEAVY DUTY "D” size batteries. Insert the
batteries in accordance with the positive (+) and
negative (-) poles. To close, slide battery cap in and
push to lock in place. Make sure it clicks to ensure
that it’s securely fastened.
LED light indicators:
1. A red light flash when the trash can is ON and in standby.
2. A green light will appear when the lid opens.
3. A red light will appear when the lid closes.
4. A yellow indicator light will appear when the batteries are low. Replace the batteries.
1. Align batteries according to the positive and negative poles.
2. Do not submerge the trash can into water because it is equipped with many electrical
components. The trash can may be wiped with a damp cloth.
3. Do not manually force the lid close; this can cause damage to the internal gears. If the
gears are damaged, the automatic lid will not function properly.
4. Replace used batteries in a timely manner to prevent battery acid leakage. Battery acid
may cause damage to the electrical components of the trash can.
5. Do not mix new and used batteries.
6. Do not place trash can in direct sunlight or a heavily moisturized environment.
7. Do not mix alkaline, standard (zinc-carbon), or rechargeable (NiCd, NiMH, etc) batteries.
Step 3 - Insert trash bag
Insert the trash bag using the liner ring (see
diagram). Fold the trash bag over the edges of the
liner ring. Place the trash bag and the liner ring in
the trash container. Tuck the bag completely into
the base of the container so that edges of the bag
do not show once the lid is placed on top of the
base.
Step 4 - Trash can set up
Align the lid with the base of the trash can and
gently place the lid on top.
Step 5 - Turning the trash can On/Off
The power switch is located on the back of the
automatic lid. When the switch is in the “I” position
the trash can is “ON”. When the switch is in the
“O” position the trash can is “OFF”.
Step 6 - Using the trash can
Place your hand or an object within inches of the
motion sensor (located on the lid). The lid will open
instantly. Once your hand or object is out of range
of the sensor, the lid will close automatically within
seconds. The lid will remain open if the object stays
within the sensor range.
Warning
Troubleshooting
Limited Warranty
Place rear side
down first
Please complete the section below and mail or email it with a PHOTO COPY of the original sales receipt within 30 days of purchase to the address below.
WARRANTY REGISTRATION
DZT-50-6
Warranty #
(Please Print Clearly)
Full Name:
______________________________________________________________
Address:
______________________________________________________________
______________________________________________________________
City:__________________________________________________________
State: ____________________ Zip Code: ___________________________
Phone #: ______________________________________________________
Email: ________________________________________________________
Date of Purchase: ______________________________________________
Purchased from: _______________________________________________
UPC # (Located under bar code of the packaging):
_______________________________________________________________________
Please mail the completed warranty registration card with proof of purchase to:
CUSTOMER SERVICE
Attn: Warranty Registration
1929 Mount Vernon Ave., Pomona, CA 91768
OR email the completed warranty registration card with proof of purchase to:
OPTIONAL:
Would you like to hear more about our products:
Yes _______ No _______
We value any comment, if any please provide it here.
_______________________________________________________________________
Please keep a record of this warranty number.
User’s Manual
MOTION SENSOR TRASH CAN (13 Gal / 50L)
Model: DZT-50-6
Introduction
Overview
Instruction
Nine Stars infrared motion sensor trash cans are designed and created to make dealing with
trash cleaner and easier. Our products provide an effortless way to dispose of trash by
providing a touch-free environment. Simply put an object or hand above the strategically
placed infrared motion sensor (located near the lip of the lid) and the lid will automatically
open. Once the object or the hand is no longer within the sensor’s range the lid will
automatically close within seconds. We at Nine Stars use the highest quality materials and the
latest technology in our products to insure reliable function and durability. Thank you for your
business and we sincerely hope that you enjoy your unit.
Additional Features
Technical Facts
Patented Product
Model: DZT-50-6
Note: This model is to be used in-doors at all times.
Keeping Lid Open Longer - Press the “OPEN” button to keep the lid open longer. This
will allow the lid to stay in the open position. Press the “CLOSE” button to close the lid and
reactivate the sensor.
Soft Close - The lid has a soft close feature that will allow the lid to close at a slow and
quiet pace.
Ninestarsusa
@NineStarsUSA
#NINESTARSUSA
Tel: 866.978.2778
Fax: 909.620.8853
Add.: 1929 Mount Vernon Ave.
Pomona, CA 91768
Email: [email protected]
CONTACT US AT:
FOLLOW US AT:
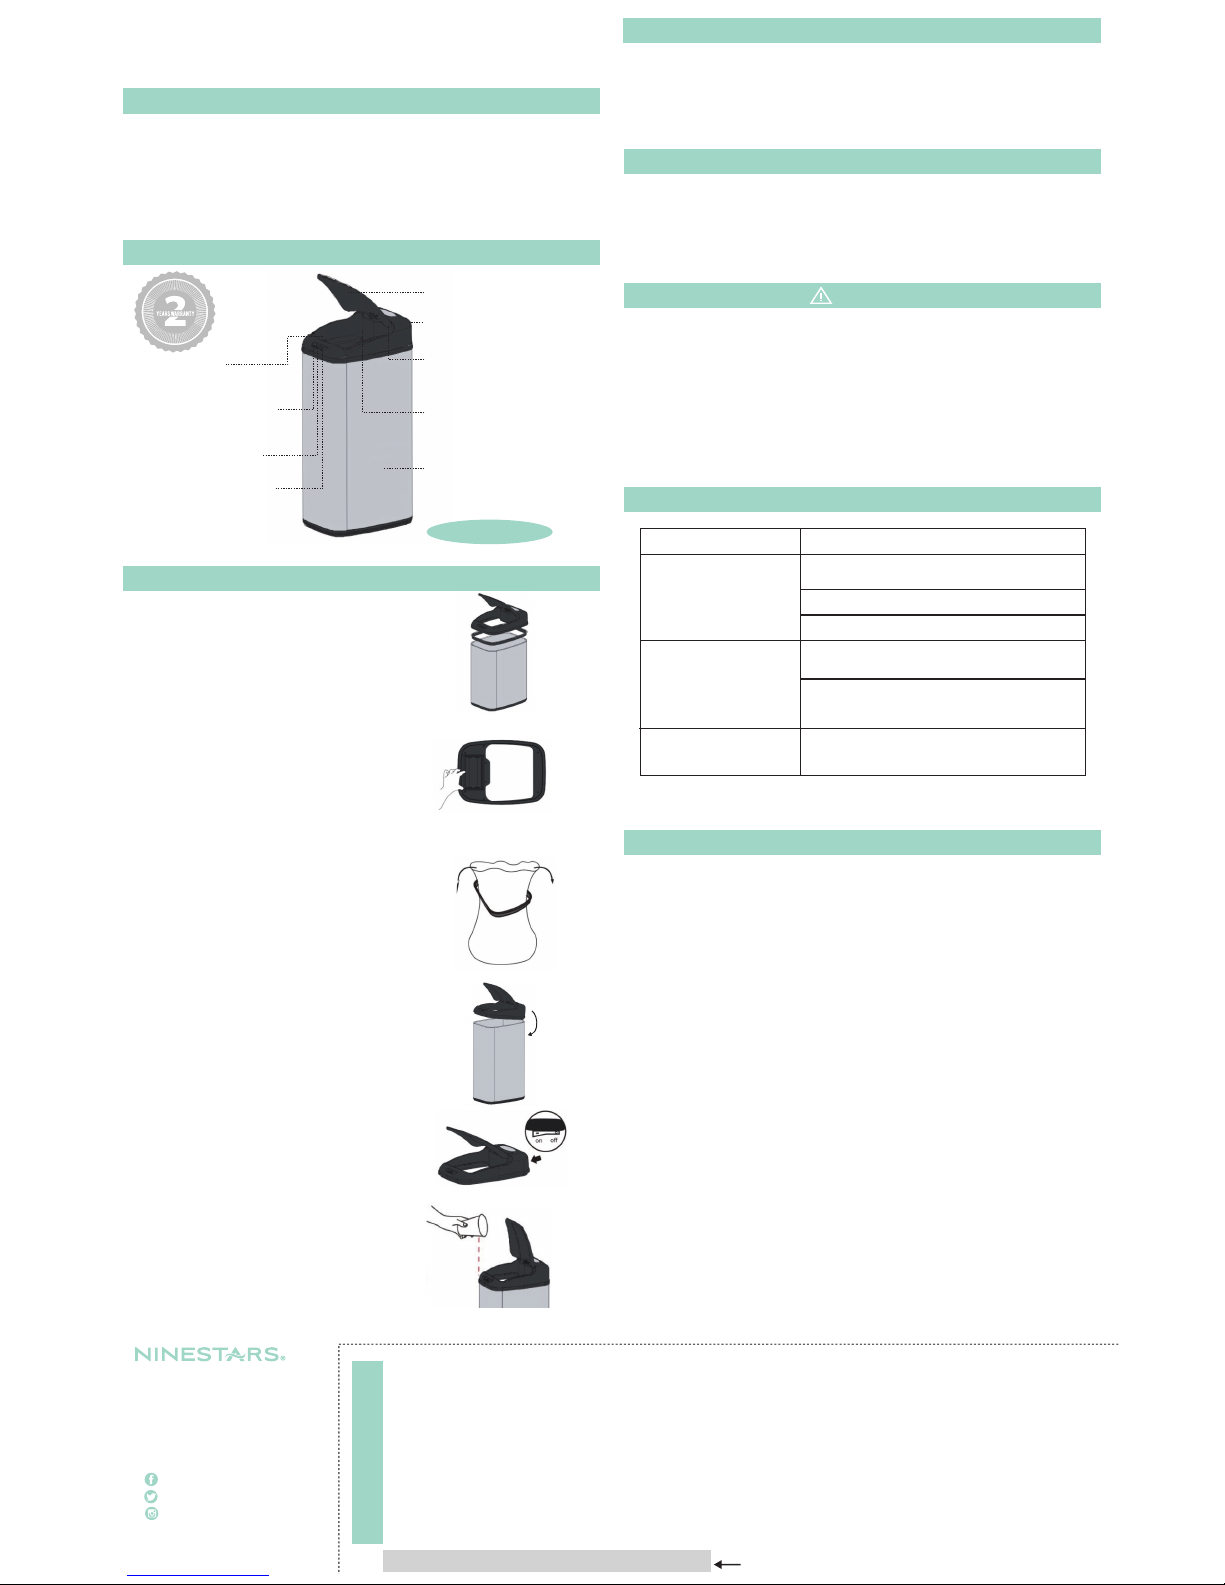
Hands-Free Automatic Lid
Liner Ring (Inside)
Keeps bag fixed in place
and hidden from sight
Manual Close Button (Resets
motion detecting sensor and
manually closes lid)
Infrared Motion Detecting
Sensor
Manual Open Button (Keeps
lid open and sensor off)
Battery Compartment
- Under the lid (Fits 4 “D”
batteries not included)
Large Opening
(Fits about 1 gallon milk
jug container)
Commercial Grade & Fingerprint
Resistant Stainless Steel Container
Capacity: 13 Gal / 50L
Power Saving On/Off Switch
**DO NOT put liner ring inside the bag*
Warranty #
Please keep a record of this Warranty # for your
future reference.
Note: If the above solutions do not correct the problem please contact Nine Stars Group
USA Inc. Customer Service.
Lid does not open
- Place the power switch in “I” position and check if
batteries are placed in correctly.
- Wipe the sensor with a dry cloth.
- Press the ”CLOSE” button to reset the trash can.
- Check to see if there are any objects within the
sensor area. If there are, remove them.
- If something is preventing the lid from closing, remove
the item and press the “CLOSE” button to reset your
trash can.
-
Battery power is low. Replace the batteries.
Lid does not close
Lid opens slowly and
Indicator light flashes yellow
Errors Solutions
What does this Warranty cover?
- This warranty covers the electronic mechanism of the lid such as the computer chip,
motor, gear box and electrical circuits only.
How long does the coverage last?
- This warranty is valid two years from the date of purchase.
What will Nine Stars do?
- Nine Stars will fix or replace any defective or malfunctioning lid.
- Customer is responsible for returning the defective or malfunctioning lid (entire top unit of
the Trash Can) to Nine Stars. The customer is also responsible for shipping charges to
return the product to us. Nine Stars will pay for shipping charges back to the customer if
the lid is covered under our warranty program outlined in this document.
What does the warranty not cover?
- The base of the unit, battery caps (if applicable), liner rings (if applicable), inner bucket (if
applicable), or any problems with the automatic lid caused by abuse, misuse, or natural
disasters (such as earthquakes, floods and fires) are not covered.
- User’s modifications or alterations to Nine Stars products will void User’s Warranty.
- Only our authorized distributors will be covered under our warranty. We will NOT
warranty products purchased from auctions, auctioneers, discount/closeout stores.
How do you get service?
Follow these steps to be eligible for service under this warranty
1. Fill out and return the warranty registration card
2. Attach a proof of purchase (such as a copy of original sales receipt) within 30 days of
purchase
3. Return authorization is required, please make sure you contact Nine Stars before
sending your unit
4. If you have any technical questions or problems, please contact us via email:
How does state law apply?
- This warranty gives you specific legal rights and you may also have other rights that vary
from state to state.
Complete la siguiente sección y envíela por correo con una COPIA FOTOGRÁFICA del recibo de venta original dentro
de los 30 días posteriores a la compra a la dirección que figura a continuación.
REGISTRO DE GARANTÍA
DZT-50-6
# GARANTÍA
(Por favor imprime claramente)
Nombre completo:
______________________________________________________________
Dirección:
______________________________________________________________
______________________________________________________________
Ciudad: _______________________________________________________
Estado: ____________________ Código postal: ____________________
Número de teléfono: ____________________________________________
Email: ________________________________________________________
Fecha de compra: ______________________________________________
Comprado de: _________________________________________________
UPC # (ubicado bajo el código de barras del envase):
_______________________________________________________________________
Envíe por correo la tarjeta de registro de garantía completa a:
SERVICIO AL CLIENTE
A la atención: registro de la garantía
1929 Mount Vernon Ave., Pomona, CA 91768
O envíe por correo electrónico la tarjeta de registro de garantía completada con el
OPCIONAL:
¿Le gustaría saber más acerca de nuestros productos?
Si _______ No _______
Valoramos cualquier comentario, si alguno, por favor bríndelo aquí.
_______________________________________________________________________
Mantenga un registro de este número de garantía.
Ninestarsusa
@NineStarsUSA
#NINESTARSUSA
Tel: 866.978.2778
Fax: 909.620.8853
Add.: 1929 Mount Vernon Ave.
Pomona, CA 91768
Email: [email protected]
CONTACTANOS EN:
SÍGUENOS EN:
# Garantía
Mantenga un registro de este número de
garantía.
Paso 1 - Retire todos los componentes del
bote de basura de la caja
• Tapa
• Anillo de revestimiento
• Contenedor de basura
Paso 2: Instalación de la batería
Ubique el compartimento de la batería debajo de la
tapa de la papelera. Empuje con cuidado la tapa
de la batería hacia abajo y deslícela hacia afuera
para quitar la tapa. Inserte cuatro (4) Pilas HEAVY
DUTY "D". Inserte las baterías de acuerdo con los
polos positivo y negativo. Deslice la tapa de la
batería sobre el compartimento. Asegure que la
cubierta esté colocada correctamente.
Indicadores de luz LED:
1. Una luz roja parpadea cuando la papelera está ENCENDIDA y en espera.
2. Aparecerá una luz verde cuando se abra la tapa.
3. Aparecerá una luz roja cuando la tapa se cierre.
4. Una luz indicadora amarilla aparecerá cuando las baterías estén bajas. Reemplace
las baterías.
1. Alinee las baterías de acuerdo con los polos positivo y negativo.
2. No sumerja la basura en agua porque está equipada con muchos componentes
eléctricos. La basura puede limpiarse con un paño húmedo o bajo agua corriente durante
un tiempo corto.
3. No fuerce la tapa de manera manual; esto puede causar daños a los engranajes internos.
Si los engranajes están dañados, la tapa automática no funcionará correctamente.
4. Reemplace las baterías usadas de manera oportuna para evitar fugas de ácido de la
batería. El ácido de la batería puede dañar los componentes eléctricos del bote de
basura.
5. No mezcle pilas nuevas y usadas.
6. No coloque la basura en la luz directa del sol o en un ambiente altamente humectado.
7. No mezcle pilas alcalinas, estándar (zinc-carbono) o recargables (NiCd, NiMH, etc.).
Paso 3: Inserte la bolsa de basura
Introduzca la bolsa de basura con el anillo (Ver
diagrama). Doble la bolsa de basura sobre los
bordes Del anillo de revestimiento. Coloque la
bolsa de basura y Anillo de revestimiento en el
contenedor de basura. Meter la bolsa completa-
mente en la base del recipiente, Que los bordes de
la bolsa no se muestran una vez La tapa se coloca
en la parte superior de la base.
Paso 4: Ensamblar el Bote
Alinee la tapa con la base de la papelera y coloque
suavemente la tapa en la parte superior.
Paso 5: Coloque el bote de basura
de encendid / apagar
El interruptor de encendid está ubicado en la parte
posterior tapa automática Cuando el interruptor
está en la posición "I" el bote de basura está
"ENCENDIDO". Cuando el interruptor está en el
Posición "O", el bote de basura está en "Apagado".
Paso 6: Cómo usar el cubo de basura
Coloque su mano o un objeto a pulgadas de el
sensor de movimiento (ubicado en la tapa). La
tapa se abrirá al instante. Una vez que tu mano o
objeto está fuera del alcance del sensor de la tapa
cerrar en segundos.
Advertencia
Solución de problemas
Garantía limitada
Coloque la parte
trasera Abajo
primero
Manual de Usuario
BOTE DE BASURA (13 Gal / 50L)
Modelo: DZT-50-6
Introduccion
Visión de Conjunto
Instrucciones
Nuestros botes de basura del sensor de movimiento infrarrojo de Nine Stars están diseñados y
creados para que lidiar con la basura sea más limpio y más fácil. Nuestros productos proporcionan
una forma sencilla de eliminar la basura proporcionando un entorno sin contacto. Simplemente
coloque un objeto o una mano sobre el sensor de movimiento infrarrojo estratégicamente ubicado
(ubicado cerca del borde de la tapa) y la tapa se abrirá automáticamente. Una vez que el objeto o
la mano ya no se encuentran dentro del sensor, la tapa se cerrará automáticamente en cuestión de
segundos. Nosotros en Nine Stars utilizamos materiales de la más alta calidad y la última
tecnología en nuestros productos para asegurar un funcionamiento confiable y duradero. Gracias
por su negocio y esperamos sinceramente que disfrute de su unidad.
Características Adicionales
Hechos Técnicos
Producto patentado
Modelo: DZT-50-6
Note: Este modelo es para uso interno solamente.
Mantener la tapa abierta por más tiempo - Presione el botón "ABRIR" para mantener la
tapa abierta por más tiempo. Esto permitirá que la tapa permanezca en la posición abierta.
Presione el botón "CERRAR" para cerrar la tapa y reactivar el sensor.
Cierre suave - La tapa tiene una función de cierre suave que permitirá que la tapa se
cierre a un ritmo lento y silencioso.
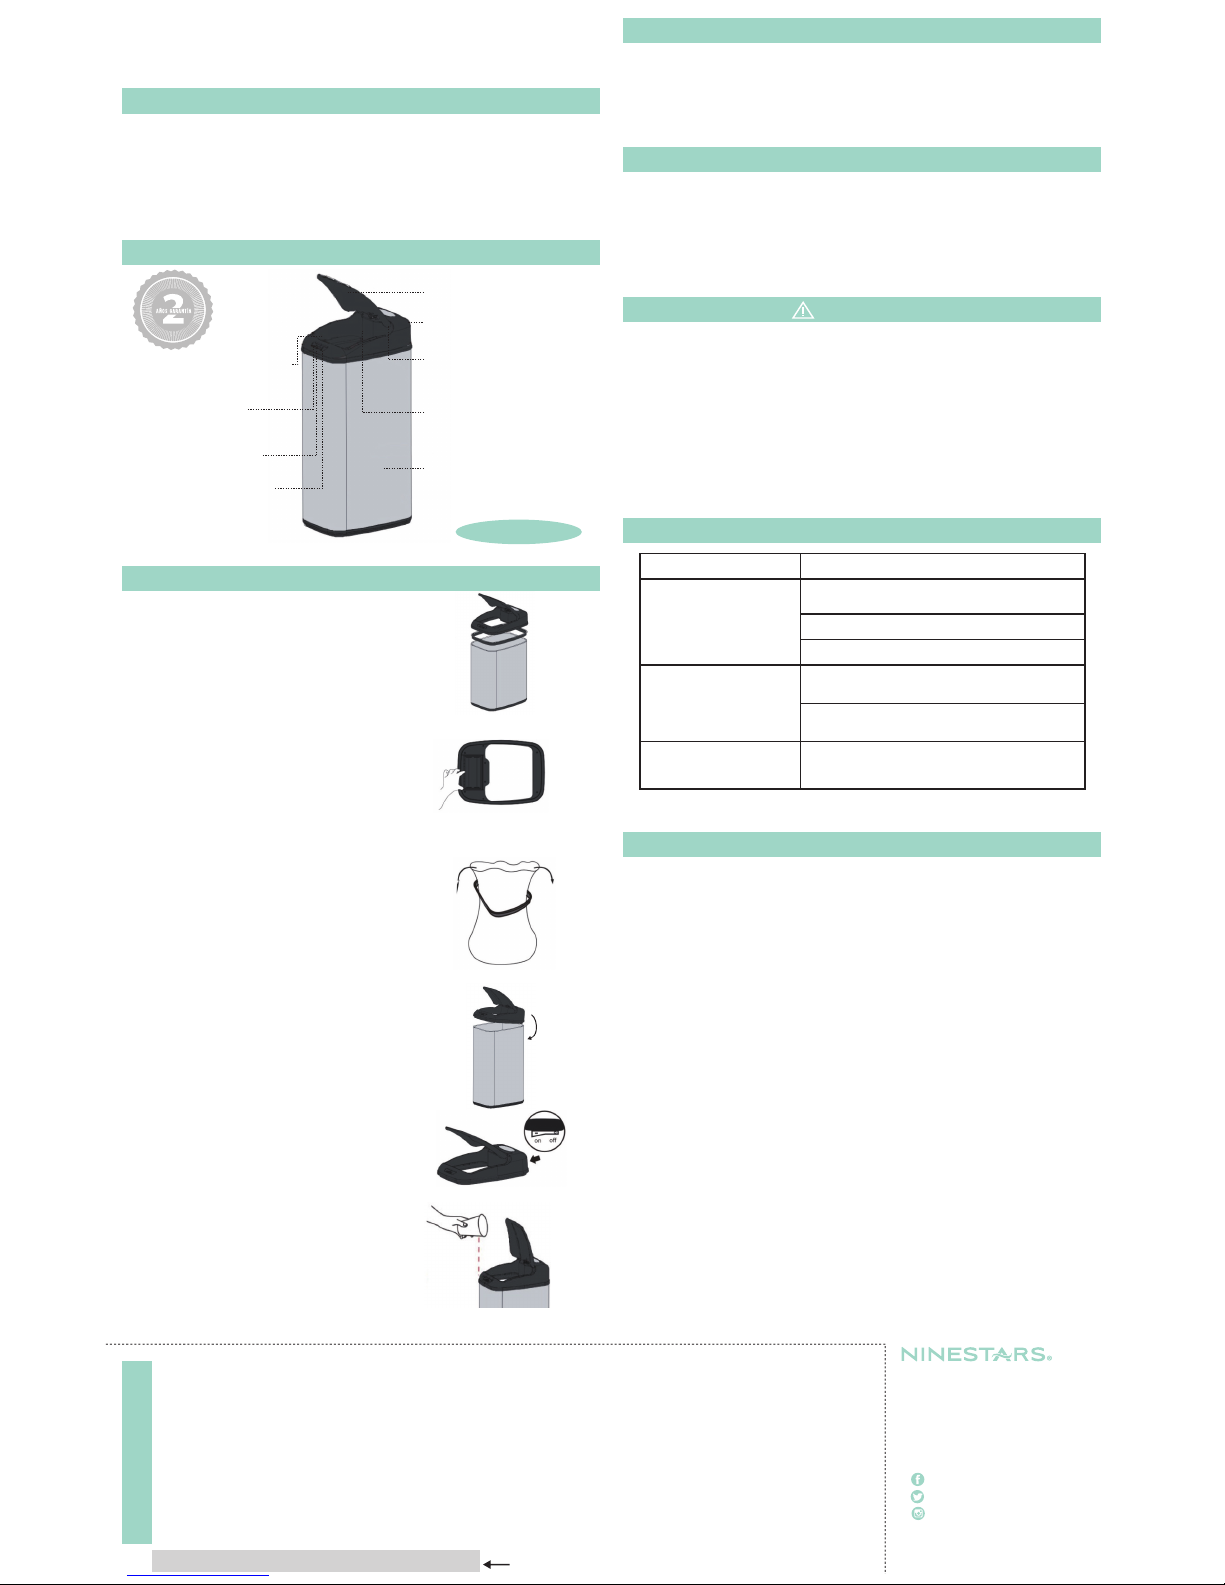
Tapa Automática de Manos Libres
Anillo de revestimiento (interior)
Mantiene la bolsa fija en su lugar
y escondido de la vista
Botón Manual de Abrir
(Mantiene la tapa abierta y
apaga el sensor)
Movimiento infrarrojo
sensor de detección
Botón de apertura manual
(mantiene La tapa abierta
y el sensor apagado)
Compartimiento de la batería
- Debajo de la tapa (Se adapta a 4
baterías "D" no incluidas)
Gran abertura (Se adapta a un
recipiente de leche de 1 galón)
Contenedor de acero inoxidable
resistente a huellas dactilares y
grado comercial
Capacidad: 13 Gal / 50L
Interruptor de encendido / apagado
de ahorro de energía
** NO coloque el anillo del forro Dentro de la bolsa.
Nota: Si las soluciones anteriores no corrigen el problema, póngase en contacto con
Servicio de atención al cliente de Nine Stars Group USA Inc. Customer Service.
La tapa no se abre
- Asegúrate de que las pilas estén colocadas
en correctamente
- Limpie el sensor con un paño seco.
- Pulse el botón "cerrar" para restablecer la papelera.
- Compruebe si hay objetos Sobre el sensor. Si lo hay
quiten lo.
- Si algo impide que la tapa se cierre puede
restablecer la basura, presione el botón "cerrar"
- La potencia de la batería es baja. Reemplace las
pilas.
La tapa no cierra
La tapa se abre lentamente y
El indicador parpadea en
Amarillo
Errors Soluciones
¿Qué es lo que esta garantia cubre?
- Esta garantía cubre el mecanismo electrónico de la tapa tal como el chip de computadora, Motor,
caja de cambios y circuitos eléctricos solamente.
¿Cuánto dura la cobertura?
- Esta garantía es válida dos años a partir de la fecha de compra.
¿Qué hará Nine Stars?
- Nine Stars reparará o reemplazará cualquier tapa defectuosa o que funcione mal.
- El cliente es responsable de devolver la tapa defectuosa o mal funcionamiento (parte superior
entera Unidad de la Papelera) a Nine Stars. El cliente también es responsable de los gastos de
envío para devolvernos el producto. Nine Stars pagará los gastos de envío al cliente si la tapa está
cubierta Bajo nuestro programa de garantía descrito en este documento.
¿Qué no cubre la garantía?
- La base de la unidad, las tapas de la batería (si corresponde), los anillos del forro (si procede), el
buchet interior (si corresponde), O cualquier problema con la tapa automática causada por abuso,
mal uso o desastres naturales (Como terremotos, inundaciones e incendios) no están cubiertos.
- La garantía se anula si se considera que las reparaciones fueron intentadas por cualquier persona
con excepción de Nine Stars que resultó en daños a la tapa automática.
- Sólo nuestros distribuidores autorizados estarán cubiertos bajo nuestra garantía. Nosotros no
Productos de garantía comprados de subastas, subastadores, tiendas de descuento / cierre.
¿Cómo se obtiene el servicio?
Siga estos pasos para ser elegible para el servicio bajo esta garantía.
1. Llene y devuelva la tarjeta de garantía.
2. Colocar una prueba de compra (por ejemplo, una copia del recibo de compra original) dentro de los
30 días de la compra.
3. Se requiere forma de autorización, por favor asegurese que tiene esto antes de enviar su unidad
4. Si tiene alguna pregunta o problema técnico, contáctenos a través de correo electrónico:
¿Cómo se aplica la ley estatal?
- Esta garantía le otorga derechos legales específicos y también puede tener otros
derechos que Varían de un estado a otro.
Table of contents
Languages:
Other Ninestars Accessories manuals


