Ninja Ninja Master Prep QB1000 30 User manual

Master Prep™ Professional
QB1000 30
QB1000CO 30
QB1002 30
QB1003 30
OWNER’S GUIDE

TOLL FREE: 1-800-798-7398 www.ninjakitchen.com
NOTE: This unit has a short power supply
cord to reduce the risk resulting from
becoming entangled in or tripping over
a long cord. An extension cord may be
used if you are careful in its use:
1. The electrical rating of the extension
cord should be at least as great as the
electrical rating of the appliance.
2. An extension cord with the power cord
must be arranged so that it will not drape
over the countertop or tabletop where
they can be pulled on by children or
tripped over accidentally.
IMPORTANT SAFETY INSTRUCTIONS
SAVE THESE INSTRUCTIONS
For Household Use Only
English
WHEN USING ELECTRICAL
APPLIANCES, BASIC SAFETY
PRECAUTIONS SHOULD ALWAYS
BE FOLLOWED, INCLUDING THE
FOLLOWING:
READ ALL INSTRUCTIONS BEFORE
USING YOUR NINJA™ MASTER PREP™
PROFESSIONAL.
POLARIZED PLUG
WARNING: To reduce the risk of
electric shock, this appliance has a
polarized plug (one blade is wider
than the other). This plug will fit into
a polarized outlet only one way. If the
plug does not fit fully into the outlet,
reverse the plug. If it still does not
fit, contact a qualified electrician to
install the proper outlet. DO NOT
modify the plug in any way.
13. DO NOT expose jars to extreme
temperature changes.
14. DO NOT use jars if they are cracked or
chipped.
15. DO NOT use the appliance if chopping
blades are bent or damaged.
16. Avoid contact with moving parts at all
times. Keep hands, hair, clothing as well
as spatulas and other utensils away from
pitcher or chopping container during
operation to prevent risk of personal
injury and/or damage to the appliance.
17. Exercise extreme caution when blending
hot liquids.
18. Immediately release the On/Off pulse
button on the motor head in the event
that the appliance malfunctions during
use.
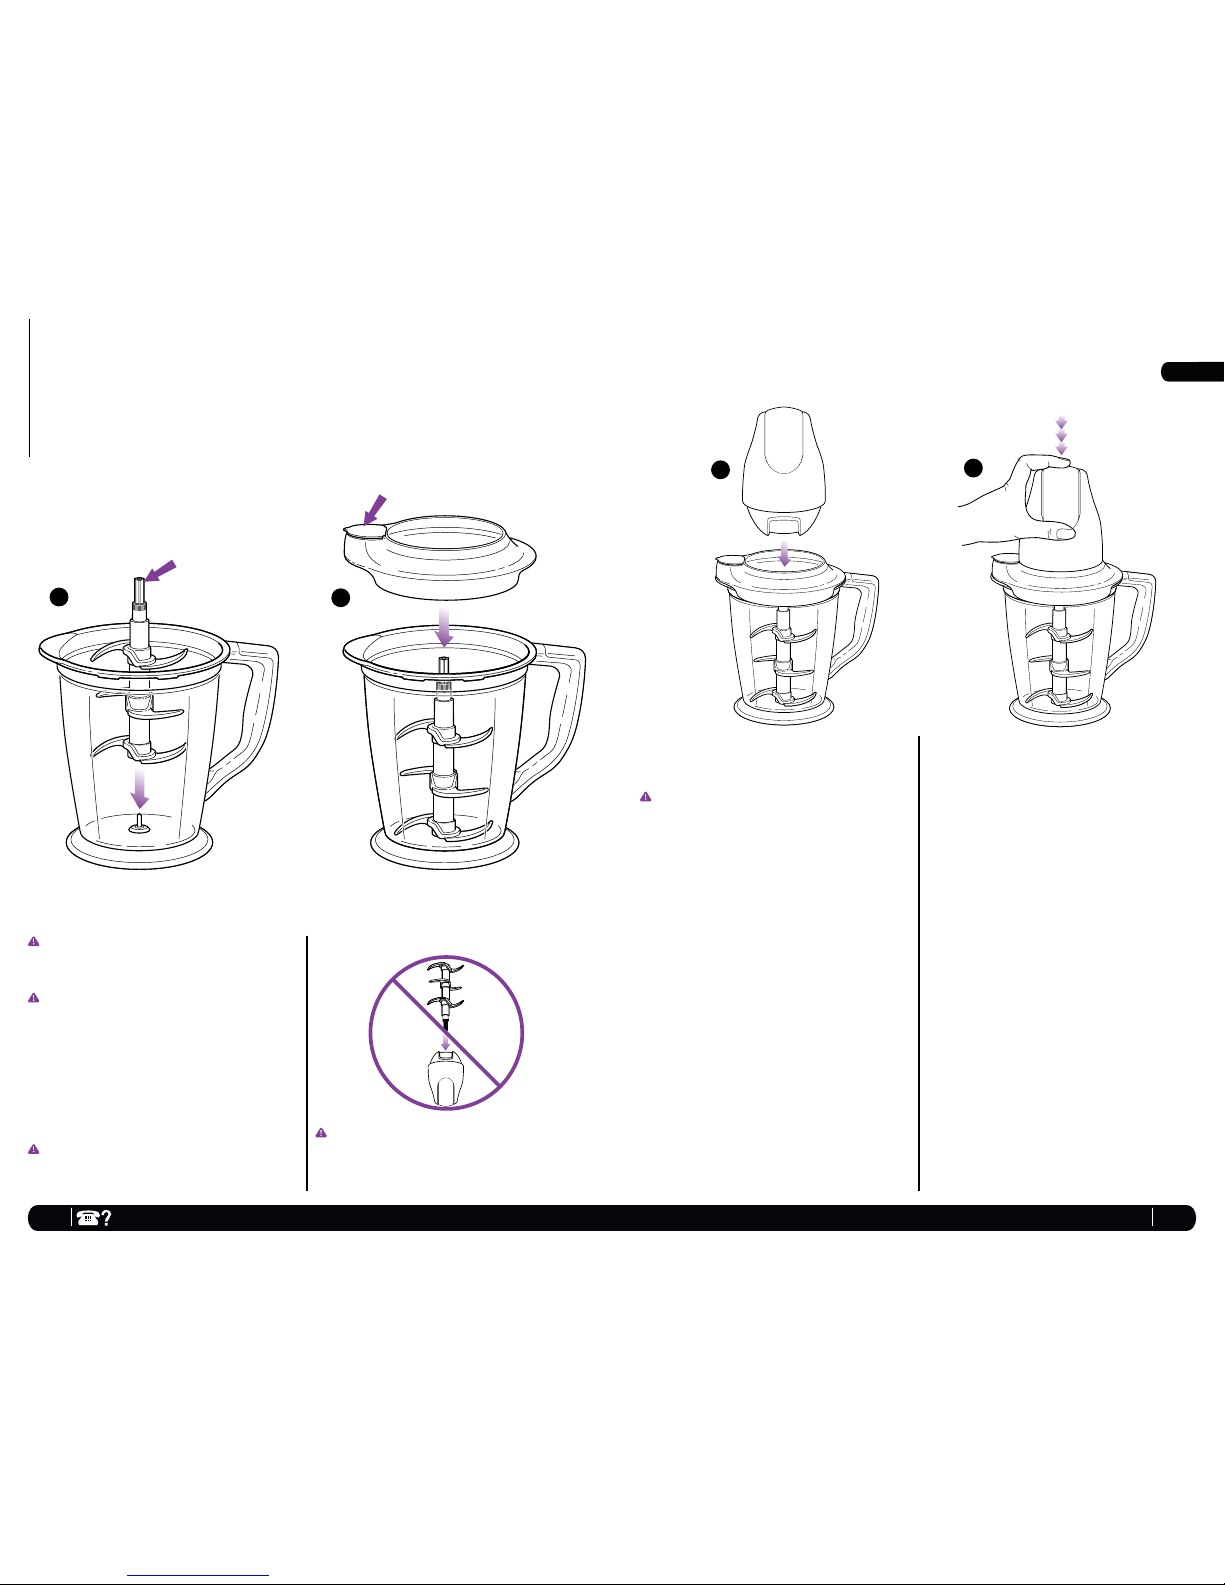
19. To reduce the risk of injury, NEVER
operate the appliance without the splash
guard in place; DO NOT try to defeat the
interlock mechanism; make sure that the
cutting blades are properly assembled
before operating the appliance.
20. DO NOT use outdoors.
21. DO NOT use appliance for other than
intended use.
22. DO NOT operate the appliance for more
than 15 seconds.
23. DO NOT operate the appliance empty.
24. If the appliance overheats, a thermal
switch will become activated and shut off
the motor. To reset, unplug the appliance
and let it cool down for approximately 10
minutes before using again.
1. Close supervision is necessary when any
appliance is used by or near children.
2. To protect against electric shock, DO
NOT immerse cord, plug or any part of
the main unit in water or any other liquids.
3. DO NOT let cord hang over edge of table
or counter, or touch hot surfaces.
4. DO NOT operate any appliance with
a damaged cord or plug, or after the
appliance malfunctions, has been
dropped or damaged in any manner.
Return the appliance to EURO-PRO
Operating LLC for examination, repair or
adjustment.
5. Unplug appliance from outlet when not in
use and before cleaning.
6. DO NOT place on or near a hot gas or
electric burner.
7. The use of accessory attachments,
including canning jars not recommended
by EURO-PRO Operating LLC may cause
fire, electrical shock or risk of personal
injury.
8. Extreme caution must be used when
moving an appliance containing hot food,
water or other liquids.
9. Use this appliance on a stable work
surface away from water.
10. DO NOT remove the motor head before
the chopping blades have stopped
turning.
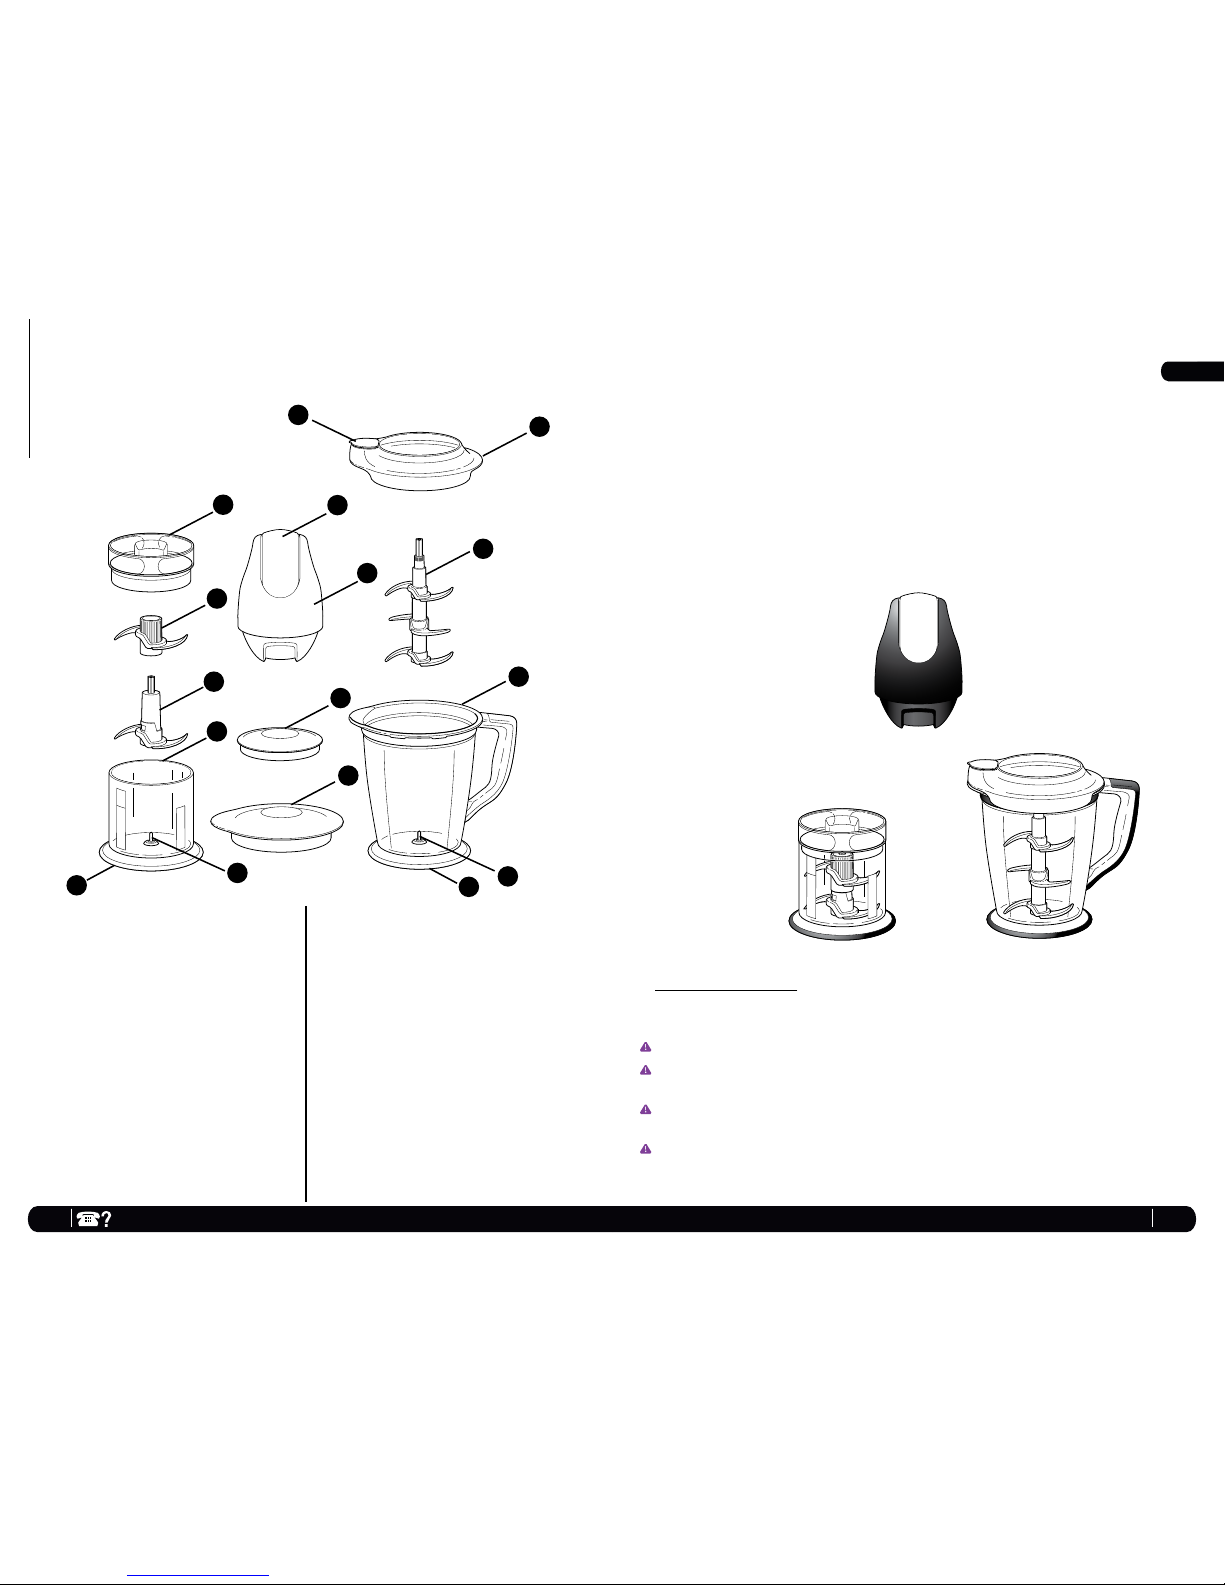
11. CAUTION! Chopping blades are sharp,
handle with care. When handling the
chopping blades, always hold by the
plastic shaft.
12. DO NOT attempt to sharpen blades.
2 3

TOLL FREE: 1-800-798-7398 www.ninjakitchen.com 5
Contents
Thank you for
purchasing
the Ninja™
Master Prep™
Professional.
English
Getting Started ......................................................................6
Using the Master Prep™ Professional Pitcher ..............8
Using the Master Prep™ Professional Bowl ..................10
Cleaning and Maintenance ................................................12
Troubleshooting Guide .......................................................12
Warranty ...................................................................................13
Registration .............................................................................15
TECHNICAL SPECIFICATIONS
Voltage: 120V., 60Hz.
Power: 450 Watts
Pitcher Capacity: 1.42 L (48 ounces) (6 cups)
Bowl Capacity: 0.47 L (16 ounces) (2 cups)
4

www.ninjakitchen.com
6 7
English
The Ninja™ Master Prep™ Professional is an indispensable kitchen tool that is perfect
for blending, chopping, mixing or pureeing when preparing your favorite recipes.
For best results, be sure to carefully read all the instructions contained in the manual
before using this appliance.
TOLL FREE: 1-800-798-7398
Getting Started
450 Watt Power Head
The 450 watt power head operates on 120V., 60Hz. electrical power. NEVER allow
the power head to become wet when plugged into an electrical outlet.
WARNING: The power head should never be immersed in water or any other liquid.
CAUTION: Make sure that the power head is unplugged from the electrical outlet and
that the blades have stopped turning before attaching or removing any accessory.
CAUTION: Blades are sharp! Use extreme caution when handling the blades.
Always hold them by the shaft. Do not attempt to sharpen blades.
IMPORTANT: Never run the appliance empty.
i* Bowl Storage Lid
j Pitcher Storage Lid
k Pouring Spout
l Pitcher Splash Guard
m Ninja™ 6-Blade
n Master Prep™ Professional Pitcher
o Spindle Pin
p Non-Slip Base Gasket (pitcher)
q Power Cord (not shown)
a Bowl Splash Guard
b Upper Blade (bowl)
c Lower Blade (bowl)
d* Master Prep™ Professional Bowl
e Spindle Pin
f Non-Slip Base Gasket (bowl)
g On/Off Pulse Button
h Power Head
*Note:
• Models QB1000CO 30 and QB1002 30
come with 2 Master Prep™ Professional
Bowls (*d) and 2 Bowl Storage Lids (*i).
• Model QB1003 30 comes with 3 Master
Prep™ Professional Bowls (*d) and 3 Bowl
Storage Lids (*i).
b
ag
e
h
*i
j
m
l
k
n
c
o
fp
*d

www.ninjakitchen.com
8 9
TOLL FREE: 1-800-798-7398
WARNING: DO NOT try to place
the Ninja™ 6-Blade onto the power
head and then into the Master Prep™
Professional pitcher.
English
Using the Master Prep™ Professional Pitcher
2
Shaft
CAUTION: Blades are sharp! Use
extreme caution when handling the
blades. Always hold them by the shaft.
IMPORTANT: Never run the appliance
empty.
1 Place the Master Prep™ Professional
pitcher on a clean, dry, level surface.
2 Holding the Ninja™ 6-Blade by the shaft,
place it onto the spindle pin inside
the Master Prep™ Professional pitcher.
(fig. 1)
IMPORTANT: Place Ninja™ 6-Blade
inside the container carefully as blades
are sharp.
Pouring Spout
3 Add the ingredients to be processed
into the Master Prep™ Professional
pitcher.
IMPORTANT: Never add ingredients
into the Master Prep™ Professional
pitcher before placing the blades in
first.
4 Place the pitcher splash guard onto the
top of the Master Prep™ Professional
pitcher. (fig. 2)
5 Place the power head on top of the
pitcher splash guard making sure
that it is securely in place. (fig. 3) DO
NOT attempt to operate the appliance
without the safety splash guard in
place.
6 To start the appliance, plug the power
cord into the electrical outlet, securely
hold power head while operating
and press on the on/off pulse button
located on the top of the power head.
(fig. 4)
7 Hold the Master Prep™ Professional
pitcher firmly while depressing the
on/off pulse button to ensure the unit
stays in place.
NOTE: DO NOT operate the appliance
continuously for more than 15 seconds
at a time.
8 To stop the appliance, remove your
fingers from the on/off pulse button.
9 In order to obtain a better quality of
chopping, operate the appliance by
using the “pulse” method.
10 Make sure that the blades have
stopped completely before removing
the power head.
11 If the ingredients stick to the side of
the Master Prep™ Professional pitcher,
stop the appliance, remove the power
head and the splash guard. Use a
spatula to dislodge the pieces and then
replace the splash guard and the power
head. Continue processing.
12 Depending on the consistency of the
contents, use the pouring spout to
empty liquid contents.
13 For thicker consistencies, first remove
splash guard and Ninja™ 6-Blade (by
its shaft), then empty contents of the
Master Prep™ Professional pitcher.
34
1

www.ninjakitchen.com
10 11
Using the Master Prep™ Professional Bowl
TOLL FREE: 1-800-798-7398
Shaft
11 Make sure that the blades have
stopped completely before removing
the power head.
12 If the ingredients stick to the side of
the Master Prep™ Professional bowl,
stop the appliance, remove the power
head and the splash guard. Use a
spatula to dislodge the pieces and then
replace the splash guard and the power
head. Continue processing.
13 Remove the blade assembly by its shaft
before you empty the contents of the
Master Prep™ Professional bowl.
HINTS & TIPS FOR USING YOUR NINJA™
MASTER PREP™ PROFESSIONAL
l The chopping blades can be used for
chopping meat, fish, vegetables, cheese
etc.
l For mincing, chopping and pureeing,
increase the length of pulses.
l For coarse chopping, use short, quick
pulses and monitor food texture.
l Pre-cut larger pieces to make them fit
into the Master Prep™ Professional.
When chopping hard foods (e.g. meat,
cheese) cut into 1-inch cubes.
l To crush ice into snow, start by using
short pulses to break up large chunks.
Continue until snow is achieved.
English
CAUTION: Blades are sharp! Use
extreme caution when handling the
blades. Always hold them by the shaft.
IMPORTANT: Never run the appliance
empty.
1 Place the Master Prep™ Professional
bowl on a clean, dry, level surface.
2 Holding the lower blade by the shaft,
place it over the spindle pin inside the
Master Prep™ Professional bowl. (fig. 1)
3 Carefully insert the upper blade over
the lower blade rotating it until it locks
onto the lower blade. (fig. 2)
IMPORTANT: Always assemble the
blades inside the container.
WARNING: DO NOT try to place the
blades onto the power head and then
into the Master Prep™ Professional bowl.
4 Place the food that you want to process
into the Master Prep™ Professional bowl.
IMPORTANT: Never add ingredients
into the Master Prep™ Professional bowl
before placing the blade assembly in
first.
NOTE: DO NOT add more than 2 cups
dry or 1 cup liquid ingredients as this
will strain the motor and may cause
overflow.
5 Place the splash guard on the bowl.
(fig. 3)
6 Place the power head on top of the
splash guard making sure that it is
securely in place. (fig. 4) DO NOT
attempt to operate the appliance
without the safety splash guard in
place.
7 To start the appliance, plug the power
cord into the electrical outlet, securely
hold power head while operating
and press on the on/off pulse button
located on the top of the power head.
(fig. 5)
8 Hold the Master Prep™ Professional
bowl firmly while depressing the on/off
pulse button to ensure the unit stays in
place.
NOTE: DO NOT operate the appliance
continuously for more than 15 seconds
at a time. Be careful not to over
process. For coarsely chopped foods,
use repeated short pulsing action until
the desired consistency is reached.
9 To stop the appliance, remove your
fingers from the on/off pulse button.
10 In order to obtain a better quality of
chopping, operate the appliance by
using the “pulse” method.
2
1
5
34

www.ninjakitchen.com
12 13
English
Cleaning and Maintenance
Models
QB1000 30
QB1000CO 30
QB1002 30
QB1003 30
TOLL FREE: 1-800-798-7398
CAUTION: Make sure that the power head is unplugged from power source before
inserting or removing any attachment and before cleaning.
DO NOT immerse the power head into water or any other liquid. Clean with a damp
sponge or cloth and wipe dry.
The Master Prep™ Professional pitcher, Master Prep™ Professional bowl, storage lids,
Master Prep™ Professional splash guards and chopping blades are all dishwasher safe.
It is recommended to place the storage lids and the chopping blades on the top rack.
Use extreme caution when handling the chopping blades as they are very sharp.
Clean the Ninja™ Master Prep™ Professional and all parts before first use and
immediately after each use.
To purchase replacement parts, please visit our website: www.ninjakitchen.com
or contact customer service: 1-800-798-7398
ONE (1) YEAR LIMITED WARRANTY
EURO-PRO Operating LLC warrants this product to be free from material defects
and workmanship for a period of one (1) year from the date of purchase when
utilized for normal household use, subject to the following conditions, exclusions
and exceptions.
The liability of EURO-PRO Operating LLC is limited solely to the cost of the repair
or replacement of the unit at our option. This Limited Warranty does not cover
normal wear of parts and does not apply to any unit that has been tampered with
or used for commercial purposes. This Limited Warranty does not cover damage
caused by misuse, abuse, negligent handling or damage due to faulty packaging
or mishandling in transit. This Limited Warranty does not cover damage or defects
caused by or resulting from damages from shipping or repairs, service or alteration
to the product or any of its parts, which have been performed by a repair person
not authorized by EURO-PRO Operating LLC.
If your appliance fails to operate properly while in use under normal household
conditions within the Limited Warranty period, you may return the complete
appliance and accessories with proof of purchase and date, freight prepaid.
For Customer Service support, call 1-800-798-7398 or visit our website
www.ninjakitchen.com.
If the appliance is found by EURO-PRO Operating LLC to be defective, in EURO-
PRO Operating LLC’s sole discretion, we will repair or replace it free of charge.
Proof of purchase date and cheque made payable to EURO-PRO Operating LLC
in the amount of $14.95 to cover the cost of return shipping and handling must be
included.*
This Limited Warranty is extended to the original purchaser of the unit and excludes
all other legal, implied and/or conventional warranties. The responsibility of
EURO-PRO Operating LLC if any, is limited to the specific obligations expressly
assumed by it under the terms of this Limited Warranty. In no event is EURO-
PRO Operating LLC liable for incidental or consequential damages to anyone of
any nature whatsoever. Some states do not permit the exclusion or limitation of
incidental or consequential damages, so the above may not apply to you.
This Limited Warranty gives you specific legal rights, and you may also have other
rights which vary from state to state or from province to province.
*IMPORTANT: Carefully pack item to avoid damage in shipping. Be sure to
include proof of purchase date and to attach tag to item before packing with
your name, complete address and phone number with a note giving purchase
information, model number and what you believe is the problem with the item.
We recommend you insure the package (as damage in shipping is not covered
by your Limited Warranty). Mark the outside of your package “ATTENTION
CUSTOMER SERVICE”. We are constantly striving to improve our products,
therefore the specifications contained herein are subject to change without
notice.
PROBLEMS POSSIBLE REASONS & SOLUTIONS
Motor Doesn’t Start
or Blades Don’t
Rotate.
Check that the bottom of motor head is clean and
there is no food blocking connection when placing
on containers.
There is too much food in the container.
The unit has overheated. Unplug and wait
approximately 10 minutes before using again.
Make sure the splash guard is securely on container.
Make sure the power head is securely placed on
splash guard.
Check that the plug is securely inserted into the
electrical outlet.
Check fuse or breaker. Replace fuse/reset
breaker.
Food is Unevenly
Chopped.
Either you are chopping too much food at one
time, or the pieces are not small enough. Try
cutting the food into smaller pieces of even size
and processing smaller amounts per batch.
Food is Chopped Too
Fine or is Too
Watery.
The food has been over processed. Use brief
pulses or process for shorter time. Let blades
stop completely between pulses.
Food Collects On
Splash Guard/Safety
Cover or On the Sides
of the Master Prep™
Professional Pitcher or
Master Prep™
Professional Bowl.
You may be processing too much food. Turn the
machine off. When the blades stop rotating,
remove the power head and the splash guard.
Remove some of the food being processed.
You Cannot Achieve
Snow From Solid Ice
Do not use ice that has been sitting out or has
started to melt. Be sure to use short pulses in
the beginning to break up large pieces.
Troubleshooting Guide

Notes
14 www.ninjakitchen.com 15
QB1000 30 / QB1000CO 30 / QB1002 30 / QB1003 30
OWNERSHIP REGISTRATION CARD
FOR CANADIAN CONSUMERS ONLY
Please fill out and mail the product registration card within ten (10)
days of purchase. The registration will enable us to contact you in the
unlikely event of a product safety notification. By returning this card
you acknowledge to have read and understood the instructions for
use, and warnings set forth in the accompanying instructions.
Mail to the following address:
• EURO-PRO Operating LLC
4400 Bois Franc, St.Laurent, Québec, Canada H4S 1A7
Owner’s Name:
Address:
City: Province: Postal Code:
Date Purchased:
Name of Store:
Appliance Model:
| |
TOLL FREE: 1-800-798-7398

U.S.: EURO-PRO Operating LLC
Newton, MA 02459
CANADA: EURO-PRO Operating LLC
4400 Bois Franc
Ville St. Laurent, Québec H4S 1A7
1-800-798-7398
www.ninjakitchen.com
COPYRIGHT © EURO-PRO OPERATING LLC 2010
PRINTED IN CHINA REV. 100113
Illustrations may differ with actual product.
This manual suits for next models
3
Table of contents
Other Ninja Mixer manuals
Popular Mixer manuals by other brands

Collomix
Collomix Collomatic XM 2-650 manual

Paramount Fitness
Paramount Fitness BM80 Installation & operation manual

Sentinel
Sentinel 10-FLE operation instruction

Winco
Winco SPECTRUM EMP-10 Installation and operating instruction manual

Goldair
Goldair GMX350 operating instructions

Andrew James
Andrew James 5.2 L Food Mixer user manual