Nitek THYROFLEX User manual

THYROFLEX 4G INSTRUCTION MANUAL
Table of Content
Section 1: Hardware Included.................................................................... Page 1
Section 2: Computer Set-up........................................................................ Page 1
Section 3: Testing......................................................................................... Page 7
Section 4: Patient Record............................................................................ Page 9
Section 5: Patient Preparation.................................................................. Page 11
Section 6: Performing Reflex Test............................................................ Page 13
Section 7: Marker Placement.................................................................... Page 14
Section 8: Result Interpretation ................................................................ Page18
Section 9: Retesting Patient....................................................................... Page 19
Section 10: View Patient Test History...................................................... Page 20
Section 11: Printing, Saving, and PDF .....................................................Page 21
Section 12: Technical Support................................................................... Page 26
Contacts:..................................................................................................... Page 28
Hashimoto’s ................................................................................................ Page 29
BioThroid.................................................................................................... Page 30
Iodine/Iodide............................................................................................... Page 34
Thyroid Notes............................................................................................. Page 36
Dr. Bayliss................................................................................................... Page 40
Nitek Pharmacy.......................................................................................... Page 41

TF.G4.2.28.14
1
NiTek Medical, Inc.
THYROFLEX INSTRUCTION MANUAL
Section 1: Hardware Included
1. Debun-Linux XUbuntu Netbook with Thyroflex software preloaded.
2. USB reflex hammer system with USB link stick and hand sensor band.
3. Additional blue reflex hammer to assist in locating the reflex muscle.
4. Power cord (adaptor, if necessary, depending on country).
5. Symptoms Sheet.
6. Instruction Manual.
7. Link to compatible printers.
8. USB memory stick.
9. Spare hand sensor strap
10. USB to micro USB charging cord
1. 2. 3.
Note: All programs on this computer will require only a single click. Double
clicking will duplicate the launch of multiple screens. Please allow at least 30
seconds for system to launch or change between screens.
Section 2: Computer Set-Up
1. Turn on the computer using the small rectangular blue power button located in the
top right hand corner.
TF.G4.2.28.14
2
2. Accept the terms and conditions of use of device.
3. To set up the wireless Internet connection, go to “Config” and “Network
Manager”icon. Select the wireless Internet connection. It may be necessary to
enter in your Internet service provider ID and password to establish password
protected connections. DISCLAIMER: Nitek is not responsible for
understanding your specific Internet type. Our computers are designed to connect
to wireless Internet connections or CAT cable connections. If you are unable to
connect through the suggestions from our manual or video please consult your IT
professional or Internet provider.
Important! : Internet connection is essential to obtaining calculated test
results and tracking of monthly testing usage for billing purposes.
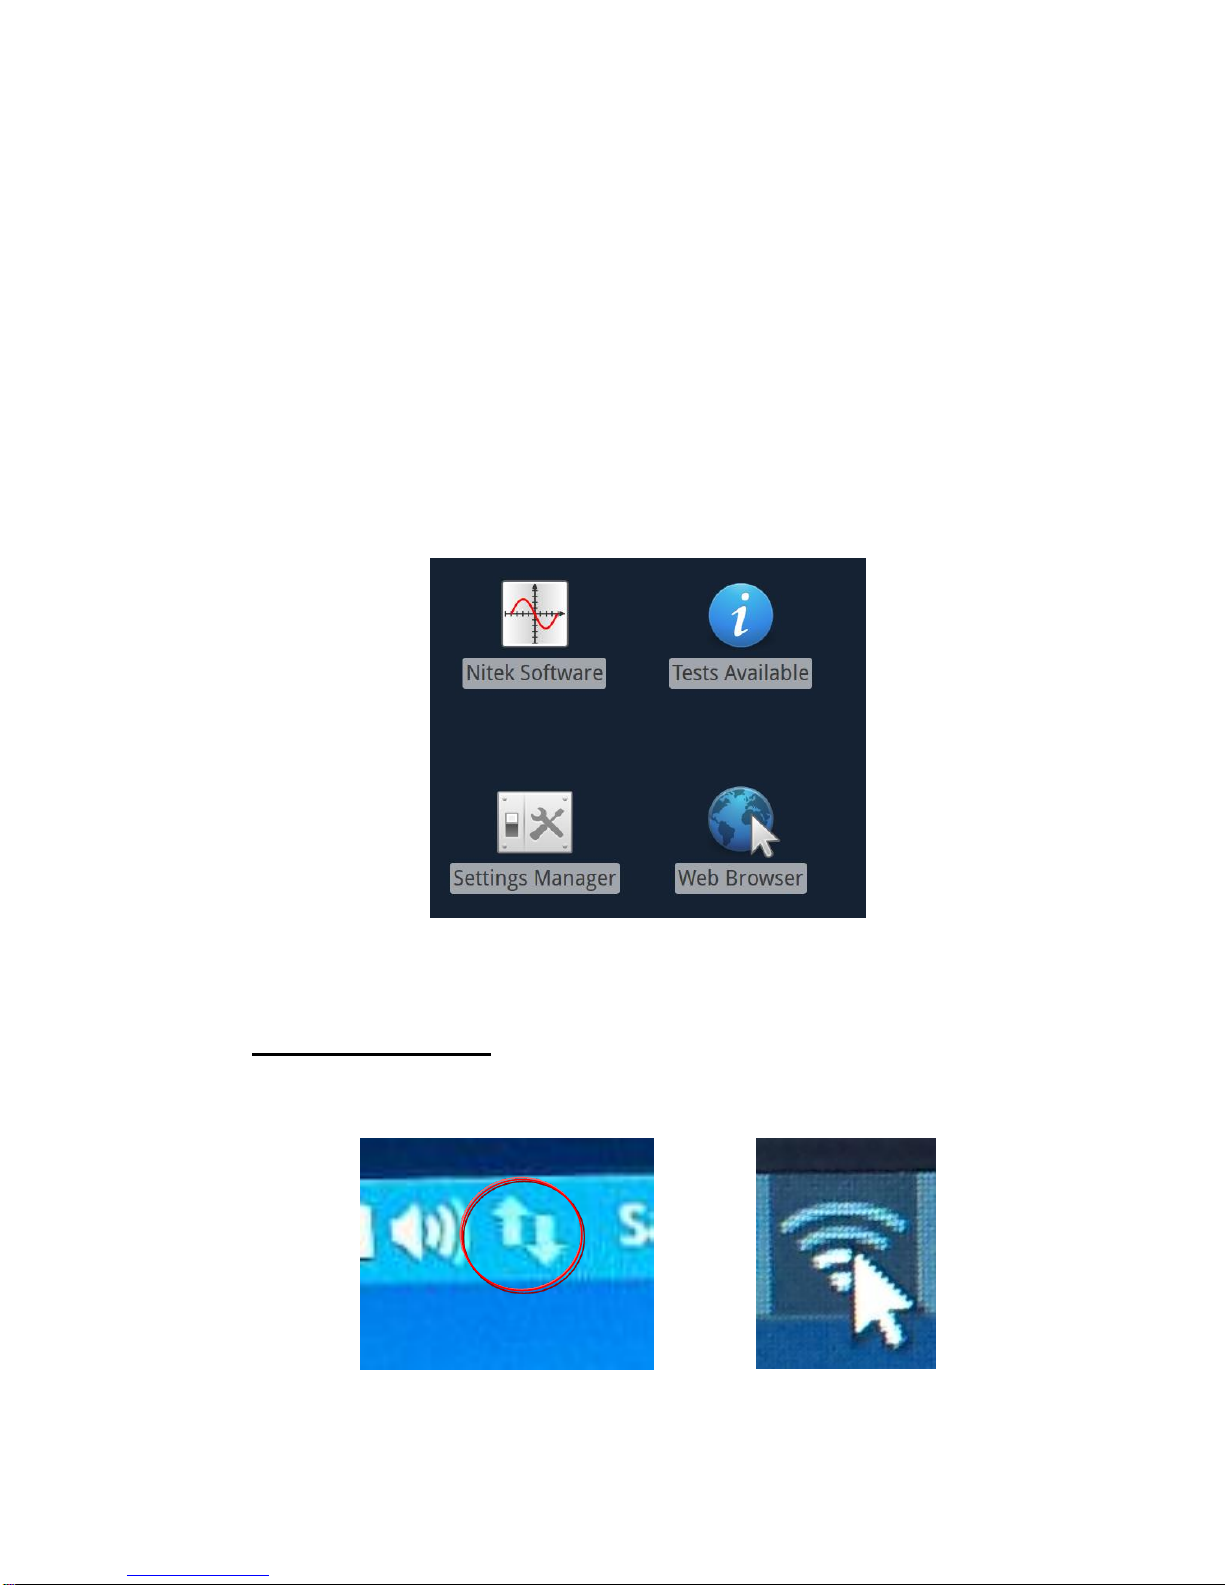
Configuration Main Screen: Set up Internet Connection.
To connect to the Internet, locate the arrows in the top bar. Click and a pull
down menu will appear below.
4. Connect to the Internet
The two arrows located in the top right hand side of the bar, are for the Internet
connection.
To Connect Connected
TF.G4.2.28.14
3
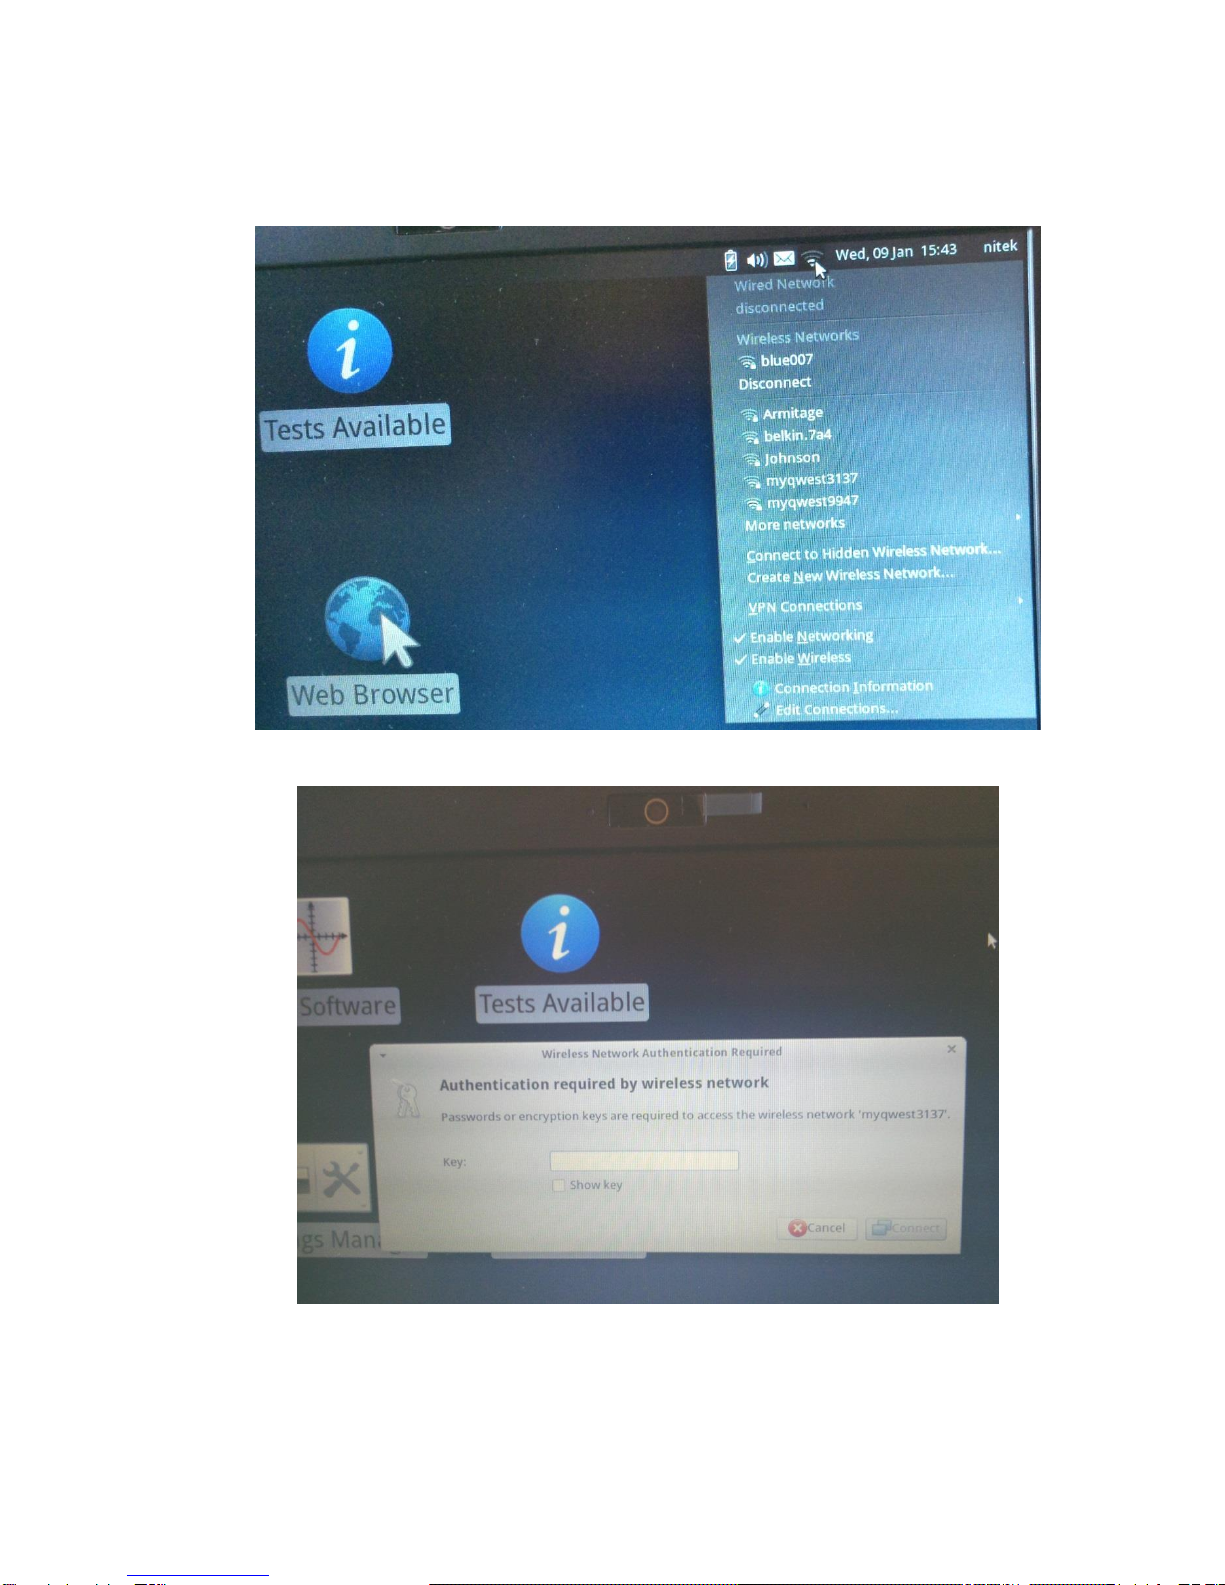
5. The pull down menu, as shown below, will pick up what services are available or
within range. Select your WiFi and register with your password to authenticate.
(This is just a sample of WiFi connections)
6. If you briefly loose Internet connection during testing, you will still be able to
complete your test and obtain results. However, you will only be able to test up to
10 “off-line” tests without the Internet before you will be locked out of the system

TF.G4.2.28.14
4
from any further testing. The following error message will appear.
Loss of Internet Connection Error Message While Going To Test = Not On
Internet, Therefore, Connect To The Internet ASAP.
7. Connect the Dongle to a port on the computer and check for the BLUE light. The
blue light on the dongle should stay on throughout testing.
Connect Dongle to computer Check for Blue light
Note: Each Thyroflex has matched ID #’s on the hammer link box and a
PAC ID # on the top right hand corner of the rotating body patient input
screen. These numbers are unique to your device. Every test can be seen in
real time on the NiTek server. If you need assistant with placing marker on a
graph or with test result interpretation or simply want us to review your
TF.G4.2.28.14
5
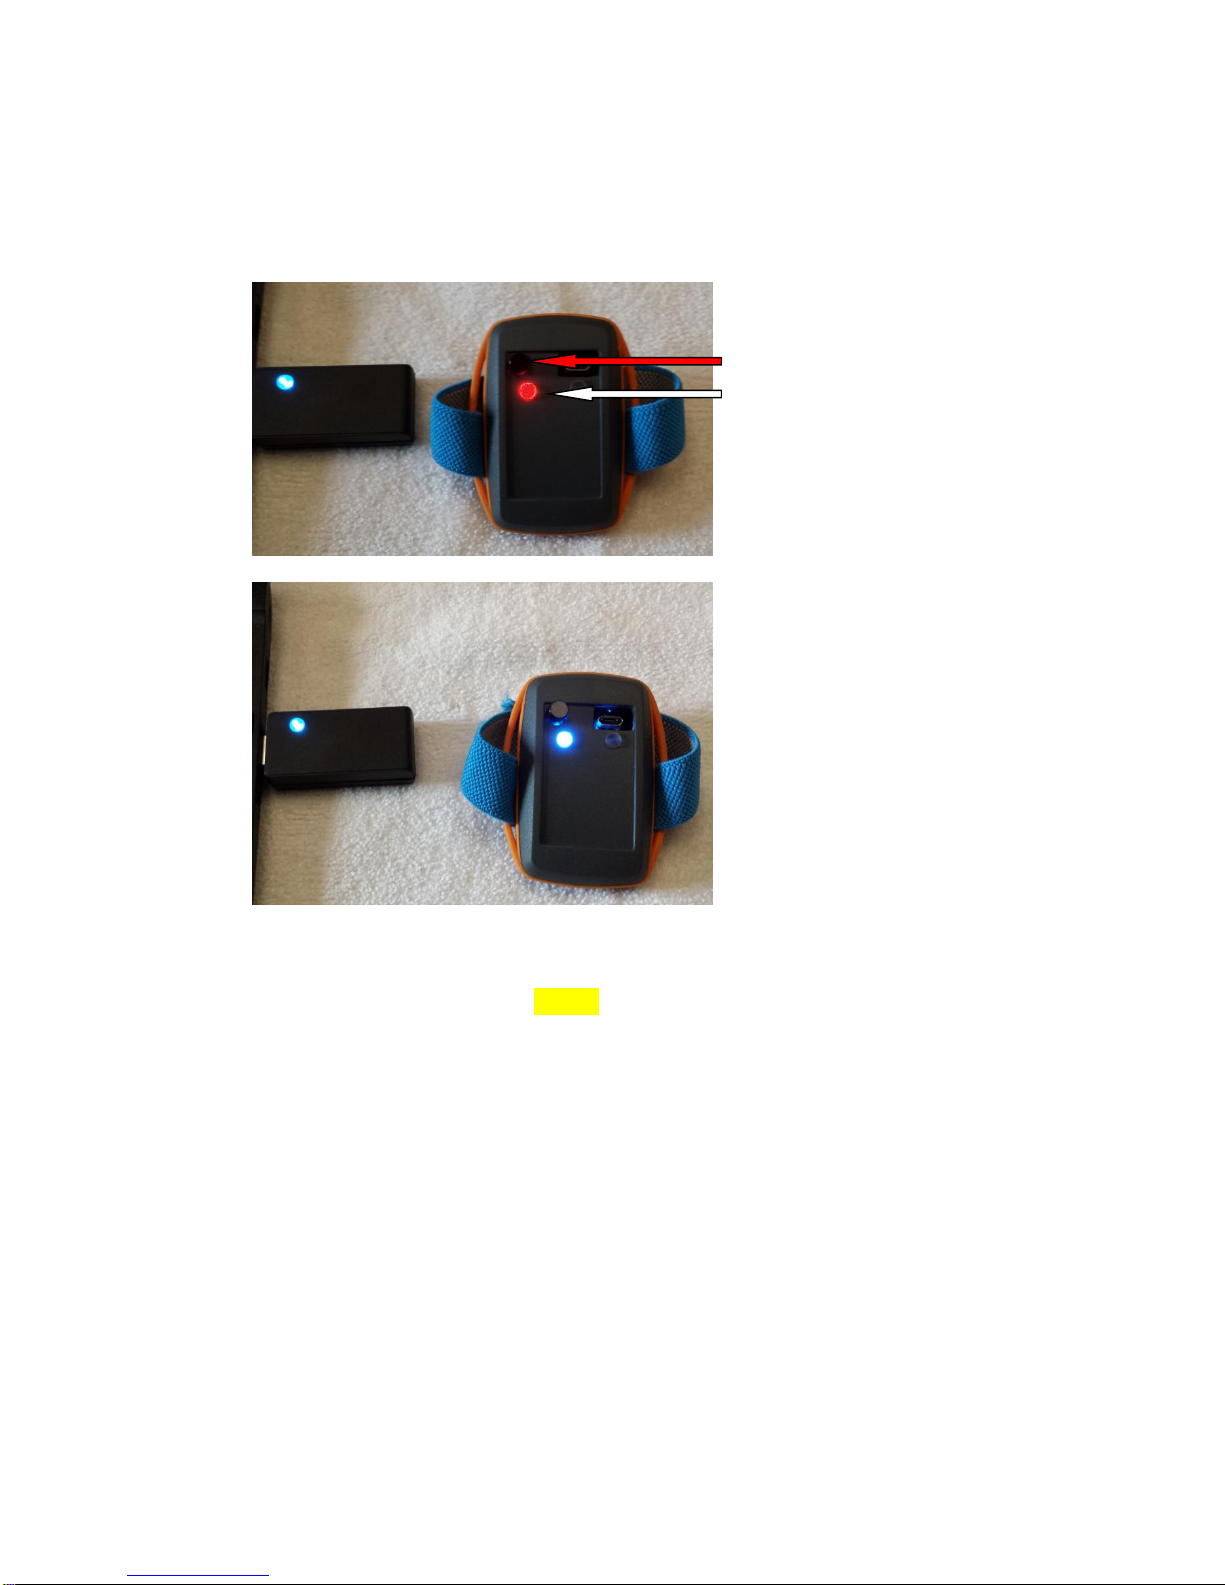
8. Press the black hand sensor button; you will get a red light. The light should then
turn blue. If hammer is not cocked after one minute of showing blue, it will show
red and then turn itself off.
9. If blue light flashes on hand sensor, it is not communicating with the dongle.
10. When cocking the hammer a yellow light will show on the hammer and the hand
sensor. (If you lose connection, the blue light will show.)
Press the black button to start
Red light will appear briefly
and then turn blue.
Light will stay a solid blue, until hammer is
cocked and then will turn yellow.
If hammer is not cocked after a minute, it
will turn from blue to red and shut off.
TF.G4.2.28.14
6
11. With the yellow light on hammer and sensor, you are now ready to “Fire.”
(Might be a blind spot and you will see a blue light, adjust and make sure you see
yellow lights before testing patient.)
12. After you “Fire,” the hand sensor light will go back to blue.
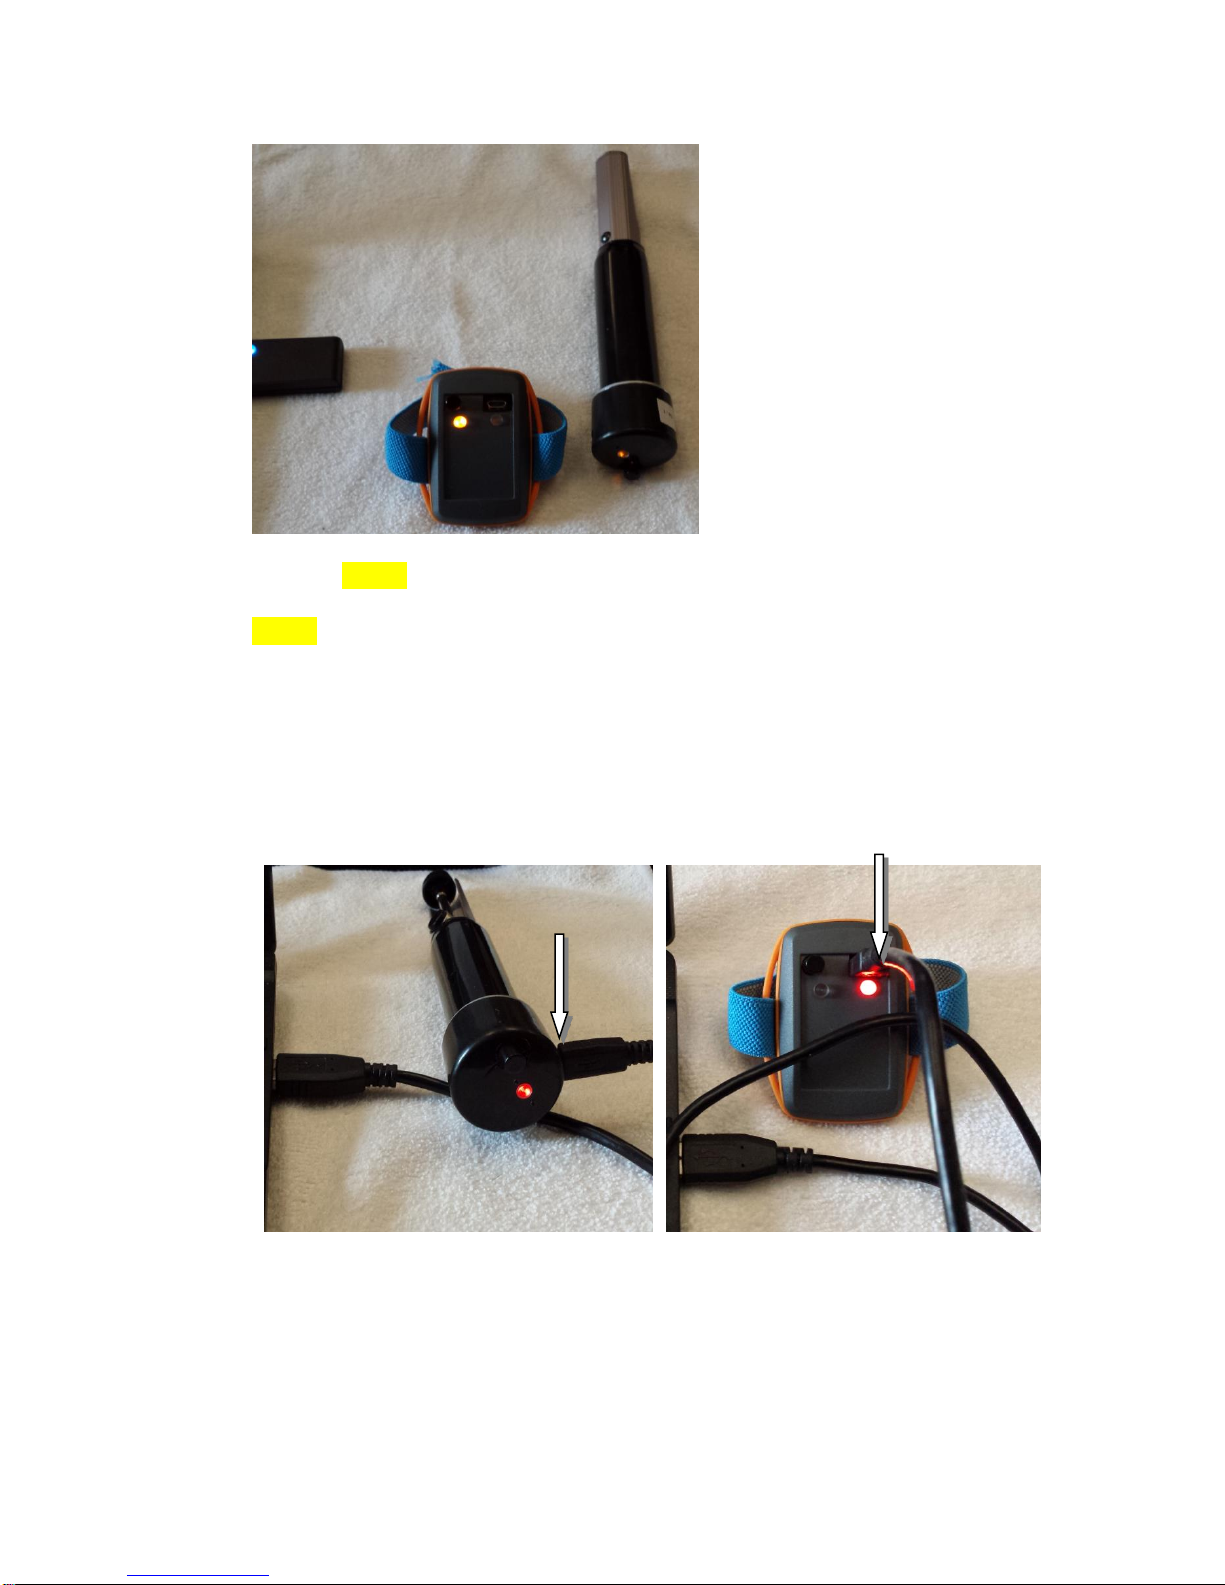
13. To charge the hammer, insert one end of the cord into the hammer and the other
end into the USB port. It will turn red when charging. Unplug charger cord after
15 minutes. Do the same to charge the hand sensor.
Hammer charging Hand sensor charging
Yellow light on sensor and yellow light
on cocked hammer. Ready to Fire.

TF.G4.2.28.14
7
Section 3: Testing
1. Launch the NiTek software from the desktop “Nitek Software” icon. Remember
to single click and watch for rotating clock.
Launch Thyroflex software program using the “Nitek Software” icon.
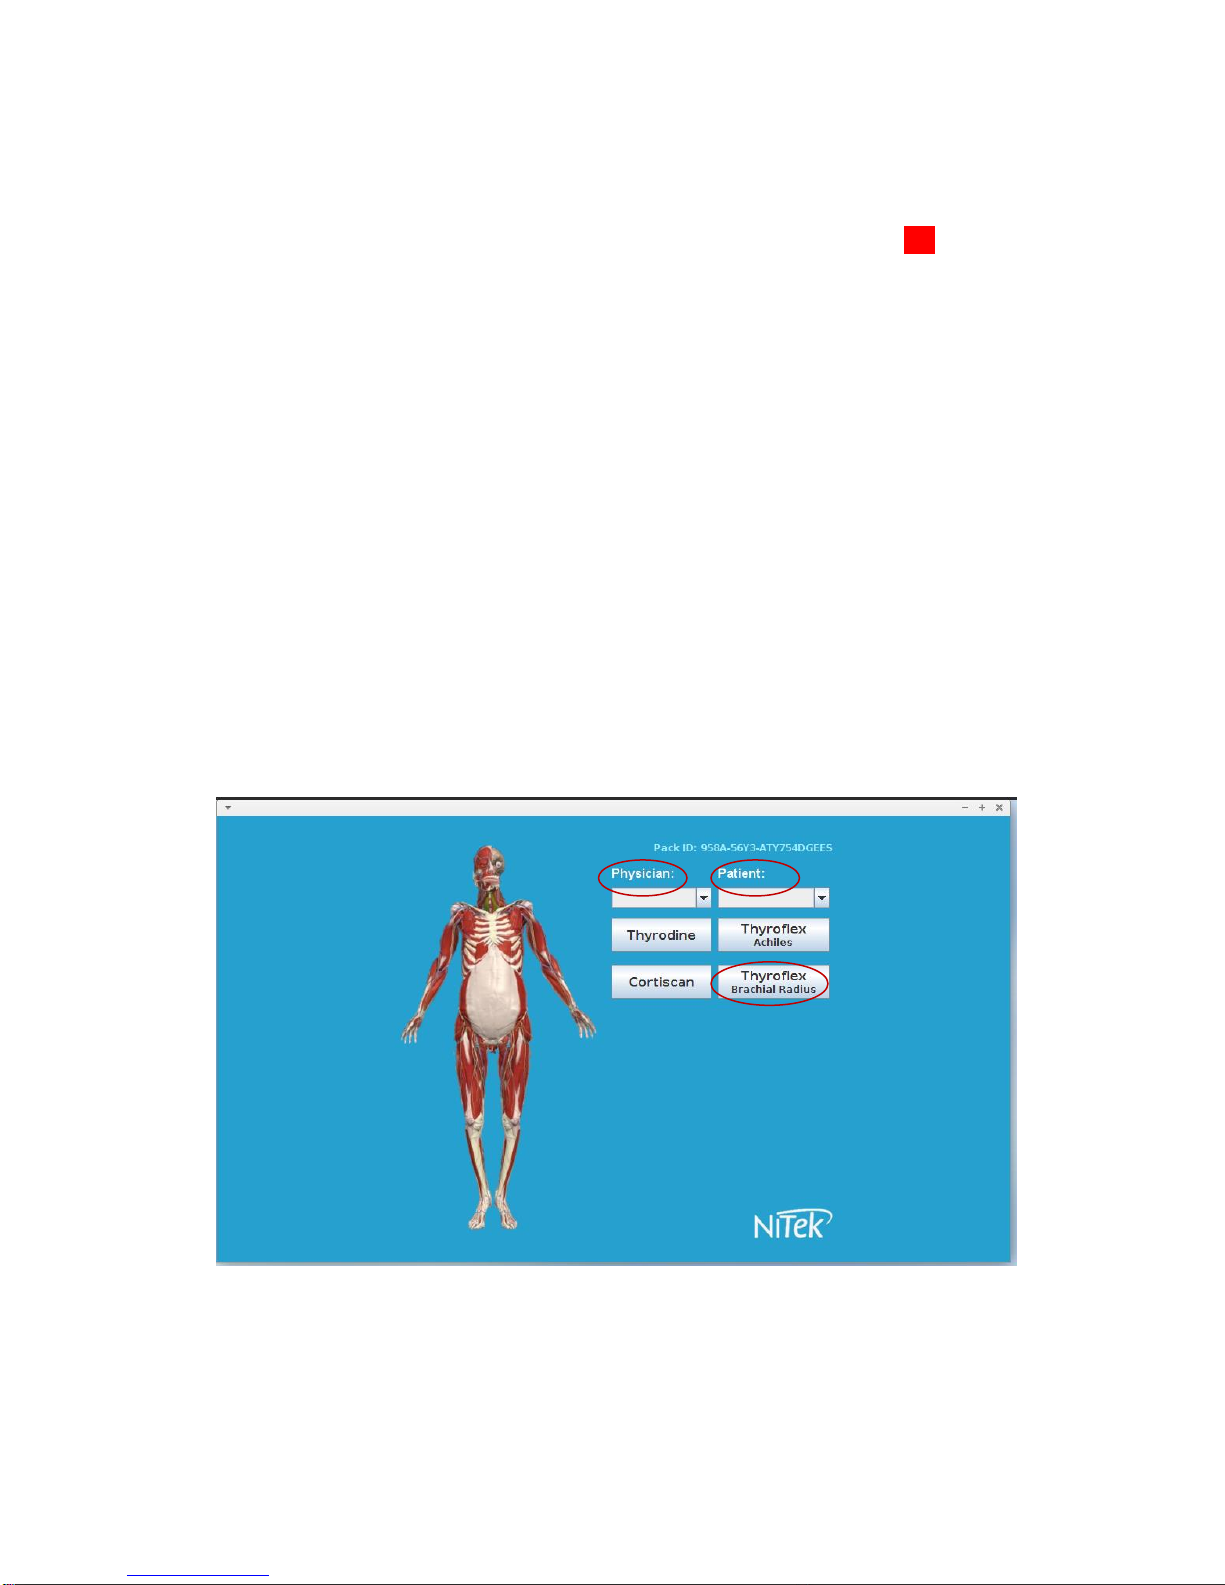
Entry Page for Testing
The PAC I.D. number is the unique identifier for your Thyroflex and is
synced to the Nitek server.
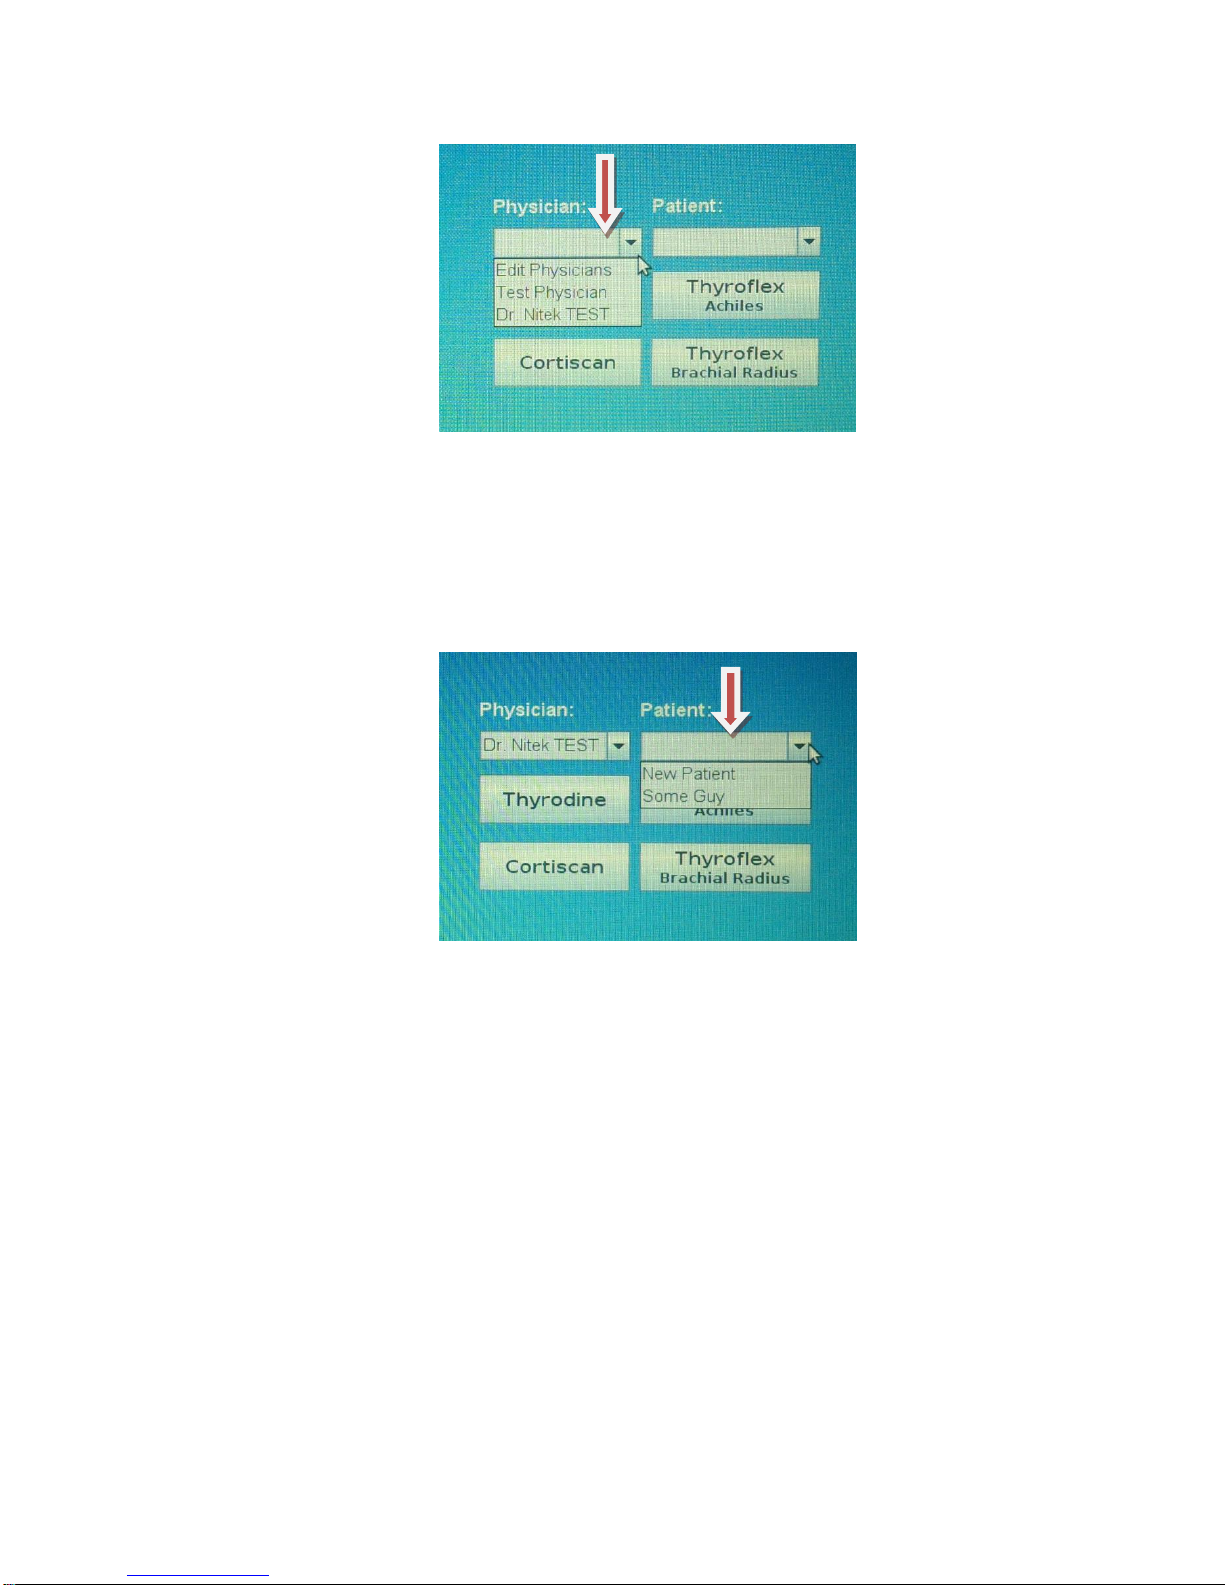
2. At the main menu, click on the drop down menu under “Physician” and select
“Edit Physicians” to manage your physician database.
TF.G4.2.28.14
8
Select and/or add new physician to database.
3. Select “Add New” and type in the new physician’s name or select the appropriate
physician name and click “Done”.
4. To add a new patient, click on the drop down menu under the “Patient” button,
select “New Patient.”
Select and/or add new client database.
5. Select the “Thyroflex Brachial Radialis” button to enter in patient information.

TF.G4.2.28.14
9
Section 4: Patient Record
1. Use the “Tab” key to go through the fields, fill in the patient name, birthday,
gender, height, and weight.
2. Click on the drop down arrow to select the “sex”.
Note: Height and weight unit of measurement is preset for your region.
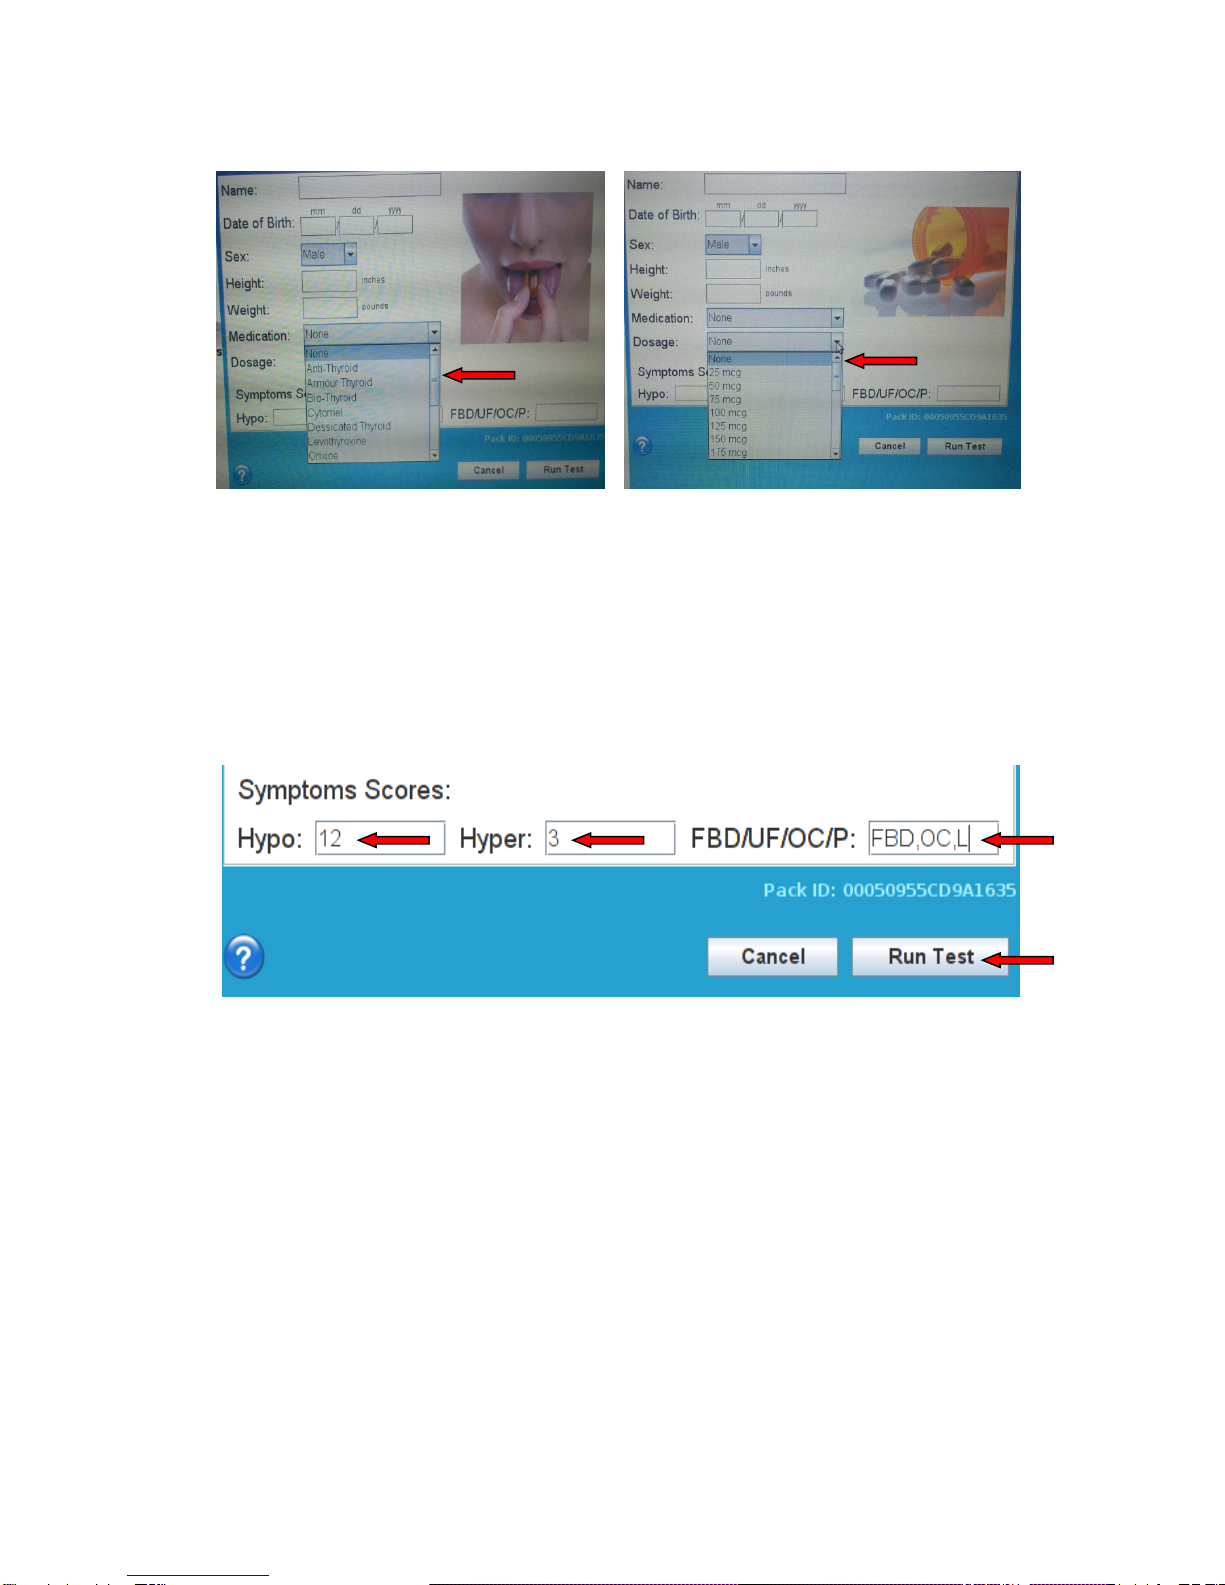
Patient Information Screen
3. If patient is on thyroid therapy, click on the drop down menu to select their
current thyroid medication and dosage level.
TF.G4.2.28.14
10
4. Enter in patient “Hyper” and “Hypo” Thyroid Symptom Survey Score from their
symptoms survey sheet.
5. Enter the following codes “FBD” for fibrocystic breast disease and lumps in
breast. Uterine fibroids should be “UF” or ovarian cysts “OC” and prostate is
“P.” If the patient does not have any of the above listed then enter “None.”
6. Press “Run Test” to begin testing.

TF.G4.2.28.14
11
Section 5: Patient Preparation
Patient arm position & band placement
1. Patient should be seated comfortably in the chair with back fully supported by the
backrest and both foot planted firmly on the ground (chair pulled close to table).
Do not cross legs.
Note: Patient crossing their legs or feet during testing will affect their test
result.
2. Patient’s arm should be fully supported on a tabletop and their wrist hanging over
the edge of the armrest.
3. Ask the patient to make a letter “L” with their thumb. Slip the band over the four
digits leaving the thumb out and stopping at the crease of the thumb. Align the
sensor with the yellow light facing towards the wrist. (See picture above.)
E x te n s o r
D i g i to r iu m
Belly of Extensor Digitorium Muscle Extensor Digitorium Anatomy

TF.G4.2.28.14
12
4. The Thyroflex tests the reflex of the Brachioradialis muscle (which sits directly
under the Extensor Digitorium muscle); therefore, consistency and accuracy of
the test is dependent on finding and hitting this correct muscle.
Dorsiflex Hand Locate muscle 2-3 fingers from elbow crease.
(2 for large hands, or 3 for petite hands)
5. This is the most critical part of the test. To locate this muscle and mark
it for ease of testing, have patient dorsiflex their hand, straighten all fingers out,
hold, and have the patient wiggle the middle finger only. Locate the muscle group
that is moving (distal to the elbow crease on the forearm and approximately two
to three fingers down) and mark the muscle with an “X.”
6. Always utilize the blue reflex hammer provided to strike and to test the muscle
reflex. If the correct muscle has been marked, the patient will have a strong
middle finger reflex. If patient wrist reflex sideways, use the blue reflex hammer
to hit a little bit over to the right or left of the mark on the forearm until patient
display a strong middle finger reflex. Remark that spot. If you get the middle
finger to fire, you are ready to proceed with the test. Do not test unless the middle
finger fires.
Test correct muscle Look for a strong middle finger reflex

TF.G4.2.28.14
13
Section 6: Performing Reflex Test
1. Cock the hammer by pushing up on the plunger until you hear a click. Place
hammer with plunger perpendicular over the mark on the arm and depressed
hammer slightly into the arm until skin indents to hold the hammer firmly in place
over the muscle.
Note: The pad is not necessary, but if patient complains of discomfort with
the force of the hammer, you may place a pad over the patient’s arm to test.
Push up on plunger to cock hammer.
Place hammer perpendicular to muscle.
If needed, use pad over arm if patient complains of discomfort from
hammer.

TF.G4.2.28.14
14
2. Patient needs to be completely relaxed with wrist dependent over the edge of the
armrest and both feet planted firmly on the ground. To obtain a better reflex from
patient, have patient make eye contact with you and use distraction techniques
(asking patient to count backwards from 100 in serial sevens or say the ages of
their children, etc.) right before the hammer is triggered.
3. Re-cock the hammer and test patient reflexes until you have obtained 3 good
reflexes. You can test up to 5 times, but it is not necessary.
Section 7: Marker Placement
There is a connectivity button on the bottom right had corner of the screen called
“Device” and “Server.” If the USB of the hammer and linkbox are not connected
then it will show in red, “No Device” or, if it is connected it will show in green
“Device.” If you are connected to the Internet it will show “Server” in green. If you
are not connected to the Internet it will show “No Server” in red.
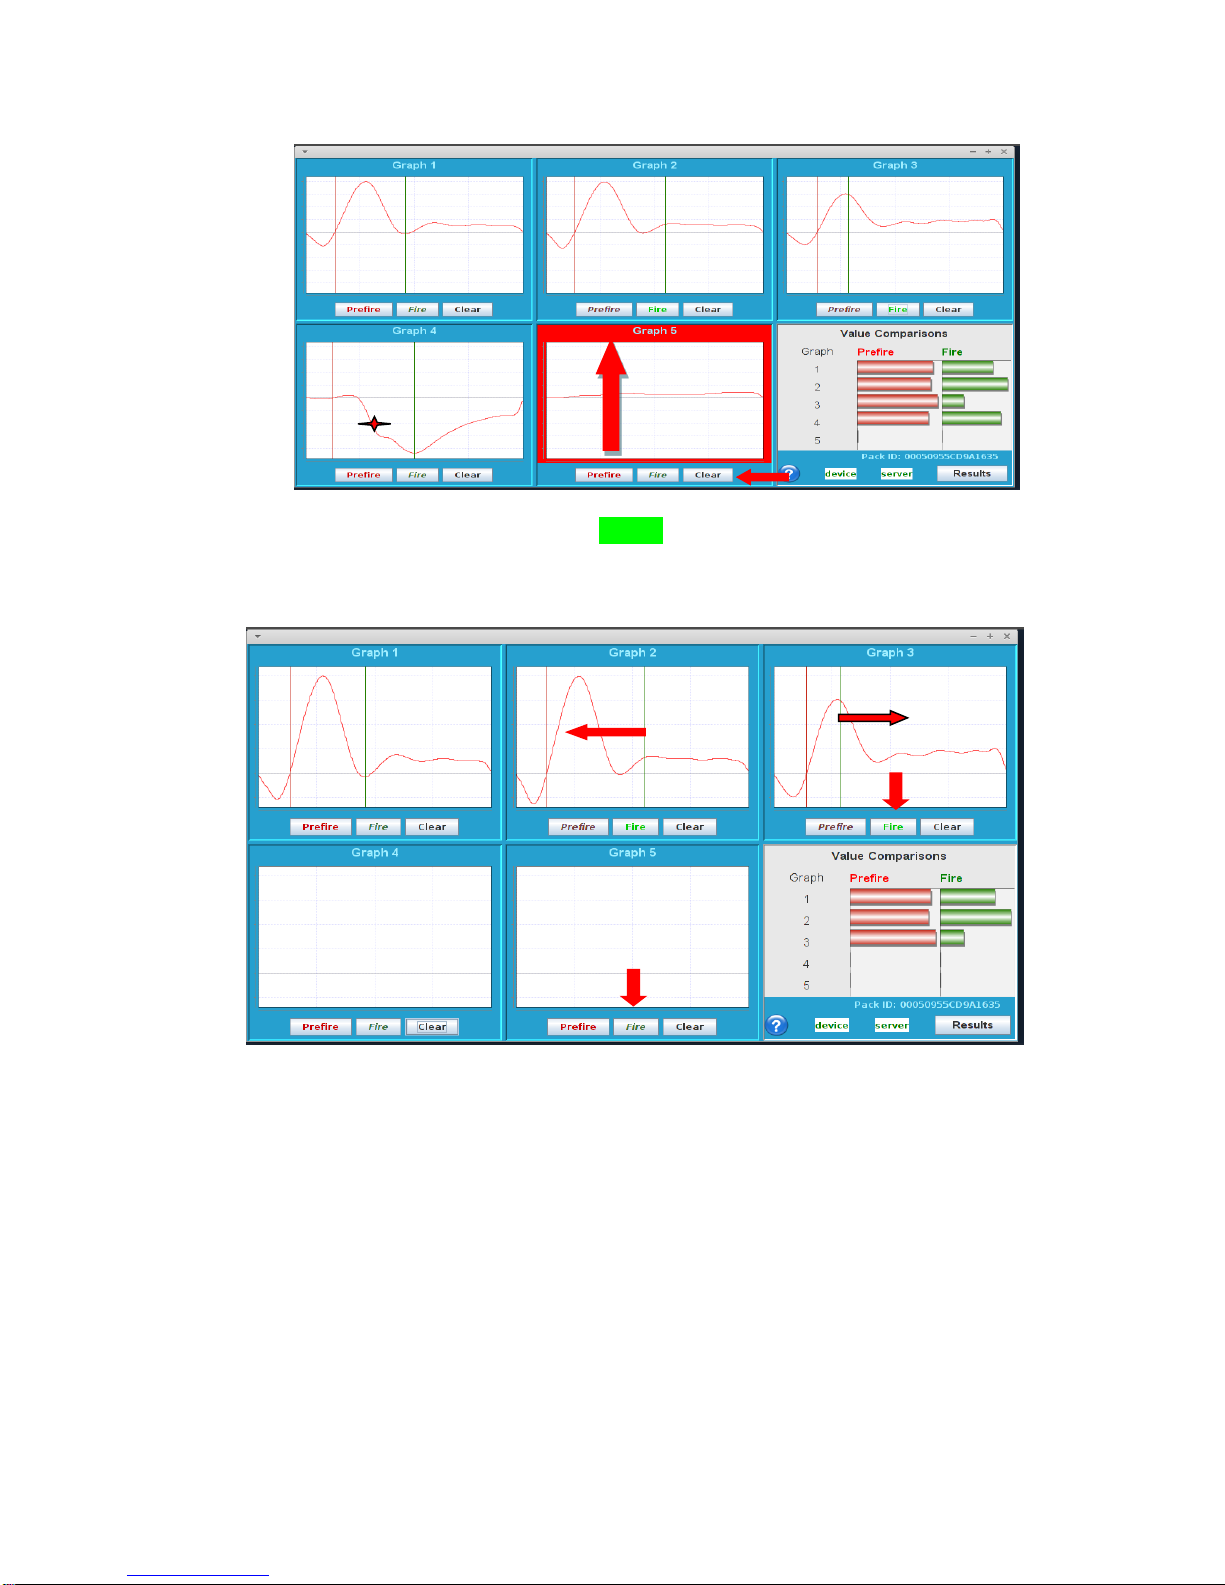
1. The Thyroflex will automatically set the reflex markers for you on valid reflex
result (see graph 1-3).
2. Invalid test results will be indicated by the RED highlight (see graph 5)
and will need to be cleared. Hit “Clear” so not to be included in the
calculation of the results.
Note: Graph 4. Hand sensor on upside Down.
TF.G4.2.28.14
15
Graph # 2 & # 3: Fire marker (Green) is misplaced and will need to be re-
adjusted to the left and right as indicated. (Click on the file to activate –
the fire button will brighten up.)
3. Manual adjustment to the markers needs to be made when the
“Fire” marker is not correctly set by the system at the trough
(lowest point) of the bottom of the bell curve. Click on the Fire or
Pre-fire button to change line placement.
4. On the bottom right hand corner, the red and green bars should be
approximately the same length. As shown in graph 3, the green bar
is too short. Either the green fire marker line should be moved or
the test cleared.
TF.G4.2.28.14
16
5. Clearing incorrect results:
If you do not like the look of the test results (Bell Curves) in the above photo
(note that the bars on the right side are not equal) hit the clear button to clear out
tests you do not want.
In the example above in graph #3, the Bell Curve did not quite come down to the
bottom line. The fire marker can also be manually placed, by tracing the
descending Bell Curve top 1/3 of the line to where it would have crossed the base
line.
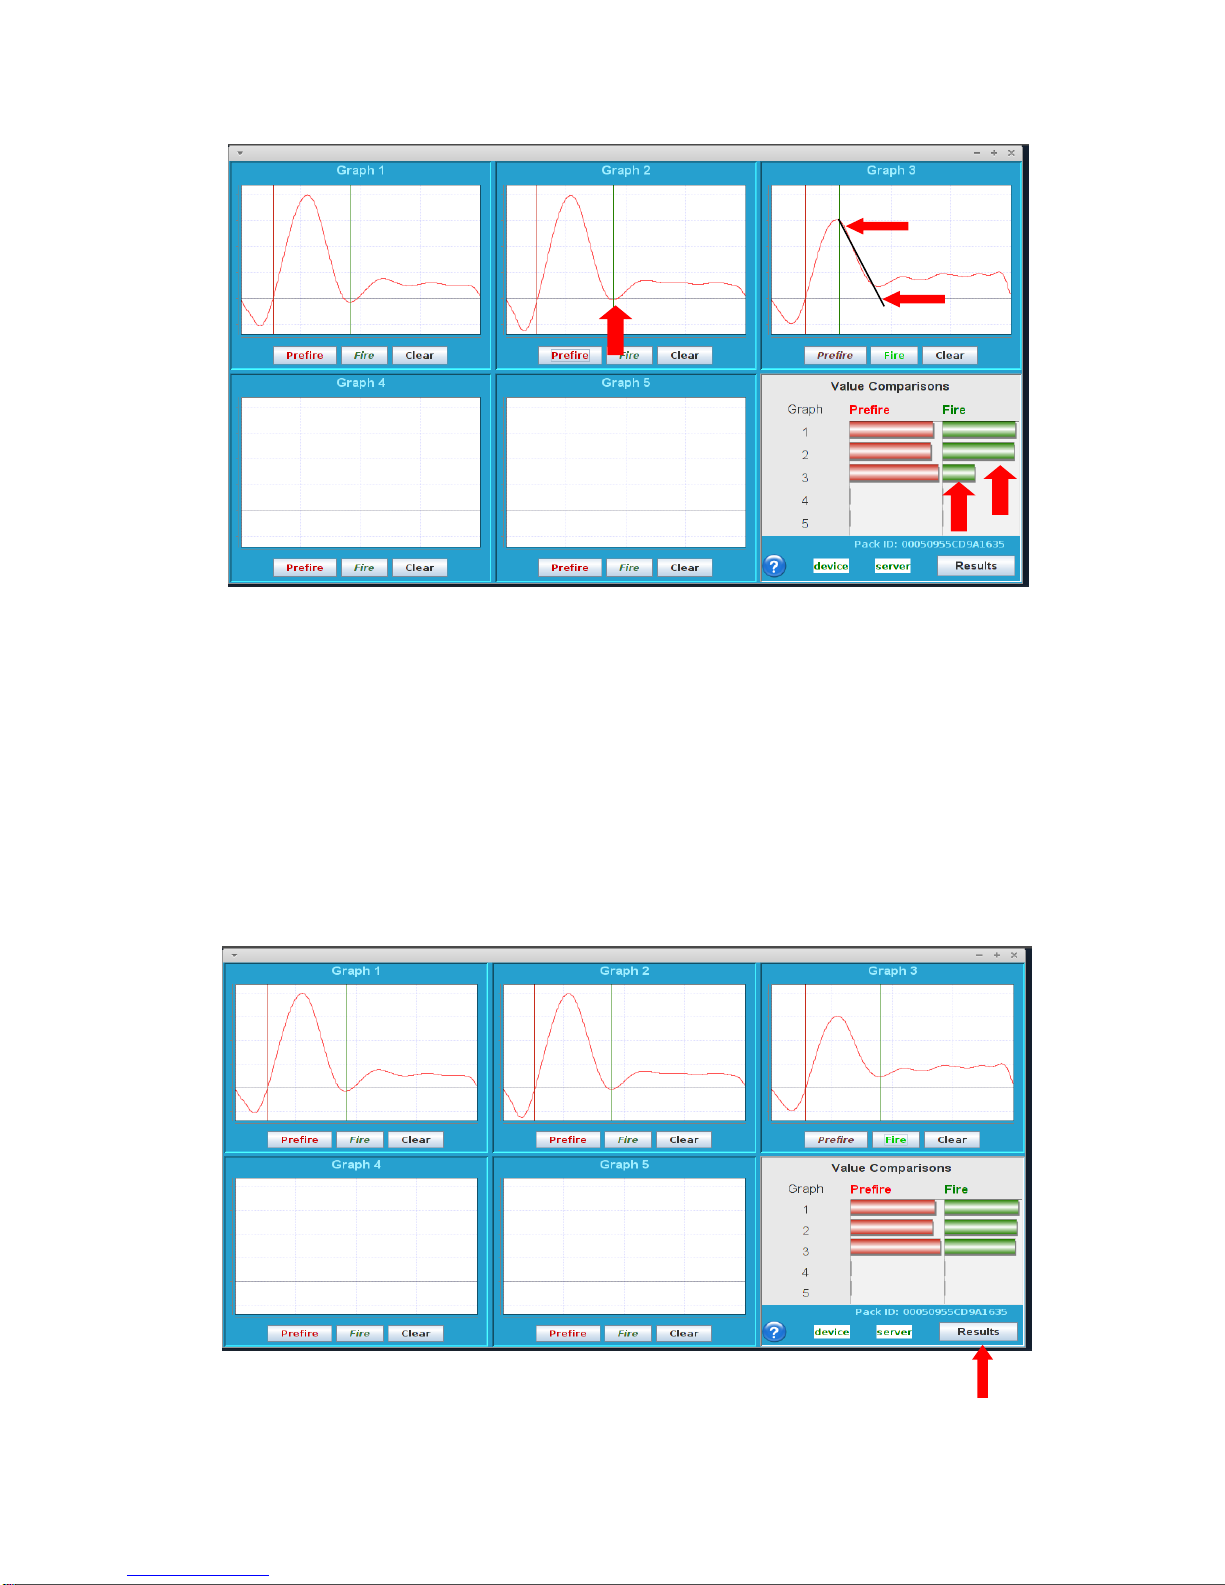
Graph # 1, 2 and 3: Perfect marker placement
TF.G4.2.28.14
17
6. Look at the “Value Comparison” bars. All the red “Pre-fire” and
all the green “Fire” bars should be relatively the same length. If
bars are uneven, re-check the placement of the markers.
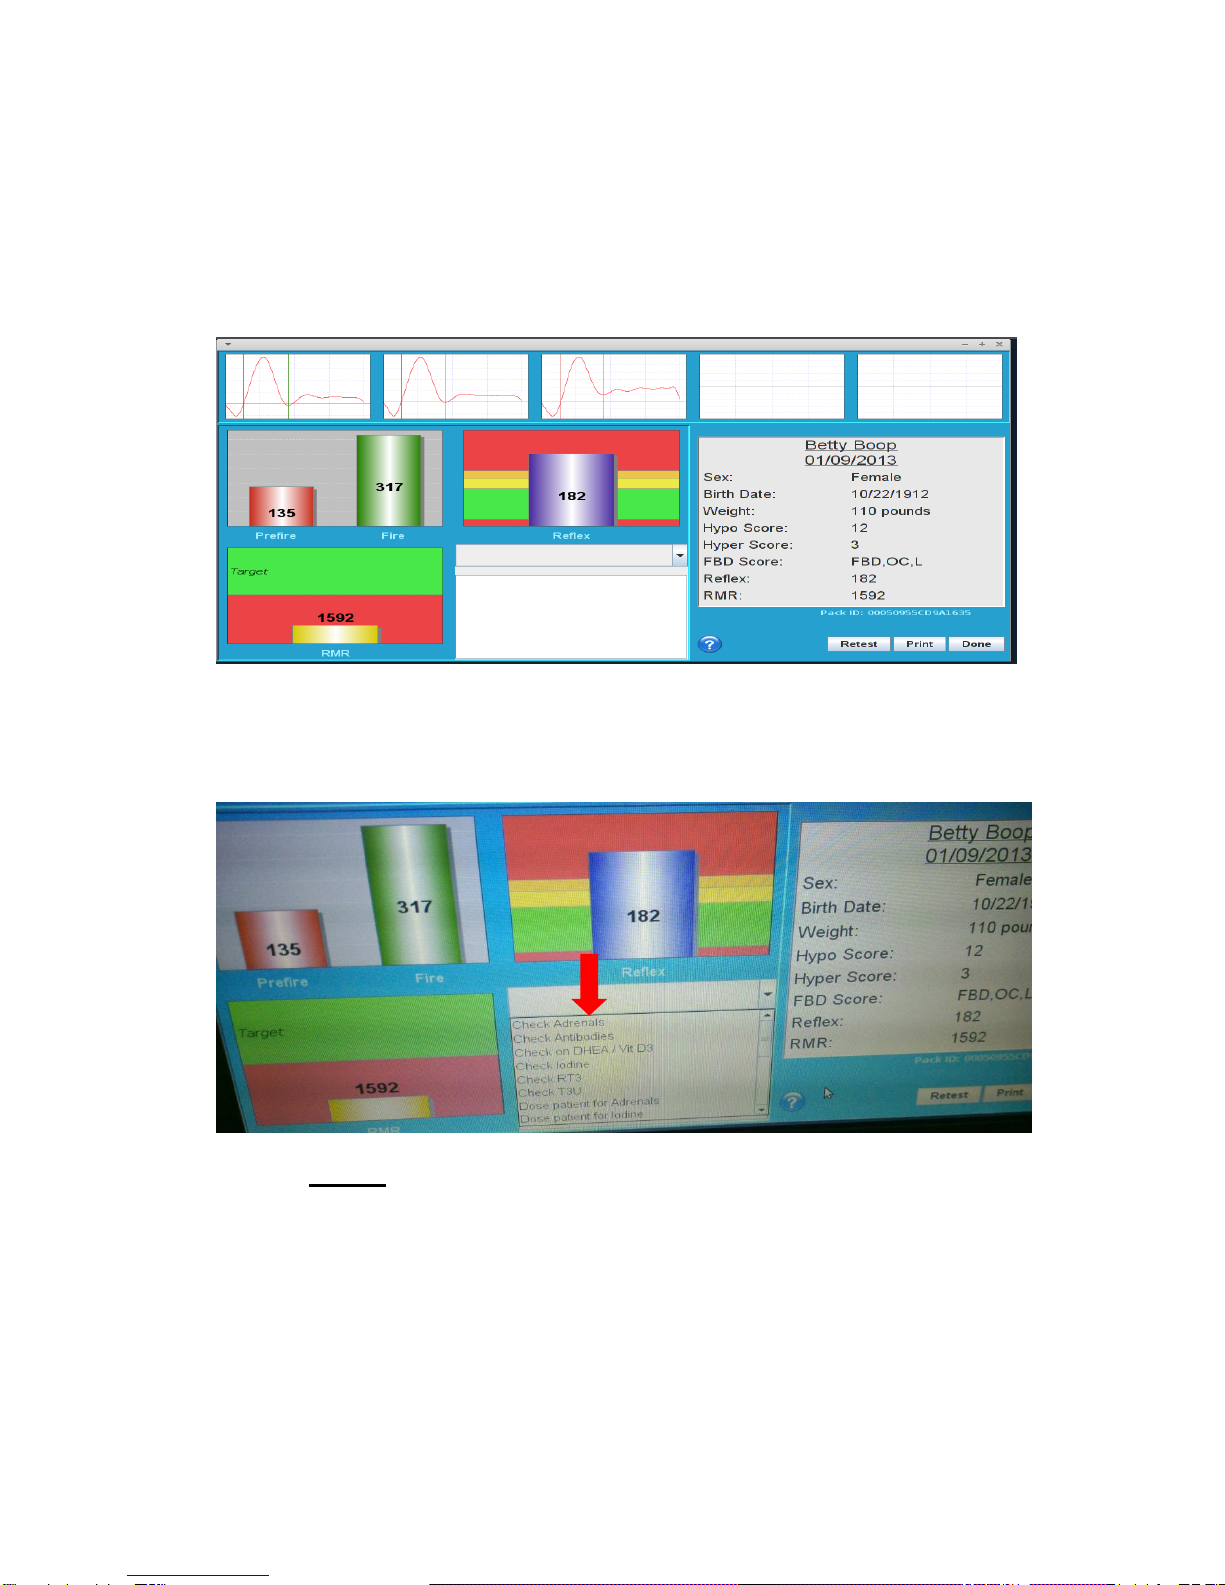
7. Click on “Results” to obtain result summary page as shown below.
Result Summary Page
8. The blank box next to the RMR result allows you to add any special notes into the
patient’s charts. Click on the drop down arrow menu to add new text.
9. Press “Done” to save test result locally on the system. (Screen returns to patient
input page.) Please note, if you do not press “Done,” your test results will not
save.
10. Press “Retest” to immediately retest the same patient.
11. Press “Print” to print and/or save a PDF file version of the test report to a USB
memory stick. See section 11 for further instructions.

TF.G4.2.28.14
18
Section 8: Result Interpretation
Hyperthyroidism ≤ 51 ms
Normal Range 52-136 ms
Green (Optimal) 52-100 ms
Yellow (Herbal Supplement) 101-119 ms
Orange (Borderline) 120-136 ms
Red Hypothyroidism (Use prescription Meds) ≥137 ms
1. Take note of the “Reflex” time. Normal range is 52-136 ms
2. Optimal reflex time is 52-100 ms with the purple bar graph falling in the green
zone.
3. Treat patient with herbal supplement when reflex time is 101-119 ms with the
purple bar graph falling in the yellow zone.
4. Borderline reflex time is 120-136 ms with the purple bar graph falling in the
orange zone.
5. Treat patient with prescription medication when patient
a. “Hypo” symptoms is ≥8
b. RMR is 2,250 for the average fit female and 2,750 for the average fit male
(the average person burns 109 calories per hour at rest) and/or their RMR is
TF.G4.2.28.14
19
400 calories less per day then the average person. Factor in ± 250 calories for
an over/under weight or aged patient.
c. Reflex time is ≥136 ms with the purple bar graph falling in the red zone.
6. ARNICA: We recommend that Arnica is used to take away any bruising on the
patient arm.
7. HASHIMOTO’S & GRAVES: If the patient has both 12+ on the Hypo side of the
symptom survey and 7+ on the Hyper side, and it includes Tachycardia and/or
Palpitations. We recommend that an antibodies test is run for Hashimoto’s and
Graves.
Section 9: Retesting Patient
1. It is recommended to retest and titrate patient after 30 days to allow the body to
equilibrate to the thyroid medication. To retest a patient, select database from the
“Physician” drop down menu, select patient name from the “Patient” drop down
menu, and select “Thyroflex Brachial Radius” click new test and modify patient
information, if necessary.
2. After selecting the patient for retest, you can view the patient’s past tests by
highlighting the last test you want to view. Then click on details.
Table of contents


