VITACON C5 User manual

(800) 757-8450 Option 2 support@vitacon.us Rev 20210908
1
Contents:
1. VitaScan LT Bladder Scanner Probe (refer to the Quick Start that accompanied the Scanner Probe for instructions on how to scan)
2. Rugged Tablet
3. Rolling Cart with Probe Holder, Gel Holder, Cord Cleat and Basket
2
ASSEMBLE THE LOWER HALF OF THE CART
C5 ASSEMBLY INSTRUCTIONS
1.a Install the casters onto the base.
1.b Insert the bottom post into Base.
1.c Lay assembly on its side to access the base bottom.
Grip the post to prevent rotation. Secure the post to the
base using the Hex Wrench. Return stand to upright
position.
It is important that you fully secure the bolt using
the Hex Wrench so that it is flush. Do not hand
tighten.
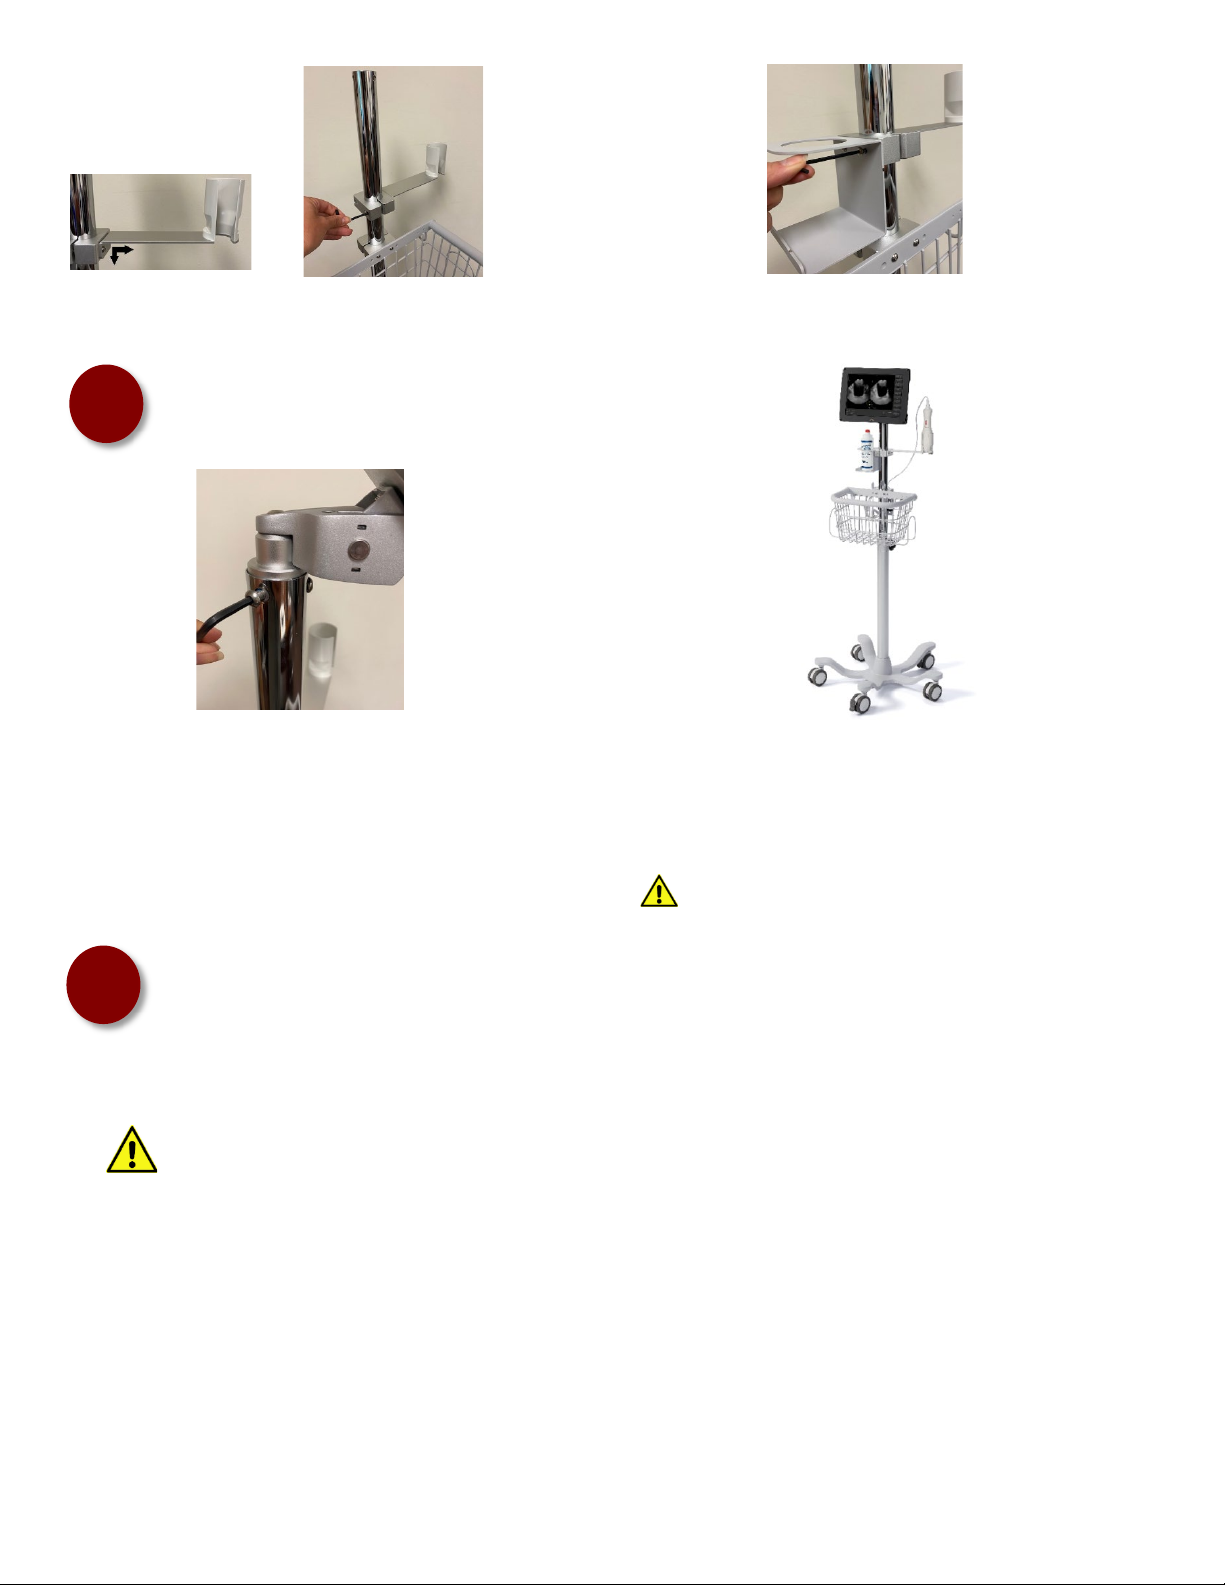
ASSEMBLE THE UPPER HALF OF THE CART
2.a Extend the top post and tighten
the Adjustment Knob to hold it in
place.
2.b Attach the Basket’s Mounting Bracket to the
Basket. Loosen the Bracket leaving enough gap to
slide the Bracket onto the Upper Post.
2.c Slide the Basket onto the upper post opposite the
Adjustment Knob. Position the Basket approx. midway
down the post and tighten the bracket evenly.
2.d Attach the Cord Cleat to the back
of the Basket’s Mounting Bracket using
the top two holes.
Install with the “lip” at the bottom
(as shown).
2.e Insert the Velcro strap with the fuzzy side
on the outside.
2.f Attach the Power Cord Extension to the Cord Cleat
and organize the cord.
Install with the outlets resting on the “lip”
with at least one accessible outlet. Secure the
Velcro tightly.
(800) 757-8450 Option 2 support@vitacon.us Rev 20210908
4
Allow the Tablet to fully charge before first use. Always charge Tablet when not being used.
It is recommended to operate this equipment on battery power. To avoid the risk of electrical shock, use only properly grounded
equipment. Grounding reliability can only be achieved when equipment is connected to a receptacle marked “Hospital Grade” or
equivalent. Run Tablet on battery whenever the integrity of the external protective earth conductor arrangement is in doubt.
MOUNT THE TABLET TO THE CART
3
4.a Connect the Power Cord to the Power Cord Extension. Plug the Power Cord Extension into an outlet and allow the scanner to fully charge.
4.b Turn the Tablet on by pressing and holding the power button. Wait until the Tablet fully boots-up and automatically launches the VitaScan
Software.
4.c (optional) Connect the Tablet to your secure Wi-Fi network and install network printer drivers.
4.d (optional) Create Default Save Folder.
From within the VitaScan software, select the
Save
button and navigate to the desired saving location (local
or on the network). When prompted, select
Yes
to make this the default path.
4.e (optional) From within the VitaScan software, select the
Setup
button and enter your Facility’s Name.
3.a Insert the stem of the Tablet Mount into the upper post and
align with the post holes. Secure using the 3 supplied screws.
Swivel the Tablet side-to-side until aligned with the Basket.
3.b Connect the Scanner Probe to the Tablet’s USB port and then place the
Scanner Probe into the Probe Holder.
The cart assembly is complete. Your scanner should closely match the image
above.
If the cart is “wobbly” ensure the post is properly secured
to the base (see step 1.c).
CHARGE SCANNER AND SET DEFAULTS
2.g Slide the Probe Holder onto the post with the Probe Sleeve
located on the right side. Align with the Basket and then tighten
the bracket evenly.
2.h Attach the Gel Holder to the Probe Holder Bracket.
This manual suits for next models
1
Other VITACON Medical Equipment manuals


Popular Medical Equipment manuals by other brands


B. Braun
B. Braun Stimuplex HNS 12 user manual

ARJO HUNTLEIGH
ARJO HUNTLEIGH Enterprise 5000X Instructions for use

Hillrom
Hillrom Affinity P3700E Service manual

3D Histech
3D Histech Pannoramic SCAN 150 1.18 user guide

Mastercare
Mastercare Master Turner Medium user guide

Hillrom
Hillrom Allen Total Knee Stabilizer Instructions for use

Cooper Surgical
Cooper Surgical Medasonics TRIA T334 manual

ARJO HUNTLEIGH
ARJO HUNTLEIGH Century Assembly and installation instructions

SereneLife
SereneLife PHSPAMT22 user manual

Breas Medical
Breas Medical Vivo 45 user manual

Thera-Band
Thera-Band Thera-Tubing instruction manual

B. Braun
B. Braun VenaTech RETRIEVABLE Instructions for use