NOBOCOOL Kapture User manual

DRAFT - v3.0d 29/10/2009

2
Contents
Introduction 3
Introduction / system components 4
Digital marker pen and cartridges 4
Plug and play USB receiver 4
Setup card 4
Digital Flipchart Pads 4
Pen case 4
Setup 5
Setup / digital marker pen 5
Setup / battery installation 6
Inserting or replacing the battery 6
Battery Do’s 6
Battery Don’ts 6
Setup / cartridge installation 7
Installing a cartridge 7
Check correct cartridge installation 7
Setup / storing the cartridge cap 8
Removing the cartridge cap 8
Storing the cartridge cap 8
Retting the cartridge cap 8
Setup / Digital Flipchart Pad 9
Digital Flipchart Pad overview 9
Setup the Digital Flipchart Pad(s) 9
Setup / software overview 10
Software overview 10
Capture mode 10
Help mode 10
Software custom pages 10
Returning to a previously created session 10
File saving 10
Setup / initial system setup 11
Computer and pen communication 11
Set the pen colour 11
Operation 12
Operation / capturing 12
Capturing from the ipchart pad 12
Reference 12
Reference / software / launch page 13
Reference / software / error page 14
Reference / software / pen management 15
Reference / software / help page 16
Reference / software / page information 17
Reference / software / save 18
Reference / software / le manager 19
Reference / software / capture mode 20
Reference / software / edit mode 21
Reference / icon quick reference guide 22
Reference / icon quick reference guide 23
Reference / Nobo Kapture™ guide to good capturing 24
Reference / miscellaneous 25
Pen LED status matrix 25
One-year limited warranty 25
Disclaimer of warranty 25
Limitation of liability 25
RF technical specications 25
FCC radiation exposure statement 26
Federal communications commission radio frequency interference
statement 26
FCC declaration of conformity compliance statement 26
CE declaration of conformity 26
Product safety 27
Produt care 28

3
Thank you for choosing Nobo Kapture™ Digital Flipchart.
We are sure it will serve you well, but please take a little time to study these
instructions to ensure you get the best out of the product.
Capture - Notes and ideas written on the Digital Flipchart Pad are instantly•
captured onto your PC / Mac.
Edit - Modify captured sessions and export the les in various formats.•
Share - Email les to meeting attendees, colleagues or clients.•
Safety First
This system is safe to use as long as you observe a few basic precautions.
Any attempt to repair this unit by unqualied personnel will invalidate the•
warranty. This unit does not require servicing.
Do not use near water.•
Do not use aerosol dusters or cleaners. Do not clean with solvents or abrasives.•
LED Radiation - Class 1 LED product.•
Do not view directly with optical instruments.
Specications
Minimum system requirements
Windows® XP SP2 / Vista™ or MAC OS X 10.5
Available USB 2.0 port
Internet connection for updates
Processor - 1.0GHz minimum (2.5GHz or higher recommended)
RAM - 512Mb minimum (1Gb recommended)
Hard Disk - 500Mb available space required
RF technical specication
Bluetooth class 2 (2.4GHz)
Battery type
1 x AAA Alkaline battery (LR03) non-rechargeable
Performance
Operating time - up to 5 hours (pen down 100%)
Battery standby time - up to 6 months (no use)
Range - up to 10m
Cartridges
Cartridges contain dry erase ink suitable for ipchart pads and dry erase boards
Digital Flipchart Pads
There are four pads available:
Pad type Sheets Re-order code
B60 1902592
(3 x 60 sheet pad - pads not to be
sold separately)
C60
D60
D20
(only available in starter kit) NA
Introduction

4
Digital marker pen and cartridges
1The system can be used with up to four digital marker pens.
The marker pen accepts disposable dry erase cartridges of either red, blue,
green or black ink.
Re-order codes:
Black (x6) 1902595.
Assorted (2 x red, 2 x blue, 2 x green) 1902596.
Spare pen 1902594.
Plug and play USB receiver
2The plug and play USB receiver allows communication between the digital
marker pens and the computer. The Nobo Kapture™ software is pre-installed
on this USB receiver as a self-extracting le, with on-screen prompts for easy
installation.
Setup card
3For setup and pairing of the pen to the system. Also allows on-screen colour
to be changed to match the cartridge in the digital marker pen.
Digital Flipchart Pads
4The Nobo Kapture™ has 3 pads in the range (B, C, D) which can all be used in
one session, giving up to 180 unique pages in each session.
Re-order code 1902592 (60 sheet pad only).
Note:
Only one pad of each letter type can be used in a session.
(e.g. 1 pad B, 1 pad C and 1 pad D only)
Pen case
5For the safe storage of two digital marker pens, USB receiver and setup card.
1
Introduction / system components
234 5

5
Setup / digital marker pen
Battery cover release button
Battery cover
Battery (1 x AAA)
Cartridge
Cartridge cover
Cartridge cap
Digital marker pen
Cartridge cover release button
Cartridge location pip
Cartridge holder
Camera
Status LED

6
Inserting or replacing the battery
1Turn the pen upside down.
With a rm hold on the body of the pen push the red release button at the
base of the pen downwards (1).
Slide the battery cover away from the body of the pen (2).
If replacing the battery remove the old battery.
2Insert the new battery, observing correct polarity (positive [+] end rst).
Replace the battery cover by inserting the tab into the slot (1) and sliding the
cover down until it clicks into place (2).
Switch on the digital marker pen by placing the nib (with or without the cap)
on a surface. The pen will switch on and be ready to use within 3 seconds. The
pen will automatically switch o after a period of inactivity.
Battery Do’s
Use only alkaline batteries of AAA (LR03) type.•
Remove the battery from the pen and store in a cool, dry, clean place if it will not•
be used for a long period of time.
Dispose of the battery taking note of any local regulations.•
Battery Don’ts
Do not attempt to recharge the battery.•
Do not short-circuit the battery. A short-circuit may cause severe damage to the•
battery.
Do not drop, hit or otherwise abuse the battery as this may result in the exposure•
of cell contents, which are corrosive.
Do not expose the battery to moisture or rain.•
Keep the battery away from re or other sources of extreme heat. Do not•
incinerate. Exposure of the battery to extreme heat may result in an explosion.
1
Setup / battery installation
2
1 x AAA battery
2
11
2

7
Installing a cartridge
1With the pen facing the correct way up and a rm hold on the body of it, push
the red release button in the centre of the pen downwards (1).
Slide the cartridge cover forward (2).
2Insert the cartridge into the cartridge holder (1).
Slide the cartridge down into position(2).
3Replace the cartridge cover by aligning the cover over the top of the cartridge
cap.
Slide the cover along the body of the pen until it clicks into place.
Check correct cartridge installation
The cartridge is correctly inserted when:
the spine is facing upwards.•
it is seated at in the carrier.•
there is slight forward and backward movement present.•
Note:
Due to moving parts the pen will rattle slightly when gently shaken.
1
Setup / cartridge installation
23
Note:
Spine should be
facing upwards
2
1
2
1

8
Removing the cartridge cap
1With a rm hold on the body of the pen, rotate the cap 90º.
2Pull the cap clear of the pen.
Storing the cartridge cap
3The cap can be stored on the rear end of the pen.
Retting the cartridge cap
4Ret the cap to the cartridge ensuring the arrow is at the top.
5Push the cap until it clicks into place.
Note:
6It is possible to put the cap on upside down, to rectify this rotate the cap until the
arrow is at the top. Push the cap until it clicks into place.
1
Setup / storing the cartridge cap
2 3 4 5 6

9
Digital Flipchart Pad overview
The Nobo Kapture™ system uses uniquely printed paper, which the camera uses to
recognise its location on the page. There are 180 individual sheets across the pad
range, separated into pad B, C and D. It is possible to use all pads at the same time
(B, C & D), but it is not possible to use more than one of a particular pad letter. i.e. it is
not possible to use two pad D’s in one session. All pad D’s are printed with the same
pages, therefore the system will overwrite or miss information if two are in the same
session.
As each sheet of paper within pad B, C & D is individual the system recognises which
sheet of which pad it is writing on.
The Nobo Kapture™ software automatically opens a digital ipchart page on the
computer when you start to write or draw on the physical ipchart page of a pad.
1Each physical ipchart page has its pad letter and page number shown in the
bottom right hand corner, so if you tear pages from the pad you can still keep
track of which page is in use.
The page also has hidden pad type and page identiers that the pen recognises to
allow the Nobo Kapture™ software to keep track of which page is in use.
Notes:
Standard non-digital ipchart pads will not work with this system, only use Nobo
Kapture™ Digital Flipchart Pads.
Do not try to use two Digital Flipchart Pads of the same Letter (e.g. B & B) at the same time,
accurate capturing will not be possible.
Setup the Digital Flipchart Pad(s)
2Place the required ipchart pads on your Nobo Easel.
See www.noboeurope.com for details of our easel range. The list below are
some of our leading models available throughout Europe.
Piranha Mobile Easel - 1901920
Piranha Static Easel - 1901919
Barracuda Mobile Easel - 1902386
Shark Easel - 1901918
Setup / Digital Flipchart Pad
12

10
Software overview
The Nobo Kapture™ software starts with the home page, from which Capture, Edit
and Help modes are accessed:
Capture mode
Captured pages can be displayed in an overview mode, showing
active pages of a pad, for clarity.
Edit mode
Captured pages can be edited, re-ordered or have sections cut-out
from the pages themselves and pasted into new additional pages
in the software. Pads or pages can then be saved as commonly
used le formats such as JPEG or PDF, ready for emailing.
Help mode
Access the following help services:
built-in help.•
software trouble-shooting guide.•
Nobo website (including software updates and FAQ forum).•
Software custom pages
Within the edit mode of the software, there is the ability to add additional pages.
Once you have captured the contents on all of the required physical pages,
additional custom pages can be added, such as the highlights of each page or
specic notes from the session.
The maximum number of physical pages is 180, but signicantly more can be added
electronically. Saved les can therefore contain more pages than the physical.
Returning to a previously created session
The link between the software and the recorded information is the Nobo Kapture™
digital ipchart paper. By retaining a physical page from a session it is possible to re-
open the session in capture mode and add to the page.
Notes:
It is not possible to erase marks on physical pages made in the previous session.•
To edit the content of a page open it in editor mode and cut and paste or re-•
arrange it.
Pages that have been edited within edit mode cannot be re-opened in capture•
mode.
File saving
By default, saved les will be in‘My Documents’on Windows® XP SP2 / Vista™ and
‘Documents’on MAC OS X 10.5. The lename will be‘Nobo Kapture’followed by an
incrementing number.
To save a le and assign it a custom lename and location, go to the le tab and
select ‘Save As’. Browse to the required location and type in the required lename.
Setup / software overview

11
Computer and pen communication
1Insert the plug and play USB receiver into a free USB port on the computer.
The USB receiver status light will ash red, blue then green. The Nobo
Kapture™ software installer will automatically start. If it does not auto-run, start
the application manually by navigating to it via Windows explorer or Mac OS
nder.
The LED light will be red until the software is launched, upon which it will turn
blue.
Follow the on-screen instructions to install the Nobo Kapture™ software.
Conrm there is a battery installed in the pen.
2Start up the installed Nobo Kapture™ software ( ) and select capture
mode ( ) followed by pen management mode ( ).
Touch the pen (with or without the cap) to the middle of the setup card, hold
it there until the LED turns solid green.
Press and release the button on the USB receiver.
Lift the pen, the light will ash green, it will return to solid green when paired
to the system.
3The pen will appear in the pen status area of pen management mode.
The pen is now paired to the system.
Set the pen colour
4Touch the pen to the colour area on the setup card that matches the colour of
the installed ink cartridge. The colour shown in the pen management mode/
colour area will change to the selected colour. The pen is now ready to use.
Note:
Once the pen is paired it will remain paired to that USB receiver. Pens can be deleted
through the software. Additional pens must be paired in the same way as the rst.
Pairing is unaected by loss of power or changing the pens battery.
The USB receiver must remain in the USB port while capturing.
Setup / initial system setup
1234

12
Capturing from the ipchart pad
1Remove the cap from the pen.
Tap the pen on the pad to ‘wake’the pen.
2Begin writing or drawing on the Digital Flipchart Pad, the information will be
displayed on the computer in real time.
See‘Reference / software / page view’on page 21 for the options available
including zoom, multiple page views and edit mode.
When you have nished the capturing session click on save to store the pages
in the system.
Tips for accurate capturing:
The Nobo Kapture™ software needs to be on the capture screen to capture what•
is being written.
Ensure the camera is not obscured when writing.•
Do not use a cartridge with a damaged tip.•
Hold the pen the correct way up, the LED should face upwards.•
Write normally with even pressure.•
Stay within the range of the system, which is up to 10 metres from the USB•
receiver.
Ensure there is enough battery life left for the current session. A battery status•
indicator can be found in the pen management section of the software.
Periodically check with the software to ensure you are within range and capturing•
is working ok.
Operation / capturing
2
1

13
Reference / software / launch page
Note:
All screens shown are for PC installation, Mac screens may vary.
Capture mode Edit mode Help
14
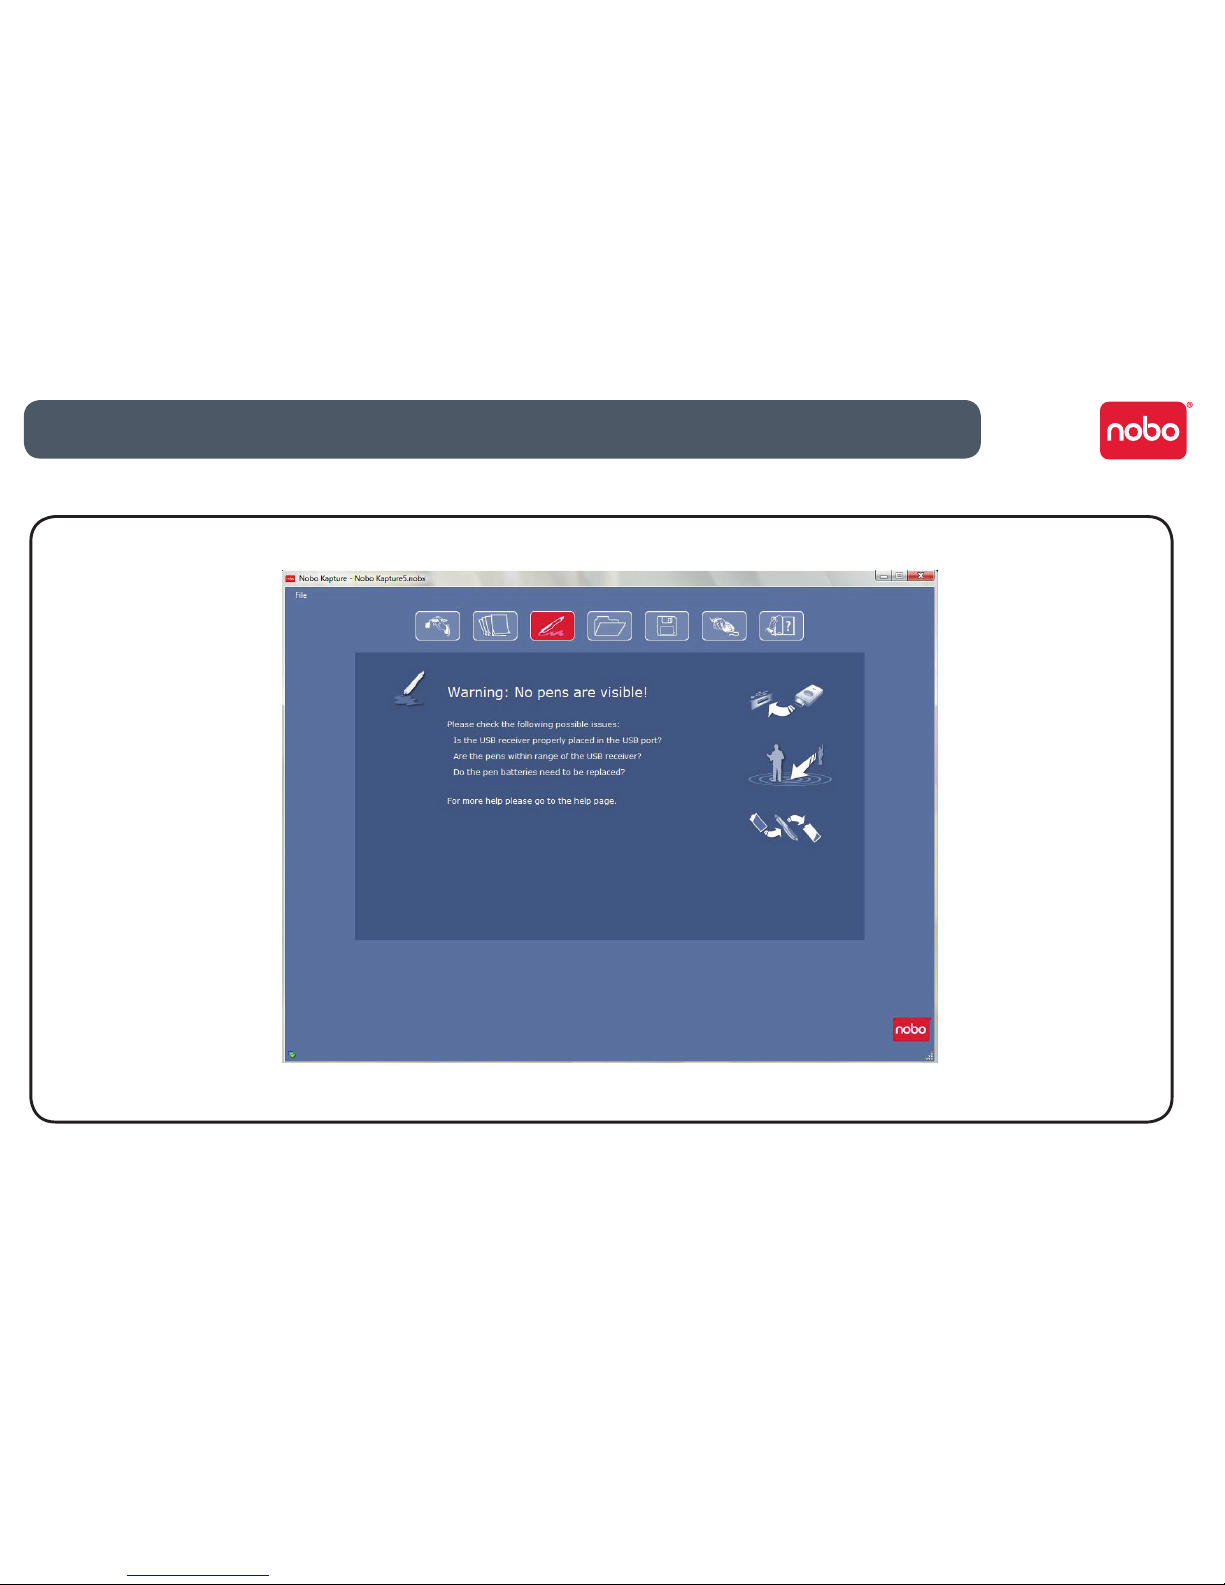
Reference / software / error page
This screen appears when the USB receiver is not inserted. When the icon is red it indicates a pen warning or error.

15
Reference / software / pen management
Pen identier / colour Pens sleeping, to wake a pen touch it to
the Nobo Kapture™ pad
Link to Nobo website
Pens in current
session
Pen signal strength
Pen management mode Battery status Paper warning
To clear a paper warning
click on the icon. A warning
appears when a pen is placed
on a surface other than a
Nobo Kapture™ pad
Identify pen
Demote pen
Puts the pen into sleep
mode, the pen will remain
paired. To wake the pen,
touch it to the pad
Remove pen from system
Unpairs a pen permanently
from the system

16
Reference / software / help page
Link to Nobo website
Help mode
Help information area
Please follow one of the
below links:
Link to user manual
Link to Nobo Kapture™ support
Link to Nobo Kapture™ website

17
Reference / software / page information
Link to Nobo website
Page information
Select ‘Apply’ to save note to current page

18
Reference / software / save
Link to Nobo website
Save
File save options

19
Reference / software / le manager
File information
area
Link to Nobo website
File manager

20
Reference / software / capture mode
Link to Nobo website
Capture mode
Page views:
Single
Twin
Quad
Previous page / next page zoom in / zoom out
Real-time page view
The capture icon will turn red if information is being written but the software is not in ‘Capture mode.
Table of contents


