Nobu NBO3-09IDU User manual

English/Ελληνικά//Romana
NBO3-09IDU/NBO3-09ΟDU
NBO3-12IDU/NBO3-12ΟDU
NBO3-18IDU/NBO3-18ΟDU
NBO3-24IDU/NBO3-24ΟDU
MODELS/
ΜΟΝΤΕΛΑ/
MODELE:
Wall Mounted Air-Conditioning Unit
Aer Conditonat model Split de Perete
Wall Mounted Air-Conditioning Unit
Aer Conditonat model Split de Perete
For correct use of this unit, please read this manual carefully and keep it for future reference.
Για τη σωστή χρήση της μονάδας, παρακαλούμε διαβάστε προσεκτικά το εγχειρίδιο
και φυλάξτε το για αναφορά στο μέλλον.
Pentru o utilizare corecta, va rugam sa cititi cu atentie acest manual si sa il pastrati pentru
o consultare ulterioara.
Remote Controller
User’s Manual
Τηλεχειριστήριο
Εγχειρίδιο Χρήσης
Telecomanda
Manual de utilizare
1
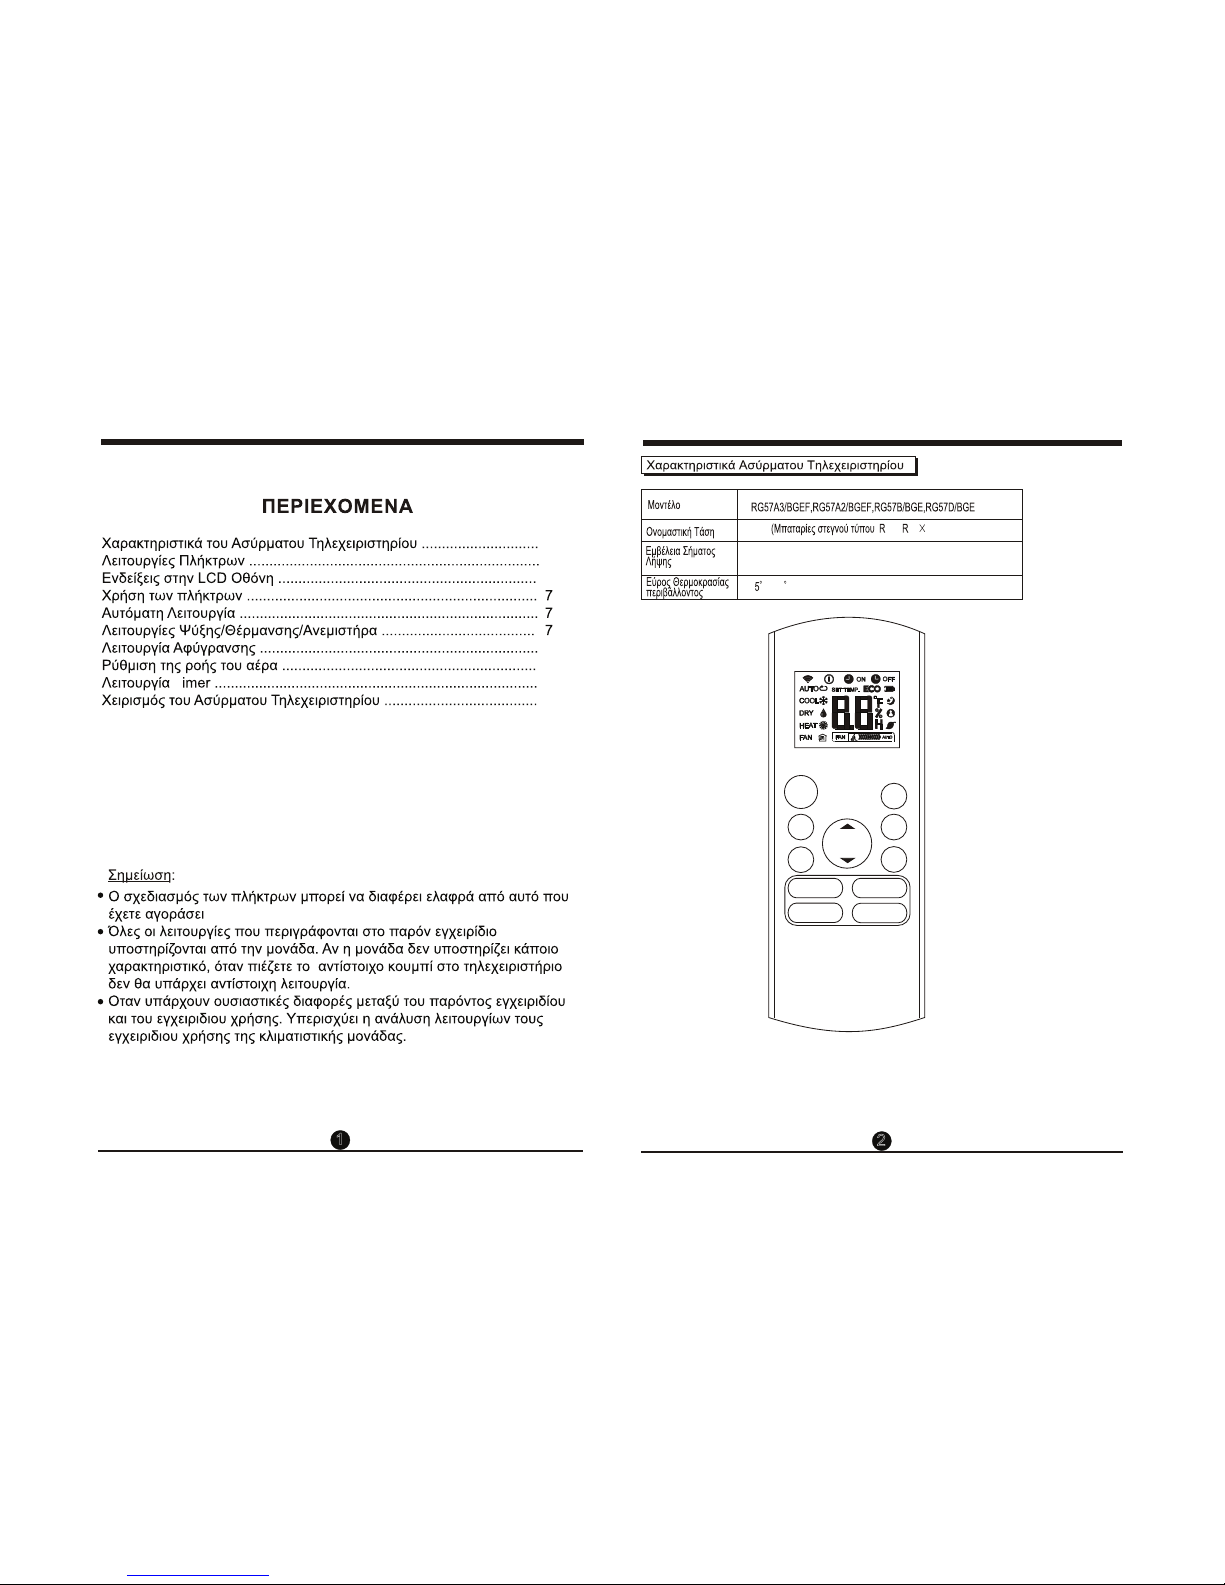
CONTENTS
2
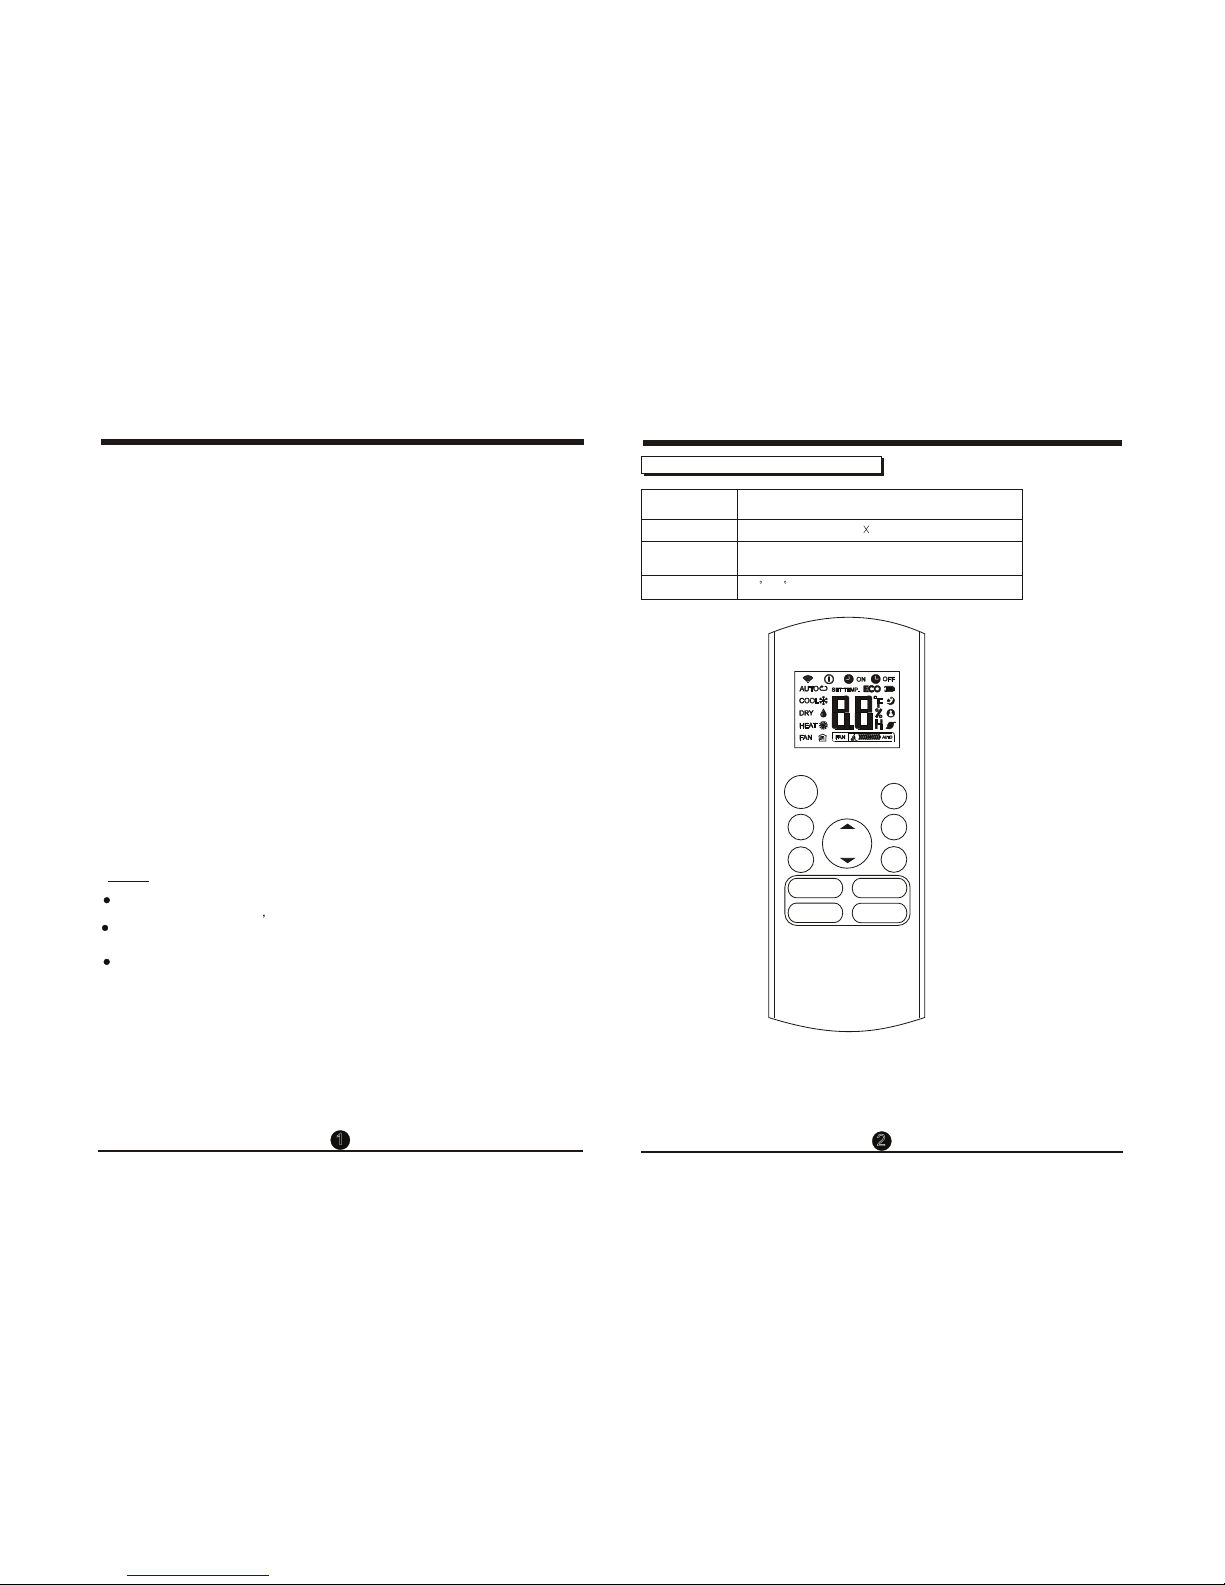
Model
Rated Voltage
8m
3.0V(Dry batteries R03/LR03 2)
RG57A3/BGEF,RG57A2/BGEF,RG57B/BGE,RG57D/BGE
Remote Controller Specifications
Environment
Signal Receiving
Range
-5 C 60C
NOTE:
Buttons design is based on typical model and might be slightly different from the
actual one you purchasedthe actual shape shall prevail.
All the functions described are accomplished by the unit. If the unit has no this
feature, there is no corresponding operation happened when press the relative
button on the remote controller.
When there are wide differences between Remote controller Illustration and
USER'S MANUAL on function description, the description of USER'S MANUAL
shall prevail.
,,
,, ,,
,, ,,
,,
2
3
6
7
7
7
8
8
9
13
Handling the remote controller ......................................................
Remote controller Specifications...................................................
Operation buttons .................. .........................................................
Indicators on LCD ..........................................................................
How to use the buttons .................................................................
Auto operation.................................................................................
Cooling/Heating/Fan operation......................................................
Dehumidifying operation ...............................................................
Adjusting air flow direction............................................................
Timer operation...............................................................................
MODE
FAN
TEMP
SLEEP
TURBO
SWING DIRECT
LED
ON/OFF
SHORT
CUT
TIMER
ON
TIMER
OFF
RG57B/BGE
~

34
1
2
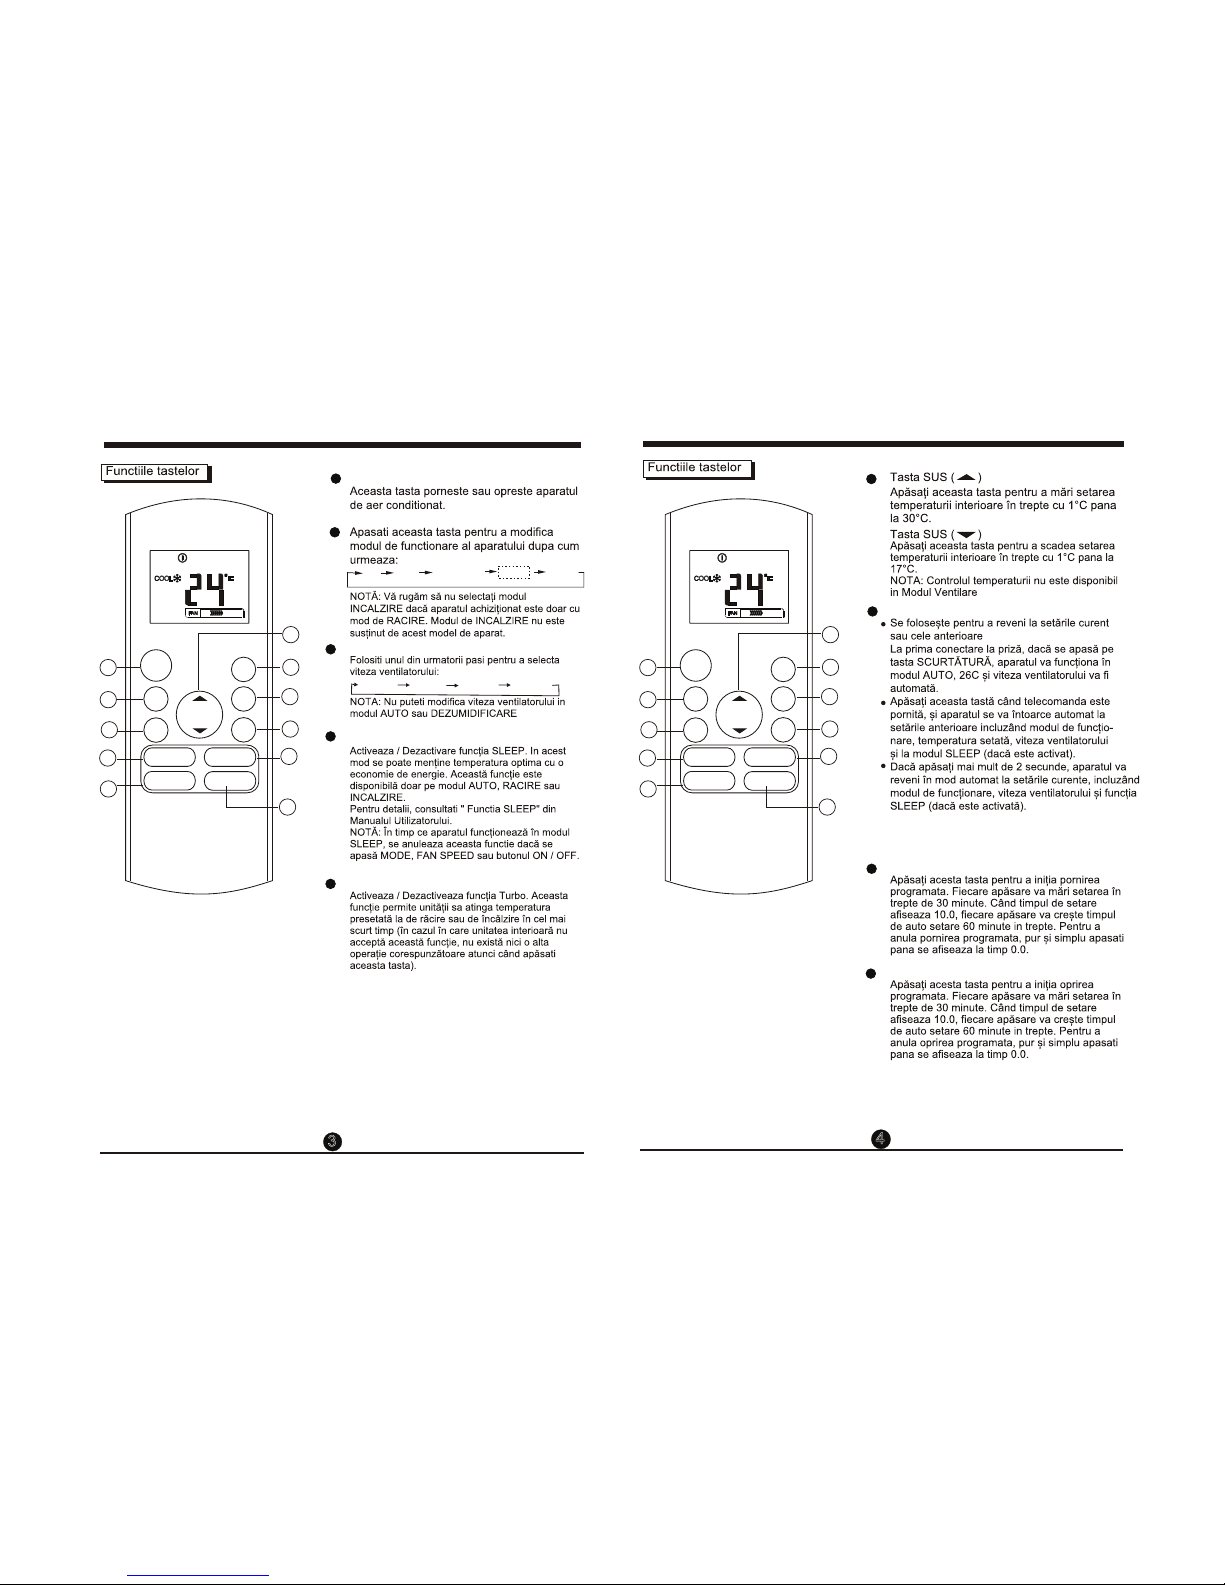
Press this button to modify the air conditioner
mode in a sequence of following:
3
MODE Button
4
ON/OFF Button
This button turns the air conditioner ON
and OFF.
AUTO
COOL
DRY
HEAT FAN
Used to select the fan speed in four steps:
AUTO LOW MED HIGH
FAN Button
SLEEP Button
NOTE: While the unit is running under SLEEP
mode, it would be cancelled if MODE, FAN
SPEED or ON/OFF button is pressed.
Active/Disable sleep function. It can
maintain the most comfortable temperature
and save energy. This function is available
on COOL, HEAT orAUTO mode only .
For the detail, see sleep operation in
USER S MANUAL.
,
,, ,,
,,
,,
NOTEPlease do not select HEAT mode if the
machine you purchased is cooling only type.
Heat mode is not supported by the cooling only
appliance.
NOTE: You can not switch the fan speed in
AUTO or DRY mode.
Operation of buttons
SHORTCUT Button
TIMER ON Button
TIMER OFF Button
Used to restore the current settings or
resume previous settings.
On the first time connecting to the power,
if push the SHORTCUT button, the unit
O
will operate on AUTO mode, 26 C, and fan
speed is Auto.
Push this button when remote controller is
on, the system will automatically revert
back to the previous settings including
operating mode, setting temperature, fan
speed level and sleep feature(if activated).
If pushing more than 2 seconds, the system
will automatically restore the current
operation settings including operating mode,
setting temperature, fan speed level and
sleep feature(if activated ).
UP Button( )
Push this button to decrease the indoor
oo
temperature setting in 1 C increments to 17 C.
DOWN Button( )
8
10
11
9
Press this button to initiate the auto-on
time sequence. Each press will increase
the auto-timed setting in 30 minutes
increments. When the setting time displays
10.0, each press will increase the auto-
timed setting 60 minutes increments.
To cancel the auto-timed program, simply
adjust the auto-on time to 0.0.
Press this button to initiate the auto-off time
sequence. Each press will increase the auto
-timed setting in 30 minutes increments.
When the setting time displays 10.0, each
press will increase the auto-timed setting
60 minutes increments. To cancel the auto-
timed program, simply adjust the auto-off
time to 0.0
Push this button to increase the indoor
oo
temperature setting in 1 C increments to 30 C.
Operation of buttons
MODE
FAN
TEMP
ON/OFF
SHORT
CUT
TIMER
ON
TIMER
OFF
1
2
4
3
9
10
8
6
11
12
14
NOTETemperature contol is not available
in Fan mode.
6
TURBO Button
Active/Disable Turbo function. Turbo function
enables the unit to reach the preset temper-
ature at cooling or heating operation in the
shortest time(if the indoor unit does not support
this function, there is no corresponding
operation happened when pressing this button.)
RG57B/BGE
SLEEP
TURBO
SWING DIRECT
LED
MODE
FAN
TEMP
ON/OFF
SHORT
CUT
TIMER
ON
TIMER
OFF
1
2
4
3
9
10
8
6
11
12
14
RG57B/BGE
SLEEP
TURBO
SWING DIRECT
LED
12
14
Operation of buttons
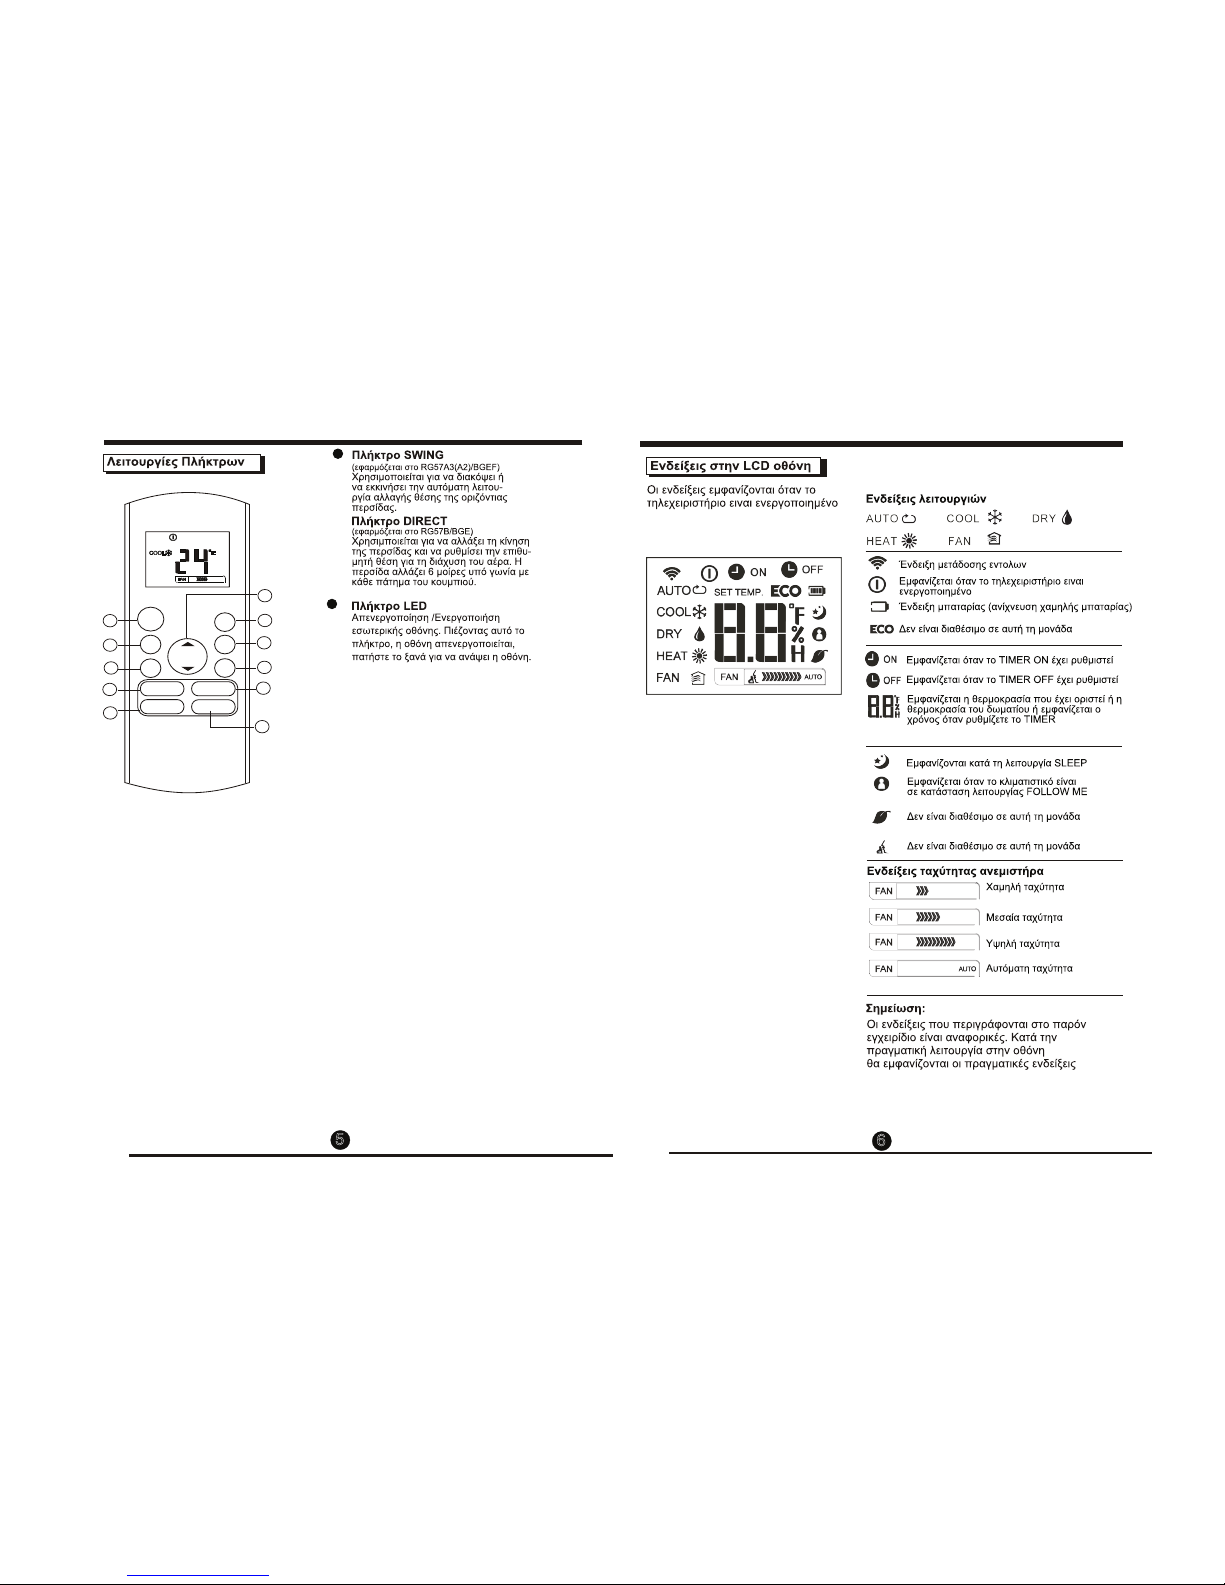
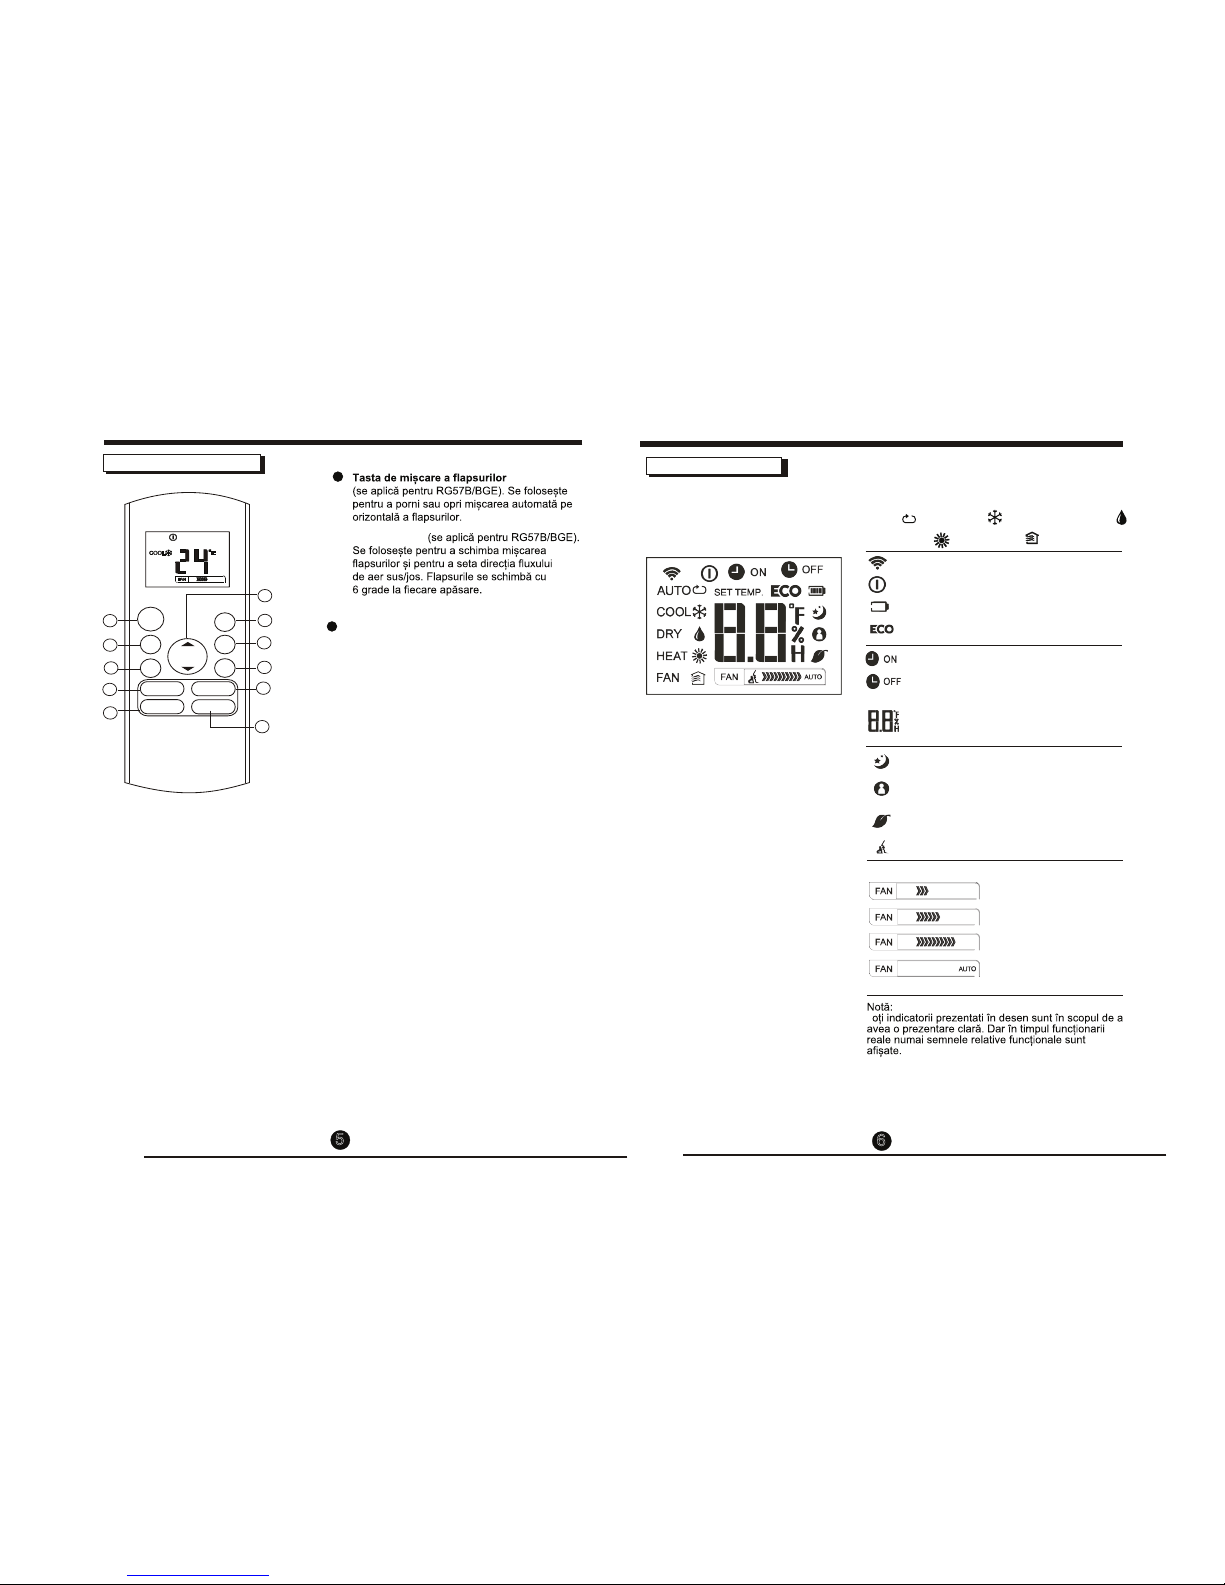
LED Button
Disable/Active indoor screen Display. When
pushing the button, the indoor screen display
is cleared, press it again to light the display.
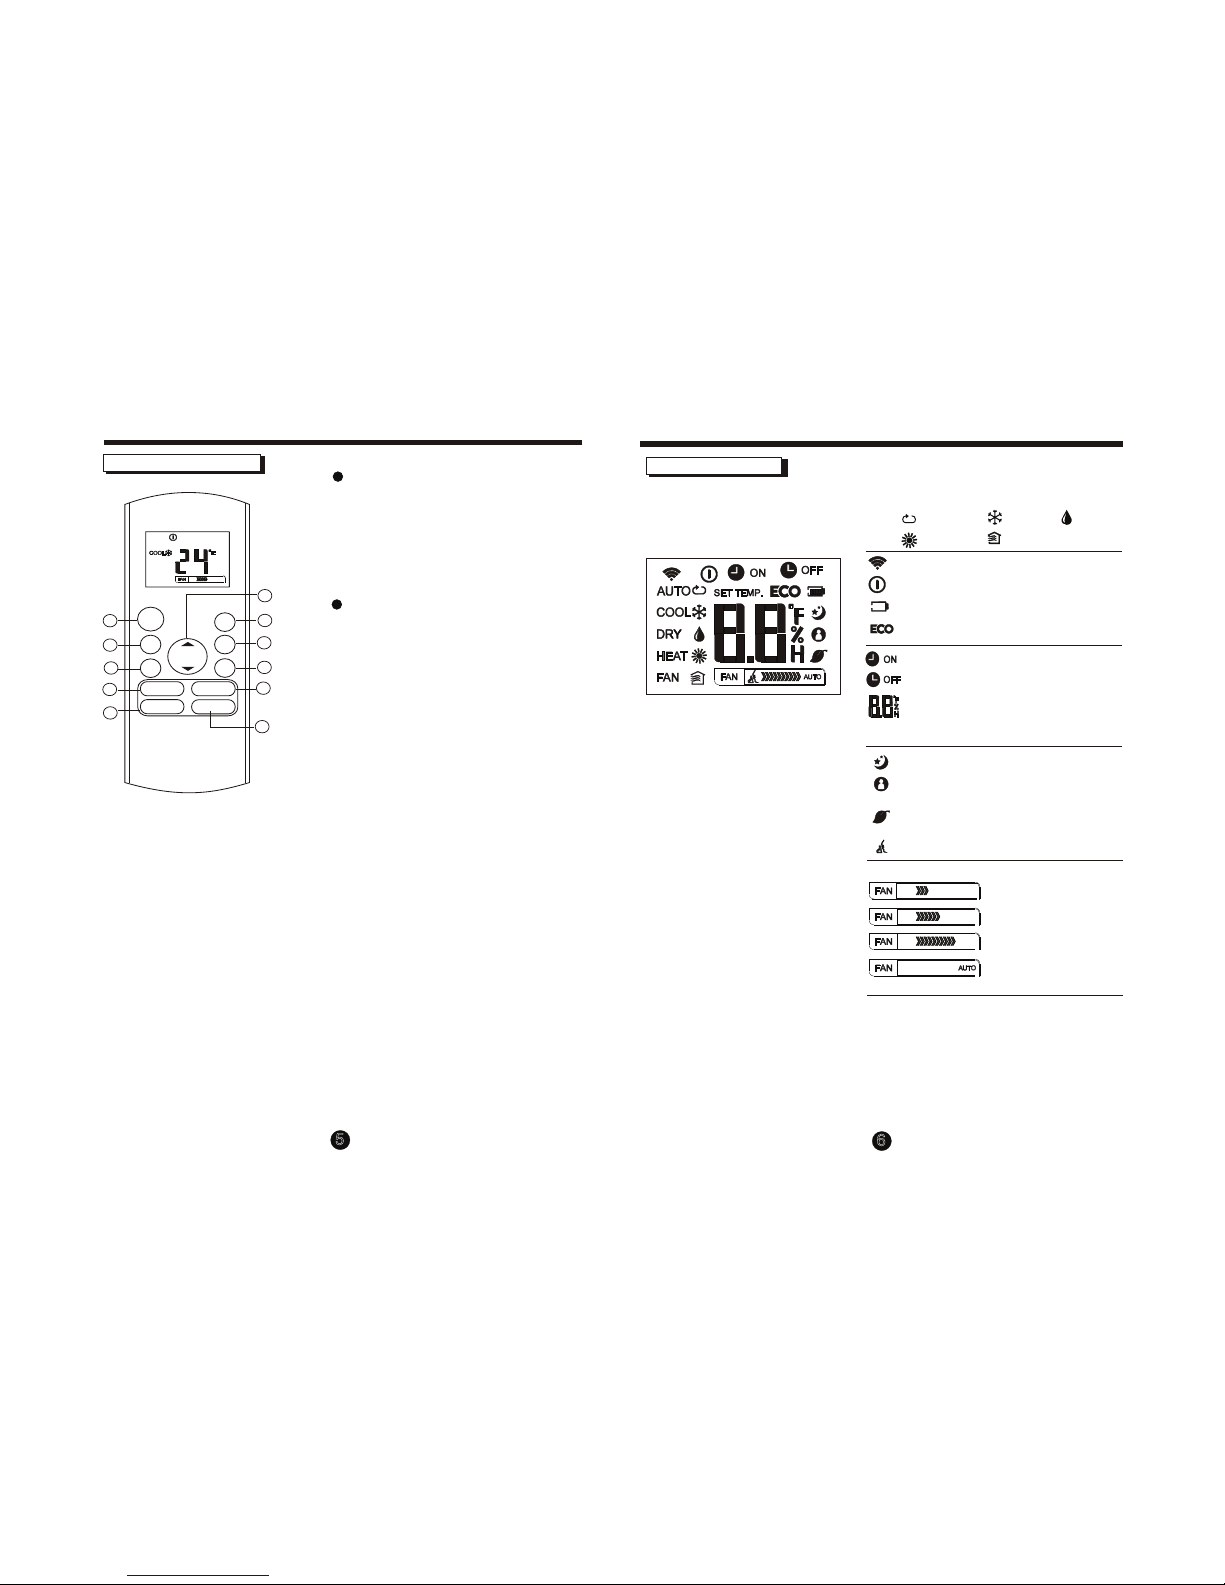
Indicators on LCD
Fan speed indication
Mode display
Information are displayed when
the remote controller is powered
up.
Displayed when data transmitted.
Displayed when remote controller is ON.
Battery display(low battery detection)
Not available for this unit
Not available for this unit
Low speed
Medium speed
High speed
Auto fan speed
Note:
All indicators shown in the figure are for the purpose
of clear presentation. But during the actual operation
only the relative functional signs are shown on the
display window.
Displayed when TIMER ON time is set.
Displayed in Sleep Mode operation.
Indicated that the air conditioner is
operating in Follow me mode
Not available for this unit
Displayed when TIMER OFF time is set.
Show set temperature or room
temperature, or time under TIMER
setting.
AUTO
HEATFAN
COOLDRY
56
SWING Button(applicable to RG57B/BGE)
DIRECT Button(applicable to RG57B/BGE)
Used to change the louver movement and set
the desired up/down air flow direction.
O
The louver changes 6 in angle for each press.
Used to stop or start horizontal louver auto
swing feature.
MODE
FAN
TEMP
ON/OFF
SHORT
CUT
TIMER
ON
TIMER
OFF
1
2
4
3
9
10
8
6
11
12
SLEEP
TURBO
SWING DIRECT
LED
14
RG57D/BGE
7
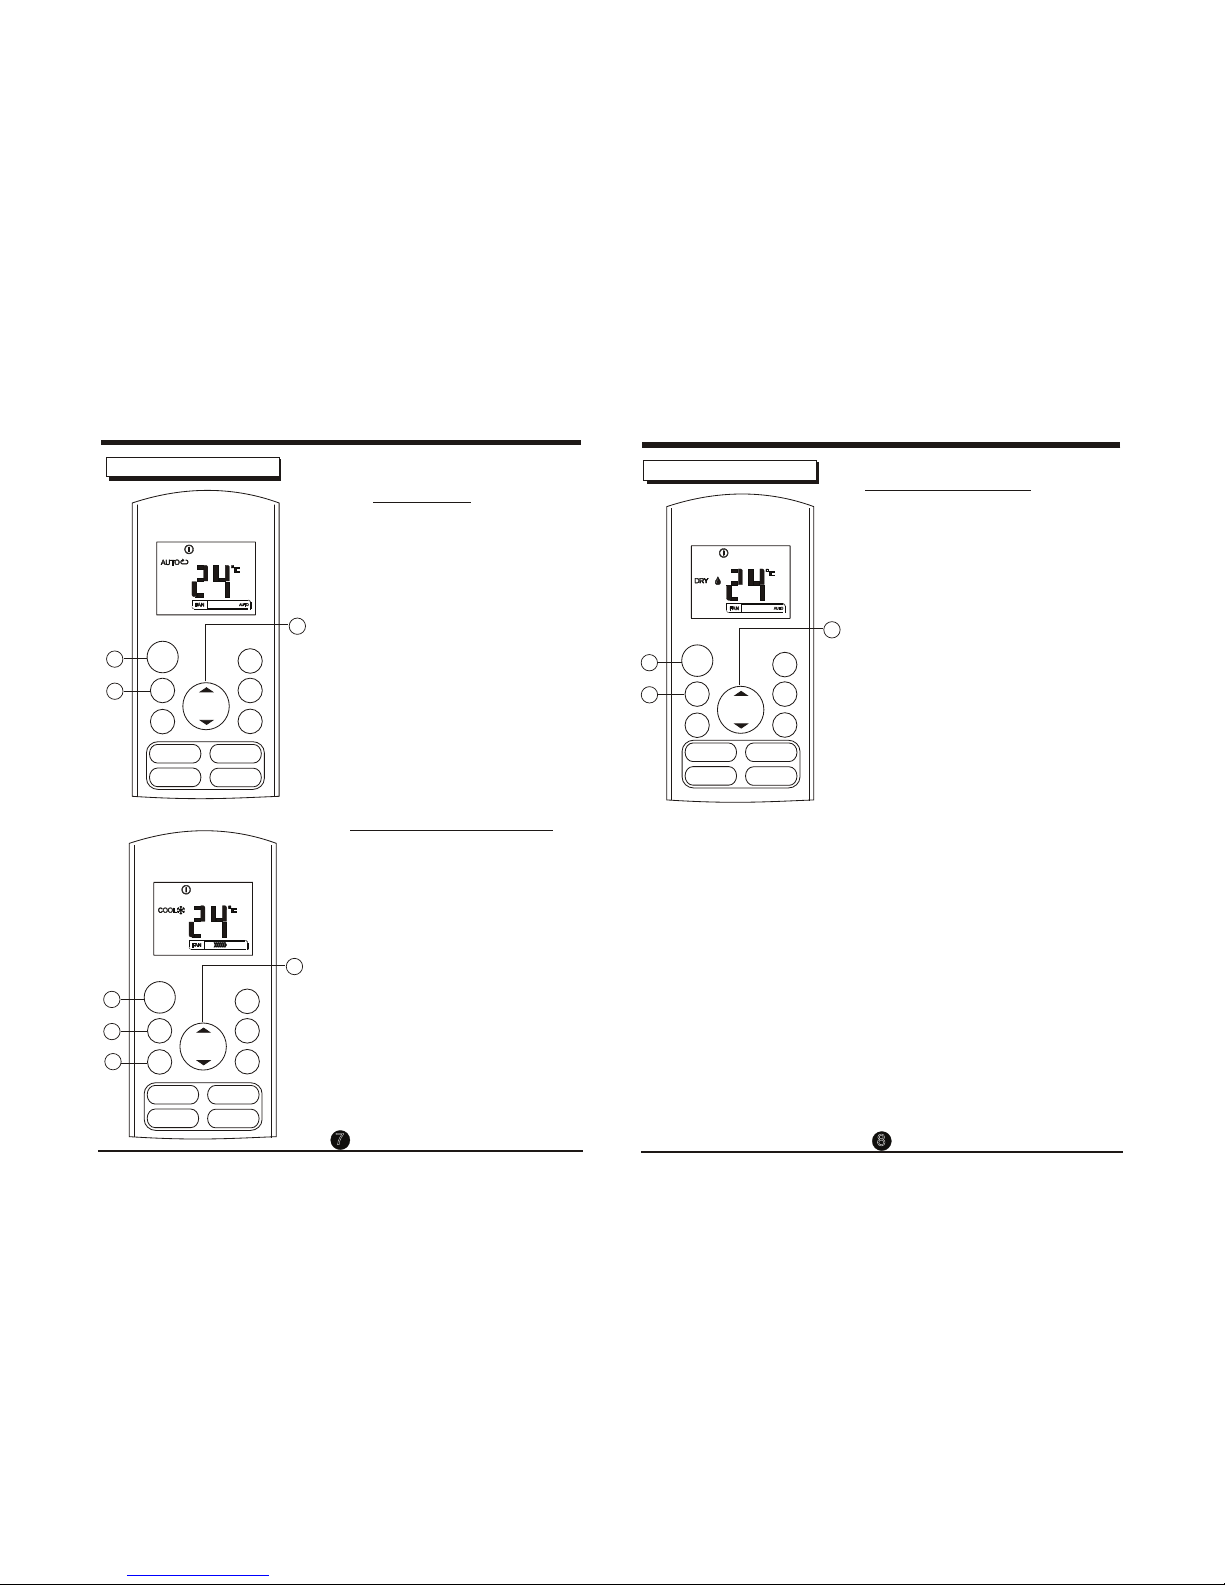
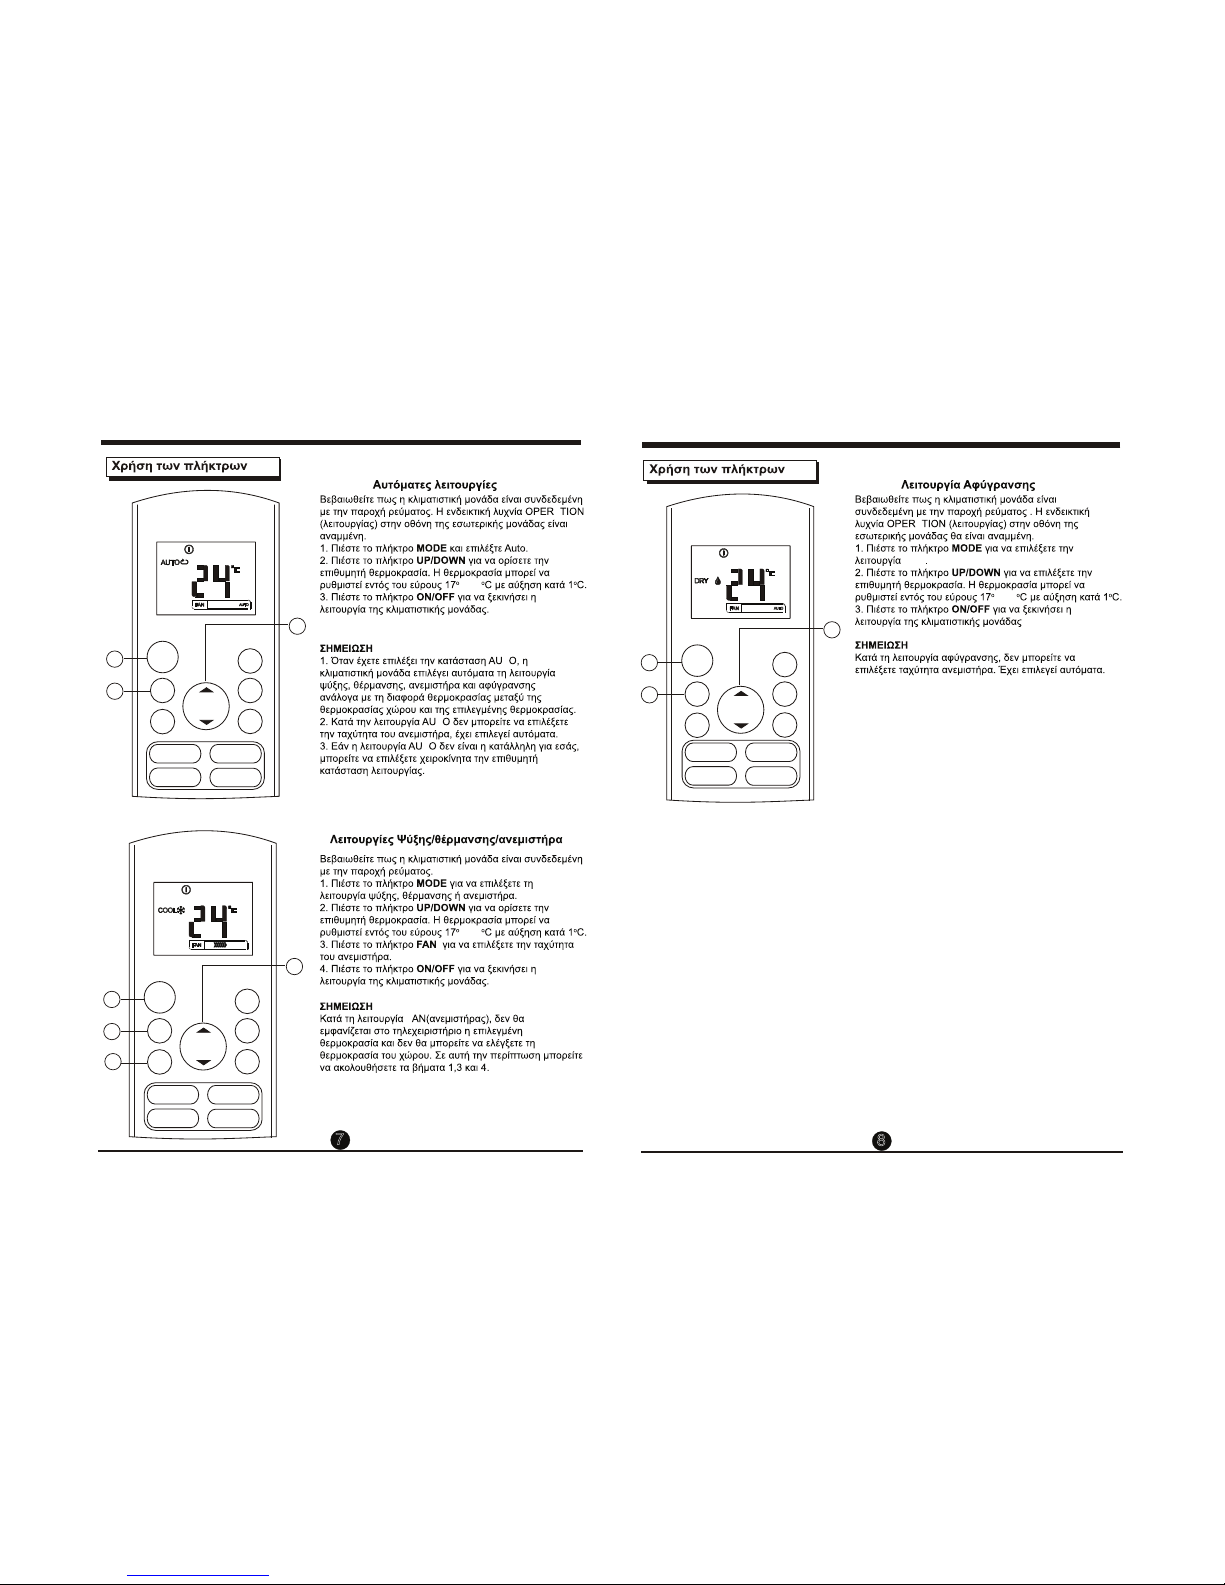
How to use the buttons
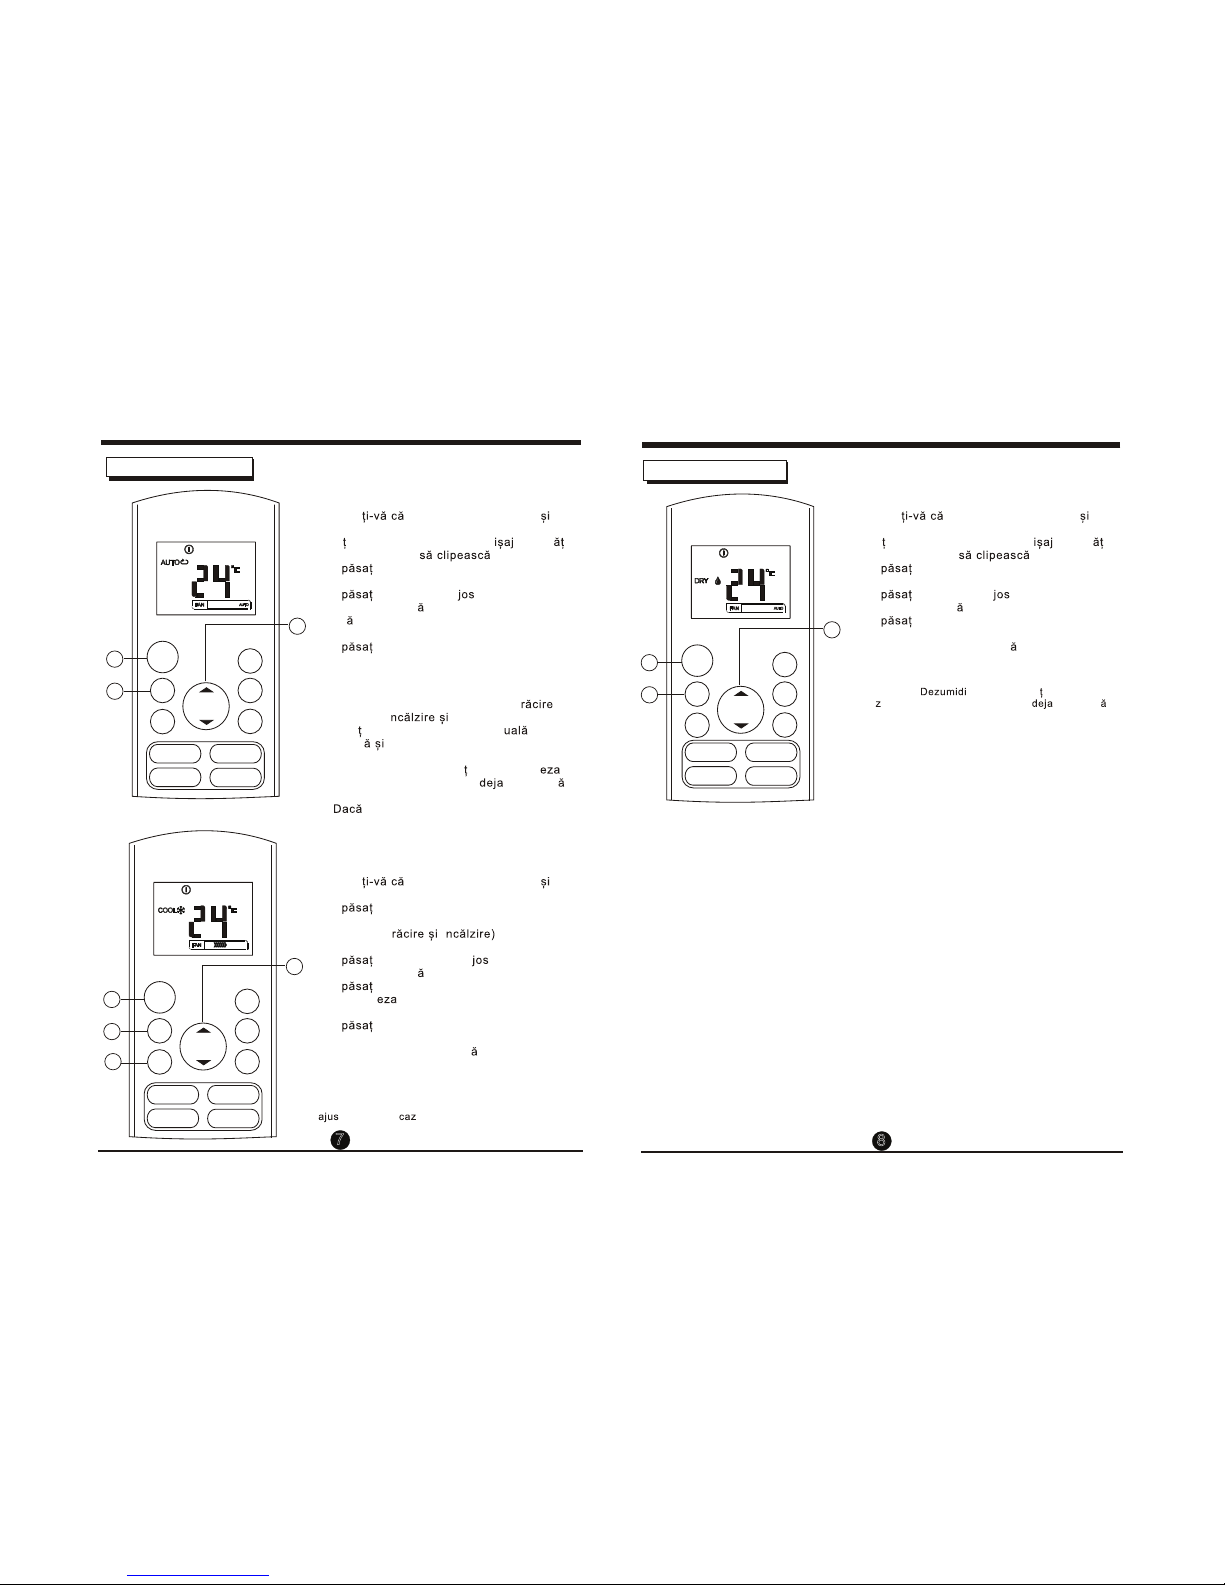
Cooling /Heating/Fan operation
Ensure the unit is plugged in and power is
available.
1. Press the MODE button to select COOL,
HEAT(cooling & heating models only) or
FAN mode.
2. Press the UP/DOWNbuttons to set the
desired temperature.
3. Press the FAN button to select the fan speed
in four steps- Auto, Low, Med,or High.
4. Press the ON/OFF button to start the air
conditioner.
The temperature can
O O O
be set within a range of 17 C~ 30 C in 1 C
increments.
In the FAN mode, the setting temperature is not
displayed in the remote controller and you are not
able to control the room temperature either. In this
case, only step 1, 3 and 4 may be performed.
NOTE
Auto operation
Ensure the unit is plugged in and power is
available. The OPERATION indicator on the
display panel of the indoor unit starts flashing.
1. Press the MODEbutton to select Auto.
2. Press the UP/DOWNbutton to set the
desired temperature. The temperature can
O O O
be set within a range of 17 C~ 30 C in 1 C
increments.
3. Press the ON/OFFbutton to start the air
conditioner.
1. In the Auto mode, the air conditioner can logically
choose the mode of Cooling, Fan, and Heating
by sensing the difference between the actual
ambient room temperature and the setting
temperature on the remote controller.
2. In the Auto mode, you can not switch the fan speed.
It has already been automatically controlled.
3. If the Auto mode is not comfortable for you , the
desired mode can be selected manually.
NOTE
MODE
FAN
TEMP
ON/OFF
SHORT
CUT
TIMER
ON
TIMER
OFF
4
1
3
2
MODE
FAN
TEMP
ON/OFF
SHORT
CUT
TIMER
ON
TIMER
OFF
3
1
2
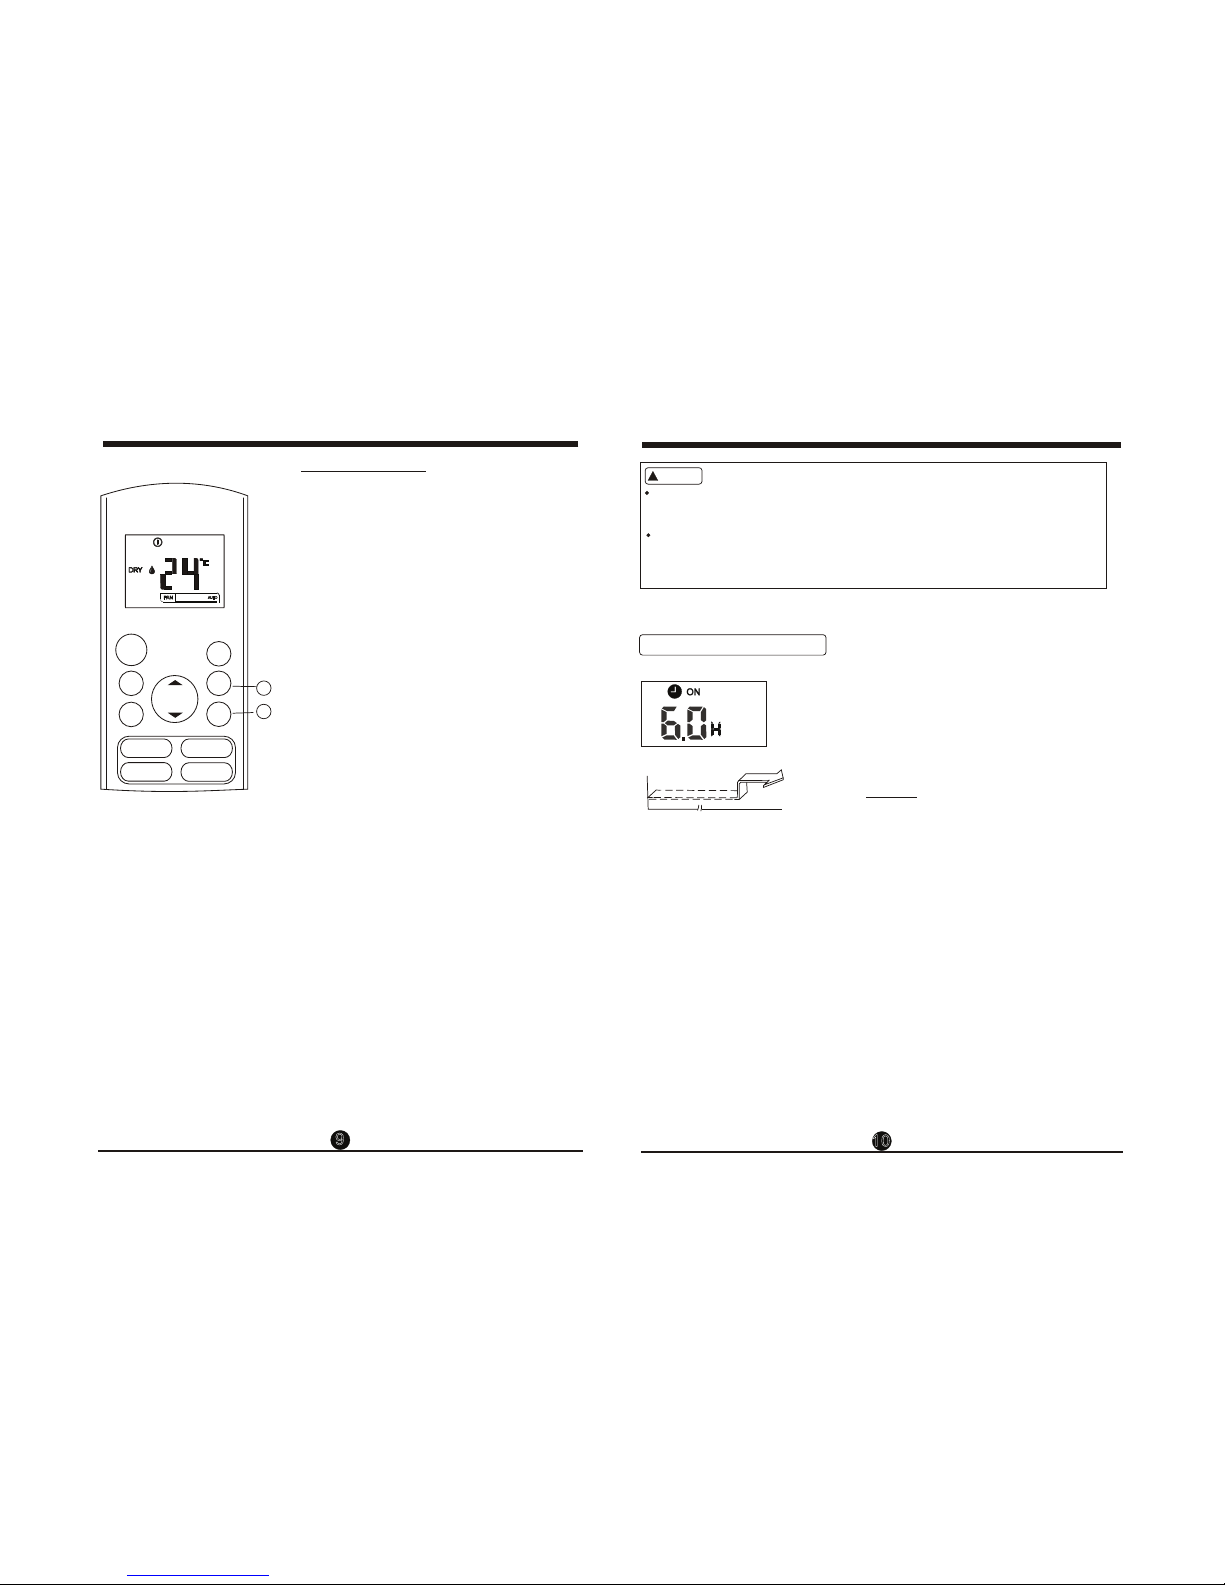
Dehumidifying operation
Ensure the unit is plugged in and power is
available. The OPERATION indicator on the
display panel of the indoor unit starts flashing.
1. Press the MODEbutton to select DRY mode.
2. Press the UP/DOWNbuttons to set the
desired temperature.
3. Press the ON/OFF button to start the air
conditioner.
The temperature
O O
can be set within a range of 17 C~ 30 C
O
in 1 C increments.
In the Dehumidifying mode, you can not switch the
fan speed. It has already been automatically controlled.
NOTE
MODE
FAN
TEMP
ON/OFF
SHORT
CUT
TIMER
ON
TIMER
OFF
3
1
2
How to use the buttons
78
SLEEP
TURBO
SWING DIRECT
LED
SLEEP
TURBO
SWING DIRECT
LED
SLEEP
TURBO
SWING DIRECT
LED
2
1
Timer operation
Press the TIMER ON button can set the auto-on
time of the unit. Press the TIMER OFF button
can set the auto-off time of the unit.
1. Press the TIMER ON button. The remote
controller shows TIMER ON, the last Auto-on
setting time and the signal "H" will be shown on
the LCD display area. Now it is ready to reset
the Auto-on time to START the operation.
2. Push the TIMER ON button again to set desired
Auto-on time. Each time you press the button,
the time increases by half an hour between 0
and 10 hours and by one hour between 10 and
24 hours.
3. After setting the TIMER ON ,there will be a one
second delay before the remote controller
transmits the signal to the air conditioner. Then,
after approximately another 2 seconds, the
signal "h" will disappear and the set temperature
will re-appear on the LCD display window.
To set the Auto-on time.
To set the Auto-off time.
1. Press the TIMER OFF button. The remote
controller shows TIMER OFF, the last Auto-off
setting time and the signal "H" will be shown on
the LCD display area. Now it is ready to reset
the Auto-off time to stop the operation.
2. Push the TIMER OFF button again to set
desired Auto-off time. Each time you press the
button, the time increases by half an hour
between 0 and 10 hours and by one hour
between 10 and 24 hours.
3. After setting the TIMER OFF ,there will be a
one second delay before the remote controller
transmits the signal to the air conditioner. Then,
after approximately another 2 seconds, the
signal "H " will disappear and the set temperature
will re-appear on the LCD display window.
MODE
FAN
TEMP
ON/OFF
SHORT
CUT
TIMER
ON
TIMER
OFF
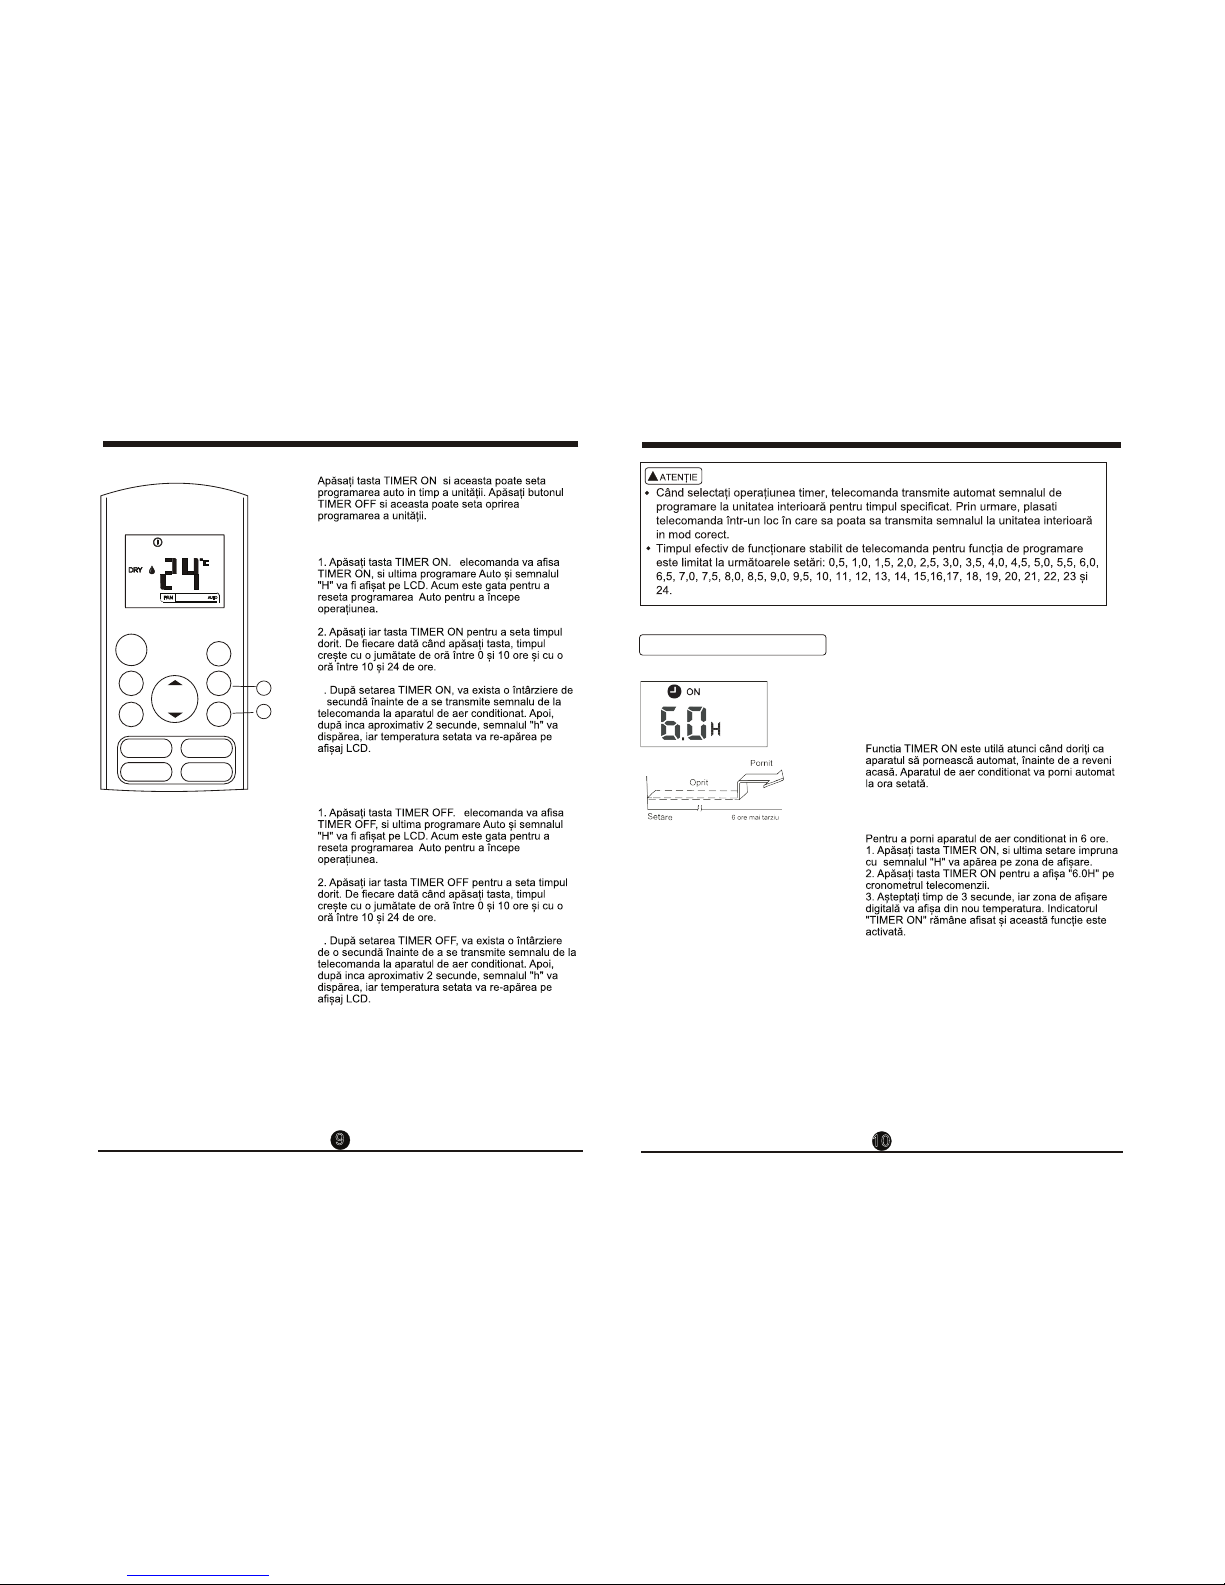
When you select the timer operation, the remote controller automatically transmits the
timer signal to the indoor unit for the specified time. Therefore, keep the remote
controller in a location where it can transmit the signal to the indoor unit properly.
The effective operation time set by the remote controller for the timer function
is limited to the following settings: 0.5, 1.0, 1.5, 2.0, 2.5, 3.0, 3.5, 4.0, 4.5, 5.0,
5.5, 6.0, 6.5, 7.0, 7.5, 8.0, 8.5, 9.0, 9.5, 10, 11, 12, 13, 14, 15,16,17, 18, 19, 20,
21, 22, 23 and 24.
CAUTION
!
Example of timer setting
Start
Off
6 hours later
(Auto-on Operation)
The TIMER ON feature is useful when you want
the unit to turn on automatically before you return
home. The air conditioner will automatically start
operating at the set time.
To start the air conditioner in 6 hours.
1. Press the TIMER ON button, the last setting
of starting operation time and the signal "H"
will show on the display area.
2. Press the TIMER ON button to display "6.0H "
on the TIMER ON display of the remote
controller.
3. Wait for 3 seconds and the digital display
area will show the temperature again. The
"TIMER ON" indicator remains on and this
function is activated.
TIMER ON
Example:
Set
910
SLEEP
TURBO
SWING DIRECT
LED
11 12
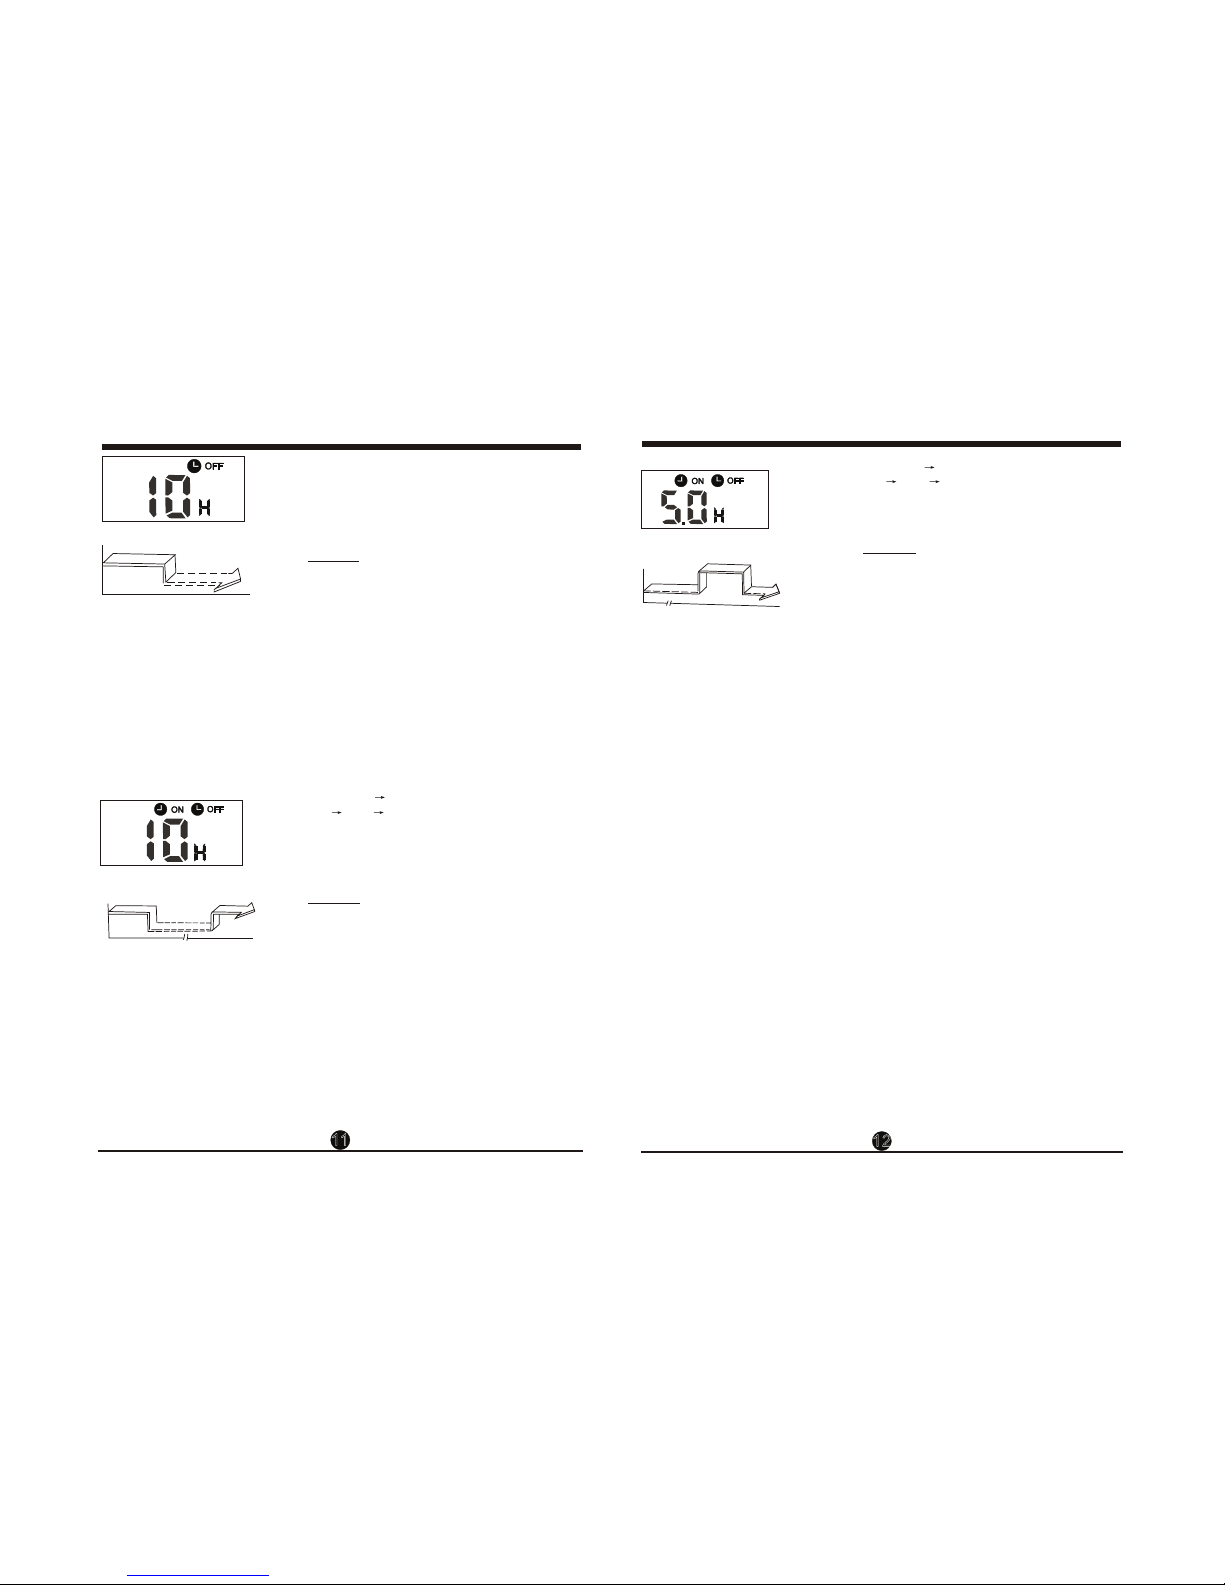
Stop
On
Set 10 hours later
(Auto-off Operation)
The TIMER OFF feature is useful when you want the
unit to turn off automatically after you go to bed. The
air conditioner will stop automatically at the set time.
To stop the air conditioner in 10 hours.
1. Press the TIMER OFF button, the last setting of
stopping operation time and the signal "H" will
show on the display area.
2. Press the TIMER OFF button to display "10H " on
the TIMER OFF display of the remote controller.
3. Wait for 3 seconds and the digital display area
will show the temperature again. The "TIMER
OFF" indicator remains on and this function is
activated.
TIMER OFF
Example:
On Stop
2 hours later
after setting
Set
To stop the air conditioner 2 hours after setting and
start it again 10 hours after setting.
1. Press the TIMER OFF button.
2. Press the TIMER OFF button again to display
2.0H on the TIMER OFF display.
3. Press the TIMER ON button.
4. Press the TIMER ON button again to display 10H
on the TIMER ON display .
5. Wait for 3 seconds and the digital display area
will show the temperature again. The "TIMER
ON OFF" indicator remains on and this function is
activated.
TIMER OFF TIMER ON
(On Stop Start operation)
This feature is useful when you want to stop the air
conditioner after you go to bed, and start it again in
the morning when you wake up or when you return
home.
Example:
COMBINED TIMER
(Setting both ON and OFF timers simultaneously)
Start
10 hours later
after setting
Example:
TIMER ON TIMER OFF
(Off Start Stop operation)
This feature is useful when you want to start
the air conditioner before you wake up and
stop it after you leave the house.
To start the air conditioner 2 hours after setting,
and stop it 5 hours after setting.
1. Press the TIMER ON button.
2. Press the TIMER ON button again to display
2.0H on the TIMER ON display.
3. Press the TIMER OFF button.
4. Press the TIMER OFF button again to display
5.0H on the TIMER OFF display .
5. Wait for 3 seconds and the digital display area
will show the temperature again. The "TIMER
ON & TIMER OFF" indicator remains on and
this function is activated.
Off Stop
Start
2 hours later
after setting 5 hours later
after setting
Set
11 12

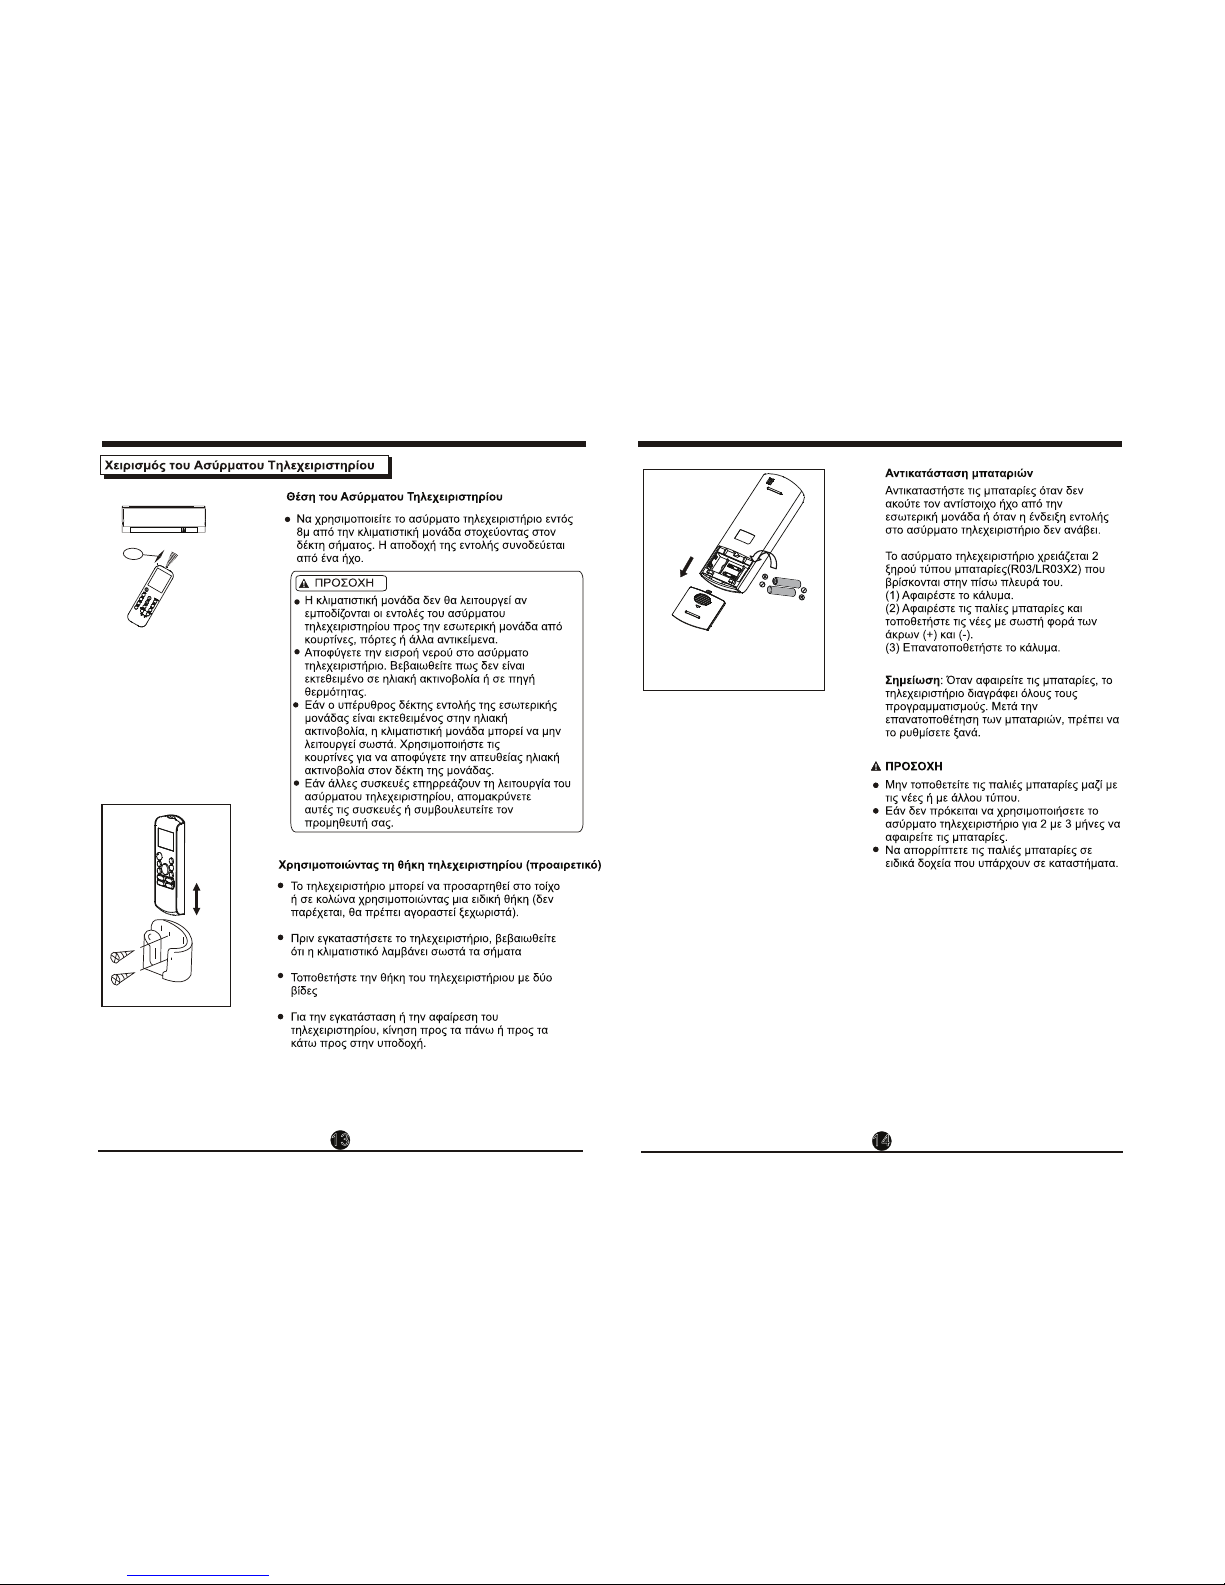
8m
Use the remote controller within a distance of 8
meters from the appliance, pointing it towards the
receiver. Reception is confirmed by a beep.
The remote controller can be attached to a wall or pillar
by using a remote controller holder(not supplied,
purchased separately).
Before installing the remote controller, check that the
air conditioner receives the signals properly.
Install the remote controller with two screws.
For installing or removing the remote controller, move
it up or down in the holder.
The following cases signify exhausted batteries.
Replace old batteries with new ones.
Receiving beep is not emitted when a signal
is transmitted.
Indicator fades away.
Location of the remote controller.
Using the remote controller holder(optional)
The remote controller is powed by two dry
batteries (R03/LR03X2) housed in the back rear
part and protected by a cover.
(1) Remove the cover in the rear part of the
remote controller.
(2) Remove the old batteries and insert the new
batteries,placing the(+) and (-) ends correctly.
(3) Install the cover back on.
NOTE: When the batteries are removed, the
remote controller erases all programming. After
inserting new batteries, the remote controller
must be reprogrammed.
Replacing batteries
CAUTIONS
The air conditioner will not operate if curtains,
doors or other materials block the signals from
the remote controller to the indoor unit.
Prevent any liquid from falling into the remote
controller. Do not expose the remote controller
to direct sunlight or heat.
If the infrared signal receiver on the indoor unit
is exposed to direct sunlight, the air conditioner
may not function properly. Use curtains to
prevent the sunlight from falling on the receiver.
If other electrical appliances react to the remote
controller, either move these appliances or
consult your local dealer.
Do not drop the remote controller. Handle with care.
Do not place heavy objects on the remote controller,
or step on it.
CAUTIONS
Do not mix old and new batteries or batteries
of different types.
Do not leave the batteries in the remote
controller if they are not going to be used for
2 or 3 months.
Do not dispose batteries as unsorted
municipal waste. Collection of such waste
separately for special treatment is necessary.
Handling the remote controller
13 14
12
8m
3.0V 03/L 03 2)
- C 60C
T
2
3
6
8
8
9
13
MODE
FAN
TEMP
SLEEP
TURBO
SWING DIRECT
LED
ON/OFF
SHORT
CUT
TIMER
ON
TIMER
OFF
RG57B/BGE
~

34
1
2
3
4
AUTO COOL DRY HEAT FAN
(
AUTO LOW MED HIGH
8
10
11
9
6
MODE
FAN
TEMP
ON/OFF
SHORT
CUT
TIMER
ON
TIMER
OFF
1
2
4
3
9
10
8
6
11
12
14
RG57B/BGE
SLEEP
TURBO
SWING DIRECT
LED
MODE
FAN
TEMP
ON/OFF
SHORT
CUT
TIMER
ON
TIMER
OFF
1
2
4
3
9
10
8
6
11
12
14
RG57B/BGE
SLEEP
TURBO
SWING DIRECT
LED
12
14
56
MODE
FAN
TEMP
ON/OFF
SHORT
CUT
TIMER
ON
TIMER
OFF
1
2
4
3
9
10
8
6
11
12
SLEEP
TURBO
SWING DIRECT
LED
14
RG57D/BGE
7
78
A
C-30
A
DRY
C-30
T
T
T
F
C-30
MODE
FAN
TEMP
ON/OFF
SHORT
CUT
TIMER
ON
TIMER
OFF
4
1
3
2
MODE
FAN
TEMP
ON/OFF
SHORT
CUT
TIMER
ON
TIMER
OFF
3
1
2
MODE
FAN
TEMP
ON/OFF
SHORT
CUT
TIMER
ON
TIMER
OFF
3
1
2
SLEEP
TURBO
SWING DIRECT
LED
SLEEP
TURBO
SWING DIRECT
LED
SLEEP
TURBO
SWING DIRECT
LED

0.5, 1.0, 1.5, 2.0, 2.5, 3.0, 3.5, 4.0, 4.5, 5.0,
5.5, 6.0, 6.5, 7.0, 7.5, 8.0, 8.5, 9.0, 9.5, 10, 11, 12, 13, 14, 15,16,17, 18, 19, 20,
21, 22, 23 and 24.
!
mer
910
TIMER ON.
TIMER ON
3. TIMER ON,
TIMER OFF.
TIMER OFF
TIMER OFF
3. TIMER
OFF
TIMER,
TIMER ON.
2
1
MODE
FAN
TEMP
ON/OFF
SHORT
CUT
TIMER
ON
TIMER
OFF
SLEEP
TURBO
SWING DIRECT
LED

11 12
11 12
8m
13 14

12
CUPRINS
................................................................................................. 2
Tastele de funcţionare ....................................................................................................... 3
............................................................................................................. 6
Cum sa folosim tastele........................................................................................................ 7
Funcţionarea Auto ............................................................................................................... 7
Răcire / încălzire / Ventilare................................................................................................ 7
.................................................................................................. 8
Funcţia de programare ..................................................................................................... 9
Fixarea de perete a telecomanzii..................................................................................... 13
NOTΑ:
•
pe care l-aţi achiziţionat. Forma actuala va prevala.
• Toate funcţiile descrise sunt realizate de către aparat. Dacă unitatea nu are această
funcţie, nu va exista nici ooperaţiune corespunzătoare atunci când apăsaţi tasta de pe
telecomandă.
• Atunci când există diferenţe mari între Manual Telecomenzii şi Manualul de Utilizare pe
descrierea funcţiei, descrierea din MANUALUL DE UTILIZARE prevalează.
Model RG57A8/BGEF
Tensiune nominală 3.0V (Dry batteries R03/LR03X2)
Interval primire semnal 8m
Mediu ambiental -5°C~ 60°C
MODE
FAN
TEMP
SLEEP
TURBO
SWING DIRECT
LED
ON/OFF
SHORT
CUT
TIMER
ON
TIMER
OFF
RG57B/BGE
34
1
2
3
4
AUTO RACIRE DEZUMIDIFICARE INCALZIRE VENTILARE
AUTO MICA MEDIE MARE
Tasta SLEEP
8
10
11
9
6
4
Tasta SHORTCUT
Tasta PORNIT/OPRIT
Tasta PORNIRE PROGRAMARE
Tasta OPRIRE PROGRAMARE
Tasta VENTILARE
Tasta TURBO
MODE
FAN
TEMP
ON/OFF
SHORT
CUT
TIMER
ON
TIMER
OFF
1
2
4
3
9
10
8
6
11
12
14
RG57B/BGE
SLEEP
TURBO
SWING DIRECT
LED
MODE
FAN
TEMP
ON/OFF
SHORT
CUT
TIMER
ON
TIMER
OFF
1
2
4
3
9
10
8
6
11
12
14
RG57B/BGE
SLEEP
TURBO
SWING DIRECT
LED
12
14
Functiile tastelor
Tasta AFISAJ
Indicatori pe afisaj
Indicator viteza ventilator
Indicator viteza ventilator
Viteza medie
Viteza mare
Viteza Auto
AUTO
INCALZIRE VENTILARE
RACIRE DEZUMIDIFICARE
56
Tasta DIRECT
Indicatorii sunt afisati cand telecomanda
este activata. Mod afisaj
Activeaza / Dezactiveaza afisajul de la unitatea
interioara. Cand se apasa, afisajul dispare iar
pentru a se aprinde iar, mai apasati o data.
Se afiseaza cand se trimite semnalul.
Se afiseaza cand telecomanda este pornita
Afisaj baterie (detectare baterie descarcata)
Nu este disponibil pentru acest aparat
Se afiseaza cand Pornirea Programata este
activata.
Se afiseaza cand Oprirea Programata este
activata.
Se afiseaza cand Oprirea Programata este
activata.
Se afiseaza in timpul Modului Sleep
Indica faptul ca aparatul functioneaza in
Modul Follow Me.
Indica faptul ca aparatul functioneaza in
Modul Follow Me.
Nu este disponibil pentru acest aparat
T
MODE
FAN
TEMP
ON/OFF
SHORT
CUT
TIMER
ON
TIMER
OFF
1
2
4
3
9
10
8
6
11
12
SLEEP
TURBO
SWING DIRECT
LED
14
RG57D/BGE
7
Cum sa folositi tastele
Functionare auto
Cum sa folositi tastele
78
Asigura aparatul este conectat
alimentat cu energie electrica. Indicatorul de
funcionare de pe panoul de af al unit ii
interioare începe .
1. A i butonul MODE pentru a selecta
Auto.
2. A i butonul sus / pentru a seta
temperatura dorit . Temperatura poate fi
setat într-un interval de 17oC~ 30oC în
trepte 1oC.
3. A i butonul ON / OFF pentru a porni
aparatul de aer conditionat.
Functionareain Dezumidificare
Asigura aparatul este conectat
alimentat cu energie electrica. Indicatorul de
funcionare de pe panoul de af al unit ii
interioare începe .
1. A i butonul MODE pentru a selecta
modul DEZUMIDIFICARE.
2. A i tastele sus / pentru a seta
temperatura dorit .
3. A i butonulPORNIT / OPRIT pentru a
porni aparatul de aer conditionat.
Temperatura poate fi setat într-un interval
de 17oC~ 30oC în trepte de 1oC.
Asigura aparatul este conectat
alimentat cu energie electrica.
1. A i butonul MODE pentru a selecta
modul RACIRE sau INCALZIRE (pentru
modelele cu î sau
VENTILARE.
2. A i butoanele sus / pentru a seta
temperatura dorit .
3. A i butonulVENTILARE pentru a
selecta vit ventilatorului în patru trepte -
Auto, Mica, Medie sau Mare.
4. A i butonulPORNIT / OPRIT pentru a
porni aparatul de aer conditionat.
Temperatura poate fi setat într-un interval
de 17oC~ 30oC în trepte de 1oC.
NOTA:
In modul de VENTILARE< temperatura setata nu
este afisata pe telecomanda si nici nu o puteti
ta. In acest , puteti parcurge pasii 1.3 si 4.
NOTA:
În modul de ficare, nu pute i schimba
vite a ventilatorului. Acesta a fost controlat
automat.
NOTA
1. În modul Auto, aparatul de aer conditionat
poate alege în mod logic modul de ,
ventilatore, î prin detectarea
diferen ei dintre temperatura act
ambiant temperatura setata pe
telecomanda.
2. În modul Auto, nu pute i schimba vit
ventilatorului. Acesta a fost controlat
automat.
3. modul Auto nu este confortabil
pentru tine, modul de functionare dorit poate
fi selectat manual.
Racire / Incalzire / Ventilare
MODE
FAN
TEMP
ON/OFF
SHORT
CUT
TIMER
ON
TIMER
OFF
4
1
3
2
MODE
FAN
TEMP
ON/OFF
SHORT
CUT
TIMER
ON
TIMER
OFF
3
1
2
MODE
FAN
TEMP
ON/OFF
SHORT
CUT
TIMER
ON
TIMER
OFF
3
1
2
SLEEP
TURBO
SWING DIRECT
LED
SLEEP
TURBO
SWING DIRECT
LED
SLEEP
TURBO
SWING DIRECT
LED
!
Exemplu de programre
910
Functia de Programare
Setare pornirii programate
T
3
o
Setare opririi programate
T
3
Exemplu:
PORNIRE PROGRAMATA
(Pornire Auto)
2
1
MODE
FAN
TEMP
ON/OFF
SHORT
CUT
TIMER
ON
TIMER
OFF
SLEEP
TURBO
SWING DIRECT
LED
This manual suits for next models
11
Table of contents
Other Nobu Air Conditioner manuals

Nobu
Nobu NBL4-09IDU32 User manual

Nobu
Nobu NBO-24IDU User manual

Nobu
Nobu NBO3-12IDU User manual

Nobu
Nobu NBL4-12IDU32 User manual

Nobu
Nobu NBO-18IDU User manual

Nobu
Nobu IRIS User manual

Nobu
Nobu OSK103 User manual

Nobu
Nobu NBFS-48IDU User manual

Nobu
Nobu NBO-09IDU User manual

Nobu
Nobu NBFS-48IDU User manual


Popular Air Conditioner manuals by other brands


ABND3A2AI Service manual")


Haier
Haier AS072AIAAA Operation manual

Samsung
Samsung AS07P2GE/XCH Owner's instructions

Mitsubishi Electric
Mitsubishi Electric Mr.Slim MS-GK36VA operating instructions

Sharp
Sharp AH-AP18DR Service manual

Frigidaire
Frigidaire FAA063P7A16 Use & care manual

Sharp
Sharp Plasmacluster GS-XP07ER Operation manual