Nobu IRIS User manual

Για τη σωστή χρήση της μονάδας, παρακαλούμε διαβάστε προσεκτικά το εγχειρίδιο
και φυλάξτε το για αναφορά στο μέλλον.
For correct use of this unit, please read this manual carefully and keep it for future reference.
Portable Air Conditioner
Φορητό Κλιματιστσικό
Εγχειρίδιο Χρήσης
Owner’s Manual
ΦΟΡΗΤΟ ΚΛΙΜΑΤΙΣΤΙΚΟ
PORTABLE AIR CONDITIONER
English/Ελληνικά
ΜΟΝΤΕΛΑ/MODELS: IRIS
Content
Operation Notices
Operation environment...........................................................................................1
Safety warning........................................................................................................2
Part's N ame............................................................................................................3
Operation Guide
Operation introduction for control panel .................................................................4
Buttons on remote controller ..................................................................................6
Introduction for icons on display screen.................................................................6
Introduction for buttons on remote controller..........................................................7
Function introduction for combination buttons........................................................9
Operation guide......................................................................................................9
Replacement of batteries in remote controller.......................................................10
Maintenance
Clean and Maintenance........................................................................................11
Malfunction
Malfunction analysis.............................................................................................13
Installation Notice
Installation Precaution..........................................................................................16
Preparation before installation..............................................................................17
Installation
Install drainage pipe .............................................................................................18
Installation and disassembly of heat discharge pipe............................................19
Operation test.......................................................................................................22
Attached sheet
D rainage way
Electric schematic diagram...................................................................................23
........................................................................................................22
This marking indicates that this product should not be disposed with other household wastes
throughout the EU. To prevent possible harm to the environment or human health from un-
controlled waste disposal, recycle it responsibly to promote the sustainable reuse of mate-
rial resources. To return your used device, please use the return and collection systems or
contact the retailer where the product was purchased. They can take this product for envi-
ronmental safe recycling.
R410A(R32/125: 50/50): 2087.5

1
Operation env ironm ent
● This air conditioner can only be used for family, not for
commercial industry.
● The appliance is for indoor use only.
● The air conditioner must be operated with in the temperaturerange:
16°C ~ 35°C.
● The appliance must be positioned so that the plug is accessible.
● Reserved space around the air conditioner should be 12″(30cm)
at least.
● Do not operate the air conditioner at humid environment.
● During operation, close doors and windows to improve cooling effect.
● Please keep air inlet and air outlet clean, no obstacles.
to avoid noise and vibration.
● Please put the air conditioner at smooth and flat ground for operation
● This air conditioner is equipped with castors. Castors should slide
at smooth and flat ground.
● Prohibit inclining or turn over the air conditioner. If there’s abnormity,
please disconnect power immediately and contact dealer.
● Avoid direct sunshine.
30cm
30cm
30cm
2
Safetywarning
● efore operation, please confirm whether power specification
● efore cleaning or maintaining the air conditioner, please turn off
air conditioner and pull out the power plug.
in order to avoid a haard.
manufacturer or professional person.
complies with that on nameplate.
● Please use the grounded power. ake sure the gounding is reliable.
● If the supply cord is damaged, it must be replaced by the
manufacturer or its service agent or a similarly qualified person
● Do not insert or pull out the power plug with wet hands.
disconnect power at once and then contact local dealer.
● If abnormal condition occurs (e.g. burned smell), please
● If the power cord is damaged, it must be replaced by
● hen nobody is taking care of the unit, please turn it off and
remove the power plug or disconnect power.
● Do not splash or pour water on air conditioner. therwise, it may
cause short circuit or damage to air conditioner.
dehumidifier without supervision.
● If use drainage hose, nearby temperature can’t lower than 0℃.
therwise, it will cause water leakage to air conditioner.
● Prohibit inserting any obects into the air conditioner.
● Do not repair or disassemble the air conditioner by yourself.
● Do not put or hang dripping obects above the air conditioner.
● eep children from playing or climbing on the air conditioner.
● Children and disabled people are not allowed to use the
● ar away from fire source, inflammable and eplosive obects.
● Prohibit operating heating equipment around the air conditioner.
● ake sure the power cord hasn’t been pressed by hard obects.
● Do not pull or drag the power cord to pull out the power plug or
move the air conditioner.
● This appliance can be used by children aged from years and
above and persons with reduced physical,sensory or mental
capabilities or lack of eperience and knowledge if they have
been given supervision or instruction concerning use of the
appliance in a safe way and understand the haards involved.
Children shall not play with the appliance. Cleaning and user
maintenance shall not be made by children without supervision.
3
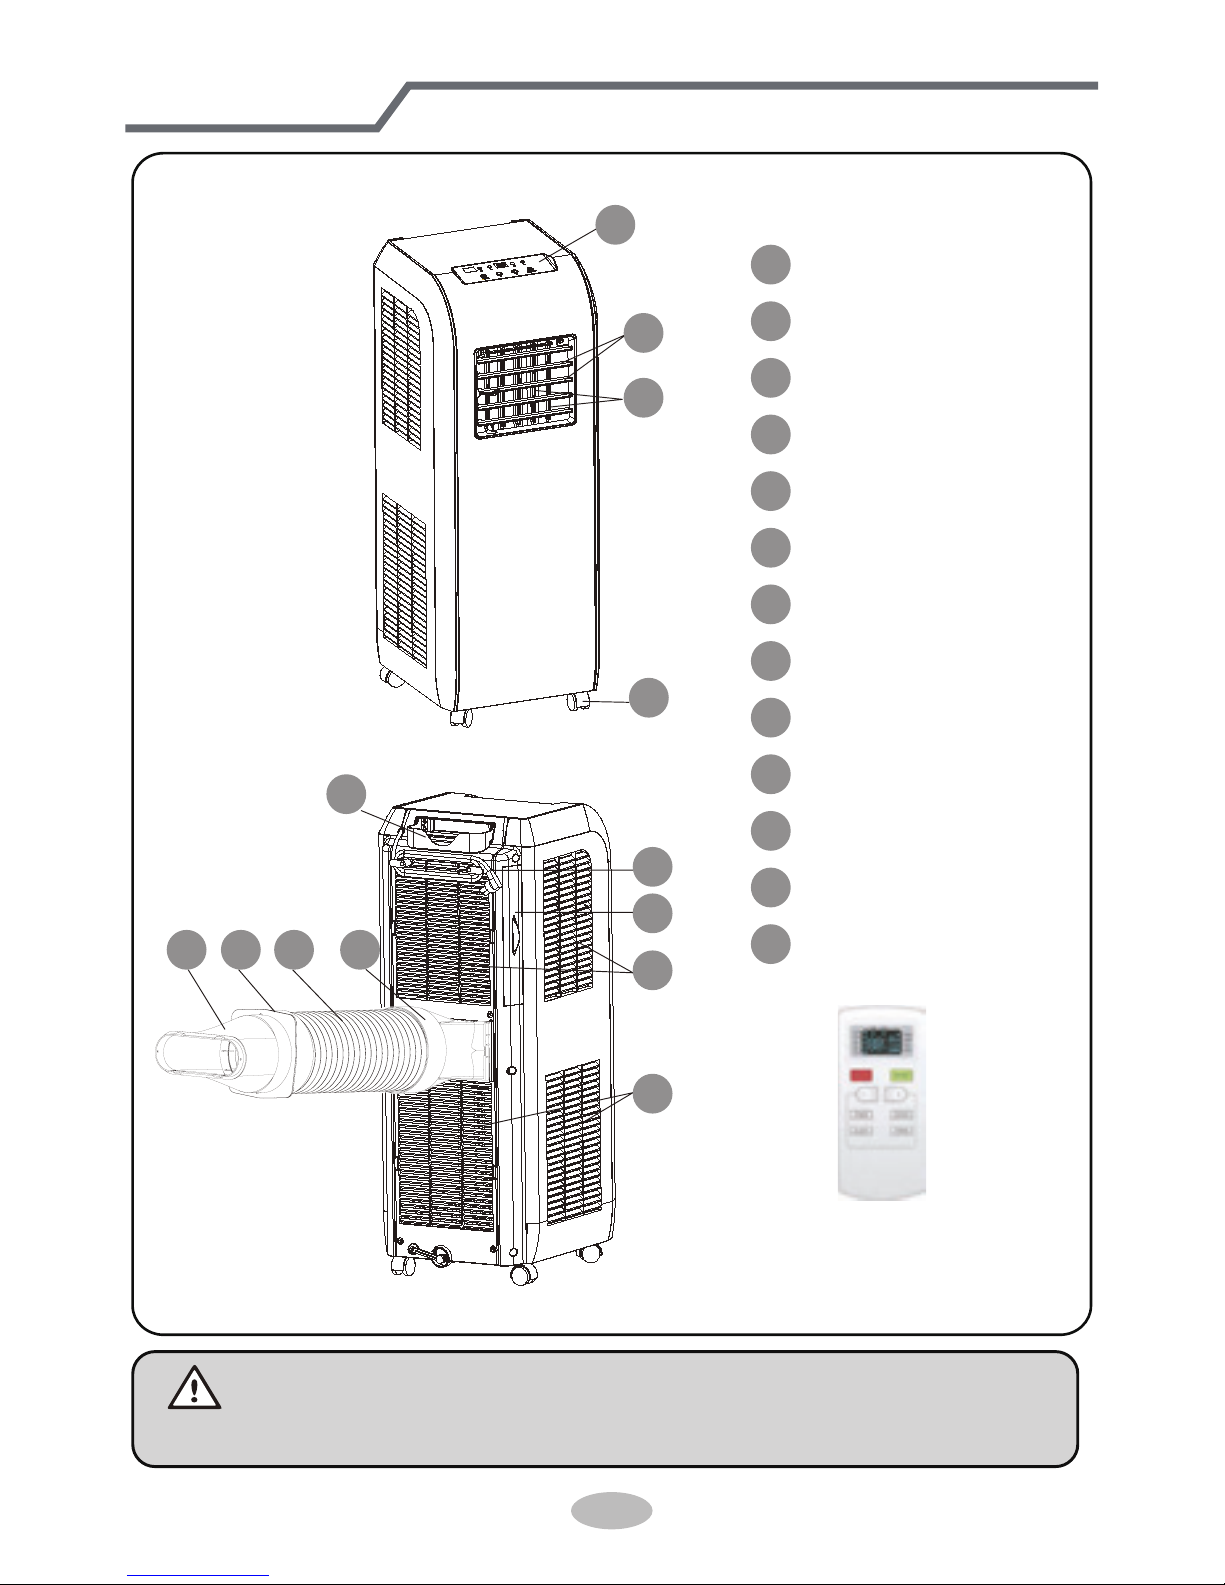
P art' s Nam e
H eat-removal pipe and other installation accessories can't be discarded.
Note:
1
2
3
4
5
1213 11 10
9
6
7
8
Remote controller
Jo int A
H eat removal pipe
Jo int B
Jo int C
1Controller panel
2G uide louver
3Swing louver
4heel
5Remote controller bo
6Power cord
7Filters
8Upper air inlet grille
9Lower air inlet grille
10
11
12
13
4
Operation introduction for control panel
Name of control panel
ON/OFF buttonMODE button + / - button
fan mode indicator
dry mode indicatorcool mode indicator
signal receiving window
water full indicator
Operation of control panel
Note:
● After putting through the power, the air conditioner will give out a sound.After
that, you can operate the air conditioner by the control panel.
● Under ON status, after each pressing of the button on control panel, the air
conditioner will give out a sound. Meanwhile, corresponding indicator on control
panelwill be bright.
● lay.
splay set temperature
under cooling mode, while it won’t display under other modes.
Press this button can turn on or turn off the air conditioner.
Under cooling mode, press “+” or “-” button to increase or decrease set temperature
er auto, drying
or fan mode, this button is invalid.
ON/OFF button
+ / - button
1
2
5
Press this button and the mode will circulate according to below sequence:
CDRFAN
when it twinkling, that means the water in the tank is full, we should drain off the
water.
COOL : nder this mode, cooling mode indicator is bright. Dual ni syalpsidebutei
set temperature. Temperature setting range is 16
° C
~ 30
° C
.
D R Y : nder this mode, drying mode indicator is bright. Dual niie tube won’ t be
display.
F AN: Under this mode, the air conditioner only blow fan. Fan indicator is bright.
Dual niie tube won’t be display.
D button
water full indicator
3
4
Operation introduction for control panel
Note:
W hen the water in chassis is full, the unit will stop operation and the buzze r will
give out eight beepbeep sounds for warning. In this case, water full indicator is
blinking (off for 3s and blink for times) and dual niie tube is displaying .
6
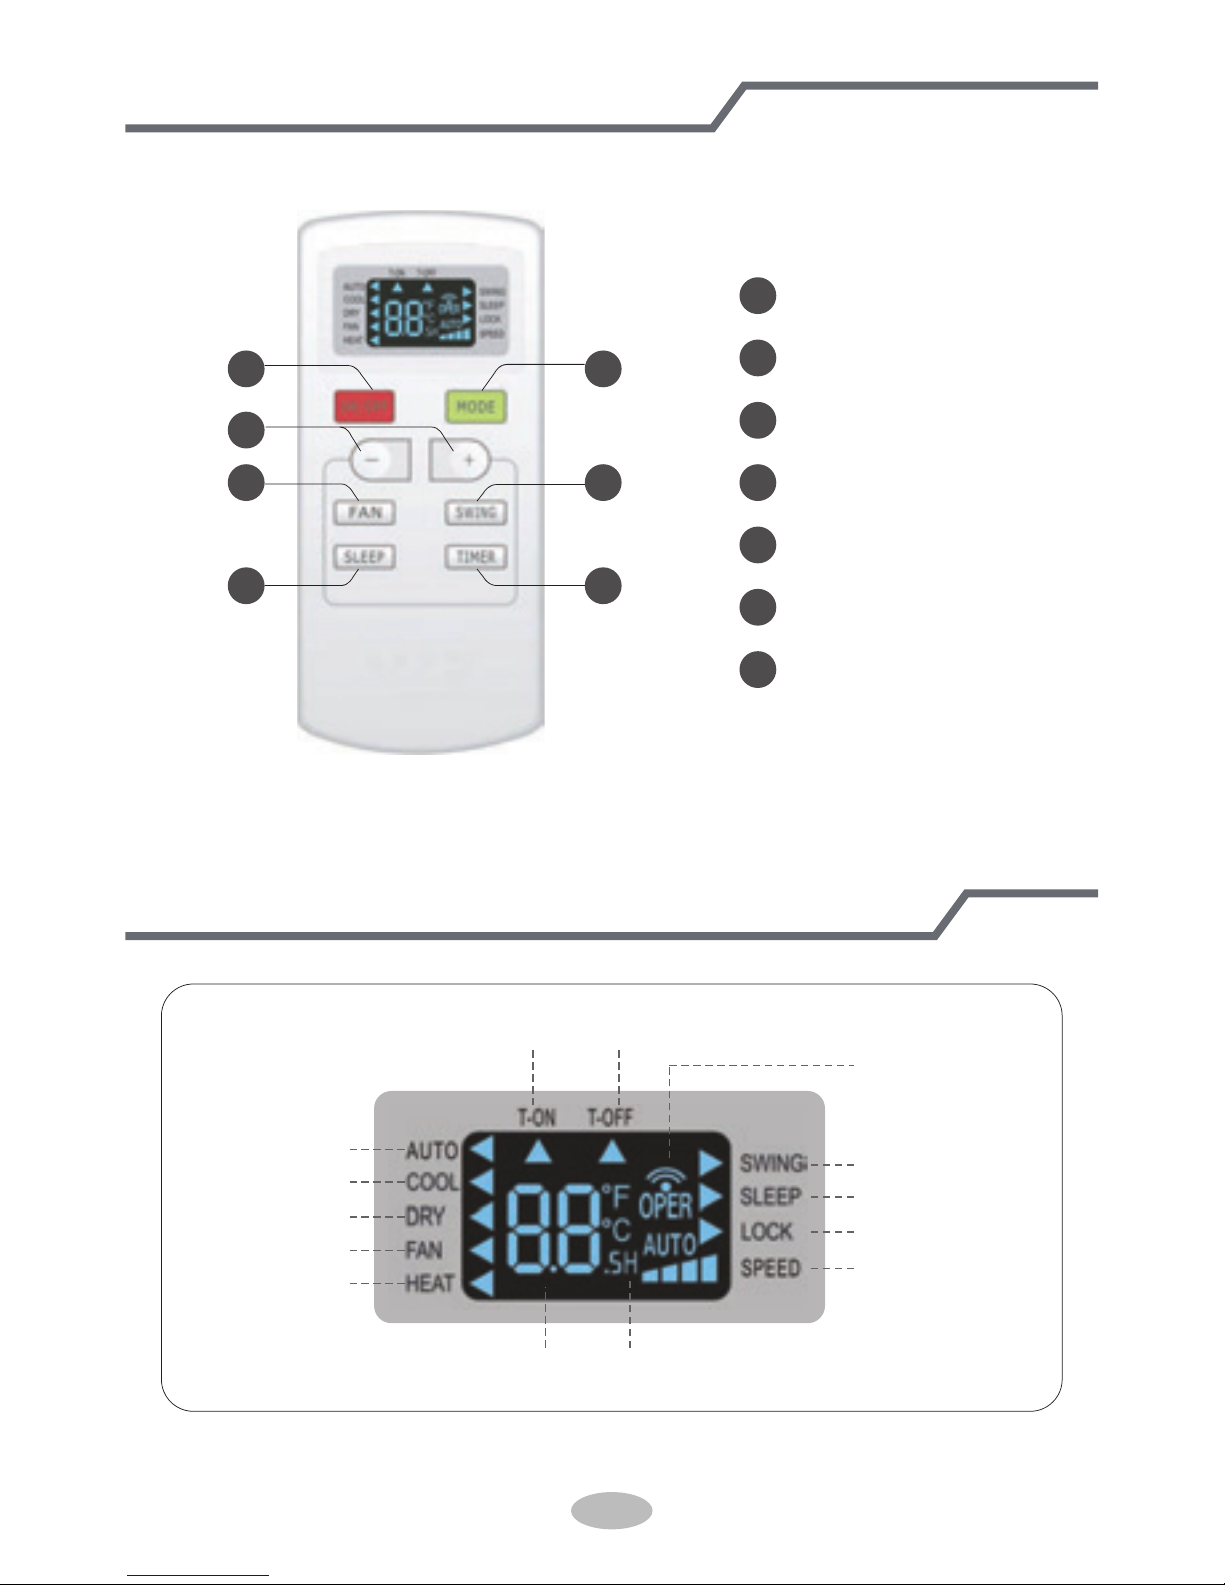
B uttons on rem ote controller
Introduction for icons on display screen
21
3
4 5
6 7
1
3
5
2
4
6
7
ON /OFF button
MOD E button
+ /- button
FAN button
I button
SLEEP button
TIMER button
Timer on Timer off Sending signal
swing operation
sleep operation
lock
set speed
Set timeSet temperature
heat operation
fan operation
dry operation
cool operation
auto operation
7
Introduction for b uttons on rem ote controller
Note:
●
hen power is connected(stand by condition), you can operate the air conditioner
through the remote controller.
●
hen unit is on, each time you press the button on remote controller, the sending
signal icon " " on the display of remote controller will blink once. If the air con-
ditioner gives out a beep sound, it means the signal has been sent.
● hen unit is off, set temperature will be displayed on the remote controller (If the
light of indoor unit display is turned on, the corresponding icon will be displayed)
hen unit is on, it will display the icon of the ongoing function.
Press this button to turn unit on/off.
ON /OFF button
1
Pressing this button once can select your required mode circularly as below (the
corresponding icon will be lit up after the mode is selected):
●
hen selecting auto mode, air conditioner will operate automatically according to
ambient temperature. et temperature cant be adusted and wont be displayed
either. Press A button to adust fan speed.
● hen selecting cool mode, air conditioner will operate under cool mode. Then
press or button to adust set temperature. Press A button to adust fan speed.
● hen selecting dry mode, air conditioner will operate at low fan speed under dry
mode. In dry mode, fan speed cant be adusted.
● hen selecting fan mode, air conditioner will operate in fan mode only. Then
press A button to adust fan speed.
● hen selecting heat mode, air conditioner will operate under heat mode. Then
press or button to adust set temperature. Press A button to adust fan speed.
(Cooling only unit can’t receive heating mode signal. If set AT mode by remote
controller, press button can’t turn on the air conditioner.)
AUTO COOL DR FAN H EAT
MOD E button
2
●
Pressing or button once will increase or decrease set temperature by 1°(°C).
old or button for 2s, set temperature on remote controller will change quickly.
Release the button after your required set temperature is reached.
● hen setting Timer n or Timer ff , press or button to adust the time.(ee
TIR utton for setting details)
+ / - button
3
8
Introduction for b uttons on rem ote controller
Press this button to turn on up& down air swing.
SW IN G button (not applicable for this model)
5
Under Cool, H eat and D ry mode, press this button to turn on Sleep function. Press
this button to cancel Sleep function. Under Fan and Auto mode, this function is
unavailable.
SLEEP button
6
● hen unit is on, press this button to set Timer Off. T-OFF and H icon will be
blinking. W ithin 5s, press + or - button to adj ust the time for Timer Off. Pressing
+ or - button once will increase or decrease the time by 0.5h. H old + or -
button for 2s, time will change quickly. Release the button after your required
will stop blinking.
● hen unit is off, press this button to set Timer On. T-ON and H icon will be
blinking. W ithin 5s, press + or - button to adj ust the time for Timer On. Pressing
+ or - button once will increase or decrease the time by 0.5h. H old + or -
button for 2s, time will change quickly. Release the button after your required
will stop blinking.
● Cancel Timer On/Off: If Timer function is set up, press TIMER button once to
review the remaining time. W ithin 5s, press TIMER button again to cancel this
function.
TIMER button
7
Note:
● nder Auto speed, air conditioner will select proper fan speed automatically acc-
ording to ambient temperature.
● an speed cant be adusted under Dry mode.
FAN button
4
Pressing this button can select fan speed circularly as: AUTO, SPEED 1 ( ),
SPEED 2 ( ), SPEED 3 ( ), SPEED 4 ( ) (unavailable in this air conditioner.
Speed 4 is the same with speed 3.).
AUTO
SPEED 1 (equals to low fan speed)
SPEED 3 (equals to high fan speed) SPEED 4
SPEED 2 (equals to medium fan speed)

9
Introduction for b uttons on rem ote controller
Note:
● Range of time setting is: 0.5~2h
● The interval between two motions cant eceed 5s, otherwise the remote con
troller will eit setting status.
F unction introduction for com b ination b uttons
Press and buttons simultaneously can turn on or turn off child lock function.
hen child lock function is started up, C indicator on remote controller is .
If you operate the remote controller, remote controller won’t send signal.
Child lock function
T em perature display sw itchov er function
nder status, press button and Dbutton simultaneously can switch
between °C and °.
Operation g uide
1. After putting through the power, press button on remote controller to
turn on the air conditioner.
2. Press D button to select your required mode: AUT, C, DRY, A,
AT.
3. Press or button to set your required temperature. (Temperature can’t be
adusted under auto mode).
4. Press A button to set your required fan speed: auto, low, medium and high
speed.
10
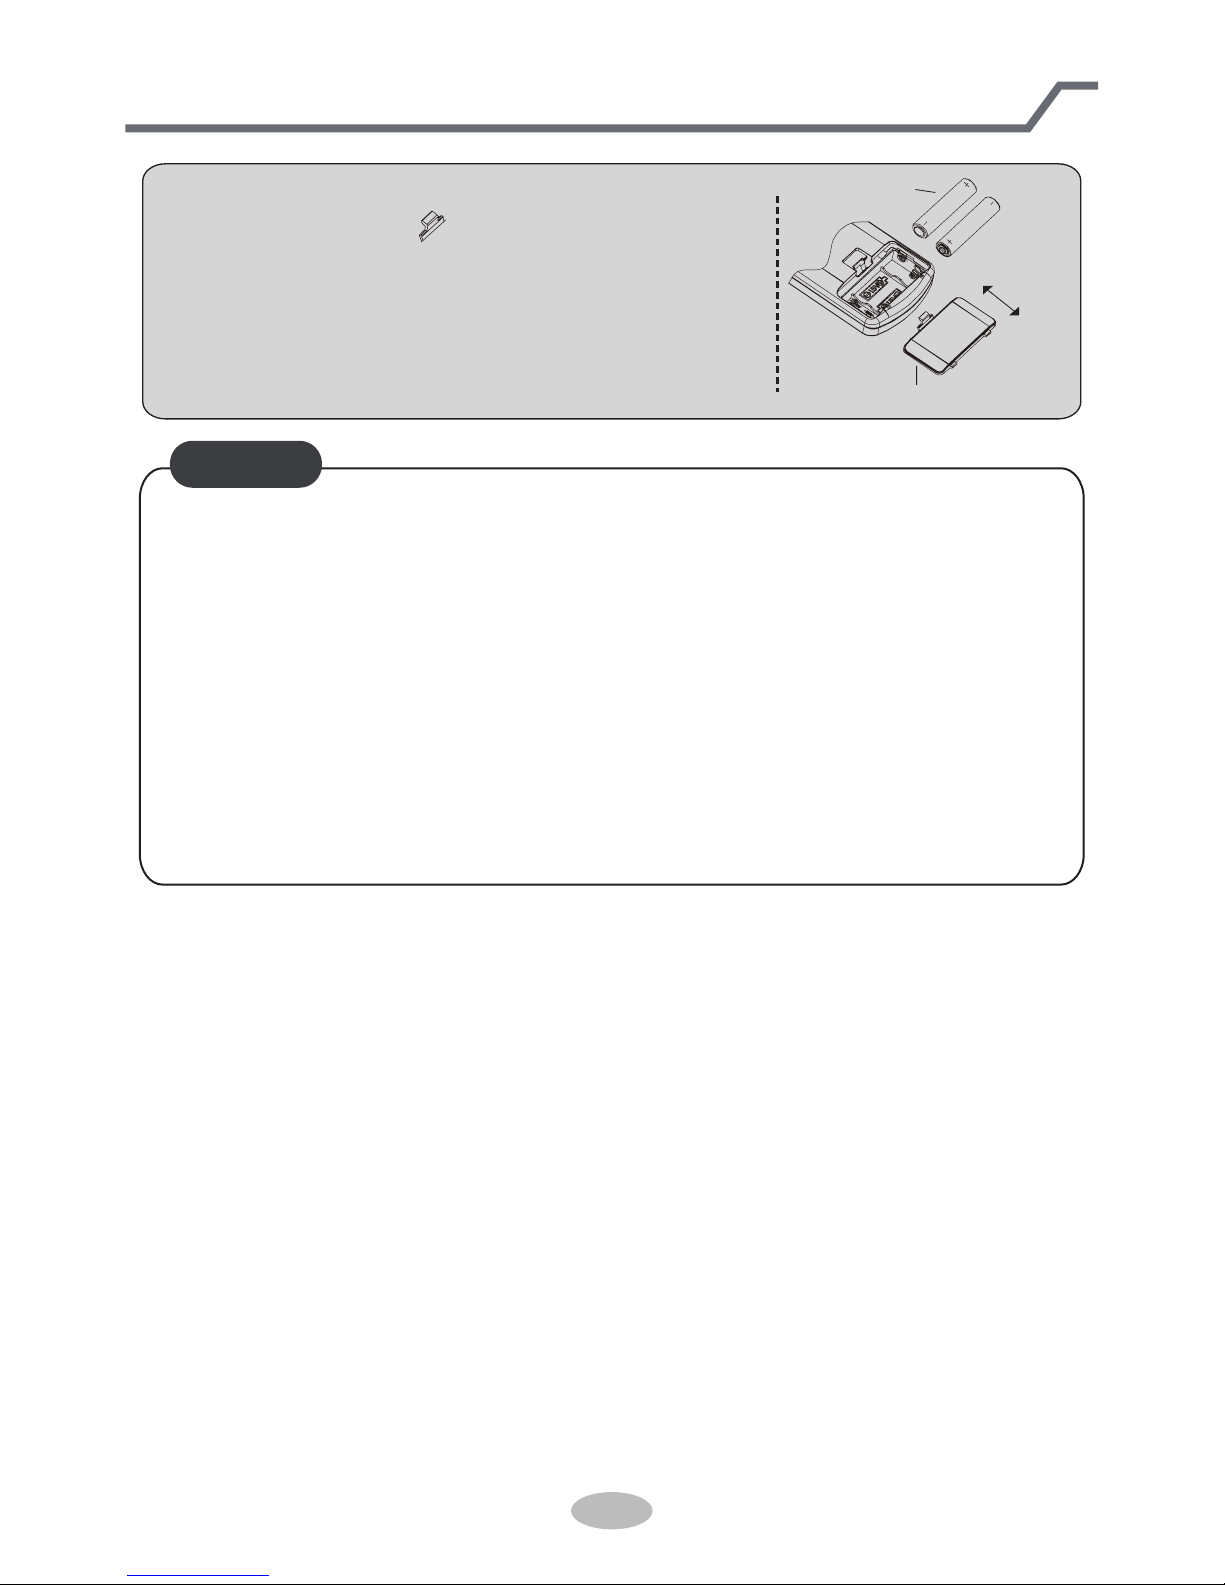
R eplacem ent of b atteries in rem ote controller
Note:
● During operation, point the remote control signal sender at the receiving
window on indoor unit.
●
The distance between signal sender and receiving window should be no more
than 8m, and there should be no obstacles between them.
● ignal may be interfered easily in the room where there is uorescent lamp
or wireless telephone remote controller should be close to indoor unit during
operation.
● Replace new batteries of the same model when replacement is required.
● hen you don’t use remote controller for a long time, please take out the
batteries.
● If the display on remote controller is fuy or there’s no display, please
replace batteries.
reinstall
remove
battery
cover of battery bo
1. Press the back side of remote controller on the
spot marked with " " , and then push out the
cover of battery bo along the arrow direction.
2. Replace two o. (AAA 1.5) dry batteries and
make sure the positions of + and- polar are
correct.
3. Reinstall the cover of battery bo.
11
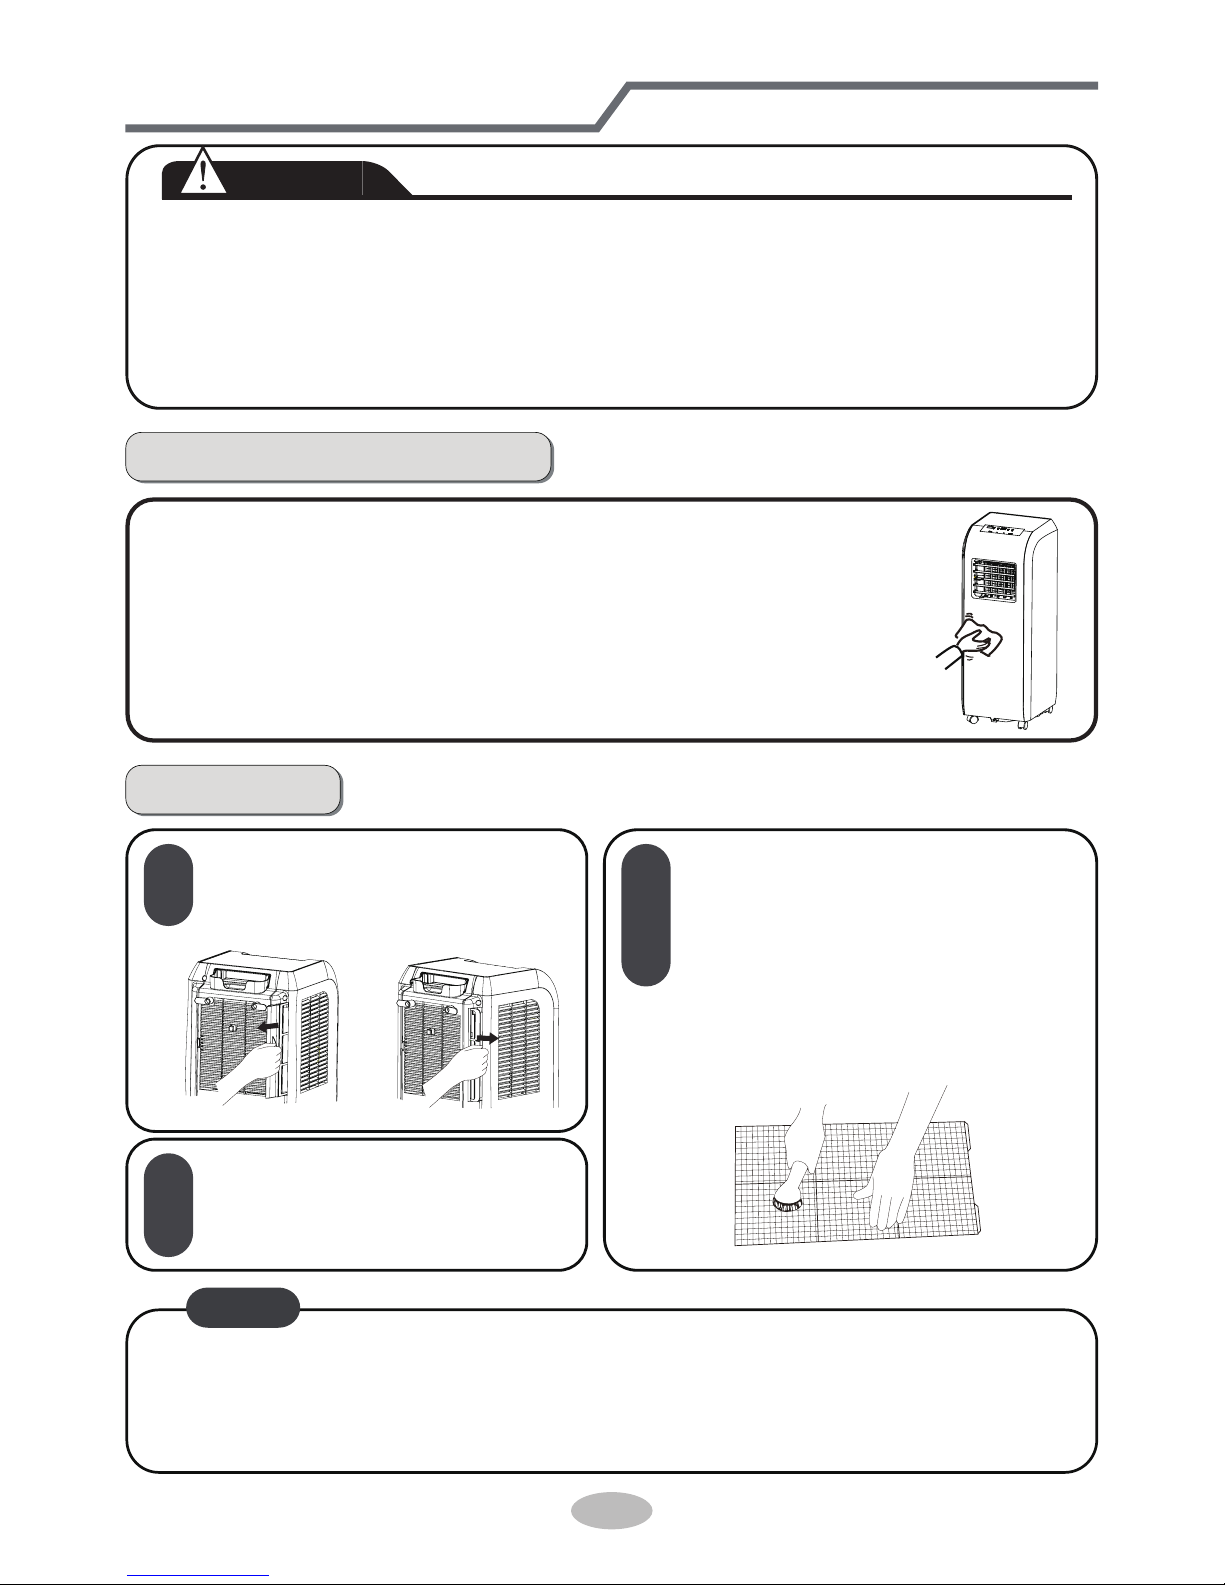
Clean and Maintenance
W arning :
● efore cleaning the air conditioner, please turn off the unit and disconnect
power. Otherwise, it may cause electric shock.
● Do not wash air conditioner with water. therwise, it may cause electric
shock.
● Do not use volatile liquid (such as thinner or gas) to clean the air conditioner.
Otherwise, it may damage the appearance of air conditioner.
Clean outer case:
If there's dust on the surface of outer case, please use soft towel
to wipe it. If the outer case is very dirty (such as grease), please
use neutral abluent to wipe it.
Clean outer case and g rille
Clean g rille: Use cleaner or soft brush to clean it.
Clean lter
Note:
① ②
1
3
2
Remove the lter
Install lter
Clean lter
Use cleaner or water to clean the
lter. If the lter is very dirty (such
as grease), use warm water 0°C
(10°) melted with neutral
abluent to clean it and then put at
shady place to dry it.
After the ler is cleaned and
dried, reinstall it well.
● The lter should be cleaned about once every three months. If theres much
dust in the operation environment, you can increase clean frequency.
● Do not dry the lter with re or hair drier. therwise, it may be deformed or
catch re.
12
Clean and Maintenance
Clean heat- rem ov al pipe
Remove the heat-removal pipe from air conditioner, clean and dry it , and then
reinstall it. (or the method of installation and removal method, please refer to the
instruction for " Installation and disassembly of heat discharge pipe" ).
Check ing b efore use- season
1. Check whether air inlets and air outlets are blocked.
2. Check whether plug and socket are in good condition.
3. Check whether lter is clean.
4. Check whether batteries is installed in remote controller.
5. Check whether oint, window bracket and heatremoval pipe are installed tightly.
6. Check whether heat-removal pipe is damaged.
Check ing after use- season
1. D isconnect power supply.
2. Clean lter and outer case.
3. Remove dust and sundries on the air conditioner.
4.
Eliminate accumulated water in chassis (refer to the section of " D rainage way"
for details).
5. Check whether window bracket is damaged or not. If yes, please contact dealer.
L ong - tim e storag e
If you don't use the air conditioner for a long time, please maintain it by following
steps for good performance:
● ake sure theres no accumulated water in chassis and the heatremoval pipe is
disassembled.
● Pull out the plug and wrap the power cord.
● Clean the air conditioner and pack it well to prevent dust.
Notice for recov ery
● any packing materials are recyclable materials. Please deal with them through
local recycle bin.
● If you want to throw away the air conditioner, please contact local division or
consultant service center for the correct disposal method.

13
Malfunction analy sis
Please check below items before asking for maintenance. If the malfunction still
can’t be eliminated, please contact local dealer or qualied professionals.
Phenomenon Troubleshooting Solution
Air conditioner
can't operate
Air conditioner
can't receive
signal from
remote contr-
oller or remote
controller is
not sensible.
Poor cooling
(heating)
● Power failure
● hether the unit is interfered
seriously (such as static pres
sure, unstable voltage)
● hether remote controller is
within the receiving range
● hether its blocked by obst
acles
● Is sensitivity of remote contr
oller low
● hether there’s uorescence
lamp in the room
● Is the power too low
●
hether the air lter is too dirty
●
hether the set temperature is
proper
● hether door and window are
closed
● Is plug loose
● hether the air switch is trip
ped off or fuse is burnt
● Is theres malfunction for the
circuit
● hether the unit is restarted up
after stopping immediately
● ait after power recovery.
● Please pull out the plug. Ins
ert the plug after about 3min,
and then turn on the unit.
●
The receiving range of remote
controller is m. Do not ece
ed this range.
● Remove the obstacles.
● Check the batteries of remote
controller. If the power is low,
please replace the batteries.
● ove the remote controller
close to air conditioner.
●
Turn off the uorescence lamp
and try it again.
●
ait after voltage is resumed.
● Clean the air lter.
● Adust the temperature.
● Close door and window.
● Reinsert the plug.
● Ask professional person to
replace air switch or fuse.
● Ask professional person to
replace circuit.
● ait for 3min, and then turn
on the unit again.
14
Phenomenon Troubleshooting Solution
Set tempera-
ture can't be
adusted.
● hether the unit operates un
der auto mode
● hether the required temper
ature eceeds the temperature
setting range
● Temperature cant be adus
ted
under auto mode.
● Temperature emperature set
ting range: 16°C30°C .
Malfunction analy sis
● hether air outlet or air inlet is
blocked
● nder heating mode, whether
indoor temperature is reached
to set temperature
● hether heating mode is sta
rted up ust now
● hether evaporator is defros
ted (observe it by pulling out
the lter)
● liminate the obstacles.
● Indoor unit will stop blowing
fan after reachingto set
temperature.
● In order to prevent cold air,
air conditioner will delay for a
while to be started up, which
is the normal phenomenon.
● Its the normal phenomenon.
Air conditioner is defrosting.
After defrosting is nished, it
will resume operation.
N o fan blowed
out from air
conditioner
There's off
avour
● There’s offavour source in
the room, such as furniture,
cigarette etc.
● liminate the offavour
source.
● Clean the lter.
There's abnor-
mal sound du-
ring operation
● hether the unit is interfered
by thunder, radio, etc
● Disconnect power, put thro
ugh the power again, and
then turn on the unit again.
ou can heard
waterowing
sound
● hether the unit is turned on
or turned off ust now
● There’s owing sound of ref
rigerant inside the air condit-
ioner, which is the normal
phenomenon.
ou can heard
the sound of
" PAPA"
● hether the unit is turned on
or turned off ust now
● eat epansion or shrinkage
for the panel due to change
of temperature, which cause
friction sound.
15
Malfunction analy sis
Malfunction code
Overcurrent protection.
Chassis is full of water.
Malfunction of ambient
temperature sensor. Please contact previsional person to deal
with it.
Malfunction of evaporator
temperature sensor. Please contact previsional person to deal
with it.
1. Pour out the water inside chassis.
2. If " H 8" still exits, please contact professional
person to maintain the unit.
D isconnect power, and then turn on
the unit
again after 10min. If " E5" still
exits, please
contact professional person to maintain the unit.
W arning
● If therere below phenomenons, please turn off the air conditioner and discon-
nect the power immediately, and then contact dealer immediately.
●If operate the air conditioner under abnormal condition, it may cause malfunc-
Power cord is overheating or damaged.
Abnormal sound during operation.
W ater leakage
F0
F2
F1
H 8
E5
H 3
E8
F4
1.Refrigerant is leaking
2.System is blocked
1. Re-energiz e the unit after turning off and
pulling out the plug for 30min;
2. If theres still malfunction, please contact
after-sales service.
Overload protection for compressor
Overload malfunction
1.Check if the unit is under high-temperature
and high-humidity environment; if ambient
temperature is too high, power off the unit and
then energiz e it for operation after the ambient
temperature drops to 35℃below.
2. Check if the evaporator and condenser are
blocked by some obj ects; if yes, take away the
obj ects, power off the unit and then energiz e
it for operation.
3. If the malfunction still occur, please contact
our after-sales service center.
Outdoor tube temperature
sensor is open/short-circuited.
Please
contact after-sale service person
to deal with it.
16
Installation P recaution
W arning :
● bserve all governing codes and ordinances.
● Do not use damaged or nonstandard power cord.
● e caution during installation and maintenance. Prohibit incorrect operation
to prevent electric shock, casualty and other accidents.
S election of Installation L ocation
R eq uirem ents F orelectric Connection
B asic req uirem ent
Installing the unit in the following places may cause malfunction. If it is unavoidable,
please
consult the local dealer:
obects spread in the air.
2. The place with highfrequency devices (such as welding machine, medical equipment).
3. The place near coast area.
. The place with oil or fumes in the air.
5. The place with sulfureted gas.
6. ther places with special circumstances.
R eq uirem ent of air conditioner
1. Air inlet should be far away from obstacles and do not put any obects near air outlet.
therwise, it will affect the radiation of heatremoval pipe.
2. elect a location where the noise and outflow air emitted by the outddor unit will not affect
neighborood.
3. Please try your best to keep far away from fluorescent lamp.
.The appliance shall not be installed in the laundry.
S afety precaution
1. ust follow the electric safety regulations when installing the unit.
2. According to the local safety regulations, use qualified power supply circuit.
3. or appliances with type attachment,the instructions shall contain the substance of
the following.If the supply cord is damaged,it must be replaced by the manufacturer, its
service agent or similarly qualified persons in order to avoid a haard.
. Properly connect the live wire, neutral wire and grounding wire of power socket.
5. e sure to cut off the power supply before proceeding any work related to electricity and
safety.
6. Do not put through the power before finishing installation.
. The air conditioner is first class electric appliance. It must be properly grounding with
specialied grounding device by a professional. Please make sure it is always grounded
effectively, otherwise it may cause electric shock.
. The yellowgreen wire or green wire in air conditioner is grounding wire, which cant be
used for other purposes.
. The grounding resistance should comply with national electric safety regulations.
10. The appliance shall be installed in accordance with national wiring regulations.

17
P reparation b efore installation
Note: check if the accessories are available before installation.
Accessory list
unit j oint A j oint Bj oint C
heat discharge pipe
drainage pipe remote controller user's manual
battery (2)
(AAA 1.5V)
screw(1) pipe clip rubber plug pipe hoop (2)
T ools needed for installation
cross screwdriver
gauge
straight screwdriver
scissors
saw
pencil

18
Install drainag e pipe
Note: Install drainage pipe before using, otherwise poor drainage will affect normal
operation of the unit.
1. Remove the rubber plug at drainage port.
2. i the drainage pipe clip on the right of rear side plate near drainage port with
a screw.
3. Put the drainage pipe into drainage port and screw it up, and then bind it with
pipe hoop.
. Put the rubber plug into the other side of drainage pipe, it with pipe hoop and
then it in the drainage pipe clip.
rubber plug drainage port
drainage port
drainage port
drainage pipe clip
drainage pipe clip
screw
pipe hoop
pipe hoop
rubber plug
drainage pipe
Table of contents
Languages:
Other Nobu Air Conditioner manuals

Nobu
Nobu OSK103 User manual

Nobu
Nobu NBFS-48IDU User manual

Nobu
Nobu NBO3-12IDU User manual

Nobu
Nobu NBL4-09IDU32 User manual

Nobu
Nobu NBFS-48IDU User manual

Nobu
Nobu NBO-24IDU User manual

Nobu
Nobu NBL4-18IDU32 User manual

Nobu
Nobu NBO-18IDU User manual

Nobu
Nobu NBL4-12IDU32 User manual

Nobu
Nobu NBFS-48IDU User manual


Popular Air Conditioner manuals by other brands

Airrex
Airrex HSC-14S user manual

Technibel Climatisation
Technibel Climatisation GR 120C installation instructions

Trane
Trane ODYSSEY TTA Series Installation operation & maintenance

akira
akira AC-S7HGC Service manual

Samsung
Samsung Wall Mounted Type Series user manual

CLIMIA
CLIMIA CMK 2600 operating manual


