NOCRY NHG-04NZ User manual

Heat Gun
Instruction Manual
We've tried to make this manual useful, simple, and understandable.
Please read it carefully, and keep it safe for future reference.

WHAT'S INSIDE THIS MANUAL
TECHNICAL SPECIFICATIONS 2
THE ABC'S OF HEAT GUN SAFETY 3
Work area safety 5
Personal safety 6
HOW TO USE YOUR HEAT GUN 7
How to switch the heat gun on/off 7
How to prevent overheating 8
How to use the heat gun for removing varnish or softening adhesives 8
How to use the heat gun for removing varnish or paint from windows 9
How to use the heat gun for shaping plastic tubing 9
How to use the heat gun for welding plastic 10
How to use the heat gun for shrinking 10
How to use the heat gun for defrosting water pipes 11
How to use the heat gun for soft soldering 11
MAINTENANCE 12
HEAT GUN LIABILITY 12
DISPOSAL 12
WARRANTY 13
HOW TO CONTACT NOCRY 14
1
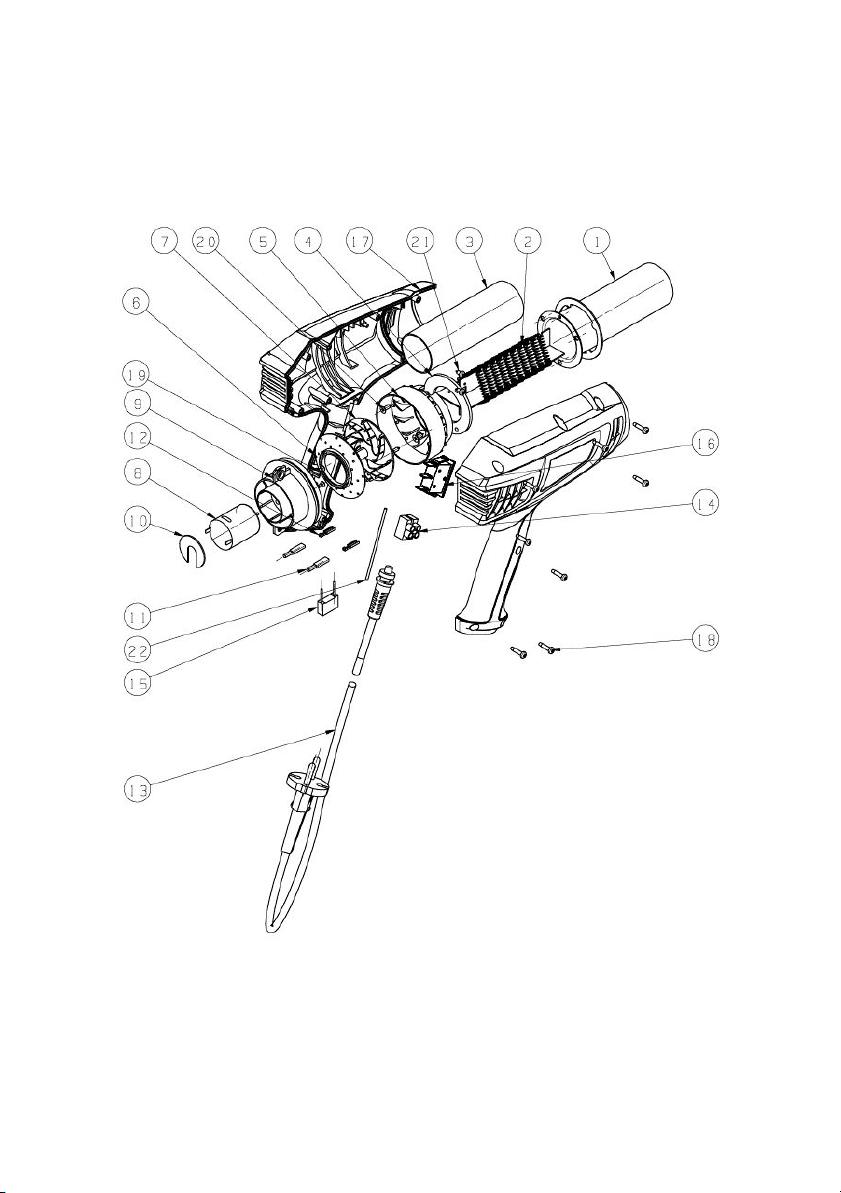
TECHNICAL SPECIFICATIONS
1.
Insulated Tube
2.
Heating Element
3. Mica Paper
4.
Heat Insulation Ring
5.
Diffuser
6. Fan Base
7. Fan
8. Electric Motor
9.
Motor Housing
10. Circular Circuit Board
11. Line
Terminal 2.8 Sheath
12. Line Terminal 2.8
13. Power Cord
14. Terminal/Diode
15.
Capacitance
16.
Switch
17.
Housing
18.
Shell Screw
19. Motor Screw
20. Wind Pipe
Screw
21.
Belt Screw
22.
Brown Connecting Line
2

Model
NoCry NHG-04NZ Heat Gun
Voltage
120V, 60Hz
Rated power
1500W / 12.5A
Air flow
I: 10.6 ft3/min
II: 17.7 ft3/min
Temperature at the
nozzle outlet
I: ~662°F
II: ~1022°F
Protection class
回/II
THE ABC'S OF HEAT GUN SAFETY
Read all safety warnings and instructions before
using your heat gun. They're
pretty reasonable, and neglecting them may bring a touch of electric shock, fire,
and/or serious injury to your heat gun-ing sessions. There are other (and much
better) ways to get your adrenaline going.
Save this manual for future reference, review in between uses, and make sure
that anyone who's going to test your new heat gun has read and fully understood
all the information in here as well.
In case this manual happens to disappear in the black hole all manuals seem to go
into, you can get a digital version of it at https://nocry.com/pages/instructions, or
by letting us know to [email protected].
So, let's get to it, shall we?
3

✔
✔
✔
✔
✔
✔
✔
✔
✔
✔
Only use your heat gun for its intended purpose. That includes the forming
and welding of plastic, removal of paint and the warming of heat-shrinkable
tubing, soldering and tinning, loosening of adhesive joints, and the defrosting
of water lines.
Be aware of the fact that your heat gun produces heat, lots of it. Make sure
to not operate it around flammable or explosive materials and spaces.
Do not direct the hot air flow to the same spot for too long. Among other
things, doing this may help develop flammable gases when working with
plastic, paint, varnish or similar materials.
Never point the heat gun at yourself, other people or animals. Also, please do
not use it for cooking food. It's not a hairdryer either.
Keep the cord and your digits away from the metal nozzle. The nozzles
become very hot, so always use heat resistant gloves when handling them.
Also, make sure to never obstruct the air flow from the gun.
Let your heat gun cool down completely before putting it in storage. Do it by
laying the gun on its back, so that the nozzle does not touch any surfaces and
thus don't damage them.
Do not leave the heat gun unattended while it's turned on or plugged in.
Pretty obvious, but needs to be said.
Do not use your heat gun if it doesn't work as it should, or if the cord is
damaged. Get it repaired or replaced before using. If you should have any
problems or concerns about anything, anything at all, let us know by emailing
Clean the heat gun after every use. Especially pay attention to removing dry
paint from the nozzle and scraper frequently, as it can ignite.
Do not take unnecessary risks by trying to reach areas that are obviously too
far away to reach safely. Keep proper footing and balance at all times - it'll
help you keep control in unexpected circumstances, whether it be the heat gun
4

✔
✔
✔
✔
✔
✔
slipping out of your hands, or someone deciding it would be fun to attempt to
pull a jumpscare on you in your workshop.
Do not abuse the cord. The cord isn't the reason you're having a bad day - and
it won't be, if you don't use it for carrying, pulling, or unplugging the heat gun,
and will keep it away from heat, oil, sharp edges, and moving parts.
Ensure the switch is in the off-position before connecting to the power
source, picking up, or carrying the heat gun. Also, unplug your heat gun
before making any adjustments, putting it in storage, or when the power
supply is interrupted.
Make sure that anyone using your heat gun or servicing it is acquainted with
this manual. The exception to the rule are children and infirm people - they
shouldn't be using your heat gun even if they remember every word written
here.
To keep your heat gun well-maintained, regularly check if any parts are
misaligned, damaged or broken, or if there's anything else that might affect its
performance. If you notice anything odd, definitely bring the heat gun for repair
before
using it.
Work or repairs on the heat gun should only be carried out by a professional.
It’s best to leave the really serious stuff to a qualified repair person who only
uses original replacement parts.
Avoid bodily contact with earthed or grounded surfaces such as pipes,
radiators, stoves, and refrigerators.
Work area safety
✔
Keep your working area clean, well illuminated and well ventilated. Accidents
are much more likely to happen in dirty, unorganised, or poorly lit workspaces -
accidents that are easy to avoid with basic upkeep.
5

✔
✔
✔
✔
✔
✔
✔
Consider your working environment. Do not operate power tools in explosive
atmospheres, such as in the presence of flammable liquids, gases, or dust.
Power tools create sparks which may ignite the dust or fumes.
When working outside, use an extension cord meant specifically for outdoor
use, and of an appropriate length. It's going to be much more convenient, and
will reduce the risk of an electric shock.
Your heat gun is not waterproof or splash proof. Do not use it in the rain,
spray with water, or immerse in liquid. It's an electric tool after all.
If damp conditions are unavoidable, use a residual current device (RCD)
protected supply.
Secure any movable workpiece(s) you're working on. A workpiece secured
with suitable clamps or in a vice is much more likely to be steady and stay in
place than one held by hand.
Keep children and bystanders away. Distractions can easily cause you to lose
control, so consider operating your power tools a solo venture. You'll catch up
with everyone later, when you've made progress with your project.
If you absolutely must have children in the working area, ensure that they're
always closely supervised by another, responsible
, adult, and do not interfere
with your work.
Personal safety
✔
Certified eye and heat resistant hand protection is a must when operating
your heat gun, as well as respiratory protection, if the working conditions are
dusty. Do not underestimate the power of personal safety equipment. By the
way, everyday eye glasses are not
safety glasses.
6

✔
Common sense is the best protection, isn't it? Stay alert - watch what you're
doing, exercise common sense, and do not operate the heat gun when you're
tired or under the influence of drugs, alcohol, or strong medication.
NB #1: Extreme care should be taken when stripping paint. The peelings, residue,
and vapors of paint may contain lead, which is poisonous. Any pre-1992 paint may
contain lead, and paint applied to homes prior to 1970 is likely to contain lead.
Once deposited on surfaces, hand-to-mouth contact can result in ingestion of
lead.
Exposures to even low levels of lead can cause irreversible brain and nervous
system damage; young and unborn children are particularly vulnerable. Before
beginning paint removal, determine whether the paint contains lead at your local
health department or by a professional using a paint analyzer. Lead based paint
should only be removed by a professional and should not be removed using a heat
gun.
NB #2: NoCry Work & Safety Gear and the manufacturer shall not be liable for any
changes made to the tool, nor for any damage resulting from such changes.
HOW TO USE YOUR HEAT GUN
How to switch the heat gun on/off
To switch it on, push the on-off switch to the position “I” or “II”. Some smoke may
be emitted after switching it on for the first time, but no worries - that is called
burn-in smoke, and does not indicate a problem.
To switch it off, push the on-off switch to the position “O”.
7
How to prevent overheating
There isn't really much you need to do, as the heat gun has a built-in thermal
protection system. In case of overheating (e.g. due to air build-up), it automatically
shuts off the heating system - but the blower continues to run. When the heat gun
has cooled down to the operating temperature, the heating system is automatically
switched on again.
However. Do not keep the nozzle too close to the workpiece, as it leads to
excessive hot air build-up, which will lead to overheating. And after operating the
heat gun at a high temperature for a longer period, switch to the position “I” for a
while before switching the heat gun off completely. That's it.
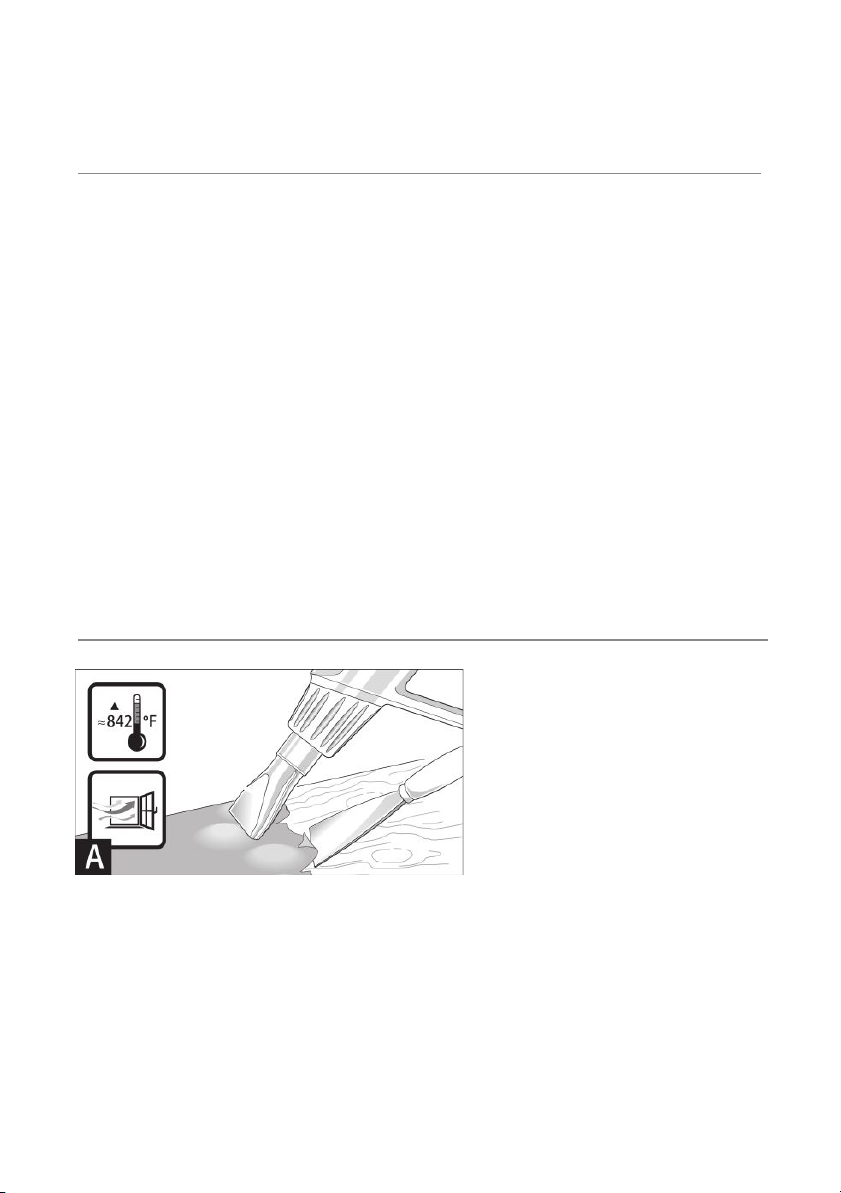
How to use the heat gun for removing varnish or softening
adhesives
Mount the wide jet nozzle
(included). Briefly soften the
varnish applying hot air and
remove it using a sharp, clean
scraper or putty knife. Applying
heat too long will burn the varnish,
making it more difficult to remove.
Many adhesives (e.g. of stickers)
become soft when heated. Heated adhesives allow for bonds to be separated or
excessive adhesive to be removed.
8
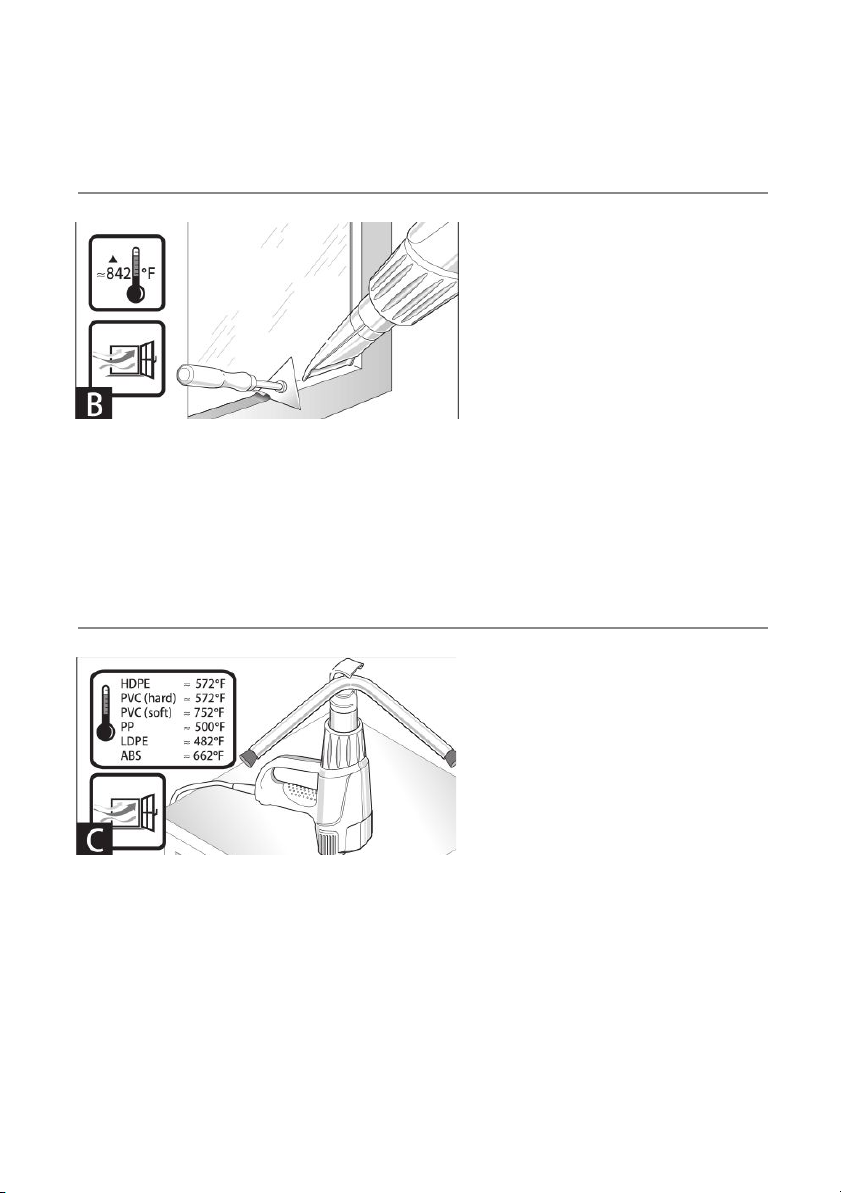
How to use the heat gun for removing varnish or paint from
windows
Using of the glass protection
nozzle (included) is essential, as
there is a danger of the glass
breaking from the applied heat. On
profiled surfaces, varnish can be
removed using an appropriately
fitting spatula and brushed off with
a soft wire brush.
How to use the heat gun for shaping plastic tubing
Mount the reflector nozzle
(included). To avoid kinking of the
tubing, fill the tubing with sand, and
plug both ends. Heat the tubing
evenly by applying the heat from
side to side.
9

How to use the heat gun for welding plastic
Mount the reduction nozzle
(included) and the welding shoe
(not included). The workpieces to
be welded and the welding rod
(accessory) must be of the same
material (e.g. both of PVC). The
seam must be clean and
grease-free.
Carefully heat up the seam location until it becomes doughy. Please note that the
temperature difference between the doughy and liquid state of plastic is low.
Feed in the welding rod and allow it to run into the gap so that a uniform bead is
produced.
How to use the heat gun for shrinking
Mount the reduction nozzle
(included). Select the diameter of
the heat-shrinkable sleeve (not
included) according to the
workpiece (e.g. a cable lug). Heat
the heat-shrinkable sleeve evenly.
10
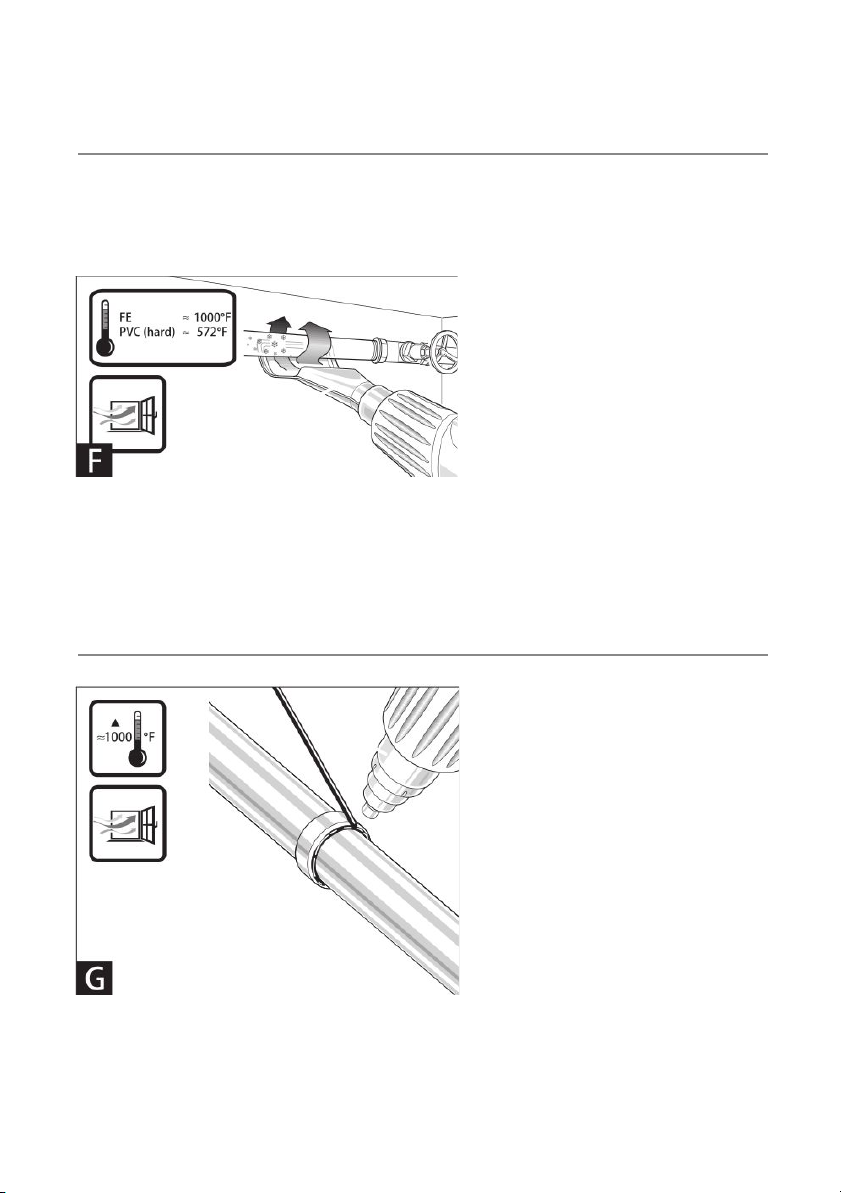
How to use the heat gun for defrosting water pipes
Before heating pipes, check to make sure that it is actually a water pipe. Water lines
often do not differ in appearance from gas lines. Gas lines are not to be heated
under any circumstances.
Place on the reflector nozzle
(included). Heat the frozen zone
from the outside to the middle.
Heat up plastic pipes as well as
connections between pipe pieces
especially careful to prevent
damage.
How to use the heat gun for soft soldering
For point soldering, place on the
reduction nozzle, for the soldering
of pipes/tubing, place on the
reflector nozzle (both accessories
included).
If solder without flux is used, apply
soldering grease or paste to the
location to be soldered. Warm the
location to be soldered for 50–120
seconds depending on the
material. Apply the solder. The
solder must melt from the
workpiece temperature. After the soldered location has cooled, remove the flux.
11

MAINTENANCE
Before any work on the heat gun itself, pull the mains plug. For safe and proper
working, always keep the machine and ventilation slots clean.
If the replacement of the supply cord is necessary, this has to be done by an
authorized service agent in order to avoid a safety hazard. Use only mild soap and
damp cloth to clean the tool. Never let any liquid get inside the heat gun, and never
immerse any part of it into a liquid.
HEAT GUN LIABILITY
This product is covered by an EU directive, valid since 01.01.1990, specifying that
the manufacturer is only liable for products if all the parts originate from the
manufacturer or are approved by them, and if the units are mounted and operated
properly.
If accessories or spare parts from third parties are used, liability can be partially or
completely inapplicable. So no using those shifty parts you picked up on the cheap.
In extreme cases the responsible authorities can prohibit the use of the entire unit.
We recommend you always buy original parts and accessories as compliance with
all safety regulations is guaranteed, meaning you are covered and protected.
Another weight off your mind.
DISPOSAL
Do not discard of this heat gun together with household products. Electrical
products used must be collected separately and disposed of at collection points
provided for this purpose. Check in with your local authorities or dealer for advice
on recycling.
12

WARRANTY
All NoCry products are inspected and tested to ensure their quality before leaving
the factory. If you’re not happy with your NoCry product, please contact us within
30 days of receiving it at [email protected] to return it for free for a replacement
product or to receive a full refund. The choice is yours.
Each NoCry electric product is warranted to be free of defects in material and
workmanship for the period of FOUR years from the date of original purchase.
Warranty does not cover normal wear and tear, abuse, altered products,
modifications, and products that have been repaired or attempted to be repaired
by others than NoCry. At NoCry’s discretion, a defective product will be repaired or
replaced.
This warranty gives you specific legal rights, but may be superseded by any other
rights or warranties in effect, which may vary from state to state (or based on your
local jurisdiction). If you think you might have a defective product, please contact
us at [email protected]. Our customer care team will be happy to help and start
the (free) procedure to determine whether your product is defective.
NoCry’s warranty applies to ONLY products being sold by Authorized Resellers. We
regretfully will not provide any warranty for products sold by any other sources.
Proof of purchase will be required to obtain warranty. Please review the warranty
carefully, and contact us if you have any questions.
13

HOW TO CONTACT NOCRY
We're glad to have you join the NoCry community, and we hope you are happy with
your new NoCry heat gun. If you have any questions or concerns, let us know by
emailing [email protected]
We'd also love to connect with you via social media. You can find us on Instagram,
Facebook and Pinterest by searching “NoCry Work & Safety Gear”.
14

So was it a thumbs up or a thumbs down for your experience with your
NoCry heat gun?
If this is your response, know that at NoCry, we try to treat everyone like we'd
treat our own mum. On her birthday, no less. So please let us know what went
away.
If you're happy with your purchase, why not spread the word to others who are
looking for a heat gun AND help us serve you better and grow as a company, by
leaving a review on Amazon? To leave a review, go to Amazon > Orders (top menu)
> Write a product review. Or search for the NoCry heat gun on Amazon, and leave
your review that way.
15
Table of contents
Other NOCRY Power Tools manuals


Popular Power Tools manuals by other brands

Central Pneumatic
Central Pneumatic 99792 Set up and operating instructions

Power Fist
Power Fist 8656860 user manual

Power Fist
Power Fist 8644171 manual

Delta
Delta ShopMaster DP250 instruction manual

FLORABEST
FLORABEST ian 271071 Operation and safety notes

MasterForce
MasterForce 241-0834 Operator's manual

QTORQ
QTORQ TCW5 Operator's manual

Doughty Engineering Ltd
Doughty Engineering Ltd T57230 user manual

Traditional Tool Repair
Traditional Tool Repair Fromm A332 Operation manual & spare parts list

woodmizer
woodmizer Re-Sharp CBN-AC Safety, Operation, Maintenance & Parts Manual

First Power
First Power Stinger Owner's/operator's manual

Lumberjack
Lumberjack CBS45LS owner's manual


