NOCRY NRT-128AC User manual

Rotary Tool Kit
Instruction Manual
We've worked very hard on making this manual useful, simple and understandable.
Please read it carefully, and keep it safe inside your rotary tool kit for future reference.

1

WHAT'S INSIDE THIS MANUAL
THE ABC'S OF POWER TOOL SAFETY 4
Basics of your work area safety 5
Basics of electrical safety 5
Basics of personal safety 6
Basics of servicing your power tools 7
THE ABC'S OF ROTARY TOOL SAFETY 8
Basics of safe rotary tool use 8
Grinding, cutting and sanding safety 9
Polishing safety 11
Wire brushing safety 11
TECHNICAL SPECIFICATIONS 12
All rotary tool parts 13
INCLUDED ATTACHMENTS & THEIR PURPOSES 14
INCLUDED ACCESSORIES & THEIR PURPOSES 17
Carving and engraving accessories 17
Cutting accessories 17
Grinding and sharpening accessories 19
Cleaning and polishing accessories 20
Sanding accessories 21
Drilling accessories 23
Adjustment accessories 23
HOW TO USE YOUR ROTARY TOOL 24
How to switch the rotary tool on or off 24
How to select and adjust the speed 24
Recommended speed settings for carving and engraving 24
Recommended speed settings for cutting 25
Recommended speed settings for grinding and sharpening 26
Recommended speed settings for cleaning and polishing 26
Recommended speed settings for sanding 27
Recommended speed settings for drilling 27
2

How to attach and change accessories with the collet nut kit 28
How to attach and change accessories using the chuck 30
How to adjust the chuck for different size accessories 30
How to fit a cutting or sanding disc 31
How to fit a felt wheel 32
How to fit a sanding band 33
How to install the flexible driver 34
How to attach an accessory to the flexible driver 35
How to set up the rotary tool stand 36
How to attach the handle for precision work 36
How to attach and use the cutting set 37
How to attach and use the sanding/grinding guide 37
How to attach and use the sharpening guide 38
How to replace the motor brushes 39
CLEANING AND MAINTENANCE 39
Cleaning 39
Maintenance 40
Responsible ways of disposal 40
ROTARY TOOL LIABILITY 4 0
WARRANTY 4 1
HOW TO CONTACT NOCRY 42
3

THE ABC'S OF POWER TOOL SAFETY
Please, please read all safety warnings and instructions - they're pretty
reasonable. We don't mean to sound dramatic, but neglecting the warnings and
instructions may actually result in electric shock, fire, and/or serious injury easier
than you might think. There's other - better ways to get your adrenaline going.
Also, save this manual for future reference . Reviewing it once in a while in
between rotary tool uses and before instructing others won't hurt either - in fact,
we strongly recommend it. If someone else is going to be operating this tool, make
sure they have read and understood all the information in this manual prior to
handling your rotary tool. Makes sense, right?
To clarify, the following safety instructions refer to all of your mains-operated
power tools (the tools with a power cable), and to your battery operated tools (the
tools with batteries and without a power cable). In addition to these, we've listed
the specific safety instructions relevant to your new NoCry rotary tool in the next
chapter - take a look at those as well.
✔
✔
✔
✔
Don't force the tool. No one is fond of having to do something they're forced
to do - same goes for your power tools. Do not overload them, and use the
right one for the job. A suitable power tool will do a thousand times better
and safer job than one that wasn't exactly designed for the task at hand.
Do not use a malfunctioning tool. If the switch doesn't turn on and/or off,
it's a pretty clear sign to not use the power tool and to get it repaired or
replaced.
Disconnect the tool from the power source and/or the battery pack before
making any adjustments, changing accessories, or putting it in storage.
This way, you'll ensure it will not turn on accidentally.
Keep your power tool away from others. Store it away from children and do
not allow anyone unfamiliar with your power tool or this manual, to operate
it.
4

✔
✔
✔
To keep your power tools well-maintained, regularly check if any parts are
misaligned, damaged or broken, or if there's anything else that might affect
their performance. If you notice anything odd, definitely bring the power tool
for repair BEFORE using it.
Keep your cutting tools sharp and clean. Cutting tools that have been
carefully maintained and have sharp cutting edges will jam less and be easier
to control. If you think that more injuries are caused by sharp tools than dull
ones, you'd be surprised.
Use the accessories and attachments as intended. On pages 14-23, we've
listed all accessories & attachments that come with your rotary tool, and
their purpose. Stick to that list.
Basics of your work area safety
✔
✔
✔
Keep your working area clean and well illuminated. Accidents are much
more likely to happen in messy, dirty, or dark workspaces - accidents that are
super easy to avoid with basic upkeep.
Do not operate your power tools in dusty or explosive areas, such as in the
presence of flammable liquids or gases, for a very simple reason - power
tools create sparks which may ignite the dust or fumes. Not the kind of
fireworks we want.
Keep children and bystanders away. Distractions can easily cause you to
lose control, so consider operating your power tools as your alone time. You'll
catch up with everyone later, when you've made some progress with the
project.
5

Basics of electrical safety
✔
✔
✔
✔
✔
✔
Do not modify the plugs, and make sure they match the outlet to reduce
your chances on getting an electric shock. Also, adapter plugs and earthed
(grounded) power tools are a really bad combo.
Do not abuse the cord. The cord isn't the reason you're having a bad day -
and it won't be, if you won't use it for carrying, pulling, or unplugging the
power tool, and will keep it away from heat, oil, sharp edges, and moving
parts.
Avoid body contact with earthed or grounded surfaces such as pipes,
radiators, stoves, and refrigerators.
When working outside, use an extension cord meant specifically for
outdoors use. It's going to be much more convenient, and will reduce the risk
of an electric shock.
Do not expose the tool to rain and wet conditions. Search “water and
electricity don't mix” on YouTube, and you'll see why.
If damp conditions are unavoidable , use a residual current device (RCD)
protected supply.
Basics of personal safety
✔
✔
Common sense is the best protection, isn't it? Stay alert - watch what
you're doing, exercise common sense, and do not operate your power tools
when you're tired or under the influence of drugs, alcohol, or strong
medications. It takes a split second of inattention to get into major medical
bills that could have easily been avoided.
To avoid unintentionally starting the tool, make sure the power switch is in
the off-position before connecting the tool to a power source and/or battery
6

✔
✔
✔
✔
✔
pack, or before picking up or carrying the tool. Also, learn to never carry
power tools with your finger on the power switch.
Remove any adjusting key or wrench before turning your power tool on. A
wrench or a key left attached to a rotating part of a power tool will ruin your
day real fast.
Do not take unnecessary risks by trying to reach areas that are obviously
too far away to reach safely. Keep proper footing and balance at all times -
it'll help you keep control in unexpected circumstances, would it be the
power tool slipping out of your hands, or someone deciding it would be fun to
attempt to pull a jumpscare on you in your workshop.
Don't underestimate the power of safety gear. No one has ever felt sorry
about using safety glasses, gloves, dust masks, non skid safety shoes, hard
hats, and/or hearing protection when operating power tools. But there's A
LOT of people who feel sorry they didn't. On that note…
Dress appropriately. Your power tools strongly prefer clothing and
accessories that are tight on your body. Do not wear loose clothing or
jewelry, keep your hair, clothing and gloves away from moving parts, and
you'll never have to experience your power tools trying to rip them off you.
Dust safely. If you're using a specific device for dust extraction and
collection, ensure that it's connected and used properly.
Basics of servicing your power tools
✔
Find a qualified repair person who only uses replacement parts identical to
the original to service and repair your power tools. This will ensure that the
safety of the power tool is maintained, and there will be no unpleasant
surprises. Pro tip: Take this manual with you to the service point, just in case.
7

THE ABC'S OF ROTARY TOOL SAFETY
These are the basic precautions you should take before, during, and after working
with your NoCry rotary tool to not end up crying over your medical bills, destroyed
workshop, or a lifeless tool. We've tried to keep it real and understandable, but if
you have any questions, feel free to let us know at wecare@nocry.com .
Basics of safe rotary tool use
✔
✔
✔
✔
✔
Keep your hands far enough from the rotating parts and cutting
attachments. If those attachments and accessories can be effectively used
on glass, metal, and other hard materials, just imagine what they could do to
your digits.
Secure the workpiece. We're not underestimating you, but a workpiece
secured with suitable clamps or in a vice is much more likely to be steady and
stay in place than one held by a hand.
Do not use third-party accessories (such as grinding discs) with the
maximum rated speed below 35,000 RPM. The power of the rotary tool will
most likely tear them apart and scatter them everywhere. Imagine a piece of
rough sandpaper hitting your face at 100mph - not the most pleasant of
experiences. And while we're on the topic...
Do not use accessories or attachments other than the ones recommended
in this user manual. We've included quite a wide variety of add-ons to get
everything done. But if you do wish us to consider adding another one, let us
know at wecare@nocry.com , and we'll see what we can do (we already tried
adding a can opener - it was a bad idea).
When the power supply is interrupted (for example, in case of a power
failure or when the mains plug is pulled), immediately set the on/off switch
to the “off” position to prevent uncontrolled restarting.
8

✔
✔
✔
✔
✔
If you absolutely must have children in the working area, make sure they're
closely supervised by another (responsible) adult and do not interfere with
your work.
Find out if there are any utility lines hidden in the work area. Use suitable
detectors or call the local utility company for assistance. It's totally worth it -
only imagine the level of booms and ouchies that coming in contact with
electric lines, damaging a gas line, or penetrating a water line can bring.
Make sure that everyone using your rotary tool kit or servicing it is
acquainted with this manual. The exception to the rule are children and
infirm people - they shouldn't be using your rotary tool even if they
remember every word written here.
Are you familiar with the accident prevention regulations and general
rules of occupational health and safety in force in your area? No? The
sooner you get acquainted, the sooner you can start using your rotary tool
there.
Do not underestimate the power of personal safety equipment. It'll make
your life way easier and better. Without goggles or safety glasses, you risk
damage to your eyes. Without an effective dust mask, you risk damaging
your lungs. Without a pair of noise-reducing earmuffs, you risk impairing
your hearing. In short - eye, head, ear, hand, foot, and respiratory
protection is a must when operating your rotary tool.
NB! NoCry Work & Safety Gear and the manufacturer shall not be liable for any
changes made to the tool, nor for any damage resulting from such changes.
Grinding, cutting and sanding safety
✔
Do not position your hand in line with or behind the rotating disc. The
kickback would most likely cost you your hand.
9

✔
✔
✔
✔
✔
✔
✔
To avoid damaging the discs and bits, only use accessory types that are
included in your rotary tool kit, and only use them for the recommended
applications. For example, do not grind with the flat surface of a cut-off disc -
it's intended for peripheral grinding, and applying side force may cause the
disc to shatter.
Only use undamaged mandrels that are of correct size and length to reduce
the possibility of cutting and sanding disc breakage.
Do not “jam” the cut-off disc, apply excessive pressure, or attempt to
make an excessively deep cut. It over-stresses the disc, increasing the risk
of it catching your hand or fingers. Your rotary tool will do the job like a hot
knife on butter even without additional effort on your part - save the energy
for showing off the finished work.
If the disc is binding or interrupting a cut for no reason, switch the rotary
tool off in the middle of the cut and hold it in the cut motionless until the disc
comes to a complete stop. Then and only then remove it from the cut,
investigate the cause of the disc binding and make it right before getting
back to work. On that note...
You can switch the rotary tool off, but do not restart it with the disc still in
the material. Instead, let the disc reach full speed in the air, and then
carefully re-enter the cut.
Use extra caution when making a “pocket cut” into existing walls or other
blind areas. The protruding disc may cut gas or water pipes, electrical wiring,
or objects that can cause kickback and other issues you don't want.
Use support underneath any workpiece - especially the larger ones. Large
workpieces tend to sag under their own weight, so, to minimize the risk of
disc pinching and kickback, it's best to place the support panels under the
workpiece near the line of cut and near the edge of the workpiece on both
sides of the disc.
10

Polishing safety
✔
This one is pretty straightforward: Do not allow any loose portion of the
polishing wheel to spin freely. Tuck away or trim any loose polishing wheel
strings, so they can't entangle your fingers or snag on the workpiece.
Wire brushing safety
✔
✔
✔
Be aware that the brush throws wire bristles even during ordinary
operation. So do not overstress the wires by applying excessive load to the
brush. It might also be useful to keep in mind that they can easily penetrate
light clothing and/or skin.
Allow the brush to run at operating speed for at least one minute before
using it. During this time, no one is to stand in front of or in line with the
brush to not get hit with the loose bristles and wires that are discharged
during the run-in time.
During use, direct the discharge of the spinning wire brush away from you
to avoid the small particles and tiny wire fragments become embedded in
your skin at high velocity.
11
TECHNICAL SPECIFICATIONS
NoCry Rotary Tool NRT-128AC
Voltage
120V ~ 60Hz
Rated power
1.4 Amps
No load speed
8,000-35,000 RPM
-1
Collet/Chuck diameter
Ø1/8 in
Weight
1.58 lb
Protection class
回/II
12
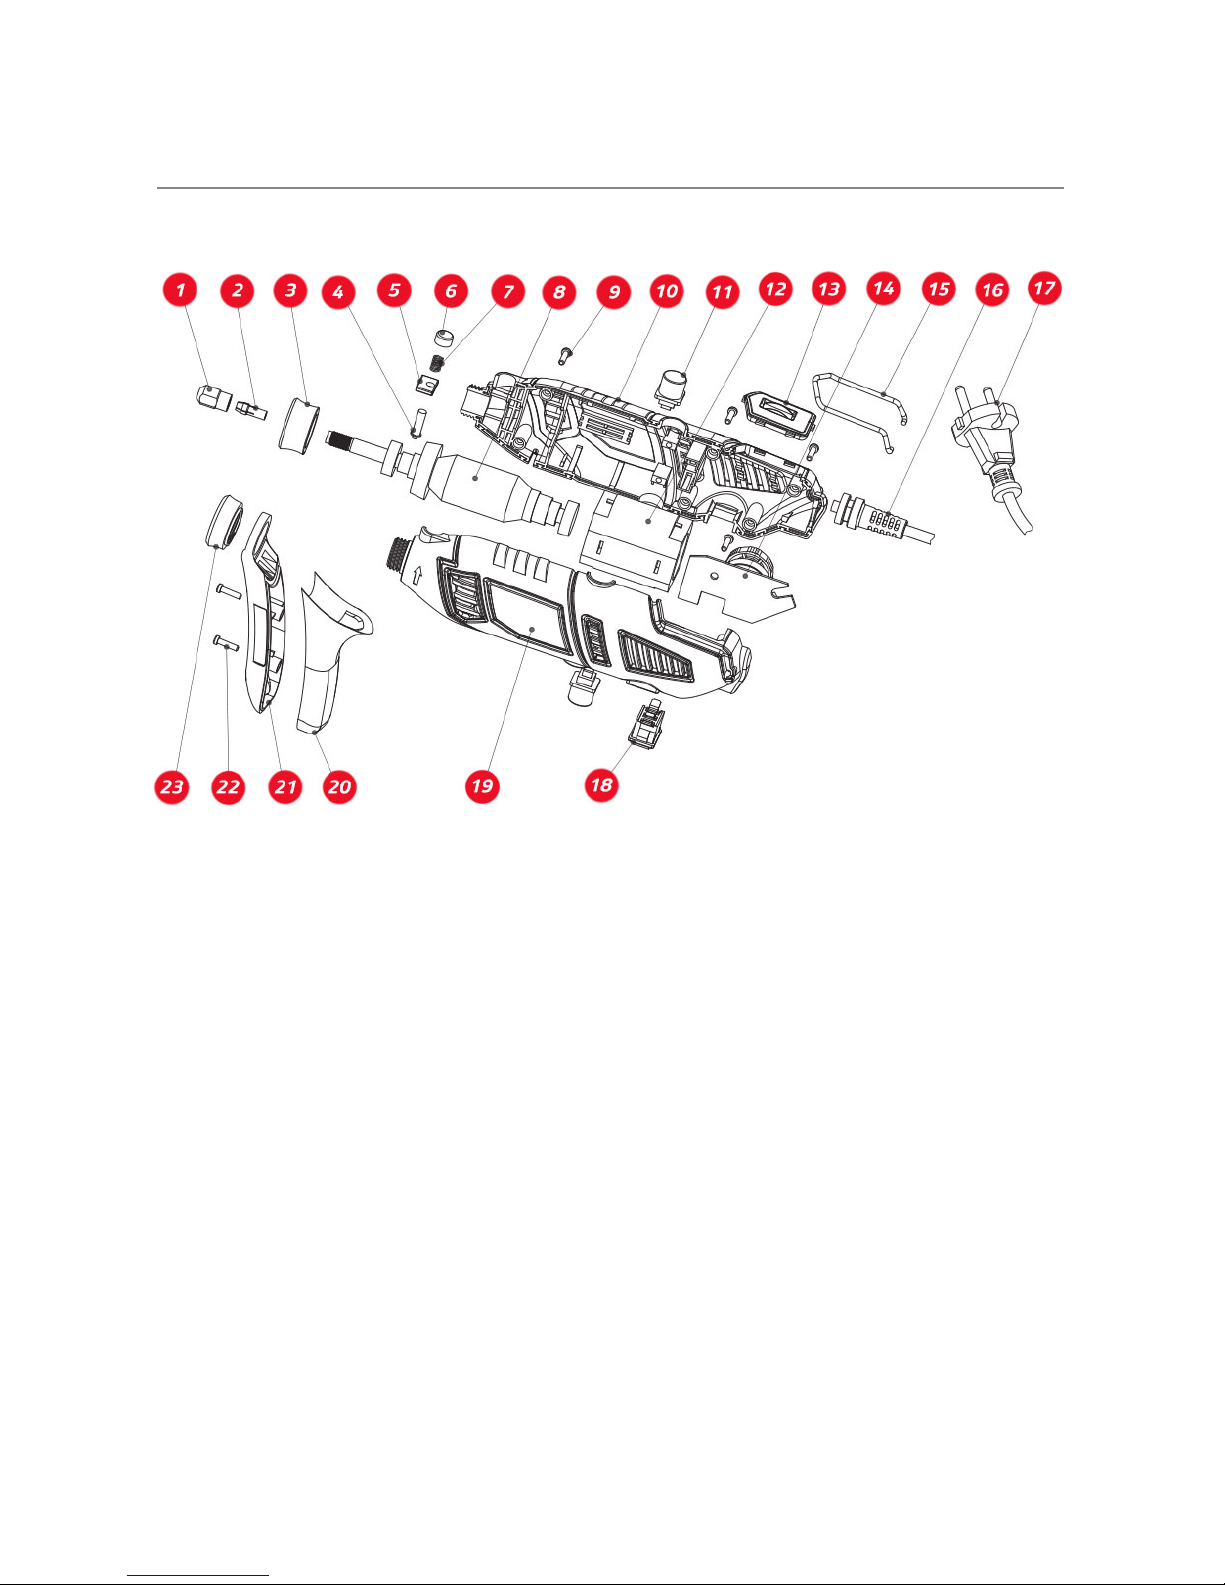
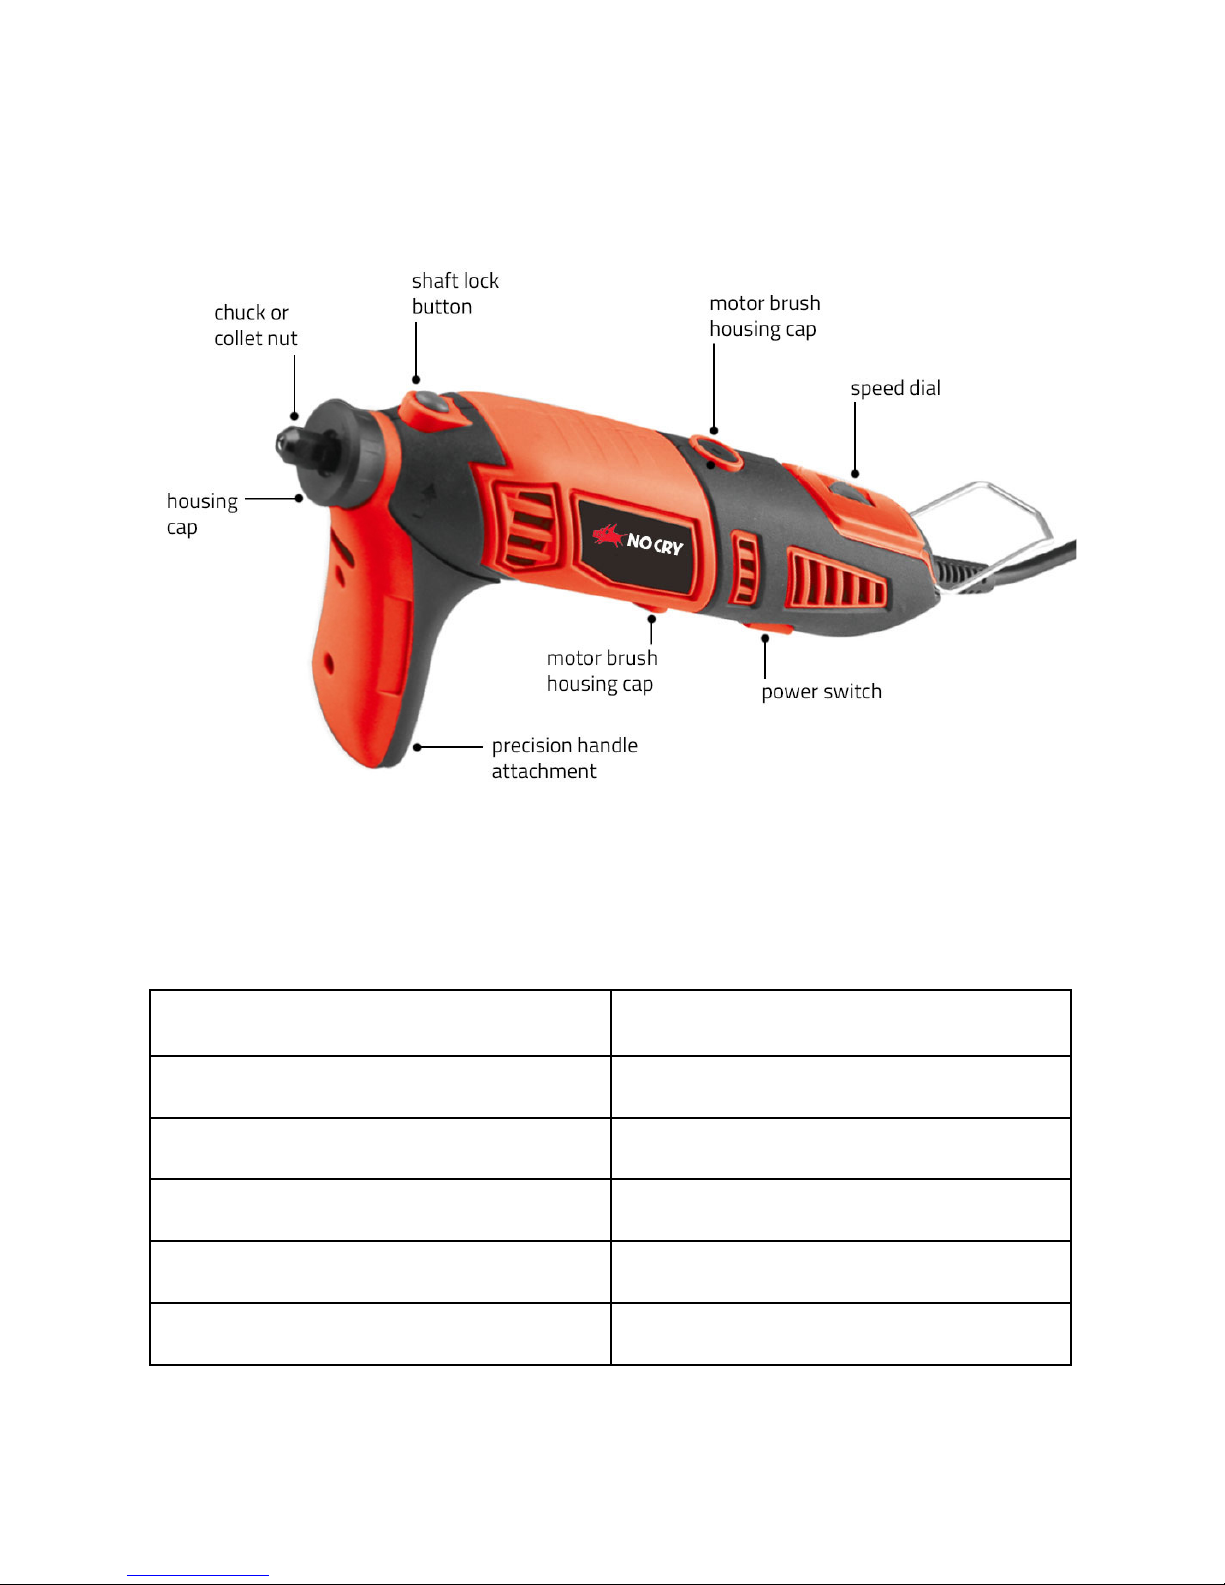
All rotary tool parts
1Collet nut. 2Collet. 3Housing cap. 4Shaft lock. 5Gasket. 6Shaft lock button.
7Spring of the shaft lock. 8Rotor. 9Screw. 10 Right body. 11 Carbon brush.
12 Stator. 13 Speed dial. 14 Circuit board. 15 Hanger. 16 Cord sleeve. 17 Plug.
18 Switch. 19 Left body. 20 Right handle. 21 Left handle. 22 Handle screws.
23 Housing cap.
13

INCLUDED ATTACHMENTS & THEIR PURPOSES
These attachments will help you get the most from all the different accessories
that come with your rotary tool kit (you can find the accessories list on pages
17-23). Here are the attachments we've included in the package - note that the
images are not to scale:
1 CHUCK
The adjustable chuck is a godsend for when you
want to quickly and easily change between
almost all rotary tool accessories, as the grip
can be easily adjusted for shanks with a
diameter of up to 1/8in. Find our tips on installing
and using it on page 30.
1 COLLET NUT SET
The most precise and secure way to hold an
accessory at high speeds. The collets come in 3
sizes (Ø1/8in, 3/32in and 1/16in) to ensure the
tightest fit for your chosen accessory. It's not as
straightforward to use as the adjustable chuck, but
still pretty simple - see the instructions on page 28.
1 FLEXIBLE DRIVER
Perfect for when you need to use the rotary
tool in hard to reach places, or for finesse work
- like when cutting or engraving. Find the steps
for installing and using the flexible driver on page
34.
14
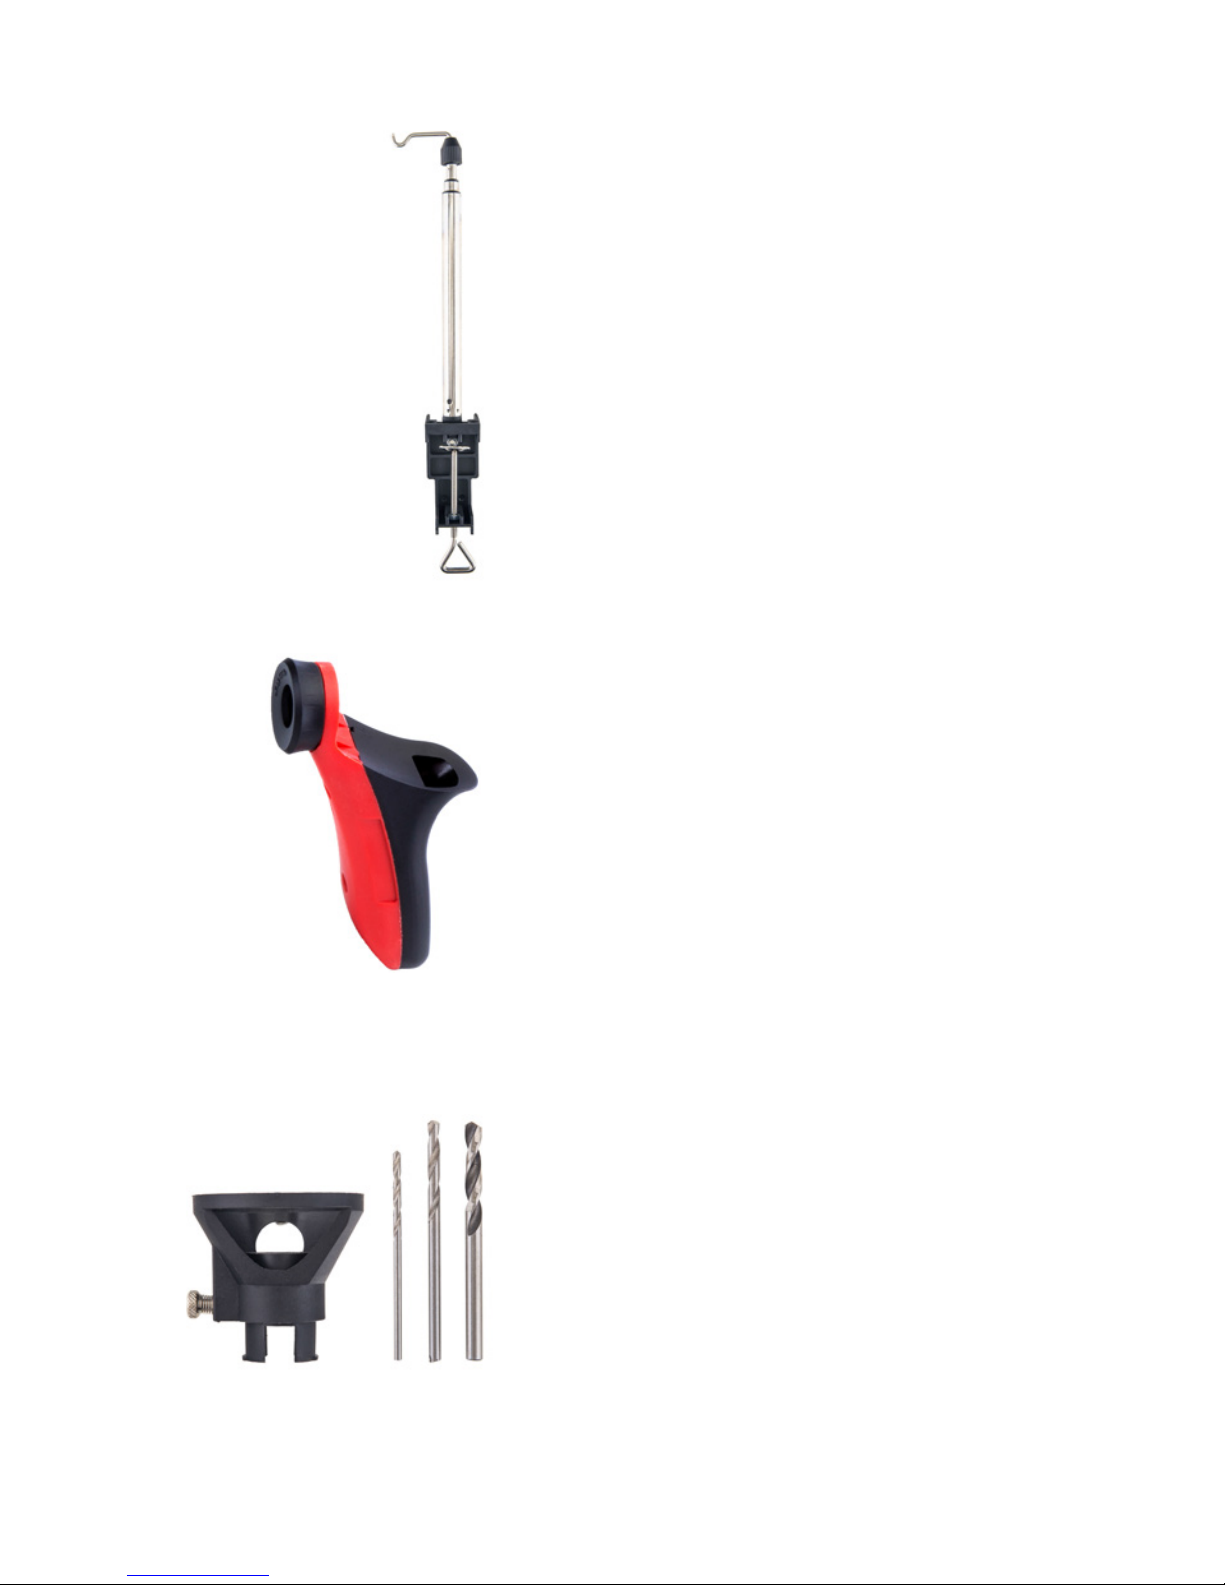
1 ROTARY TOOL STAND
The stand is used to hold the rotary tool up for
maximum mobility when using the flexible
driver. If you can't immediately recognize it,
know that it consists of a table clamp and an
adjustable height rod, and comes disassembled
in the box - find our tips on setting it up on page
36.
1 PRECISION HANDLE SET
This is the key to doing any sort of precision
work with your rotary tool - it redistributes the
weight of the tool to your palm for improved
balance, which is oh-so important for those
precision projects. When looking for it in the
box, keep in mind that the set consists of the
precision handle and the narrow housing cap.
Find tips on attaching and using it on page 36.
1 CUTTING SET
The cutting guide with adjustable depth and the
3 drill bits together allow for a sturdy and
controlled cut with maximum visibility. Look for
the set-up instructions on page 37, and speed &
material recommendations - on page 25.
Pro tip: The drill bits can also be used
independently from the cutting guide, to help
you get the most from the kit.
15

1 PIVOT LIGHT
Even though you won't be using your rotary tool
in dark conditions, sometimes, a little extra light
is necessary for detailed work. The set-up is
pretty simple - replace the housing cap with the
pivot light, and you're good to go.
1 SHIELD
This bad boy provides additional protection by
redirecting sparks and debris while cutting,
grinding, sanding, and polishing. Just replace the
housing cap with the shield, and don't worry -
it's compact enough to not disturb your work.
A SANDING/GRINDING GUIDE
The platform provides stability and enhanced
control during edge sanding and sharpening.
Interested? Find the set-up & use instructions on
page 37.
1 SHARPENING GUIDE
Use the guide with the grinding stones and
sanding bands to sharpen all blades, such as
shears, hoes, lawn mower blades, shovels etc.,
at the optimal angle. Find our tips on using it with
your rotary tool on page 38, and the speed &
material recommendations for sharpening - on
page 26.
16

INCLUDED ACCESSORIES & THEIR PURPOSES
The below listed accessories, used with the appropriate attachments, are the key
to gettings things done with your rotary tool. Note that the images may not be to
scale.
We'd love to keep up with your projects - share the process (and the finished work)
with us sometimes via Instagram with the hashtag #nocrygear, on our Facebook
page, or via email to wecare@nocry.com .
Carving and engraving accessories
Pro tip: A useful accessory to use with these accessories is the flexible driver, which
provides extra level of control and mobility. See our tips on installing it on page 34.
7 DIAMOND-TIP BITS, Ø1/8in
Covered with diamond particles, these bits are
made to be used on harder materials for fine
detail work, engraving, carving, touch-up, and
finishing. Which materials exactly, you ask? See
our material & speed setting guide on page 24,
and if you need help setting up, find our tips on
pages 28-30.
1 HSS CUTTER, Ø1/8in
Use the HSS cutter for shaping, hollowing,
grooving, slotting, and making tapered holes in
a variety of materials - see our material & speed
setting recommendations on page 24. For set-up
instructions, flip over to pages 28-30.
17

Cutting accessories
36 BLACK CUT-OFF DISCS, 15/16 x 1/64in
These black cut-off discs cut along their edge
for a nice, sharp, thin cut in tougher materials
like plastic and metal (might have some
difficulties with really tough reinforced metals
though). See our tips on attaching them on page
31, and in case you're wondering about the
materials they can cut, and at which speed setting
- our guide is right there on page 25.
1 CUT-OFF & SANDING DISC MANDREL, Ø1/8in
This mandrel's main task is to attach the cut-off
and sanding discs to your rotary tool - see how
on page 31.
1 HSS CUTTER, Ø1/8in
The HSS cutter can not only be used as a
carving tool, but together with the tile cutting
guide, it becomes great for cutting various
metals, woods and plastic (hence the name) in a
manner similar to spiral saw blades in any
direction - see our material & speed setting tips
for cutting with the HSS cutter on page 25. To find
set-up instructions, flip over to pages 28-30.
18

Grinding and sharpening accessories
The grinding and sharpening accessories are probably among the most useful in
the kit, as they are perfect for those practical, everyday money-saving DIY jobs like
sharpening tools, mower blades, and even boat propellers, and smoothing,
grinding and cleaning a variety of materials around the house and garden.
5 PINK, 3 BROWN & 2 GREEN GRINDING
STONES, Ø1/8in, 120 grit
The different colors aren't just for fun
(otherwise we'd have made all the stones red,
obviously). The brown and pink ones are
aluminum oxide stones, while the green ones -
silicon carbide, and all colors have different
applications. See our tips on which materials to
use them on, and at which speed setting on page
26. For installation instructions, flip over to pages
28-30.
1 GREEN WHET STONE
Grind your grinding stones against this little
fella, and it'll bring them back to life in no time.
If necessary, you can also reshape your grinding
stones with this.
19
Other manuals for NRT-128AC
1
Table of contents
Other NOCRY Power Tools manuals


