nodon PIR-2-1-0 series User manual

The NodOn®PIR Motion Sensor allows to detect motion and trigger actions directly on
your actuators (such as NodOn®Smart Plug, NodOn®In-Wall module, etc…) or through your
EnOcean®compatible Home Automation gateway. Use your NodOn®PIR Motion Sensor in
standalone mode with a NodOn®actuator to perform simple and construction work-free
Smart Lighting Management, or integrate it into your EnOcean®Smart Home ecosystem.
INSTALLATION
Thanks to its shape and the included accessories, you can install your PIR Motion Sensor
anywhere in your house.
On your desk On your wall On your ceiling
ON YOUR WALL
aUse a screw to hang your sensor on the wall.
bStick your sensor on the wall with the double sided tape.
cScrew the support on the wall to mount your sensor on it.
ON YOUR CEILING
dDrill a 45mm diameter hole in thin ceiling to insert the included fastening hooks and
mount the support in them.
eMount your sensor into the support.
PIR Motion Senror by NodOn®
Reference: PIR-2-1-0x
Power supply: battery CR123A 3V
Lifetime: 5 years
Center radio frequency : 868.3 MHz
Occupied frequency band : 868.0 to 868.6 MHz
RF power Max : +3dBm
Wireless range: Up to 30 meters
Detection range: Up to 5 meters
Lux sensing: 0 to 1000Lux
Operational temperature: -10°C / 45°C
EEP (Prol EnOcean®): A5-07-03
Dimensions: 65 mm (l) x 65 mm (L) x 39 mm (h)
Weight: 54 g
Warranty: 2 years
USER GUIDE
PIR - MOTION SENSOR
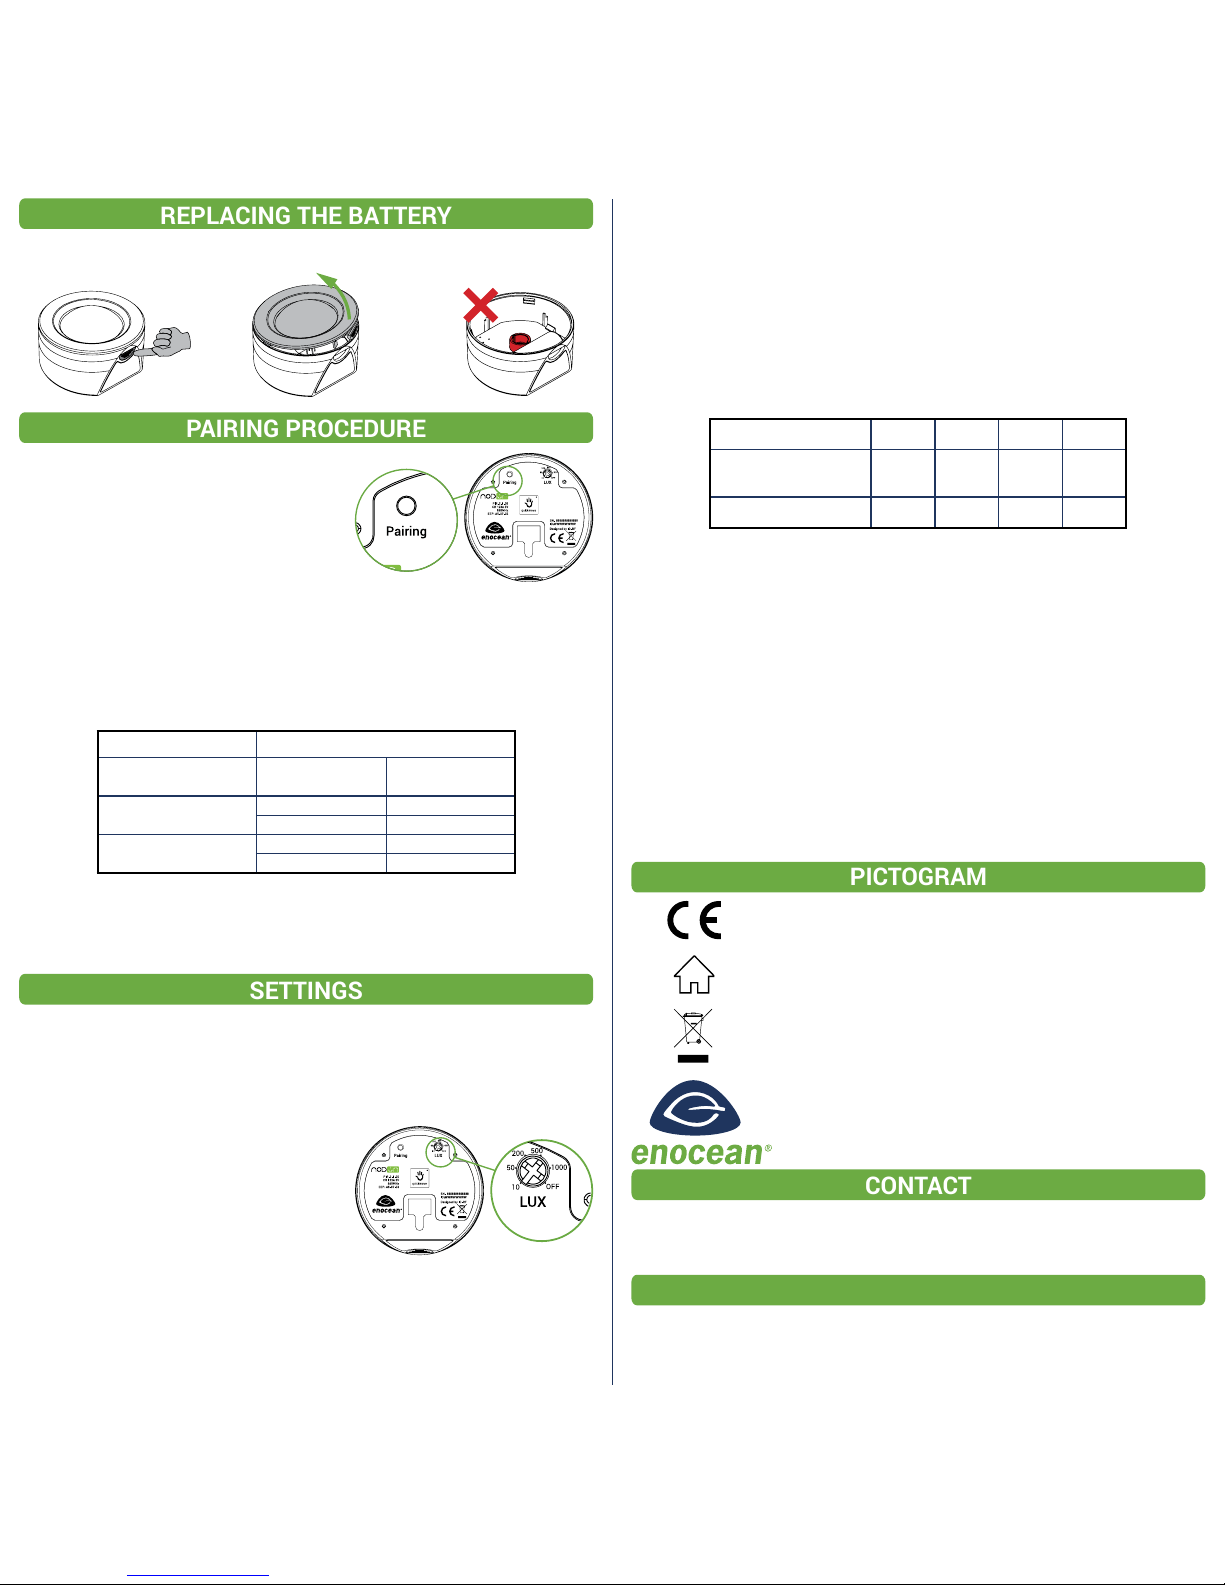
REPLACING THE BATTERY
In order to replace the battery, open the product following the below instructions.
Please, make sure you don’t touch the sensing part located in the middle of the circuit board.
PAIRING PROCEDURE
The NodOn®PIR Motion Sensor can work in 2
modes:
•Standalone Mode: by directly controlling
compatible receivers (such as NodOn®Smart Plug,
NodOn®In-Wall Module (1 or 2 Channels), …)
•Gateway Mode by notifying the Gateway about the
motion Status (Movement / No More Movement).
STANDALONE MODE
To pair the PIR Motion Sensor with another receiver:
1Put the receiver into «Pairing Mode».
2Do a single push on the PIR Motion Sensor « Pairing » Button.
On NodOn®compatible receivers (Smart Plug, In-Wall Module, etc…), it’s possible to create a
Smart Control System only with the PIR Motion Sensor and the receiver(s).
The state of the receiver before entering it into « Pairing Mode » denes the receiver state
when movement will be detected. When no movement is detected, the receiver will be in the
opposite state. Check below table for details:
Pairing Mode Usage
Receiver state before
“pairing mode” Sensor status Final receiver state
ON MOVEMENT ON
NO MOVEMENT OFF
OFF MOVEMENT OFF
NO MOVEMENT ON
GATEWAY MODE
To pair the PIR Motion Sensor with a gateway:
1Put your Gateway into « Pairing Mode ».
2Do a single push on the PIR Motion Sensor « Pairing » Button.
The sensor will report the « Movement » / « No More Movement » Status to the Gateway.
SETTINGS
The NodOn®PIR Motion Sensor embeds several settings, for both Standalone and Gateway Mode.
WALK TEST MODE
When the product is powered-up for the rst time (of after removing the battery), the sensor enters
into « Walk Test Mode ». During 3 minutes, the LED will ash every time a motion is detected.
Use this feature to nd the perfect location, and its eciency, for your sensor.
LIGHT SENSITIVITY
The NodOn®PIR Motion Sensor embeds an
ambient light sensor, allowing to only detect
movement under a luminosity level:
If the ambient light is below the limit dened by
the potentiometer, an ON or OFF frame will be
sent when motion is detected. The feature can
be deactivated by placing the potentiometer on
position OFF.
Default position: OFF.
AUTO OFF-TIME SETTING
In Standalone Mode (directly paired with a receiver), the NodOn®PIR Motion Sensor is
capable to Switch ON or OFF a receiver when Motion is detected, as well as capable to Switch
OFF or ON a receiver when no more Motion is detected.
Typically, if no motion is detected during a certain time, the PIR Motion Sensor will
automatically send an ON or OFF frame (depending how it has been paired to the receiver -
Check the « Pairing Procedure »). This time is called the « Auto-Off Time ».
Please note that the counter is resetted every time a motion is detected.
To enter in the Auto-Off Time setting, long press 3sec on the « Pairing » button. The LED is
glowing to let you know your are in the « Setting Mode ».
While in the « Setting Mode », press once the button to select the willing Auto-Off Time. At
every press, the LED will blink a number of time to conrm the current setting (Check below
table for details)
Auto off-time 30sec 5min 15min 30min
Number of press after
glowing
1st
press
2nd
press
3rd
press
4th
press
LED blinks 1 2 3 4
« Setting » Mode will be automatically exit, and the setting memorized, after no action on the
button during 5sec. By default, the Auto-Off time is set on 30sec.
Best Practice
In a hallway, or some place where people are just passing by, set up the Auto-Off time to a small value, to
automatically switch OFF the light as fast as possible (and save energy).
In a meeting room or some place where people are pretty static, set up the Auto-Off time to a big value, to avoid
the light switch ON/OFF while you’re still in the room. Once you’ll leave the room, the light will be automatically
switched ON (or OFF) after the Auto-Off time is elapsed.
LOW BATTERY INDICATOR
The LED will ash twice every 10sec when the battery need to be replaced.
HEARTBEAT SETTING
The Heartbeat is an automatically triggered frame, and is sent every 30min. It contains
information from the sensor, such as current Lux level, battery level and current sensor state
(Movement / No Movement). By default the Heartbeat is activated.
To deactivate (or activate) the Heartbeat, press 3 times on the « Pairing » button.
If the LED glows 1 time, the Heartbeat will be set OFF.
If the LED glows 2 times, the Heartbeat will be set ON.
If you want to change this parameter, press again 3 times on the « Pairing » button.
PICTOGRAM
This product is compliant with all relevant European standards.
This product must be used indoor only.
When sorting your waste, please observe the disposal regulations in
force. Please place your waste in the facilities provided for that purpose
and with all due respect for the environment.
This product is compliant with EnOcean®radio protocol.
CONTACT
Manufacturer & Importer :
ID-RF SAS
121 rue des Hêtres
45590 St CYR EN VAL (FRANCE)
AFTER SALES
www.nodon.fr section “support”
For user guides in other languages, please visit
www.nodon.fr/notices
Other nodon Accessories manuals


Popular Accessories manuals by other brands


Vernier
Vernier UVB-BTA quick start guide

Waeco
Waeco CombiCool CAS-60 Installation and operating manual

International Biomedical
International Biomedical AirBORNE A750i Service manual

Ivation
Ivation IVAEAC55 user guide

APG
APG IRU-2 4 Series Operator's manual

Royal Catering
Royal Catering RC-BC001 user manual


