NODOR D1050BKHK User manual


PRODUCT SAFETY
These instructions are for your safety. Please read the following instructions carefully before proceeding with the installation
and use of this applicnce. Keep the instruction manuals for future reference.
Warning: All installation work must be carried out by a suitably qualified person, strictly following
local building regulations and these instructions.
To avoid the risks that are always present when you use an electrical appliance it is important that this oven is installed
correctly and that you read the safety instructions carefully to avoid misuse and harzards. After packing th oven please
check that it is not damaged. If in doubt, do not use the appliance but contact Customer Service or
Check the package and make sure you have all of the parts lsted and decide upon the appropriate location for your product.
If this product contains glass pleae take care with fitting or handling to prevent personal injury or damage to the product.
The specification plate shown on this appliance displays all the necessary identification information for ordering replacement
parts. If you sell the appliance, give it away, or leave it behind when you move house, please ensure that you pass on this
manual so that the new owner can become familiar with the appliance and its safety warnings.
SAFETY
All installation work must be carried out by a suitably qualified person, strictly following local building
regulations and these instructions.
!Warning: Ensure that the appliance is switched off at the fused spur before replacing the lamp to
avoid the possibily of electric shock.
!Warning: Accessible parts may become hot during use. Children should be kept away.
!Warning: If the door or door seals are damaged, the oven must not be operated until it has been
repaired. Contact Customer Services for advice.
!During Installation do not allow the supply cord to touch the hot parts of the appliance.
!Make sure that the supply cord is not caught under or in the appliance and avoid damage to the
supply cord.
!Do not install the appliance outdoors in a damp place or in an area which may be prone to water
leaks such as under or near a sink unit. In the event of a water leak allow the machine to dry
naturally. Do not use and contact Customer Services for advice.
!Please dispose of the packing material carefully.
!Do not use flammable sprays in close vicinity to the appliance.
!Warning: This appliance can be used by children aged from 8 years and above and persons with
reduced physical, sensory or mental capabilities or lack of experience and knowledge if they have
been given supervision or instruction concerning use of the appliance in a safe way and
understand the hazards involved. Children shall not play with the appliance.
!Cleaning and user maintenance shall not be made by children without supervision. Keep the
appliance and its supply cord out of the reach of children less than 8 years old.
!If the supply cord becomes damaged, it must be replaced by the manufacturer, its service agent or
similarly qualified persons in order to avoid a danger or injury.
!The appliance is not intended to be operated by means of an external timer of separated remote
control system.
!The appliance is for domestic use only and only for cooking food. Do not use this appliance as a
source of heat.
!The manufacturer declines all liability for personal or material damage as a result of misuse or
incorrect installation of this appliance.
!Danger of burns! During use the appliance becomes hot. Care should be taken to avoid touching
heating elements inside the oven.
!Do not lean on the door or place any objects on the door of the appliance. This can damage the
door hinges.

PRODUCT SAFETY
!The oven must be installed in accordance with installation instructions and all dimensions must be
followed.
!Before connecting the appliance to the power supply, check that the power supply voltage and
current rating correspondings with the power supply details shown on the appliance rating label.
!Never use a damaged appliance! Disconnect the appliance from the electrical outlet and contact
your retailer if it is damaged.
!Danger of electric shock! Do not attempt to repair the appliance yourself. In case of malfunction,
repairs are to be conducted by qualified personnel only.
!To avoid damaging the cord, do not squeeze, bend or chafe it on sharp edges. Keep it away from
hot surfaces and open flames.
!Lay out the cord in such a way that no unintentional pulling or tripping over it is possible. Keep the
appliance and its cord out of reach of children. Do not operate the appliance with wet hands or
while standing on a wet floor. Always turn the appliance off before disconnecting it from the power
supply.
!Disconnect the oven from the power supply when not in use and before cleaning.
!Warning: This appliance is supplied with a three core supply cord and must be connected direct to
the mains electricity supply via a omni-polar or double pole switch having a 3mm minimum contact
gap on each connector.
!The fused spur should be installed in an easily reachable place so that in case of emergency the
appliance can be disconnected from power immediately.
!The fixed wiring must be protected against heat surfaces.
!Do not hang any objects on the handle of the oven door.
!Caution: Do not cover the bottom of the oven with aluminium foil or other objects. There is a risk
of fire and damage to the enamel in the oven!
!Do not allow aluminium foil, plastic, paper or fabric contact with heating elements. Never leave the
appliance unattended during use, especially when cooking with flammable substances (e.g. hot oil,
fat, etc.).
!Do not store or never use harsh chemicals, sprays, flammable or non-food in or near the oven.
!This oven is designed specificially for heating or cooking food. The use of corrosive chemicals in
heating or cleaning will damage the unit and may cause injury.
!Should any food inside the oven catch fire, keep the door closed. Switch the oven off and
disconnect the power supply. Always exercise caution when opening the door.
!Move to the side, and open the door slowly to vent the hot air and/or steam. Make sure your face
is away from the openning and make sure there are no children or pets near the oven.
!Do not touch the steam from the oven to avoid scald.
!Only use utensils that are suitable for use in this type of oven.
!The oven should be cleaned regularly and any food deposits removed.
!Do not use harsh abrasive cleaners or sharp metal scrapers to clean the oven door glass. They
can scratch the surface, which may result in shattering of the glass.
!A steam cleaner is not to be used.
!Warning: The appliance and its accessible parts become hot during use. Care should be taken to
avoid touching heating elements.
!Children less than 8 years of age shall be kept away unless continuously supervised.
!The appliance must not be installed behind a decorative door in order to avoid overheating.
!The rear panel of the cabinet must be removed so that air can circulate freely for good ventliation.
PRODUCT INSTALLATION
INSTALLATION
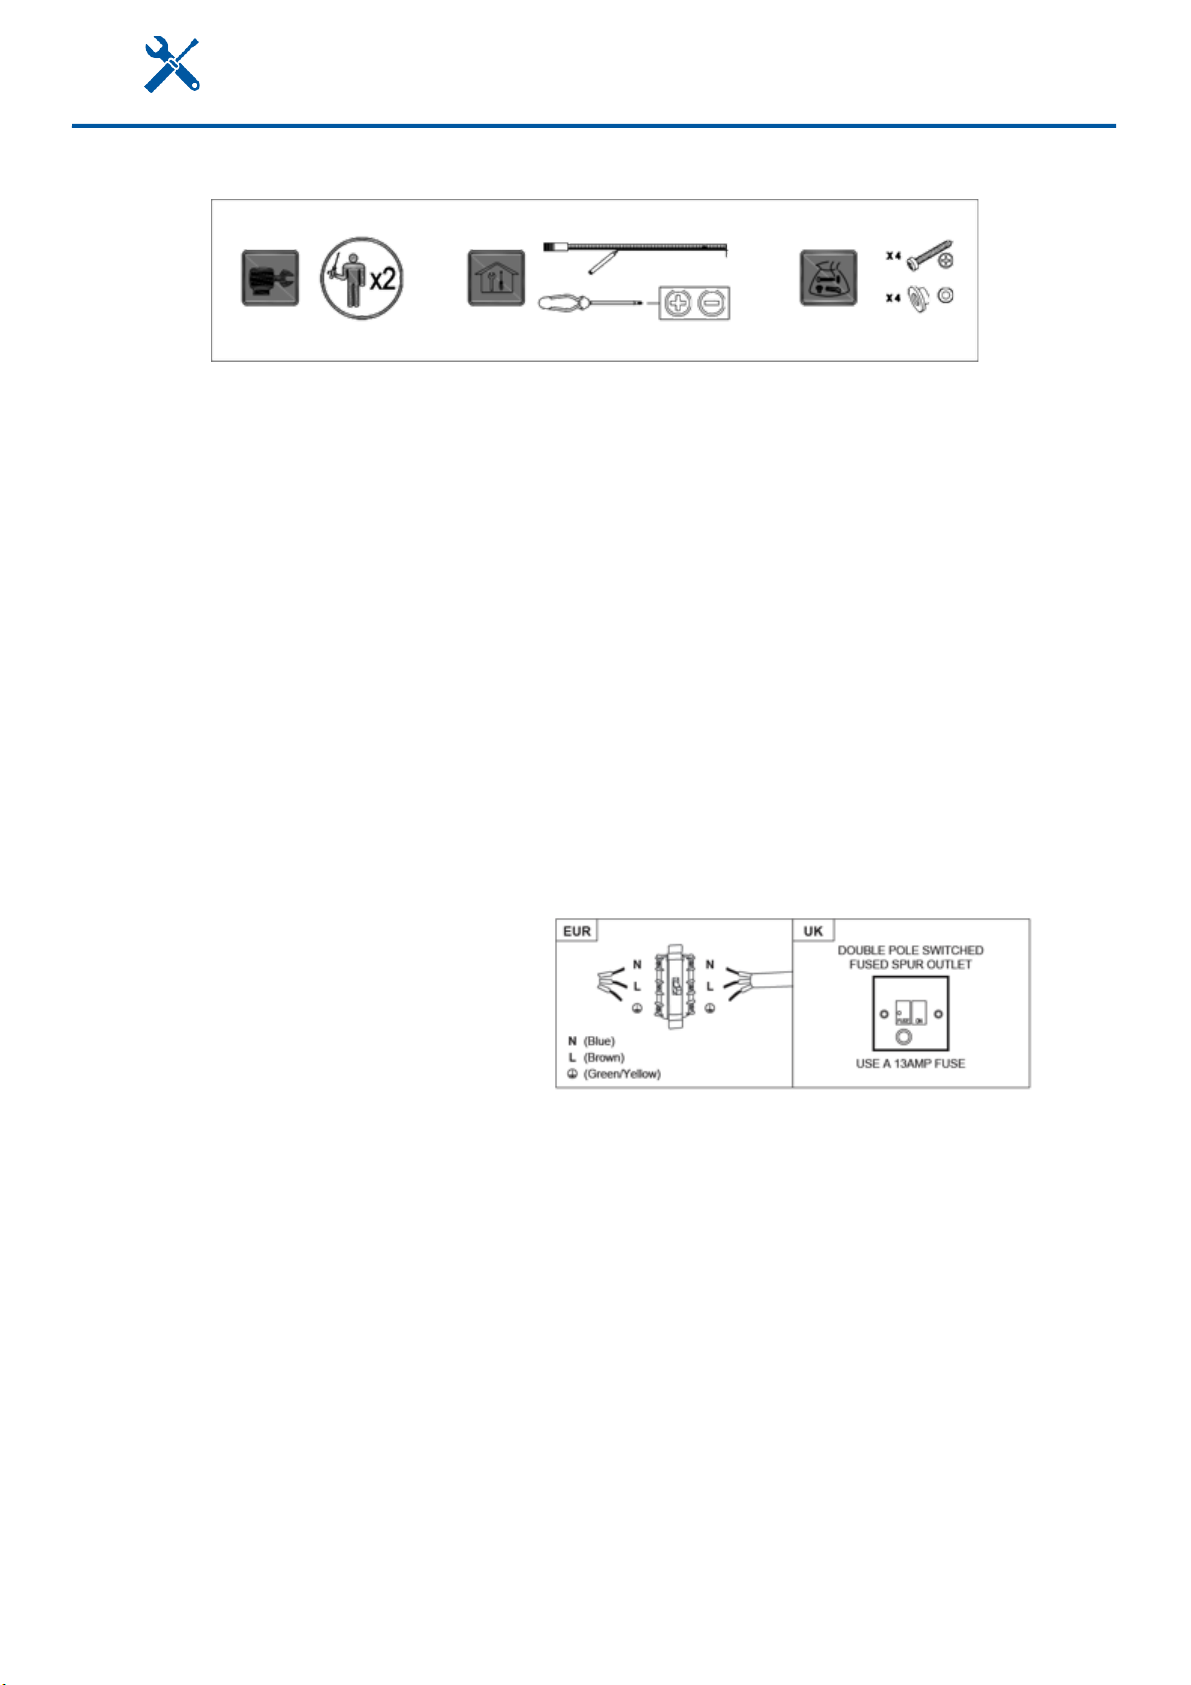
All installation must be carried out by a competent person or qualified electrician. Before connecting
the mains supply ensure that the mains voltage corresponds to the voltage on the rating plate.
DIRECT CONNECTION
This appliance must be connected directly to the mains using an omnipolar circuit breaker with a
minimum opening of 3mm between contacts.
The installer must ensure that the correct electrical connection has been made and that it complies with
the wiring diagram.
The cable must not be bent or compressed.
Regularly check the power cord for damage. If the suppy cord becomes damaged, it must be replaced
by the manufacturer, its service agent or similarly qualified persons in order to avoid a hizard.
Warning: This is a Class I appliance and MUST be earthed.
This appliance is supplied with a 3 core mains cable coloured as follows:
•Brown = L or Live
•Blue = N or Neutral
•Green and Yellow = E or Earth
The fuse must be rated at 16 amps.
To avoid the risks that are always present you use an electrical appliance it is important that this
appliance is installed correctly and that you read the safety instruction carefully to avoid misuse and
hazards. Please keep this instruction booklet for future reference and pass it on to any future owners.
After unpacking the appliance please chek that it is not damaged. If in doubt, do not use the appliance
but contact Customer Services. The manufacturer declines all liability for damage caused to persons
and objects due to incorrect or improper installation of the appliance. Any permanent electrical
installation must comply with the latest wiring regulations applicable to your country and for your own
safety a qualified electrician or contractor should undertaken the electrical installation.
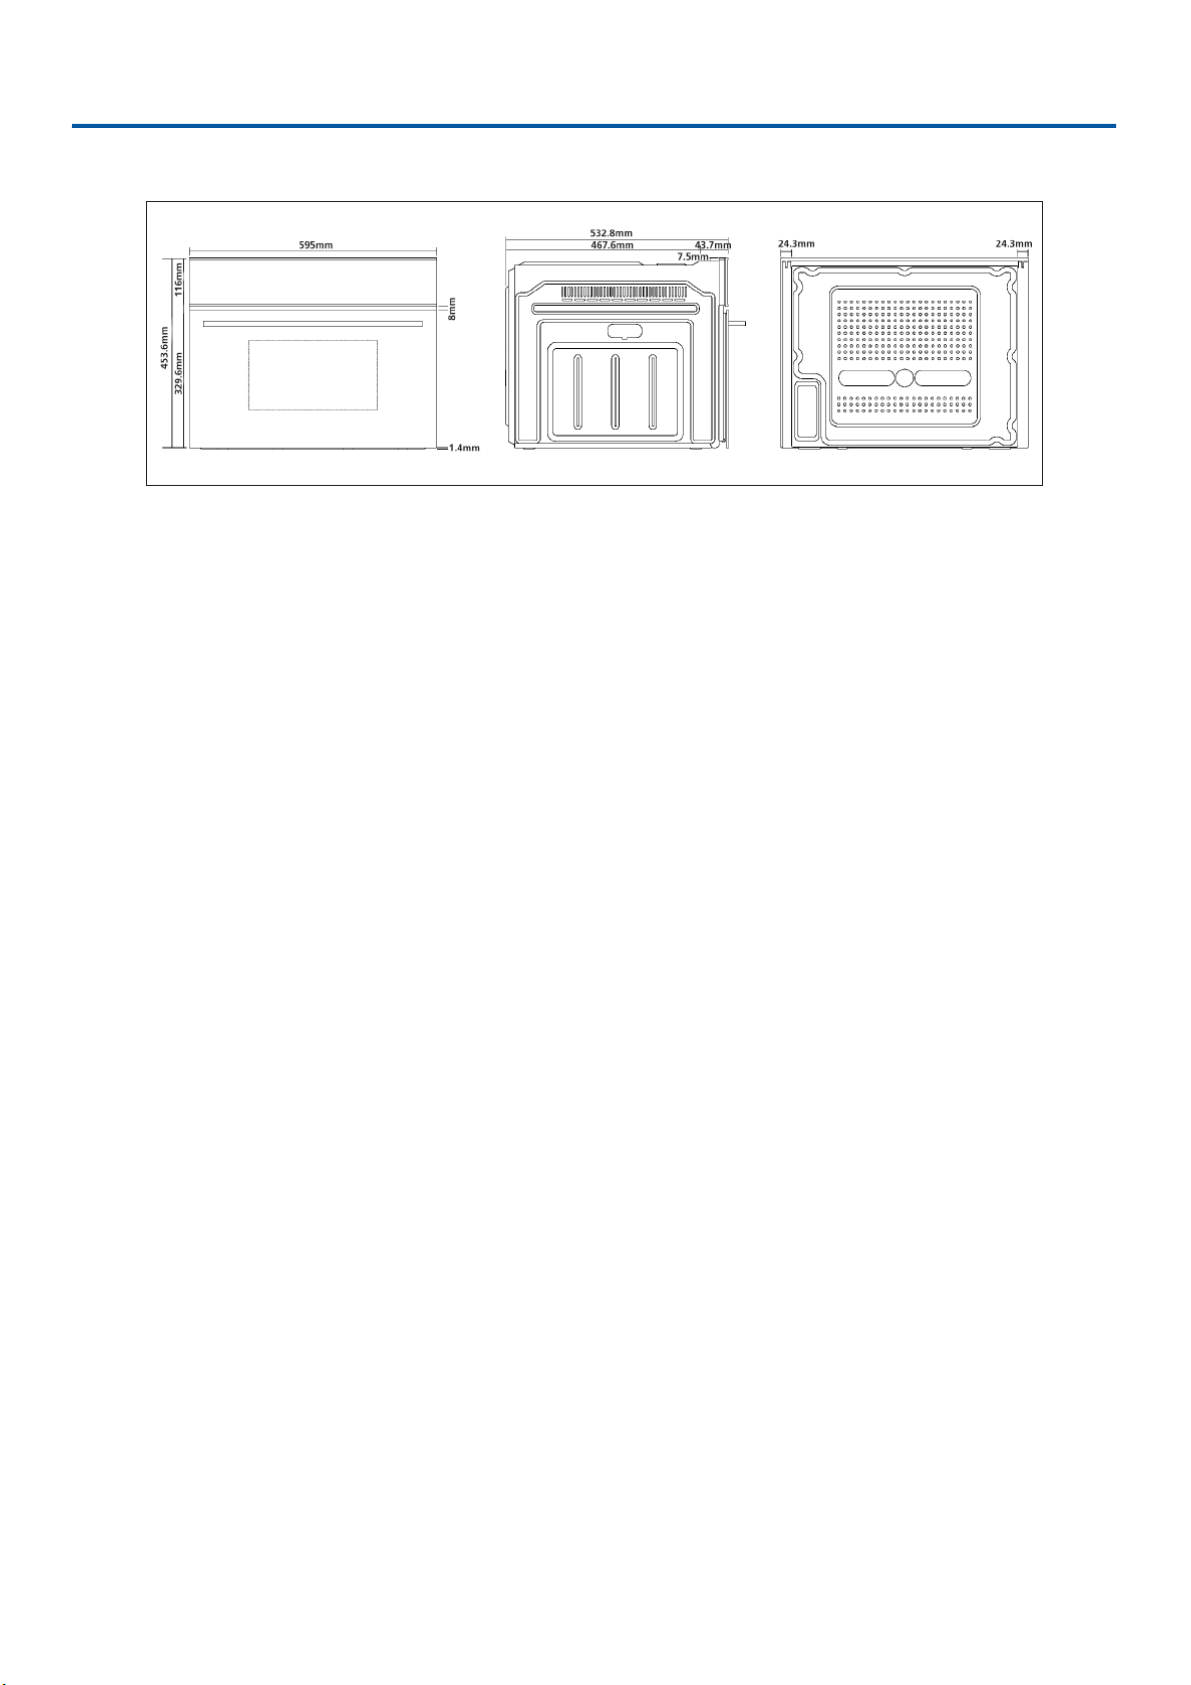
STEAM OVEN AND BUILT-IN DIMENSION
See below for full dimensional drawings of the steam oven to help with installation.
For a built-in steam oven to work well, the cabinet must be of the right type.
The panels of the adjoining furniture should be heat resistant. Particularly when the adjoining furniture
is made of veneered wood, the adhesives should be able to withstand a temperature of 120°C. Plastic
materials or adhesive which cannot withstand this temperature may become deformed or unstuck.
To comply with safety regulations, once the appliance has been fitted it should not be possible to make
contract with the electrical parts.
All parts which offer protection should be fixed in such as way that they cannot be removed without the
use of tool.
TECHNICAL DATA
Input Voltage : 220V ~ 240V / 50Hz
Rating Power : 3,050W

STEAM OVEN AND BUILT-IN DIMENSION

STEAM OVEN AND BUILT-IN DIMENSION
HANDLING WITH CARE
85

ASSEMBLY
FIXING & ASSEMBLY

USE
BEFORE YOU START
Switch on the appliance at the switched fused connection unit. The appliance is ready for use.
WARNING: Read the instructions before using the appliance.
Check the package and make sure you have all of the parts listed. Decide on the appropriate location for your product.
This product contains glass, please take care when fitting or handling to prevent personal injury or damage to the product.
If you sell the appliance, give it away, or leave it behind when you move house, make sure you also pass on this manual so
that the new owner can become familiar with the appliance and its safety warnings.
Note! Before using the oven for the first time we recommend that the oven is switched on and set to its highest temperature.
Keep the oven door closed and leave the appliance on for 1.5hours with nothing on it.
Ensure adequate ventilation during the process by opening doors and windows in the room. Any odours created during this
operation are due to the evaporation of substances used to protect the appliance during storage prior to installation.
PRODUCT DESCRIPTION
1. Control panel
2. Side rails / Lateral guides
3. Grill rack / Oven sheet
4. Steam tray / Deep pan
5. Oil collection plate
6. Door hinge
7. Water collection tray
8. Oven door
9. Water tank

USE
FUNCTION & SETTINGS
FUNCTION
T°C
ADJUSTABLE T°C
RANGE
POWER
OVEN LIGHT
DEFROST
20°C ~ 60°C
FAN HEAT
200°C
50°C ~ 225°C
1680W
FULL GRILL
200°C
50°C ~ 225°C
1450W
TURBO GRILL
200°C
50°C ~ 225°C
1480W
TURBO GRILL AN STEAM COOKING
120°C
120°C ~ 220°C
2520W
STEAM COOKING
100°C
40°C ~ 100°C
1740W
FAN HEAT AND STEAM COOKING
120°C
120°C ~ 220°C
1980W
DESCALING
NOTE : When using a steam function, ensure the water tank is suitably filled depnding on cooking
times.
Select the right cooking trays / pans etc:
Please select the correct cooking tray or pan for different kind of foods. All the trays and racks included
in the oven are heat resistant. Below you can find our suggestion:
-For food such as sweet potatoes, corn, tomato and egg, please place on the steam tray, do not put
it directly on the metal rack.
-Foods such as seafood, chicken wings, chicken steak or pumpkin, which can be cooked with
sauces, you can use the steam tray.
-For food such as fish, ribs, whole chicken or beef, where you do not want to keep the juices or oils,
then you can use the grill rack with the steam tray beneath to catch any oils or juices.

USE
SUGGESTED STEAMING TIMES
FOOD TYPE
WEIGHT
TIME
FOOD TYPE
WEIGHT
TIME
Fish
650g
15 min
Soup
450g
15 min
Crab
500g
25 min
Egg
650g (~ 10pcs)
15 min
Shrimp
500g
12 min
Pumpkin
850g
20 min
Chicken leg
650g (~ 5pcs)
30 min
Tomato
550g
30 min
Chicken
1100g
35 min
Corn
550g
30 min
Beef
350g
40 min
Bread
10
18 min
Pork
400g
20 min
Rice
400g
30 min
STEAM COOKING TIPS
It is fat free and has the advantage of preserving the original flavour of the food. In this case, the food
is not cooked with water but with water vapour. Steam cooking is different than boiling. In fact, the
water vapour works on the inside of the cells, which is fundamentally different from the effect of boiling
water.
In fact, steam also cooks the food completely but, except fr the fat, nothing else comes out of the food.
The cell walls and tendons gradually soften, the protein coagulates without coming out, the starches
swell and combine, and the sugars and minerals remain unchanged.
The same goes for odours, which are reduced to a minimum or coloured substances. Only the fat
liquefies due to the heat and, for this reason, it is almost never a good idea to steam cook large cuts of
meat or fish.
So, the foods that benefits to this cooking method are generally, those with no fat such as, fish, some
types of meat, legumes, potatoes, cereals, eggs, pudding, vegetables, etc. It is not good far vegetables
with tough fibres or fruits in general.
USEFUL TIPS
-When using the steam oven, always start with the oven cold. Using steam in a hot oven
(immediately after traditional cooking) is not recommended because the benefits of cooking with
steam will be cancelld out.
-For steam cooking try to use the perforated stainless steel tray together with the lower stainless
steel drip tray as much as possible.
-The first, resting with its support on the flat grill, allows the steam to fully cook the food while
drawing everything released by the food during cooking through the holes.
-The second, lower tray, slid under the grill on itsguies, will collect the drippings and keep the oven
chamber cleaner.

USE
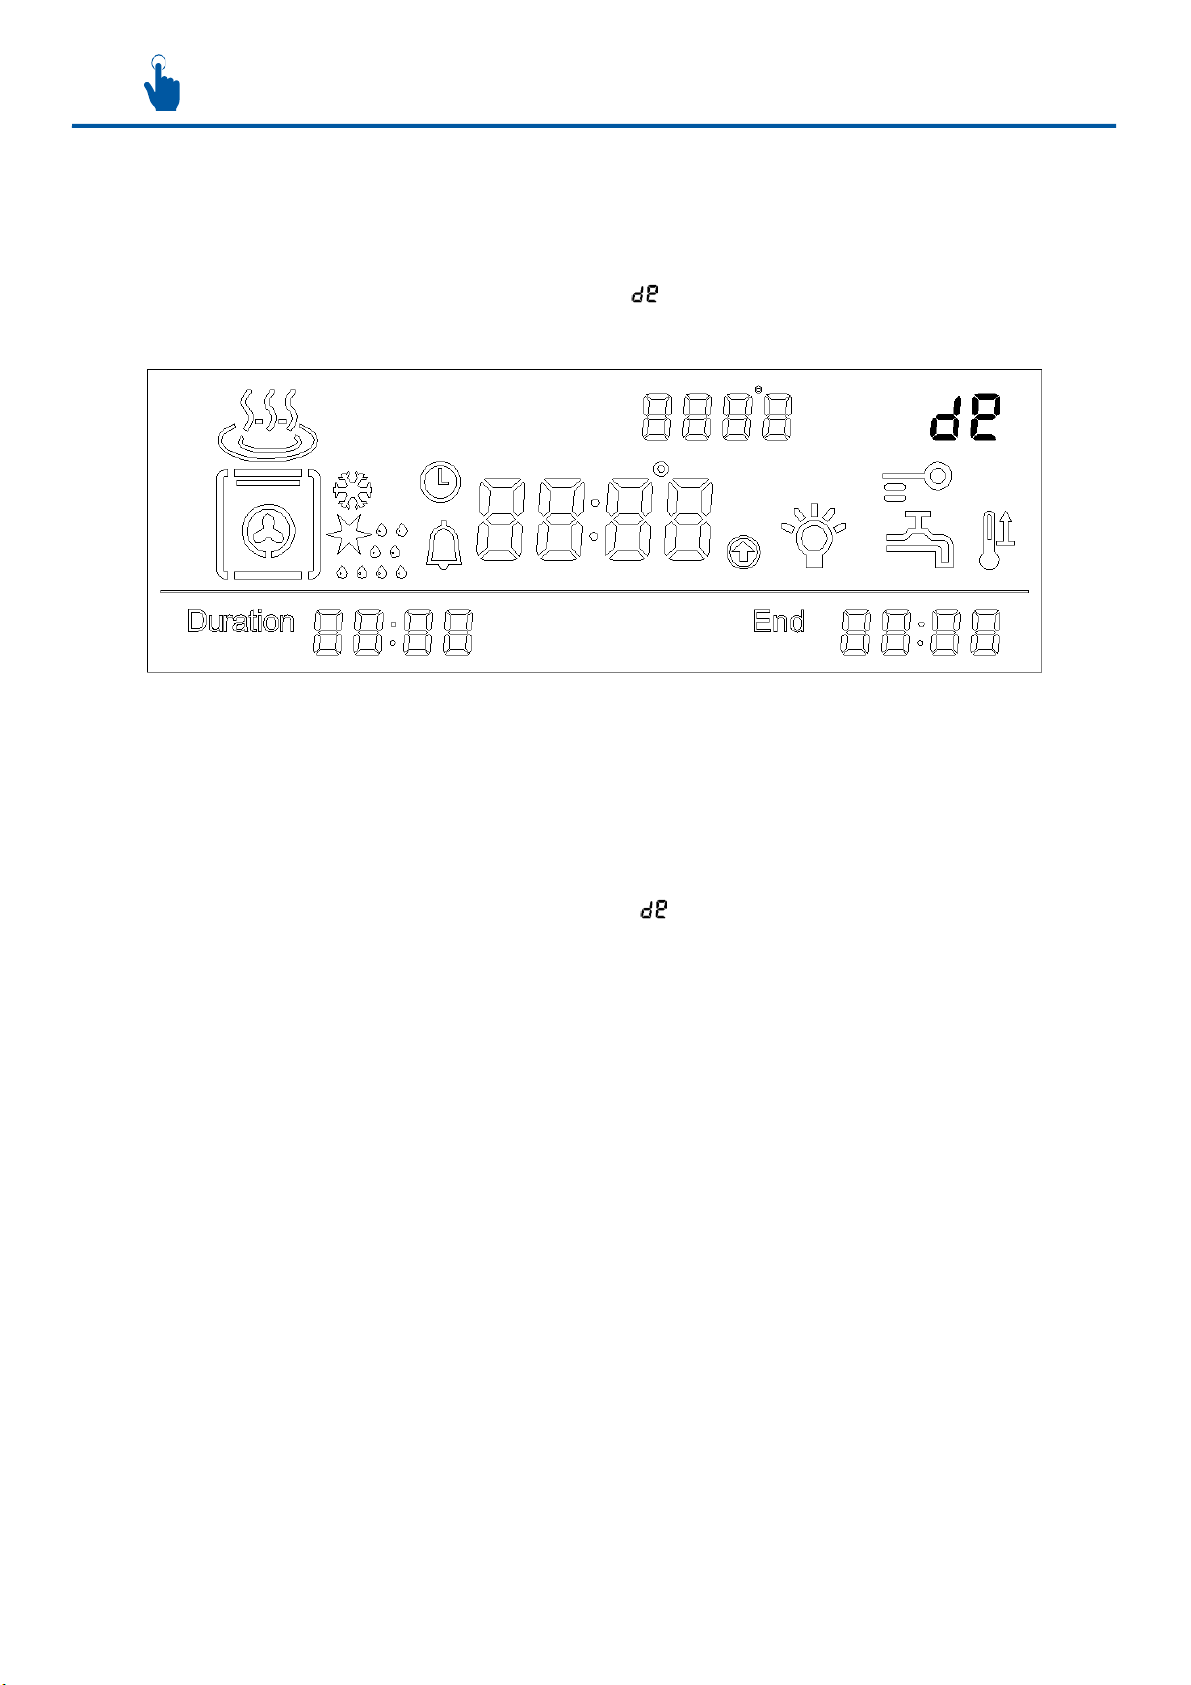
SWITCHING ON/OFF
1
ON/OFF Power
7
Increase
P
2
Program
8
Decrease
3
Oven light
OK
9
OK
C
4
Temperature (°C)
10
Quick start
5
Timer selection
11
Start / stop
6
Display Zone
QUICK START
1) Activate the steam function
STEP 1 : Press “ON/OFF”
STEP 2: Press “Timer” twice for cooking time
STEP 3 : Press “+/-“ to adjust and “OK” to confirm
STEP 4 : Press “Start/stop” to start cooking

USE
HOW TO USE
Date / Cooking time / finish time setting
•The sequence of cooking time modes will be displayed in the screen as below:
•Clock : Pressing “Timer Selection” for 3 seconds, press “+” or “-“ to adjust the time, press “OK” to
confirm.
•Alarm clock : Press “Timer Selection” to bring up Duration and the display will flash “0.00”, press
“+” or “-“ to adjust the time, press “OK” to confirm the duration. Once the time is up an alarm will
sound and the oven will switch off. Press any button to cancel the alarm if wish to cancel the
alarm before it sounds, set time back to “0.00” to cancel.
•Automatic cooking : Once the Duration time has been set, press the “Timer Selection” until the
End time starts to flash. Adjust the end time by pressing “+” or “-“ and press “OK” to confirm.
Oven start time = End Time – Duration Time.
•Setting the alarm/minute minder : Press “Timer Selection” twice, this takes you to the minute
minder function and the will appear. Press “+” or “-“ to select the time and press “OK” to confirm.
Once the time runs out an alarm will sound, press any button to turn the alarm off.
Temperature Setting
•In standby mode, press “Temperature”, press “+” or “-“ to set desired temperature, press “OK” to
confirm.
•Temperature can be adjusted by press “Temperature”, press “+” or “-“ to adjust the temperature,
press “OK” to confirm. Once the function is selected, press “Start/stop” to start cooking. Press
“Start/stop” again to stop and again to start cooking.
Quick Start Function
•When the setting temperature exceed 100°C, press “Quick start” to start rapid heating.
•The display will show and the steam oven will stop when gets to the required temperature.
Child lock Function
•Pressing “OK” during 5 seconds, the oven will be locked.
•Pressing “OK” again during 5 seconds, the oven will be unlocked.
Lighting Function
•Press “Oven light” to turn the internal oven light on/off. The light will automatically turn off if no
operation in 3 minutes.

USE
Cooking Functions
•Press “Program” to start operating, pressing continuously to select the function that you desire.
•The current function will be stopped and cooking time must be reset if new function is selected.
•The sequence of the function selection as below.
Descaling Function
•Take out the water tank, pour water in the descaling pack until it is half full and put the water tank
back.
•Close the door and press “Program” to select to start working. will appear on the display
zone.
•Descale until the sign appear on the display zone with beep sound.
•Take out the water tank, pour water in the descaling pack until it is half full again and put the water
tank back.
•Close the door and press “Start/stop” to start the second time until with beep sound.
•And repeat pour water and start the third time until beep sound to complete the descaling.
USE
DEMO MODE (For shop use only)
To Turn-On Demo Mode:
Press “On/Off Power” to turn the oven on (In standby mode). Pressing “Start/stop” during 5 seconds in
order the alarm will give a short “beep” for 3 times and will be shown on the top right of the display
to confirm the system has entered into the demo mode.
In demo mode, the normal operation of the cooling fan, circulation fan, and the lighting work normally ,
however all heating elements and other functions are disabled. Even the oven is turned off, it will
remain in demo mode when the oven is turned back on.
To Turn-Off Demo Mode
Press “On/Off Power” to turn the oven on (In standby mode). Pressing “Start/stop” during 5 seconds in
order the alarm will give a short “beep” for 3 times and will be disappeared on the top right of the
display to confirm the system has existed demo mode.The steam oven will be ready back for normal
cooking use.
USE
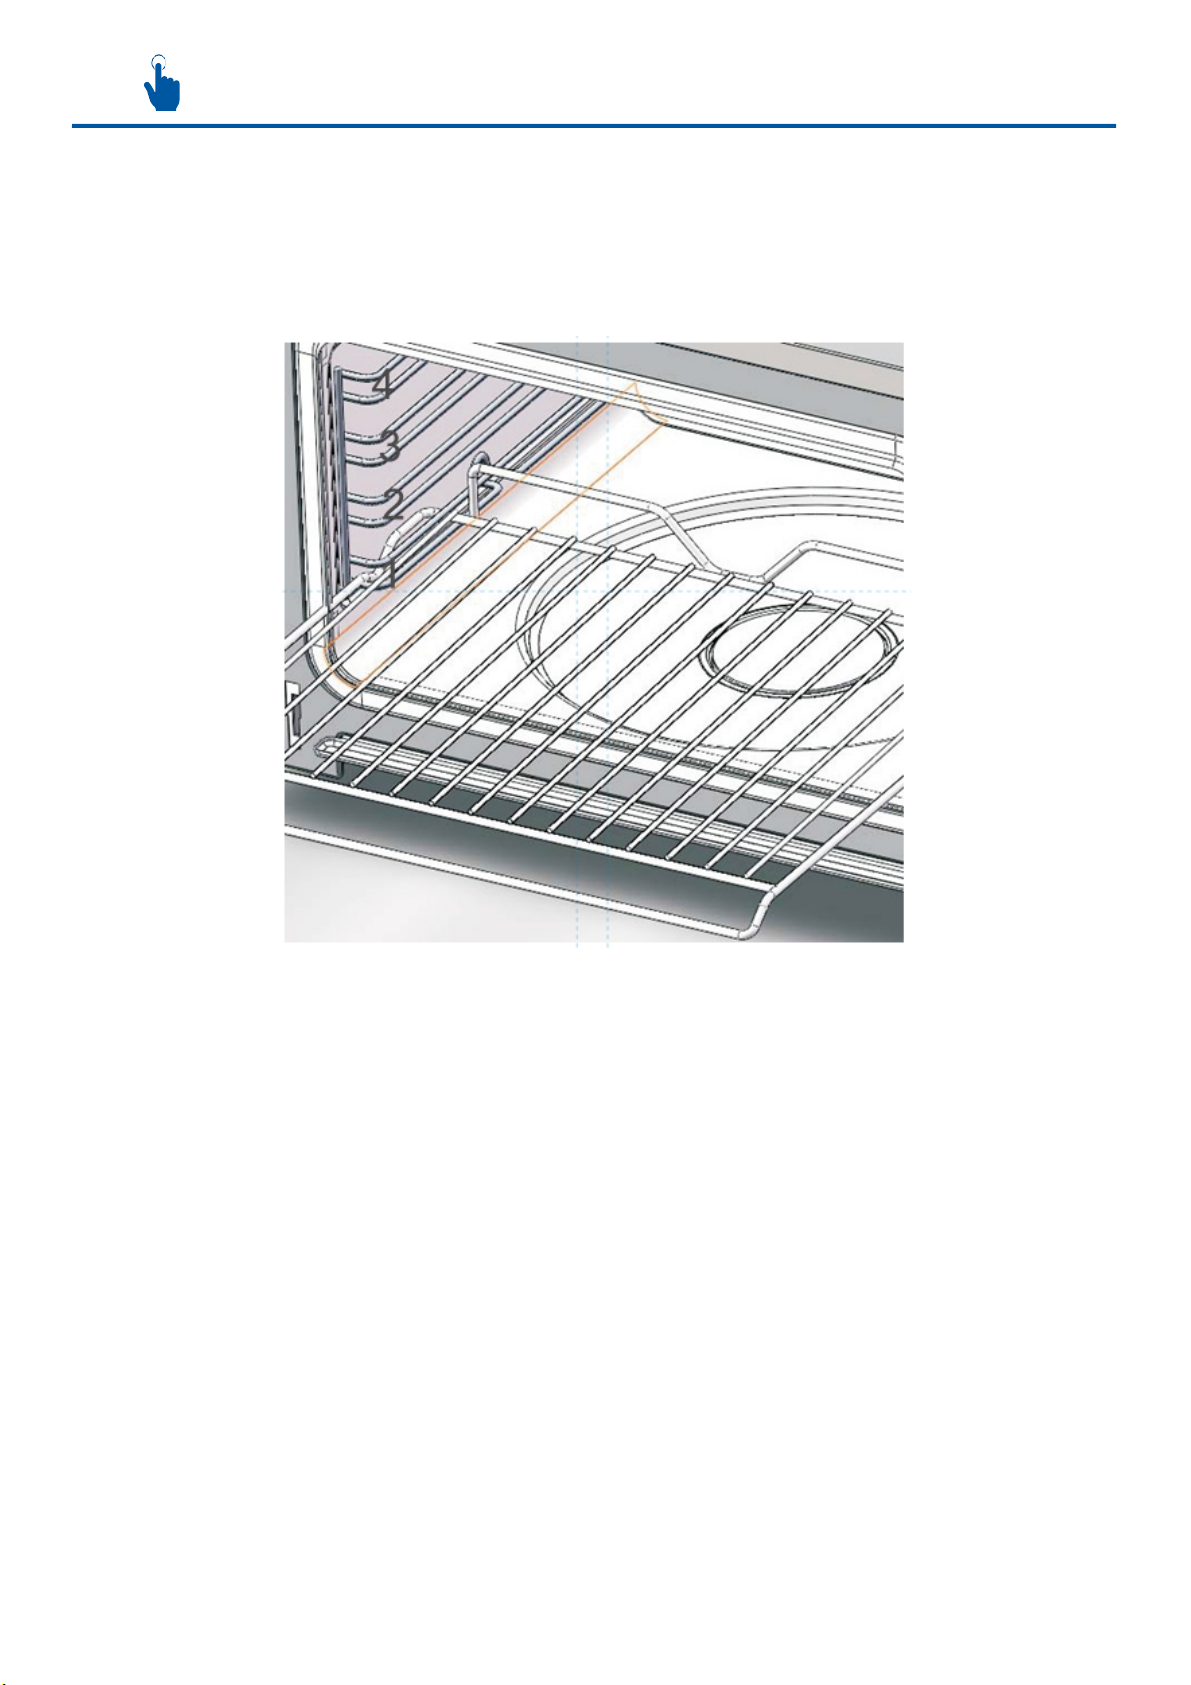
OVEN ACCESSORIES
The deep pan and wired shelf have a side edge, these edges can match with the sliding rack on the
sides of the cavity. It can prevent the rack or tray from slipping out from the oven.
Insert the deep pan and oven sheet on the lateral guides (position 1 – 4 marked) fitted to the oven wall.

CARE & MAINTENANCE
CARE
•There will be water droplets form on the appliance when it is in use, please wipe.
•Only fill water into water tank, and fill up the water tank between “_MIN_” and “_MAX_”. At
“_MAX_” fill up level, the steaming can be lasted up to 1 hour and 45 mins.
•Filling distilled water or bottled water inside the water tank for steaming.
•If the water tank is not installing back to a correct position, display zone shown “E1” with tone.
•Please use the provided suction tool to remove excess water from the water tank.
•Please always empty the water inside the water tank and use the provided suction tool to remove
any excess water on the water collection tray, after cooking finish.
•Please Descale the appliance at least once a month.
CLEANING
Before cleaning or performing maintenance, disconnect the oven from the power supply. To extend the
life of your oven, it must be cleaned frequently, keep in mind that :
•Do not use abrasive powders or corrosive substances which could ruin the surfaces.
•The inside of the oven should preferably be cleaned immediately after use, when it is still warm,
with hot water and soap. The soap should be rinsed away and the interior dried thoroughly. Avoid
using abrasive detergents (for example cleaning powders, etc.) and abrasive sponges for dishes.
•If the oven is in use for an extended period of time, condensation may form. Once the oven has
cooled, remove the condensation using a dry cloth.
•Never put aluminum foil at the bottom of the oven as the build up of heat could compromise
cooking.
•Please refer to the descaling function section for details, and descale the steam oven once every
three months.
•Please clean the water tank regularly. When cleaning the water tank, remove the cover and use a
dry cloth to wipe it.
•Cleaning the glass door using non-abrasive products or sponges and dry it with a soft cloth.
1. Open the door.
2. Clean all oven accessories with warm water or washing up liquid and polish dry with a soft
clean cloth.
3. Clean the oven interior with a soft clean cloth.
4. Wipe the front of the appliance with a damp cloth.
5. Let the oven and all accessories dry well.
WARNING: Always switch off the electricity supply before carrying out maintenance work
on the oven. In the event of a fault, contact customer services.
CARE & MAINTENANCE
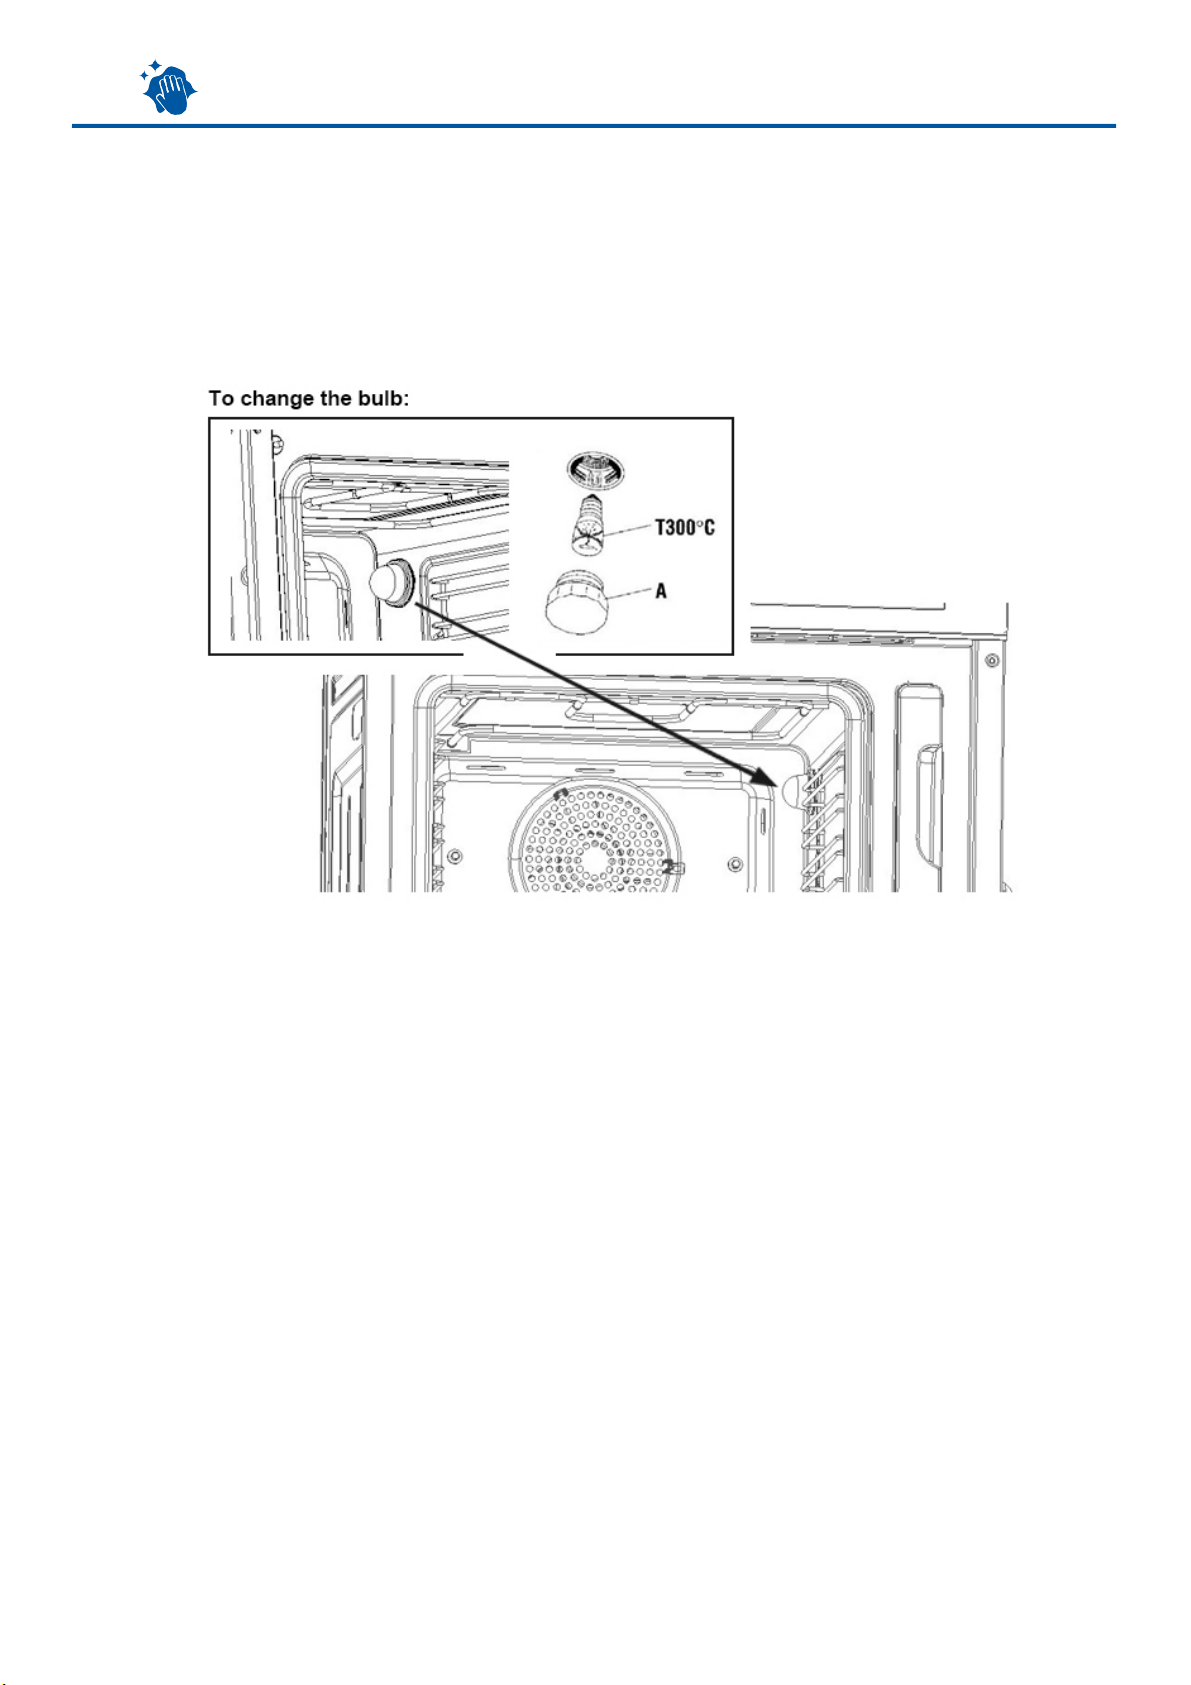
REPLACING THE OVEN LIGHT BULB
•Remove all pans and grills from inside the oven to easily access the Iight cover.
•Unscrew the glass cover attached to the lamp holder.
•Unscrew and remove the old light lamp. Dispose of it safely and ecologically.
•Insert a new E14 high-temperature lamp (300°C, AC220~240V/15W) into the lamp holder.
•Remount the glass cover.
WARNING! Ensure that the appliances is switched off and completely cool before
replacing the lamp to avoid the possibility of electric shock or burns.
FAQS
TROUBLE SHOOTING
FAQS
SOLUTION
What should I do if the oven does not heat
up?
Check to see if one of the following actions resolves the issue :
The oven may not be switched on. Switch on the oven.
(Switching On/Off).
Check to see if the required settings have been applied.
A household fuse may have blown or a circuit breaker may have tripped.
Replace the fuses or reset the circuit. If this happens repeatedly, call the
Service Centre.
What should I do if , even though the oven
function and temperature have been set, the
oven does not heat up?
There may be problems with the internal electrical components. Call the
Service Centre.
What should I do if the oven light does not
illuminate?
The oven light is faulty. Replace the oven light bulb
(Replacing the oven light bulb).
Lack of water “ “ sign
Water tank is empty, refill water into the water tank.
Control panel without response
Child lock may be activated, unlock again
Food is not cooked after steaming
The food may be sealed with cover, remove it
“E” is displayed
Please let the steam oven to cool down for 30mins.
Call service centre if appeared again.
ENERGY SAFE ADVICE
Use the maximum available space in the oven cavity.
If you were using the oven, once the recipe is finished, take advantage of the heat inside the oven
and cook another recipe.
Take out the internal cooking accessories that you aren’t using.
During cooking process, try to not open the door very often, because of the loss temperature.
Do not cook frozen products, defrost them before.
The manufacturer declares that this product meets all the essential requirements for low voltage
electrical material set out in European directive 2014/35/EU and for electromagnetic compatibility as
required by European directive 2014/30/EU.
Table of contents
Other NODOR Oven manuals


