Nokia 6090 User manual

User‘s Guide
9352245
Issue 2
Electronic user’s guide released subject to “Nokia User’s Guide Terms and Conditions, 7th June, 1998”.

Nokia is a registered trademark of Nokia Corporation, Finland.
Navi is a trademark of Nokia Mobile Phones.
©1999. Nokia Mobile Phones. All rights reserved.
Nokia Mobile Phones operates a policy of continuous develop-
ment. Therefore, we reserve the right to make changes and im-
provements to any of the products described in this guide
without prior notice.

Smart Tips
©1999 Nokia Mobile Phones. All rights reserved.
Smart Tips
These Smart Tips pages include some useful tips for efficient us-
age of your phone.
For more detailed information, read through the user ’s guide.
Lift off the handset
Call functions
Phone book functions
Press at least one push button of the cradle
to lift off the handset.
Making a call
Answering a call
Ending a call
Key in the phone number including the area
code, press the Navi Key M (Call).
Press the Navi Key M(Answer).
Press the Navi Key M(End).
Rejecting a call Press cupon receiving an incoming call.
(If the Divert when busy function is acti-
vated, rejecting an incoming call will also di-
vert the call).
Redial With display clear, press uto access the
last-dialled numbers.
Adjusting the
volume
Press bduring a call.
Switching to
handsfree
Press c, then put the handset back onto
the cradle.
Quick save
in Phone book
Key in the phone number, press bto change
the Navi Key text to Save.
Press M(Save).
Key in the name and press M(OK).
Quick find
in Phone book
Press d(with display clear), key in the first
letter of the name and use bto scroll to the
desired name.
Press and hold #to view the phone
number.
Using the Phone
book during a
call
To access the Phone book during a call,
press c, M(Options) and
select Phone book.

Smart Tips
©1999 Nokia Mobile Phones. All rights reserved.
Essential shortcuts
Storing a phone
number for
speed dialling
Press M(Menu), M(Select),
use bto find Speed dials,
press M(Select), M(Assign),
find the desired name/phone number and
press M(OK).
Speed dialling Press a number key 1- 9and
press M(Call).
Calling the
mailbox
Press and hold 1to dial the voice mailbox
number. (The voice mailbox number has to
be stored in the memory).
One touch
dialling
If the Speed dialling function in the menu is
activated, press and hold a number key 2
- 9for one touch dialling.
Reading
messages
Press M(Read) to reach the messages,
use bto browse through the messages.
Press M(Options) for available options.
Press cto exit the messages.
Writing / send-
ing a message
Press M(Menu), 2, 3, key in a
message (press #to change between up-
per and lower case characters,
press and hold #for numbers,
press *for special characters).
Press M(Options), access Send via b,
press M(OK), enter the phone number or
search for it in the Phone book using b,,
then press M(OK).
SIM card
priority
Press M(Menu), 4, 2, 7,1
to prioritise radio unit SIM or
press M(Menu), 4, 2, 7,2
to prioritise handset SIM.
Selecting a
ringing tone
Press M(Menu), 9, 2to select a
ringing tone out of the available list.
Selecting the
ringing volume
Press M(Menu), 9, 3to select the
ringing volume level.

Table of contents
©1999 Nokia Mobile Phones. All rights reserved.
Table of contents
For Your Safety . . . . . . . . . . . . . . . . . . . . . . . . . . . . . . . . . 7
Welcome . . . . . . . . . . . . . . . . . . . . . . . . . . . . . . . . . . . . . . . 8
About labels on your car phone . . . . . . . . . . . . . . . . . . . . 8
Security code . . . . . . . . . . . . . . . . . . . . . . . . . . . . . . . . . . . 8
Using this guide . . . . . . . . . . . . . . . . . . . . . . . . . . . . . . . . . 8
1. Getting Started . . . . . . . . . . . . . . . . . . . . . . . . . . . . . . 9
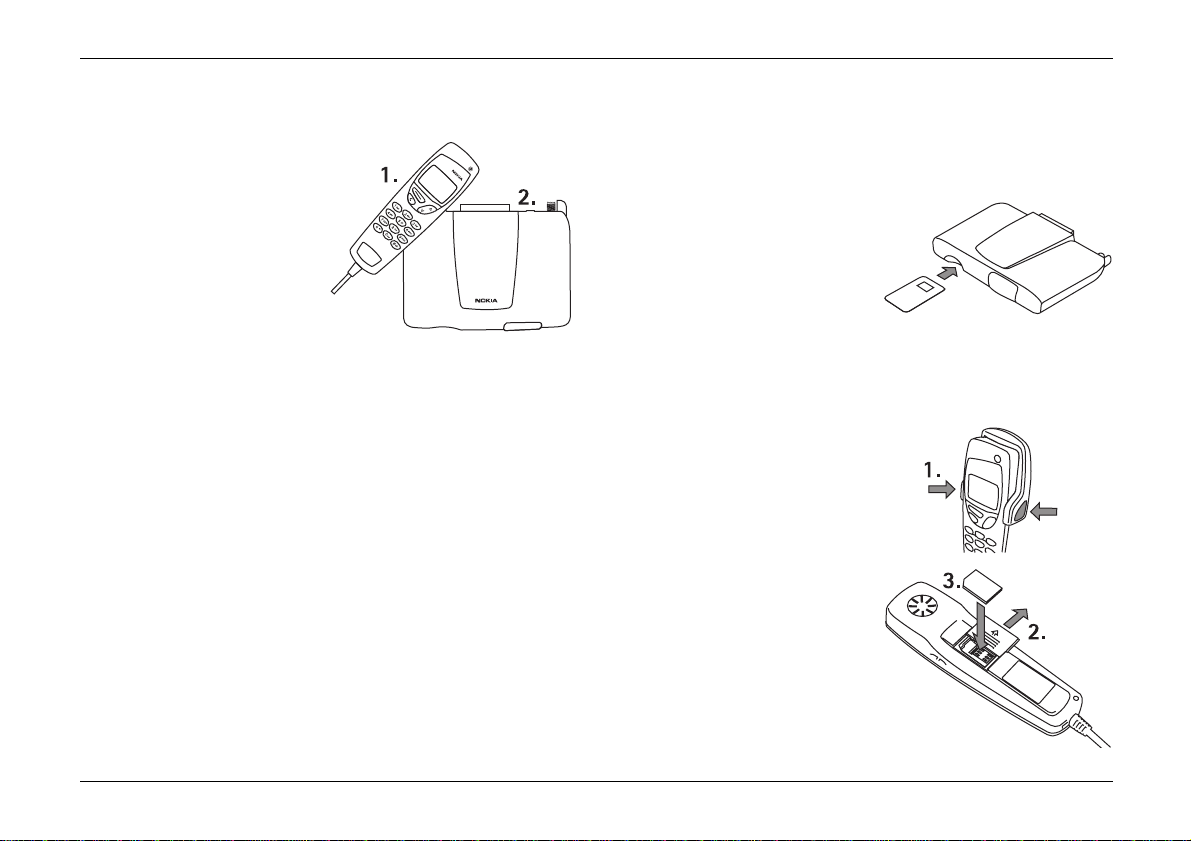
Inserting a SIM card in the radio unit . . . . . . . . . . . . . . . 9
Inserting a SIM card in the handset . . . . . . . . . . . . . . . . . 9
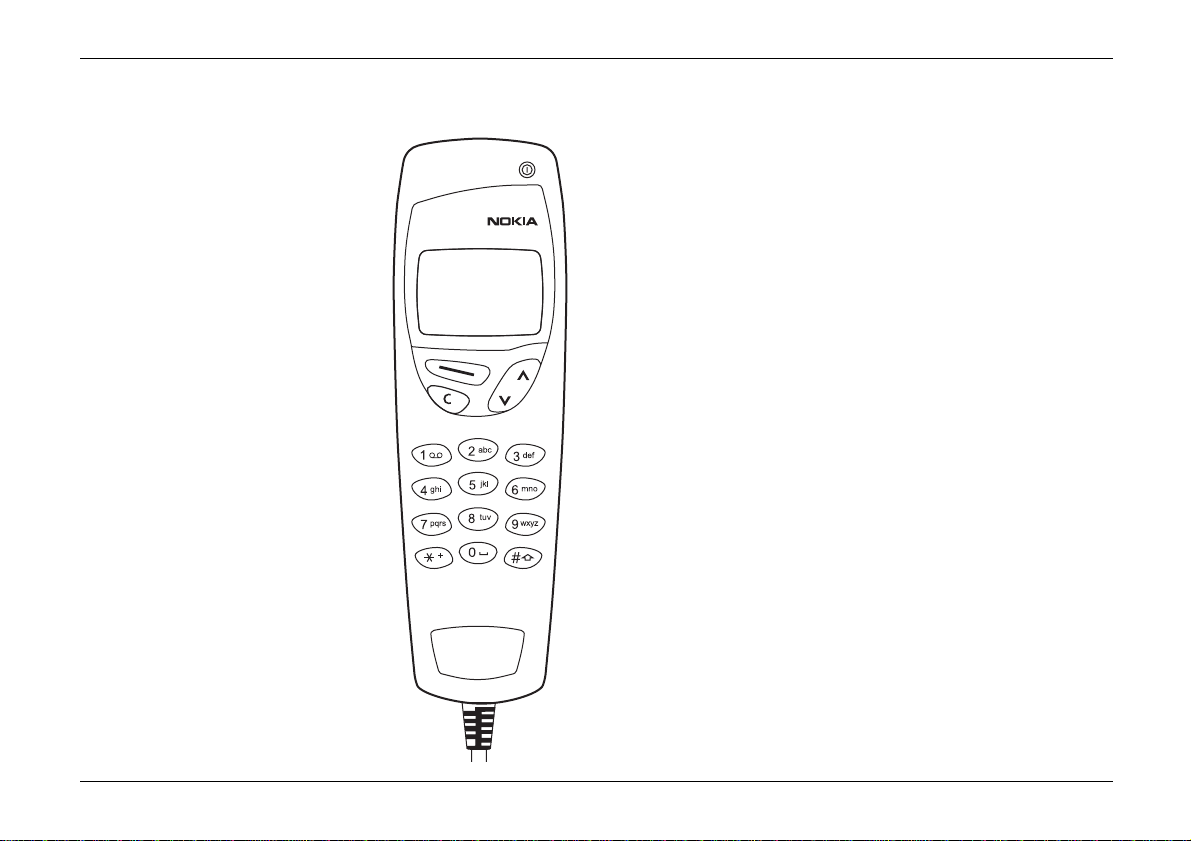
Using the keys . . . . . . . . . . . . . . . . . . . . . . . . . . . . . . . . . 10
Switching the car phone on and off . . . . . . . . . . . . . . . 10
The display indicators . . . . . . . . . . . . . . . . . . . . . . . . . . . 11
2. Basic Functions . . . . . . . . . . . . . . . . . . . . . . . . . . . . . 12
Making a call . . . . . . . . . . . . . . . . . . . . . . . . . . . . . . . . . . 12
Receiving a call . . . . . . . . . . . . . . . . . . . . . . . . . . . . . . . . 12
Adjusting the volume . . . . . . . . . . . . . . . . . . . . . . . . . . . 13
Redialling last number . . . . . . . . . . . . . . . . . . . . . . . . . . 13
Storing a name and phone number in the Phone book 13
Making a call using the Phone book . . . . . . . . . . . . . . . 14
3. Other Essential Functions . . . . . . . . . . . . . . . . . . 15
Setting the time . . . . . . . . . . . . . . . . . . . . . . . . . . . . . . . . 15
Selecting a ringing tone . . . . . . . . . . . . . . . . . . . . . . . . . 15
In-call options . . . . . . . . . . . . . . . . . . . . . . . . . . . . . . . . . 15
Voice messages . . . . . . . . . . . . . . . . . . . . . . . . . . . . . . . . 16
Text messages . . . . . . . . . . . . . . . . . . . . . . . . . . . . . . . . . 16
Fax and data call . . . . . . . . . . . . . . . . . . . . . . . . . . . . . . . 17
Ignition sense . . . . . . . . . . . . . . . . . . . . . . . . . . . . . . . . . 17
Automatic power-off . . . . . . . . . . . . . . . . . . . . . . . . . . . 18
Car radio mute . . . . . . . . . . . . . . . . . . . . . . . . . . . . . . . . . 18
Backlight dimming . . . . . . . . . . . . . . . . . . . . . . . . . . . . . 18
4. Using the Menu . . . . . . . . . . . . . . . . . . . . . . . . . . . . 19
Accessing the menus by scrolling . . . . . . . . . . . . . . . . . 19
Accessing the menus by shortcut . . . . . . . . . . . . . . . . . 19
List of menu functions . . . . . . . . . . . . . . . . . . . . . . . . . . 20
1 Phone book . . . . . . . . . . . . . . . . . . . . . . . . . . . . . . . . . . 22
2 Messages . . . . . . . . . . . . . . . . . . . . . . . . . . . . . . . . . . . 24
3 Call register . . . . . . . . . . . . . . . . . . . . . . . . . . . . . . . . . 26
4 Settings . . . . . . . . . . . . . . . . . . . . . . . . . . . . . . . . . . . . . 27
5 Call divert . . . . . . . . . . . . . . . . . . . . . . . . . . . . . . . . . . . 30
6 Call counters . . . . . . . . . . . . . . . . . . . . . . . . . . . . . . . . 30
7 Calculator . . . . . . . . . . . . . . . . . . . . . . . . . . . . . . . . . . . 31
8 Clock . . . . . . . . . . . . . . . . . . . . . . . . . . . . . . . . . . . . . . . 32
9 Tones . . . . . . . . . . . . . . . . . . . . . . . . . . . . . . . . . . . . . . . 32
5. Reference Information . . . . . . . . . . . . . . . . . . . . . 34
Facts about cellular transmission . . . . . . . . . . . . . . . . . 34
Access codes . . . . . . . . . . . . . . . . . . . . . . . . . . . . . . . . . . 35
Battery information . . . . . . . . . . . . . . . . . . . . . . . . . . . . 36
Accessories . . . . . . . . . . . . . . . . . . . . . . . . . . . . . . . . . . . . 37
6090 DIN/ISO installation kit . . . . . . . . . . . . . . . . . . . . . 37

Table of contents
©1999 Nokia Mobile Phones. All rights reserved.
Care and Maintenance . . . . . . . . . . . . . . . . . . . . . . . . 38
Important Safety Information . . . . . . . . . . . . . . . . . 39
Traffic safety . . . . . . . . . . . . . . . . . . . . . . . . . . . . . . . . . . 39
Operating environment . . . . . . . . . . . . . . . . . . . . . . . . . . 39
Electronic devices . . . . . . . . . . . . . . . . . . . . . . . . . . . . . . 39
Potentially explosive atmospheres . . . . . . . . . . . . . . . . . 40
Vehicles . . . . . . . . . . . . . . . . . . . . . . . . . . . . . . . . . . . . . . 40
Emergency calls . . . . . . . . . . . . . . . . . . . . . . . . . . . . . . . . 41
Installation . . . . . . . . . . . . . . . . . . . . . . . . . . . . . . . . . . . . 42
Glossary . . . . . . . . . . . . . . . . . . . . . . . . . . . . . . . . . . . . . . . . 44
Index . . . . . . . . . . . . . . . . . . . . . . . . . . . . . . . . . . . . . . . . . . . 46

7
©1999 Nokia Mobile Phones. All rights reserved.
For Your Safety
Read these simple guidelines. Breaking the rules may be
dangerous or illegal. Further detailed information is giv-
en in this manual.
ROAD SAFETY COMES FIRST
Don‘t use a handheld phone while driving; park the ve-
hicle first.
INTERFERENCE
All wireless phones may get interference which could af-
fect performance.
SWITCH OFF IN HOSPITALS
Follow any regulations or rules. Switch phone off near
medical equipment.
SWITCH OFF WHEN REFUELING
Don‘t use phone at a refuelling point. Don‘t use near fuel
or chemicals.
SWITCH OFF NEAR BLASTING
Don‘t use phone where blasting is in progress. Observe
restrictions, and follow any regulations or rules.
MAGNETISM
ATM and credit cards brought into contact with the cra-
dle may be demagnetized and information stored on the
card erased. Avoid storage of ATM and credit cards near
your cradle.
USE QUALIFIED SERVICE
Only qualified service personnel must install or repair
equipment.
ACCESSORIES
Use only approved accessories. Do not connect incom-
patible products.
CONNECTION TO OTHER DEVICES
When connecting to any other device, read its user’s
guide for detailed safety instructions. Do not connect in-
compatible products. Remember to make backup copies
of all important data.
MAKING CALLS
Ensure the phone is switched on and in service. Enter the
phone number, including the area code, then press
M(Call). To end a call, press M(End).
To answer a call press M(Answer).
EMERGENCY CALLS
Make sure the phone is switched on and in service. Hold
cfor several seconds, to clear the display. Enter the
emergency number, then press M(Call). Give your
location. Do not end the call until told to do so.

Welcome
8©1999 Nokia Mobile Phones. All rights reserved.
Welcome
We congratulate you on your purchase of this mobile car phone,
which allows you access to GSM900 networks worldwide.
GSM, the Global System for Mobile Communications, is the dig-
ital standard used in many countries throughout the world, en-
abling you to benefit from the GSM services provided by your
car phone.
About labels on your car phone
Your car phone has labels on it which are important for service
and related purposes. Therefore be careful not to remove or lose
any label or the information it contains.
Security code
The factory setting for the security code is 12345. It is supplied
with the car phone on an identification sticker. The security
code protects your car phone against unauthorised use.
Change the code, see “4-3 Security settings” on page 28, and
keep the new code secret and in a safe place separate from the
car phone.
Using this guide
The car phone described in this guide is approved for use on the
GSM900 network.
There are a number of features included in this guide which are
called Network Services. They are special services provided by
wireless service providers. Before you can take advantage of any
of these Network Services, you must subscribe to these ser-
vice(s) with your home service provider and obtain instructions
for their use.
In this manual, the menu names and commands that appear on
the display of your phone are always in bold print. For example:
Phone book, calling.

Inserting a SIM card in the radio unit
9
©1999 Nokia Mobile Phones. All rights reserved.
1. Getting Started
Your car phone consists of
two major parts:
1. Handset
2. Radio unit
Before you can use your car
phone, you must plac
e a SIM (Subscriber Identity
Module) card in the phone.
Your car phone has two SIM card readers: one in the radio unit
and the other in the handset. The factory setting assigns the
card reader in the handset priority; the car phone will only work
with the prioritised card (e.g. Phone book).
The user can change the priority of the card readers for use via
the menu, see “4-2-7 SIM card priority” on page 28. The user‘s
priority setting is then used as a default setting. If only one
reader is initially loaded with a card, that reader is automatical-
ly used.
If an invalid or corrupted SIM card is used in the prioritised card
reader, the user is notified through a message on the display.
The phone will not try to use a different card reader with a lower
priority. Switch off the car phone and remove the invalid SIM
card. Then restart the car phone. The car phone will then work
with the second SIM card.
Inserting a SIM card in the radio unit
The SIM card and the contacts stored in it can easily be dam-
aged if scratched or bent, so be careful when handling, inserting
or removing the card.
Before you insert the SIM card,
make sure that the car phone
has been switched off!
Insert the SIM card into the slot
so that the contacts are towards
the radio unit.
Inserting a SIM card in the handset
Warning! Keep all miniature
SIM cards out of the reach of
small children.
Before you insert the SIM card,
make sure that the car phone
has been switched off!
1. Press at least one push but-
ton of the cradle to lift off
the handset.
2. At the back of the handset,
push the cover for the SIM
card aside.
3. Insert the SIM card and close
the cover.

Using the keys
10 ©1999 Nokia Mobile Phones. All rights reserved.
Using the keys
Navi key M
The use of the phone is largely based
on the Nokia NaviTM key M, located
below the display. The function of the
Nokia NaviTM key Mvaries accord-
ing to the guiding text shown above
the key on the display.
Throughout this user’s guide, the rele-
vant guiding text is mentioned togeth-
er with the Nokia NaviTM key, e.g.
M(Menu) or M(Select).
Scroll keys b
Scroll keys are used to browse through
menus, submenus and settings and to
move the cursor to the right or left.
With clear display, press d once to
access the names and phone numbers
stored in the Phone book.
With clear display, press uonce to
access the list of last-dialled numbers.
During a call, press b to adjust the
volume.
The clear key c
• Use cto delete a character to the left of the cursor,
• to clear all the characters keyed in from the display (press
and hold),
• to return from a submenu to the previous menu level in the
menu facility,
• to exit the menu facility,
• to switch to handsfree,
• to activate options while you have a call in progress and
• to reject an incoming call.
Switching the car phone on and off o
Warning! Do not switch on the car phone when wireless phone
use is prohibited or when it may cause interference or danger.
Press and hold the okey for a second.
Note: Your car phone will not work unless sufficient battery
power is supplied through your car battery.
If the handset asks for the PIN code
The PIN code protects your SIM card against unauthorised use
and is usually supplied with the SIM card.
Note: Your car phone may have two different SIM cards: one
card in the handset and one SIM card in the radio unit.

The display indicators
11
©1999 Nokia Mobile Phones. All rights reserved.
Key in the PIN code of the SIM card used
(factory setting: SIM card of the handset),
which is displayed as ****, and press M
(OK), see “4-3-5 Change access codes” on
page 29.
Note: If you enter an incorrect PIN three times in succession,
the card is blocked and you have to re-enter the PIN using the
personal unblocking key number (PUK), see “Access codes” on
page 35.
Note: If your SIM card is lost or stolen, immediately inform your
network operator or service provider to block the card and thus
prevent any unauthorised use at your expense. As a rule, you will
have to specify your name, the SIM card number and your sub-
scriber‘s number.
If the handset asks for a security code
Key in the security code, which is displayed
as *****, and press M(OK), see “About
labels on your car phone” on page 8.
Note: If you take out the SIM card while the
phone is in operation, information could be
lost.
The display indicators
The indicators described below are shown
when the car phone is ready for use, and no
characters have been entered by the user.
This is also called a “clear display”.
Operator Indicates which cellular network
the car phone is currently being used in.
Depending on your SIM card, the name of the ser-
vice provider may be shown in the next line.
½Shows the signal strength of the cellular network at
your current location: the higher the bar, the stron-
ger the signal.
10:12 Shows the time.
¼Shows that you have received a short message.
‰Notifys divert of all voice calls.
²Shows that the phone is in silent mode.
¹
Enter PIN code
of handset SIM
****
OK
¹
Security
code
***** OK
10:12
Operator
½
Menu

Making a call
12 ©1999 Nokia Mobile Phones. All rights reserved.
2. Basic Functions
Making a call
1. Key in the phone number including the
area code. The text Menu changes to Call.
Correct keying mistakes by pressing c
to delete the last character to the left.
2. Press M(Call) and wait for the an-
swer. The text Call changes to End.
3. Press M(End) to finish the call
(or to cancel the call attempt).
International call
1. Press *twice for the international prefix (+ character re-
places the international access code).
2. Enter the country code, the area code and the phone number.
3. To call the number, press M(Call).
Handsfree mode
When you are using the handset while it remains in its cradle,
the phone automatically works in handsfree mode. You can
switch from handsfree to private mode by picking up the hand-
set. If you replace the handset on the cradle, the call is termi-
nated.
To switch back to handsfree, first press cand then put the
handset back in the cradle.
Receiving a call
When a call is put through to you, the phone
will ring and flash either the caller’s name or
phone number or the text calling.
To answer the call, press M(Answer).
Note: If more than one name with the same last seven digits as
the caller’s phone number is found in the Phone book, only the
caller’s phone number is displayed if available.
To reject an incoming call, press c. If the Divert when busy
function is activated to divert the calls, e.g. to your voice mail-
box, rejecting an incoming call will also divert the call, see “5
Call divert” on page 30.
If you select Automatic answer (see “4-1 Call settings” on page
27) your phone is set to automatically answer an incoming call
after one ring.
Note: If you are using the handsfree mode, you do not have to
take the handset out of its cradle. Lift the handset from its cra-
dle only if you want to speak privately. If you put the handset
back into its cradle, you will terminate the call!
½Call
01
23456789
Œ
Calling
½End
012345678
½calling
Answer

Adjusting the volume
13
©1999 Nokia Mobile Phones. All rights reserved.
Adjusting the volume
You can adjust the handset volume of the
phone during a call. Press uto increase and
dto decrease the volume level.
You can also adjust the handsfree volume of
the phone during a call. Press uto increase
and dto decrease the volume level.
Redialling last number
The last eight phone numbers you called or attempted to call are
stored in the car phone’s memory. To redial one of these last-
dialled numbers,
1. with display clear, press uonce to ac-
cess the list of the last-dialled numbers.
2. Use bto access the desired number.
3. Press M(Call).
Storing a name and phone number in the
Phone book
1. Press M(Menu) to access the menu
facility.
2. With Phone book displayed, press M
(Select).
3. Use bto access Add entry and press
M(Select).
Name: prompt is displayed.
4. Key in the desired name as follows:
Press the key labelled with the character you want: press
once for the first character, twice (before the cursor appears)
for the second, etc.
The available character set depends on the selected lan-
guage, see “4-2-1 Language” on page 27.
• Press a key 0- 9repeatedly to find characters, e. g.
1for characters . , ? ! - & 1 and 0gives a space,
• #switches between upper- and lower-case characters.
The ABC or abc indicator is shown on the display.
• Press and hold #to switch between characters and
numbers. The ABC (abc) or 123 indicator is shown on the
display.
• You can also add a number by pressing and holding the
appropriate number key for a second.
When the flashing cursor appears, you can enter the next
character.
Press bto move the cursor.
Volume
Dialled 1:
Call
23456789
1
Select
Phone book
1-3
Search
Add entry
Erase
Select

Making a call using the Phone book
14 ©1999 Nokia Mobile Phones. All rights reserved.
Press *to call up a list of special char-
acters. The ?!£ indicator is shown.
Use bto scroll to the desired character
and press M(Use) to add it to the
name.
5. When you have written the name, press
M(OK).
Number: prompt is displayed.
6. Key in the country code (if necessary), the
area code and phone number.
Note: If you key in the + character for the international pre-
fix (by pressing *twice) in front of the country code, you
can use the phone number when calling from abroad.
7. Press M(OK). The name and phone number are stored in
the Phone book.
Quick Save
With the display clear, key in the phone number, press bto
change the Navi key text to Save and press M(Save).
Key in the name and press M(OK).
Making a call using the Phone book
1. Press M(Menu).
2. With Phone book displayed, press M(Select).
3. Press M(Select) to choose Search.
4. Key in the first letter(s) of the name and press M(OK).
You can skip this step if you like.
5. Use bto reach the desired name. You can check the phone
number by pressing and holding #.
6. Press M(Call).
A quick way to access the Phone book
With the display clear, press d. The first name (and phone
number) in Phone book are displayed.
Note: The names and phone numbers assigned to the speed
dial keys 1 to 9 can be speed dialled via the number keys 1
to 9and M.
¹ ? ! £
.
,
?
!
:
;
-
+
#
*
(
)
'
"
_
@
&
$
£
%
/
< > ¿ ¡
§
=
º
¢
¥
Use
Number:
OK

Setting the time
15
©1999 Nokia Mobile Phones. All rights reserved.
3. Other Essential Functions
Setting the time
1. Press M(Menu) and use bto access Clock and press
M(Select).
2. Use bto access Clock settings, press M(Select).
3. Use bto scroll to Set the time and
press M(Select).
4. Key in the time, e.g 0, 8, 3, 0
for 8.30.
5. Press M(OK) to confirm. The time is
displayed in the right-hand corner of the display.
Note: The car phone does not contain its own battery, therefore
the setting will be lost if the voltage of the car battery is low.
Selecting a ringing tone
1. Press M(Menu).
2. Use bto access Tones and press M(Select).
3. Use bto access Ringing tone and press M(Select).
4. Use bto scroll to the ringing tone you prefer. The phone
gives you a ringing sample. Press M(OK) to select it.
5. Press and hold cto exit the menu.
In-call options
Your phone provides a number of control functions that you can
use during a call. You cannot utilise all of these functions at all
times. Only those functions which are available and enabled will
be shown in the in-call menu.
Many of the in-call options are network services.
While you have a call in progress, press M(Options) to enter
the in-call menu. If the Navi key text is End, press cto acti-
vate the text Options.
The following in-call options may be available:
Hold or Unhold to hold or release a call
New Call to make a call during an on-going call
Answer to answer the incoming call
Reject to reject the incoming call
Swap to switch between the two calls
End this call to end the active call
Send DTMF to send DTMF tones
Send to send the character string on the display to
the network
End all calls to end both calls
Phone book to enter the Phone book
To exit the in-call menu, press c.
¹
Time:
OK
hh:mm

Voice messages
16 ©1999 Nokia Mobile Phones. All rights reserved.
Voice messages
The network may offer you a voice mailbox service, which you
have to install before you can receive voice messages. After you
have installed this mailbox (refer to the user‘s guide supplied by
your service provider), you can divert your calls to the voice
mailbox and callers can leave you messages.
The network informs you when you have a voice message wait-
ing. Call the mailbox number and listen to the message(s).
1. With clear display, press and hold 1for a second to call
your voice mailbox.
If the phone asks for the voice mailbox number, key it in and
press (OK), see “2-6 Voice mailbox number” on page 25. You
will obtain your voice mailbox number from your service pro-
vider upon subscription to the voice mailbox service.
2. Listen to the messages. End the call by pressing M(End).
Note: If the Navi key text Listen is available, press M
(Listen) to call your voice mailbox.
Text messages
You can read, write and store short text messages of up to 160
characters’ length.
Before you can send any messages, you need to store the num-
ber of your message centre in the memory of the SIM card. It
will remain unchanged until replaced. You will be allocated a
number by your service provider upon subscription to the Short
Message Service (SMS), see “2-4 Message settings” on page 24.
Make sure, before sending a text message, that the called party
is provided with the SMS feature.
Reading messages
1. When you have received an SMS message, the text ...Mes-
sages(s) Received and the ¼indicator are displayed. Press
M(Read).
2. Use bto scroll to the desired message and
press M(Read).
3. While reading a message, use bto browse through the mes-
sage. Press M(Options) for available options.
Press cbriefly to exit the message.
4. Press and hold cfor a second to exit the menu.
Writing and sending a message
1. Press M(Menu).
2. Use bto scroll to the menu function Messages and press
M(Select).
3. Use bto access Write messages and press M(Select).

Fax and data call
17
©1999 Nokia Mobile Phones. All rights reserved.
4. Key in the message. For information on
how to use the keys for writing, see “Stor-
ing a name and phone number in the
Phone book” on page 13.
5. When you have finished writing, press
M(Options).
6. Select Send and press M(OK) or select Save to store the
message so that it may be sent later.
7. Key in the recipient’s phone number or press M(Search)
and use bto search for it in the Phone book and press M
(OK).
8. Press M(OK) to send the message.
9. Press and hold ctwice to exit the menu.
Deleting messages
The storage capacity of the SIM card may vary depending on the
card. If the SIM card is full, the ¼indicator begins flashing. To
store new messages, you have to delete those messages no
longer required.
1. Press M(Menu) and scroll to Messages.
2. Use bto access Inbox.
3. Press M(Options) and delete the selected message.
Fax and data call
Your radio unit supports fax and data calls. For example, the ra-
dio unit may be connected to a compatible mobile fax machine
or to a compatible laptop computer via an RS-232 connection.
The RS-232 connector supports full protocol and 9 PIN standard
(TIA/EIA-562). You have to select 19200 bps as RS-232 interface
speed. For further information, see the Nokia 6090 webpage:
http://www.nokia.com.
The transceiver is provided with a
plastic cap to protect the data
adapter connector. Remove the
cap and then connect the termi-
nal.
Warning! Keep the cap out of
small children‘s reach! Always remove the cap whenever you
may have small children in your vehicle.
Ignition sense
The ignition sense prevents the car phone from draining the car
battery. The ignition sense enables the car phone to be switched
on or off automatically whenever the car’s ignition is switched
on or off. However, you can switch the handset on or off at any
time via o.
¹ABC 159
A
Options

Automatic power-off
18 ©1999 Nokia Mobile Phones. All rights reserved.
Automatic power-off
Automatic power-off prevents the car phone from draining the
car battery if the car phone is accidentally left on. You can set
this function by selecting the length of the automatic power-off
time.
1. Press M(Menu), use bto access the menu function
Settings and press M(Select).
2. Use bto scroll to Phone settings and
press M(Select).
3. Use bto scroll to Automatic power-off and select the op-
tion.
Note: If automatic power-off is disabled, the car phone don‘t
switch itself off automatically.
Ignition sense is connected:
If automatic power-off is set to on and the ignition is turned off,
the car phone switches itself off after the set time (45 sec. -
24 hours). The countdown time can be restarted by any user ac-
tion, i.e. key press or replacement of handset.
Ignition sense is not connected:
If automatic power-off is set to on, the car phone is switched
off within the set time after the last user action, i.e. a key press
or replacement of the handset.
Note: If you have selected 45sec., you can postpone switching
off for one hour by pressing c when the message is displayed.
Car radio mute
This feature mutes the car radio during a phone call, or during
selecting of the ringing tones and of the volume and during SMS
signalling, if the car radio mute cable is connected.
Backlight dimming
1. Press M(Menu).
2. Use bto access the menu function Settings and press
M(Select).
3. Use bto scroll to Phone settings and
press M(Select).
4. Use bto scroll to Lights and select an option:
Full brightness: Backlighting is always fully on.
Custom setting: Backlighting is adjusted to the bright-
ness of the dash lighting (only if the ca-
ble for backlight dimming is connected).
Off: Lights are always off.

Accessing the menus by scrolling
19
©1999 Nokia Mobile Phones. All rights reserved.
4. Using the Menu
The car phone allows you to alter and view the settings of the
functions and options that are listed in the menus and sub-
menus.
The menus and submenus can be accessed by scrolling or by us-
ing the appropriate shortcut.
Accessing the menus by scrolling
1. To access the menu facility, press M
(Menu).
2. Press bto reach the desired main menu,
e.g. Settings.
3. Press M(Select) to enter the menu.
4. If the menu contains any submenus,
scroll to the desired one with b.
5. Press M(Select) to enter the sub-
menu (e.g. Call settings). If the menu
contains submenus, repeat steps 4 and 5.
6. Press bto scroll to the setting of your
choice.
7. Press M(OK) to confirm the chosen
setting.
Note: You can return to the previous menu
level by pressing cbriefly or exit the
menu without changing any of the settings
by pressing and holding c.
Accessing the menus by shortcut
The menu items (menus, submenus and setting options) are
numbered and can be accessed via their shortcut number. This
number is shown in the top right-hand corner of the display.
1. Press M(Menu).
2. Key in the number of the desired menu function you
wish to access quickly, i.e. within three seconds.
For example, to set the keypad tones to off:
Press M(Menu), 9, 5, 1, M(OK).:
M(Menu) to enter the menu,
9for Tones,
5for Keypad tones and
1for keypad tones Off.
Press M(OK) to confirm.
4
Select
Settings
4-1
Call
settings
Select
4-1-2
Automatic
redial
Off
Select
4-1-2-2
On
Off
OK
4-1

List of menu functions
20 ©1999 Nokia Mobile Phones. All rights reserved.
List of menu functions
1 Phone book
1 Search
2 Service Nos.
3 Add entry
4 Erase
1 One by one
2 Erase all
5 Edit
6 Copy
7 Send entry
8 Options
1 Memory in use
2 Type of view
3 Memory status
9 Speed dials
2 Messages
1 Inbox
2 Outbox
3 Write messages
4 Message settings
1 Set 1 1
1 Message centre number
2 Messages sent as
3 Message validity
2 Set N 2
3 Common
1 Delivery reports
2 Reply via same centre
5 Info service
1 On
2 Off
3 Topic index
4 Topics
5 Language
6 Voice mailbox number
3 Call register
1 Missed calls
2 Received calls
3 Dialled numbers
4 Erase recent call lists
4 Settings
1 Call settings
1 Anykey answer
2 Automatic redial
3 Speed dialling
4 Call waiting options
5 Own number sending
6 Automatic answer
7 Phone line in use (only when ALS)
2 Phone settings
1 Language
2 Cell info display
3 Welcome note
4 Network selection
5 Lights
1 Full brightness
2 Custom setting
3 Off
6 Automatic power-off
1 Disabled
2 45 sec.
3 1h
...
26 24h
7 SIM card priority
1 Radio unit SIM
2 Handset SIM
3 Security settings
1 PIN code request
2 Fixed dialling
1. The number of the settings depends
on how many settings your SIM card
offers. Each setting appears in its
own submenu and may have any
name.
2. The shortcut number of this menu
depends on the number of settings
available.
Other manuals for 6090
6
Table of contents
Other Nokia Automobile Electronic manuals