Nokia 2760 - Cell Phone 11 MB User manual

Nokia 2760 User Guide
9206392
Issue 1
Nota: La traducción en español de este manual inicia en la Página xx.
2760_9206392_30Jan2008.fm Page 1 Wednesday, January 30, 2008 11:47 AM

2
LEGAL INFORMATION
© 2007 Nokia. All rights reserved.
Nokia, Nokia Connecting People, and Navi are trademarks or registered trademarks of Nokia Corporation.
Nokia tune is a sound mark of Nokia Corporation. Other product and company names mentioned herein
may be trademarks or tradenames of their respective owners.
Reproduction, transfer, distribution, or storage of part or all of the contents in this document in any form
without the prior written permission of Nokia is prohibited.
US Patent No 5818437 and other pending patents. T9 text input software Copyright (C) 1997-2007. Tegic
Communications, Inc. All rights reserved.
Includes RSA BSAFE cryptographic or security protocol software from RSA Security.
Java and all Java-based marks are trademarks or registered trademarks of Sun Microsystems, Inc.
This product is licensed under the MPEG-4 Visual Patent Portfolio License (i) for personal and noncommercial
use in connection with information which has been encoded in compliance with the MPEG-4 Visual
Standard by a consumer engaged in a personal and noncommercial activity and (ii) for use in connection
with MPEG-4 video provided by a licensed video provider. No license is granted or shall be implied for any
other use. Additional information, including that related to promotional, internal, and commercial uses,
may be obtained from MPEG LA, LLC. See http://www.mpegla.com.
Nokia operates a policy of ongoing development. Nokia reserves the right to make changes and improvements
to any of the products described in this document without prior notice.
TO THE MAXIMUM EXTENT PERMITTED BY APPLICABLE LAW, UNDER NO CIRCUMSTANCES SHALL NOKIA
OR ANY OF ITS LICENSORS BE RESPONSIBLE FOR ANY LOSS OF DATA OR INCOME OR ANY SPECIAL,
INCIDENTAL, CONSEQUENTIAL OR INDIRECT DAMAGES HOWSOEVER CAUSED.
THE CONTENTS OF THIS DOCUMENT ARE PROVIDED "AS IS". EXCEPT AS REQUIRED BY APPLICABLE LAW,
NO WARRANTIES OF ANY KIND, EITHER EXPRESS OR IMPLIED, INCLUDING, BUT NOT LIMITED TO, THE
IMPLIED WARRANTIES OF MERCHANTABILITY AND FITNESS FOR A PARTICULAR PURPOSE, ARE MADE IN
RELATION TO THE ACCURACY, RELIABILITY OR CONTENTS OF THIS DOCUMENT. NOKIA RESERVES THE
RIGHT TO REVISE THIS DOCUMENT OR WITHDRAW IT AT ANY TIME WITHOUT PRIOR NOTICE.
The availability of particular products and applications and services for these products may vary by region.
Please check with your Nokia dealer for details, and availability of language options.
The third-party applications provided with your device may have been created and may be owned by persons
or entities not affiliated with or related to Nokia. Nokia does not own the copyrights or intellectual property
rights to the third-party applications. As such, Nokia does not take any responsibility for end-user support,
functionality of the applications, or the information in the applications or these materials. Nokia does not
provide any warranty for the third-party applications.
BY USING THE APPLICATIONS YOU ACKNOWLEDGE THAT THE APPLICATIONS ARE PROVIDED AS IS WITHOUT
WARRANTY OF ANY KIND, EXPRESS OR IMPLIED, TO THE MAXIMUM EXTENT PERMITTED BY APPLICABLE
LAW. YOU FURTHER ACKNOWLEDGE THAT NEITHER NOKIA NOR ITS AFFILIATES MAKE ANY
REPRESENTATIONS OR WARRANTIES, EXPRESS OR IMPLIED, INCLUDING BUT NOT LIMITED TO WARRANTIES
2760_9206392_30Jan2008.fm Page 2 Wednesday, January 30, 2008 11:47 AM

3
OF TITLE, MERCHANTABILITY OR FITNESS FOR A PARTICULAR PURPOSE, OR THAT THE APPLICATIONS WILL
NOT INFRINGE ANY THIRD-PARTY PATENTS, COPYRIGHTS, TRADEMARKS, OR OTHER RIGHTS.
Export controls
This device may contain commodities, technology or software subject to export laws and regulations from
the US and other countries. Diversion contrary to law is prohibited.
FCC/INDUSTRY CANADA NOTICE
Your device may cause TV or radio interference (for example, when using a telephone in close proximity to
receiving equipment). The FCC or Industry Canada can require you to stop using your telephone if such
interference cannot be eliminated. If you require assistance, contact your local service facility. This device
complies with part 15 of the FCC rules. Operation is subject to the following two conditions: (1) This
device may not cause harmful interference, and (2) this device must accept any interference received,
including interference that may cause undesired operation. Any changes or modifications not expressly
approved by Nokia could void the user's authority to operate this equipment.
9206392/Issue 1
2760_9206392_30Jan2008.fm Page 3 Wednesday, January 30, 2008 11:47 AM

4
Contents
SAFETY............................................... 6
General information ......................... 7
Access codes ...................................................... 7
1. Get started .................................. 8
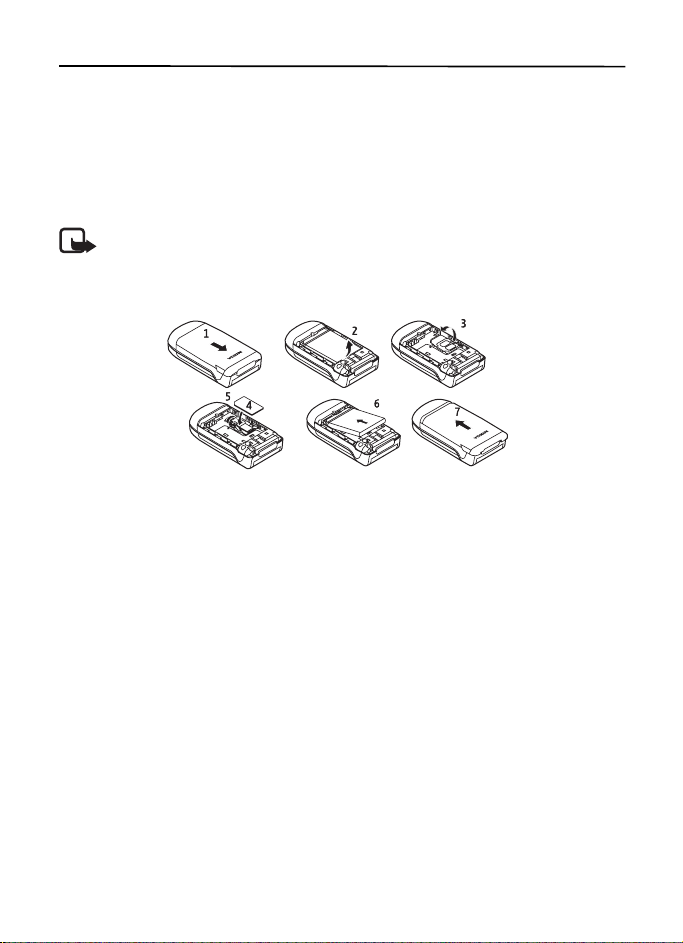
Install the SIM card and battery.................. 8
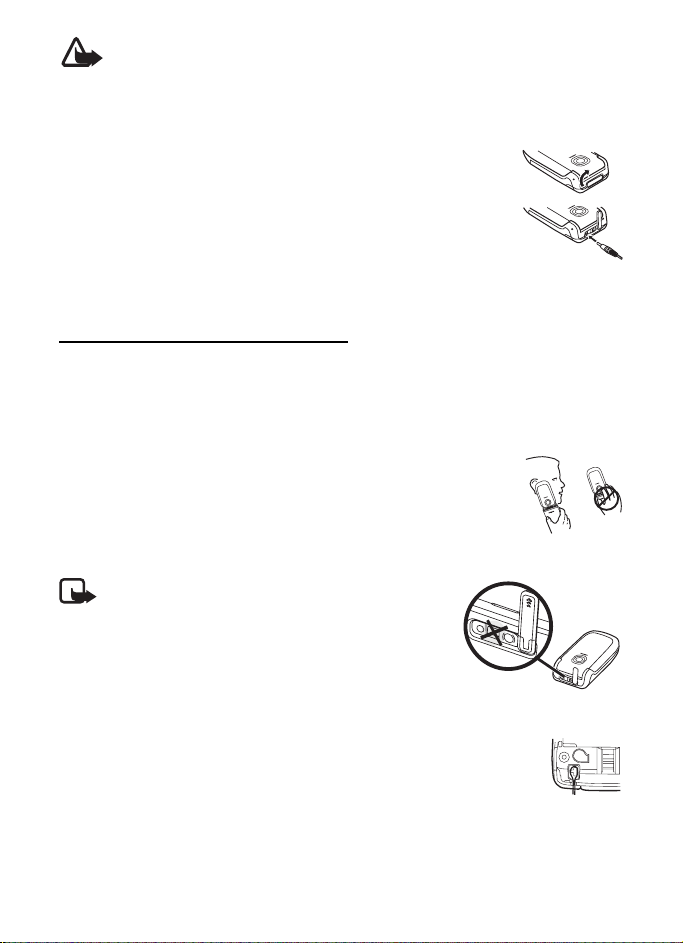
Charge the battery ........................................... 8
Switch the phone on or off ........................... 9
Antenna............................................................... 9
Wrist strap.......................................................... 9
2. Your phone............................... 10
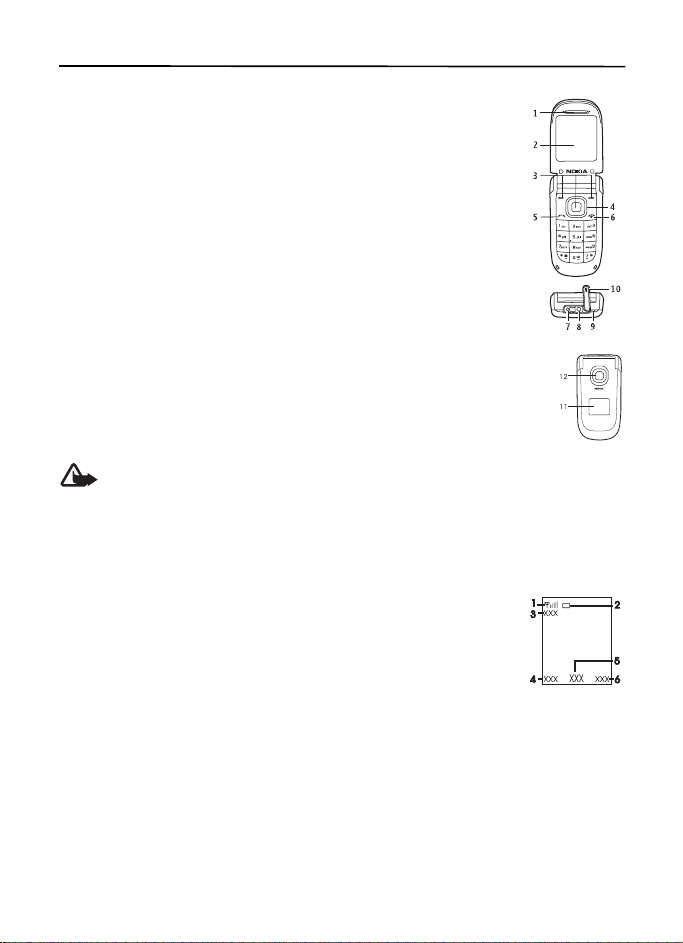
Keys and parts ................................................. 10
Standby mode.................................................. 10
Demo mode ...................................................... 11
Keypad lock (keyguard)................................. 11
3. Call functions........................... 11
Make and answer a call................................ 11
1-touch dialing ............................................... 11
Loudspeaker...................................................... 12
4. Write text................................. 12
Tips for writing text ....................................... 12
5. Menu functions ....................... 12
6. Voice notes............................... 13
7. Log............................................ 13
8. t-zones ..................................... 13
Service connection......................................... 13
Browser appearance settings ...................... 14
Cookies and cache memory ......................... 14
t-zones inbox................................................... 15
Browser security ............................................. 15
9. IM & E-mail............................. 15
Instant messaging .......................................... 15
E-mail................................................................. 18
10. Messaging................................. 20
Text and picture message settings............ 20
Text messages ................................................. 21
Picture messages............................................ 21
Create a text or picture message .............. 21
Voice notes....................................................... 22
Voice mail......................................................... 22
11. Fun & Apps............................... 22
Gallery ............................................................... 22
Games & Apps................................................. 23
Media................................................................. 23
Organizer .......................................................... 24
12. Help........................................... 25
13. Phonebook ................................ 25
14. Settings..................................... 26
Profiles .............................................................. 26
Tones.................................................................. 26
Main display .................................................... 27
Mini display ..................................................... 27
Date and time ................................................. 27
My shortcuts.................................................... 27
Connectivity..................................................... 27
Call ..................................................................... 29
Phone................................................................. 30
Enhancements................................................. 30
Configuration .................................................. 30
Restore settings.............................................. 31
15. SIM services.............................. 31
16. Enhancements .......................... 31
17. Battery and charger
information ..................................... 31
Nokia battery authentication guidelines. 32
Care and maintenance.................... 33
Additional safety information ....... 35
2760_9206392_30Jan2008.fm Page 4 Wednesday, January 30, 2008 11:47 AM

6
SAFETY
Read these simple guidelines. Not following them may be dangerous or illegal. Read the
complete user guide for further information.
SWITCH ON SAFELY
Do not switch the device on when wireless phone use is prohibited or when it
may cause interference or danger.
ROAD SAFETY COMES FIRST
Obey all local laws. Always keep your hands free to operate the vehicle while
driving. Your first consideration while driving should be road safety.
INTERFERENCE
All wireless devices may be susceptible to interference, which could affect
performance.
SWITCH OFF IN RESTRICTED AREAS
Follow any restrictions. Switch the device off in aircraft, near medical
equipment, fuel, chemicals, or blasting areas.
QUALIFIED SERVICE
Only qualified personnel may install or repair this product.
ENHANCEMENTS AND BATTERIES
Use only approved enhancements and batteries. Do not connect incompatible
products.
WATER-RESISTANCE
Your device is not water-resistant. Keep it dry.
■About your device
The wireless device described in this guide (type RM-391) is approved for use on the GSM
850 and 1900 networks. Contact your service provider for more information about networks.
When using the features in this device, obey all laws and respect local customs, privacy and
legitimate rights of others, including copyrights.
Copyright protection may prevent some images, music, and other content from being
copied, modified, or transferred.
Warning: To use any features in this device, other than the alarm clock, the device
must be switched on. Do not switch the device on when wireless device use may
cause interference or danger.
Remember to make back-up copies or keep a written record of all important information
stored in your device.
2760_9206392_30Jan2008.fm Page 6 Wednesday, January 30, 2008 11:47 AM

7
When connecting to any other device, read its user guide for detailed safety instructions. Do
not connect incompatible products.
■Network services
To use the phone you must have service from a wireless service provider. Many of the features
require special network features. These features are not available on all networks; other networks
may require that you make specific arrangements with your service provider before you can
use the network services. Your service provider can give you instructions and explain what
charges will apply. Some networks may have limitations that affect how you can use network
services. For instance, some networks may not support all language-dependent characters
and services.
Your service provider may have requested that certain features be disabled or not activated
in your device. If so, these features will not appear on your device menu. Your device may
also have a special configuration such as changes in menu names, menu order, and icons.
Contact your service provider for more information.
This device supports WAP 2.0 protocols (HTTP and SSL) that run on TCP/IP protocols. Some
features of this device, such as multimedia messaging (MMS), e-mail application, instant
messaging, remote synchronization, and accessing the internet with the browser, require
network support for these technologies.
General information
■Access codes
The security code helps to protect your phone against unauthorized use. You can create and
change a code, and set the phone to request the code.
The PIN code, supplied with the SIM card, protects the card against unauthorized use. The
PIN2 code, supplied with some SIM cards, is required to access certain services. If you enter
the PIN or PIN2 code incorrectly, three times in succession, you are asked for the PUK or
PUK2 code. If you do not have them, contact your local service provider.
The module PIN is required to access the information in the security module of your SIM card.
The signing PIN may be required for the digital signature. The restriction password is required
when using the call restriction service.
Select Menu > Settings > Security to set how your phone uses the access codes and security
settings.
2760_9206392_30Jan2008.fm Page 7 Wednesday, January 30, 2008 11:47 AM

8
1. Get started
■Install the SIM card and battery
Always switch the device off and disconnect the charger before removing the battery.
For availability and information on using SIM card services, contact your SIM card vendor.
This may be the service provider or other vendor.
This phone is intended for use with a BL-4B battery.
Note: Always switch off the power and disconnect the charger and any other device
before removing the cover. Avoid touching electronic components while changing
the cover. Always store and use the device with the cover attached.
To install the SIM card:
• Press and slide the back cover toward the top of the phone to remove it (1).
• To remove the battery, lift it as shown (2).
• Carefully lift the SIM card holder from the finger grip of the phone, and open the flip
cover (3).
• Insert the SIM card, so that the bevelled corner is on the upper left side and the
gold-colored contact area is facing downward (4). Close the SIM card holder, and press it
to lock it into place (5).
• Insert the battery into the battery slot (6).
• Align the back cover with the back of the phone. Slide and push it toward the bottom of
the phone to lock it (7).
■Charge the battery
Check the model number of any charger before use with this device. This device is intended
for use when supplied with power from an AC-3 charger.
2760_9206392_30Jan2008.fm Page 8 Wednesday, January 30, 2008 11:47 AM

9
Warning: Use only batteries, chargers, and enhancements approved by Nokia for
use with this particular model. The use of any other types may invalidate any
approval or warranty, and may be dangerous.
For availability of approved enhancements, please check with your dealer. When you
disconnect the power cord of any enhancement, grasp and pull the plug, not the cord.
1. Connect the charger to a wall outlet.
2. Lift the cover at the top of the phone.
3. Connect the charger to the phone.
■Switch the phone on or off
To switch the phone on or off, press and hold the power key. See “Keys
and parts,” p. 10.
Set the time, time zone, and date
Enter the local time, select the time zone of your location in terms of the time difference
with respect to Greenwich Mean Time (GMT), and enter the date. See “Date and time,” p. 27.
■Antenna
Your device may have internal and external antennas. As with any radio
transmitting device, avoid touching the antenna area unnecessarily
while the antenna is transmitting or receiving. Contact with such an
antenna affects the communication quality and may cause the device to
operate at a higher power level than otherwise needed and may reduce
the battery life.
Note: Do not touch this connector as it is intended for
use by authorized service personnel only.
■Wrist strap
Remove the back cover, and insert the wrist strap as illustrated. Replace the
back cover.
2760_9206392_30Jan2008.fm Page 9 Wednesday, January 30, 2008 11:47 AM

10
2. Your phone
■Keys and parts
• Earpiece (1)
•Maindisplay(2)
• Selection keys (3)
•Navi
TM key (4). Hereinafter scroll key
• Call key (5)
• End key and power key (6)
• Charger connector (7)
• Headset connector (8)
• Wrist strap eyelet (9)
• Cover for connectors (10)
• Mini display (11)
• Camera lens (12)
Warning: The scroll key in this device may contain nickel. Continuous exposure to
nickel on the skin may lead to a nickel allergy.
■Standby mode
When the phone is ready for use, and you have not entered any characters, the phone is in
the standby mode:
• Network signal strength (1)
• Battery charge level (2)
• Network name or the operator logo (3)
• Function of the left selection key is Go to (4), which is used to view
the functions in your personal shortcut list. When viewing the list, select Options >
Select options to view the available functions that you can add in the options list; select
Organize > Move and the location to rearrange the functions of your shortcut list.
• Function of the middle selection key (5) is Menu.
• Function of the right selection key (6) is t-zones.
2760_9206392_30Jan2008.fm Page 10 Wednesday, January 30, 2008 11:47 AM

11
■Demo mode
To start up the phone without the SIM card, accept Start up phone without SIM card?. Use
those features of the phone that do not require the SIM card.
In demo mode, calls may be possible to the official emergency numbers programmed into
your device.
■Keypad lock (keyguard)
Select Menu and press *quickly to lock the keypad to prevent accidental keypresses. To answer
a call when the keyguard is on, press the call key. When you end or decline the call, the keypad
remains locked. To unlock, select Unlock and press *quickly.
Select Menu > Settings > Phone > Automatic keyguard > On to set the keypad to lock
automatically after a preset time delay when the phone is in the standby mode.
When the device or keypad is locked, calls may be possible to the official emergency number
programmed into your device.
3. Call functions
■Make and answer a call
To make a call, enter the phone number, including the country code and area code, if necessary.
Press the call key to call the number. Scroll right to increase, or left to decrease, the volume
of the earpiece or headset during the phone call.
To answer an incoming call, press the call key. To decline the call without answering, press
the end key or close the fold.
To answer an incoming call by opening the fold, select Menu > Settings > Call > Answer
when fold is opened > On.
■1-touch dialing
To assign a number to a 1-touch-dialing key, select Menu > Phonebook > 1-touch dialing,
scroll to the desired 1-touch-dialing number, and select Assign. Enter the desired phone
number, or select Find to choose a phone number from your phonebook.
To switch the 1-touch dialing function on, select Menu > Settings > Call > 1-touch
dialing > On.
To make a call using the 1-touch-dialing keys, in the standby mode, press and hold the
desired number key.
2760_9206392_30Jan2008.fm Page 11 Wednesday, January 30, 2008 11:47 AM

12
■Loudspeaker
If available, you may select Loudsp. or Normal to use the loudspeaker or the earpiece of the
phone during a call.
Warning: Do not hold the device near your ear when the loudspeaker is in use,
because the volume may be extremely loud.
4. Write text
You can enter text in predictive text ( ) and traditional text ( ) input. To use
traditional text input, press a number key (1 to 9) repeatedly until the desired character
appears. To turn predictive text input on or off when writing, press and hold #, and select
Prediction on or Prediction off.
When using predictive text input, press each key once for a single letter. If the displayed word
is the one you want, press 0to add a space, and write the next word. To change the word,
press *repeatedly until the word you want appears. If ? is displayed after the word, the word
is not in the dictionary. To add the word to the dictionary, select Spell, enter the word (using
traditional text input), and select Save.
■Tips for writing text
• To add a space, press 0.
• To quickly change the text input method, press #repeatedly, and check the indicator at
the top of the display.
• To add a number, press and hold the desired number key.
• To get a list of special characters when using traditional text input, press *; when using
predictive text input, press and hold *.
5. Menu functions
The phone functions are grouped into menus. Not all menu functions or option items are
described here.
In the standby mode, select Menu and the desired menu and submenu. Select Exit or Back to
exit the current level of menu. Press the end key to return to the standby mode directly. To
change the menu view, select Menu > Options > Main menu view > List or Grid.
2760_9206392_30Jan2008.fm Page 12 Wednesday, January 30, 2008 11:47 AM

13
6. Voice notes
Use Voice notes to create and send voice mails directly to a recipient’s mobile or e-mail.
Select Menu > Voice notes to display the voice recorder. See “Voice notes,” p. 22.
7. Log
The phone registers the missed, received, and dialed calls, if the network supports it, and the
phone is switched on, and within the network service area.
You can view the date and the time of the call, edit or delete the phone number from the list,
save the number in Phonebook, or send a message to the number.
To view the information on your calls, select Menu > Log > Missed calls, Received calls, or
Dialed numbers. To view your recent missed and received calls and the dialed numbers
chronologically, select Call log. To view the contacts to whom you most recently sent
messages, select Message recipients.
Select Menu > Log > Call timers, Packet data counter, or Packet data conn. timer for
approximate information on your recent communications.
Note: The actual invoice for calls and services from your service provider may vary,
depending on network features, rounding off for billing, taxes, and so forth.
To delete the recent calls lists, select Clear log lists. You cannot undo this operation.
8. t-zones
You can access various mobile internet services with your phone browser. Check the
availability of these services, pricing, and fees with your service provider.
Important: Use only services that you trust and that offer adequate security and
protection against harmful software.
■Service connection
Make sure that service settings are saved and activated.
To make a connection to the service, open the start page (for example, the home page of the
service provider), select Menu > t-zones > Home, or in the standby mode, press and hold 0.
To access a bookmark, select Menu > t-zones > Bookmarks. If the bookmark does not work
with the current active service settings, activate another set of service settings and try
2760_9206392_30Jan2008.fm Page 13 Wednesday, January 30, 2008 11:47 AM

14
again. To access the last URL, select Menu > t-zones > Last web address. To enter the
address of the service, select Menu > t-zones > Go to address.
To quit browsing and to end the connection, press and hold the end key.
After you connect to the service, you can browse its pages. The function of the phone keys
may vary in different services. Follow the text guides on the phone display.
Note that if GPRS is selected as the data bearer, the indicator is shown on the top left of
the display during browsing. If you receive a call or a text message, or make a call during a
GPRS connection, the indicator will be shown on the top left of the display to indicate
that the GPRS connection is suspended (on hold). After a call, the phone tries to reconnect
the GPRS connection.
Your device may have preinstalled bookmarks and links for third-party internet sites. You
may also access other third-party sites through your device. Third-party sites are not
affiliated with Nokia, and Nokia does not endorse or assume liability for them. If you choose
to access such sites, you should take precautions for security or content.
■Browser appearance settings
In the standby mode, select Menu > t-zones > Settings > Appearance settings. Select Text
wrapping > On to allow the text to continue on the next line. If you select Off, the text will
be abbreviated. Select Show images > No, and any pictures appearing on the page are not
shown. To set the phone to alert when a secure connection changes to an insecure one
during browsing, select Alerts > Alert for unsecure connection > Yes. To set the phone to
alert when a secure page contains an insecure item, select Alert for unsecure items > Yes.
These alerts do not guarantee a secure connection. To select the character set for showing
browser pages that do not include that information or to select whether to always use UTF-8
encoding when sending a web address to a compatible phone, select Character encoding.
■Cookies and cache memory
A cookie is data that a site saves in your phone browser cache memory. The data can be your
user information or your browsing preferences. Cookies are saved until you clear the cache
memory. To allow or prevent the phone from receiving cookies, select Menu > t-zones >
Settings > Security settings > Cookies > Allow or Reject.
A cache is a memory location that is used to store data temporarily. If you have tried to
access or have accessed confidential information requiring passwords, empty the cache
after each use. The information or services you have accessed are stored in the cache. To
empty the cache, select Menu > t-zones > Clear the cache.
2760_9206392_30Jan2008.fm Page 14 Wednesday, January 30, 2008 11:47 AM

15
■t-zones inbox
The phone can receive service messages (network service) (pushed messages) sent by your
service provider. To read this service message, select Show. If you select Exit, the message is
moved to the t-zones inbox. To set the phone to receive service messages, select Menu >
t-zones > Settings > t-zones inbox settings > t-zones messages > On.
■Browser security
Security features may be required for some services, such as banking services or online
shopping. For such connections you need security certificates and possibly a security
module, which may be available on your SIM card. For more information, contact your
service provider.
9. IM & E-mail
The IM & E-mail menu contains the Instant messaging and E-mail menus.
■Instant messaging
You can take text messaging to the next level by experiencing instant messaging (IM,
network service) in a wireless environment. You can engage in IM with friends and family,
regardless of the mobile system or platform (like the internet) they are using, as long as you
all use the same IM service.
Before you can start using IM, you must first register with the instant messaging service you
want to use and obtain a unique ID and password before you can use IM. See “Register with
an IM service,” p. 15 for more information.
Note: Depending on your IM service provider, you may not have access to all of the
features described in this guide and your menus may be different.
To check the availability and costs and to subscribe to the IM service, contact your wireless
service provider and the IM service provider from whom you receive your unique ID,
password, and settings.
While you are logged in and connected to the IM service, you can exit the IM application and
use the other functions of the phone, and the IM session and conversations remain active in
the background.
Register with an IM service
You can do this by registering over the internet with the IM service provider you have
selected to use. During the registration process, you will have the opportunity to create the
2760_9206392_30Jan2008.fm Page 15 Wednesday, January 30, 2008 11:47 AM

16
unique ID and password of your choice. For more information about signing up for IM
services, contact your wireless service provider or an IM service provider.
Login
1. Select Menu > IM & E-mail > I M.
A list of available IM services is displayed.
2. Select the IM service you want to use and enter your unique ID and password.
If you have already logged in to an IM service before, the unique ID you used previously is
displayed automatically.
3. Select Sign On, Connect, or Sign In, depending on your IM service provider.
Depending on the IM service provider you are using, these may not be the exact menu
items displayed.
You can choose to save your password so you do not have to enter it each time you sign in,
or you can choose to log in automatically and skip the login menu when you select the
IM application.
Begin an IM session
You can send instant messages to anyone if you have the person’s unique ID and you use the
same IM service.
To begin an IM session, do the following:
1. From your contacts list, select a contact who is online.
Some IM service providers also allow sending instant messages to contacts who are
not online.
2. To send a message to a person who is not in your contacts list, select Options, the option
to send a message, and enter the unique ID of the person.
A conversation menu is displayed, with the contact’s name displayed at the top.
3. Enter a message. When you finish the message, select Send.
Receive and reply to messages
If you have an active IM conversation open and receive an instant message from the contact
with whom you are chatting, the new message notification sound plays and the message
appears in the conversation. As the conversation progresses, the most recent message
appears at the bottom of the menu, causing the previous messages to move up if the screen
is full. To reply, enter your message and select Send.
2760_9206392_30Jan2008.fm Page 16 Wednesday, January 30, 2008 11:47 AM

17
If you receive an instant message when you have the IM application open, but do not have
an active conversation open, the new message notification sound plays. Also, a new IM icon
is displayed next to the name of the message sender under the conversations section of the
contacts list.
If you receive an instant message when you are logged in to the IM service, but do not have
the IM application open on your phone, a message is displayed telling you that a new IM
message has been received. Select Start to open the IM application, and view the new
message.
Return to chat session
From the IM contacts list, select Conversations. This list displays all IM conversations and
group chats in which you are currently participating. To view a conversation or continue
chatting, select a group name or contact name.
Contacts
You can add the names of contacts with whom you interact frequently by IM to the contacts
list.
Add a new contact
To add a contact to the contacts list, select Options > Add buddy, Add user, Add new contact,
or Add a Contact, depending on your IM service provider.
Enter the contact’s unique ID for the IM service and select OK.
Remove a contact
From the contacts list, select the contact you want to remove, and select Options > Delete
buddy, Delete contact, or Remove contact, depending on your IM service provider, then
select OK.
Conversation options
You can save an open conversation to be available for viewing, even after you end
the conversation.
To save a conversation, while you have it open, select Options > Save, edit the name, if you
want, and select Save.
To view a saved conversation, from the contacts list, select Options > Saved convers.. Scroll
to the conversation name you want, and select Open.
To rename a saved conversation, from the contacts list, select Options > Saved convers..
Scroll to the conversation name you want, and select Options > Rename. Rename the
conversation, and select OK.
2760_9206392_30Jan2008.fm Page 17 Wednesday, January 30, 2008 11:47 AM

18
To delete a saved conversation, from the contacts list, select Options > Saved convers..
Scroll to the conversation name you want, and select Options > Delete, and select OK.
Set your availability
You can determine if other users can tell whether you are available or not. From the contacts
list, highlight your name at the top of the menu, and select Options > My status > Available,
Away, or Invisible.
Log off service
Exit the IM application
From the contacts list, you can exit the IM application, but still be connected to the IM
service. Select Exit to return to the main menu. If you open IM again, you do not need to log
in again.
You can receive instant messages from your contacts when using your phone for other
purposes, such as playing a game. If you are connected to your IM service, but you have not
used your IM application for some time, you may be automatically disconnected from the IM
service. The next time you open the IM application, you must log in again.
Log out of IM
To disconnect from the IM service, you must log out. From the contacts list, select Options >
Sign off, Disconnect, or Sign out, depending on your IM service provider, and select OK.
You are taken to the login screen of the IM service provider, where you can return to the IM
service provider selection list, exit the IM application, or select an IM service and log in
again.
■E-mail
E-mail provides access to certain common e-mail services. If you have an e-mail account
with one of the supported e-mail services, then you can use this application to access your
e-mail account. With this application you can view your inbox, compose and send e-mail,
receive e-mail, receive notification of new e-mail, and delete e-mail. This e-mail application
is different from the SMS and MMS e-mail function.
If you do not have an e-mail account already, visit the Web site of one of the e-mail service
providers and register for an e-mail account. If you have questions regarding the cost of
e-mail service, contact your wireless network operator.
Start E-mail
1. Select Menu > IM & E-mail > E-mail.
2760_9206392_30Jan2008.fm Page 18 Wednesday, January 30, 2008 11:47 AM

19
2. Highlight and select the provider with which you have an e-mail account. Alternatively,
you can select Options > Add account and the appropriate provider from the list.
3. Read and accept the terms of use, if you are presented with any.
4. Enter your user id and password. Note that the password is case sensitive.
5. If you wish to have your login information remembered or set e-mail notifications on,
highlight the checkbox option, and select Mark.
If e-mail notifications are enabled, you get notifications of new e-mails. This setting only
applies to the current e-mail account, and does not affect the notification settings of
other e-mail accounts in e-mail.
View the inbox and other folders
The inbox view will load the first page of the inbox by default. To go to the next page of the
inbox, select Next page (the last item on the page).
To navigate from the inbox to another folder, scroll right or left. This switches the tab view
from the current folder to the next folder. Scroll to the desired folder. Stop at the desired
folder and the first page of that folder loads automatically. When folder content is loaded,
it will not be updated again until you select Options > Refresh.
To view an e-mail, select the e-mail. When you highlight a particular e-mail, you see an
expanded view with more details about the e-mail.
Write and send
1. To start writing an e-mail from the inbox view, select Options > Create.
2. Enter the recipient’s e-mail address, a subject, and the e-mail message. To select from a
list of recent e-mail addresses, select Insert.
3. Select Send to send the e-mail.
Reply and forward
1. When viewing an e-mail, select Options > Reply, Reply to all, or Forward. The e-mail view
loads with the appropriate fields completed.
2. Enter in the remaining information.
3. Select Send to send the e-mail.
Delete
To delete an e-mail from the inbox view, select Options > Delete. To mark multiple e-mails
to be deleted, select Options > Delete Multiple. To delete marked e-mail, select Options >
Delete marked.
To delete an e-mail you are viewing, select Options > Delete.
2760_9206392_30Jan2008.fm Page 19 Wednesday, January 30, 2008 11:47 AM

20
E-mail settings
From the inbox view, select Options > Email settings to set the following settings:
Folder display — to view e-mails in the inbox view by their From Address or their Subject
Confirm deletion — to be prompted with a delete confirmation or not
Message AutoExpand — to automatically expand the e-mail message in the inbox view
when it is highlighted
Exit confirmation — to be prompted with an exit confirmation or not
Highlight and select your desired settings. To apply your setting changes, select > Save.
These settings will be applied to all of your e-mail accounts.
10. Messaging
The message services can only be used if they are supported by your service provider.
Note: The message sent icon or text on your device screen does not indicate that
the message is received at the intended destination.
Important: Exercise caution when opening messages. Messages may contain
malicious software or otherwise be harmful to your device or PC.
■Text and picture message settings
Select Menu > Messaging > Message settings > Text messages > Message centers. If your
SIM card supports more than one message center, select or add the one you want to use. You
may need to get the center number from your service provider.
Select Menu > Messaging > Message settings > Picture messages and from the following:
Delivery reports > Yes — to ask the network to send delivery reports about your messages
(network service)
MMS creation mode > Restricted — to set the phone to not allow the type of content that
may not be supported by the network or the receiving device in a picture message. Select
Free to allow such contents, but the receiving device may not receive the message properly.
Image size (restricted) or Image size (free) — to define the size of the image you may insert
into a picture message when MMS creation mode is set to Restricted or Free.
Default slide timing — to define the default time between slides in picture messages
Allow picture message reception — Select No, Yes, or In home network to use the multimedia
service.
Incoming picture messages — to decide how picture messages are retrieved. This setting is not
shown if Allow picture message reception is set to No.
2760_9206392_30Jan2008.fm Page 20 Wednesday, January 30, 2008 11:47 AM
Other manuals for 2760 - Cell Phone 11 MB
5
Table of contents
Other Nokia Cell Phone manuals

Nokia
Nokia 6610 - Cell Phone 625 KB Guide

Nokia
Nokia 2760 - Cell Phone 11 MB User manual

Nokia
Nokia 6225 User manual

Nokia
Nokia N-GAGE QD User manual

Nokia
Nokia 1100 - Cell Phone - GSM User manual

Nokia
Nokia SLIDE 2220 User manual

Nokia
Nokia 306 User manual

Nokia
Nokia E65 Quick start guide

Nokia
Nokia E65 User manual

Nokia
Nokia 2135 User manual

Nokia
Nokia E63 User manual

Nokia
Nokia Lumia 920 User manual

Nokia
Nokia 225 4G User manual

Nokia
Nokia fold 6600 User manual

Nokia
Nokia 8.1 User manual

Nokia
Nokia 6230 Service manual

Nokia
Nokia E51 - Smartphone 130 MB User manual

Nokia
Nokia G100 User manual

Nokia
Nokia N95 User manual

Nokia
Nokia 5125 User manual