NOMA MEDIUM User manual

USER MANUAL
READ AND SAVE THESE INSTRUCTIONS
MEDIUM
PRODUCT NO. 043-0741-4 LARGE
PRODUCT NO. 043-0742-2

2
TABLE OF CONTENTS
01. KNOW YOUR AIR PURIFIER
02. OPERATING INSTRUCTIONS
03. SMART WIFI SETUP
04. CLEANING INSTRUCTIONS
05. FILTER REPLACEMENT
06. PRODUCT SPECIFICATIONS
07. FAQs
08. SAFETY / CAUTIONS
09. TROUBLESHOOTING
10. WARRANTY & DISPOSAL
3
7
11
13
15
17
18
19
21
22

43
KNOW YOUR AIR PURIFIER
FEATURES
01.
02.
03.
04.
05.
AIR OUTPUT VENT
AIR QUALITY INDICATOR RING
CONTROL PANEL
AIR INPUT GRILLE
AC PLUG
01 01
03
04
05
02

65
01
02
04
05
03
KNOW YOUR AIR PURIFIER
FEATURES
01.
02.
03.
04.
05.
AIR QUALITY SENSOR DOOR
FAN HOUSING
TRUE HEPA FILTER
PRE-FILTER
AIR INTAKE GRILLE
01

02
OPERATING INSTRUCTIONS
SET UP DIRECTIONS
87
01. Place
Place your air purifier on the floor and be sure nothing is covering the air
intake grille.
03. Sense
The air quality indicator ring will automatically illuminate and start detecting
the quality of your air. It will turn blue if the quality is great, pink if the quality
is average, and red if the quality is poor.
05. Set Up Smart WiFi Function (Optional)
See “Smart WiFi Setup“ Chapter (3) for Smart WiFi set up details.
06. Relax
Enjoy your air purifier in quiet, peaceful, bliss.
04. Set
Select your optimal settings by referring to the OPERATING INSTRUCTIONS
(pages 9 - 10).
02. Power
Plug in the air purifier and press the Power Button once. The unit will start
immediately on the AUTO setting .
02. 03.
Captures up
to 99.97%
of airborne
particles as
small as 0.3
microns.

109
02
03. Timer Button
Set the purifying duration for 2, 4 or 8 hours.
07. Night Mode
To dim the indicator lights, press and hold the Power Button for 2 sec-
onds. To exit night mode, press and hold the Power Button for 2 seconds
again.
05. Ionizer Switch
Turn on the optional Ionizer to help your air purifier trap airborne particles
more eciently.
04. Smart WiFi Button
See “Smart WiFi Setup“ Chapter (3) for Smart WiFi set up details.
01. Power Button
Push once to turn on the air purifier and the unit will start immediately on
the AUTO setting .
a) AUTO Fan Speed
Fan speed will automatically adjust according to the air quality indicator
ring. If the indicator detects poor air quality (red ring), the fan speed will
automatically turn to High. If the indicator detects great air quality (blue
ring), the fan speed will automatically switch to Low.
02. Fan Speed Button
Change the fan speed to AUTO, Low, Medium or High.
OPERATING INSTRUCTIONS
CONTROLS AND SETTINGS
03 02 01
06. Filter Replacement Indicator
Only when the True HEPA filter needs to be replaced will the indicator
beside the Power Button illuminate. Follow the FILTER REPLACEMENT
instructions on page 16 and when completed, reset the indicator by pressing
and holding the Power and Timer buttons for 2 seconds.
04
05

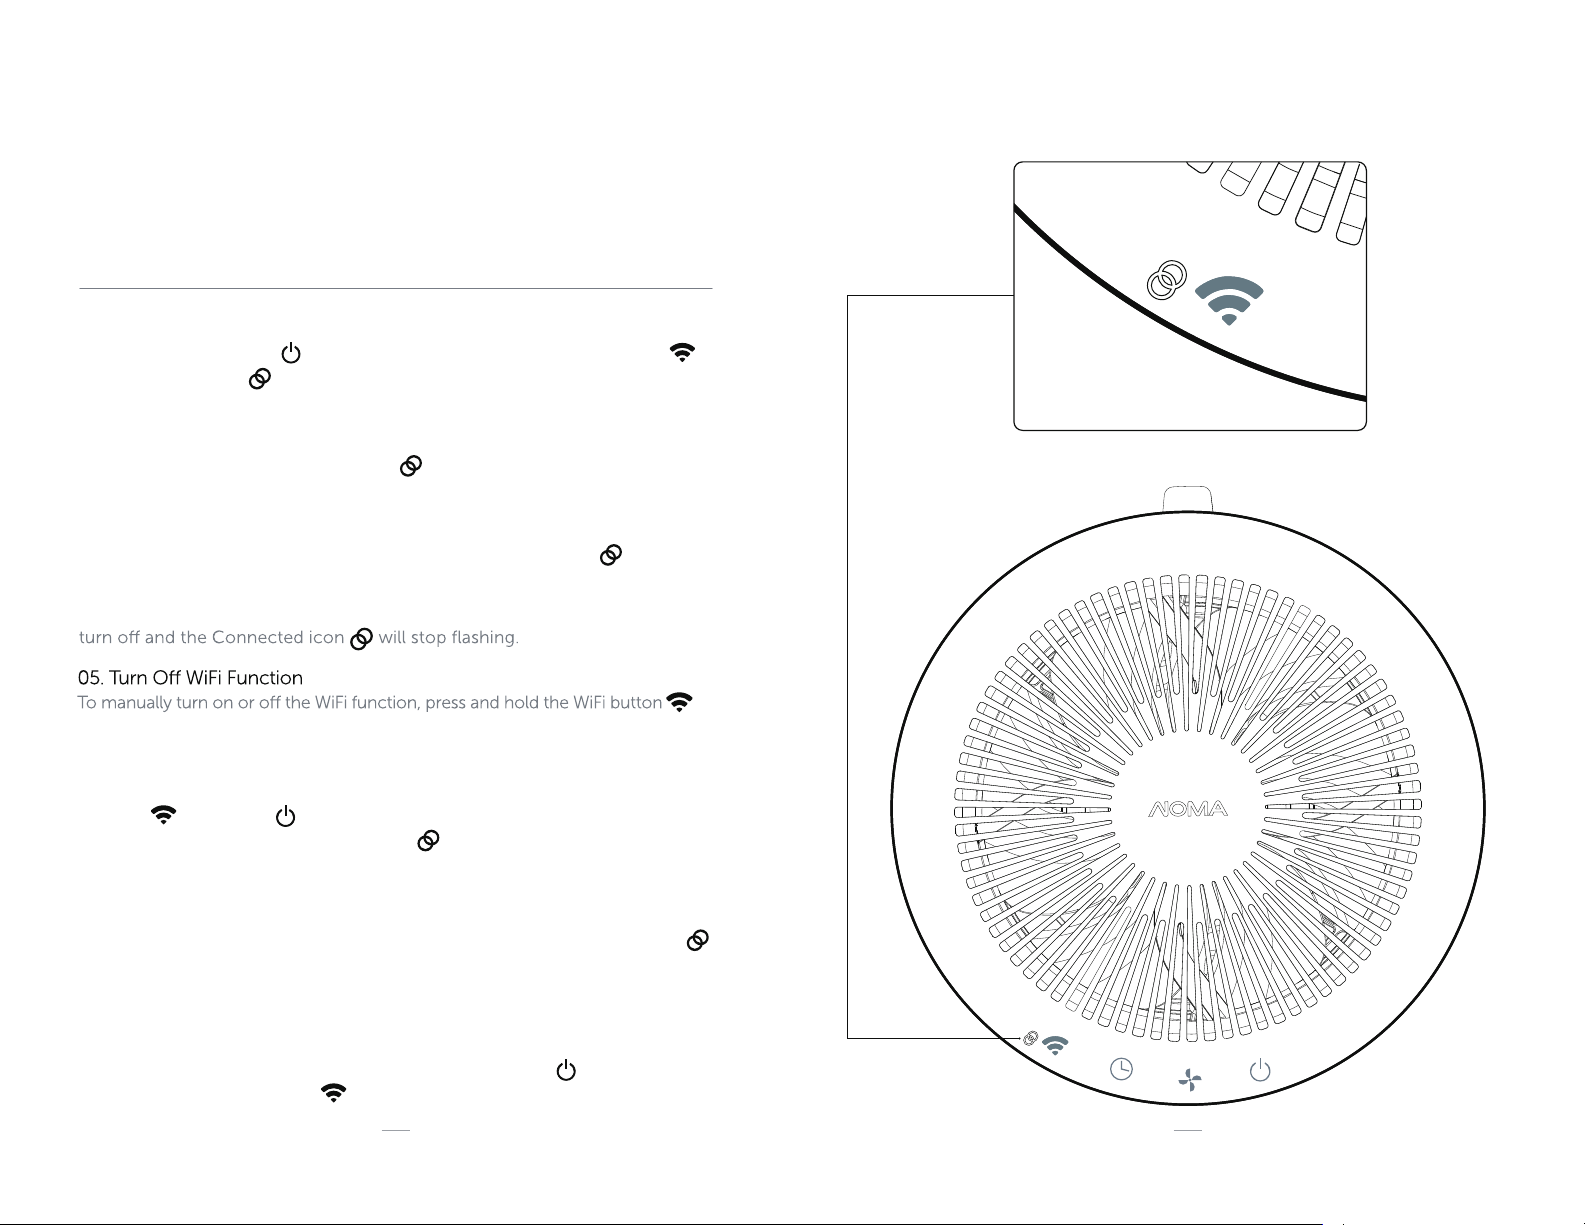
07. No Cloud Connection
If the Cloud is down and the device can not connect, the Connected icon
will flash slowly. After 3 minutes of no connection the air purifier will stop
trying to connect and the flashing will stop.
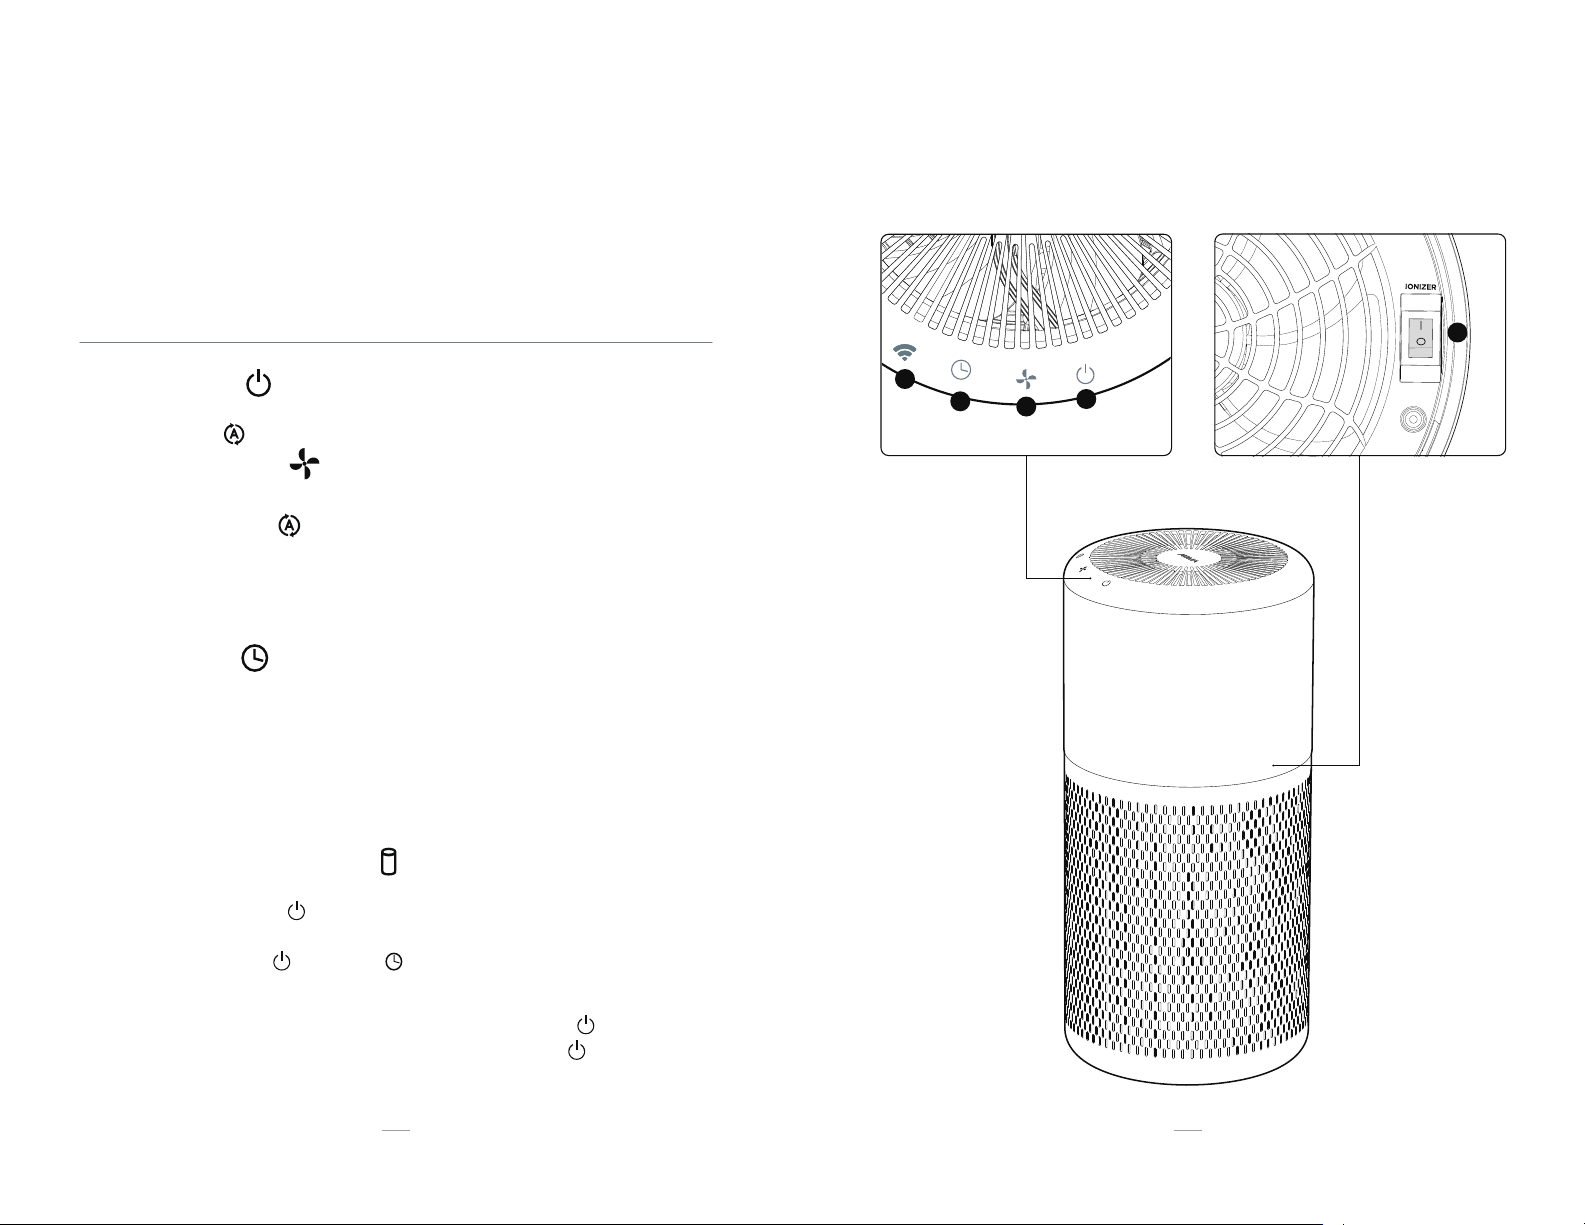
01. Power Button
When the Power button is turned on, press and hold the WiFi button .
The Connected icon will flash slowly while the unit waits for a connection.
11
03
SMART WIFI SETUP
SMART INTERFACE WORK FLOW
12
02. Pre-Connected Network
If any pre-connected WiFi network is found, the unit will connect
automatically and the Connected icon will stay lit.
03. No Pre-Connected Network
If no pre-connected WiFi network is found, follow the NOMA iQ app
instructions to connect. Once connected, the Connected icon will stay lit.
04. No Network Found
If no WiFi network is found after 3 mins, the WiFi function will automatically
for 2 seconds.
06. Reset WiFi Connection / Pairing Mode
To reset your WiFi connection or set it to pairing mode, press and hold
the WiFi and Power button down at the same time and listen for 5
consecutive beeps. The Connected icon will start flashing slowly as it
waits for the new WiFi connection.
08. Power Cycle or Outage
Once a connection has already been established, in the event of a power
outage or if the unit is unplugged, press the power button to turn the unit
on and hold the Wi-Fi button to re-establish the connection.

13
CLEANING INSTRUCTIONS
CARE & MAINTENANCE
Make sure the air purifier is turned o and unplugged.
For a quick cleaning, wipe down the unit with a soft, lightly dampened
cloth. Do not get the fan housing too wet as problems may arise during
operation.
For a more thorough cleaning, dust the air output vent and air intake
grille with a small soft brush and use a dry, soft cloth to wipe down the
exterior.
To clean the pre-filter, refer to Pre-Filter Maintenance for instructions.
When the Filter Replacement Indicator turns on, the True HEPA filter
needs to be replaced. Follow FILTER REPLACEMENT directions on page 15
for instructions. Do not wash the True HEPA filter.
Make sure the air purifier is turned o and unplugged.
Follow the first 2 operations of FILTER REPLACEMENT on page 15.
Vacuum the pre-filter or machine wash in cool water and dry on the
gentle cycle.
Be sure the pre-filter is dry and slip it back onto the True HEPA filter by
following the last 2 operations of FILTER REPLACEMENT on page 16.
General Maintenance
01.
02.
03.
04.
05.
Pre-Filter Maintenance
01.
02.
03.
04.
14
04
Air Quality Sensor Maintenance
01.
02.
03.
Open the air quality sensor door located behind the fan housing.
Use a dry cotton swab or soft cloth to gently wipe the sensor.
Close the air quality sensor door to ensure no moisture reaches the
sensor.
01. 02. 03.

15
Rotate the fan housing
counter-clockwise and lift from air
intake grille.
Take the filter our of the air intake
grille.
Remove the pre-filter from the True
HEPA filter.
0201
16
05
FILTER REPLACEMENT
TRUE HEPA FILTER REPLACEMENT
IMPORTANT:
True HEPA filter should be replaced every 3-6 months. The life of the filter will
vary depending on air quality and usage.
Dispose of the used True HEPA filter
and replace with a new filter.
Slip the pre-filter back onto the True
HEPA filter and place back into the
air intake grille.
Put the fan housing back onto the air
intake grille, rotating clockwise until the
fasteners lock into the groove.
Reset the Filter Replacement Indicator by
pressing and holding the Power and Timer
buttons for 2 seconds.
0403

17
06
PRODUCT SPECIFICATIONS
OVERVIEW
18
07
FAQs
FREQUENTLY ASKED QUESTIONS
Q: What does the Clean Air Delivery Rate (CADR) mean?
A: CADR is a measure of the volume of air that is processed by the
purifier. The higher the CADR, the more powerful the air purifier.
Q: What does a pre-filter do?
A: It extends the life of your True HEPA filter by initially filtering out
larger particles, such as mould and pollen.
Q: What does an Ionizer do?
A: Ionizers electrically charge a room’s air molecules so your air
purifier can trap airborne particles more eciently.
Q: Will my settings be saved if I turn off my air purifier?
A: Yes, if kept plugged in and the WiFi is still connected in the
background, the air purifier will return to the last settings it was on
before being turned o. If unplugged, the unit will return to the
default AUTO setting when turned back on and will search for the
connected WiFi network to connect automatically.
For any other questions on how to run your smart device, please visit
www.canadiantire.ca/nomaiq
Pro
duct Name
duct Name
NOMA iQ True HEPA
Smart WiFi Medium
Air Purifier
NOMA iQ True HEPA
Smart WiFi Large
Air Purifier
Product No. 043-0741-4 043-0742-2
Clean Air Delivery
Rate (CADR) 130 177
Optimal Room Size MEDIUM SPACE:
200 sq. ft. (18.6 m2)
LARGE SPACE:
275 sq. ft. (25.5 m2)
Pre-Filter Used
NOMA®Reusable
Medium Air Purifier
Pre-Filter
NOMA®Reusable
Large Air Purifier
Pre-Filter
Main Filter Used
NOMA®True
HEPA Medium
Replacement Filter
NOMA®True HEPA
Large
Replacement Filter
Ionizer Switch Yes Yes
Number of Fan
Speeds 33
Energy Star
Certified Yes Yes
cETLus Listed Yes Yes
AHAM Certified Yes Yes
Input Voltage AC 120 V | 60Hz |
24W
AC 120 V | 60Hz |
38W

19
SAFETY / CAUTIONS
SAFETY CONCERNS
•
•
•
•
•
•
•
•
E
NSURE THAT ALL AIR OPENINGS ARE
NOT
RESTRICTED OR COVERED
IN ANY WAY. DO NOT PLACE ANYTHING ON TOP OF THE UNIT.
NEVER DROP OR INSERT ANY OBJECT INTO ANY OPENINGS.
D
O NOT PLACE AIR PURIFIER NEAR HEAT SOU
RCES SUCH AS STOVES,
RADIATORS, AND HEATERS. DO LOCATE YOUR AIR PURIFIER ON AN
INSIDE WALL NEAR AN ELECTRICAL OUTLET.
D
O
NOT OPERATE THE AIR PURIFIER I
F THE
RE IS DAMAGE TO THE
POWER CORD OR IF THE AIR P
URIFIER HAS BEEN DROPPED,
DAMAGED O
R MALFUNCTIONS. R
ETURN THE AIR PURIFIER TO AN
AUTHORIZE
D SERVICE FACILITY FOR EXAMINATION, ELECTRICAL OR
MECHANICAL ADJUSTMENT, OR REPAIR.
DO
NOT ATTEMPT TO REPAIR OR ADJ
UST AN
Y ELECTRICAL OR
MECHANICAL FUNCTIONS ON THIS UNIT. DOING SO WILL VOID
YOUR WARRANTY. THE INSIDE OF THE UNIT CONTAINS NO USER
SERVICEABLE PARTS. ALL SERVICING SHOULD BE PERFORMED BY
QUALIFIED PERSONNEL ONLY.
TO AVOID FIRE OR SHOCK HAZARD, PLUG THE AIR PURIFIER
DIRECTLY INTO A 120 V AC ELECTRICAL OUTLET.
TO AVOID FIRE HAZARD, NEVER PLACE THE CORD UNDER RUGS OR
NEAR HEAT REGISTERS.
DO NOT ALLOW CHILDREN TO HANDLE THE AIR PURIFIER.
SUPERVISION REQUIRED WHEN PLACED IN A ROOM WITH
CHILDREN.
20
08
•
•
•
•
•
•
•
USE AIR PURIFIER ONLY FOR INTENDED HOUSEHOLD USE AS
DESCRIBED IN THIS MANUAL. ANY OTHER USE NOT RECOMMENDED
BY THE MANUFACTURER MAY CAUSE FIRE, ELECTRIC SHOCK,
OR INJURY TO PERSONS. THE USE OF ATTACHMENTS NOT
RECOMMENDED OR SOLD BY THE MANUFACTURER MAY CAUSE
HAZARDS.
DO NOT USE OUTDOORS.
AIR PURIFIER SHOULD BE UNPLUGGED WHEN NOT IN USE. BE SURE
TO UNPLUG THE UNIT BY PULLING ON THE PLUG AND NOT THE
CORD.
THIS AIR PURIFIER REQUIRES MAINTENANCE TO OPERATE
EFFICIENTLY. REFER TO CLEANING AND MAINTENANCE PROCEDURES.
NEVER CLEAN THE AIR PURIFIER WHILE IT IS PLUGGED IN. DO NOT
ATTEMPT TO WASH THE UNIT UNDER RUNNING WATER.
DO NOT PLUG IN THE CORD WITH WET HANDS: ELECTRIC SHOCK
COULD RESULT.
THIS PRODUCT COMPLIES WITH THE MAXIMUM ALLOWABLE
CONCENTRATION OF OZONE OF 0.050 PARTS PER MILLION BY
VOLUME (PPMV) IN A 24-HOUR PERIOD.

21
09
TROUBLESHOOTING
COMMON PROBLEMS
PROBLEM
PROBLEM
SOLUTIONS
SOLUTIONS
Unit does not
power on.
• Ensure unit is plugged into a working power
outlet.
• Check that the Power Button is on.
• If the power indicator light does not come on,
contact the toll free NOMA®customer service
centre at 1-866-827-4985.
Unit is not
producing
desired amount
of airflow.
• Ensure nothing is blocking the air intake grille.
• Ensure nothing is blocking the air output vent.
• Clean the pre-filter (see CLEANING
INSTRUCTIONS).
• Check the Filter Replacement Indicator and
if lit, replace the True HEPA filter (see FILTER
REPLACEMENT).
• Unit settings are too low — increase the fan speed
(see OPERATING INSTRUCTIONS).
22
10
WARRANTY & DISPOSAL
ENVIRONMENTALLY FRIENDLY
You can help protect the environment!
Please remember to respect local regulations. Dispose of the non-working
electrical unit to an appropriate waste disposal centre.
2 YEAR LIMITED WARRANTY
This NOMA iQ product carries a 2 year warranty against defects in
workmanship and materials. At its discretion, Noma Canada agrees
to have any defective part(s) replaced free of charge within the stated
warranty period, when returned with proof of purchase. This product
is not guaranteed against wear or breakage due to misuse and/or
abuse.
CAN ICES-003(B)/NMB-003(B)
&RQWDLQV)&&,'$&=(63:5220'
&RQWDLQV,&(63:5220'
)RUDQ\RWKHULVVXHVDERXWFRQQHFWLQJRUUXQQLQJ\RXUVPDUWGHYLFHSOHDVH
YLVLWZZZFDQDGLDQWLUHFDQRPDLT

This device complies with Part 15 of the FCC Rules. Operation is
subject to the following two conditions:
(1) this device may not cause harmful interference, and
(2) this device must accept any interference received, including
interference that may cause undesired operation.
Golden Viking Sports, LLC.
Address: Sumner, WA, USA 98390. TOLL FREE: www.noma.com
For customer service in the United States, please contact us
at:[email protected].
For customers within Canada, please call 1-866-827-4985 for
support.
Please note that changes or modifications of this product if not
expressly approved by the party responsible for compliance could
void the user’s authority to operate the equipment.
NOTE: This equipment has been tested and found to comply with
the limits for a Class B digital device, pursuant to Part 15 of the FCC
Rules. These limits are designed to provide reasonable protection
against harmful interference in a residential installation. This
equipment generates, uses and can radiate radio frequency energy
and, if not installed and used in accordance with the instructions,
may cause harmful interference to radio communications. However,
there is no guarantee that interference will not occur in a particular
installation.
If this equipment does cause harmful interference to radio or
television reception, which can be determined by turning the
equipment o and on, the user is encouraged to try to correct the
interference by one or more of the following measures:
-- Reorient or relocate the receiving antenna.
-- Increase the separation between the equipment and receiver.
-- Connect the equipment into an outlet on a circuit dierent from
that to which the receiver is connected.
-- Consult the dealer or an experienced radio/TV technician for help.
This device contains licence-exempt transmitter(s)/receiver(s) that
comply with Innovation, Science and Economic Development
Canada’s licence-exempt RSS(s). Operation is subject to the
following two conditions:
(1) This device may not cause interference.
(2) This device must accept any interference, including interference
that may cause undesired operation of the device. GUIDE D’UTILISATION
LISEZ ET CONSERVEZ CES INSTRUCTIONS
SURFACES MOYENNES
Nº DE MODÈLE : 043-0741-4 GRANDES SURFACES
Nº DE MODÈLE : 043-0742-2
PURIFICATEUR D’AIR À FILTRE HEPA
AUTHENTIQUE
INTELLIGENT À CONNEXION WIFI
23

TABLE DES MATIÈRES
24
01.
02.
03.
04.
05.
06.
07.
08.
09.
10.
25
29
33
35
37
39
40
41
43
44
FAMILIARISEZ-VOUS AVEC
VOTRE PURIFICATEUR D’AIR
CONSIGNES D’UTILISATION
CONFIGURATION WIFI
INSTRUCTIONS DE NETTOYAGE
REMPLACEMENT DU FILTRE
FICHE TECHNIQUE
FAQ
AVERTISSEMENTS
DÉPANNAGE
GARANTIE ET ÉLIMINATION

25
FAMILIARISEZ-VOUS AVEC
VOTRE PURIFICATEUR D’AIR
CARACTÉRISTIQUES
01.
02.
03.
04.
05.
ÉVENT DE SORTIE D’AIR
VOYANT CIRCULAIRE INDICATEUR
DE LA QUALITÉ DE L’AIR
PANNEAU DE COMMANDE
GRILLE D’ADMISSION D’AIR
FICHE CA
01
26
01
03
04
05
02

27
FAMILIARISEZ-VOUS AVEC
VOTRE PURIFICATEUR D’AIR
PIÈCES 01
01.
02.
03.
04.
05.
PORTE DU CAPTEUR DE
QUALITÉ DE L’AIR
BOÎTIER DU VENTILATEUR
FILTRE HEPA AUTHENTIQUE
PRÉFILTRE
GRILLE D’ADMISSION D’AIR
28
01
02
04
05
03

02
CONSIGNES D’UTILISATION
INSTRUCTIONS D’INSTALLATION
29
01. Emplacement
Placez votre purificateur d’air sur le sol et assurez-vous que rien ne recouvre
la grille d’admission d’air.
03. Capteur
Le voyant circulaire indicateur de la qualité de l’air s’allume
automatiquement et le capteur commence à détecter la qualité de
votre air. Le voyant devient bleu si l’air est de qualité excellente, rose si
l’air est de qualité moyenne et rouge si l’air est de qualité mauvaise.
&RQÀJXUDWLRQGHODIRQFWLRQ:L)LIDFXOWDWLYH
&RQVXOWH]OHFKDSLWUH©&RQÀJXUDWLRQ:L)LªSRXUOHVGpWDLOVGH
FRQÀJXUDWLRQGH:L)L
06. Détendez-vous
3URÀWH]GHYRWUHSXULÀFDWHXUG·DLUGDQVOHFDOPHODSDL[OHERQKHXU.
04. Réglage
Sélectionnez vos réglages optimaux en consultant les CONSIGNES
'·87,/,6$7,21SDJHVj
02. Alimentation
Branchez le purificateur d’air et appuyez une fois sur le bouton Marche/
Arrêt . L’appareil démarre immédiatement sur réglage AUTO .
30
Capture
jusqu’à
99,97% des
particules en
suspension
dans l’air aussi
petites que 0,3
micron.
02. 03.

31
02
03. Minuterie
Réglez la durée de purification pour une période 2, 4 ou 8 heures.
07. Mode nuit
Pour atténuer les voyants, appuyez sur le bouton Marche/Arrêt pendant
2 secondes. Pour quitter le mode nuit, appuyez à nouveau sur le bouton
Marche/Arrêt pendant 2 secondes.
05. Interrupteur de l’ionisateur
Allumez l’ionisateur en option pour aider votre purificateur d’air à piéger plus
ecacement les particules en suspension dans l’air.
04. Bouton WiFi intelligent
Consultez le chapitre 3 « Configuration de WiFi » pour les détails de config-
uration de WiFi intelligent.
01. Bouton Marche/Arrêt
Appuyez une fois sur le bouton Marche/Arrêt pour allumer le purificateur
d’air. L’appareil démarrera immédiatement sur réglage AUTO .
a) Vitesse du ventilateur AUTO
La vitesse du ventilateur s’ajuste automatiquement en fonction du voyant
circulaire indicateur de qualité de l’air. Si le capteur détecte une mauvaise
qualité de l’air (voyant circulaire rouge), la vitesse du ventilateur passe
automatiquement à Haute vitesse. Si le capteur détecte une excellente
qualité de l’air (voyant circulaire bleu), la vitesse du ventilateur passe
automatiquement à Basse vitesse.
02. Bouton de vitesse du ventilateur
Réglez la vitesse du ventilateur sur AUTO, Basse, Moyenne ou Haute.
CONSIGNES D’UTILISATION
COMMANDES ET RÉGLAGES
06. Témoin de remplacement de filtre
Ce n’est que lorsque le filtre HEPA authentique doit être remplacé que
le témoin situé à côté du bouton Marche/Arrêt s’allume. Suivez les
instructions de remplacement du filtre aux pages 37 à 38 et une fois terminé,
réinitialisez le voyant en appuyant sur les boutons Marche/ Arrêt et
Minuterie enfoncés pendant 2 secondes.
32
03 02 01
04
05

01. Bouton d’alimentation
Lorsque le bouton d’alimentation est allumé, appuyez longuement sur
le bouton WiFi . L’icône connectée clignote lentement pendant que
l’appareil attend une connexion..
02. Réseau préconnecté.
Si un réseau WiFi préconnecté est détecté, l’appareil se connecte
automatiquement et l’icône Connecté reste allumée.Pour nettoyer le
préfiltre, consultez la section.
03. Aucun réseau préconnecté
Si aucun réseau WiFi préconnecté n’est trouvé, suivez les instructions de
l’application NOMA iQ pour vous connecter. Une fois connecté, l’icône
Connecté reste allumée.
04. Aucun réseau trouvé
Si aucun réseau WiFi n’est trouvé après 3 minutes, la fonction WiFi s’éteint
automatiquement et l’icône Connecté arrête de clignoter.
05. Désactiver la fonction WiFi
Pour activer ou désactiver manuellement la fonction WiFi, appuyez sur le
bouton WiFi pendant 2 secondes.
06. Réinitialiser la connexion WiFi / Mode jumelage
Pour réinitialiser votre connexion WiFi ou la mettre en mode jumelage,
appuyez simultanément sur les boutons WiFi et Alimentation et
attendez 5 bips consécutifs. L’icône Connecté se met à clignoter en
attendant la nouvelle connexion WiFi.
07. Aucune connexion de nuage
Si le Nuage est inaccessible et que l’appareil ne peut pas se connecter,
l’icône Connecté clignote lentement. Après 3 minutes sans connexion, le
purificateur d’air arrête d’essayer de se connecter et le clignotement s’arrête.
08. Cycle d’alimentation ou panne de courant
Une fois la connexion établie, en cas de panne de courant ou si l’appareil est
débranché, appuyez sur le bouton d’alimentation pour allumer l’appareil et
maintenez le bouton Wi-Fi enfoncé pour rétablir la connexion.
33 34
CONFIGURATION WIFI
FLUX DE TRAVAIL DE L’INTERFACE
INTELLIGENTE 03

INSTRUCTIONS DE NETTOYAGE
ENTRETIEN
Assurez-vous que le purificateur d’air est éteint et débranché.
Pour un nettoyage rapide, essuyez l’appareil avec un chion doux
légèrement humide. Ne mouillez pas trop le boîtier du ventilateur, car des
problèmes peuvent survenir pendant le fonctionnement.
Pour un nettoyage plus en profondeur, époussetez l’évent de sortie d’air
et la grille d’admission d’air à l’aide d’une petite brosse douce et utilisez un
chion doux et sec pour le nettoyer à l’extérieur.
Pour nettoyer le préfiltre, consultez la section Entretien du préfiltre.
Lorsque le témoin de remplacement du filtre s’allume, le filtre
HEPA authentique doit être remplacé. Suivez les instructions de
REMPLACEMENT DU FILTRE à la page 37. Ne lavez pas le filtre HEPA
authentique.
Assurez-vous que le purificateur d’air est éteint et débranché.
Suivez les 2 premières opérations de la section REMPLACEMENT DU
FILTRE à la page 37.
Passez l’aspirateur sur le préfiltre ou lavez-le dans une laveuse à l’eau
froide et faites-le sécher au cycle délicat.
Assurez-vous que le préfiltre est sec et replacez-le sur le filtre HEPA
authentique en suivant les 2 dernières opérations de la section
REMPLACEMENT DU FILTRE à la page 38.
Entretien général
01.
02.
03.
04.
05.
Entretien du préfiltre
01.
02.
03.
04.
35 36
04
Entretien du capteur de qualité de l’air
01.
02.
03.
Ouvrez la porte du capteur de qualité de l’air située derrière le boîtier du
ventilateur.
Utilisez un coton-tige sec ou un chion doux pour essuyer doucement le
capteur.
Fermez la porte du capteur de qualité de l’air afin que l’humidité n’atteint
pas le capteur.
01. 02. 03.
This manual suits for next models
3
Table of contents
Languages:
Other NOMA Air Cleaner manuals