Nora NSPEC NUTP8-LED User manual
6505 Gayhart St., Commerce, CA 90040 | Phone: 800.686.6672 | www.noralighting.com | e-mail: [email protected]
Instructions subject to change without notice. © 2018 073118P1
Installation Instructions
SPECIALTY LIGHTING - HIGH OUTPUT LED TAPE LIGHT
READ PRIOR TO ATTEMPTING INSTALLATION
ALWAYS TURN OFF MAIN POWER BEFORE INSTALLATION
INSTALLATION SHOULD BE CARRIED OUT BY YOUR LOCAL ELECTRICIAN
Installation Instructions:
1. Decide where you want to place the LED tape light.
2. The tape light has a 3M™ self-adhesive backing, ensure the surface area that you intend to adhere the tape light to is clean and dry. Simply
remove the backing strip and carefully lay the tape light in place working from one end to the other ensuring there are no raised sections.
3. Using a lint-free cloth gently press between the LEDs on the tape to remove any air bubbles and activate the adhesive, make sure you do
not press on the LEDs themselves as this could damage the joint.
IMPORTANT: Please read before installation
• Alwaysturnoffpowerpriortoinstallationorreplacement.
• TapeLightcontactsareveryfragile,handlewithcare.
• DonotturnonTapeLightwhileonthespool,maycausethetapelighttooverheatandmeltorignite.
• DonotpressdirectlyontheLEDsthemselves,asitmaycausedamage.
• Donotusetheproductinapotentiallycombustiveenvironments.
• Donotcoverthisproductasthecoveringmaycausethetapelighttooverheatandmeltorignite.
• Donotoperatewiththetapelighttightlycoiled.
• Donotroutethecordortapelightthroughwalls,doors,windowsoranylikepartofthebuildingstructure.
• Donotuseifthereisanydamagetothelightorcordinsulation.Inspectperiodically.
• NUTP8SeriesiscULusListedforDampLocation.
• Securethetapelightusingonlythe3M™tape,hangers,clips,orNATHR-680AluminumChannel(soldseparately).Donotsecurethis
product or its cord with staples, nails, or like means that may damage the insulation or permanently attach to the building structure.
• Wireleadsandaccessoriesarenotratedforin-wallinstallationunlessotherwisenoted.
• Attachedwireleadsandconnectionsarefield-cuttable.
• Tapelight,attachedwireleads,andadditionalextensioncables,connectors,etc.,arenotratedforin-wallinstallation
unless otherwise noted.
• DonotinstallinenvironmentwhereLEDchipsareexposedtodirectsunlightasdamagetothephosphorwilloccur.
• Donotinstallinenvironmentwhereexcessiveheatmayexist(ex.closeproximitytothefireplace,etc.)
• Seeoperatingtemperatureonspecsheet.
Wiring Instructions to Driver:
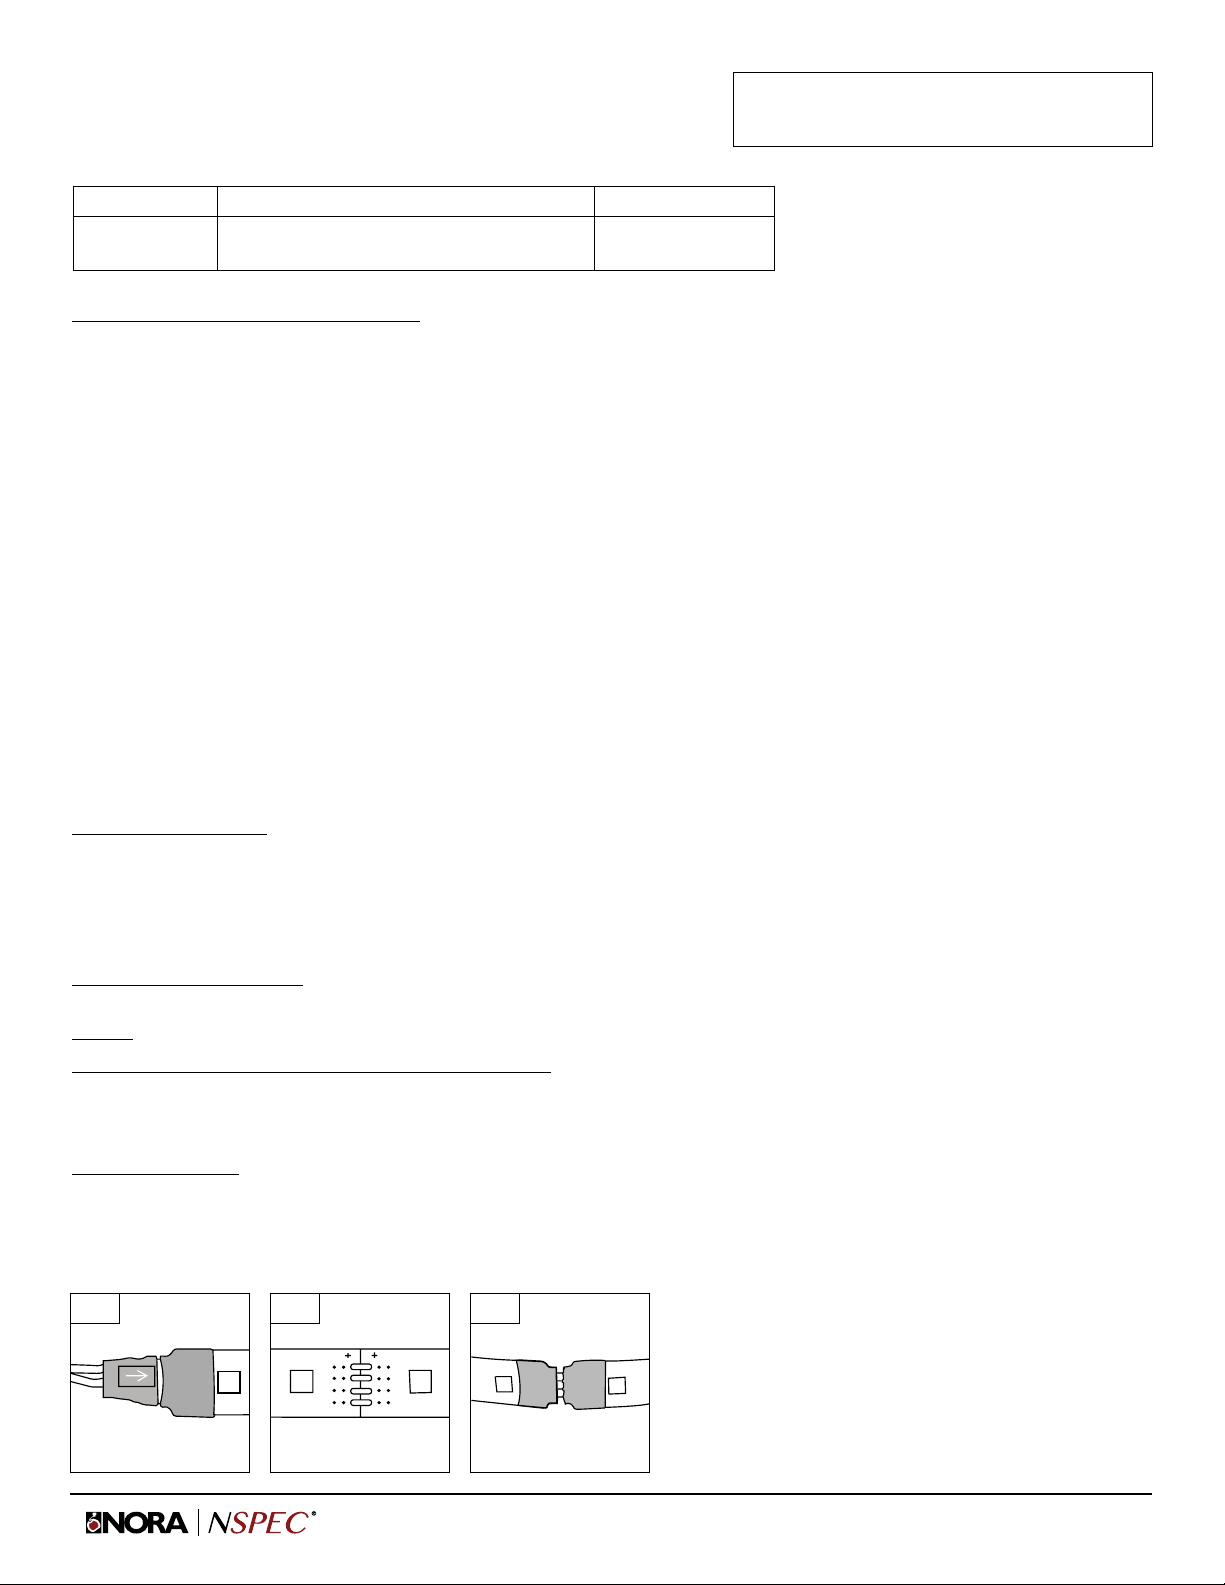
1. DriverhasmaleplugandtheLEDTapeLighthasthefemaleconnector.Plugmaleconnectorintofemaleconnectortogether.
Polarity: TapeLightmustalwaysbeconnectedfacingupwardandredarrowonconnectorsmustalwaysfaceup.(Fig.1)
Separable every 12":
1. TheLEDtapelightmaybeseparatedevery12".Every12"sectionisshrinkwrappedaroundtheconnectionpoint.Cutthesiliconetoreveal
theconnectionpoint.(Fig.3)
2. Twoseparatedtapelightmaybeconnected,butmustbeshrinkwrapped(Page2)tomaintaincULusListing.
Cutting Instructions - See back side for joining instructions:
1. TheLEDtapelightmaybecutevery4"or6LEDs.Every4"sectionisseparatedbycutline.(Fig.2)
2. Carefullycutthetapelightalongtheline,becarefulnottopressontheLEDsasthiscoulddamagethejoint.
3. Whencuttingtheendofthetapelight,shrinkwraptheopencutwithNATL-400.
Item No. Description Rating
NUTP8-LED
NUTP8-WLED
24V High Output LED Tape Light (Amber Finish)
24V High Output LED Tape Light (White Finish)
24V / 4.2 W/ft
24V / 4.2 W/ft
Fig. 1 Fig. 2 Fig. 3
May be cut every 4" or 6
LEDs at cut line

6505 Gayhart St., Commerce, CA 90040 | Phone: 800.686.6672 | www.noralighting.com | e-mail: [email protected]
Instructions subject to change without notice. © 2018 073118P2
Installation Instructions
SPECIALTY LIGHTING - HIGH OUTPUT LED TAPE LIGHT
READ PRIOR TO ATTEMPTING INSTALLATION
ALWAYS TURN OFF MAIN POWER BEFORE INSTALLATION
INSTALLATION SHOULD BE CARRIED OUT BY YOUR LOCAL ELECTRICIAN
Shrink Wrap Installation Instructions to ensure cULus listing:
1. Haveonemaleandonefemaleendofthetapelight.
2. Insertmaleendofthetapelightintothepre-cutshrinkwrapsuppliedbyNoraLighting.
3. Connectthemaleandfemaleconnectionsinsidetheshrinkwrap.Adjustshrinkwrapsobothtapelightshavesufficientshrinkwrapcovering
black insulation.
4. Heattheshrinkwrap(hairdryer,orflameatleast6"awayfromtape/shrinkwrap)aroundentireconnectiontowraptheconnectiontightly
and maintain cULus listing.
List of driver’s that can be used with NUTP8 Series:
• MeanwellElectronicDriverPLC-100-24
• MeanwellElectronicDriverPLC-60-24
• MeanwellElectronicDriverPLC-30-24
• MeanwellElectronicDriverELN-60-24
• MeanwellElectronicDriverELN-30-24
• MagneticDriverNMT-48/24C2
• MagneticDriverNMT-60/24C2
• MagneticDriverNMT-96/24C2
• MagneticDriverNMT-303/24C2
• GMEWallPlugElectronicDriverGFP451DA
• GMEWallPlugElectronicDriverGFP241DA
• VariousListedDriver
Item No. Description Rating
NUTP8-LED
NUTP8-WLED
24V High Output LED Tape Light (Amber Finish)
24V High Output LED Tape Light (White Finish)
24V / 4.2 W/ft
24V / 4.2 W/ft
Fig. 1 Fig. 2 Fig. 3 Fig. 4
This manual suits for next models
1
Table of contents
Other Nora Lighting Equipment manuals


Popular Lighting Equipment manuals by other brands

Philips
Philips Compac CTX6 Series quick guide

RFR
RFR Dynamo TOUR 12 Safety-, Mounting- and Instruction Manual

Godox
Godox LDX100 R instruction manual

Bargeheights
Bargeheights LED PAR user manual

Superfire
Superfire EDCL2-T user manual

Knightsbridge
Knightsbridge TNXQUADMWEMW Installation & maintenance manual


EuroLite
EuroLite STAGE PANEL 16 user manual

Lonza
Lonza CCH Endurance CCH-1SD Installation and operation manual

CoCo
CoCo AFR-060 Quick installation guide

Accessory Power
Accessory Power ENHANCE MoodBRIGHT CST user guide

Bowens
Bowens BW3370 UNILITE Operating instrctions

Brilix
Brilix ALBIXON SAL 16 Installation and user guide