Norcool CAVE 45 BI DZ Product guide

CAVE 45 BI DZ | CAVE 60 BI DZ
English
OPERATING &
INSTALLATION
INSTRUCTIONS

2
3
Please visit www.norcool.no for operating &
installation instructions in other languages.

4Content
1. Safety Instructions & warnings....................................................................................... 5
2. Components and parts...................................................................................................... 8
3. Installation .............................................................................................................................. 9
4. Appliance features and wine storage .......................................................................... 11
5. Operating your appliance................................................................................................ 13
6. Care and maintenance ...................................................................................................... 15
7. Troubleshooting guide...................................................................................................... 16
8. Technical specifications.................................................................................................... 17
9. Disposal of used products............................................................................................... 17

R600a
5
1. Safety instructions and warnings
Please read these instructions fully before installing or operating the
product.
THE MANUFACTURER OF THIS APPLIANCE CANNOTBE HELD LIABLE
FOR DAMAGE CAUSED BYNONCOMPLIANCE WITH THESE SAFETY
INSTRUCTIONS AND WARNINGS.
• Secure the accessories during transportation to prevent damage.
• The appliance is designed for use within a certain temperature range (ambient
temperatures), and should not be used outside this range.
The temperature range for your appliance is specified on the data plate inside the
appliance.
This appliance contains the refrigerant Isobutane (R600a), a natural, environmentally
friendly gas. It is important to ensure that no components of the cooling system were
damaged during transport or installation. Leaking refrigerant can damage the eyes.
In the event of any damage:
• Avoid open flames, switching the thermostat, and anything which
creates a spark.
• Disconnect from the mains.
• Air the room in which the appliance is located for at least an hour.
• Contact the manufacturer for further advice.
According to the EN378standard, the room must be at least 1m3per 8g of cooling agent.
The amount of refrigerant in the appliance is stated on the data plate inside the appliance.
Do not install or use a damaged appliance. Contact your manufacturer
immediately for further advice before connecting the power cord.
Due to the instability of the appliance, install the product in accordance
with the instructions to avoid potential hazard.
Do not damage the refrigerant circuit. Carry and position the appliance
with care to prevent damage on the refrigerant circuit.
Do not block the appliance’s vents, as this will impair the eciency of
the appliance, increase its electricity consumption and could damage the
appliance.
Do not use mechanical devices or other means to accelerate the defrosting
process, other than those recommended by the manufacturer.
Leaking refrigerant can form a flammable gas-air mixture in rooms
which are too small.
WARNING:
WARNING:
WARNING:
WARNING:
WARNING:
WARNING:

6
The electrical safety of this appliance can only be guaranteed when there is an unbroken
connection between the appliance and an eective earthing system, which complies with
current local and national safety regulations. It is very important that this basic safety
requirement is met and checked regularly. If there is any doubt, the household wiring
must be checked by a qualified electrician.
Service and repairs may only be carried out by an authorized and qualified service
technician in accordance with national and local safety regulations. Ensure the appliance
is not plugged in during maintenance or repair work.
The appliance is only completely isolated from the electricity supply when:
• It has been unplugged
• The mains fuse has been switched o
• The screw-in plug fuse has been removed (in countries where this is applicable)
To reduce the risk of fire, electrical shock, or injury when using your appliance,
follow these basic precautions:
This appliance is not intended for use by persons (including children) with
reduced physical, sensory or mental capabilities, or lack of experience
and knowledge, unless they have been given supervision or instruction
concerning use of the appliance by a person responsible for their safety.
Children should be supervised to ensure that they do not play with the
appliance.
Read all instructions before using the wine or beverage cooler.
lf the power cord is damaged, it must be replaced by the manufacturer,
its service agent or similarly qualified persons in order to avoid a hazard.
Before connecting the appliance, make sure that the connection data on
the data plate (voltage and frequency), matches the mains electricity
supply. This data must correspond in order to avoid the risk of damage to
the appliance. Consult a qualified electrician if in any doubt.
Do not connect the appliance to the mains electricity supply using an
extension cord. Extension cords do not guarantee the required safety of
the appliance (e.g. danger of overheating).
Do not splash water on the appliance. It may cause electrical parts to fail
and result in an electric shock.
Do not use any electrical equipment inside the storage compartments of the
appliance unless they are of the type recommended by the manufacturer.
Danger of sparks and explosion.
Do not use a steam-cleaning appliance to clean the appliance. Steam could
reach the electrical components and cause a short circuit.
WARNING:
WARNING:
WARNING:
WARNING:
WARNING:
WARNING:

7
To avoid the possibility of child entrapment, please take the following precautions before
throwing out the appliance:
• Remove all doors from the unit.
• Leave the shelves in place so that children may not easily climb inside.
Never allow children to operate, play with, or crawl inside the appliance.
Refrigerants: All refrigeration products contain refrigerants, which under the guidelines of
federal law must be removed before disposal of product. It is the consumer’s responsibility
to comply with federal and local regulations when disposing of this product.
Never clean appliance parts with flammable fluids. The fumes can create a fire hazard or
explosion.
Do not store or use gasoline or any other flammable vapors and liquids in the vicinity of
this or any other appliance. The fumes can create a fire hazard or an explosion.
Risk of child entrapment.
WARNING:
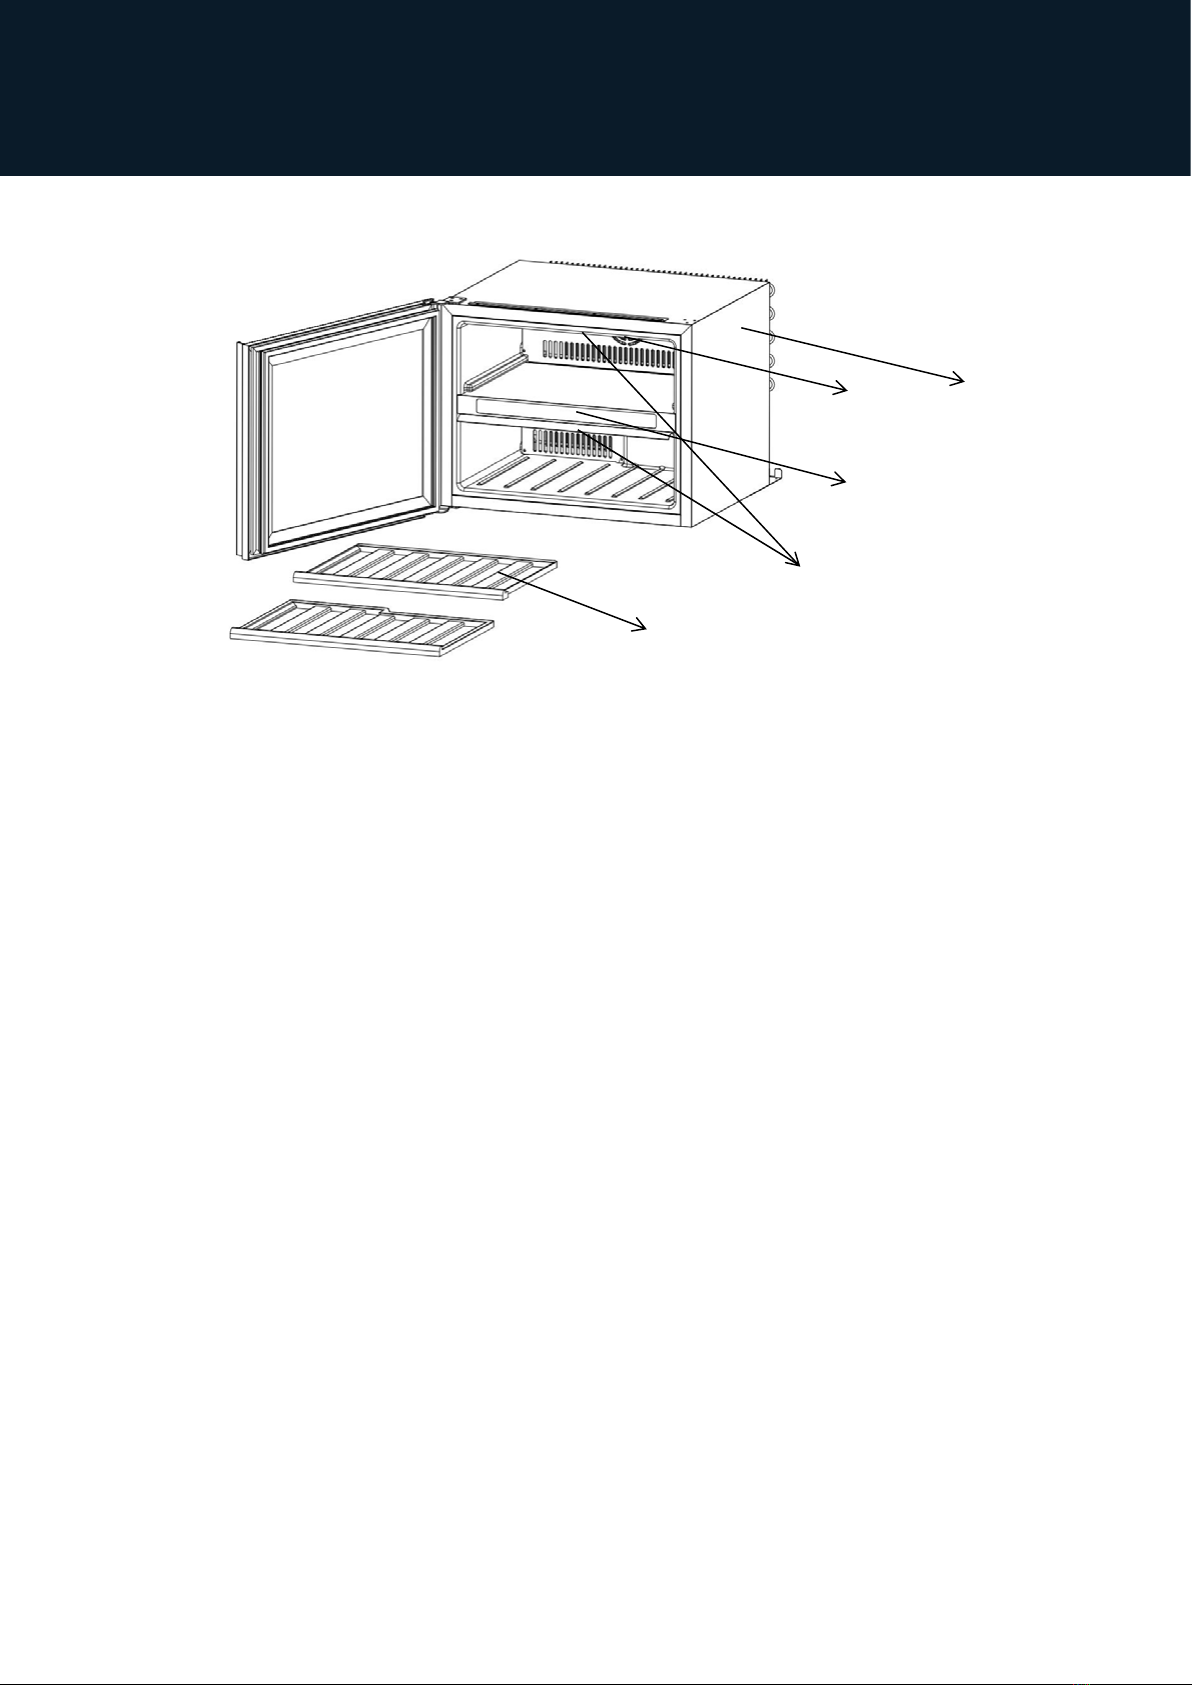
82. Components and parts
1 Temperature control and display
2 Circulation fan
3 Interior light
4 Cabinet
5 Wooden shelves
1
24
3
5
Parts
Upper zone controller/display
Lower zone controller/display
Warmer
Warmer
Light
Light
Colder
Colder
˚C/˚F
ON/OFF

9
3. Installation
Before using your appliance
• Remove the exterior and interior packaging.
• Before connecting the appliance to the power source, let it stand upright for
approximately 4 hours. This will reduce the possibility of a malfunction in the cooling
system from improper handling during transportation.
• Clean the interior surface with lukewarm water using a soft cloth.
Installation
Locate the appliance away from direct sunlight and sources of heat (stove, heater, radiator,
etc.). Direct sunlight may aect the acrylic coating and heat sources may increase electrical
consumption. Ambient temperature below 60.8 F (16 C) or above 100.4 F (38 C) will
hinder the performance of this appliance.
This unit is not designed for use in a garage or any other outside installation.
Avoid locating the appliance in moist areas.
Plug the appliance into dedicated, properly installed-grounded wall outlet. Do not under
any circumstances cut or remove the third (ground) prong from the power cord. Any
questions concerning power and/or grounding should be directed toward a certified
electrician or an authorized service center. This unit is not designed to be installed in an
RV or used with an inverter.
After plugging the appliance into a wall outlet, allow the unit to cool down for 3 ~ 4 hours
before placing wine bottles or beverage cans in the appliance.
Ventilation
The air at the back panel of the appliance will warm up. This warm air must be able
to escape. Your appliance is designed to provide this ventilation. Air inlets and outlets
must not be covered or blocked in any way. This will reduce the appliance’s capacity and
increase power consumption.
Cave 45 BI DZ
Niche dimensions: (min) W562-568mm (max) x H445mm x (min) D555mm

10
Cave 60 BI DZ
Niche dimensions: (min)W562-568mm (max) x H590mm x (min) D555mm
Electrical connection
This appliance should be properly grounded for your safety. The power cord of this
appliance is equipped with a three-prong plug which mates with standard three prong
wall outlets to minimize the possibility of electrical shock.
Do not, under any circumstances, cut or remove the third ground prong from the power
cord supplied.
This appliance requires a standard 220-240 Volt A.C. /50Hz electrical outlet.
This appliance is not designed to be used with an inverter.
The cord should be secured behind the appliance and not left exposed or dangling to
prevent accidental injury.
Never unplug the appliance by pulling the power cord. Always grip the plug firmly and
pull straight out from the outlet.
Do not use an extension cord with this appliance. If the power cord is too short, have a
qualified electrician or service technician install an outlet near the appliance. Use of an
extension cord can negatively aect the performance of the unit.

11
4. Appliance features and wine storage
Two temperature zones
There are two zones in this appliance (upper zone and lower zone)
Each zone has its independent temperature control and display.
Each of the two zones can be used to store wine bottles.
Interior light
Each zone has its own interior light, which can be switched on or o by pressing the pad
(light) on the control panel. Long-life and high eciency LEDs are installed for durability
and energy saving.
Engaged wine shelves
All the shelves have tabs to engage the cabinet on both sides.
Any of the shelves can be removed to accommodate larger bottles.
To remove a shelf:
• Remove all bottles from the shelves.
• Unlock the clip on the gliding rail, both sides. Push the right side clip down and the
left side clip up at the same time.
Ensure that the clips are firmly engaged in place before storing any bottles.
NOTE:

12
CAVE 60 Bi DZ
Capacity CAVE 45 BI DZ
750 ml bottle 28
Upper zone 11
Lower zone 6 (pull-out wooden shelves x1) + 11
Storage volume 50 liters
Pull-out shelf dimension 466 x 340 mm
CAVE 45 Bi DZ
Capacity CAVE 45 BI DZ
750 ml bottle 22
Upper zone 11
Lower zone 11
Storage volume 50 liters
Pull-out shelf dimension 466 x 340 mm

13
5. Operating your appliance
Upper zone controller/display
Lower zone controller/display
K8
K4
K7
K3
K6
K2
K5
K1
Temperatures for wine storage
Champagne 5˚C ~ 8˚C
White wine 9˚C ~ 14˚C
Red wine 15˚C ~ 18˚C
Temperature control and display
1. When the unit is plugged both indicators will glow for 3 seconds (display888), and an
audible beep will be heard.
2. The temperatures in the upper zone and lower zone can be independently controlled
and displayed.
3. The temperature in either zone can be controlled between 5 C to 20 C. (The zone
temperature may have a tolerance of +/-3 C from setting depending on dierent
loading and ambient conditions.)
Memory device
When restarting the appliance after a power failure, the memory device will keep the last
saved settings.
K1 key (ON/OFF)
Power switch: press and hold the key to turn on/o the appliances.
K2 key (lower interior light)
Interior light control switch of the lower zone: To turn on or o the interior light, press
the K2 key once for each time. The interior light will keep lighting if it is not turned o.

14
K3/K4 key (colder/warmer)
Temperature setting switch of the lower zone: Under normal conditions the temperature
display will flash and indicates the current temperature of the lower zone. Pressing the
K3/K4 key when setting the temperature, the temperature displayed will decrease or
increase in an increment of one degree. If the K3 (colder) or K4 (warmer) key is pressed
and held for one second, the temperature displayed will decrease or increase in a
speed of one degree per second. The temperature display will flash 5 seconds after the
temperature has been set, and indicates the current temperature.
K5 key (˚C/˚F)
The temperature display can be changed between Celsius and Fahrenheit by pressing
the K5 key.
K6 key (upper interior light)
Interior light control switch of the upper zone. To turn on or turn o the interior light,
by pressing the K6 key once for each time. The interior light will keep lighting if it is not
turned o.
K7/K8 key (colder /warmer)
Temperature setting switch of the upper zone. Under normal conditions the temperature
display will flash and indicate the current temperature of the upper zone. Pressing the
K7/K8 key when setting the temperature, the temperature displayed will decrease or
increase in an increment of one degree. If the K7 (colder) or K8 (warmer) key is pressed
and held for one second, the temperature displayed will decrease or increase in a speed
of one degree per second. The temperature dis-play will flash 5 seconds after the
temperature been set, and indicates the current temperature.

15
6. Care and maintenance
Defrost
• The ice build-up on the inner back wall during compressor operation will be
automatically defrosted in a compressor o cycle.
• When defrosting is in process, only the circulation fans for both zones run.
• Defrost water will drain into the drip tray (on the compressor) and the Water will be
• evaporate by compressor.
Cleaning Your Appliance
Upon installation of your new appliance, cleaning it thoroughly is recommended.
• Unplug the unit from the wall outlet.
• Remove all contents.
• Wash the inside with a damp warm cloth soaked in lukewarm water and bak-ing soda
solution. The solution should be about 2 tablespoons of baking soda to a quart of
water.
• Be sure to keep the door gasket (seal) clean to keep the unit running eciently.
• The outside of the appliance should be cleaned with mild detergent and warm water.
• Dry the interior and exterior with a soft cloth.
• Dust or anything else blocking the vent may hinder the cooling eciency of the
appliance. Vacuum the vent if necessary.
Vacation Time
• Unplug the unit from the wall outlet.
• Remove all the contents.
• Clean the appliance.
• Leave the door open slightly to avoid possible formation of condensation, mold, or
odors.
• Short vacations: Leave the appliance operating during vacations of less than three
weeks.
• Long vacations: If the appliance will not be used for several months, remove all
content and unplug the power cord. Clean and dry the interior thoroughly. To prevent
odor and mold growth, leave the door open slightly, blocking it open if necessary.
Moving Your Appliance
• Unplug the unit from the wall outlet.
• Remove all the contents.
• Securely tape down all loose items inside your appliance.
• Tape the doors shut.
Energy Saving Tips
• The appliance should be located in the coolest area of the room, away from heat
producing appliances or heating ducts, and out of the direct sunlight.
• Ensure that door is closed when the appliance is plugged in.
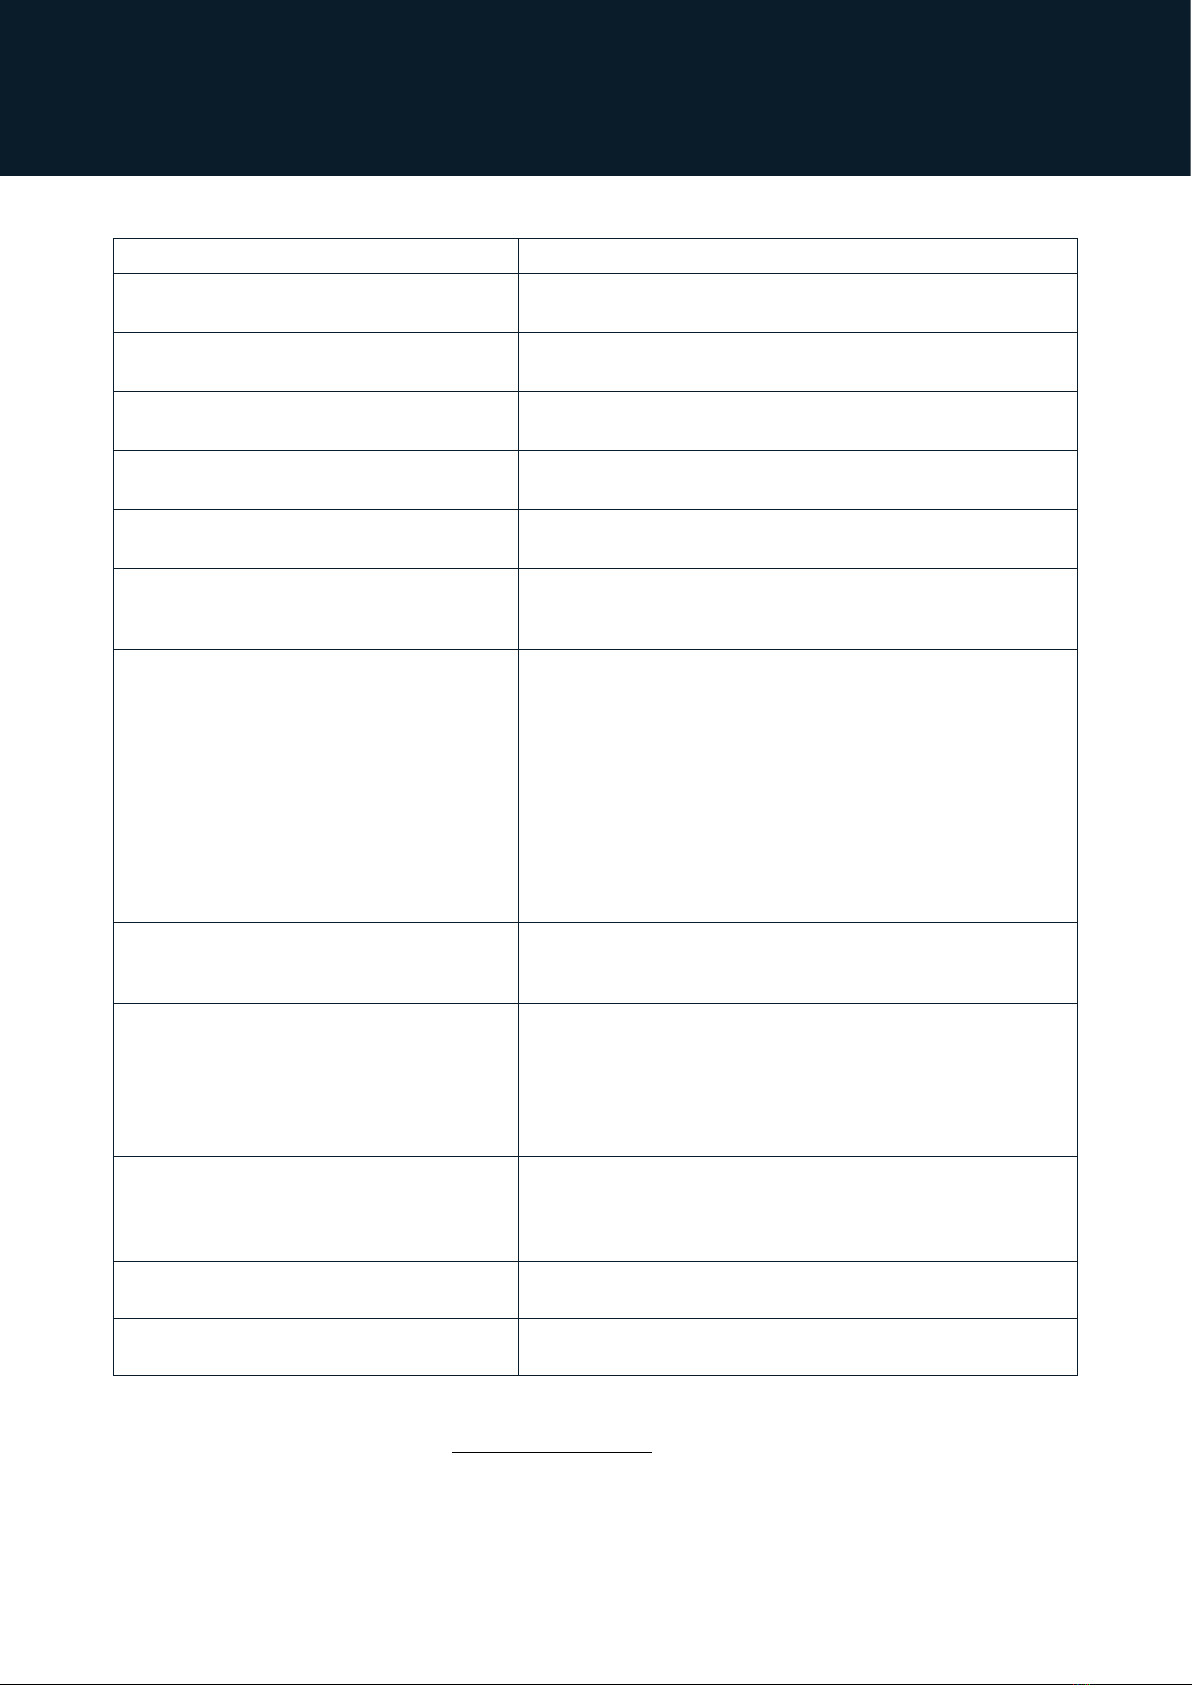
16 7. Troubleshooting guide
PROBLEM POSSIBLE CAUSE
Display flash and indicate “HH”, flash
speed one time per second
The temperature sensor of zone > 37˚C
Display flash and indicate “LL”, flash
speed one time per second
The temperature sensor of zone < 0˚C
Display flash and indicate “E0”, flash
speed one time per second
Connection failure, wire or component is not connected
Display flash and indicate “E1”, flash
speed one time per second
Temperature sensor is failure in corresponding zone
Display flash and indicate “E2”, flash
speed one time per second
Error defrost sensor in corresponding zone
Appliance does not operate Not plugged in.
The circuit breaker has tripped or there is a blown
fuse.
Temperature inside the appliance is
too warm
Temperature control is set too warm. Turn the con-
trol to a cooler setting and allow several hours for the
temperature to stabilize.
Door is kept open too long or is opened too frequent-
ly. Warm air enters the appliance every time the door
is opvened. Open the door less often.
The door is not closed completely.
The door gasket does not seal properly.
The appliance has recently been disconnected for a
period of time. 4 hours are required for the appliance
to cool down completely.
Temperature inside the appliance is
too cold.
Temperature control is set too cold. Turn the control
to a warmer setting and allow several hours for the
temperature to stabilize.
Vibrations Check to assure that the appliance is on a level surface.
The appliance is touching the wall. Re-level the
appliance and move it from the wall.
If continued vibration occurs, turn o the appliance
and unplug the power plug. Contact Customer Service
Dept. for further assistance.
Moisture forms on inside appliance
walls
Door is slightly open.
Door is kept open too long, or is opened too frequent-
ly. Open the door less often.
The door is not sealed properly
Moisture forms on outside of appliance Door is slightly open, causing cold air from inside the
appliance to meet warm moist air from outside
Temperature inside the appliance is
too cold.
The appliance is not on a level surface.
The gasket is dirty.
For service, see our website at www.norcool.com
By checking the above before ordering service, you will help the service engineer know
what parts they may need to bring and what measures to take.

17
9. Disposal of used products
8. Technical specifications
DESCRIPTION CAVE 45 BI DZ CAVE 60 BI DZ
External measurements W590 x H455 x D555 mm W590 x H593 x D555 mm
Niche measurements W562-568 x H455 x D555 mm W562-568 x H590 x D555 mm
Capacity (standard 75 cl bottles,
76mm Ø x 3000,5mm) 22 28
Weight 32 kg 36 kg
Energy consumption 105 kWh/year 135 kWh/year
Energy class G G
Lighting LED 4 W LED 4 W
Refrigerant R600a R600a
Disposal of the packaging material:
The packaging protects your appliance from damage during transportation. All packaging
materials are recyclable and display the recycling symbol.
Ensure that any plastic wrappings, bags, etc. are disposed of safely and kept out of the
reach of children, as they are a potential source of danger.
Please ask your dealer or your local authority about relevant means of safe disposal
Disposal of the appliance:
This appliance is subject to European Directive 2002/96/EC on Waste Electrical and
Electronic Equipment (WEEE). This symbol indicates that this appliance must not be
treated as domestic waste. Valuable raw materials can be reclaimed by recycling old
appliances. By disposing of this appliance correctly, you can help prevent potentially
negative consequences for the environment and public health
Scrapping the appliance:
Pull out the mains plug.
• Cut o the power cord.
• Ensure that the refrigerant circuit is not damaged before disposal.
Information about the refrigerant can be found on the data plate.
• Scrapped appliances must be disposed of in a professional and
appropriate way, in accordance with the current local regulations and
legislation.

18 Notes:

19
Notes:

Scandinavian Appliances AS
Postboks 61
1740 Borgenhaugen
Norway
T: +47 815 69 117
post@norcool.no
Please visit out website for operating & installation
instructions in other languages.
www.norcool.no
Version 1.0 - November 2021
This manual suits for next models
1
Table of contents
Other Norcool Wine Cooler manuals


