Nordic Cab Urban Instruction Manual

NordicCab AS Instructions and user manual for the NordicCab Urban Page 1 of 26
Nordic Cab Urban
Instructions and user
manual
“Start life exploring”

NordicCab AS Instructions and user manual for the NordicCab Urban Page 2 of 26

NordicCab AS Instructions and user manual for the NordicCab Urban Page 3 of 26
CONTENTS
INTRODUCTION ...................................................................................................................................................................5
OUR HISTORY.........................................................................................................................................................................................5
SAFETY ....................................................................................................................................................................................6
SYMBOLS..................................................................................................................................................................................................6
SAFETY INSTRUCTIONS ....................................................................................................................................................................6
RULES FOR SAFE CYCLING...............................................................................................................................................................7
PARTS LIST ............................................................................................................................................................................8
GET STARTED .................................................................................................................................................................... 10
MOUNTING THE SHOCK DAMPER AND DISC BRAKE ........................................................................................................10
ADJUSTING THE BRAKES ...............................................................................................................................................................11
ADJUSTING THE DAMPER .............................................................................................................................................................12
PREPARING THE CABIN .................................................................................................................................................................13
ATTACHING THE WHEELS ............................................................................................................................................................14
FUNCTIONS ......................................................................................................................................................................... 15
CANOPY .................................................................................................................................................................................................15
BRAKE AND PARKING BRAKE .....................................................................................................................................................17
SEAT ........................................................................................................................................................................................................17
SAFETY HARNESS .............................................................................................................................................................................18
ADJUSTING THE HANDLEBAR.....................................................................................................................................................18
FOLDING THE CART .........................................................................................................................................................................19
CONVERSIONS.................................................................................................................................................................... 20
BICYCLE TRAILER .............................................................................................................................................................................20
STROLLER.............................................................................................................................................................................................22
JOGGER...................................................................................................................................................................................................23
SLED AND HIKING.............................................................................................................................................................................24
MAINTENANCE .................................................................................................................................................................. 26
WARRANTY CONDITIONS.............................................................................................................................................. 26
SPECIFICATIONS ............................................................................................................................................................... 26

NordicCab AS Instructions and user manual for the NordicCab Urban Page 4 of 26

NordicCab AS Instructions and user manual for the NordicCab Urban Page 5 of 26
INTRODUCTION
Congratulations on your new Urban and thank you for choosing NordicCab Urban!
Just one carriage for all purposes! Our aim is to provide solutions for safe, comfortable and
functional transportation of children. It is a means of transportation you can use in all weather
conditions and with most of your activities. This makes your everyday life easier, saves the
environment and advances your health.
OUR HISTORY
In 1980 Dagfinn Nyborg came up with the idea of a cart that his dog, Gorm, could pull. The whole idea
started as a hobby, which became a bit commercialised after a while. The first cart sold was named
“Kombikjerra” (Combi-Sled) and had many of the same solutions we see in current NordicCab.
As today, the cart was developed to be pulled by a dog or a bicycle, and even people pulling the cart
was already part of the concept.
The cart was developed further little by little. New ideas materialised, and over time many versions of
“Kombikjerra”, later named Rocky2, came to fruition.
Rocky2 became our brand for many years to come, right up until we decided to change the name to
NordicCab. This was done due feedback from our partners in the United States, who informed us that
the name could be associated with some guy named Balboa.
Earlier versions of Rocky2 are still used by people in Norway and Sweden. Rocky2 models received
quite good feedback from the customers, but we didn’t want to stop there...
NordicCab, which is our newest version, is an extensive improvement and development of our
concept. The result is a cart that is in world class on all usage areas. Sled/Ski-Sled, Bicycle trailer and
Dog-Sled have become first class products. In addition, we now have a stroller and a jogger, which
makes our product uniquely suitable for an active family with children. The cart also has a bunch of
fine details and unique solutions which make the cart a pleasure to use for kids, grownups, and even
your dog.
Based the on the massive feedback from our users, we have realised we truly have succeeded to
make an unbelievably good product! Our sales also show we have done something right...
Note:
Check the part list on page 8 to make sure you have received all the parts. Contact your authorised
Urban reseller immediately, if you find some parts missing.
Important:
Practise combining parts, opening and closing the canopy and assembling your new cart to get better
acquainted with the possibilities and security features of the cart. The cart is delivered with most parts
assembled.
NordicCab AS Instructions and user manual for the NordicCab Urban Page 6 of 26
SAFETY
SYMBOLS
WARNING: This symbol is important, as it contributes to the safe use of Urban. If the
warnings are not followed, passenger(s) can be exposed to accidents, harm, and even
death.
ATTENTION: The symbol indicates actions needed to avoid damage to the Urban cart.
SAFETY INSTRUCTIONS
WARNING:
Read the user manual carefully and test the cart before you use it with children. Should something be
unclear, please contact your NordicCab Urban reseller.
Never replace original Urban parts with other parts.
Always use the parking brake when leaving the cart unattended.
Remember to be careful when opening or folding the cart together, to avoid injuring your
fingers.
Do not make any modifications or alterations to the cart.
Ensure that children can never come in contact with any moving parts. This applies also to
clothes, shoe laces, toys, and similar.
Never leave children unattended in the cart.
Use the cart only in accordance with the manufacturer’s instructions, as this provides better
safety.
Do not use the cart with more than 2 children or exceed the weight and height restrictions of
the cart.
Secure the child with the safety harness, and ensure that the child stays correctly seated at all
times.
You can transport a child up to 9 kg in Babyseat (available as an accessory) when used as a
stroller or a jogger.
The Urban cart can become unstable if the manufacturer’s maximum allowable weight is
exceeded.
The Urban cart can become unstable if a shopping basket, bag, or a rack not designed for the
Explorer is used.
Always use the safety strap when using the Urban as a stroller or a jogger.
If the user manual is available in the language of the country you currently are located
in, that manual should be followed.

NordicCab AS Instructions and user manual for the NordicCab Urban Page 7 of 26
RULES FOR SAFE CYCLING
WARNING:
Do not use a car seat or a seat not approved by the manufacturer.
Always use a well maintained bicycle with good brakes and correct air pressure in the tires.
Check that air pressure in the tires for the bicycle and the cart match the recommended
pressure every time you use the cart.
Always follow the safety instructions when you are out and about.
Your child’s safety harness must be correctly attached at all times. Always use a flag/flagpole
for best possible visibility.
Children under the age of 1 should not be transported in the bike trailer.
Bicycle helmet - Children using the cart must wear a bicycle helmet. Bicycle helmet must be
fitted to fit the child’s head and be CPSC or CE approved. The child must have strong enough
neck muscles to hold their head upright themselves.
The bicycle trailer can become overturned if used carelessly. Do not ride over holes or objects
with high speed. Ensure that the child does not rock or move in a way that can alter the
weight distribution of the cart. Do not turn or ride downhill with high speed. Always turn
carefully (5 km/h or less). The maximum speed for the bicycle trailer is 24km/h.
Ride always with the canopy pulled down and fastened with the magnets. Stones and other
objects can be thrown in the cart and harm your child.
Maximum allowed load is 45 kg. Maximum allowed total weight of the cart is 62.5 kg.
Maximum allowed combined weight of the passengers is 36 kg.
Make sure that the weight at the end of the arm (where the bicycle attachment is attached) is
above 2 kg, but does not exceed 9 kg with the cart fully loaded. If the weight exceeds this
limit, redistribute the weight in the cart until the weight is within the required limits.
It is VERY different to ride with a bicycle trailer than without one. The higher weight means
that acceleration and braking are significantly slower than when cycling without a trailer. A
combination of a bicycle and a trailer is also significantly longer, and it is important to allow
more time for crossing roads. Take also trailer’s width in account when taking large turns.
Practise cycling with the trailer without children to gain better understanding of and more
experience with the usage of bicycle trailer.
A reflector (in accordance with CPSC standard) must be visible on the rear of the bicycle
trailer.
Ensure before every ride that the bicycle trailer does not affect braking, movement of the
pedals or steering of the bicycle.
Do not use the bicycle trailer during nights without sufficient lighting. Lights must be used in
accordance with the locale regulations.
The smaller child must always sit on the left side (as seen from behind).
Ensure before every ride that the bicycle attachment is securely attached.

NordicCab AS Instructions and user manual for the NordicCab Urban Page 8 of 26
PARTS LIST
NR
NUMBER
PART NAME
BASIC
PACKAGE
JOGGER KIT
(sold separately)
SKI KIT
(sold separately)
A
1
Cart cabin (frame, canopy, seats, cushions,
harnesses)
x
B
2
20“ aluminium wheel with wheel bolts
x
C
2
Caster
x
D
1
Bicycle arm
x
E
1
Bicycle attachment
x
F
1
Flag with pole
x
G
1
Red LED light
x
H
2
Jogger wheel arm
x
I
1
16" jogger wheel
x
J
2
Ski with bracket
x
K
2
Ski axle bolt
x
L
2
Bent aluminium arm
x
M
2
Straight aluminium arm
x
N
4
Velcro pins
x
O
1
Harness
x

NordicCab AS Instructions and user manual for the NordicCab Urban Page 9 of 26
NordicCab AS Instructions and user manual for the NordicCab Urban Page 10 of 26
GET STARTED
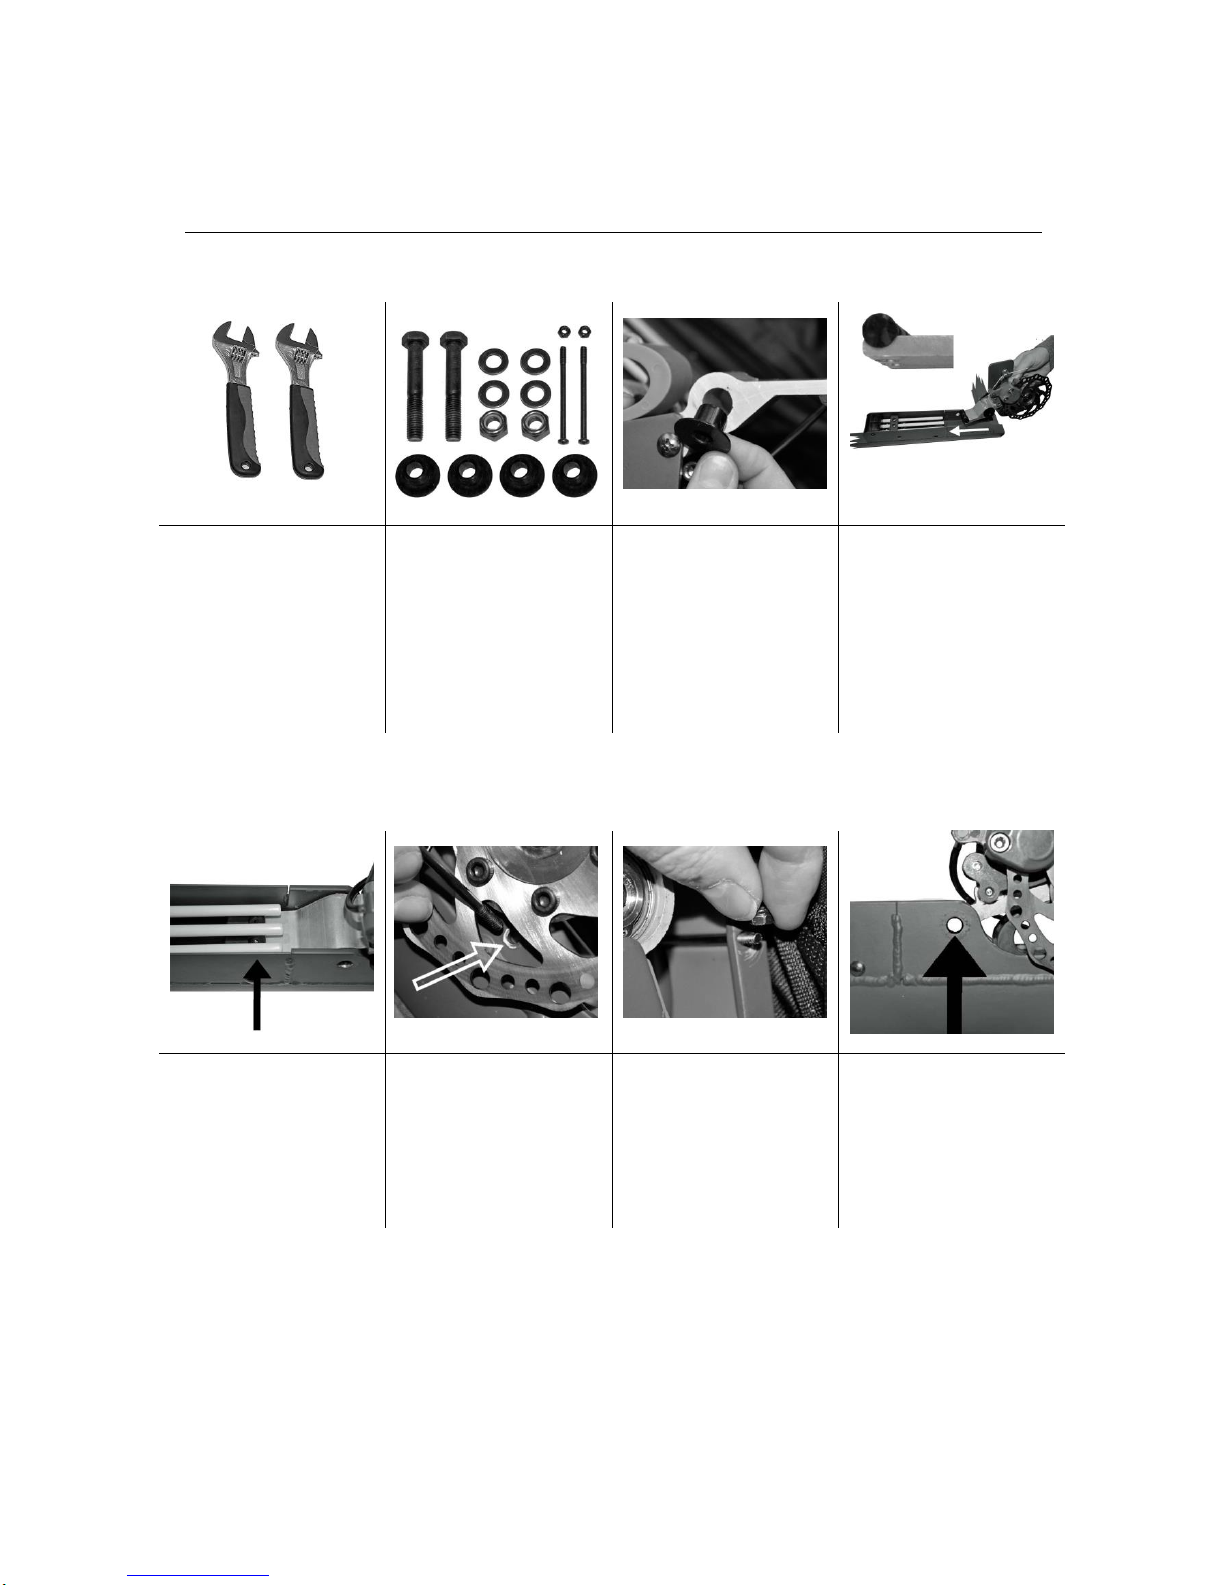
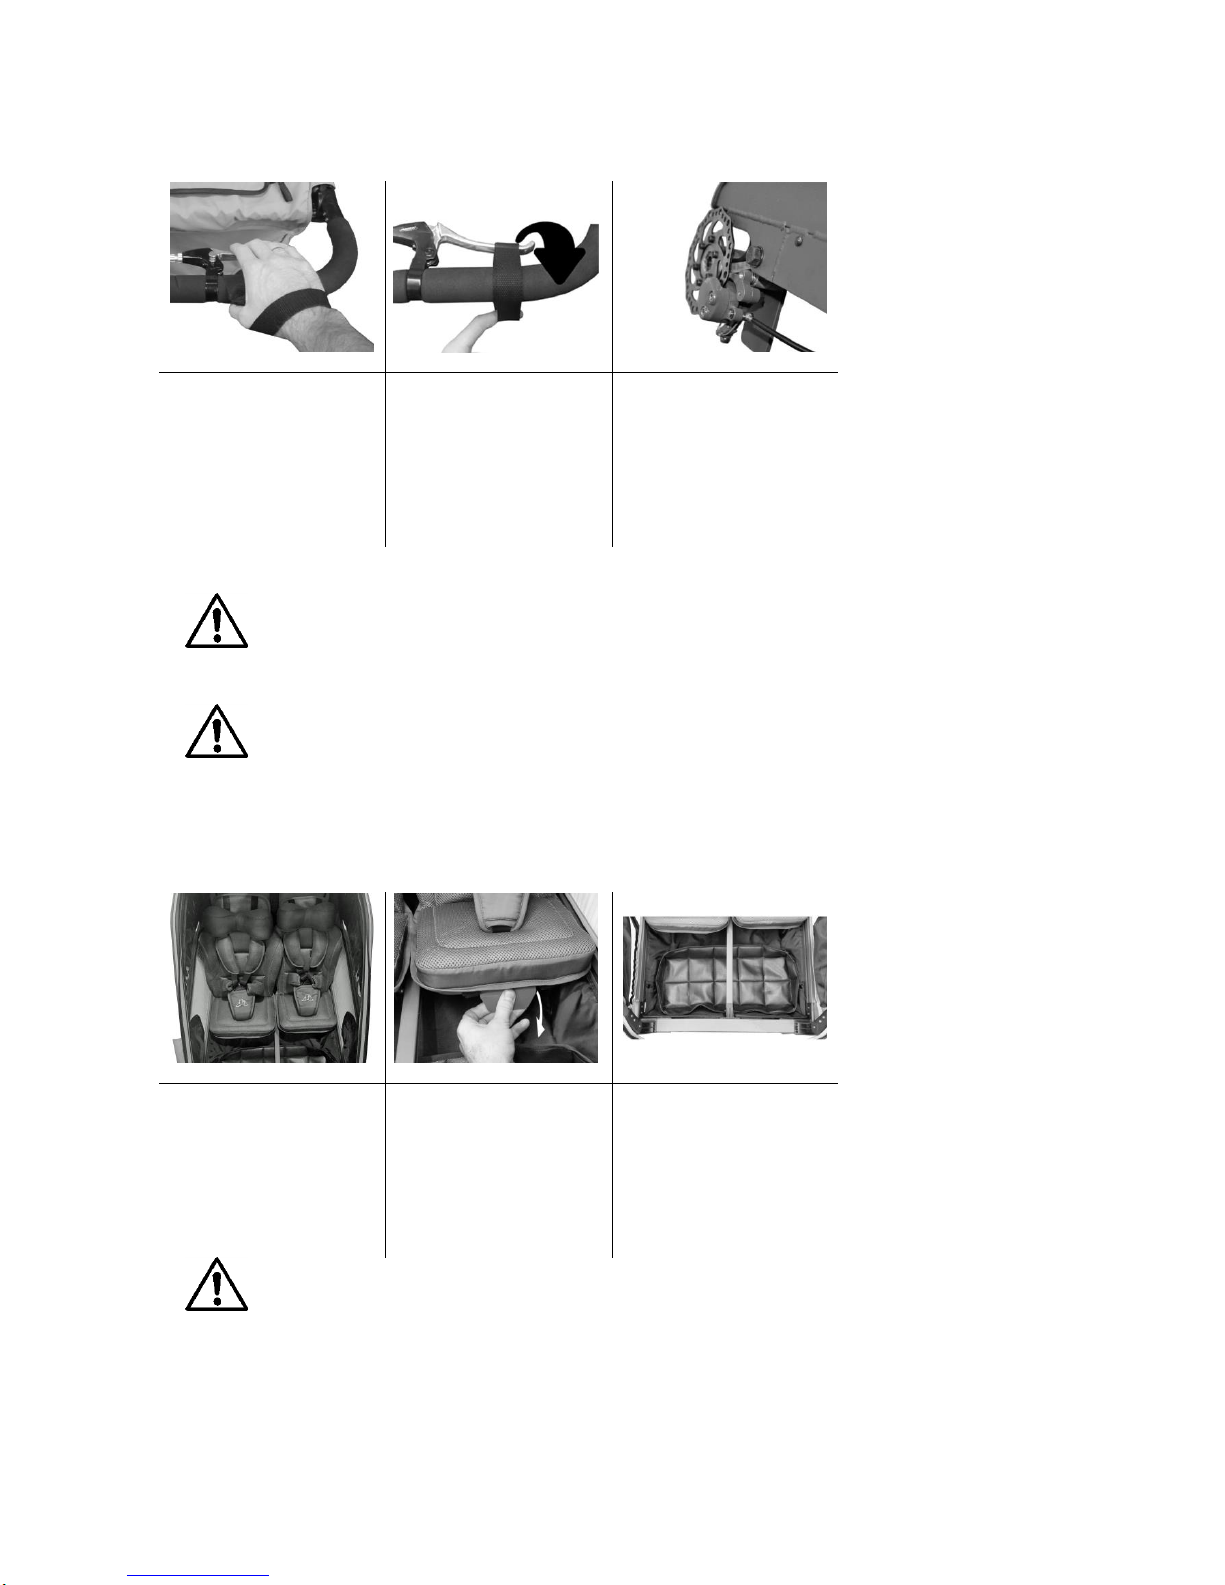
MOUNTING THE SHOCK DAMPER AND DISC BRAKE
1
2
3
4
Required tools
(not included):
Adjustable wrench x 2/
Wrench 17 mm x 2
Required screw set and parts
(included):
Bolts x 2
Washers x 6
Nuts x 4
Thin screws x 2
Plastic inserts x 4
Insert the plastic insert on
each side of the damper bar
as shown in the picture.
Place the cart upside down on
a surface that does not
damage the frame or the
canopy. Insert the damper and
the brake harness in the
damper cassette. Ensure that
the brake disc is on the
outside of the frame of the
cart, and that the plastic tube
on the end of the damper bar
is pointing upwards.
5
6
7
8
Insert the aluminium part
under the white fibreglass
rods.
Insert the thin screw on the
inside of the brake disc and
alongside the green rubber
damper.
Tighten the nut on the
opposite side.
Locate the point where the
holes in the damper arm and
the frame align.
NordicCab AS Instructions and user manual for the NordicCab Urban Page 11 of 26
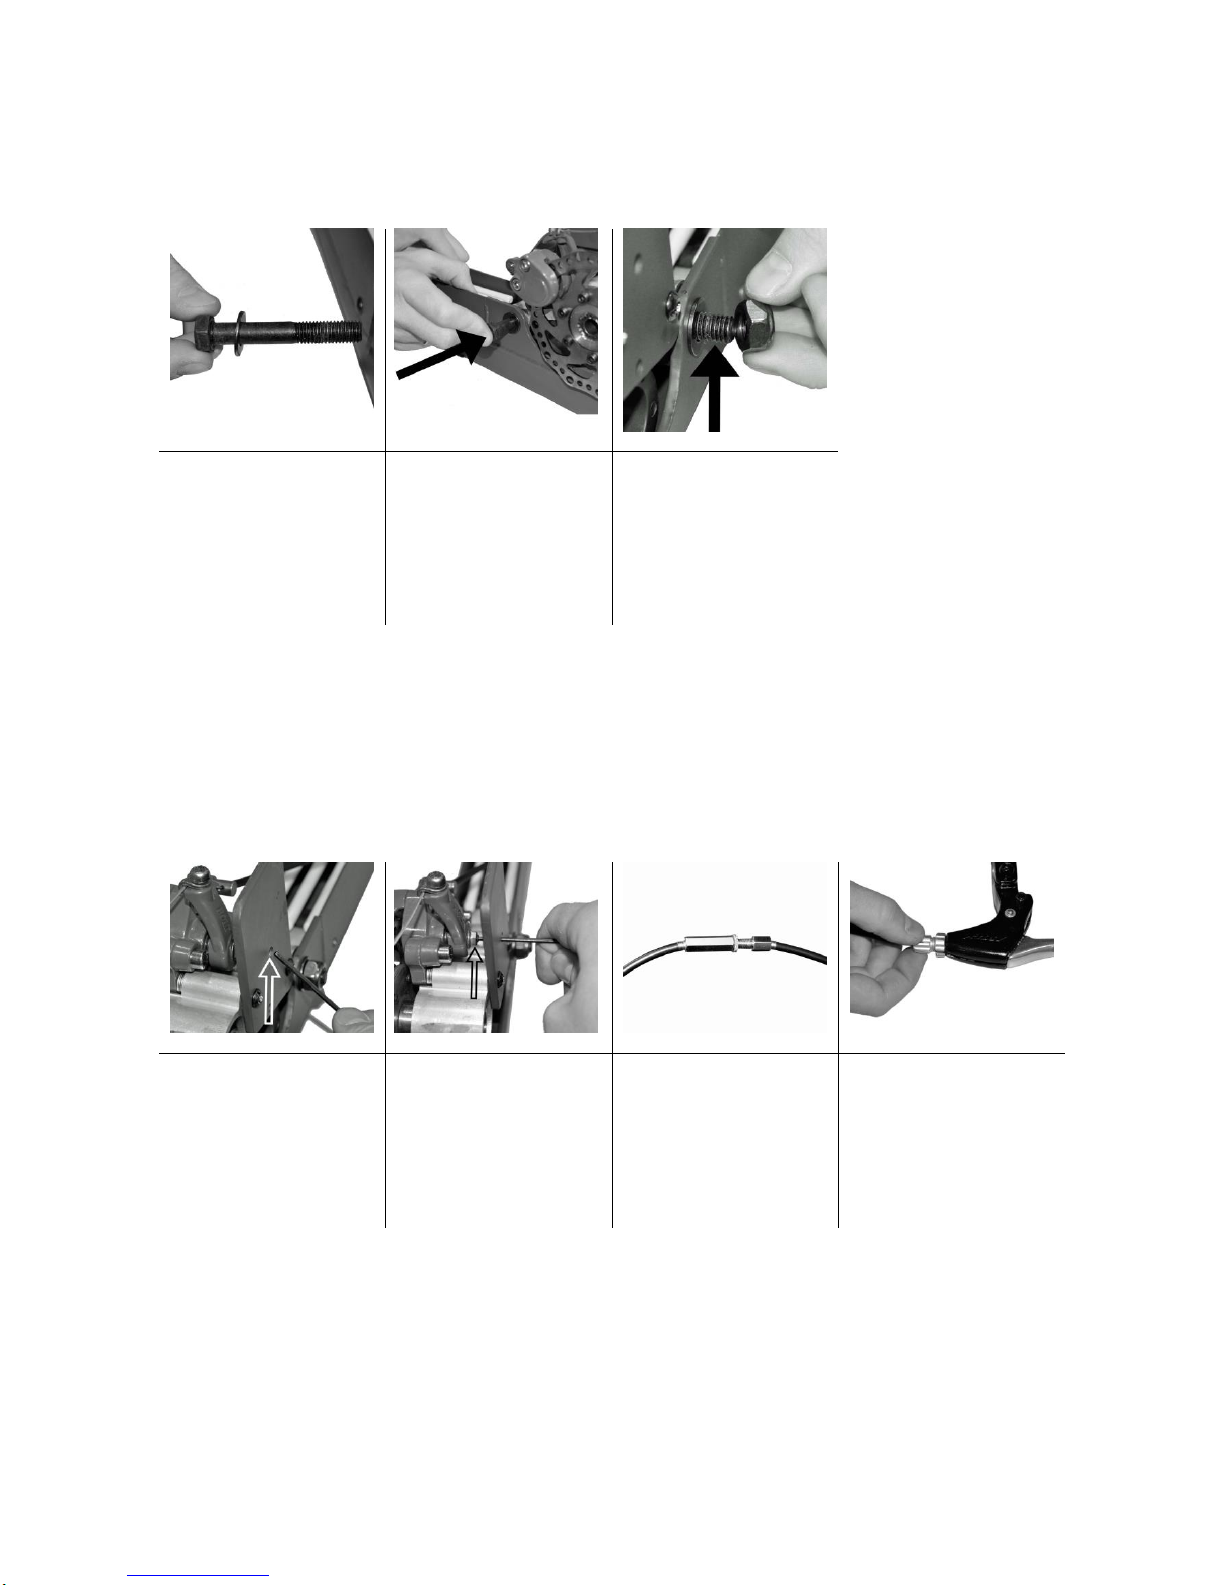
9
10
11
Take a bolt and insert it
through a washer.
Insert the bolt through the hole
in the aluminium part and the
frame from outside inwards.
Insert a washer and a nut in
the other end and tighten.
Do not tighten the screw
further than until it touches
the metal plate.
ADJUSTING THE BRAKES
1
2
3
4
Adjusting the brake calliper
against the brake disc.
Find the hole in the support
bracket inside the brake
calliper.
Insert a hex key through the
hole until it meets the screw.
You can now adjust how
tightly the calliper presses
against the brake disc.
ADJUSTING THE BRAKE
CABLE
There are two adjustments for
the brake cable under the cart.
One for each side. Turn these
to adjust the tension in the
cable.
There is also an adjustment
for the cable in the brake
handle. This adjust the tension
in the whole cable.

NordicCab AS Instructions and user manual for the NordicCab Urban Page 12 of 26
ADJUSTING THE DAMPER
1
2
3
The firmness of damper can
be adjusted to 2 different
settings, depending on how
much weight there is in the
cart.
This is accomplished by
moving the bar over the
fibreglass rods.
0-25 kg
25 kg
WARNING
Ensure you tighten the screws securely. Inspect the screws for looseness after the
cart has been used for a while.
WARNING
Be careful not to cut yourself or get your fingers injured during assembly.
ATTENTION
Ensure the cart is placed on a suitable surface to avoid damage to the
frame and the canopy during the assembly.
NordicCab AS Instructions and user manual for the NordicCab Urban Page 13 of 26
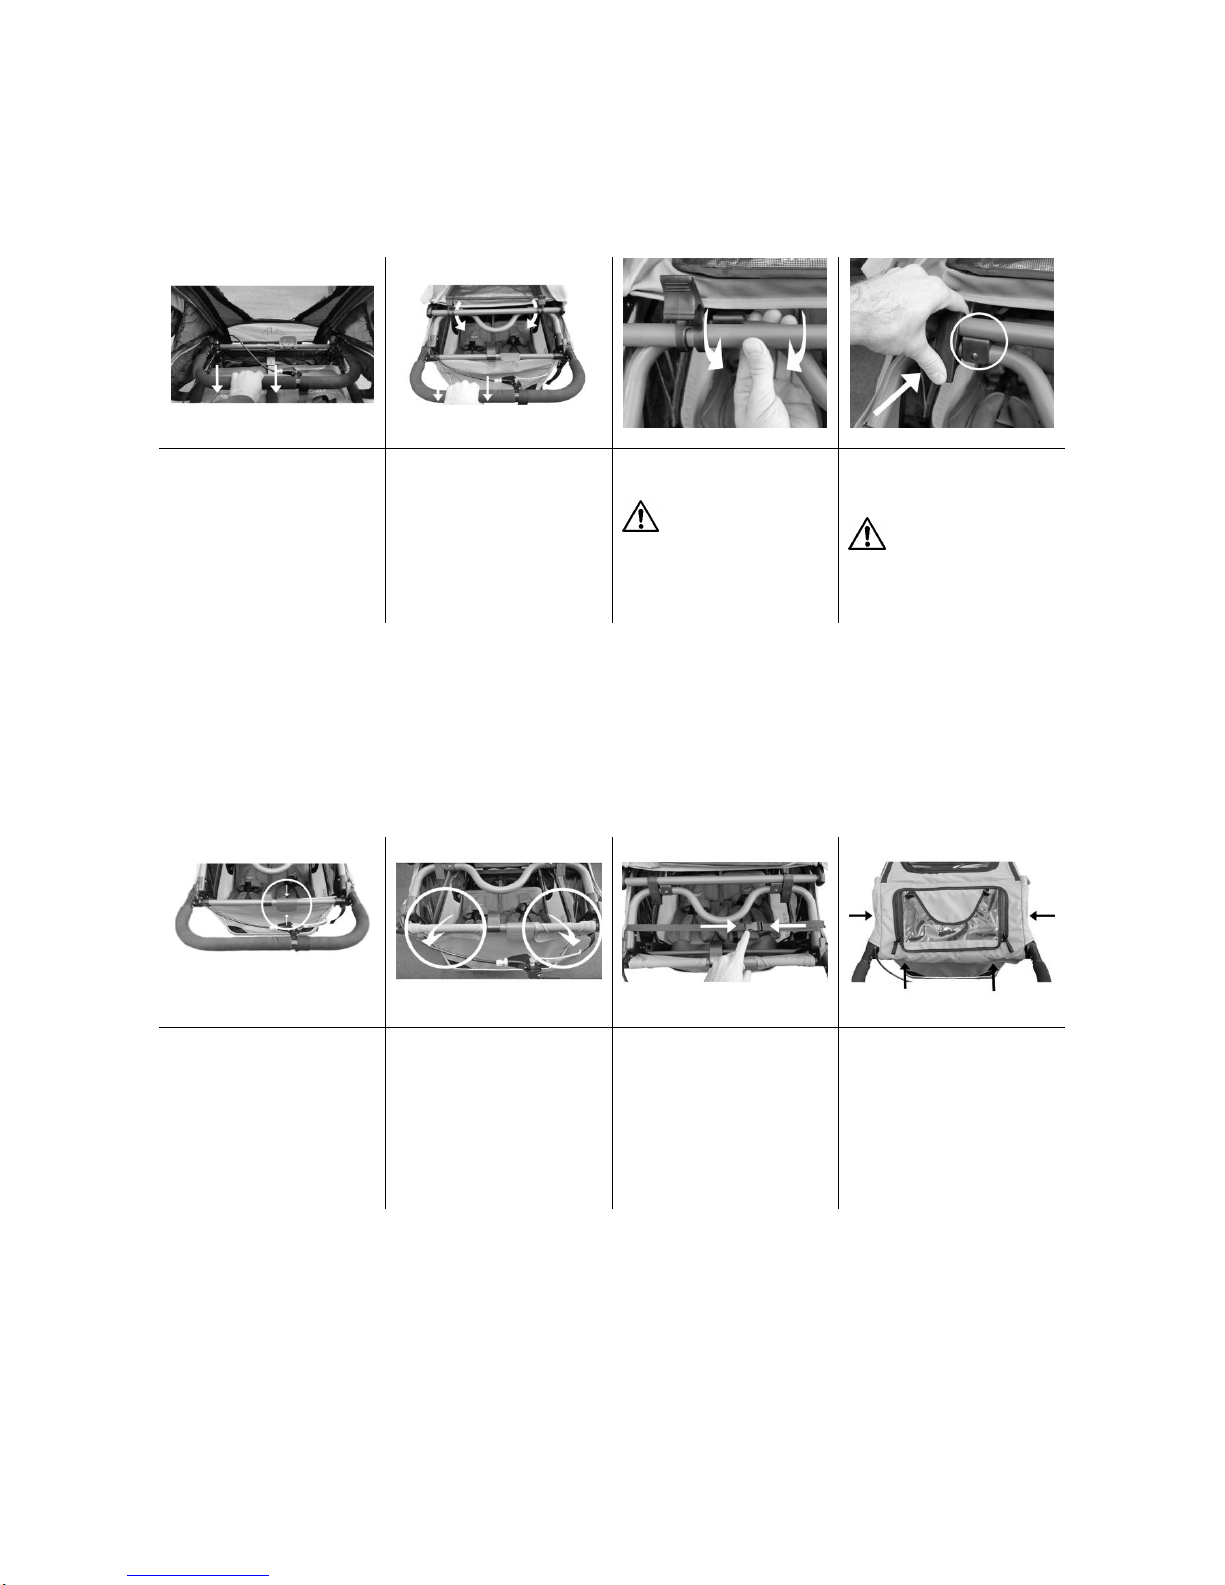
PREPARING THE CABIN
1
2
3
4
Lift the canopy and the frame
from the rear of the cart. Grab
the handle in the cart and pull
it towards yourself.
Pull the handle all the way up
until the crossbars on the top
meet.
Press the lower crossbar in
the plastic groove.
WARNING
Be careful not to injure your
fingers. Be careful not to trap
any plastic parts, cables or
fabric.
When the crossbar is in the
groove, lock it in place by
closing the clip.
WARNING
Be careful not to injure your
fingers.
Ensure that the top of the
frame is firmly attached.
5
6
7
8
Find your own position for the
handlebar. Pull the red tab, as
shown in the picture, towards
yourself. Adjust the handlebar.
Then push it in and lock it.
Tighten the rear canopy by
bringing the uppermost
canopy flaps over the crossbar
from inside outwards. Secure
them with Velcro.
Tighten the side canopy by
clipping the strap in place and
tightening.
Then put the top of the canopy
over it and secure it with
Velcro.

NordicCab AS Instructions and user manual for the NordicCab Urban Page 14 of 26
ATTACHING THE WHEELS
9
10
11
12
Insert the provided bolt
through the wheel hub while
pressing the button on the end
of the bolt.
Then insert the bolt in the hole
on the side of the cart.
Pull firmly on the wheel to
ensure it is firmly locked in
place.
Fully assembled.
ATTENTION
Be careful when assembling/disassembling the cart. Set the cart
carefully down and take exceptional care when handling the wheel
attachment or the brake/disc brake. Do not push or pull the cart while the
wheels are unattached.

NordicCab AS Instructions and user manual for the NordicCab Urban Page 15 of 26
FUNCTIONS
CANOPY
1
2
3
4
The front part of the canopy
includes a mosquito net, a
window/rain protector and a
sunshade. The canopy is
opened and closed with a zip
and is kept in the down
position by a magnet.
To open the canopy in the
front, open the zips on the top
edge. Roll the cover up and
attach it to the top with a band.
The sunshade is pulled down
when needed. They can be
rolled up and stored in the
upper canopy between the
window and the mosquito net,
Attached with Velcro.
The side sunscreens can be
pulled down as needed. They
can be rolled up and stored in
the pockets over the windows.
Attached with Velcro.
5
6
7
8
The flap on top gives a good
view on the child. The window
can also be rolled up for better
ventilation. Attached with a
band.
Inside the front you can find
two ventilation openings on
both sides. These can be
opened to improve ventilation
if needed.
Ventilation openings can be
closed by pulling the cover
down. Attached with Velcro.
A bottle holder is located
above the ventilation
openings.

NordicCab AS Instructions and user manual for the NordicCab Urban Page 16 of 26
WARNING
The canopy must always be pulled down when cycling with the cart, to prevent
objects getting thrown into the cart.
WARNING
Ensure that the child has a comfortable temperature at all times.
WARNING
Ensure that the child has a comfortable temperature at all times.
ATTENTION
Do not let moisture stand in the cart for longer periods. This can cause mould to
grow. For longer periods, store the cart in a dry place with the ventilation openings
opened.
NordicCab AS Instructions and user manual for the NordicCab Urban Page 17 of 26
BRAKE AND PARKING BRAKE
1
2
3
Keep the safety strap around
your wrist when pushing the
cart. Put your hand through
the loop in the strap.
The parking brake is activated
by twisting safety strap around
the handbrake, tighten well
and lock with Velcro. Pull the
cart to ensure the wheels are
immobile.
The brake and the parking
brake are activated from the
brake handle to the disc
brakes.
WARNING
Never leave the cart on an incline. The cart must always be parked on a flat surface.
Never leave children in the cart unattended.
WARNING
Always ensure that the parking brake locks both wheels.
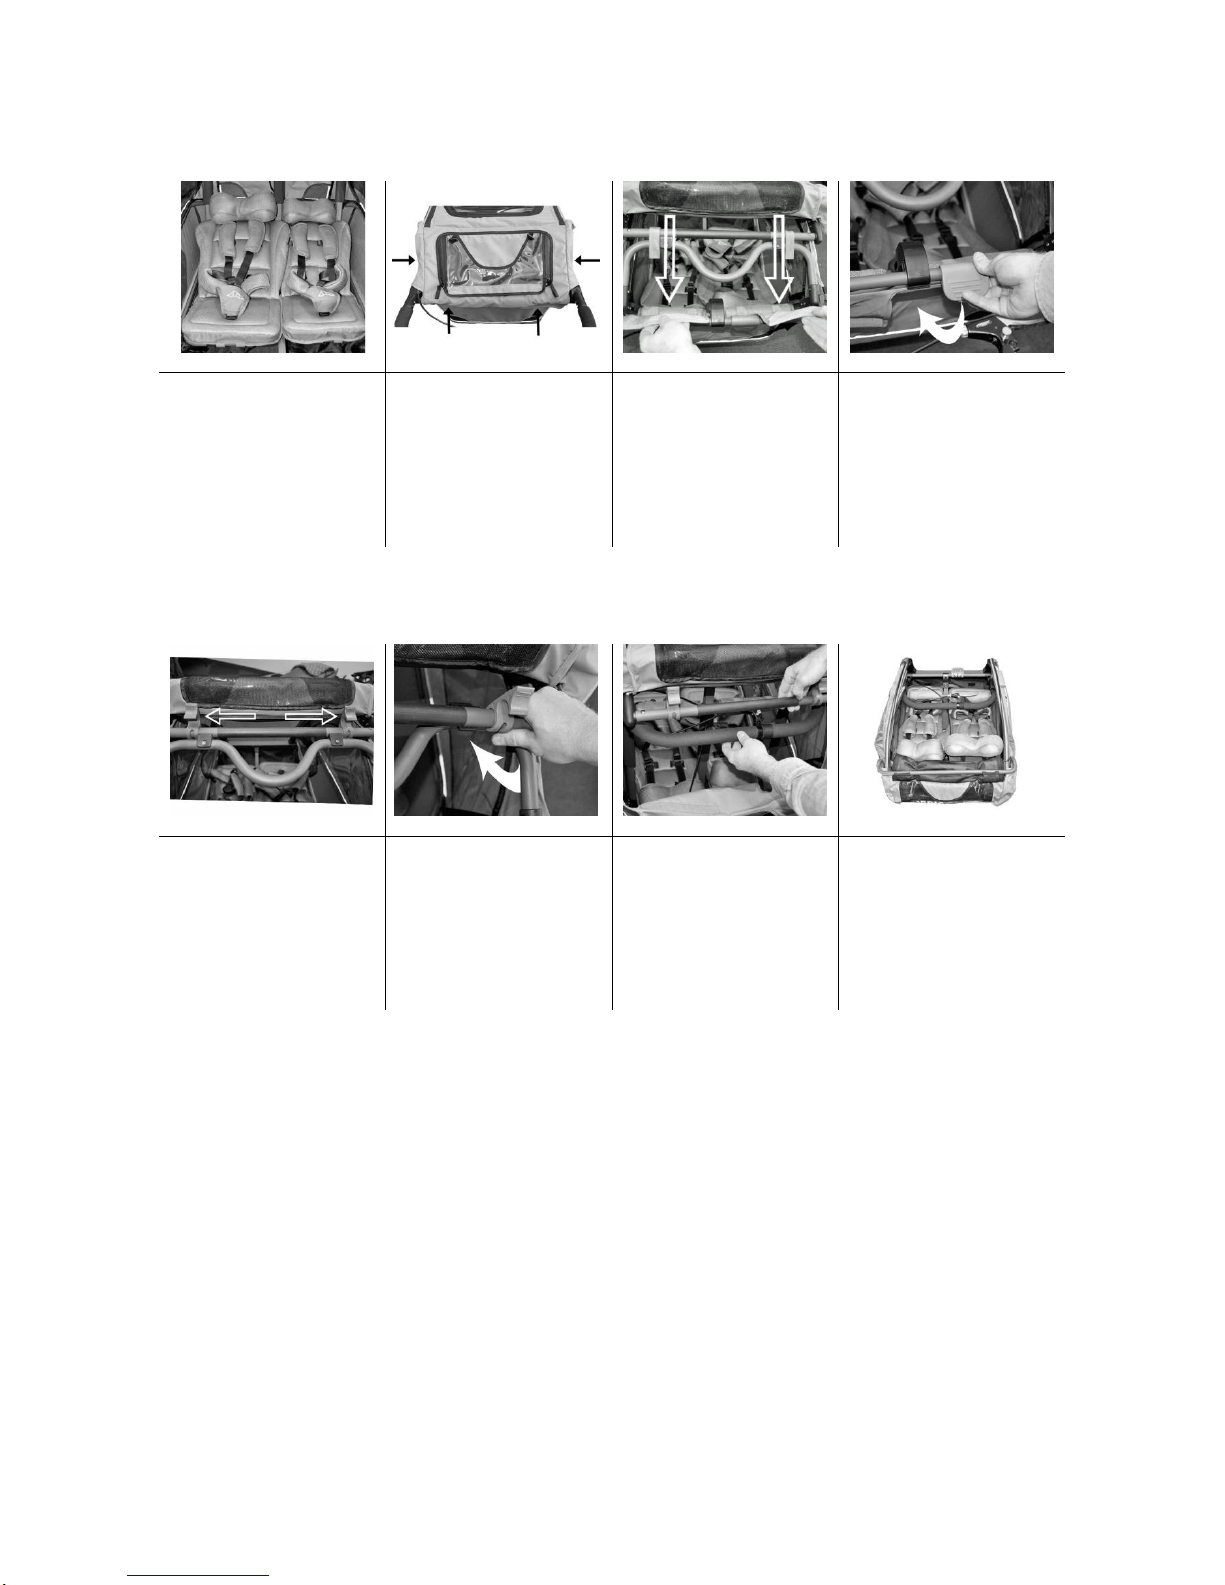
SEAT
1
2
3
The Urban has two
independent seats. The right
seat (in the direction of travel)
is somewhat wider than the
left one.
The seat can be adjusted to
different positions. Pull out the
tab under the seat and push or
pull the seat in the desired
position.
A mat gathers water and dirt
children bring in the cart. The
mat is easy to remove and
clean. Attached with Velcro.
WARNING
Always place the heavier child in the right seat (in the direction of travel). If only one
child is transported, the child should always be placed in the right seat, regardless of
size.
Always remove the child before adjusting the seat. Adjusting the seat with a child in it
can lead to injury or the seat can become damaged.

NordicCab AS Instructions and user manual for the NordicCab Urban Page 18 of 26
SAFETY HARNESS
1
2
3
4
The Urban is delivered with 5-
point safety harness.
Open the buckle and place the
child in the cart. The lower part
of the harness is pulled
between the legs of the child.
Ensure the abdominal belt is
placed over the waist of the
child and the upper straps
over the shoulders. Insert the
buckles one by one in the
receptacle until you hear a
click.
Adjust the shoulder straps so
that the child is sitting steadily,
safely and comfortably in the
harness.
To open the harness press the
release buttons marked with
arrows.
WARNING
Always use the safety harness.
ADJUSTING THE HANDLEBAR
1
Twist the tab up, as shown in
the picture, to adjust the
handlebar as desired.
NordicCab AS Instructions and user manual for the NordicCab Urban Page 19 of 26
FOLDING THE CART
1
2
3
4
Lower both seats to
recumbent position.
Open the top of that canopy.
Open the rear part of the
canopy, which sits around the
frame.
Open the tab in the handlebar,
so that the handlebar is loose.
5
6
7
8
Open up the clips that hold the
frame of the cart together.
Push the rear part under and
off its groove.
Push the whole rear frame
down over the seats.

NordicCab AS Instructions and user manual for the NordicCab Urban Page 20 of 26
CONVERSIONS
BICYCLE TRAILER
1
2
3
4
Push the tab down to allow
insertion of the bicycle arm.
Insert the bicycle arm in the
opening until it stops.
Push the tab back in place.
A bit of the bicycle arm will
stick out of the back. Attach a
safety pin in the small hole.
5
6
7
8
Attach the included bicycle
bracket to the back hub on the
bicycle. Ensure the bracket
“bends” outwards from the
bicycle. Ensure that you don’t
lose any small parts or
springs. Tighten securely.
Insert the tip of the bicycle arm
into the bicycle bracket.
Secure them with a lock pin.
Ensure the ring on the ring on
the lock pin is threaded around
the tip of the bicycle arm.
Thread the safety cable
around the bicycle frame
(behind the fork) and back,
and secure the hook on the
cable.
The flag is inserted in the
narrow pocket on the right
side.
Table of contents
Other Nordic Cab Bicycle Accessories manuals


