Norsk Data ND-110 COMPACT Manual

fiflffifim}
$3
.m
2
3w
‘
M
«2
Es
J
4?
,
$
3,,
3
$391,
‘
a».
«aiA
v.
.
.
h
Emwiww
4%»

ND—IIO
COMPACT
,
w
Operator
Guzde
ND—30.089.]
EN

Preface
This
manual
is
written
primarily
for
those
who
are
responsible
for
the
operation
of
the
ND-l
10
Compact
computer.
No
previous
knowledge
of
computer
systems
is
required
to
understand
the
manual
The
manual
explains:
'how
to
start
and
stop
the
computer
how
to
log
in
how
to
handle
floppy
diskettes
how
to
take
personal
backup
on
floppy
diskettes
how
to
handle
the
streamer
drive
and
tape
cartridge
-
how
to
handle
simple
error
situations.
For
more
details
on
how
to
take
backup
and
other
system
supervisor
responsibilities,
you
are
referred
to
the
following
manuals:
SINTRAN
III
System
Supervisor
ND-30.003
EN
BACKUP
User
Guide
ND-60.250
EN
Contents
Introduction
2
Read
this
if
you
know
nothing
about
computers
2
The
ND-l
10
Compact
computer
system
4
Starting
and
stopping
the
ND-110
Compact
6
,,
Logging
in
8
I)
If
something
goes
wrong
when
you
log
in...
10
Inserting
the
floppy
diskette
12
Handling
floppy
diskettes
14
Taking
personal
backup
15
Some
things
you
should
know
about
personal
backup
15
Taking
personal
backup
on
the
latest
ND
diskettes
16
Copying
from
the
floppy
diskette
back
to
the
disk
pack
22
Taking
personal
backup
on
older
ND
diskettes
and
diskettes
from
other
vendors
23
Protecting
your
floppy
diskettes
from
accidental
erasure
26
Cleaning
the
floppy
drive
27
I?
If
something
goes
wrong
when
you
take
personal
backup
28
Streamer
drive
and
tape
cartridge
29
What
is
the
streamer
drive
used
for?
29
Inserting
the
tape
cartridge
30
Labelling
the
tape
cartridge
30
Protecting
the
tape
cartridge
from
accidental
erasure
31
Cleaning
the
streamer
drive
31
Telefix
-
how
to
get
help
from
Norsk
Data's
Service
Centre
32
Index
33
The
information
in
this
manual
is
subject
to
change
without
notice.
Norsk
Data
A.S
assumes
no
responsibility
for
any
errors
that
may
appear
in
this
manual,
or
for
the
use
or
reliability
of
its
software
on
equipment
that
is
not
furnished
or
supported
by
Norsk
Data
A.S.
Copyright
©
1987
by
Norsk
Data
A.S
.
lst
edition
August
1987

2
Introduction
Introduction
Read
this
if
you
know
nothing
about
computers
This
is
your
tenninal.
This
is
where
you
work.
The
work
you
do
on
the
terminals
keyboard
goes
to
the
computer
where
it
is
stored
on
a
disk
pack.
The
disk
pack
is
actually
a
stack
of
round
magnetic
plates,
but
you
can
think
of
it
as
a
filing
cabinet
where
your
work
is
stored
in
files
each
of
which
is
given
a
file
name.
3
Introduction
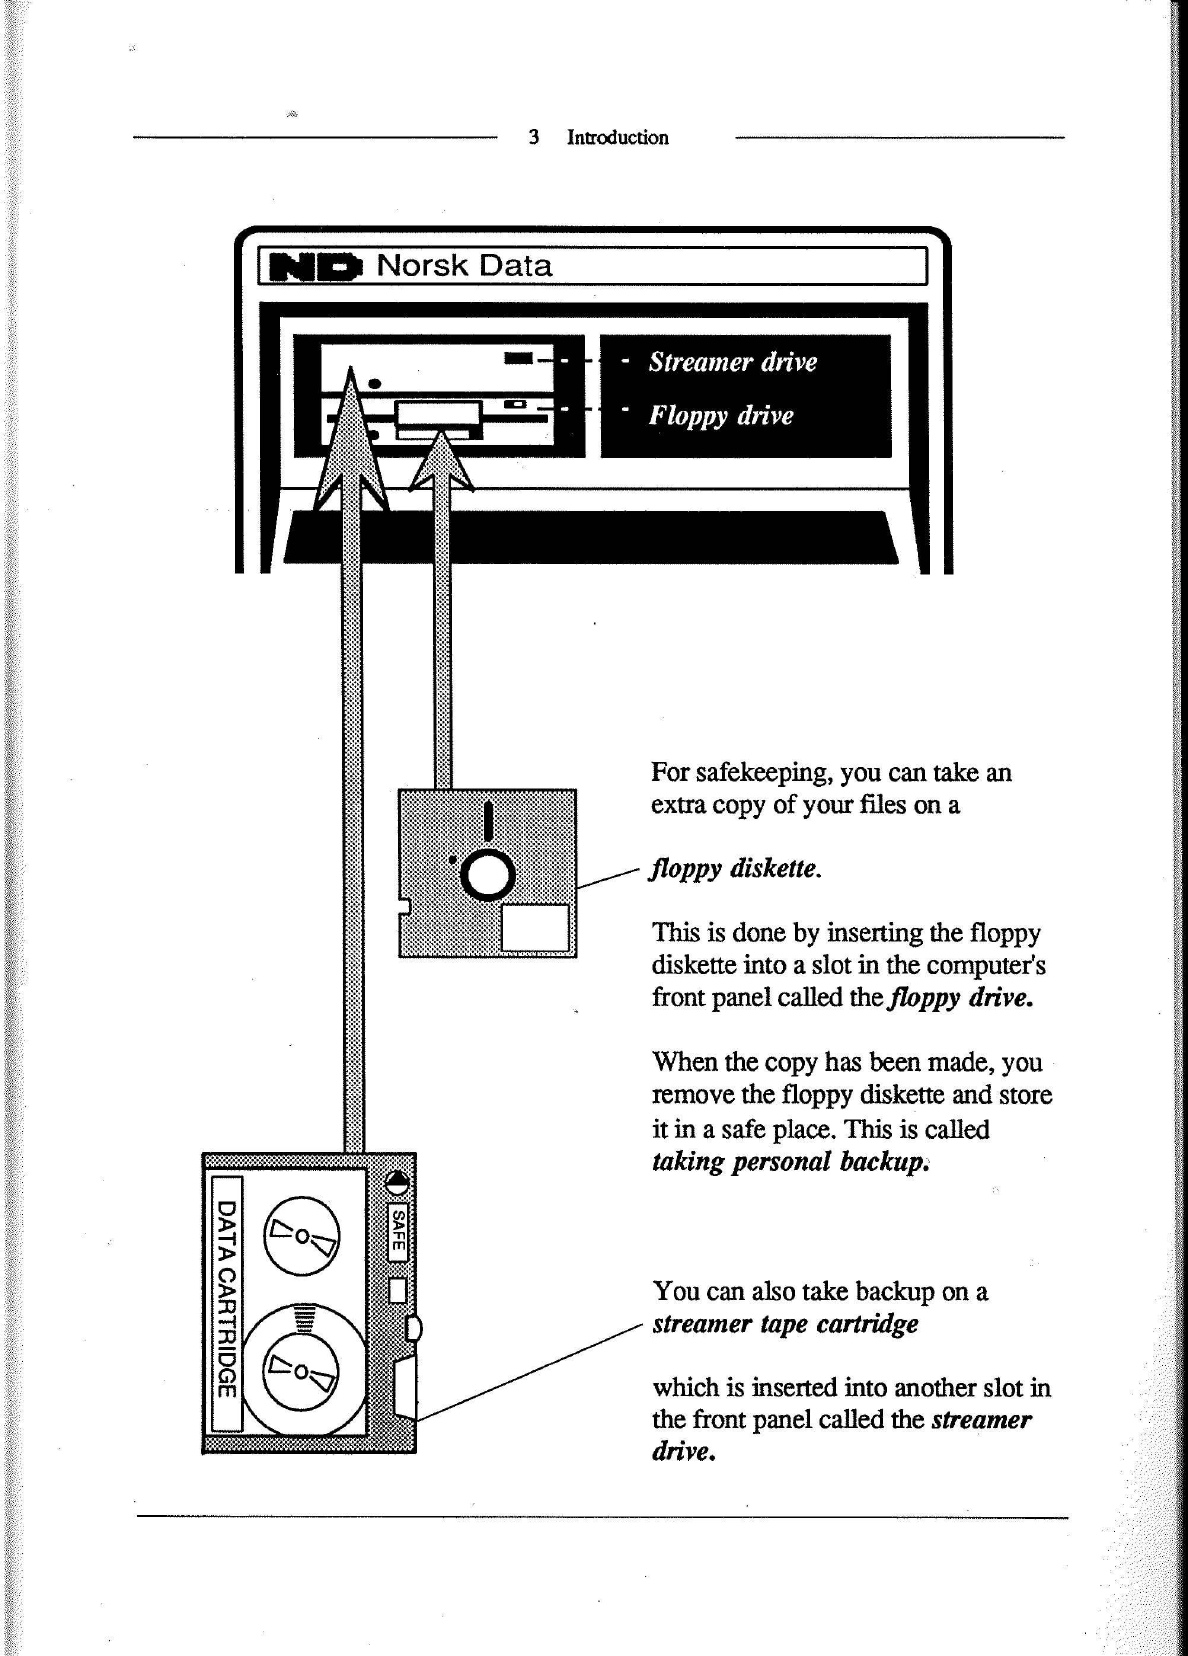
LEE
Norsk
Data
-
Streamer
drive
Floppy
drive
For
safekeeping,
you
can
take
an
extra
copy
of
your
files
on
a
/
floppy
diskette.
This
is
done
by
inserting
the
floppy
diskette
into
a
slot
in
the
computer's
front
panel
called
the
floppy
drive.
When
the
copy
has
been
made,
you
remove
the
floppy
diskette
and
store
it
in
a
safe
place.
This
is
called
taking
personal
backup;
-D-
You
can
also
take
backup
on
a
streamer
tape
cartridge
aeoluwvo
ViVC] I
which
is
inserted
into
another
slot
in
the
front
panel
called
the
streamer
drive.
4
Introduction
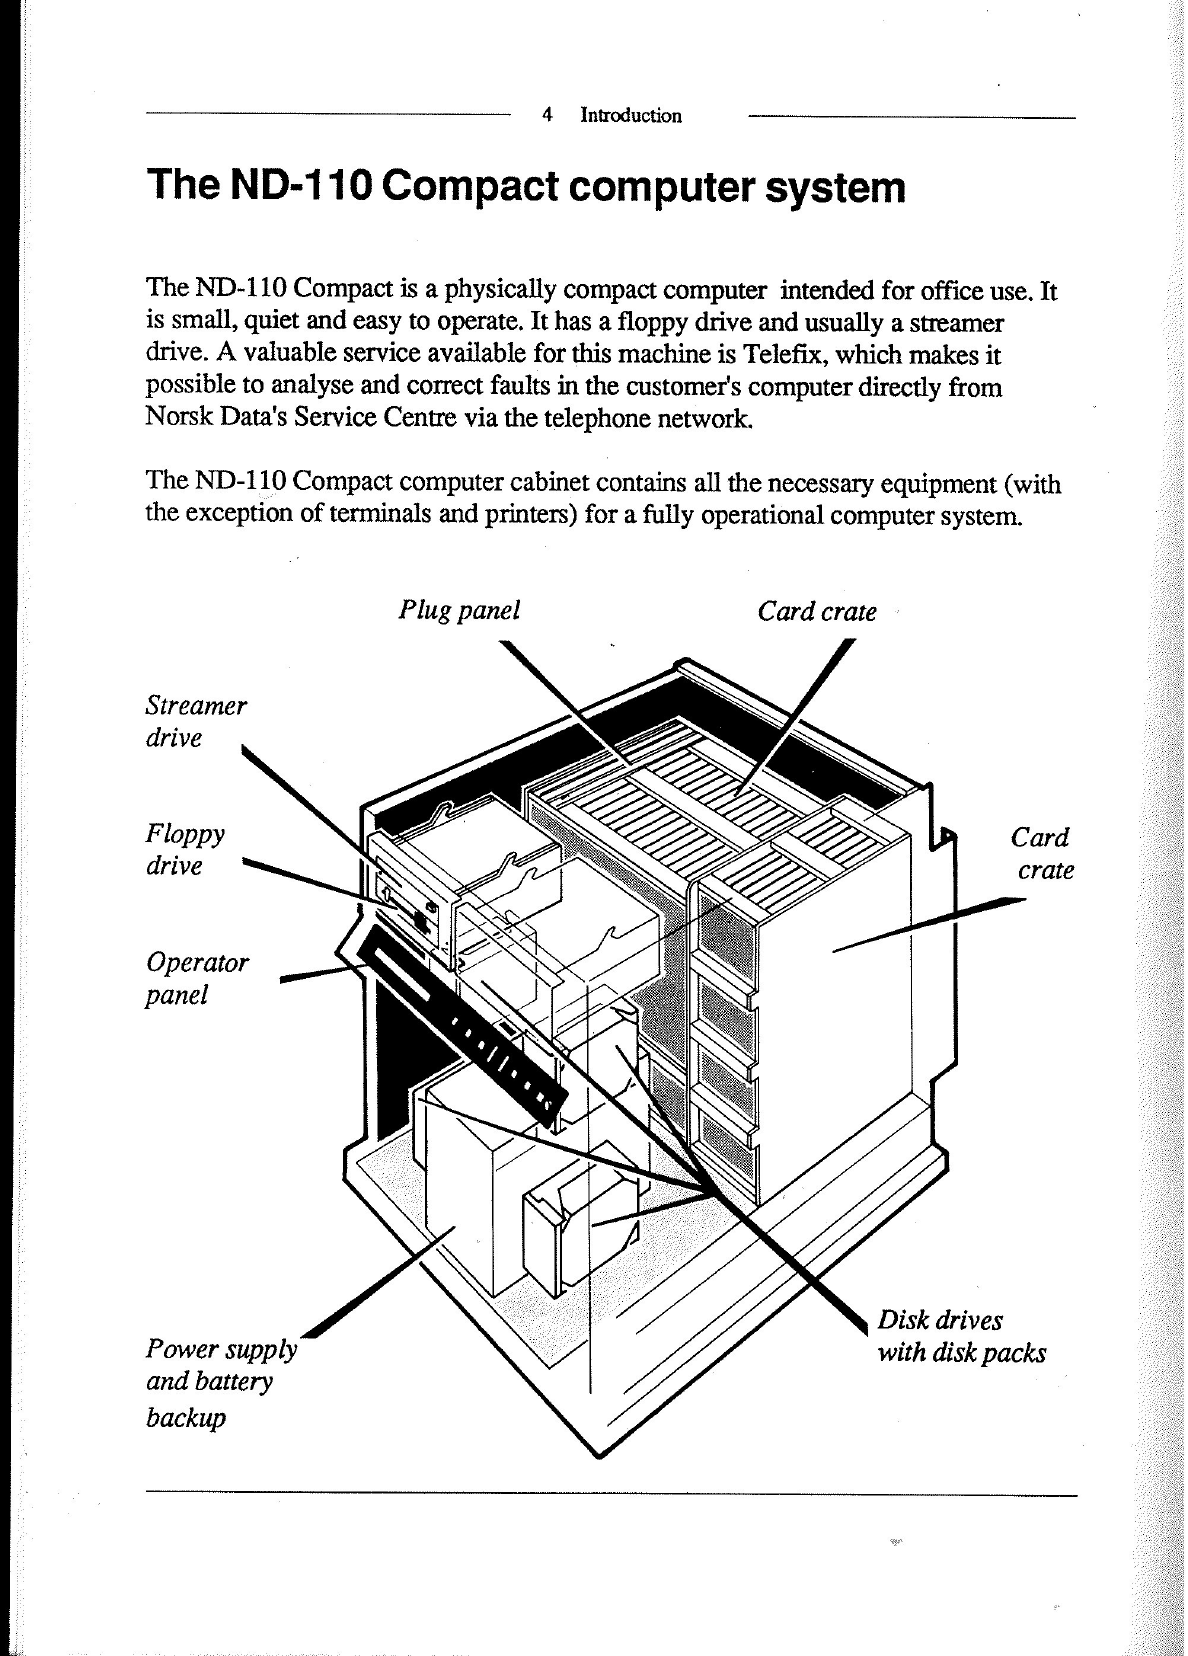
The
ND-110
Compact
computer
system
The
ND-l
10
Compact
is
a
physically
compact
computer
intended
for
office
use.
It
is
small,
quiet
and
easy
to
operate.
It
has
a
floppy
drive
and
usually
a
streamer
drive.
A
valuable
service
available
for
this
machine
is
Telefix,
which
makes
it
possible
to
analyse
and
correct
faults
in
the
customer's
computer
directly
from
Norsk
Data's
Service
Centre
via
the
telephone
network.
The
ND-1,1__0
Compact
computer
cabinet
contains
all
the
necessary
equipment
(with
the
exception
of
terminals
and
printers)
for
a
fiilly
operational
computer
system.
Plug
panel
Card
crate
-
Streamer
drive
Card
crate
Floppy
drive
Operator
panel
Disk
drives
Power
supply
with
disk
packs
and
battery
backup
5
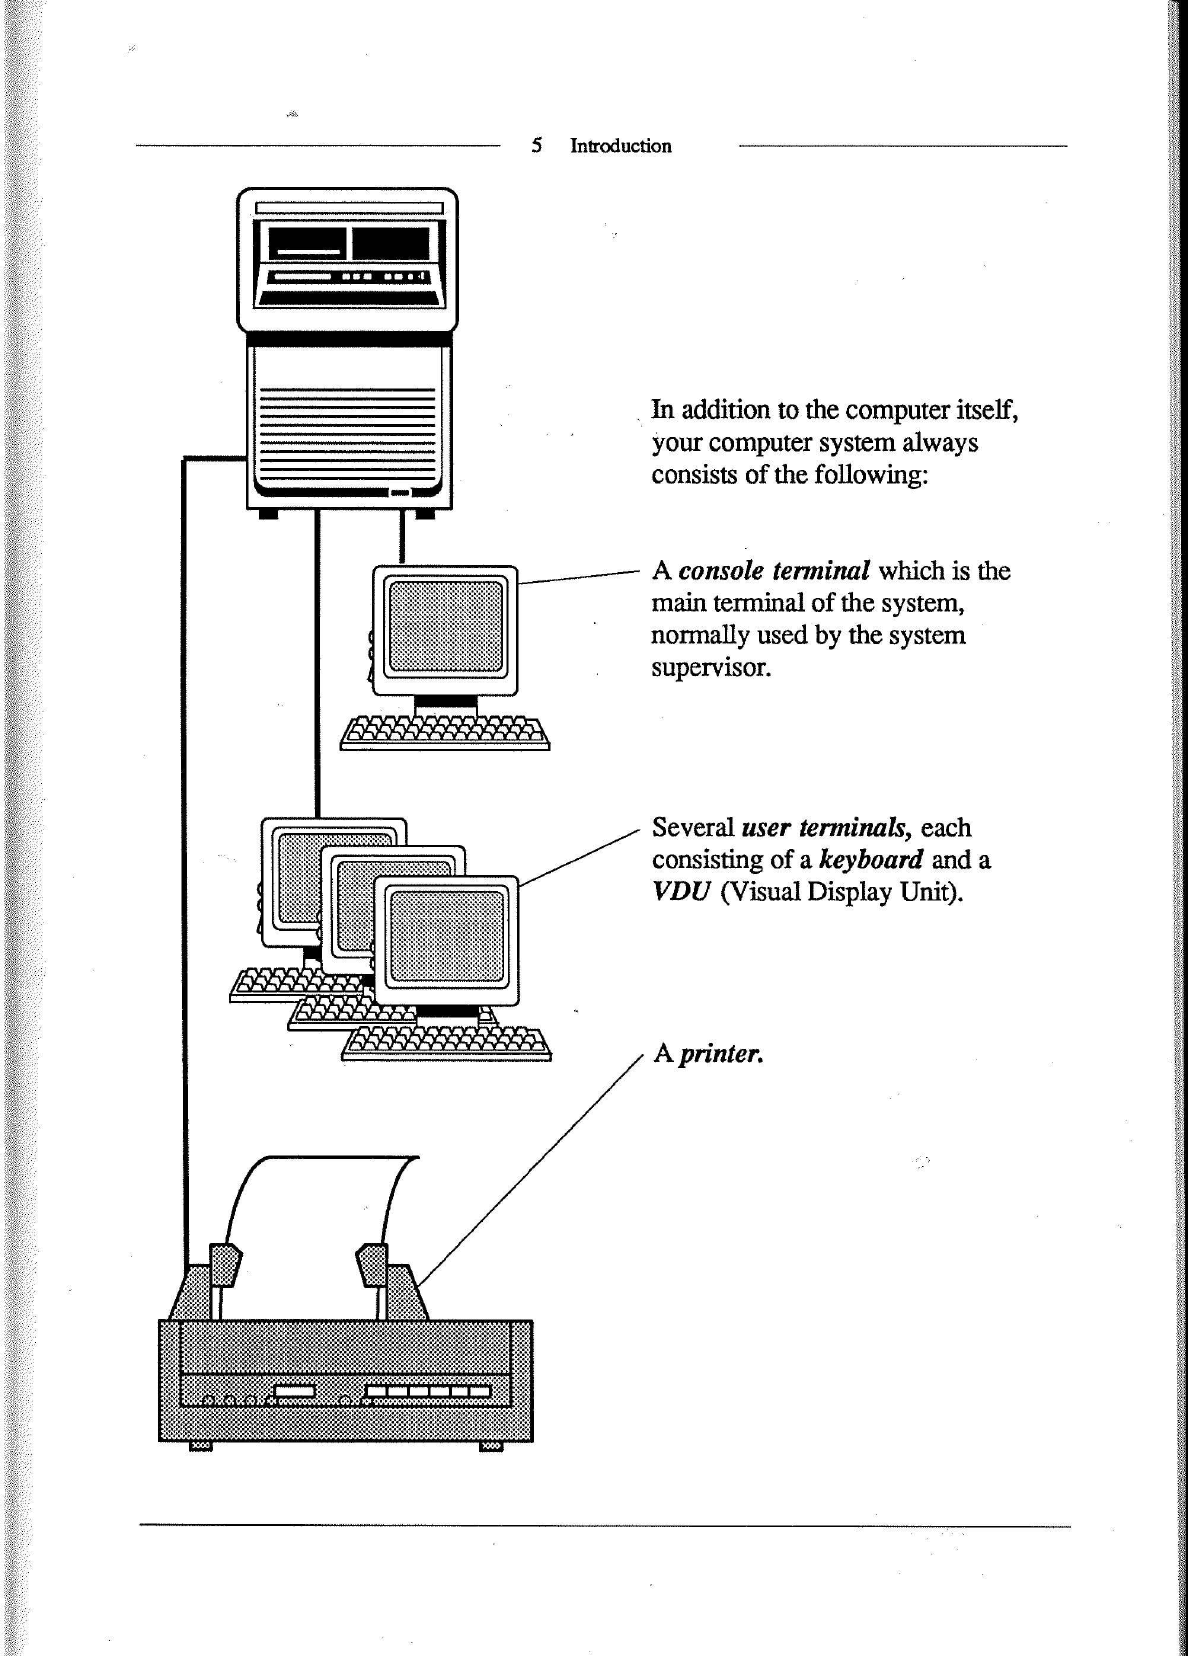
Introduction
.
In
addition
to
the
computer
itself,
your
computer
system
always
consists
of
the
following:
A
console
terminal
which
is
the
main
terminal
of
the
system,
normally
used
by
the
system
supervisor.
Several
user
terminals,
each
consisting
of
a
keyboard
and
a
VDU
(Visual
Display
Unit).
A
printer.

6
Starting
and
stopping
the
ND-IIO
Compact
Starting
and
stopping
the
ND~110
Compact
1.
Locate
the
power
switch
in
the
lower
right
hand
comer
of
the
computer's
front
and
switch
it
on.
CAUTION!
Do
not
move
the
computer
whemhe
power
is
on.
2.
On
the
operator
panel,
turn
the
key
switch
to
ON
and
push
the
START
button.
3.
Wait
until
the
word
RUNNING
appears
on
the
front
panel,
then
turn
the
key
switch
to
LOCKED.
This
blocks
the
front
panel
so
that
nobody
can
use
it
while
the
computer
is
running.

7
Starting
and
stopping
the
ND-llO
Compact
—
CAUTION!
The
computer
has
a
battery
which
keeps
it
alive
for
approximam
10
minutes
in
case
of
power
failure.
To
prevent
undesirable
discharge
of
this
battery,
do
not
switch
off
the
office
power
or
disconnect
the
computer's
power
cable
as
long
asthe
key
switch
is
in
position
ON
or
LOCKED.
To
prevent
unwanted
power
breaks,
it
is
recommended
that
the
computer
be
given
a
separate
power
circuit
which
bypasses
the
office
power
switch.
Stopping
Normally,
it
is
unnecessary
to
stop
the
computer.
However,
if
you
must
stop
it,
for
example
in
order
to
move
it,
proceed
as
follows:
1.
If
the
key
switch
is
in
LOCKED
position,
turn
it
to
ON.
2.
Press
the
STOP
button.
3.
Turn
the
key
switch
to
OFF.
4.
Switch
off
the
power
switch.
CAUTION!
Always
set
the
key
switch
to
OFF
before
switching
off
the
power
switch.
Logging
in
8
Leggingin
When
using
the
computer,
the
first
thing
you
must
do
is
to
get
in
touch
with
it;
that
is,
you
must
log
in.
To
log
in,
you
need
a
user
name
and
a
password.
The
password
is
necessary
so
that
only
you
can
log
into
the
computer
using
your
name.
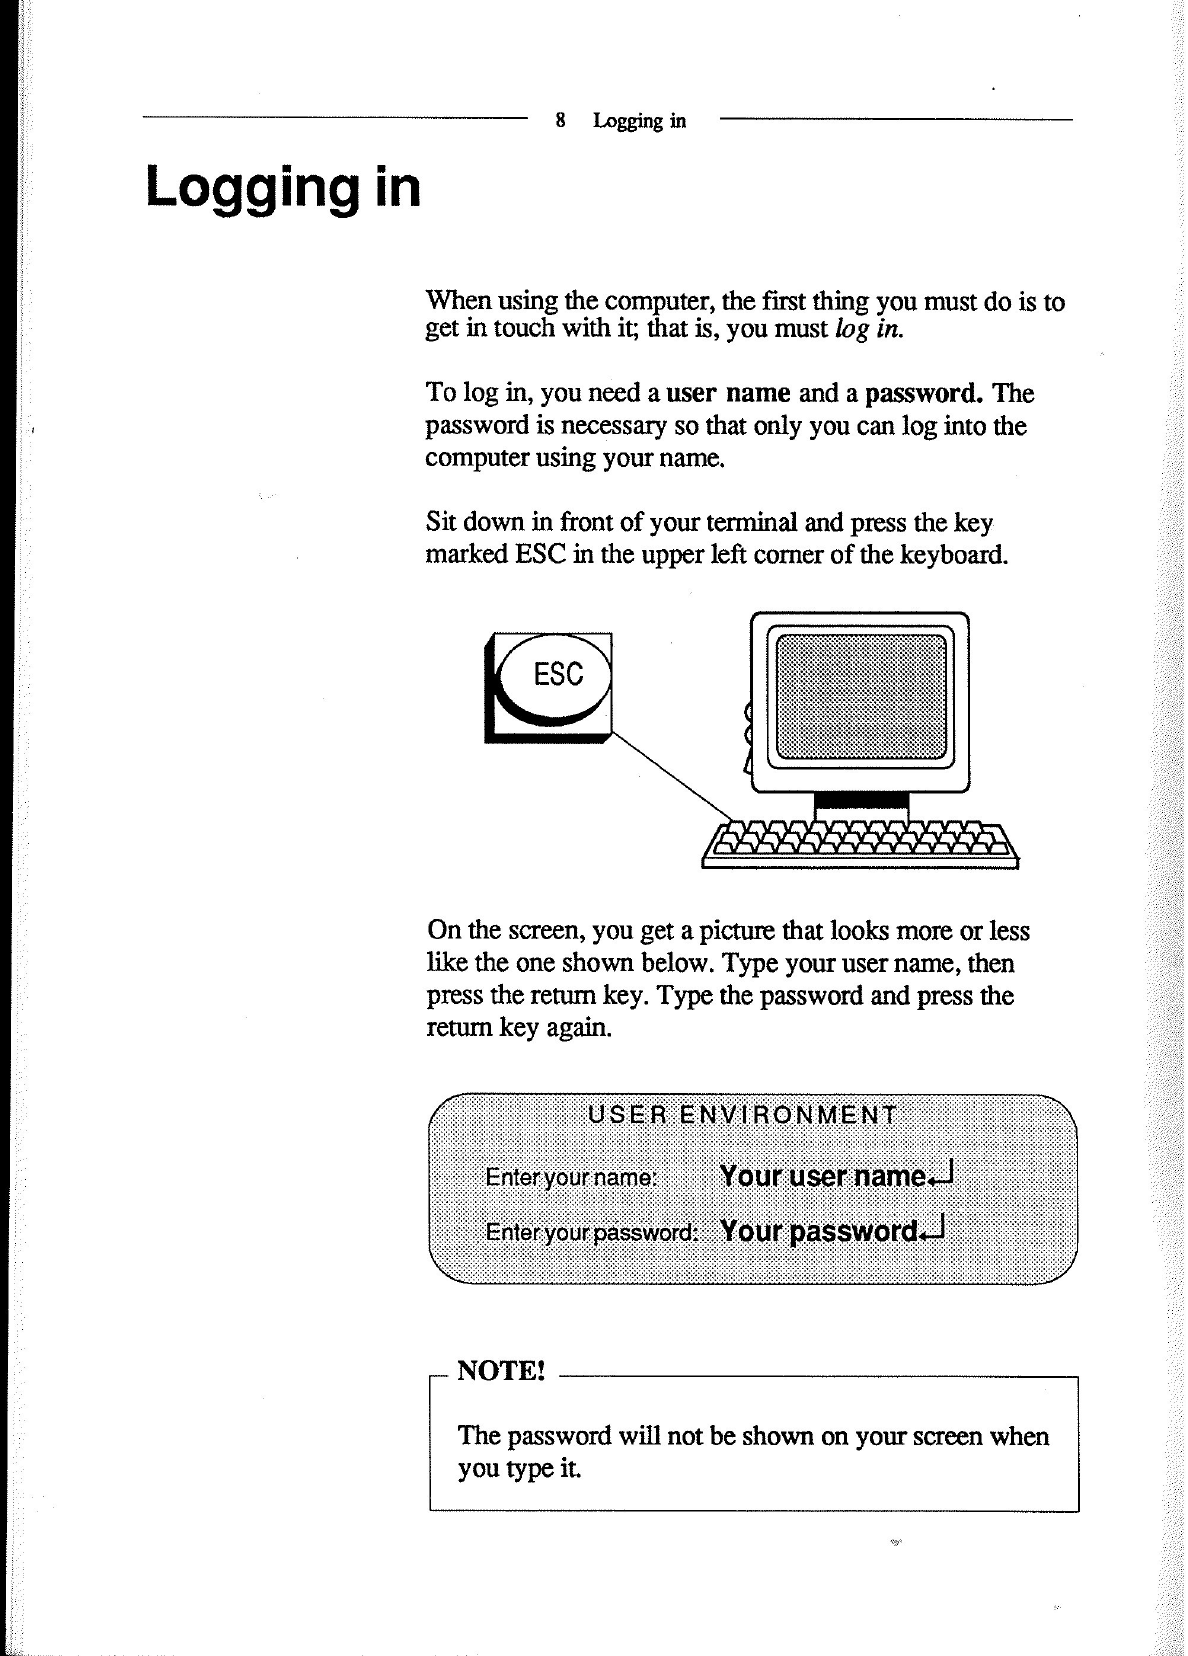
Sit
down
in
front
of
your
terminal
and
press
the
key
marked
ESC
in
the
upper
left
corner
of
the
keyboard.
0n
the
screen,
you
get
a
picture
that
looks
more
or
less
like
the
one
shown
below.
Type
your
user
name,
then
press
the
return
key.
Type
the
password
and
press
the
return
key
again.
NOTE!
The
password
will
not
be
shown
on
your
screen
when
you
type
it.
9
lagging
in
If
your
computer
uses
an
accounting
system,
the
words
project
password
appear.
If
you
do
not
have
a
project
password,
simply
press
the
return
key.
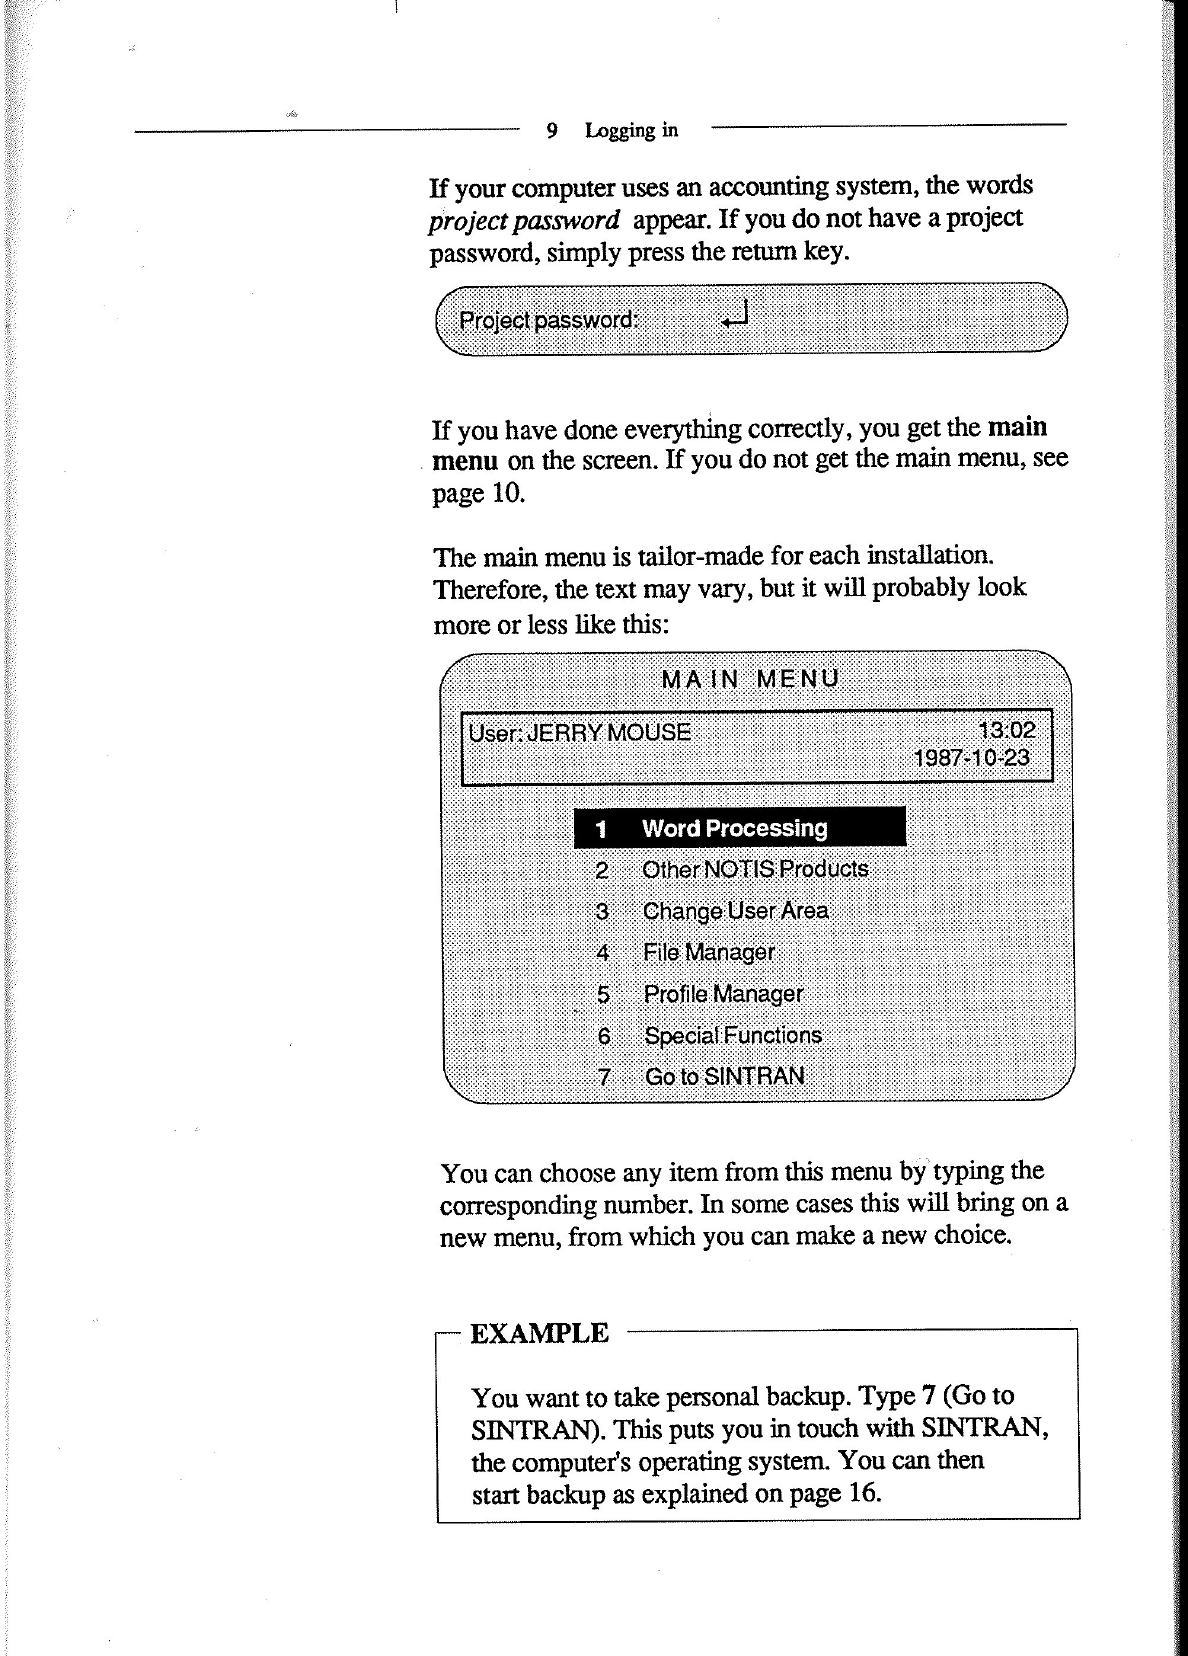
If
you
have
done
everything
correctly,
you
get
the
main
.
menu
on
the
screen.
If
you
do
not
get
the
main
menu,
see
page
10.
The
main
menu
is
tailor-made
for
each
installation.
Therefore,
the
text
may
vary,
but
it
will
probably
look
more
or
less
like
this:
1
Word
Processmg
You
can
choose
any
item
from
this
menu
byityping
the
corresponding
number.
In
some
cases
this
will
bring
on
a
new
menu,
from
which
you
can
make
a
new
choice.
EXAMPLE
You
want
to
take
personal
backup.
Type
7
(Go
to
SINTRAN).
This
puts
you
in
touch
with
SINTRAN,
the
computer's
operating
system.
You
can
then
start
backup
as
explained
on
page
16.
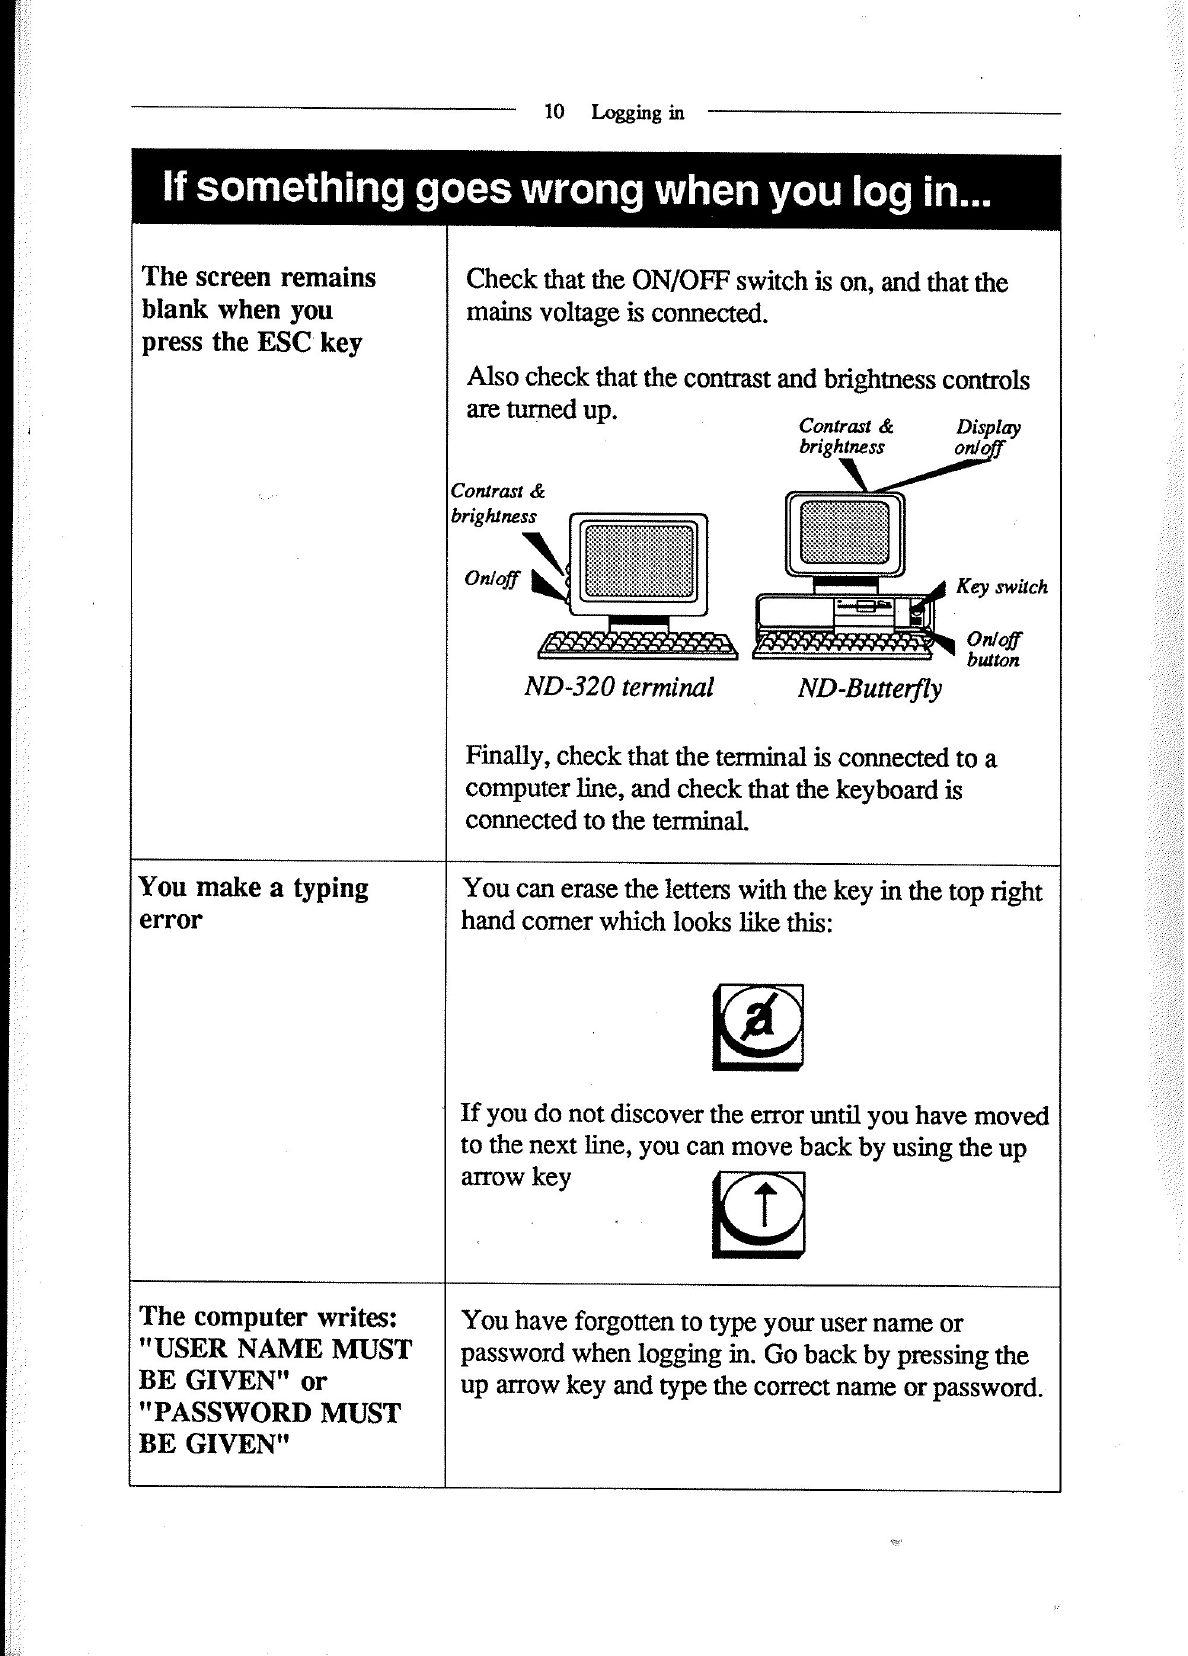
The
screen
remains
blank
when
you
press
the
ESC
key
If
something
goes
wrong
when
you
log
in...
10
Logging
in
Check
that
the
ON/OFF
switch
is
on,
and
that
the
mains
voltage
is
connected.
Also
check
that
the
contrast
and
brightness
controls
are
turned
up.
Contrast
&
brightness
Display
on/o
’
Contrast
&.
brightness
ND-Buttetfly
Finally,
check
that
the
terminal
is
connected
to
a
computer
line,
and
check
that
the
keyboard
is
connected
to
the
terminal.
You
make
a
typing
error
You
can
erase
the
letters
with
the
key
in
the
top
right
hand
corner
which
looks
like
this:
If
you
do
not
discover
the
error
until
you
have
moved
to
the
next
line,
you
can
move
back
by
using
the
up
arrow
key
VG
L4
The
computer
writes:
"USER
NAME
MUST
BE
GIVEN"
or
"PASSWORD
MUST
BE
GIVEN"
You
have
forgotten
to
type
your
user
name
or
password
when
logging
in.
Go
back
by
pressing
the
up
arrow
key
and
type
the
correct
name
or
password.
ll
Logging
in
If
something
goes
wrong
when
you
log
in...
The
computer
The
computer
has
rejected
your
user
name
or
writes
password.
Go
back
by
pressing
the
up
arrow
key
and
"USER
NAME/
try
again,
taking
care
to
avoid
spelling
mistakes.
PASSWORD
NOT
RECOGNIZED"
You
do
not
get
a
Some
installations
do
not
use
menus.
In
this
case
you
menu
will
get
the
SINTRAN
sign
(@)
on
the
screen
instead.
This
sign
means
that
you
are
in
touch
with
SINTRAN,
the
computer‘s
operating
system.
You
can
now
give
the
computer
instructions
by
typing
SINTRAN
commands.
For
example,
to
start
a
personal
backup,
you
type
BACKUP-SYSTEM.
In
SINTRAN
commands,
hyphens
are
used
instead
of
spaces
between
words.
—
NOTE!
If
you
try
to
log
in
unsuccessfully
more
than
10
times,
the
computer
will
suspect
that
you
are
an
unauthorized
user
trying
to
log
in
without
lmowing
the
correct
user
name
or
password.
The
computer
will
then
respond
with
the
words
"TOO
MANY
ATTEMPTS
TO
ENTER",
and
any
further
attempts
to
log
in
from
your
keyboard
will
be
blocked.
In
this
case,
the
terminal
must
be
stopped
from
the
computer.
See
instructions
for
stopping
the
terminal
in
the
manual
SINTRAN
III
System
Supervisor.

12
Inserting
the
floppy
diskette
Inserting
the
floppy
diskette
When
you
want
to
take
a
personal
backup,
you
must
go
to
the
computer
and
insert
a
floppy
diskette
in
the
floppy
drive
which
is
located
in
the
top
left
comer
of
the
computer's
front
panel.
CAUTION!
llllllllllll
Do
not
try
to
open
the
floppy
drive
if
its
red
lamp
is
on
or
blinking.
Floppy
drive
with
locking
latch:
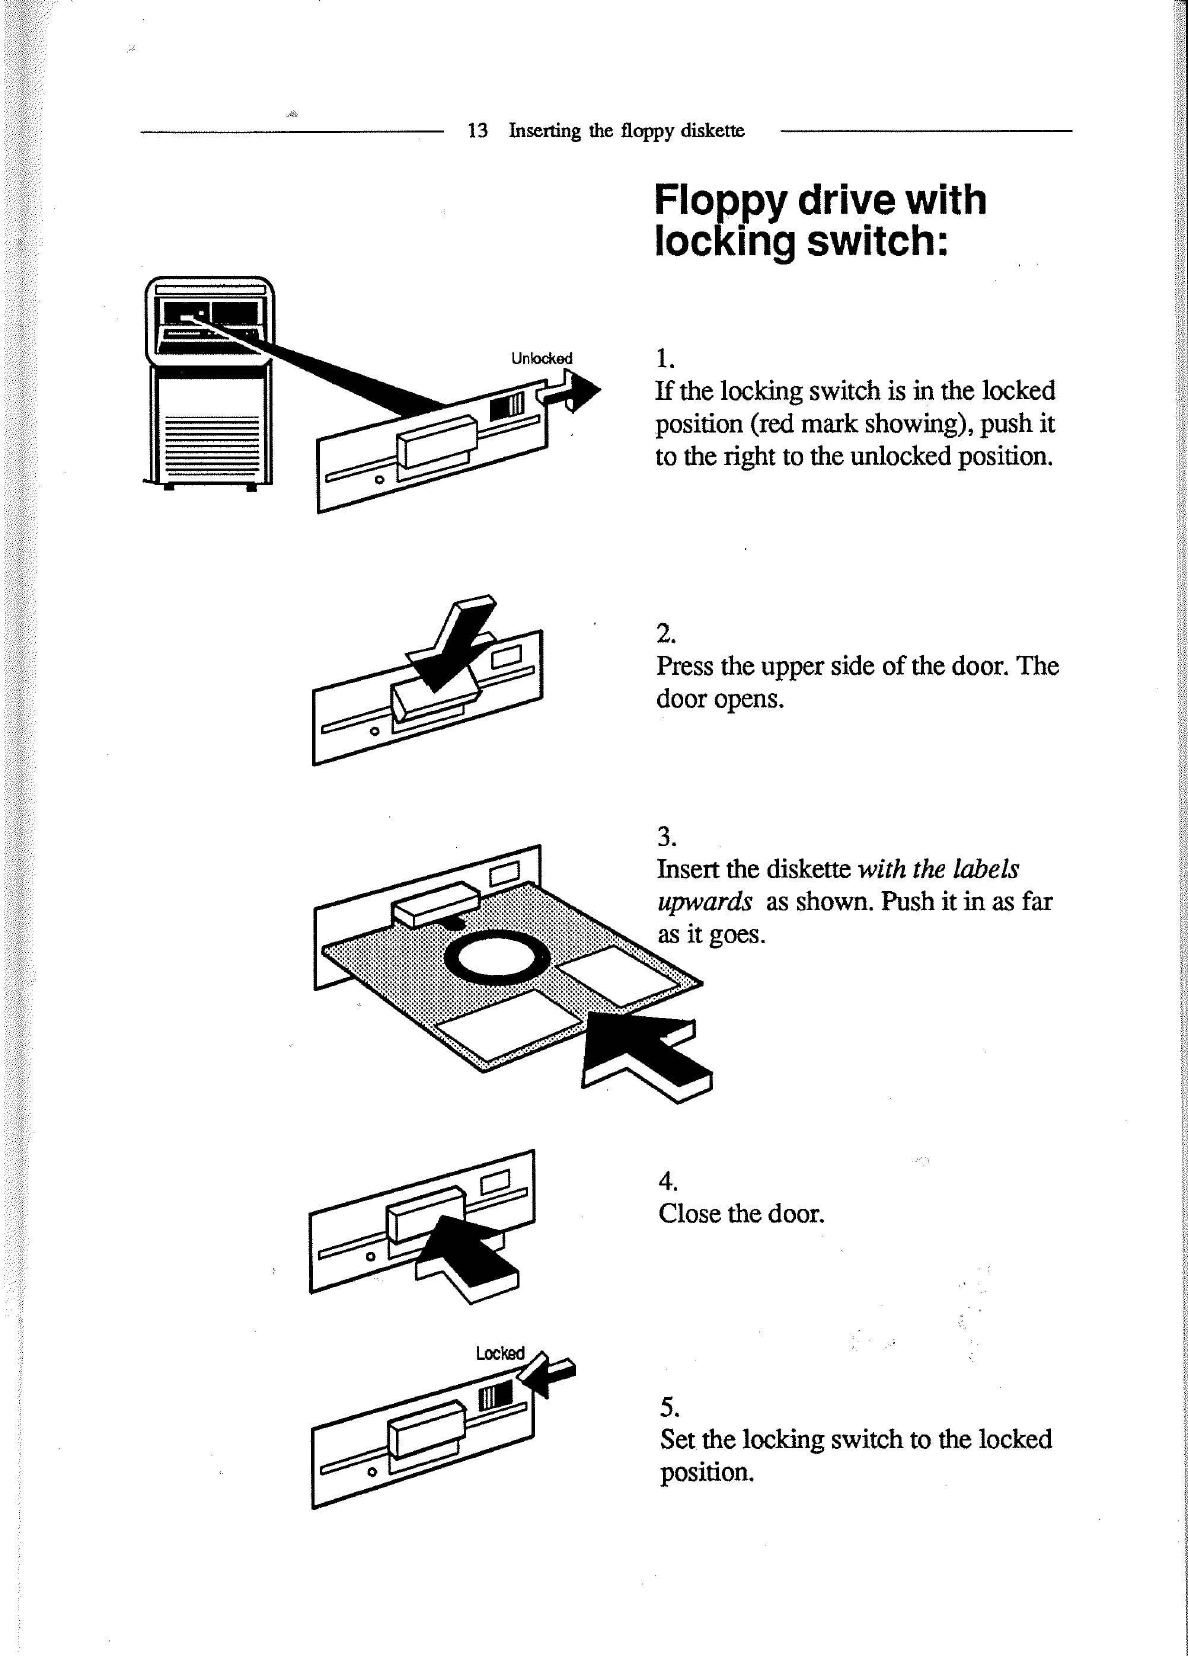
1;
If
the
latch
is
in
the
vertical
position,
turn
it
1/4
tum
counterclockwise
to
the
horizontal
position.
2
Insert
the
diskette
with
the
labels
up
and
out
as
shown.
Push
it
in
as
far
as
it
goes.
3.
Close
the
floppy
drive
by
tuming
the
-
latch
back
to
the
vertical
position.
13
Inserting
the
floppy
diskette
Floppy
drive
with
locking
switch:
Unlocked
1
If
the
lockn
switch
is
in
the
locked
Iii]
.
position
(red
mark
showing),
push
it
to
the
right
to
the
unlocked
position.
’
I
r
I
2.
\
/
gisodiggpper
side
of
the
door.
The
“
p
.
//
3.
Insert
the
diskette
with
the
labels
upwards
as
shown.
Push
it
in
as
far
as
it
goes.
4.
If/
Close
the
door.
I
‘
.
/
Locked/’
ml
5.
fl
Set
the
locking
switch
to
the
locked
0
position.

Handling
floppy
diskettes
Good
diskette
habits
minimize
the
risk
of
losing
data.
For
your
own
benefit,
always
follow
these
rules:
1.
Hands
off
the
diskette
Surface!
2.
-
Keep
the
diskettes
away
from
magnetic
fields.
Do
not
place
them
on
top
of
your
terminal
or
other
equipment.
3.
Do
not
bend
or
fold
the
diskettes.
4.
Keep
the
diskettes
in
their
jackets
when
not
in
use.
5.
Be
careful
when
inserting
the
diskette
into
the
computer.
Never
leave
it
halfway
inserted.
CAUTION!
Take
care
not
to
drop
the
diskette
on
the
carpet.
If
you
do,
pick
it
up
irn'rnediately,
as
the
static
electricity
in
the
carpet
may
damage
it.
15
Taldng
personal
backup
Taking
personal
backup
Some
things
you
should
know
about
personal
backup
What
is
a
personal
backup?
Why
take
a
personal
backup?
Who
should
take
personal
backups?
What
this
section
tells
you
When
you
use
your
terminal,
the
work
you
do
is
normally
stored
in
files
on
the
computer's
disk
packs.
To
take
a
personal
backup
means
to
make
a
copy
of
these
files
on
a
floppy
diskette.
You
can
take
a
copy
of
all
your
files,
or
just
some
of
them;
for
example,
you
may
wish
to
copy
the
work
you
did
last
week,
but
not
the
week
before.
Personal
backup
on
a
floppy
diskette
is
taken
for
safety
reasons
in
case
the
original
files
are
accidentally
erased
or
destroyed.
The
diskette
should
therefore
be
stored
in
a
safe
place
such
as
a
fireproof
cabinet.
Each
user
is
responsible
for
taking
personal
backup
of
his
own
work.
This
section
explains
one
simple
method
for
taking
personal
backup.
There
are
other
methods
and
other
options.
If
you
want
to
learn
more
about
backup,
see
the
manual
BACKUP
User
Guide,
ND-60.250
EN.
16
Taking
personal
backup
Taking
personal
backup
on
the
latest
ND
diskettes
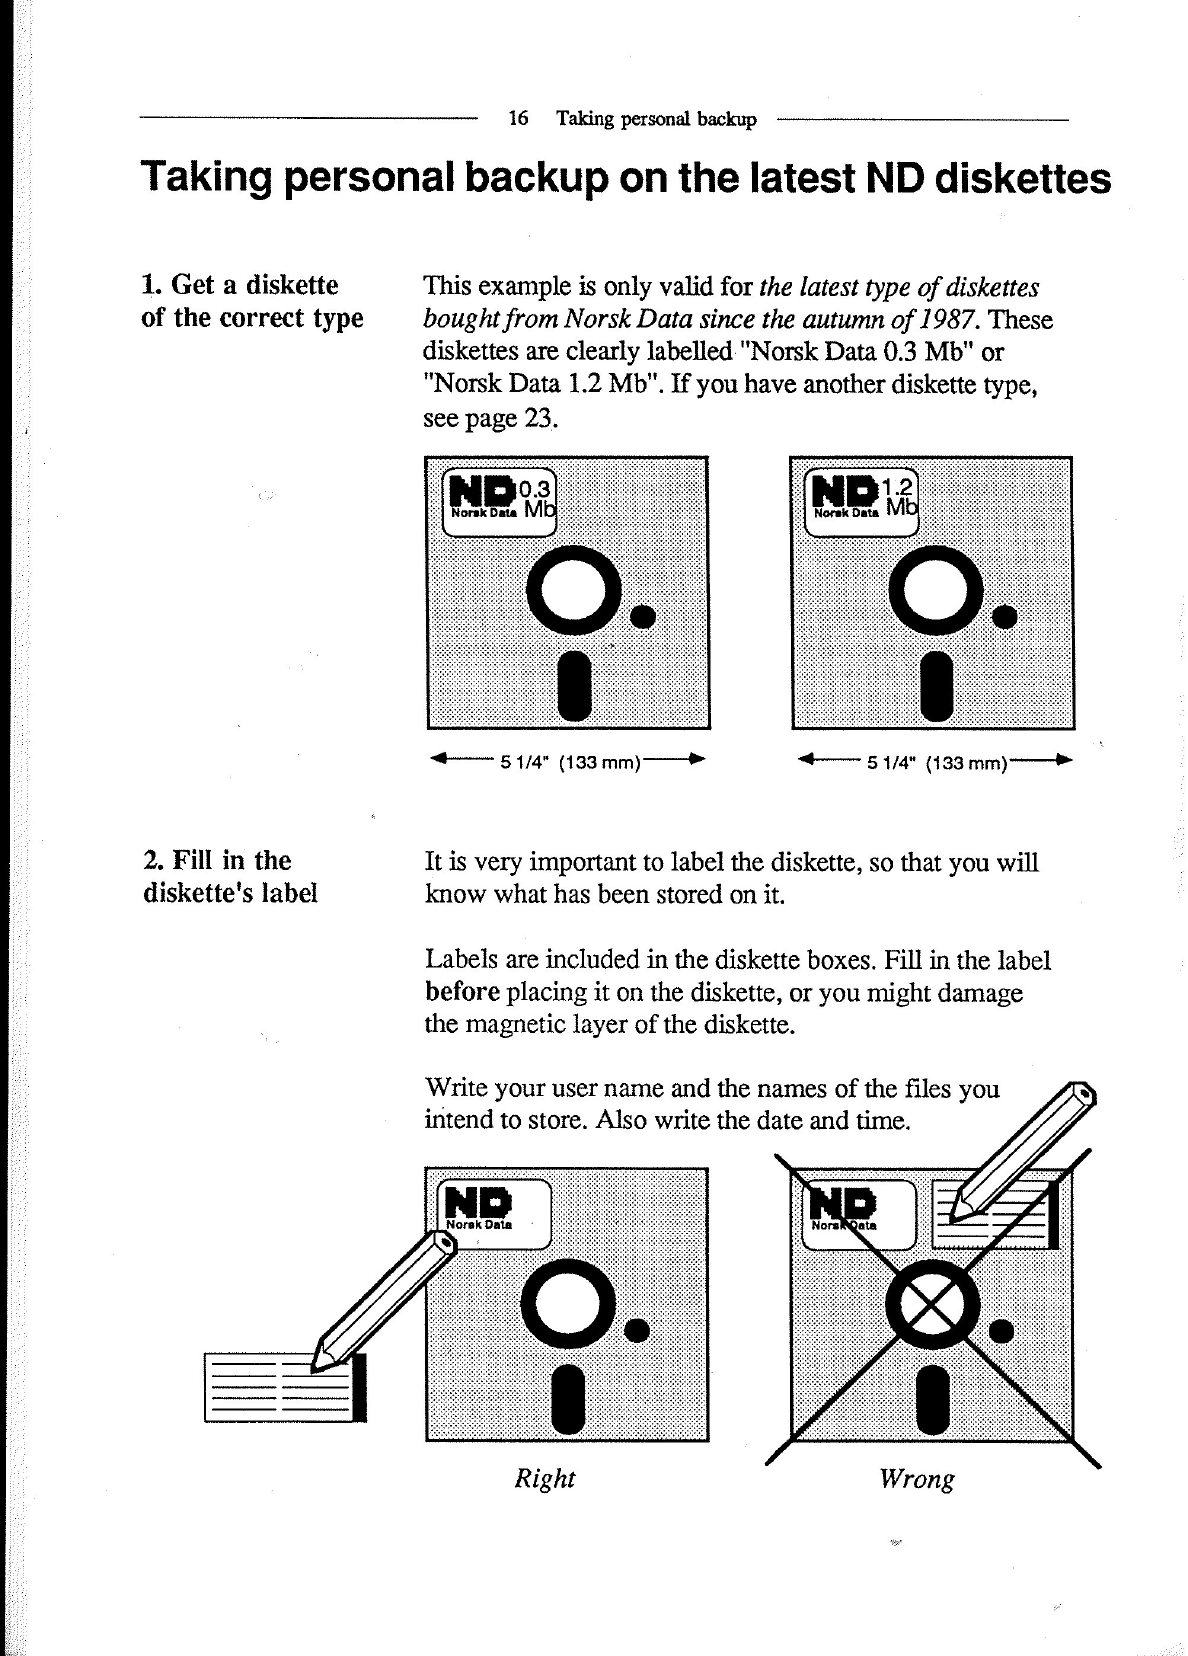
1.
Get
a
diskette
This
example
is
only
valid
for
the
latest
type
of
diskettes
of
the
correct
type
bought
from
Norsk
Data
since
the
autumn
of
1987.
These
diskettes
are
clearly
labelled
"Norsk
Data
0.3
Mb"
or
"Norsk
Data
1.2
Mb".
If
you
have
another
diskette
type,
see
page
23,.
<—-—-
51/4"
(133
mm)—->
*—
51/4"
(133
mm)*~—*
2.
Fill
in
the
It
is
very
important
to
label
the
diskette,
so
that
you
will
diskette's
iabel
know
what
has
been
stored
on
it.
Labels
are
included
in
the
diskette
boxes.
Fill
in
the
label
before
placing
it
on
the
diskette,
or
you
might
damage
the
magnetic
layer
of
the
diskette.
Write
your
user
name
and
the
names
of
the
files
you
intend
to
store.
Also
write
the
date
and
time.
Right
Wrong
3.
Check
that
the
floppy
drive
is
free
4.
Insert
the
floppy
diskette
5.
Log
in
6.
Get
in
touch
with
SINTRAN
17
Taking
personal
backup
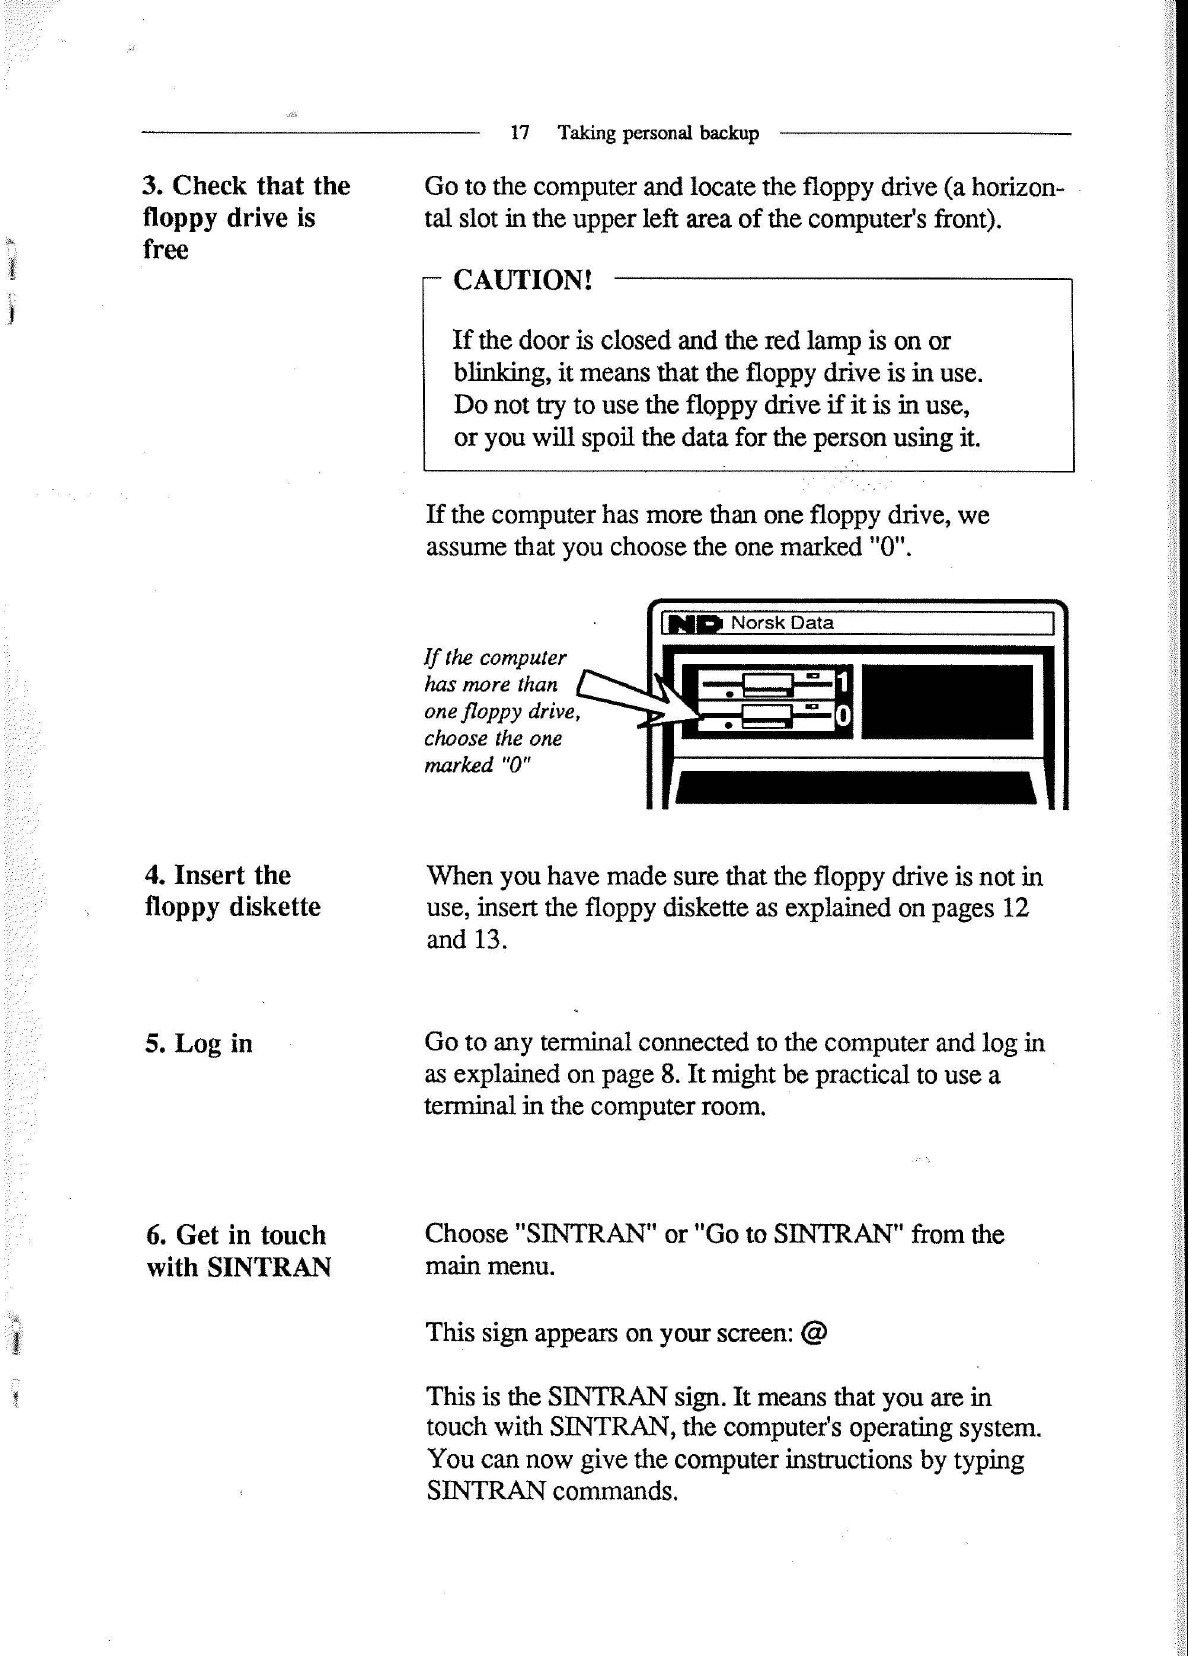
Go
to
the
computer
and
locate
the
floppy
drive
(a
horizon-
tal
slot
in
the
upper
left
area
of
the
computer's
front).
CAUTION!
If
the
door
is
closed
and
the
red
lamp
is
on
or
blinking,
it
means
that
the
floppy
drive
is
in
use.
Do
not
try
to
use
the
floppy
drive
if
it
is
in
use,
or
you
will
spoil
the
data
for
the
person
using
it.
If
the
computer
has
more
than
one
floppy
drive,
we
assume
that
you
choose
the
one
marked
"0".
[in
Norsk
Data
If
the
computer
has
more
than
one
floppy
drive,
choose
the
one
marked
"0"
When
you
have
made
sure
that
the
floppy
drive
is
not
in
use,
insert
the
floppy
diskette
as
explained
on
pages
12
and
13.
Go
to
any
terminal
connected
to
the
computer
and
log
in
as
explained
on
page
8.
It
might
be
practical
to
use
a
terminal
in
the
computer
room.
Choose
"SINTRAN"
or
"Go
to
SINTRAN"
from
the
main
menu.
This
sign
appears
on
your
screen:
@
This
is
the
SINTRAN
sign.
It
means
that
you
are
in
touch
with
SlNTRAN,
the
computer's
operating
system.
You
can
now
give
the
computer
instructions
by
typing
SINTRAN
commands.
Other Norsk Data Desktop manuals


Popular Desktop manuals by other brands

Dell
Dell OptiPlex L60 Setup and quick reference guide

HP
HP Z600 - Workstation - 6 GB RAM Installation

Tucker-Davis Technologies
Tucker-Davis Technologies WS4 Hardware reference

Spectra
Spectra PowerTwin-Pix-6x00 Series user manual

Dell
Dell Inspiron 2100 Quick reference guide

Sony
Sony VAIO SVL24114FXB Specifications


