North Coast Splint-Form 1000 User manual
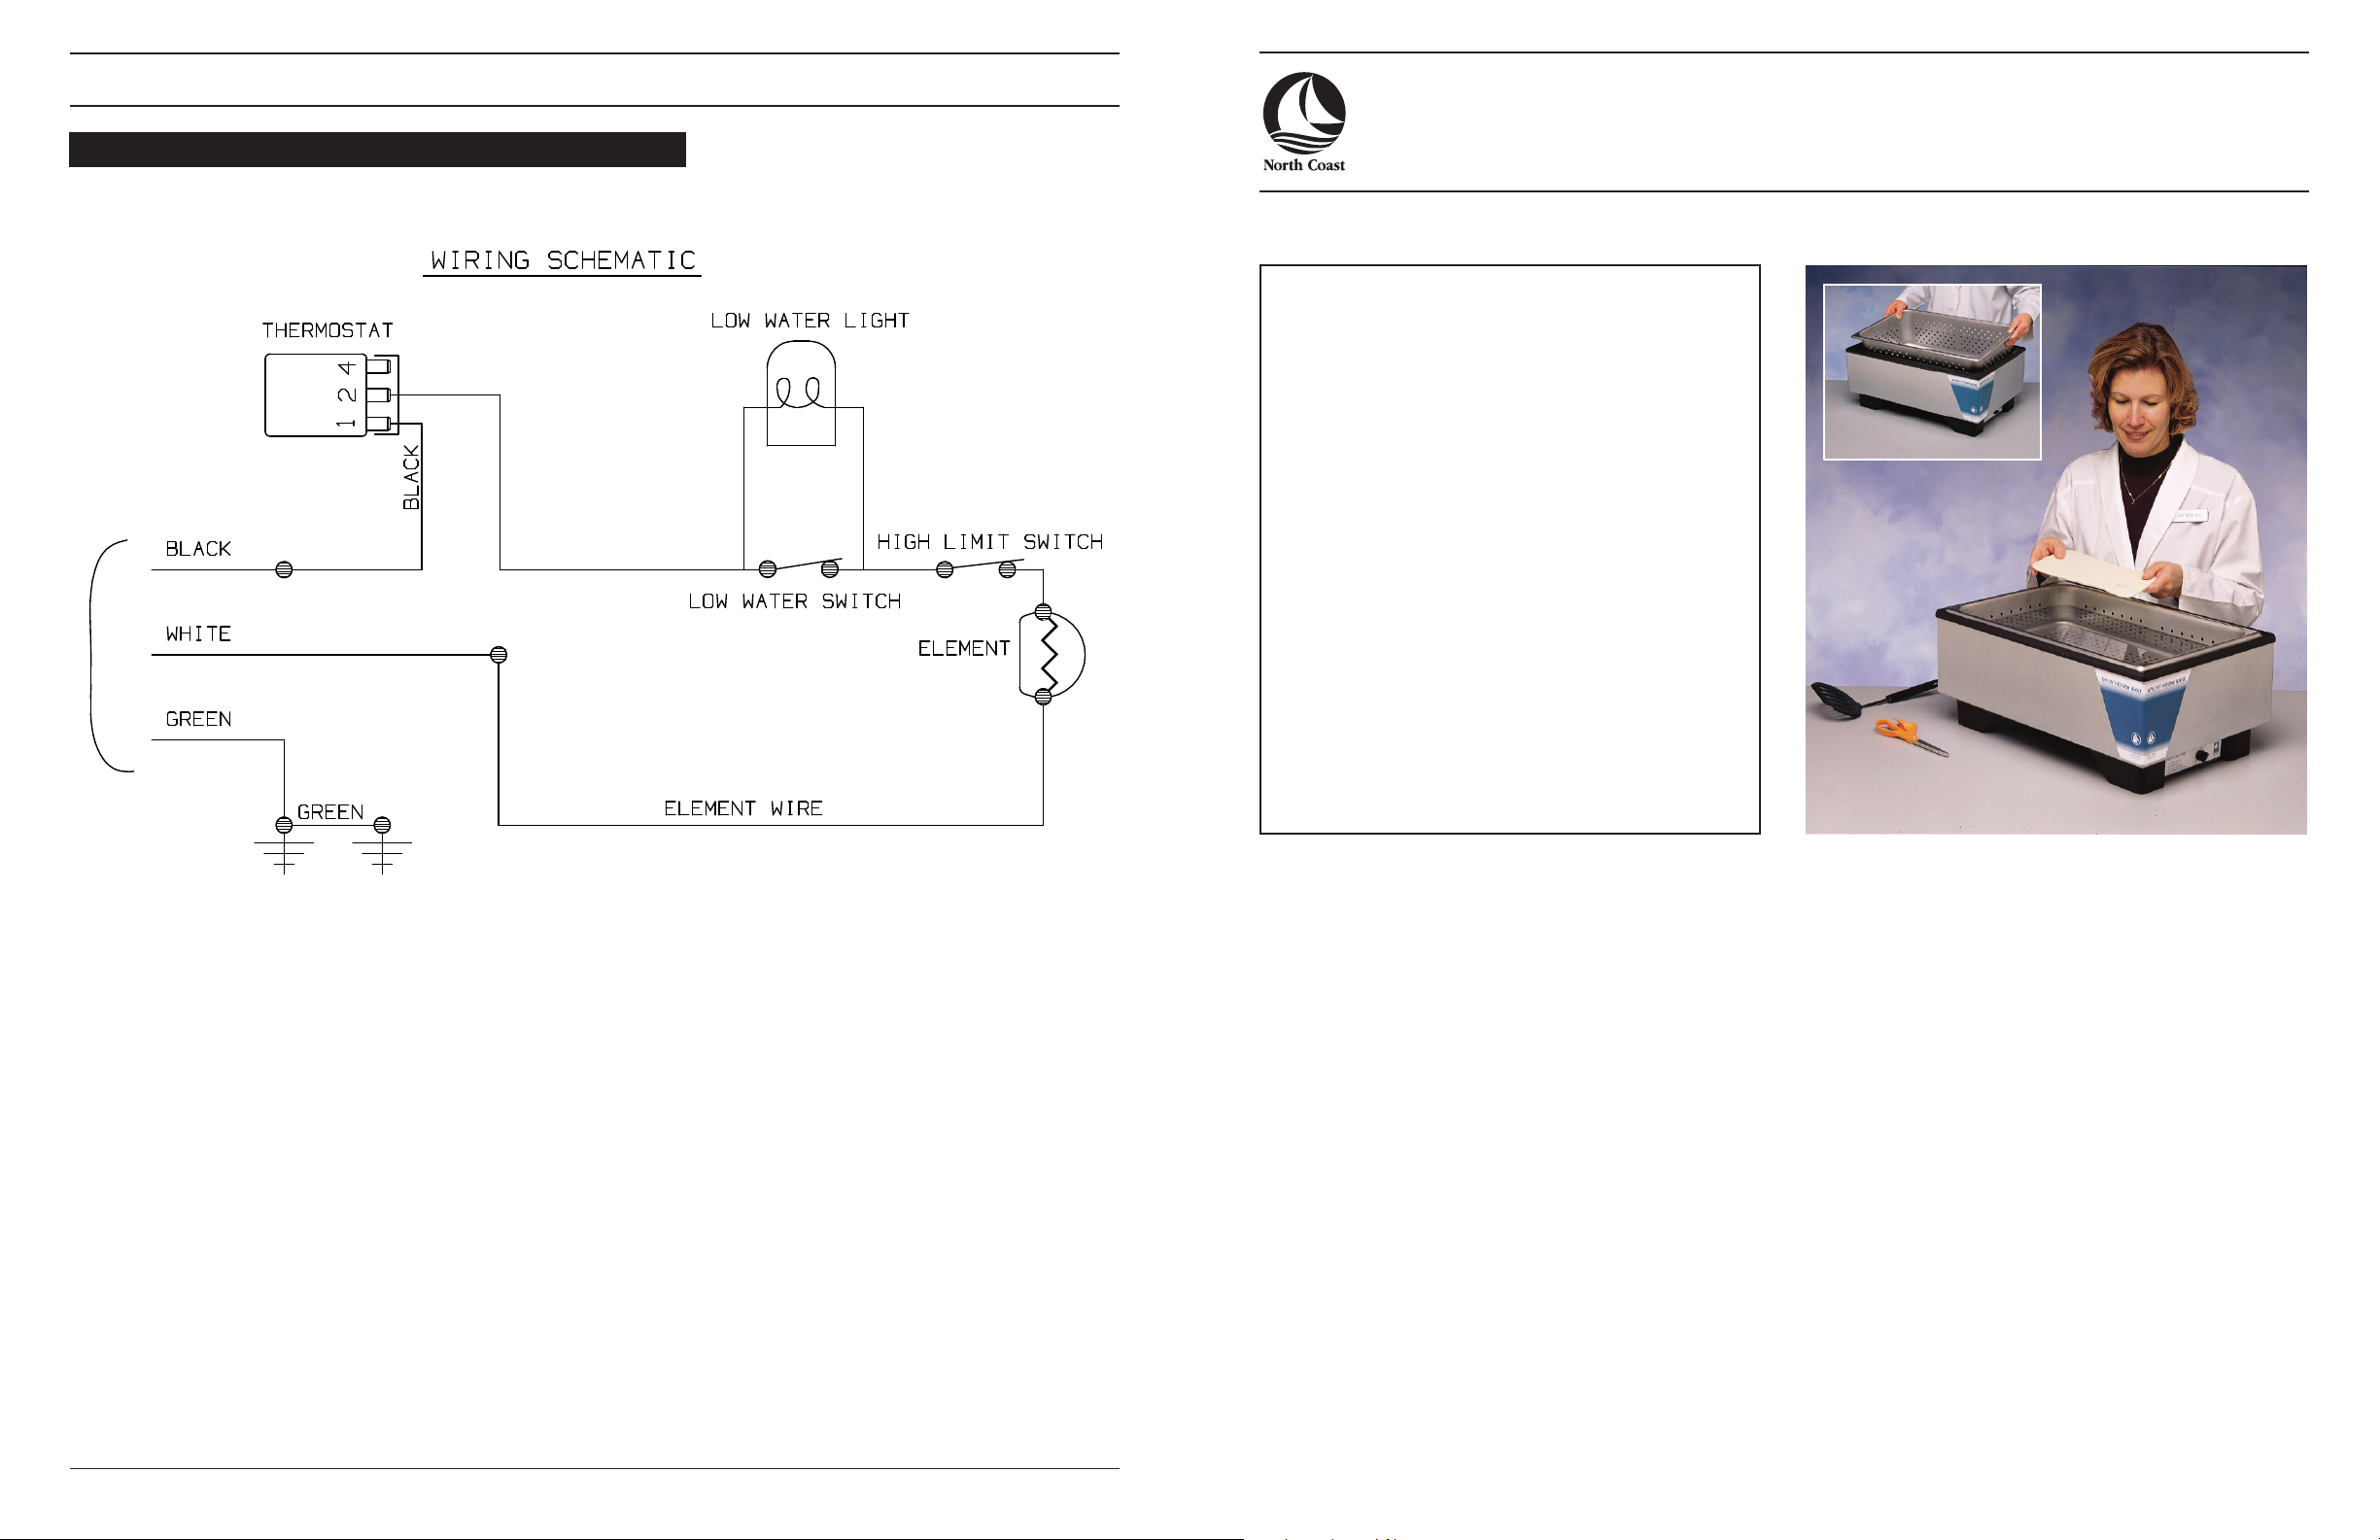
Splint-Form 1000 Wiring Diagram
Upside down view of pan with ground plate cover removed
© 2013 North Coast Medical, Inc., 800-821-9319
Instructions For Initial Use
1. Carefully unpack your Splint-Form 1000. Retain original
packaging for any future transportation or servicing.
2. Use a dry cloth or paper towel to wipe away the protective
oil coating from the metal surface.
3. Add water (recommend 3" of water from bottom of pan).
Temperature Setting
1. The Splint-Form 1000’s dial template is marked #1-10, to allow
the therapist to select and mark the desired temperature setting
for particular thermoplastic materials.
2. To determine the proper setting, fill the pan until water level
measures at least 3" (7.6cm) from pan bottom. Plug in the cord
and turn the control dial clockwise from the “off" position. Place
a waterproof thermometer (i.e. NC70112) in the pan and turn
the control dial to #10. Adjust the control dial from this position
to achieve the desired heating requirements and mark the dial
template for future reference. Water temperature should be
between 140° and 160° F (60° and 71° C). To turn off the pan, turn
the dial to the off position.
Electrical Installation
The Splint-Form 1000 is equipped with a 6 ft. (1.8 m) cord with
a three-prong electrical plug. It is designed to protect from
electrical shock should the internal wiring fail.
The plug must be plugged into a grounded, isolated three-
prong socket (15 AMP, 120 volt grounded outlet). Avoid
plugging into an extension cord or power strip. Make certain
incoming voltage is the same as what the unit is rated for.
Do not cut or break off the large third prong on the plug, or
the protective system will not work.
CAUTION
Do not submerge the product in water. Avoid splashing or
pouring water onto Splint-Form 1000 side panels or wiring.
Splint Form 1000 unit is to be used only with perforated insert
pan for thermoplastic heating.
Care and Cleaning
1. The Splint-Form 1000 is intended to hold approximately twelve
quarts of water. Due to water loss during daily use, it is
recommended that the pan be refilled once a week. Mineral
deposit build-up on the sides and bottom of pan is normal.
To minimize deposit build-up, change the water weekly or use
distilled water.
2. Prior to cleaning, unplug the unit and allow it to cool.
3. To clean the pan, use one to two quarts of water and a low-
abrasion, bleach-free cleanser. Rub the metal surfaces with a non-
metallic, plastic scrub pad. Rinse pan thoroughly with hot water
after cleaning and dry with a soft cloth. Avoid using steel wool or
scouring pads. To remove hard water mineral build-up, fill the
pan with one gallon of distilled vinegar and three gallons of water
after cleaning. Let the pan soak overnight and rinse thoroughly.
The perforated insert also may be soaked if needed.
Warranty and Repairs
1. The Splint-Form 1000 has a one-year warranty from the date of
shipment covering the cost of pick up, repairs and return ship-
ment of a new replacement unit. North Coast is not responsible
for outside repair work or electrical modifications performed by
the customer or unauthorized technician. Removing the bottom
cover from the pan to expose electrical components or any
alteration to the external or internal wiring voids the one
year warranty.
Statement of Intended Use
The Splint Form 1000 is designed to maintain water bath temperatures for heating thermoplastic materials in clinics and hospitals.
2. A thirty day warranty is in effect following repairs authorized by
North Coast Medical. This warranty is from the date of the return
shipment to the customer.
3. All repair work must be performed by a qualified service technician.
Removable
Insert Pan
Splint-Form 1000
NC14600
© 2013 North Coast Medical, Inc. www.ncmedical.com
800-821-9319 Manufactured by North Coast Medical. REV14600i_0413

Problem
Pan does not turn on.
Solutions
❶
Is the pan plugged in?
❷
Check breaker for any tripped switches.
❸
Problem may be caused by plugging the pan into an extension
cord or power strip. Pan must be plugged into an isolated
electrical outlet.
❹
If the pan is properly plugged in, a qualified technician may need
to check if the control dial and wiring need to be replaced.
Pan takes twice as long to heat up.
❶
Heating time is about 120 minutes. If the pan takes over two
hours to heat up, then the heating element and/or thermostat
may be burned out and will need to be checked by a qualified
technician.
❷
Problem may be caused if the pan is plugged into an extension
cord or a power strip. Pan must be plugged into an isolated
electrical outlet.
❸
A qualified technician check wiring or replace heating element.
Can the pan warm up any faster? No, however, the use of a heavy duty timer is recommended so that the
pan can warm up prior to use. (timer sold separately at www.ncmedical.com)
Pan does not heat up.
❶
A qualified technician may replace the thermostat.
❷
A qualified technician may check the wiring.
Water boils away or water level drops quickly.
❶
Heated water evaporates; using the lid will reduce water loss. Water
level must be maintained for proper performance.
❷
Use thermometer to monitor temperature and keep water
temperature 140°-170° (60°-77°).
❸
Use heavy duty timer to automatically turn pan off/on to avoid exces-
sive, unnecessary heating. (timer sold separately at www.ncmedical.com)
How should a qualified electrical technician check the wiring? Use an OHM meter; this should be done by a qualified technician.
Use the included wiring diagram as referenced.
Important
All electrical repairs to the Splint-Form 1000 must be performed by a qualified technician. North Coast Medical is not responsible
for outside repair work, or electrical modifications performed by the customer or his/her technician(s). Any alteration to the external or
internal wiring voids the one year warranty.
Splint-Form 1000 Trouble Shooting
Indicator light near dial comes on.
Difficulty draining water out of pan prior to cleaning.
Water level is too low. Add water.
Recommend using Jack Rabbit Hand Pump (NC15489) to
empty/siphon water out.
Turn the unit on without any water in the well and turn the control
knob to “10" or HIGH. Wait 2-3 minutes for the light to come on. Once
the indicator light is on, pour water into the well to just cover the
element and the light will turn off. The light operates off of the
element temperature, when the water is low and the element is not
operating efficiently, the light will indicate water is needed.
Indicator light near dial does not come on.
Construction
Stainless steel heat well surrounded by hard plastic outer housing.
Features a stainless steel, perforated insert and a removable clear
plastic cover.
Overall Size
Width 13!" (34cm) Insert size 20" x 12" x 6" (51x 30x 15cm)
Length 21!" (55cm) Lid size 12!" x 20!" (32 x 52 cm)
Height 9" (23cm) Cord and Plug 6" (15 cm) long
Water Capacity
Twelve quarts maximum (3" of water, measured from bottom of
pan excluding insert).
Temperature Range
90 to 170° F (32°to 77°C) for wet operation with approximately
120 minutes warm up time.
If unit is left on and all the water evaporates, the high limit
thermostat will shut off the unit when temperatures reach
220° F (104° C). Note: Leaving the unit on continuously for 24
hours is not recommended. The use of a heavy duty timer (sold
separately at www.ncmedical.com) to automatically turn pan off
and on is recommended.
Sheet Capacity
Pan accepts sheet sizes measuring up to 11" x 19" (30 x 48cm).
Only original manufacturer parts may be used to repair the
Splint-Form 1000.
Warning Labels
Metal surfaces may be hot
to touch.
Liquids in the unit will be
hot to touch.
CAUTION
CAUTION Hot Surface
Hot Liquid
Splint-Form 1000 Specifications
This manual suits for next models
1
Popular Laboratory Equipment manuals by other brands

VWR International
VWR International 1915A-2 Installation and operation manual

Ultravation
Ultravation UVMATRIX SI Seris owner's guide

VWR
VWR Mini Bead Mill quick start guide

Labconco
Labconco Protector Premier 10040 Series user manual

WPI
WPI PV850 instruction manual

Market Forge Industries
Market Forge Industries STM-EL Parts and service manual

Emperor Aquatics
Emperor Aquatics 02818 instructions

Thermo Scientific
Thermo Scientific MaxQ SHKE420HP Operating and maintenance manual

SCHOTT
SCHOTT ACE Series owner's manual

Altronix
Altronix NetWay1DWP installation guide

Miele
Miele A 203 operating instructions

Cuisinart
Cuisinart CS-7 SERIES Quick reference guide


