North Star CutoMato 51 User manual

North Star Engineered Products
Division of Glassline Corporation
PO Box 1141
Perrysburg, OH 43552
419 726 2647 ph
419 726 8583 fax

-2-
11
4
10
12
2
8
13
1
53
9A
9
11A
7
6
VEGETABLES SLICING MACHINE,CUTOMATO MODEL 51
Instructions Manual
General
The Vegetables Slicing Machine, Cutomato Model 51, can process all types of vegetables and
fruits, including the soft and squashy ones.
General Description
The Slicing Machine includes the following basic components:
1. The machine body
2. Machine cover
3. product pusher handle
4. Stainless Steel Cover – casing
5. Handle axis support and limit switch housing
6. Products fennel (body part)
7. Products fennel (cover part)
8. Feed tube for products input
9. Manual pusher
10. Cover locking handle
11. Base supporters
12. Off switch
13. On switch
Power Supply
Voltage: 208 – 230 VAC
110 VAC
Capacity: ½ HP
Operation
1. Place machine on stable working table, 70 cm high.
2. Place machine so there is space left on the working table for placing a container under the
fennel (6) for collecting the sliced products. If the base supporters (11) are too close to the
table’s edge (if the working table is less than 80 cm wide), you can choose between the 2
following options to your convenience:
Placing a mobile container adjacent to the working table, under the fennel, at an
appropriate height.
Installation of leading rods into the leading feed tube (11A) on the base supporters.
When selecting this option, it will be possible to place vessels, of a maximum of 11
cm high over these rods.

-3-
3. Generally, products are inserted through the feed tube (8) and are pushed in using the
pushing handle (3). Elevating the handle beyond a certain height will automatically stop
machine operation.
Working Methods
Products can be prepared and processed in 3 optional ways:
Option # 1: Cutting of relatively large and hard vegetables, such as: potatoes, radishes, onions,
apples.
Option # 2: Slicing of soft and squashy vegetables and fruits of up to 78 mm in diameter in
various shapes (chips, cubes, and slices).
Option # 3: Precise cutting of round slices of up to 44 mm in diameter, of elongated vegetables
and fruits such as: cucumbers, squash, bananas, carrots – using a special feed tube.
The final shape of the sliced products is detailed in the table on page…
Option # 1
1. Prepare the pushing handle: attach the pushing shaper (part No. 20) into the handle
feed tube (3) by pressing the two spring pins and sliding it inside until pins are released
into the designated bores (pictures No. 2.1 and 2.2).
2. Prepare the product feed tube on the cover: the feed tube (8) is clean and there is no
other adapter.
3. Preparation of the slicers:
Open cover. Move pushing handle as far to the back as possible. Open cover by
releasing closure (part No. 10 in picture 1) and turn cover counter clockwise.
Attach plastic slinger (part No. 25 in picture 2.3).
4. Slicing options
Cutting slices: attach disc according to the required slice size (see picture 2.4).
Fig. 2.1 Fig. 2.2 Fig. 2.3
8
25
20
3

-4-
Grating or Waldorf style: attach the grating or Waldorf disc as in the slicing
options.
Cutting different sizes of cubes or sticks. Place permanent disc on its designated
base (picture 2.5), and attach the desired blade above it (picture 2.6).
Note: place the plate only after you swiftly clean the base.
Warning!
Hold blades only in designated holding points.
Keep your fingers away from blades.
Never apply too much pressure when installing or removing the cutting
appliances.
Always act gently and with consideration.
Option # 2
1. Prepare the compression system: attach the special round compressor as described in
option # 1 (see picture 3.1).
2. Prepare the feed tube. Place round adapter into its designated niche in the feed tube. You
can find the adapter’s correct place by turning it and then slide it all the way inside (see
picture 3.2).
Prepare blades:
Open cover as described in option # 1.
Fig. 2.6Fig. 2.5Fig. 2.4
Fig. 3.2Fig. 3.1
3
22
8

-5-
Do not install the plastic ejector if you intend to cut an especially soft or squashy
vegetable or fruit (such as a tomato).
Install the slicing blade (part No. 24) in accordance with the cutting plate (see
picture 3.3).
Note: always make sure (by touch) that the blade adapter will be in its designated
place, on the main axis.
Install the blades frame (part No. 23) as shown in pictures 3.4 and 3.5. Ensure
contact between front leading points on sliding surface frame (green bushing – part
No. 27), and the lower side of the adapter bushing of the frame (part No. 23A) to
the horizontal dynamic leading rod (part No. 28).
Notice: the frames are installed gradually. Initially place the lower frame. Note
that frames are identical. Note that you can obtain sticks by installing
frames only – without using the slicing blade. Slices can be obtained by
using the upper frame only.
Warning!
Assembly and disassembly of components will always be done without exerting
any force.
It is forbidden and undesired to draw fingers near any of the blade types.
Always act gently and with consideration.
Option # 3
1. Prepare the pushing system: using this method, products are pushed in with the manual
pusher (part No. 9) or without it at all – the vegetable is pushed into the blades by its own
weight (a cucumber for example).
Fig. 3.3
24
Fig. 3.5Fig. 3.4
23A
28
27
23

-6-
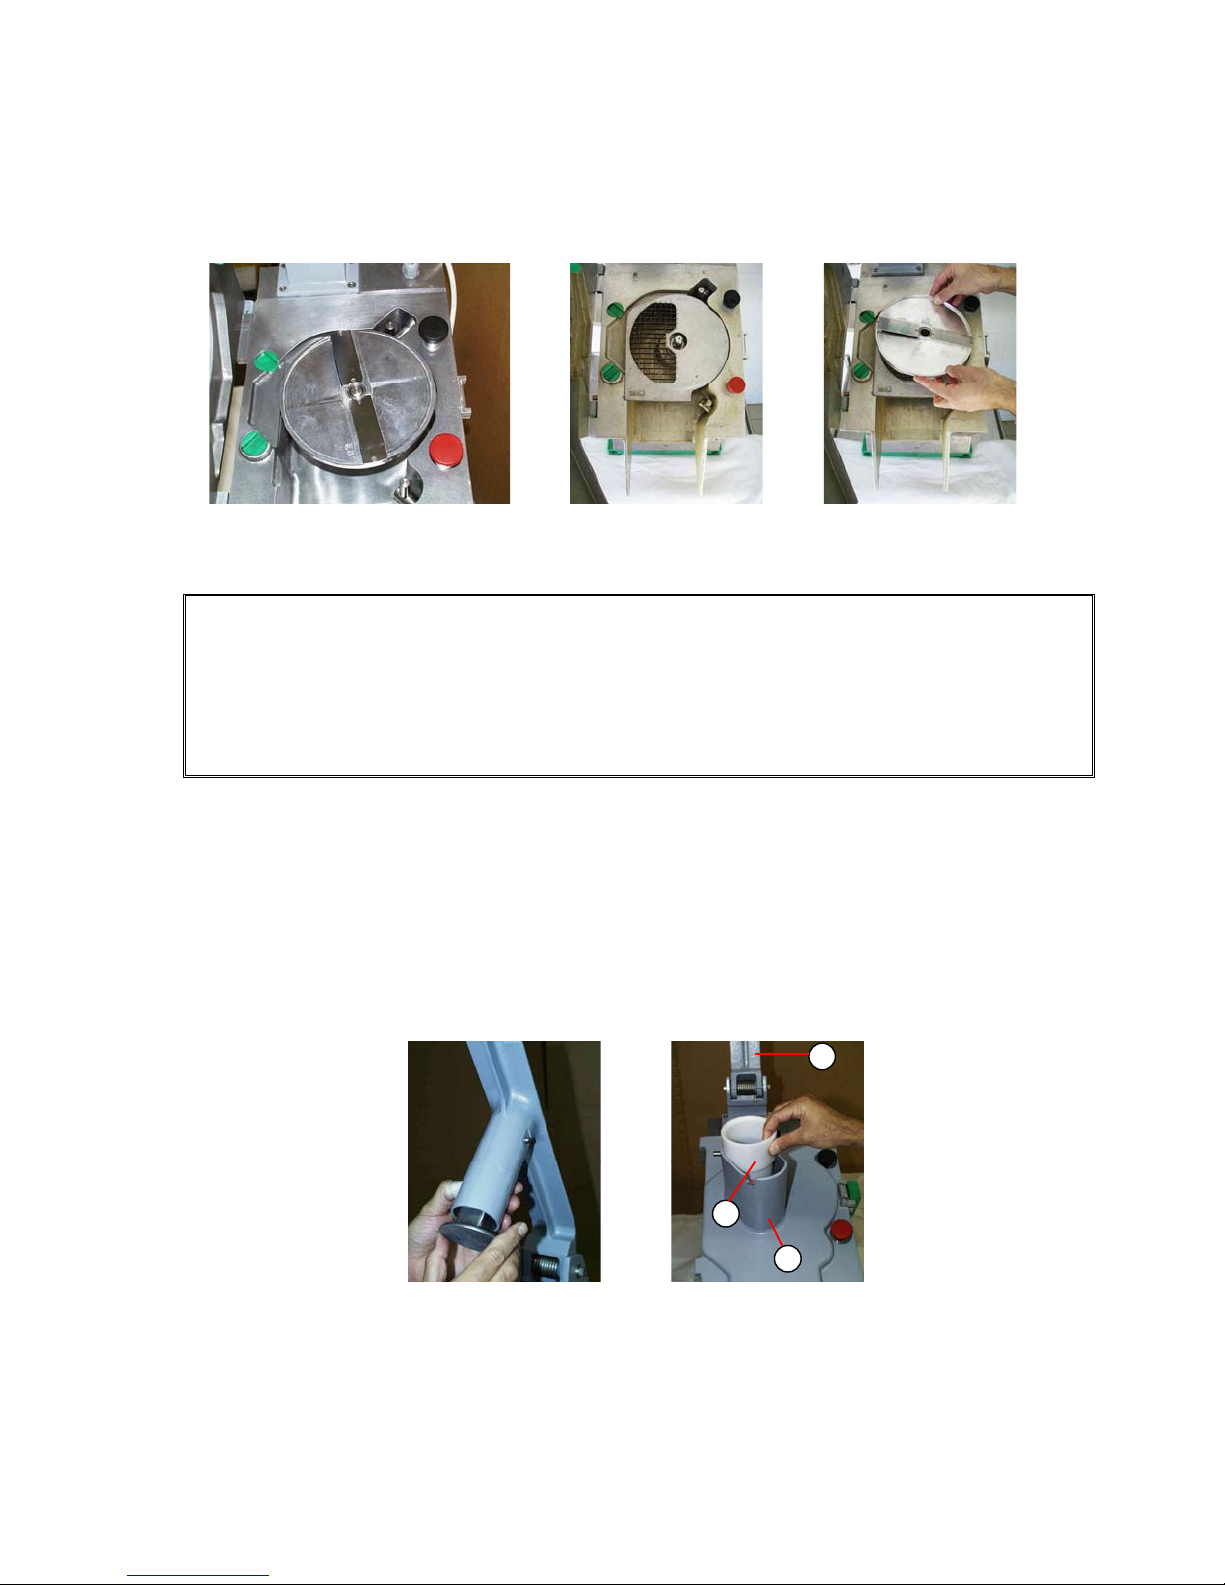
2. Prepare the feed tube. Using this method, the feed tube handle (3), together with the
adapter (9A) become the feed tube. Lower the handle and insert the plastic adapter (9A)
(see picture 4.1).
Make sure the pin set on the feed tube (30) will be inserted, by a ¼ turn, into the slit in the
Stainless Steel ear-shaped adapter (picture 4.2).
Products are inserted using the manual compressor as shown in picture 4.3.
3. Prepare blades: prepare blades by selecting one of the possibilities described earlier.
Usually, one of the slicing blades is selected.
Warning!
Never insert your fingers through the cut product outlet fennel (parts 6 and
7). If any cut vegetables have accumulated it should be cleaned only after the
cover is opened!
Cleaning Operations
1. During work, when transferring between different types of slicing or products, you may
open the cover and, quite easily, manually remove remaining product from the machine
inner spaces into the collecting vessel.
2. Upon completion of work, rinse the inner parts only with running water. The cover,
which can be easily removed, can also be rinsed with running water.
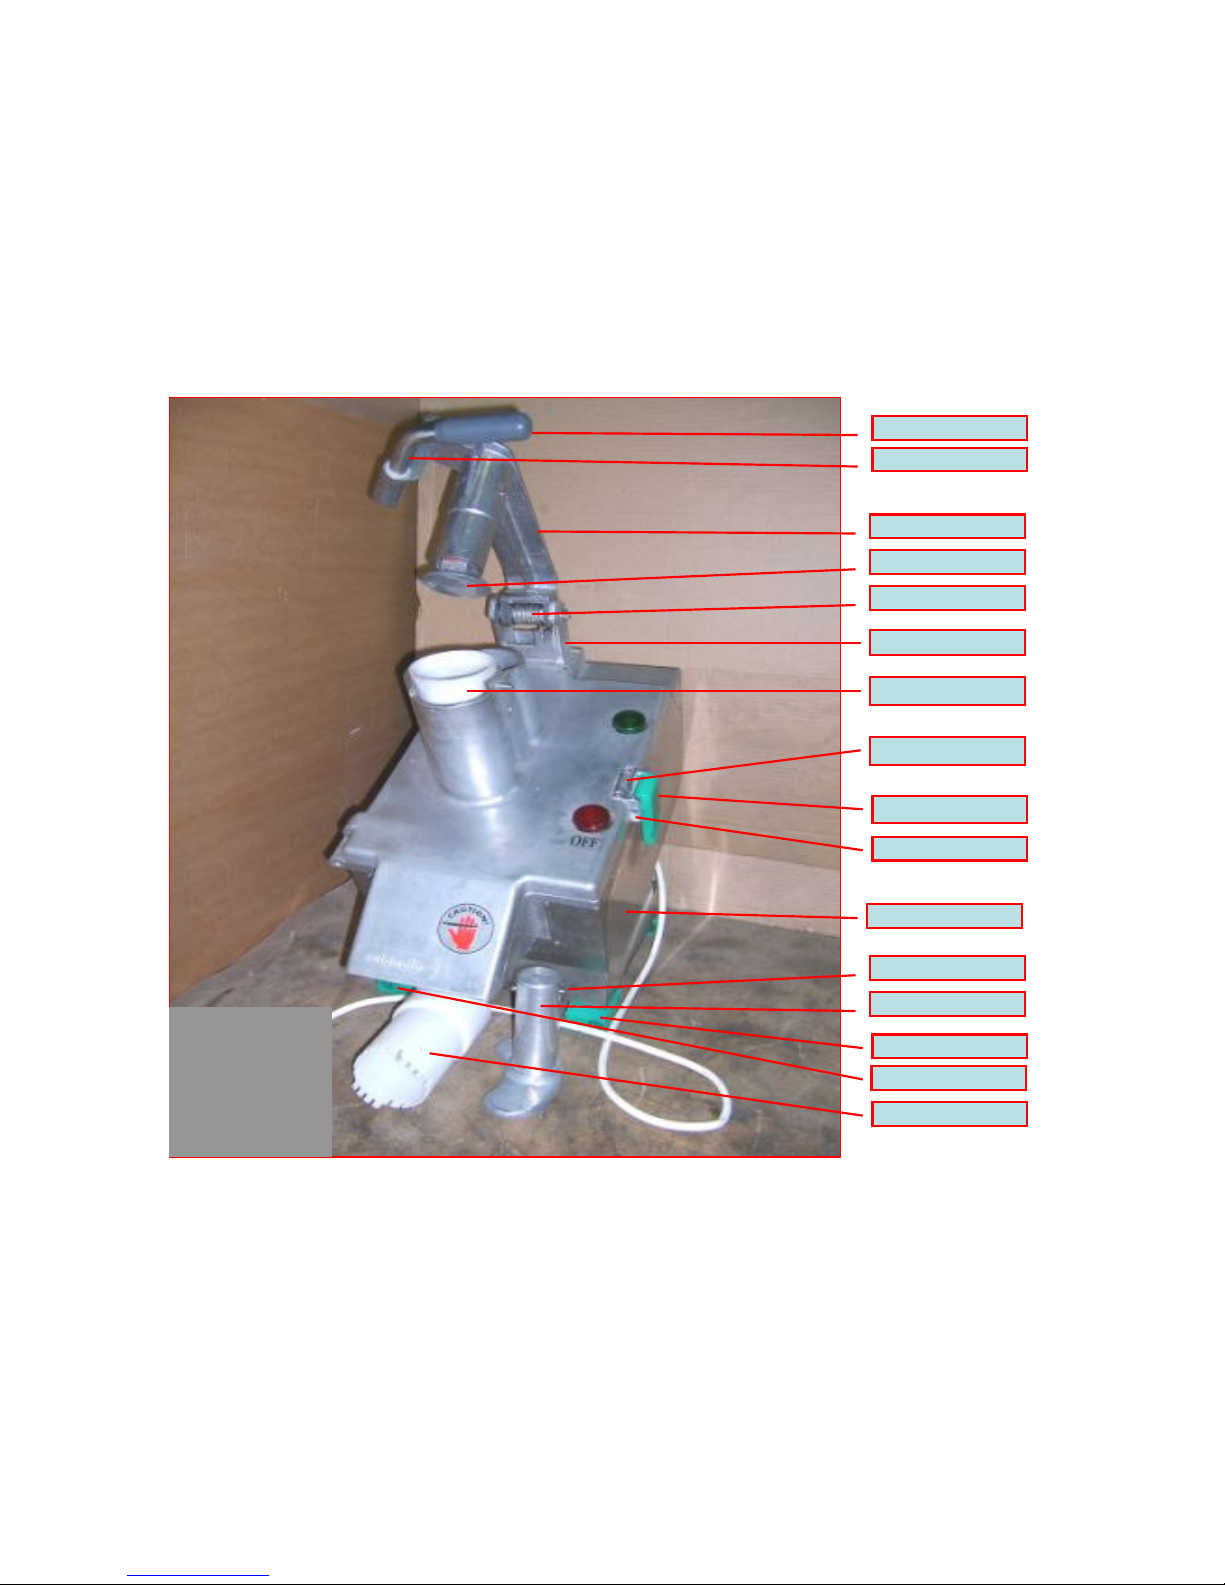
3. Warning! Never let running water come in contact with upper surface of machine
body, (see area 5C in picture 5.1), connecting line to closure (5A in picture 5.1), and
area of connection to handle (5B in picture 5.1).
These surfaces can be wiped with a damp cloth only.
4. All cutting appliances and adapters will be cleaned separately in running water. All these
Fig. 4.1 Fig. 4.3Fig. 4.2
9A
30
9
8
3
9A
5A
Fig. 5.1
5B
5C

-7-
appliances can be cleaned in the dishwasher.
Warning!
Never attempt to free remains of food, which are stuck in the blades, with your
fingers.
Preventive Maintenance
The operator can perform the following maintenance jobs:
1. Replace blades on the moving frames.
During normal operation, a blade will need to be replaced once every few months:
When blade looks damaged (worn, blunt, cracked, etc.), replace it by releasing the
2 screws attaching it to the frame. Open screws gently and carefully with a
screwdriver.
Release blade from frame while paying attention to the way it was installed.
Place the new blade exactly in the same way as the other blades. Do not turn its
direction.
Before closing screws, wipe clean the screw head.
During normal operation, send the slicer to be sharpened every 4 to 6 months.
Always have a spare slicer at hand.
Release the installed slicer from the adapter by releasing 6 screws.
Send the slicer for sharpening.
Install the reserve slicer.
2. Send the slicing blades to a professional grinder for sharpening.
3. Perform daily lubrication.
Every morning, before commencing work, place several edible oil drops (soy oil, for
example) over:
The moving rods (part No. 28 in picture 3.4)
The green bushings that are used for the sliding surfaces (part No. 27 in picture
3.4).

-8-
Description of Different Cutting Appliances
FR Blade Frames:
The standard blade frames included with the machine include 7 blades each (10-mm space
between each of the blades). In order to achieve slices in thin/thick geometry it is possible to
order frames with a different number of blades:
R1 1 blade 40 ×40 mm space
FR3 3 blades 22 ×22 mm space
FR5 5 blades 16 ×16 mm space
FR7 Standard
FR99blades9
×9mm space
The Slicing Knife:
Used for cutting all soft vegetables/fruits.
Note:Do notuse theframes and the slicing knife to cut especiallyhard vegetables/fruits such
as: Potatoes, Radish, carrots, etc. In addition to soft products (tomatoes, oranges, bananas,
melons, etc.), it is possible to also cut cucumbers, apples, peppers, etc.

55542210
55543110
55540500
55540800
55543800
55543500

55547200
55547100
55547300
55547500
55548300
55548600
55552000
55549510
55548900
55552310
55552500
55552600
55549500
55549
2
00
55547510
55552210

16410011
55553500
16020041
16020040
16100102
16100101
55542300
55542400
55542100

55544300
55541100
55541300
55542200
55542500
16020041
16020040

55541400
55542220
55548300
55106304
55548100
55548900
55540300
55540500
55540400
55548500 55548110
55548400
55553500
55544200
55542210
55106008
55000005

16089858
55543220
55543800
55543500
55551800
55540710
55541500

16170032
16100101
16100102
55551800
55543500

Cat. No.Spare part
55542300DRIVE SHAFT
55542400LOWER HORIZONTAL LEADER
55542500VERTICAL CASSETTE LEADER
55543800BELT
55544200COVER AXIS BUSHING
55544300FRONTAL PLASTIC SLEEVE
55547100COVER MIDDLE LOCK
55547200COVER LOWER LOCK
55547300COVER UPPER LOCK
55547500ROUND PLASTIC ADAPTOR
55548100HANDLE AXIS
55548110BASE AXIS BUSHING
55548300TORQUE SPRING
55548400TORQUE SPRING BUSHING
55548500HANDLE AXIS BUSHING
55548600ROUND PLUNGER COMPLEX
55548900SPRINGY GRIP
55549200SHEET MANTLE
55549500RIGHT SUPPORT
55549510LEFT SUPPORT
Cat. No.Spare part
16020040START PUSH BUTTON
16020041EMERGENCY PUSH BUTTON
16089858POWR SUPPLY CORD CAT.NO.09858
16100101"NO" PUSH BUTTON CONTACTOR
16100102"NC" PUSH BUTTON CONTACTOR
16170032MAGNETIC SWITCH
16410011EC2-101 24 AWG PVC SPST 6" LDS
55000005OIL SEAL
55102321BUSHING IGUS 21
55106008BALL BEARING - 6008-2RS1
55106304BALL BEARING - 6304-2RS1
55540300IGUS 21
55540400IGUS 16
55540500IGUS 28
55540710LARGE BELT WHEEL
55541100CENTRAL AXIS
55541300CENTRAL AXIS COVER
55541400ECCENTER
55542100CONNECTION ROD (BIELA-510107(
55542200UPPER HORIZONTAL LEADER
55542210RED WASHER HOUSING
55542220RED WASHER
55543110SMALL BELT WHEEL

Cat. No.Spare part
55551800DYNAMIC BALANCING WEIGHT
55552000SHAPED PLUNGER COMPLEX
55552210BASE
55552310PROCESSED ALUMINUM HANDLE
55552500PIPE GRIP
55552600PVC CUSHION FOR PIPE GRIP
55553500MAGNETIC SENSOR ADAPTOR


-9-

-10-
Use Discs
Use Discs
Use Discs
Table of contents
Other North Star Cutter manuals
Popular Cutter manuals by other brands

Racing
Racing TCA-L25 Instruction guide

Lincoln Electric
Lincoln Electric OPTITOME II Series Safety instruction for use and maintenance

Thermal Dynamics
Thermal Dynamics A80 CUTMASTER operating manual

Makita
Makita 4101RH instruction manual

BREN
BREN PRO Series quick guide

Makita
Makita SC103D instruction manual

Greenlee
Greenlee 764 Operation, service and parts instruction manual

wurth
wurth MSF 180 N Translation of the original operating instructions

Makita
Makita 4100KB instruction manual

VEVOR
VEVOR AY-420 instruction manual

REED
REED LCRC4X operating instructions

Meec tools
Meec tools 019020 operating instructions