Northern Diver Varilux Travel User manual
USER MANUAL
Please ensure you have read and understood this manual.
Don’t hesitate to contact us with any queries.
INCLUDED
- Varilux Travel V19 torch x 1
- 26650 battery x 1
- Smart battery charger x 1
- Car adapter x 1
- Spare O ring x 1
- Tail cap lubricant x 1
- Lanyard x 1
- Hard storage case x 1
- User manual x 1
SPECIFICATION
Material: Anodised aircraft 6061 aluminium
Colour: Silver/grey
LED: 1x CREE XM-L2
LED lifespan: 100000 h
Brightness: 1000 lm
Light colour: White
Mode: High/dimming
Battery: 26650 3.7 V, 5200 mAh
Switch design: Magnetic induction switch
Lens: Coated glass lens
Size: 161 x 45 mm (length x head diameter)
Weight (torch): 232g
Weight (torch and battery): 324g
Please note weights are approximate
100 m (depth rating)
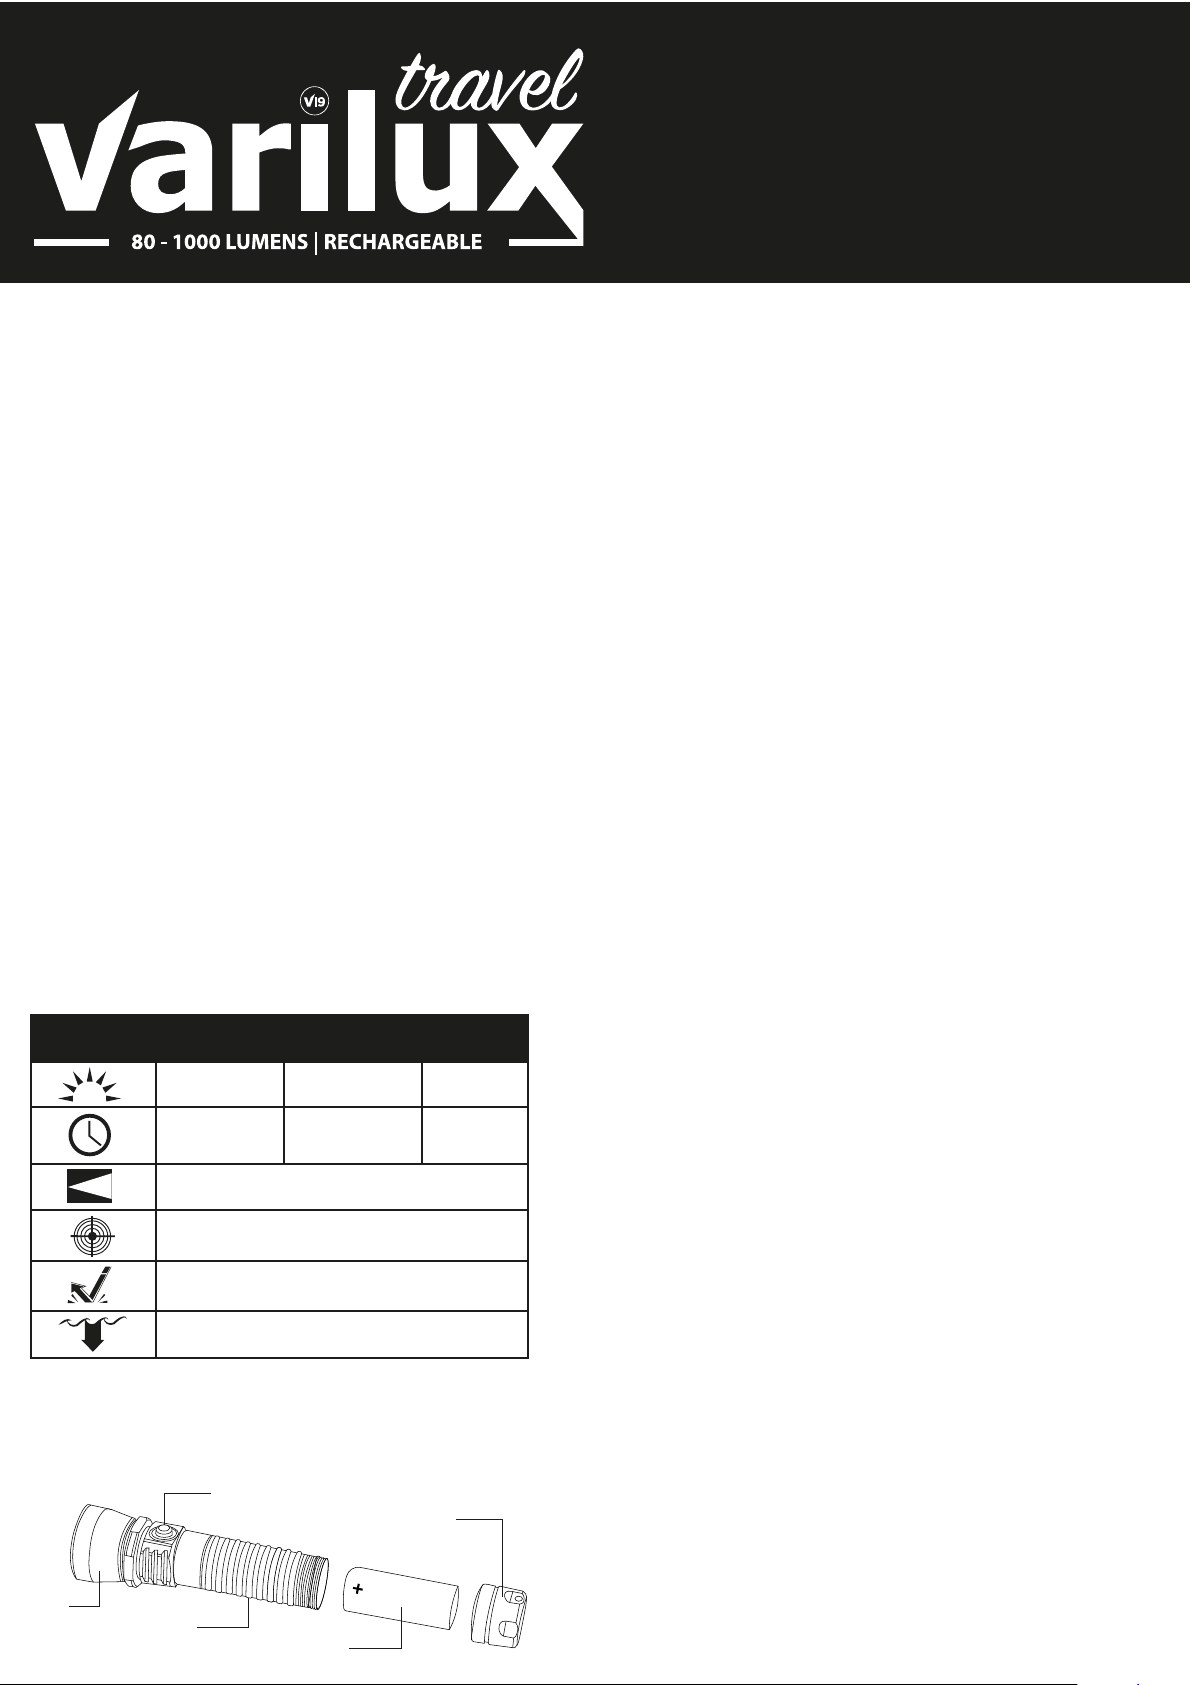
1000 LUMENS 1000-80 LUMENS 80 LUMENS
2 hours 2 - 30 hours 40 hours
1000 m (beam distance)
30000 cd (peak beam intensity)
1 m (impact resistance)
STANDARD HIGH POWER MID POWER LOW POWER
WARNING
1. The battery must be inserted positive end first.
Do not insert the battery the wrong way.
2. Do not use different batteries to the one provided.
3. Do not use the battery if it is damaged.
4. When storing the torch, unscrew the tail cap to ensure the
power is cut off.
5. After every dive, clean the torch with fresh, clean water
and dry prior to storage. Salt water residue can corrode
the torch surface.
6. Ensure that the tail cap is lubricated regularly.
A container of lubricant comes with your torch.
7. Avoid any impact on the torch.
8. Do not shine the light directly into eyes.
BATTERY INSTALLATION - Open the torch by unscrewing the
tail cap by hand. Insert the battery positive end first (facing the
switch), taking care not to disturb the O rings. Do not insert the
battery the wrong way. Reclose the torch.
CHARGING - When you receive the torch, the battery will be
partially charged. Please fully charge the battery before the first
use of the torch. Charging instructions are on the reverse.
OPERATION
1. The torch is operated by the top-mounted induction switch.
Press once to switch the light on. Now you can press and hold
to gradually decrease the output. Release the switch when you
reach the desired output. Press once to switch the light off.
2. When the torch is turned on, the ring around the switch will
emit a constant green light. When the torch is turned off, the
green light will flash every 5 seconds. This is to help the user
locate the torch, for example in darkness or if it is dropped.
The light will turn red when approximately 20% of the battery’s
charge is remaining. When the torch is not in use, the tail cap
should be unscrewed and the battery should be removed to
ensure the power is cut off.
WARRANTY
1. Your torch is covered by a full 12 month warranty.
2. If a fault occurs within 14 days due to a manufacturing defect,
your torch will be replaced (proof of purchase required).
3. After 14 days and within 12 months of purchase, your torch
will be repaired or replaced (excludes accidental damage or
damage caused by misuse).
4. Outside the 12 month warranty period, your torch will be
repaired at cost (if repairable).
5. In all cases, inward and outward shipping will be the
customer’s responsibility.
The warranty does NOT cover the following:
1. Damage caused by disassembly or modification.
2. External cosmetic damage caused by normal use or misuse.
3. Damage caused by incorrect battery insertion/leakage.
Handle
Battery
Tail cap
Induction switch
See paragraph 2 under ‘operation’,
ref charge warning light.
NOTICE
This data may vary depending on environmental
conditions.
STRUCTURE
Head
-

Write to: East Quarry, Appley Lane North, Appley Bridge, Wigan, WN6 9AE, UK
Visit our website : www.ndiver.com, telephone: +44 (0) 1257 25 44 44 or email: [email protected] V.01.02102018
CHARGER INSTRUCTIONS
Please follow the points below to sucessfully charge the battery for the Travel torch.
1.0A 0.5A
( + ) ( - )
+
-
+
-
Battery charge time is 4 hours at 1A and 8 hours at 0.5A. When the battery has finished charging, disconnect the
charger from the power source (switching off the power source if necessary), and remove the battery from the charger. It
is normal for the battery/charger to become warm when charging.
Insert the smaller end of the USB cable into the
corresponding port on the charger.
1 2
3 4
5 6
Ensure you insert the battery into the charger the correct
way, i.e. with the battery’s poles (- and +) touching the
corresponding terminals. The correct battery position is
labelled on the charger.
“NC” displayed on the charger’s screen denotes that
there is no battery inserted or the battery is not charging.
The screen may display “NC” for a moment when the
battery is inserted. It will then charge normally.
If the screen continues to display “NC”, check the
battery is inserted correctly.
The charger will display the battery’s current voltage and
overall charging progress. “100%” displayed on the
screen denotes that charging is complete.
The button above the screen allows you to toggle
between a 0.5A current and a 1A current. the 1A current
is twice as quick to charge as 0.5A, but the 0.5A current
will charge the battery more efficiently and slightly
prolong the length of time to the next charge.
Other Northern Diver Flashlight manuals


