Northern Micro Spirit P8Q87-AS User manual
Spirit P8Q87-AS (SFF) User
Guide
Rev 1.0. September 2013
Please Read This First
Thank you for buying a Northern Micro Spirit P8Q87-AS computer. Northern Micro is committed to providing our customers
with the best value on the market today. This means building the systems that meet your specific needs and supporting you
with any issues that you may encounter.
All Northern Micro Spirit computers are assembled and tested in our manufacturing facility in Ottawa. A full Service &
Support network across Canada stands behind every Spirit system we build.
The computer you have purchased is optimized for today’s Operating Systems and applications; however, in the future, you
may come upon situations that demand greater processing power or speed. Thanks to the latest advances in computer
hardware technology, your Spirit P8Q87-AS is completely upgradable. Contact your Northern Micro Sales or Service
representative for advice on how to upgrade your computer should the need arise.
The Spirit P8Q87-AS is Energy Star and Epeat Gold certified. These environmental standards ensure that the computer can
take advantage of energy saving features. Your Spirit P8Q87-AS is designed to run in sleep mode when user inactivity
reaches 30 minutes. Your monitor is designed to run in display sleep mode when user inactivity reaches 15 minutes. You
can "wake up" the computer or display by moving the mouse or by hitting any key on the keyboard. If connected to a
network, Wake-on-LAN features can be enable to allow network administrators to wake up the computer remotely or on a
given schedule. The Spirit P8Q87-AS is certified to meet power management criteria of the Microsoft logo program and is
equipped with an 80 Plus Gold power supply.
This manual has been prepared for both advanced and novice users. You will find general PC information as well as detailed
specifications about the system you have purchased.
Northern Micro Sales and Service & Support Departments can be reached at: 1-800-563-1007.
▪
Northern Micro is one of Canada's leading hardware integrators and custom manufacturers of mid-range and high-end PCs
and workstations.
Our mission is to provide customized high quality computer hardware products and services to meet the advanced technical
needs of highly knowledgeable customers who seek to maximize their productivity.
To be fully responsive to our customers’ wants and needs, we also:
carry brand name computer products;▪
supply network peripheral equipment and multi-media products;▪
supply server / storage and printing solutions.▪
Through all facets of the operation, we are driven by our quality philosophy.
Northern Micro’s quality policy, communicated within and beyond the corporation, reads as follows:
"Northern Micro is committed to delivering the ultimate customer satisfaction by providing reliable, innovative and flexible
computing solutions and by continuously improving our product and service offerings".
In essence, Northern Micro, its management and its employees strive to be their customers’ personal computer hardware
specialists. Northern Micro’s focus is on quality and customer satisfaction , and to provide products and services in
complementary areas of specialization. We strongly believe in treating customers as members of our own family.
Additionally read our Privacy Statement .
Energy Star®
The Northern Micro Spirit P8Q87-AS is certified to meet Energy Star requirements. ENERGY STAR is a voluntary program
that helps businesses and individuals save money and protect our climate through superior energy efficiency. Governments
around the world, including Canada's, have embraced the Energy Star program. Through its partnerships with 18,000
private and public sector organizations, ENERGY STAR delivers the technical information and tools that organizations and
consumers need to choose energy-efficient solutions and best management practices.
An ENERGY STAR qualified computer delivers substantial savings over a conventional computer. Power management is
important to saving energy, especially since computers are often in use more hours per day than they used to be. ENERGY
STAR power management features place computers (CPU, hard drive, etc.) into a low-power "sleep mode" after a
designated period of inactivity. Simply hitting a key on the keyboard or moving the mouse awakens the computer in a
matter of seconds. Additionally, ENERGY STAR qualified computers with networking capabilities have the ability to enable
and disable Wake On LAN for Sleep mode, allowing greater use of low power modes without a loss of IT system
maintenance capabilities.

Template
[Image... Important▪
[Image... Caution▪
[Image... Danger▪
[Ima... Note▪

Contact Us
Northern Micro Locations
Northern Micro is a Canada-wide operation with offices in Halifax, Québec City and
Ottawa.
Our headquarters and manufacturing plant are located in Ottawa.
National Service Center :
1-800-563-1007 extension 241
NM Ottawa
3155 Swansea Cr.
Ottawa, Ontario
K1G 3J3
Phone: (613) 226-1117
Fax: (613) 226-3810
Toll Free: 1 (800) 563-1007
NM Halifax
102 Chain Lake Drive
Suite 220
Halifax, NS
B3S 1A7
Phone: (902) 422-9383
Fax: (902) 422-9384
NM Québec
3107 ave des Hotels, Suite 24
Sainte-Foy, Québec
G1W 4W5
Phone: (418) 654-1733
Fax: (418) 654-1744
Toll Free: 1 (877) 654-1733
On-Line Support
Northern Micro has been continuously investing time and resources to improve and
provide you with a wide range of on-line support:
The Secure Web portal where you can apply for a Personal
Identification Number (PIN); customize and order computer
systems on-line; check the status of your orders; verify warranty
expiry dates for systems; review service history and manage your
computer assets.
x
The Service and Support Site where you can download the latest
device drivers and BIOS upgrade; visit our PC Archives for
specifications, manuals and; place service calls, etc.
x

Unpacking your Computer
The Spirit P8Q87-AS is packed with molded foam or with honeycomb cardboard to keep it in place during transit. To unpack
it, cut the tape holding the flaps, fold back the flaps, and carefully slide the PC and the packing material up out of the box.
Here’s what you will find in the box:
Mouse
▪
Keyboard▪
Power cord▪
Spirit System▪
Save all cartons and packing material for future shipping and transportation.▪
To repack the PC, reverse the above instructions.▪

Initial Computer Setup
Setting up your Computer
After unpacking your computer and checking all the items in the box, you are ready to set up and start your computer.
Place the computer on a flat space. Tower units can be put on their sides, as long as the vents are not blocked.
▪
Locate your monitor and computer in a dust and moisture-free area where there will be minimal glare on the screen.▪
Connect the monitor cable to the video connector at the back of the computer.▪
Connect the mouse and keyboard cables to the matching connectors at the back of the computer.▪
Plug the monitor power cord into a dedicated electrical outlet or a surge-protected power bar.▪
Plug the system power cord into the back of the system in the matching connector; then plug the cord into the power
bar.
▪
Starting up the Computer for the first time
Turn on the devices in the following order:
Monitor 1.
External devices (USB or other)2.
System power
3.

Front Panel
USB Ports
There are two (2) additional USB Ports on the Front panel of the computer.
Audio Ports
For convenience there is 1 (one) Microphone port and 1 (one) stereo line out port on the front panel.
System Power Switch
The system power switch is located on the front of the case. You should always be certain that the power is turned off before
modifying the hardware configuration in any way. Pushing the power switch for less than 4 seconds places the system into sleep
mode (if enabled in Setup). When the power button is pressed for more than 4 seconds, the system enters the Soft-Off mode.
Indicator Lights
These lights indicate the operation status of your computer.
Reset Button
The reset button allows you to restart the system without turning the power off. If you encounter any problems while using unfamiliar
software you can always restart quickly from the RAM (Random Access Memory .) You will have to use a pen, pencil or other small
object to press the Reset button. This feature was added to prevent accidental reset of the unit.
Any data not saved to disk will be lost▪

Back Panel
The back panel has all the connections that lead from the system unit to external peripherals and the power source.
Turn off all power switches before connecting or disconnecting cables/wires!▪
Ensure that cables/wires are attached to the peripheral device first and connect to
the outlet unit later.
▪
Turn the system unit power switch off before you plug the power cable into an
electrical outlet.
▪
See details on Rear Panel Connectors .
▪
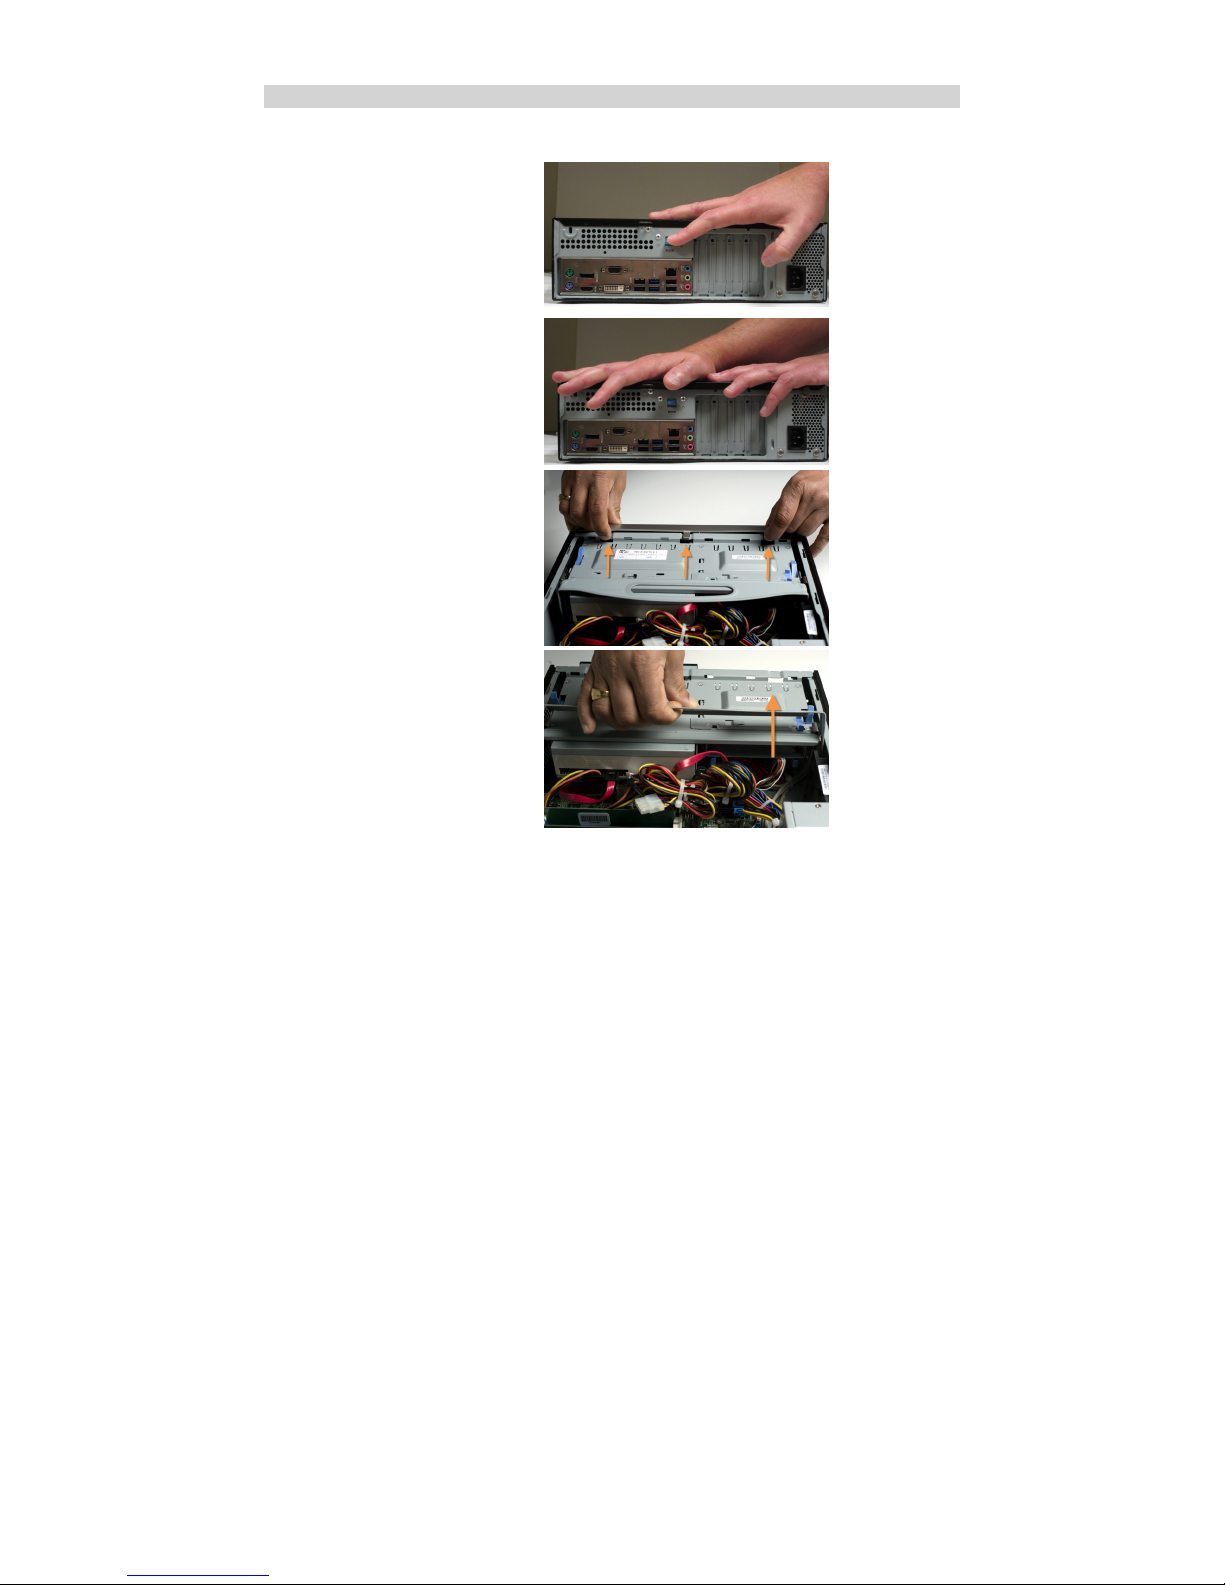
Removing the Case Cover
Removing the case cover from your Spirit computer requires no tools.
Press down on the release lever.
1.
Slide the cover back towards the back.2.
To remove the front case pull up the three tabs
(see picture) and move them toward yourself
3.
For a better visibility, remove the drive cage by
pulling it up and toward yourself as shown in
the picture below. Two blue thumb screws must
first be removed at the front of the case.
4.

Chassis Intrusion
The board suppo rts a chassis security feature that detects if the chassis cover is removed. The security featur e uses a mechanical switch
on the chassis that attaches to the chassis intrusion header. When the chassis cover is remo ved, the mechanical switch is in the closed
position.
The removal of the case cover while the system is powered on will register a Chassis Intrusion Alert detected by the
Chassis Intrusion lead on the motherboard.
▪

Power Supply Specifications
SFF
Watts 300
Form Factor TFX
UL, CSA, QPS X
FCC, 1CES-003 X
+5, +12, +3.3 X
80 Plus Gold Certified X X X
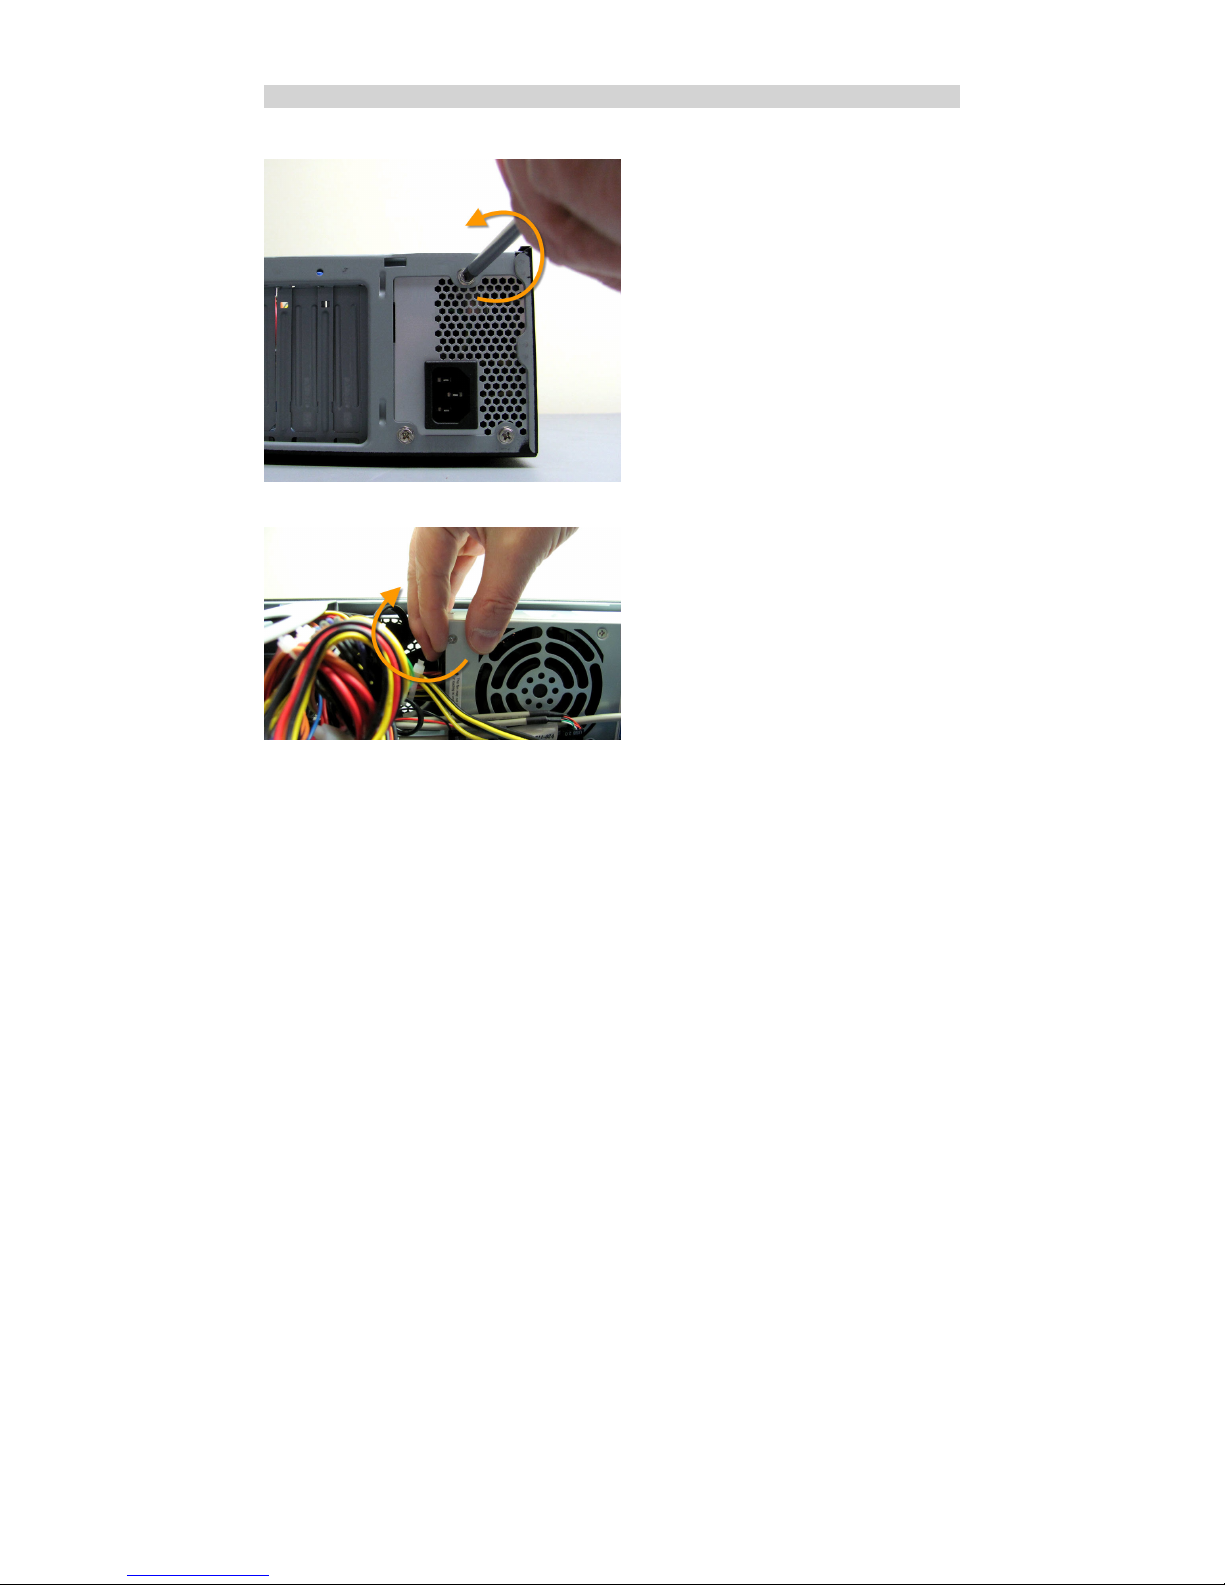
Power Supply Removal
Remove the power supply screws.1.
Lift-out the power Supply. 2.

Final Power Connection Procedure
Connect the 2 x 4 power supply cable to the matching 2 x 4 power connector on the board.
▪
Connect the 2 x 12 power supply cable to the matching 2 x 12 power connector on the board. Your power supply may have a 2 x
10 power cable, if so connect as shown.
▪
Failure to use an appropriate power supply and / or not connecting the 12V (2x2) power connector to the
desktop board may result in damage to the board, or the system may not function properly.
▪
After all connections are made, close the system case cover.1.
Make sure that all switches are in the off position.2.
Connect the power supply cord into the power supply located on the back of your system case.3.
Connect the power cord onto a power outlet that is equipped with a surge protector .4.
You may then turn on your devices in the following order:5.
Monitor
▪
External Devices▪
System Power▪
The power LED on the front panel of the system case will light, as will the monitor LED. The system will then run power-on tests.
While the tests are running, additional messages will appear on the screen. If you do not see anything within 30 seconds from the
time you turn on the power, the system may have failed a power-on test. Recheck your settings and connections or call Northern
Micro for assistance.
6.
During power-on, hold down the del key to enter BIOS setup. 7.

Before you Proceed
Take note of the following precautions before you install motherboard components or change any motherboard settings.
Unplug the power cord from the wall socket before touching any component.▪
Use a grounded wrist strap or touch a safely grounded object or to metal object, such as the power supply case, before
handling components to avoid damaging them due to static electricity
▪
Hold components by the edges to avoid touching the ICs on them.▪
Whenever you un-install any component, place it on a grounded anti-static pad or in the bag that came with the
component.
▪
Before you install or remove any component, ensure that the power supply is switched off or the power cord is detached
from the power supply. Failure to do so may cause severe damage to the motherboard, peripherals, and/or
components.
▪
Onboard LED
The motherboard comes with a standby power LED that lights up to indicate that the system is ON, in sleep mode, or in soft-off
mode. This is a reminder that you should shut down the system and unplug the power cable before removing or plugging in any
motherboard component. The illustration below shows the location of the onboard LED.
Product Highlights
LGA1150 socket for Intel 4th Generation Core i7® / Core i5® / Core i3® / Pentium® Processors
This motherboard supports Intel® 4th generation Core™ i7/i5/i3/Pentium®/Celeron®
processors in the LGA1150 package, with iGPU, memory and PCI Express controllers integrated
to support onboard graphics output with dedicated chipsets, 2-channel (4 DIMM) DDR3 memory
and 16 PCI Express 3.0/2.0 lanes. This provides great graphics performance. Intel® 4th
generation Core™ i7/i5/i3/Pentium®/Celeron® processors are among the most powerful and
energy efficient CPUs in the world.
Intel Q87 Express Chipset
The Intel® Q87 Express chipset is a single-chipset design that supports socket LGA1150 4th
generation Intel® Core™ i7/i5/i3/Pentium®/Celeron® processors. It provides improved
performance by utilizing serial point-to-point links, allowing increased bandwidth and stability.
It natively supports up to six USB 3.0 ports for up to ten times faster transfer rates than USB
2.0. Moreover, the Intel® Q87 Express chipset also supports iGPU functionality, letting users
enjoy the latest Intel integrated graphics performance.
Dual-Channel DDR3 1600 / 1333 / 1066MHz support
The motherboard supports DDR3 memory that features data transfer rates of 1600 / 1333 /
1066 MHz to meet the higher bandwidth requirements of the latest 3D graphics, multimedia ,
and Internet applications. The dual-channel DDR3 architecture enlarges the bandwidth of your
system memory to boost system performance.
Native SATA 6.0 Gb/s support
The Intel® Q87 Express Chipset natively supports next-generation Serial ATA (SATA ) storage
interface . This motherboard delivers up to 6.0 Gb/s data transfer rates. Additionally, get
enhanced scalability, faster data retrieval, double the bandwidth of current bus systems.
Complete USB 3.0 Integration
ASUS facilitates strategic USB 3.0 accessibility for both the front and rear panel – 4 USB3.0
ports in total. Experience the latest plug & play connectivity at speeds up to 10 times faster
than USB 2.0. This motherboard affords greater convenience to high speed connectivity.
Intel Smart Response Technology SSD Speed with HDD Capacity
Intel® Smart Response Technology boosts overall system performance by using an installed
fast SSD (min 18.6GB available capacity required) as a cache for frequently accessed data. Key
benefits include reduced load and wait times, and lower power consumption through the
elimination of unnecessary hard drive spin. This technology combines SSD performance with
hard drive capacity, operating up to 6X faster than a hard drive-only system.
Intel®Smart Response Technology is supported by 3rd/2nd generation Intel® Core
processor family on Windows 7 operating systems.
▪
Operating Systems must be installed on the HDD to launch Intel® Smart Response
Technology.
▪
The capacity of the SSD is reserved for caching function.
Intel® Smart Connect Technology
Your computer could receive web updates with fresh content for selected applications, even
when setting the system to sleep. This means less time waiting for applications to start, update
and sync with the cloud, providing a more efficient way.
Intel Rapid Start Technology
Allows your computer to quickly resume from a low-power hibernate state in seconds. Saving
system memory to the designed SSD, provides your computer a faster wake-up response time,
while keeping the energy use low.
PCI Express 3.0
PCI Express ® 3.0 (PCIe 3.0) is the latest PCI Express bus standard with improved encoding
schemes that provide twice the performance of the current PCIe 2.0.The total bandwidth for a
x16 link reaches a maximum of 32Gb/s, double the 16 Gb/s of PCIe 2.0 (in x16 mode). As
such, PCIe 3.0 provides users an unprecedented data speeds, combined with the convenience
and seamless transition offered by complete backward compatibility with PCIe 1.0 and PCIe 2.0
devices. PCIe 3.0 will become a must-have feature for users who wish to improve and optimize
graphic performance, as well as have the latest technology available to them.
* PCI 3.0 speed is supported by Intel® 3rd and 4th generation Core™ processors
Innovative ASUS features
ASUS UEFI BIOS
Flexible and Easy BIOS Interface
ASUS UEFI BIOS offer the first mouse -controlled graphical BIOS designed with selectable
modes, providing a user-friendly interface that goes beyond the traditional keyboard-only
controls. It also natively supports fully-utilized hard drives larger than 2.2TB in 64-bit
operating systems.
ASUS exclusive interface
EZ Mode displays frequently-accessed info. Users can choose system performance settings,
and drag and drop boot priorities. advanced Mode for performance enthusiasts includes
detailed DRAM settings via a dedicated memory info page for complete insight.
Quick and Easy information for enhanced system control
F7 BIOS snapshot hotkey for sharing UEFI information and troubleshooting▪
New F3 Shortcut for most accessed information▪
ASUS DRAM SPD (Serial Presence Detect) information for accessing memory information,
detecting faulty DIMMs, and helping with difficult POST situations.
▪
USB 3.0 Boost
With USB 3.0 Boost technology, a USB device’s transmission speed is significantly increased,
adding to an already impressive fast USB 3.0 transfer speed. ASUS software automatically
accelerates data speeds for compatible USB 3.0 peripherals without the need for any user
interaction.
GPU Boost
Go to the Limit with iGPU Level Up!
GPU Boost accelerates the integrated GPU for extreme graphics performance. The user-friendly
interface facilitates flexible frequency adjustments. It easily delivers stable system-level
upgrades for every use.
Al Suite 3
With its fast user-friendly interface , ASUS AI Suite 3 consolidates all the exclusive ASUS

features into one simple to use software package. It allows you to supervise overclocking,
energy management, fan speed control, and voltage and sensor readings. This all-in-one
software offers diverse and ease to use functions,with no need to switch back and forth
between different utilities.
ASUS Anti-Surge Protection
This special design prevents expensive devices and the motherboard from damage caused by
powe r surge s from switching power supply (PSU).
ASUS Q-Fan 2
The ASUS Q-Fan 2 technology intelligently adjusts both CPU and chassis fan speeds according
to system loading to ensure quiet, cool and efficient operation.
ASUS EPU
Tap into the world’s first real-time PC power saving chip through the AI Suite 3 utility. Get total
system-wide energy optimization by automatically detecting current PC loadings and
intelligently moderating power consumption. This also reduces fan noise and extends
component longevity.
ASUS MyLogo2®
This feature allows you to convert your favorite photo into a 256-color boot logo for a more
colorful and vivid image on your screen.
ASUS CrashFree BIOS 3
ASUS CrashFree BIOS 3 is an auto-recovery tool that allows you to restore a corrupted BIOS
file using the bundled support DVD or USB flash disk that contains the latest BIOS file.
ASUS EZ Flash 2
ASUS EZ Flash 2 is a utility that allows you to update the BIOS without using an OS-based
utility.
C.P.R. (CPU Parameter Recall)
The BIOS C.P.R feature automatically restores the CPU default settings when the system hangs
due to overclocking failure. C.P.R. eliminates the need to open the system chassis and clear the
RTC data. Simply shutdown and reboot the system, and the BIOS automatically restores the
CPU parameters to their default settings.
ErP ready
The motherboard is European Union´s Energy-related Products (ErP) ready, and ErP requires
products to meet certain energy efficiency requirements in regards to energy consumptions.
This is in line with ASUS vision of creating environment-friendly and energy-efficient products
through product design and innovation to reduce carbon footprint of the product and thus
mitigate environmental impacts.

Motherboard Layout
Item # Connectors / Jumpers/ Slots / LED Item # Connectors / Jumpers/ Slots / LED
1CPU and Chassis fan connectors (4-pin
CPU_Fan, 4-pin CHA_FAN 1/2) 9Intel ME jumper (3-pin DIS_ME)
2Serial port connector (10-1 pin COM1) 10 Speaker connector (4-pin SPEAKER)
3ATX power connectors (24-pin
EATXPWR, 8-pin EATX12V) 11 Clear RTC RAM (3-PIN CLRTC)
4Intel LGA1150 CPU socket 12 USB 2.0 connectors (10-1 pin USB 5~14)
5DDR3 DIMM slots 13 Chassis Intrusion connector (4-1 pin
CHASSIS)
6USB 3.0 connector (20-1 pin USB3_12) 14 Front Panel audio connector (10-1 pin AAFP)
7Intel Q87 Serial ATA 6.0Gb/s connectors
(7-pin SATA6G-1~6 [yellow]) 15 Standby power LED (SB_PWR)
8System panel connector (10-1 pin
F_Panel) 16 LPT connector (26-1 pin LPT)

Motherboard Installation and Removal
Before removing the Motherboard, ensure the power is off by checking the indicator light. (See section Before you proceed )
When lit, the onboard LED indicates that the system is ON, in sleep mode or in soft-off mode, not powered OFF.
Placement Direction
When installing the motherboard, make sure that you place it into the chassis in the correct orientation. The edge with External ports
goes to the rear part of the chassis as indicated in the image below.
Place six screws into the holes indicated by circles to secure the motherboard to the chassis. DO NOT overtighten the
screws! Doing so can damage the motherboard.
▪
Before you start, always make sure the computer is turned off. Observe standard static-electricity discharge
precautions. You can damage your expansion card, the motherboard, or both, by not being careful about this.
▪
Unplug the system’s power cable from the back of the unit.1.
Remove the case cover.(Please see instruction on cover removal Removing the Case Cover )2.
Disconnect all cables and wires connected to the motherboard and expansion cards3.
Remove all expansion cards and remove all screws holding the motherboard in place.4.
Lift the motherboard out by pulling it up and away from the back of the case.5.
Take note of where and how cables are connected for re-installation.▪
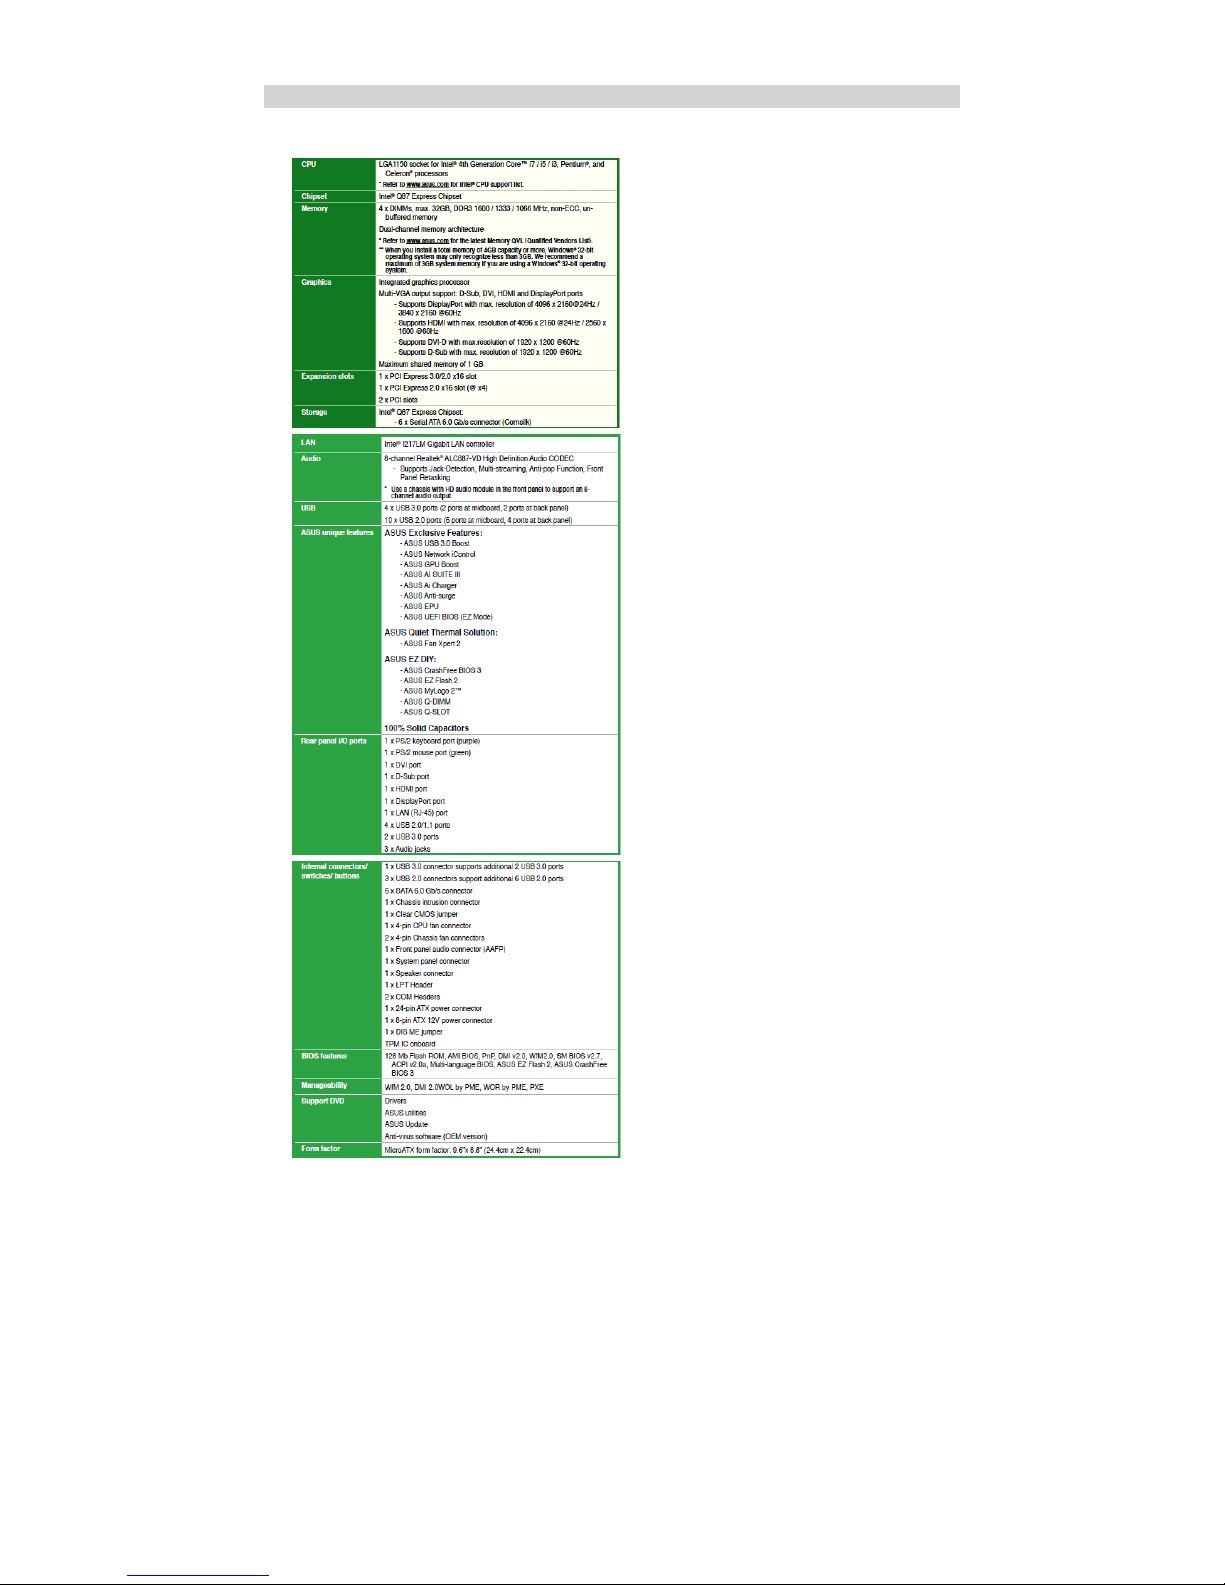
Specifications Summary
P8Q87-M motherboard specifications summary

Expansion Slots
In the future, you may need to install expansion cards. The following sub-sections describe the slots and the expansion cards that they
support.
Unplug the power cord before adding or removing expansion cards. Failure to do so may cause you physical injury and
damage motherboard components.
▪
Installing an Expansion Card
Before installing the expansion card, read the documentation that came with it and make the necessary hardware settings for the
card.
1.
Remove he system unit cover (if your motherboard is already in a chassis). 2.
Remove the bracket opposite the slot that you intend to use.
3.
Align the card connector with the slot and press firmly until the card is completely seated on the slot. 4.
Secure the card to the chassis.5.
Replace the system cover. 6.
Configuring an expansion card
After installing the expansion card, configure it by adjusting the software settings.
Turn on the system and change the necessary BIOS settings, if any. See BIOS setup for more details.
1.
Assign an IRQ to the card.
2.
Install the software drivers for the expansion card.
3.
When using PCI cards on shared slots, ensure that the drivers support "Share IRQ" or that the cards do not need IRQ
assignments. Otherwise, conflicts will arise between the two PCI groups, making the system unstable and the card
inoperable.
▪
PCI Slot
The PCI slots support cards such as a LAN card, SCSI card, USB card, and other cards that comply with PCI specifications.
PCI Express x4 slot
This motherboard supports PCI Express x4 network cards, SCSI cards, and other cards that comply with the PCI Express specifications.
PCI Express x16 slot
This motherboard has a PCI Express 3.0 x16 slot that supports PCI Express x16 3.0/2.0 graphic cards complying with the PCI Express
specifications.
IRQ Assignments for this motherboard
Table of contents
Other Northern Micro Desktop manuals

Northern Micro
Northern Micro Spirit Q270-AS TWR User manual

Northern Micro
Northern Micro Spirit Q370-AS User manual

Northern Micro
Northern Micro Spirit P9X79-AS User manual

Northern Micro
Northern Micro Spirit P8Q77-AS User manual

Northern Micro
Northern Micro Spirit P8Q77-AS User manual

Northern Micro
Northern Micro Spirit Q270-AS SFF User manual

Northern Micro
Northern Micro Spirit X299-AS User manual


