Northern Micro Spirit P8Q77-AS User manual

Northern Micro Spirit P8Q77-AS
User Guide Rev 1.0

ii
Table of Contents
Spirit P8Q77-AS User Guide ................................................................... 1
Spirit P8Q77-AS User Guide ........................................................... 1
Rev 1.0. February 2013 .....................................................1
Please Read This First............................................................................. 2
Contact Us................................................................................................ 4
Northern Micro Locations.....................................................4
On-Line Support.................................................................4
Getting Started......................................................................................... 5
Unpacking your Computer...................................................................... 5
Initial Computer Setup............................................................................. 6
Setting up your Computer ...................................................6
Starting up the Computer for the first time............................6
System Hardware..................................................................................... 7
Case...........................................................................................7
Front Panel ............................................................................................... 7
Back Panel................................................................................................ 8
Removing the Case Cover ...................................................................... 9
Chassis Intrusion................................................................................... 11
Power Supply.............................................................................12
Power Supply Specifications................................................................ 12
Power Supply Removal ......................................................................... 13
Final Power Connection Procedure ..................................................... 14
Motherboard..............................................................................15
Before you Proceed............................................................................... 15
Onboard LED ................................................................... 15
Product Highlights................................................................................. 17

Table of Contents
iii
LGA1155 socket for Intel 3rd / 2nd Generation Core i7® / Core
i5® / Core i3® / Pentium® Processors ............................... 17
Intel Q77 Express Chipset ................................................. 17
Dual-Channel DDR3 1600 / 1333 / 1066MHz support............17
Native SATA 6.0 Gb/s support............................................17
Complete USB 3.0 Integration ...........................................17
Intel Smart Response Technology SSD Speed with HDD
Capacity..........................................................................17
Intel® Smart Connect Technology......................................18
Intel Rapid Start Technology..............................................18
PCI Express 3.0 ............................................................... 18
Innovative ASUS features..................................................18
USB 3.0 Boost ................................................................. 19
GPU Boost ....................................................................... 19
MemOK!.......................................................................... 19
Al Suite II ....................................................................... 19
ASUS Anti-Surge Protection...............................................19
ASUS Q-Fan 2..................................................................19
ASUS EPU ....................................................................... 20
ASUS MyLogo2®.............................................................. 20
ASUS CrashFree BIOS 3....................................................20
ASUS EZ Flash 2 .............................................................. 20
C.P.R. (CPU Parameter Recall) ...........................................20
ErP ready ........................................................................20
Motherboard Layout .............................................................................. 21
Motherboard Installation and Removal................................................ 23
Placement Direction.......................................................... 23
Specifications Summary ....................................................................... 25
Expansion Slots..................................................................................... 28
Installing an Expansion Card..............................................28
Configuring an expansion card ...........................................28
PCI Slot ..........................................................................28
PCI Express x4 slot........................................................... 29
PCI Express x16 slot......................................................... 29
Jumpers.................................................................................................. 30
Clear RTC RAM (3-pin CLRTC)............................................30
To Erase the RTC RAM ...................................................... 30
Intel ME jumper (3-pin DIS_ME) ........................................ 30
Connectors ...................................................................... 32
Rear Panel Connectors ......................................................................... 32
Internal Connectors............................................................................... 34
Front Panel Audio Connector (10-1pin AAFP) ....................... 34
Serial Port Connector (10-1 pin COM1) ............................... 34

Northern Micro Spirit P8Q77-AS User Guide Rev 1.0
iv
CPU and Chassis Fan Connectors (4-pin CPU_FAN, 3-pin
CHA_FAN1/2) ..................................................................35
Chassis Intrusion Connector (4-1 pin CHASSIS) ...................35
ATX Power Connectors (24-pin EATXPWR, 8-pin EATX12V).... 36
Digital Audio Connector (4-1 pin SPDIF_OUT) ...................... 36
Intel Q77 Serial ATA 6.0GB/s connectors (7-pin
SATA6G_1/2[gray]).......................................................... 37
Intel Q77 Serial ATA 3.0GB/s connectors (7-pin SATA3G_1-4
[blue])............................................................................37
Speaker Connector (4-pin SPEAKER) ..................................38
System Panel Connector (10-1 pin F_PANEL) ...................... 38
LPT Connector (26-1 pin LPT) ............................................ 39
USB Connectors (10-1 pin USB56, USB78, USB910) ............. 40
USB 3.0 Connector (20-1 pin USB3_34).............................. 40
Video Card ...................................................................... 42
Video Connectors .................................................................................. 42
Integrated Video Driver Installation ....................................42
To run the Support DVD.................................................... 42
Removing & Installing a Video Card .................................................... 43
PCI Adapter Cards ................................................................................. 44
PCI slots ......................................................................... 44
Removal/Install of a PCI Adapter Card ................................ 44
Onboard Switches ................................................................................. 46
MemOK! switch ................................................................ 46
Onboard LEDs........................................................................................ 47
Standby Power LED .......................................................... 47
DRAM LED....................................................................... 47
CPU .......................................................................................... 48
CPU Overview / Specs........................................................................... 48
Installing a CPU ..................................................................................... 50
Installing / Removal of a CPU Heatsink & Fan .................................... 53
To un-install the CPU heatsink and fan assembly..................54
System Memory ......................................................................... 56
System Memory Overview .................................................................... 56
System Memory Configuration............................................................. 58
Installing System Memory..................................................................... 63
Removing System Memory ................................................................... 64

Table of Contents
v
Hard Drive ................................................................................ 65
Hard Drive Removal / Installation......................................................... 65
Unpacking and Handling.................................................... 66
Software / Operating System ................................................................ 67
Installing an Operating System .......................................... 67
Support DVD Information ..................................................67
To run the Support DVD.................................................... 67
Optical Drive........................................................................................... 69
Optical Drive Removal ...................................................... 69
BIOS Information ................................................................................... 71
Managing and Updating your BIOS...................................................... 71
ASUS Update Utility.......................................................... 71
ASUS EZ Flash 2 .............................................................. 72
ASUS CrashFree BIOS 3....................................................73
ASUS BIOS Updater.......................................................... 73
BIOS Setup Program ............................................................................. 76
Entering the BIOS setup at Startup .................................... 76
Entering BIOS Setup after POST.........................................76
BIOS Menu Screen ........................................................... 76
EZ Mode .........................................................................77
Advanced Mode................................................................ 78
Menu items .....................................................................78
Back button..................................................................... 78
Submenu items................................................................ 79
Pop-up Window................................................................ 79
Scroll bar ........................................................................79
Navigation keys ............................................................... 79
General help....................................................................79
Configuration fields .......................................................... 79
Main Menu .............................................................................................. 80
System Language [English] ...............................................80
System Date [Dayxx/xx/xxxx] ...........................................80
System Time [xx:xx:xx] ...................................................80
Security .......................................................................... 80
Administrator Password .................................................... 81
User Password
...................................................................81
Ai Tweaker Menu ................................................................................... 82
CPU bus speed: DRAM speed ratio mode [Auto] ...................82
Memory Frequency [Auto] .................................................82
EPU Power Saving Mode [Disabled] ....................................83

Northern Micro Spirit P8Q77-AS User Guide Rev 1.0
vi
EPU Setting [Auto] ........................................................... 83
GPU Boost [OK] ............................................................... 83
DRAM Timing Control........................................................ 83
CPU Power Management ...................................................83
CPU Voltage [Offset Mode] ................................................84
DRAM Voltage [Auto]........................................................ 84
VCCIO Voltage [Auto] ....................................................... 84
VCCSA Voltage [Auto]....................................................... 85
CPU PLL Voltage [Auto]..................................................... 85
PCH Voltage [Auto] .......................................................... 85
Load-Line Calibration [Auto] .............................................. 85
Advanced Menu ..................................................................................... 86
Trusted Computing........................................................... 86
CPU Configuration ............................................................ 86
PCH Configuration ............................................................ 88
SATA Configuration .......................................................... 88
System Agent Configuration .............................................. 89
Intel TXT(LT) Configuration ...............................................90
AMT Configuration............................................................ 91
USB Configuration ............................................................ 91
Onboard Devices Configuration ..........................................92
The third-party ROM messages will be forced to display during
the boot sequence............................................................ 94
Setup Mode [EZ Mode] .....................................................94
UEFI/Legacy Boot [Enabled both UEFI and Legacy]............... 94
PCI ROM Priority [Legacy ROM]..........................................94
Boot Option Priorities........................................................ 94
Serial Port Console Redirection ..........................................95
Monitor Menu ......................................................................................... 97
CPU Temperature / MB Temperature [xxx/C/xxx/F]..............97
CPU / Chassis Fan Speed [xxxx RPM] or [Ignore] / [N/A] ......97
CPU Q-Fan Control [Enabled]
..................................................... 97
CPU Voltage,3.3V Voltage, 5V Voltage, 12V Voltage
............................ 99
Anti Surge Support [Enabled]
.....................................................99
Boot Menu
............................................................................................... 100
Boot NumLock State [ON]
...................................................... 100
Full Screen Logo [Enabled]
...................................................... 100
Tools Menu
.............................................................................................. 102
ASUS EZ Flash 2Utility
.......................................................... 102
ASUS O.C.Profile
................................................................. 102
ASUS SPD Information
......................................................... 102
Exit Menu
................................................................................................. 104
Platform Security ................................................................................. 105

Table of Contents
vii
TPM ....................................................................................................... 105
Warning of Potential Data Loss.......................................................... 106
Environmental Initiative ...................................................................... 107
Introduction to Environmental Program ............................................ 107
Environmental Policy ...................................................... 107
Environmental Program ...................................................................... 108
Care & Maintenance............................................................................. 111
Electrostatic Discharge (ESD) ............................................................ 111
Static Electricity: Creating Charge .................................... 111
Static Electricity Precautions............................................ 111
Location & Electrical Service.............................................................. 112
Cleaning & Moving Your Computer.................................................... 113
The computer: ............................................................... 113
The keyboard: ............................................................... 113
The monitor: ................................................................. 113
The mouse: ................................................................... 113
Moving the computer:..................................................... 113
Information Backup ............................................................................. 114
Hard Drive Maintenance ...................................................................... 115
Passwords............................................................................................ 116
Computer Viruses ................................................................................ 117
System Safety ...................................................................................... 118
Electrical safety.............................................................. 118
Monitor Safety Instructions ................................................................ 119
DOC Requirements.............................................................................. 120
Warranty Policy.................................................................................... 121
Glossary ............................................................................................... 122
Index ..................................................................................................... 131


1
Spirit P8Q77-AS User Guide
Spirit P8Q77-AS User
Guide
Rev 1.0. February 2013

Northern Micro Spirit P8Q77-AS User Guide Rev 1.0
2
Please Read This First
Thank you for buying a Northern Micro Spirit P8Q77-AS computer. Northern Micro is
committed to providing our customers with the best value on the market today. This
includes building the systems that meet your specific needs through to supporting any post-
sales issues you may encounter.
All Northern Micro Spirit computers are assembled and tested in our Ottawa, Canada,
manufacturing facility. A full Service & Support network across Canada stands behind every
Spirit system built.
The computer you have purchased is optimized for today’s Operating Systems and
applications; however, in the future, you may come upon situations that demand greater
processing power or speed. Thanks to the latest advances in computer hardware
technology, your Spirit P8Q77-AS is completely upgradable. Contact your Northern Micro
Sales or Service representative for advice on how to upgrade your computer should the
need arise.
This manual has been prepared for both advanced and novice users. You will find general PC
information as well as detailed specifications about the system you have purchased.
Northern Micro Sales and Service & Support Departments may be reached
at: 1-800-563-1007.
Northern Micro is one of the leading Canadian hardware integrators and custom
manufacturers of mid-range, high-end PCs and workstations.
Our mission is to provide customized mid-range to high-end & high quality computer
hardware products and services to meet the advanced technical needs of highly
knowledgeable customers who seek to maximize their productivity.
To be fully responsive to our customers’ wants and needs, we also:
carries brand name computer products;
supplies network peripheral equipment and multi-media products;
supplies server / storage and printing solutions.
Through all facets of the operations, we are driven by our quality philosophy.
Northern Micro’s quality policy, communicated within and beyond the corporation, reads as
follows:
"Northern Micro is committed to delivering the ultimate customer satisfaction by providing
reliable, innovative and flexible computing solutions and by continuously improving our
product and service offerings".
In essence, Northern Micro, its management and its employees strive to be their customers’
personal computer hardware specialists. Northern Micro’s focus is on quality and customer
satisfaction, and to provide products and services in complementary areas of specialization.
We strongly believe in treating customers as members of our own family.
Additionally read our Privacy Statement.

Spirit P8Q77-AS User Guide
3

Northern Micro Spirit P8Q77-AS User Guide Rev 1.0
4
Contact Us
Northern Micro Locations
Northern Micro is a Canada-wide operation with offices in Halifax, Montréal, Quebec City,
Ottawa and Vancouver.
Our headquarter and manufacturing plant are located in Ottawa.
National Service Center:
1-800-563-1007 extension 241
NM Ottawa
3155 Swansea Cr.
Ottawa, Ontario
K1G 3J3
Phone: (613) 226-1117
Fax: (613) 226-3810
Toll Free: 1 (800) 563-1007
info@nmico.ca
NM Montréal
1260 Crescent, Suite 201
Montréal, Québec
H3G 2A9
Phone: (514) 395-2386
Fax: (514) 395-2459
montre[email protected]
NM Halifax
102 Chain Lake Drive
Suite 220
Halifax, NS
B3S 1A7
Phone: (902) 422-9383
Fax: (902) 422-9384
halifax@nmicro.ca
NM Vancouver
10691 Shellbridge Way
Suite 130
Richmond, BC
V6X 2W8
Phone: (604) 231-5841
Fax: (604) 270-3644
vancouve[email protected]
NM Québec
3107 ave des Hotels, Suite 24
Sainte-Foy, Québec
G1W 4W5
Phone: (418) 654-1733
Fax: (418) 654-1744
Toll Free: 1 (877) 654-1733
quebec@nmicro.ca
On-Line Support
Northern Micro has been continuously investing time and resources to improve and provide
you with a wide range of on line support:
The Secure Web portal where you can - Apply for a Personal Identification Number
(PIN);Customize and order computer system on-line, Check the status of your
orders;, Verify warranty expiry dates for systems ; Review service history and
Manage your computer assets;
The Service and Support Site where you can - Download the latest device drivers
and BIOS Upgrade; Visit our PC Archives for specs, manuals and Place service calls,
etc.

5
Getting Started
Unpacking your Computer
The Spirit P8Q77-AS is packed with molded foam or with honeycomb cardboard to keep it in
place during transit. To unpack it, cut the tape holding the flaps, fold back the flaps, and
carefully slide the PC and the packing material up out of the box.
Here’s what you will find in the box:
Mouse
Keyboard
Power cord
Spirit System
Save all cartons and packing material for future shipping and transportation.
To repack the PC, reverse the above instructions.

Northern Micro Spirit P8Q77-AS User Guide Rev 1.0
6
Initial Computer Setup
Setting up your Computer
After unpacking your computer and checking all the items in the box, you can set up and
start your computer.
Set the computer on a flat space. Tower units can be put on their sides, as long as
the vents are not blocked.
Locate your monitor and computer in a dust-and-moisture-free area where there will
be minimal glare on the screen.
Connect the monitor cable to the video connector at the back of the computer.
Connect the mouse and keyboard cables to the matching connectors at the back of
the computer.
Plug the monitor power cord into a dedicated electrical outlet or a surge-protected
power bar.
Plug the system power cord into the back of the system in the matching connector;
then plug the cord into the power bar.
Starting up the Computer for the first time
Turn on the devices in the following order:
1. Monitor
2. External devices (USB or other)
3. System power

7
System Hardware
Case
Front Panel
USB Ports
There are two (2) additional USB Port on the Front panel of the computer.
Audio Ports
For convenience there is 1 (one) Microphone port and 1 (one) stereo line out port on the
front panel.
System Power Switch
The system power switch is located on the front of the case. You should always be
certain that the power is turned off before modifying the hardware configuration in any
way. Pushing the power switch for less than 4 seconds places the system into sleep
mode (if enabled in Setup). When the power button is pressed for more than 4 seconds,
the system enters the Soft-Off mode.
Indicator Lights
These lights indicate the operation status of your computer.
Reset Button
The reset button allows you to restart the system without turning the power off. If you
encounter any problems while using unfamiliar software you can always restart quickly
from the RAM (Random Access Memory.) You will have to use a pen, pencil or other
small object to press the Reset button. This feature was added to prevent accidental
reset of the unit.
Any data not saved to disk will be lost

Northern Micro Spirit P8Q77-AS User Guide Rev 1.0
8
Back Panel
The back panel has all the connections that lead from the system unit to external
peripherals and the power source.
Turn off all power switches before connecting or disconnecting cables/wires!
Ensure that cables/wires are attached to the peripheral device first and
connect to the outlet unit later.
Turn the system unit power switch off before you plug the power cable into
an electrical outlet.
See details on Rear Panel Connectors.
System Hardware
9
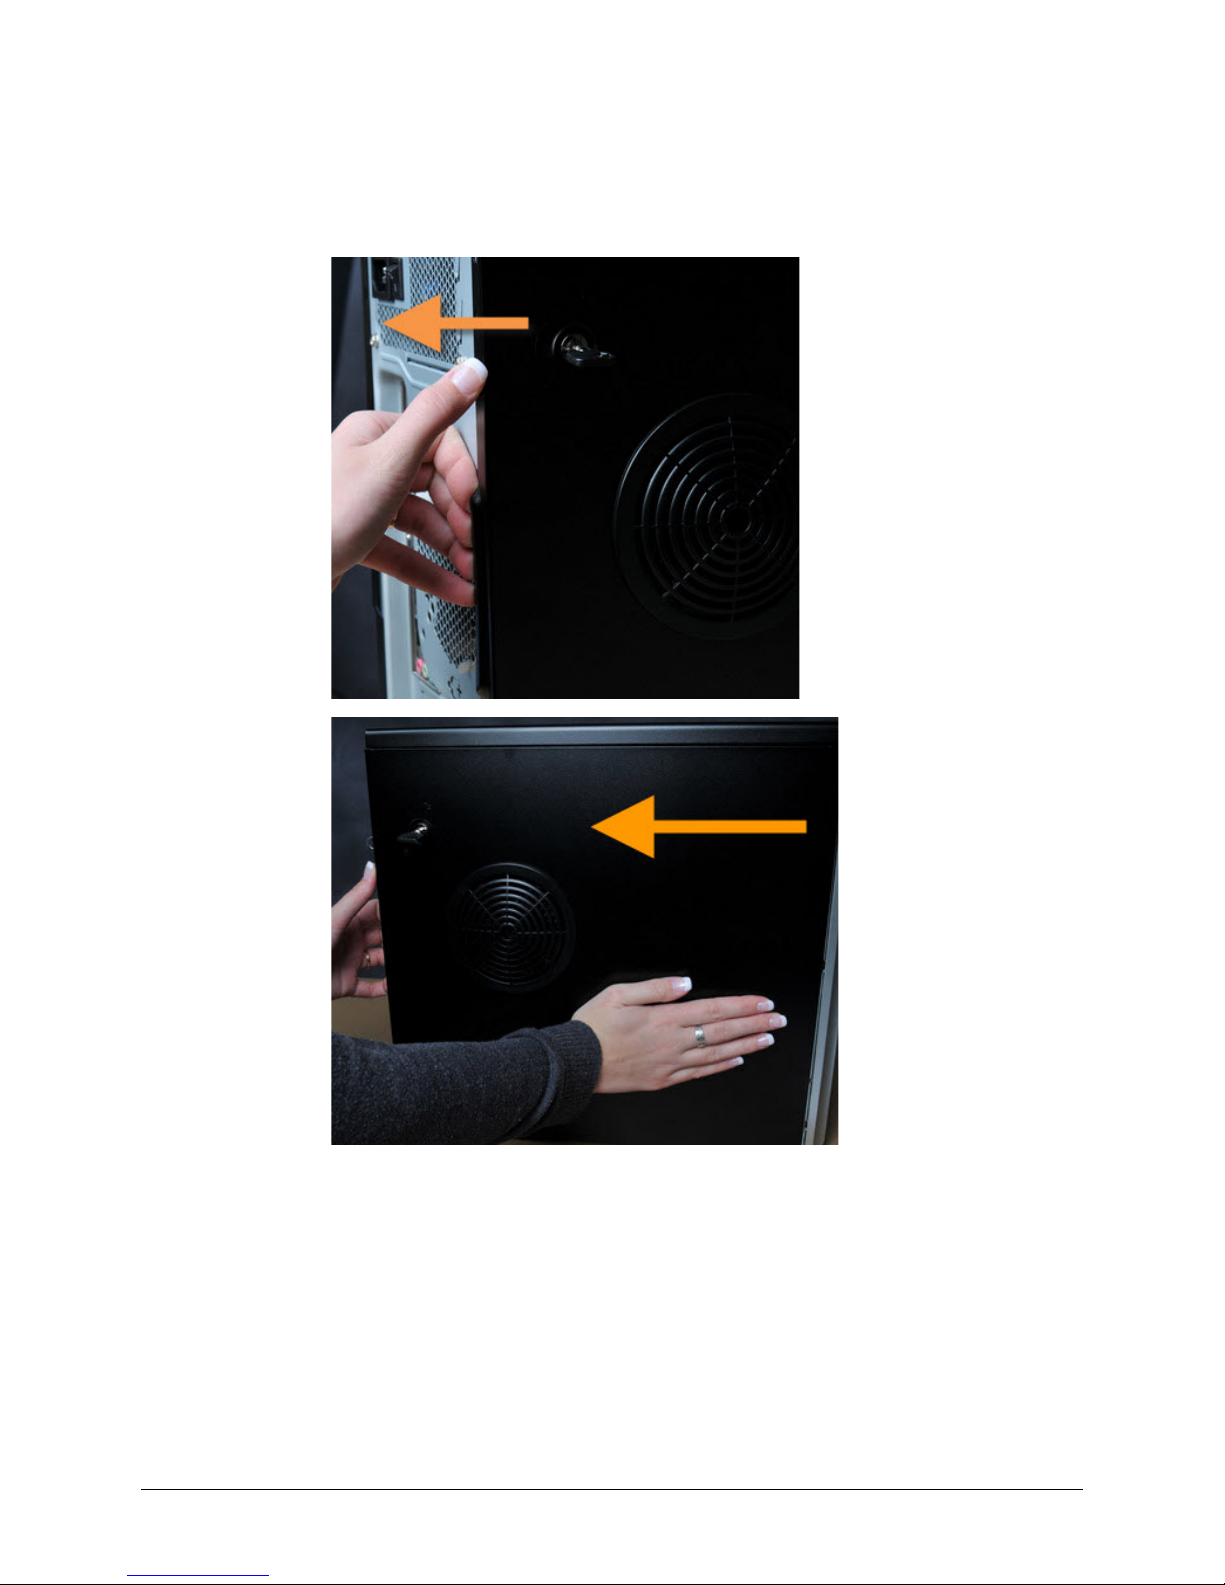
Removing the Case Cover
Removing the case cover from your Spirit computer requires no tools.
1. Unlatch
the cover
and open
the case
from the
back
2. Slide the
cover back

Northern Micro Spirit P8Q77-AS User Guide Rev 1.0
10
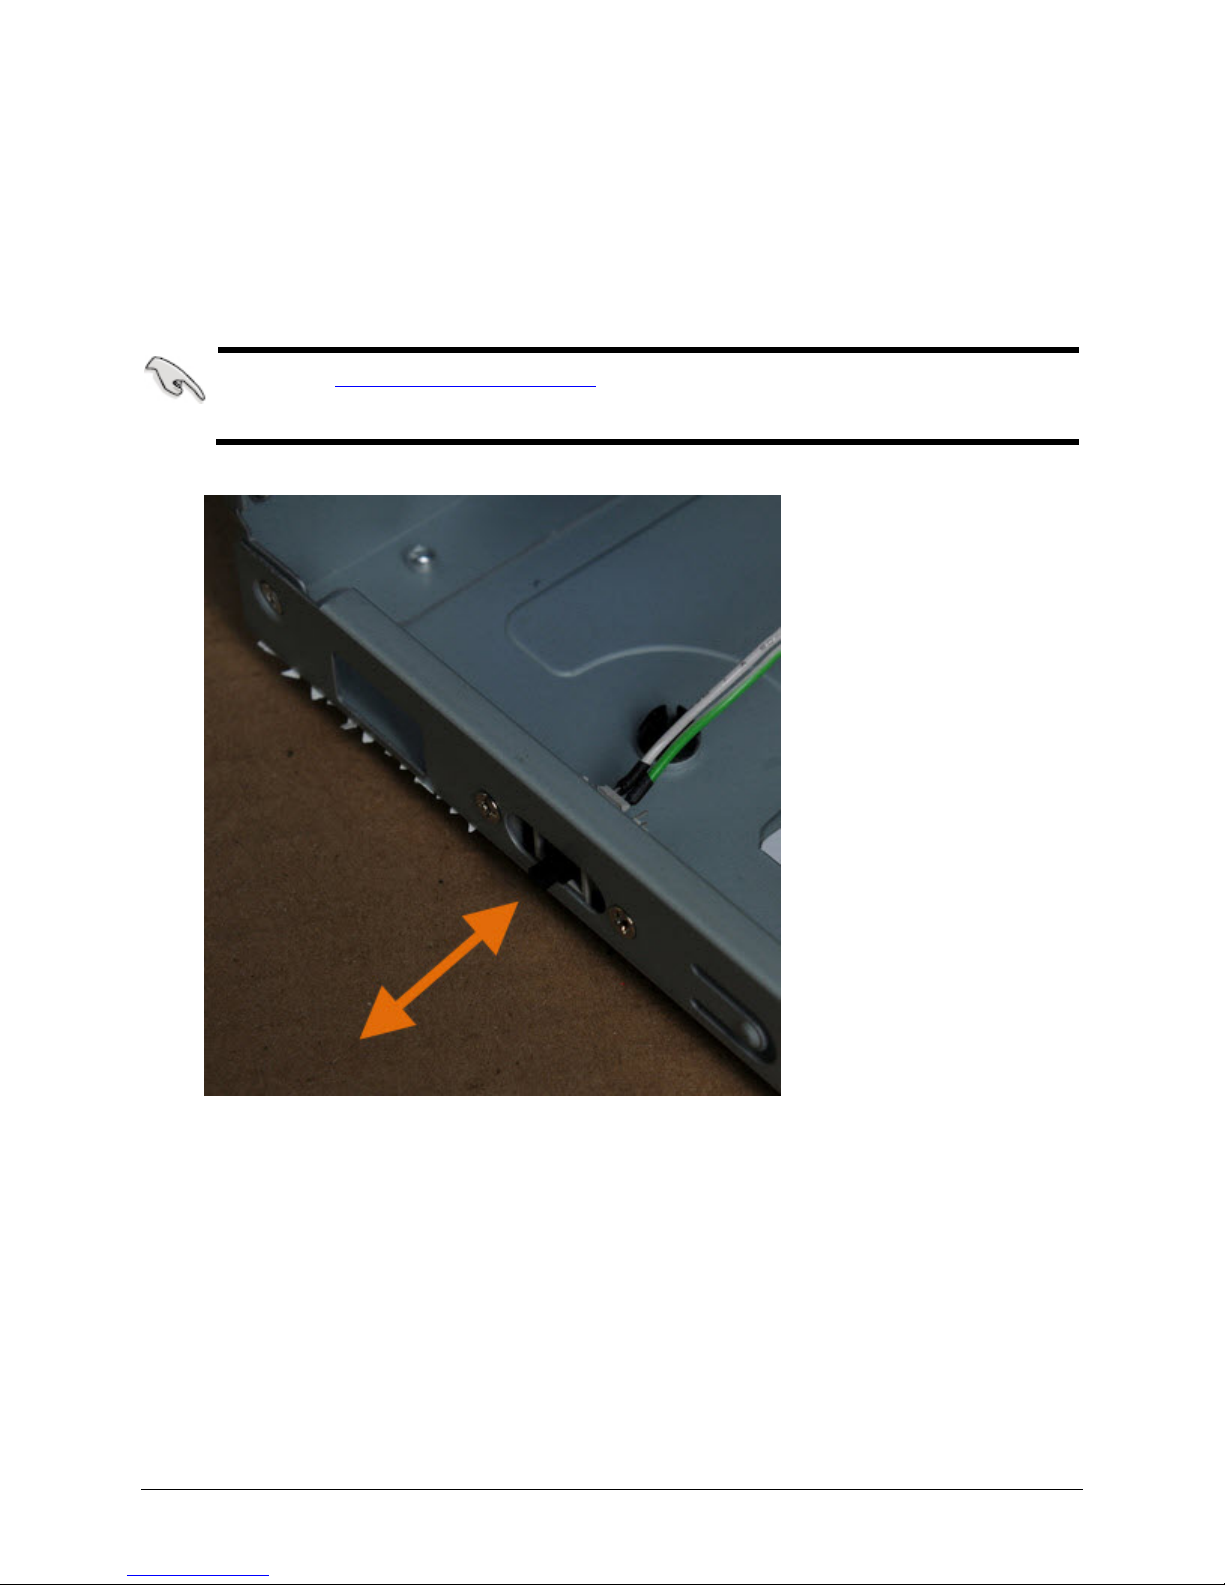
3. Press the
tabs as
illustrated
below and
pull back
the Front
Bezel.
4.
That opens
the front
case.
System Hardware
11
Chassis Intrusion
The board supports a chassis security feature that detects if the chassis cover is removed.
The security feature uses a mechanical switch on the chassis that attaches to the chassis
intrusion header. When the chassis cover is removed, the mechanical switch is in the closed
position.
The removal of the case cover while the system is powered on will register a
Chassis Intrusion Alert detected by the Chassis Intrusion lead on the
motherboard.
Northern Micro Spirit P8Q77-AS User Guide Rev 1.0
12
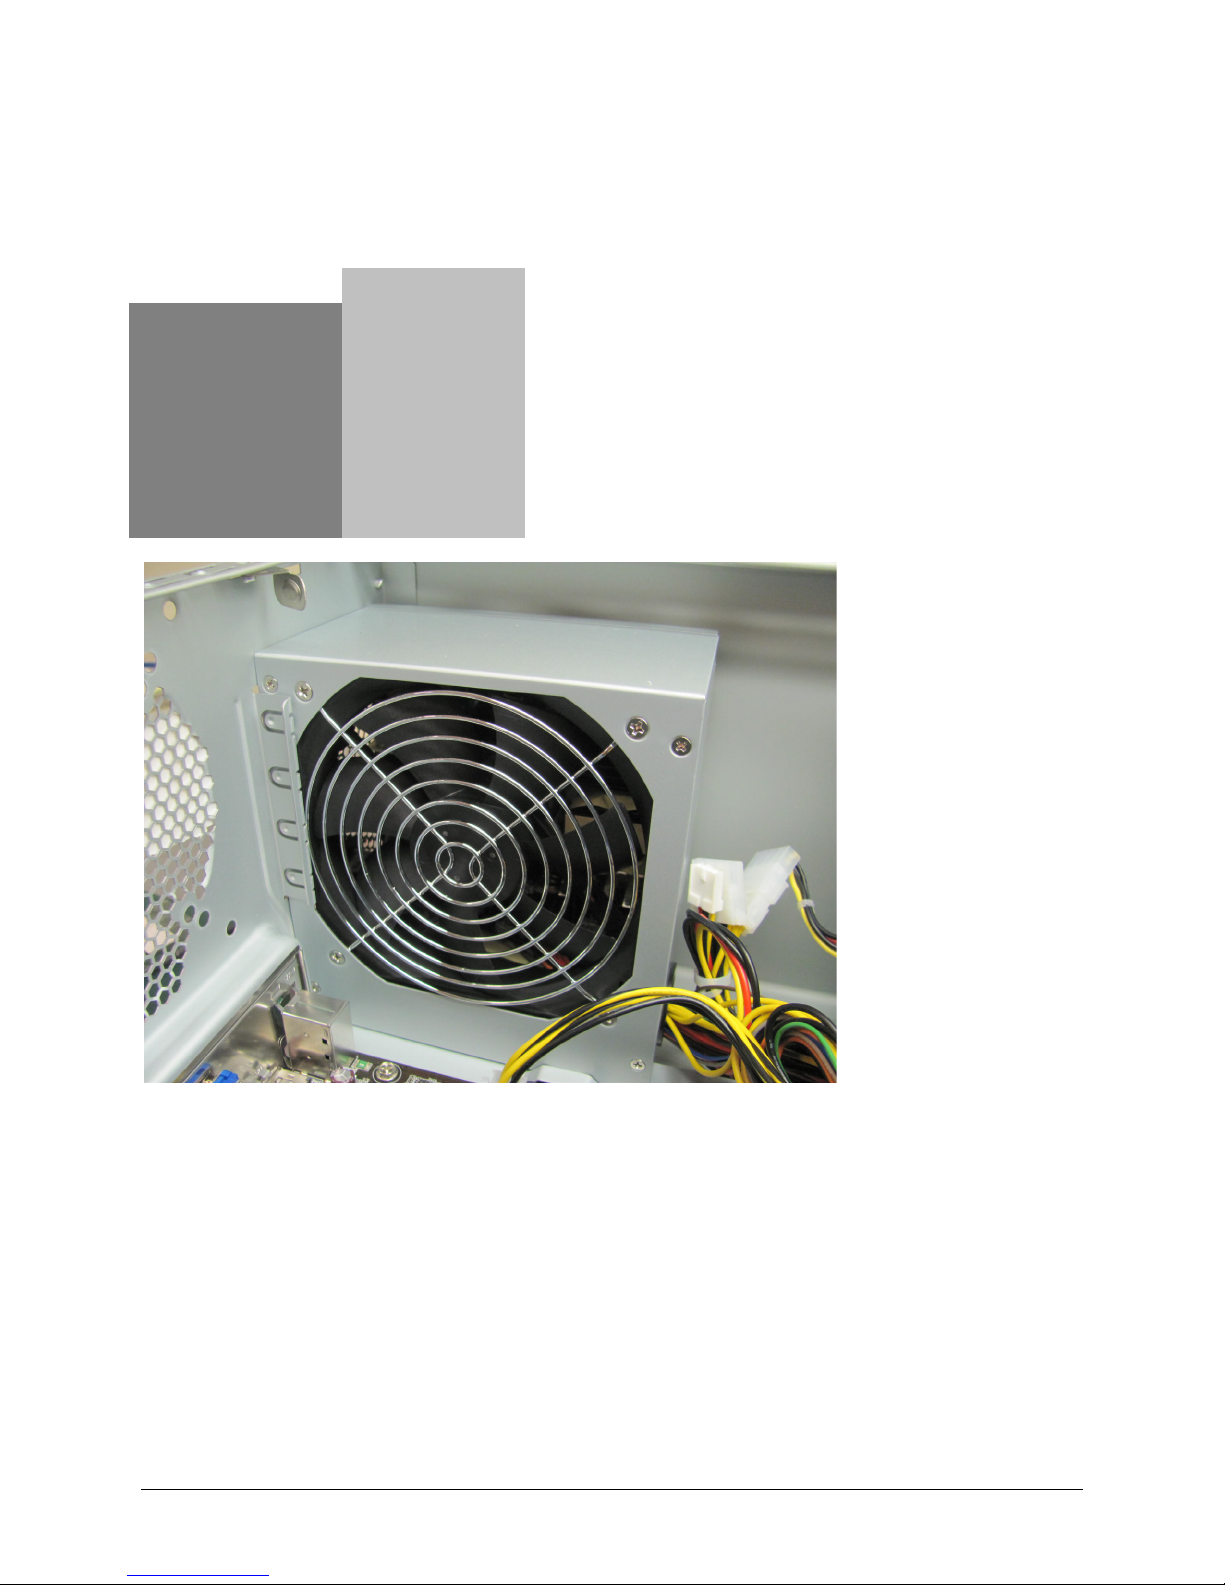
Power Supply
Power Supply Specifications
Mid Tower
Watts 350
Form Factor ATX
UL, CSA, QPS X
FCC, 1CES-003 X
+5, +12, +3.3 X
80 Plus Gold
Certified X X
X
Other manuals for Spirit P8Q77-AS
1
Table of contents
Other Northern Micro Desktop manuals

Northern Micro
Northern Micro Spirit P9X79-AS User manual

Northern Micro
Northern Micro Spirit P8Q87-AS User manual

Northern Micro
Northern Micro Spirit P8Q77-AS User manual

Northern Micro
Northern Micro Spirit Q370-AS User manual

Northern Micro
Northern Micro Spirit X299-AS User manual

Northern Micro
Northern Micro Spirit Q270-AS TWR User manual

Northern Micro
Northern Micro Spirit Q270-AS SFF User manual


