NorthStar 76136 User manual

READ & SAVE THESE INSTRUCTIONS
15-Gallon Electric Air Compressor
Owner’s Manual
WARNING: Read carefully and understand all ASSEMBLY AND OPERATION
INSTRUCTIONS before operating. Failure to follow the safety rules and other basic safety
precautions may result in serious personal injury.
Item #76136

Page 2 of 23
Thank you very much for choosing a NorthStar®product!
For future reference, please complete the owner’s record below:
Serial Number/Lot Date Code: ________________________________
Purchase Date: ____________________________________________
Save the receipt, warranty, and this manual. It is important that you read
the entire manual to become familiar with this product before you begin
using it.
This air compressor is designed for certain applications only. Northern
Tool and Equipment is not responsible for issues arising from
modification or improper use of this product such as an application for
which it was not designed. We strongly recommend that this product not
be modified and/or used for any application other than that for which it
was designed.
For technical questions, please call 1-800-222-5381.

Page 3 of 23
Table of Contents
Intended Use..........................................................................................................................................4
Packaging Contents..............................................................................................................................4
Technical Specifications......................................................................................................................4
Important Safety Information...............................................................................................................5
Grounding..............................................................................................................................................8
Extension Cords....................................................................................................................................9
Main Parts of Air Compressor ...........................................................................................................10
Assembly Instructions........................................................................................................................11
Before Each Use..................................................................................................................................11
Operating Instructions........................................................................................................................12
After Each Use.....................................................................................................................................13
Maintenance ........................................................................................................................................13
Troubleshooting..................................................................................................................................15
Pump/Motor Diagram..........................................................................................................................17
Pump/Motor Parts List........................................................................................................................17
Air Compressor Diagram....................................................................................................................18
Air Compressor Parts List..................................................................................................................19
Replacement Parts..............................................................................................................................20
Limited Warranty.................................................................................................................................21

Page 4 of 23
Intended Use
The NorthStar 15-Gallon Electric Air Compressor is ideal for inflating tires, air mattresses, pool toys,
and sports balls. The air compressor can be used for operating pneumatic tools including: air nailers,
impact wrenches, air ratchets, drills, and cutting tools. It’s the perfect air compressor for medium to
heavy automotive, farm, and shop-type applications. It features:
•Maximum Efficiency: High performance pump provides 225 max. PSI for longer tool run times.
•Compact Power: Power and performance of a large compressor in a portable size.
•Efficient Operation: Low maintenance, oil-free pump produces cleaner air for tools.
Packaging Contents
•Air Compressor
•Owner’s Manual
Technical Specifications
Property
Specification
Model
C151N
Running Horsepower
*1.7
Bore
2.875" (73.025 mm)
Stroke
1.45" (36.83 mm)
Voltage
120
Hz-Single Phase
60
Minimum Branch Circuit Requirement
15 Amps
Fuse Type
Time Delay
Air Tank Capacity (Gallon)
15 (56.8 liters)
Maximum Air Pressure
225 PSI
Sound Rating
78 dB
Approximate Cut-in Pressure
175 PSIG
Approximate Cut-out Pressure
225 PSIG
CFM @ 40 PSI
*6.8
CFM @ 90 PSI
*5.1
* Tested per ISO 1217
Safety Signal Words
The definitions below describe the level of severity for each signal word. Please read the manual and pay
attention to the following.
DANGER: Indicates an imminently hazardous situation which, if not avoided, will result in
death or serious injury.
WARNING: Indicates a potentially hazardous situation which, if not avoided, could result in death
or serious injury.
CAUTION: Indicates a potentially hazardous situation which, if not avoided, may result in minor
or moderate injury.

Page 5 of 23
Important Safety Information
⚠WARNING
•Read and understand all instructions. Failure to follow all instructions may result in serious injury
or property damage.
•The warnings, cautions, and instructions in this manual cannot cover all possible conditions or
situations that could occur. Exercise common sense and caution when using this tool. Always be
aware of the environment and ensure that the tool is used in a safe and responsible manner.
•Do not allow persons to operate or assemble the product until they have read this manual and
have developed a thorough understanding of how it works.
•Do not modify this product in any way. Unauthorized modification may impair the function and/or
safety and could affect the life of the product. There are specific applications for which the product
was designed.
•Use the right tool for the job. DO NOT attempt to force small equipment to do the work of larger
industrial equipment. There are certain applications for which this equipment was designed. This
product will be safer and do a better job at the capacity for which it was intended. DO NOT use
this equipment for a purpose for which it was not intended.
•Industrial or commercial applications must follow OSHA requirements.
⚠WARNING
PROP 65
•This product can expose you to chemicals including lead, which is known to the State of California
to cause cancer. For more information, go to www.p65warnings.ca.gov.
⚠WARNING
WORK AREA SAFETY
•Inspect the work area before each use. Keep work area clean, dry, free of clutter, and well-lit.
Cluttered, wet, or dark work areas can result in injury. Using the product in confined work areas may
put you dangerously close to cutting tools and rotating parts.
•Do not use the product where there is a risk of causing a fire or an explosion; e.g., in the presence of
flammable liquids, gases, or dust. The product can create sparks, which may ignite the flammable
liquids, gases, or dust.
•Do not allow the product to come into contact with an electrical source. The tool is not insulated and
contact will cause electrical shock.
•Keep children and bystanders away from the work area while operating the tool. Do not allow children
to handle the product.
•Be aware of all power lines, electrical circuits, water pipes, and other mechanical hazards in your
work area. Some of these hazards may be hidden from your view and may cause personal injury
and/or property damage if contacted.

Page 6 of 23
•Keep your work area clean and well lit. Ensure floors are not slippery from wax or dust.
•The compressed air directly from your compressor is not safe for breathing. The air stream may
contain carbon monoxide, toxic vapors, or solid particles from the air tank. Breathing these
contaminants can cause serious injury or death. Never use air obtained directly from the compressor
to supply air for human consumption. The compressor is not equipped with suitable filters and in-line
safety equipment for human consumption.
•Never drill into, weld or make any modifications to the air tank or its attachments. Never attempt to
repair a damaged or leaking air tank. Replace with a new air tank.
•The air tank is designed to withstand specific operating pressures. Never make adjustments or parts
substitutions to alter the factory set operating pressures.
•Over inflation of tires could result in serious injury and property damage. NOTE: Air tanks,
compressors and similar equipment used to inflate tires can fill small tires very rapidly. Adjust
pressure regulator on air supply to no more than the rating of the tire pressure. Add air in small
increments and frequently use the tire gauge to prevent over inflation.
⚠WARNING
PERSONAL SAFETY
•Stay alert, watch what you are doing, and use common sense when operating the tool. Do not use
the tool while you are tired or under the influence of drugs, alcohol, or medication. A moment of
inattention while operating the tool may result in serious personal injury.
•Dress properly. Do not wear loose clothing, dangling objects, or jewelry. Keep your hair, clothing and
gloves away from moving parts. Loose clothes, jewelry, or long hair can be caught in moving parts.
Air vents on the tool often cover moving parts and should be avoided.
•Wear the proper personal protective equipment when necessary. Use ANSI Z87.1 compliant safety
goggles (not safety glasses) with side shields, or when needed, a face shield. Use a dust mask in
dusty work conditions. Also use non-skid safety shoes, hardhat, gloves, dust collection systems, and
hearing protection when appropriate. This applies to all persons in the work area.
•Work in an area with good cross ventilation. Read and follow the safety instructions provided on the
label or safety data sheets for the materials you are spraying. Always use certified safety equipment:
NIOSH/OSHA respiratory protection or properly fit-ting face mask designed for use with your specific
application.
•Do not overreach. Keep proper footing and balance at all times.
•Remove keys or wrenches before connecting the tool to an air supply, power supply, or turning on the
tool. A wrench or key that is left attached to a rotating part of the tool may cause personal injury.
•Secure the work with clamps or a vise instead of your hand when practical. This safety precaution
allows for proper tool operation using both hands.
•Never touch any exposed metal parts on compressor during or immediately after operation. The
compressor will remain hot for several minutes after operation. Do not reach around protective
shrouds or attempt maintenance until the unit has been allowed to cool.
•The compressed air stream can cause soft tissue damage to exposed skin and can propel dirt, chips,
loose particles and small objects at high speed, resulting in property damage or personal injury.
Never point any nozzle or sprayer toward any part of the body or at other people or animals.

Page 7 of 23
⚠CAUTION
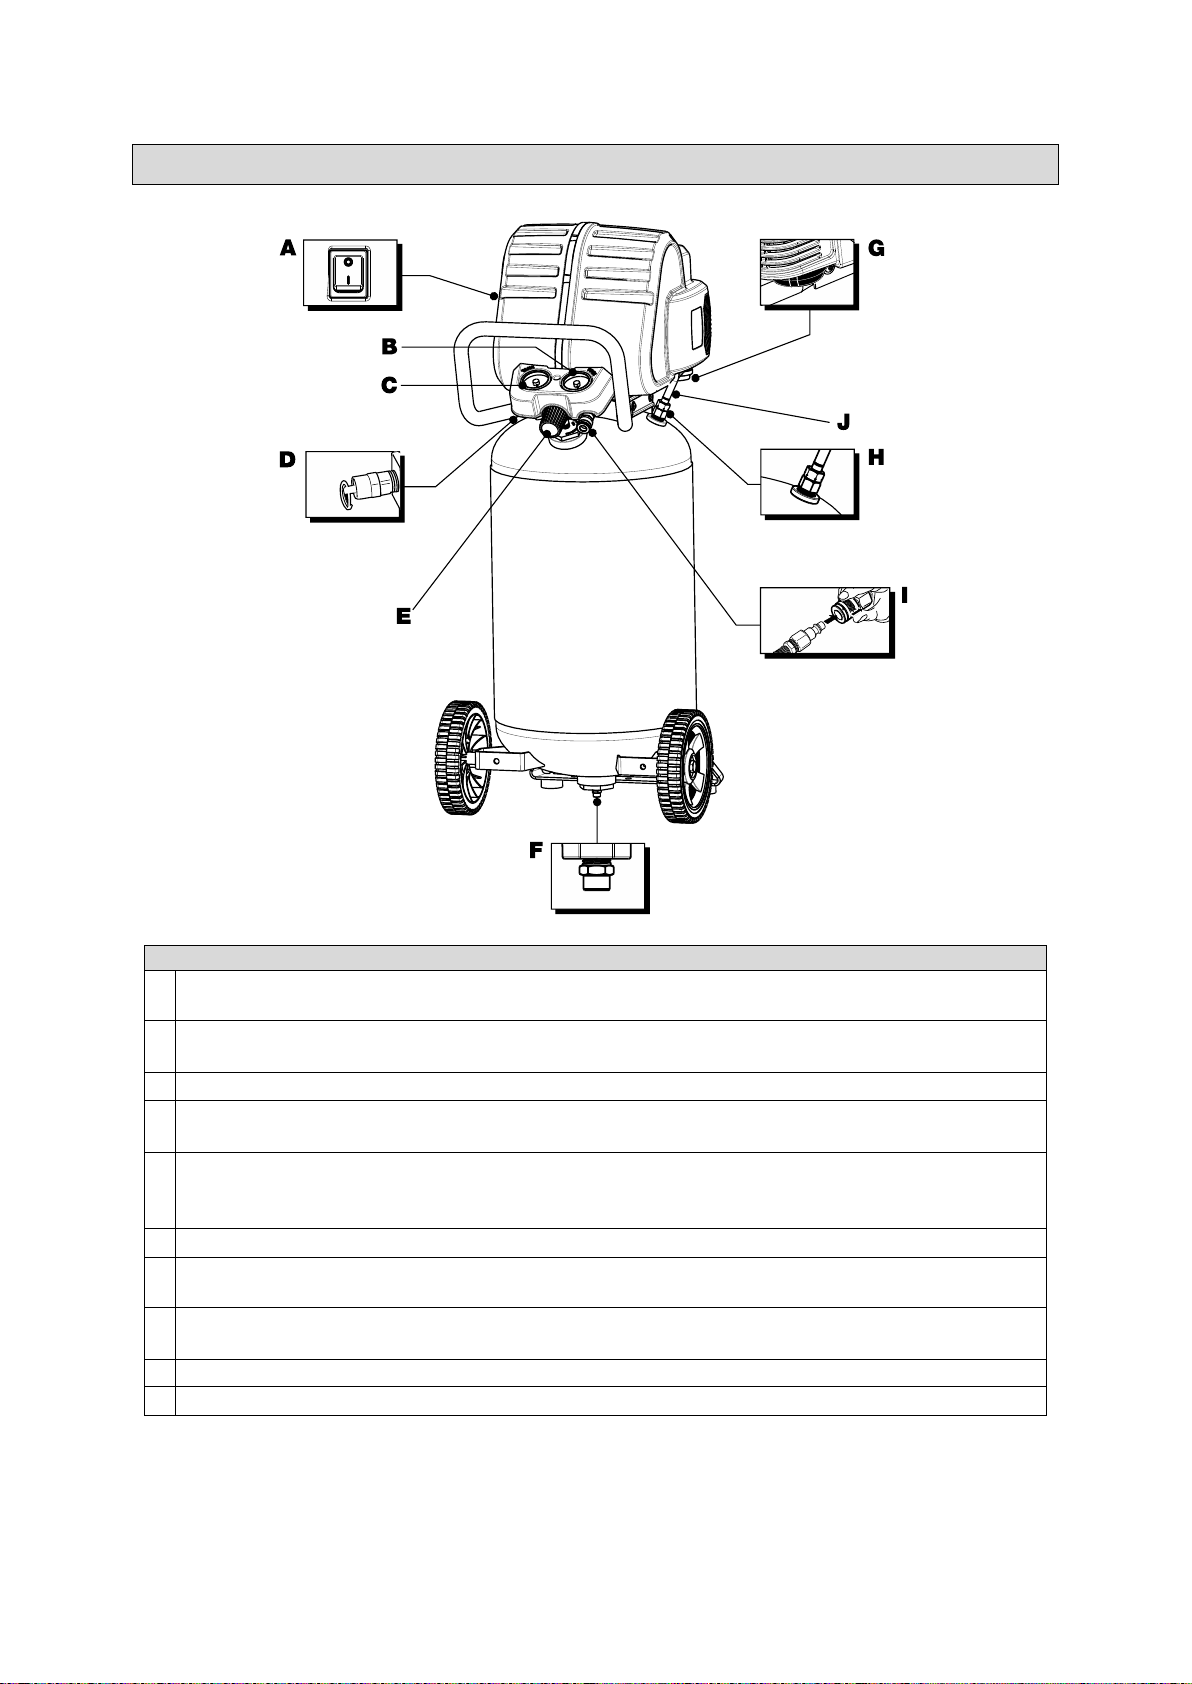
AIR COMPRESSOR USE AND CARE
•Do not force the air compressor. Products are safer and do a better job when used in the manner for
which they are designed. Plan your work and use the correct product for the job.
•Check for damaged parts before each use. Carefully check that the product will operate properly and
perform its intended function. Replace damaged or worn parts immediately. Never operate the
product with a damaged part.
•Do not use a product with a malfunctioning switch. Any power tool that cannot be controlled with the
power switch is dangerous and must be repaired by an authorized service representative before
using.
•Disconnect the power/air supply from the product and place the switch in the locked or off position
before making any adjustments, changing accessories, or storing the tool. Such preventive safety
measures reduce the risk of starting the tool accidentally.
•Store the product when it is not in use. Store it in a dry, secure place out of the reach of children.
Inspect the tool for good working condition prior to storage and before re-use.
•Use only accessories that are recommended by the manufacturer for use with your product.
Accessories that may be suitable for one product may create a risk of injury when used with another
tool. Never use an accessory that has a lower operating speed or operating pressure than the tool
itself.
•Keep guards in place and in working order. Never operate the product without the guards in place.
•Do not leave the tool running unattended.
•Drain the moisture from the tank on a daily basis. A clean, dry tank will help prevent corrosion.
•Pull the pressure relief valve ring daily to ensure that the valve is functioning properly, and to clear
the valve of any possible obstructions.
•To provide proper ventilation for cooling, the compressor must be kept a minimum of 12 inches (31
cm) from the nearest wall, in a well–ventilated area.
•Fasten the compressor down securely if transporting is necessary. Pressure must be released from
the tank before transporting.
•Protect the air hose and electric cord from damage and puncture. Inspect them weekly for weak or
worn spots and replace if necessary.
•To reduce the risk of electric shock, do not expose to rain. Store indoors.
•Never operate the compressor if the power cord or plug are damaged. Take the equipment to the
nearest Authorized Service Center and a specialized technician will replace it.
Specific Operation Warnings
⚠WARNING
•Repairs attempted by unqualified personnel can result in serious injury or death by electrocution. Any
electrical wiring or repairs required on this product should be performed by authorized service center
personnel in accordance with national and local electrical codes.
•Failure to provide adequate grounding to this product could result in serious injury or death from

Page 8 of 23
electrocution. Refer to Grounding Instructions paragraph in the Installation section. Make certain that
the electrical circuit to which the compressor is connected provides proper electrical grounding,
correct voltage and adequate fuse protection.
•Under some conditions and duration of use, noise from this product may contribute to hearing loss.
Always wear certified safety equipment: ANSI S12.6 (S3.19) hearing protection.
•Exceeding the pressure rating of air tools, spray guns, air operated accessories, tires and other
inflatables can cause them to explode or fly apart and could result in serious injury. Follow the
equipment manufacturer’s recommendation and never exceed the maximum allowable pressure
rating of attachments.
•Drain air tank daily or after each use. If air tank develops a leak, replace it immediately with a new air
tank or replace the entire compressor.
Grounding
⚠WARNING
•This machine must be grounded while in use to protect the operator from electrical shock. This
compressor is equipped with an electrical cord that has an equipment grounding conductor and a
grounding plug. The plug MUST be plugged into a matching receptacle that is properly installed
and grounded in accordance with ALL local codes and ordinances.
•DO NOT MODIFY THE PROVIDED PLUG. If it will not fit the receptacle, have the proper
receptacle installed by a qualified electrician.
•CHECK with a qualified electrician or service person if you do not completely understand the
grounding instructions, or if you are not sure the tool is properly grounded.
Grounded Tools: Tools with 3-Prong Plugs
Tools marked with Grounding Required have a 3-wire cord and 3-prong grounding plug. The plug
must be connected to a properly grounded outlet. If the tool should electrically malfunction or break
down, grounding provides a low resistance path to carry electricity away from the user, reducing the
risk of electric shock. (See Figure A.)
The grounding prong in the plug is connected through the green wire inside the cord to the grounding
system in the tool. The green wire in the cord must be the only wire connected to the tool’s grounding
system and must never be attached to an electrically live terminal.
Your tool must be plugged into an appropriate outlet, properly installed and grounded in accordance
with all codes and ordinances. The plug and outlet should look like those in the following illustration.

Page 9 of 23
Extension Cords
⚠WARNING
•USE A PROPER EXTENSION CORD. Make sure your extension cord is in good condition. When
using an extension cord, be sure to use one heavy enough to carry the current your product will
draw. An undersized cord will cause a drop in line voltage, resulting in loss of power and cause
overheating.
•Be sure your extension cord is properly wired and in good condition. Always replace a damaged
extension cord or have it repaired by a qualified person before using it. Protect your extension
cords from sharp objects, excessive heat and damp or wet areas.
•Grounded tools require a 3-wire extension cord.
•As the distance from the supply outlet increases, you must use a heavier gauge extension cord.
Using extension cords with inadequately sized wire causes a serious drop in voltage, resulting in
loss of power and possible tool damage.
•The smaller the wire’s gauge number, the greater the capacity of the cord. For example, a 14-
gauge cord can carry a higher current than a 16-gauge cord. Minimum extension cord wire size is
shown in the following table:
Minimum Wire Size of Extension Cords
Nameplate AMPS
Cord Length
25'
50'
100'
150'
0-6
18 AWG
16 AWG
16 AWG
14 AWG
6-10
18 AWG
16 AWG
14 AWG
12 AWG
10-12
16 AWG
16 AWG
14 AWG
12 AWG
12-16
14 AWG
12 AWG
NOT RECOMMENDED
•When using more than one extension cord to make up the total length, make sure each cord
contains at least the minimum wire size required.
•If you are using one extension cord for more than one tool, add the nameplate amperes and use
the sum to determine the required minimum cord size.
•If you are using an extension cord outdoors, make sure it is marked with the suffix W-A (Win
Canada) to indicate it is acceptable for outdoor use.
•Make sure your extension cord is properly wired and in good electrical condition. Always replace
a damaged extension cord or have it repaired by a qualified electrician before using it.
•Protect your extension cords from sharp objects, excessive heat, and damp or wet areas.

Page 10 of 23
Main Parts of Air Compressor
Main Parts Description
A
Power Switch: This controls the power to the motor and also the cut-in/ cut-out pressure
settings. This switch serves as the Auto-On/Off positions for the unit.
B
Tool Pressure Gauge: Indicates the outgoing air pressure to the tool and is controlled by the
regulator.
C
Tank Pressure Gauge: Indicates the reserve air pressure in the tank.
D
Tank Safety Valve: Used to allow excess tank pressure to escape into the atmosphere.
This valve should only open when the tank pressure is above the maximum rated pressure.
E
Regulator: The air pressure coming from the air tank is controlled by the regulator. To increase
the pressure, turn the knob clockwise, and to decrease the pressure, turn the knob
Counter-clockwise.
F
Tank Drain Valve: Used to drain condensation from the air tank, located at bottom of tank.
G
Air Intake Filter: Provides clean air to the pump and must always be kept free of debris. Check
on a daily basis or before each use.
H
Check Valve: When the pump is not in operation, the valve closes to retain air pressure inside
the tank, an internal component.
I
Quick Connect: Offers a quick release feature for attaching and removing the air hose.
J
Outlet Tube: Transfers pressurized air from the air compressor pump to the tank.

Page 11 of 23
Assembly Instructions
⚠WARNING
•The air compressor should be turned off, unplugged from the power source, the air bled from the
tank and the unit allowed time to cool before any maintenance is performed. Personal injuries
could occur from moving parts, electrical sources, compressed air or hot surfaces. The quick
connect assembly must be attached before use. Failure to assemble correctly could result in
leaks and possible injury.
•If unsure of assembly instructions or you experience difficulty in the assembly please call your
local service department for further information.
1. Unpack the air compressor. Inspect the unit for damage. If the unit has been damaged in
transit, contact the carrier and complete a damage claim. Do this immediately because there
are time limitations to damage claims.
2. Check the compressor’s serial label to ensure that you have received the model ordered, and
that it has the required pressure rating for its intended use.
3. Locate the compressor according to the following guidelines:
a. Position the compressor near a grounded electrical outlet.
b. The compressor must be at least 12 inches (31 cm) from any wall or obstruction, in a
clean, well-ventilated area, to ensure sufficient air flow and cooling.
c. In cold climates, store portable compressors in a heated building when not in use.
This will reduce problems with the motor starting and freezing from water
condensation.
d. Remove the compressor from the carton and place it on the floor or a hard, level
surface. The compressor must be level to ensure proper drainage of the moisture in
the tank.
Before Each Use
⚠WARNING
•Risk of unsafe operation. Firmly grasp air hose in hand when installing or disconnecting to prevent
hose whip.
•Risk of unsafe operation. Do not use damaged or worn accessories.
•Risk of bursting. Too much air pressure causes a hazardous risk of bursting. Check the
manufacturer’s maximum pressure rating for air tools and accessories. The regulator outlet pressure
must never exceed the maximum pressure rating.
LOCATION OF THE AIR COMPRESSOR: The air compressor should always be located in a clean,
dry, and well-ventilated environment. The unit should have at minimum 12 inches of space on each
side. The air filter intake should be free of any debris or obstructions. Check the air filter on a daily
basis to make sure it is clean and in working order.

Page 12 of 23
DUTY CYCLE: This air compressor pump is capable of running continuously. To prolong the life of
your air compressor, it is recommended that a 50%-75% average duty cycle be maintained; that is,
the air compressor pump should not run more than 30-45 minutes in any given hour.
ACCESSORIES: Accessories for this unit are sold separately.
Operating Instructions
⚠WARNING
•Risk of bursting. If any unusual noise or vibration is noticed, stop the compressor immediately and
have it checked by a trained service technician.
DAILY START-UP
1. Set the Power Switch to the OFF (0) position (A).
2. Inspect the air compressor, air hose, and any accessories/tools being used for damage or
obstruction. If any of these mentioned items need repair/replacement, contact your local
authorized dealer before use.
3. Close the drain valve (B).
4. Connect the air hose to the quick connect socket on the regulator assembly by inserting the
quick connect plug on the air hose into the quick connect socket. The quick connect socket
collar will snap forward and lock the plug into place, providing an air tight seal between the
socket and plug. To release the air hose, push the collar back on the quick connect socket
(C).
a. Firmly grasp the hose prior to inserting it into the quick connect and when removing it
from the quick connect socket.
5. Plug the power cord into the proper receptacle (D).
6. Turn the Power Switch to the ON (I) position and the compressor will start and build pressure
in the tank until cut-out pressure is reached and the unit shuts off automatically (A).
7. Adjust the regulator to a PSI setting that is needed for your application and be sure it is within
the safety standards required to perform the task. If using a pneumatic tool, the manufacturer
should have recommendations in the manual for that particular tool on operating PSI settings
(E).

Page 13 of 23
After Each Use
⚠WARNING
•Risk of unsafe operation. Firmly grasp air hose in hand when installing or disconnecting to
prevent hose whip.
•Risk of bursting. Drain air tank daily. Water will condense in air tank. If not drained, water will
corrode and weaken the air tank causing a risk of air tank rupture.
DAILY SHUT-DOWN
1. Set the Power Switch to the OFF (0) position (A).
2. Unplug the power cord from the receptacle (D).
3. Set the outlet pressure to zero on the regulator (E).
4. Remove any air tools or accessories.
5. Open the drain valve allowing air to bleed from the tank. After all of the air has bled from the
tank, close the drain valve to prevent debris build-up in the valve (B).
Maintenance
⚠WARNING
•To ensure efficient operation and longer life of the air compressor unit, a routine maintenance
schedule should be followed. The following schedule is geared toward a consumer whose

Page 14 of 23
compressor is used in a normal working environment on a daily basis.
•Risk of unsafe operation. Unit cycles automatically when power is on. When performing
maintenance, you may be exposed to voltage sources, compressed air, or moving parts. Personal
injuries can occur. Before performing any maintenance or repair, disconnect power source from the
compressor and bleed off all air pressure.
•Risk of bursting. If the safety valve does not work properly, over-pressurization may occur,
causing air tank rupture or an explosion.
•Risk of burn. Tubes, pump head, and surrounding parts are very hot; do not touch these. Allow
compressor to cool prior to servicing.
•Risk from flying objects. Always wear certified safety equipment: ANSI Z87.1 eye protection
(CAN/CSA Z94.3 with side shields).
•Risk from noise. Use ear protection ANSI S12.6 (S3.19) as air flow noise is loud when draining.
•Risk of bursting. Water will condense in the air tank. If not drained, water will corrode and weaken
the air tank causing a risk of air tank rupture.
•This compressor is equipped with an automatic reset thermal overload protector which will shut off
the motor if it becomes overheated. If the thermal overload protector is actuated, the motor must be
allowed to cool down before start-up is possible. NOTE: To reset the motor overload, turn the
power switch to the OFF position and unplug the unit from the power outlet. Allow 10 minutes
(minimum) for motor overload cut-out to cool and reset. Unit can then be plugged in and re-started.

Page 15 of 23
CHECKING THE SAFETY VALVE
Check the safety valve by performing these three steps:
1. Plug the compressor in and run until shut-off pressure is reached.
2. Wearing safety glasses and hearing protection, pull out on the safety valve ring to release
pressure from the tank.
3. The safety valve should close automatically at approximately at 40-50 PSI. If the safety valve
does not allow air to be released when you pull out on the ring, or does not close
automatically, it must be replaced.
STORAGE
To store the air compressor, be sure to do the following:
1. Turn the unit off and unplug the power cord from the receptacle.
2. Remove all air hoses, accessories, and air tools from the air compressor.
3. Perform the daily maintenance schedule.
4. Open the drain valve to bleed all air from the tank.
5. Close the drain valve.
6. Protect the electrical cord and air hose from damage (such as being stepped on or run over).
Wind them loosely around the compressor handle.
7. Store the air compressor in a clean and dry location.
Maintenance Schedule
Items to Check/Change
Before Each Use or Daily
Check Tank Safety Valve
X
Overall Unit Visual Check
X
Drain Tank
X
Check Power Cord for Damage
X
Troubleshooting
⚠WARNING
•Risk of unsafe operation. Unit cycles automatically when power is on. When servicing, you may
be exposed to voltage sources, compressed air, or moving parts. Before servicing unit, unplug or
disconnect electrical supply to the air compressor, bleed tank of pressure, and allow the air
compressor to cool.

Page 16 of 23
Failure
Possible Cause
Corrective Action
Low pressure,
not enough air, or
compressor does
not stop.
Tank drain valve is open.
Close drain valve.
Fittings leak.
Check fittings with soapy water.
Restricted air intake.
Clean or replace intake filter element.
Prolonged excessive use of air.
Decrease amount of air used.
Compressor is not large enough.
Check air requirement for the
accessory. If it is higher than the CFM
and pressure supplied by the
compressor, you need a larger
compressor. Most accessories are
rated at 25% of actual CFM while
running continuously.
Hole in air hose.
Check and replace if necessary.
Tank leaks.
Immediately replace tank.
DO NOT attempt to repair.
Blown seals.
Replace seals.
Valve leaks.
Replace seals.
Leaking or worn piston.
Replace piston.
Air leaks from
regulator or
regulator does
not regulate
pressure.
Dirty or damaged regulator internal
parts.
Replace regulator or internalparts.
Regulated
pressure gauge
reading drops
when air
accessory is
being used.
This is normal.
If pressure drops too low, adjust
regulator while accessory is used.
Compressor not large enough.
Check air requirement of the accessory.
If it is higher than the CFM and the
pressure supplied by the compressor,
you need a larger compressor. Most
accessories are rated at 25% of actual
CFM while running continuously.
Pressure relief
valve opens.
Tank pressure exceeded normal
operating pressure.
Replace pressure switch.
Motor will not run.
Tank pressure exceeds preset pressure
switch limit.
Motor will start automatically when tank
pressure drops below cut- in pressure of
pressure tank.
Make sure the Thermal Overload Switch
has not tripped. The motor has a built-in
thermal cut-out that trips when necessary
to protect the motor from damage when
overheated.
Fuse blown or circuit breaker tripped.
To reset the motor overload toggle, turn
the power switch to the OFF position and
unplug the unit from the power outlet.
Allow 10 minutes (minimum) for the
motor overload cut-out to cool and reset.
Unit can then be plugged in and re-
started.
•Replace blown fuse or reset
circuit breaker.
•Do not use fuse or circuit breaker
with higher rating than specified
for your branch circuit.

Page 17 of 23
•Check for proper fuse.
Fusetron™type T is acceptable.
•Check for low voltage and proper
extension cord size.
•Disconnect other applications
from circuit. Operate compressor
on a dedicated circuit.
Check valvestuck open.
Remove and clean orreplace.
Wrong wire gauge in cord or excessive
extension cord length.
Check for proper gauge and extension
cord length.
Loose electrical connections.
Contact authorized service center.
Paint spray on internal motor parts.
Have unit inspected atservice center. Do
not operate compressor in the paint
spray area.
Possible defective motor.
Have unit inspected at service center.
Pump/Motor Diagram
Pump/Motor Parts List
Reference
Part Number
Part Description
Quantity
1
E106663
PULLEY
1
2
E106664
BELT
1

Page 18 of 23
Reference
Part Number
Part Description
Quantity
3
E107844
FAN
1
4
E106666
SCREW .50-20 UNF x 4.50 HEX FLANGE -
TORQUE 100-120 FT./LB.
1
5
E106667
FLYWHEEL
1
6
E106668
SCREW .50-20 UNF X 1.25 HEX FLANGE -
TORQUE 100-120 FT./LB.
1
7
E106669
SCREW .25-20 X 1.25 HEX FLANGE - TORQUE
7-10 FT./LB.
4
8
E106670
VALVE PLATE KIT
1
9
E107845
CONROD KIT
1
10
E106672
HEAD
1
Air Compressor Diagram

Page 19 of 23
Air Compressor Parts List
Reference
Part
Number
Part Description
Quantity
1
E106660
KIT SCREW .250-20 X .750 HHW, SET OF 3 -
TORQUE TO 9-12 FT./LB.
1
2
E107996
MANIFOLD INCLUDES ITEM 40
1
3
E106917
COVER CONSOLE
1
4
E106614
KIT SCREW #10-24 X .563, SET OF 4 - TORQUE
12-30 IN./LB.
3
5
E107856
OUTLET TUBE
1
6
E107847
TANK -INCLUDES ITEMS 16, 18, 21, 22, 31, 33, 35,
& 42
1
7
E107848
HANDLE ASSEMBLY, PTD
1
8
E106618
CHECK VALVE 1/2 NPT X 1/2
1
*9
E107849
LEFT SHROUD
1
*10
E107850
RIGHT SHROUD
1
11
E107851
SAFETY VALVE 250 .250 NPT
1
12
E106622
ISOLATOR 3PT. MOUNT 90 DURO, SET OF 3
3
13
E106623
NUT TUBE .750-16 UNF HEX - TORQUE TO 15-25
FT./LB.
1
*14
E106624
O-RING .362 ID X .103 WIDTH
1
15
E106625
CUP SADDLE MOUNT
1
16
E106626
SCREW HEX FLANGE SHOULDER .50 X 1.50,
SET OF 2 - TORQUE 15-25 FT./LB.
2
17
E106627
KIT SCREW .250-20 X .750 HHW, SET OF 3 –
TORQUE TO 3-5 FT./LB.
4
18
E107857
WHEEL 8 X 1.75 SEMI-PNEUMATIC
2
19
E106629
POWER CORD (14GA) 120V 75 IN
1
20
E106658
ZIP TIE
1
21
E106630
LABEL/HOT SURFACE (not shown)
1
22
E106631
LABEL/WARNING, DRAIN TANK (not shown)
1
23
E106632
AIR INLET FILTER ASSEMBLY 3/8 NPT
1
24
E106633
SWITCH ROCKER
1
25
E106634
BRACKET EHP MICRO PRESSURE SWITCH
1
26
E107852
PRESSURE SWITCH 175-225 PSI MICRO-
BARBED
1
27
E111189
HOSE .25 ID X 9 BLK RUBBER
1

Page 20 of 23
Reference
Part
Number
Part Description
Quantity
28
E106637
ASSEMBLY WIRE JUMPER
1
29
E106638
SCREW #8-16 X .375 PLASTITE T20 - TORQUE
12-30 IN./LB.
1
30
E107853
PUMP
1
31
E106640
NUT .375-16 SERRATED HEX, SET OF 2
2
32
E106641
ASSEMBLY NUT SLEEVE 1/2
1
33
E106661
BUMPER RECESS RUBBER 50 DURO, SET OF 2
2
34
E106643
SCREW #8-32 X .375/.344 HHW, SET OF 2 -
TORQUE 40-50 IN./LB.
2
35
E106644
DRAIN VALVE
1
36
E107855
GAUGE 2 IN. OD 300PSI .25 NPT
1
37
E106648
HOSE CLAMP .250 ID, SET OF 2
4
38
E107854
GAUGE 2 IN OD 400PSI .25 NPT
1
39
E106659
ZIP TIE
1
40
E107858
NIPPLE .250-18 X 2.0 NPT
1
41
E106657
WASHER 1.00 OD X .188 ID
1
42
E106660
KIT SCREW .250-20 X .750 HHW, SET OF 3 -
TORQUE SNUG
2
Reference
Notes
*9, *10
All snaps on shroud need to be fully engaged.
*14
Seat O-ring securely in groove on outlet tube before installing into pump head.
Note: Descriptions are provided for reference only.
Replacement Parts
•For replacement parts and technical questions, please call Customer Service at 1-800-222-5381.
•Not all product components are available for replacement. The illustrations provided are a
convenient reference to the location and position of parts in the assembly sequence.
•When ordering parts, the following information will be required: item description, item model
number, item serial number/item lot date code, and the replacement part reference number.
•The distributor reserves the rights to make design changes and improvements to product lines
and manuals without notice.
Table of contents
Other NorthStar Air Compressor manuals

NorthStar
NorthStar M459212B.6 User manual

NorthStar
NorthStar 459232 User manual

NorthStar
NorthStar M4592900A.4 User manual

NorthStar
NorthStar M459392B.4 User manual

NorthStar
NorthStar NS459392 User manual

NorthStar
NorthStar M36029L User manual

NorthStar
NorthStar 53009 User manual

NorthStar
NorthStar 45933 User manual

NorthStar
NorthStar 25654 User manual

NorthStar
NorthStar M459392L User manual