Nostalgia MyMini NMDFWM15AQ Quick guide

All products are trademarks of Nostalgia Products LLC.
Worldwide design & utility patented or patents pending.
© 2023 Nostalgia Products LLC.
www.nostalgiaproducts.com
(rev. 05/15/23 WJE)

NMDFWM15AQ
MyMini™ Personal Deep Fryer
Freidora Personal MyMini™
Friteuse Personnelle MyMini™
Instructions and Recipes
Instrucciones y recetas
Consignes et recettes


ENGLISH
2
Make every day a party!
Visit www.nostalgiaproducts.com for more fun products.
CONTENTS
SAFETY. . . . . . . . . . . . . . . . . . . . . . . . . . . . . . . . . . . . . . . . . . 2
IMPORTANT SAFEGUARDS . . . . . . . . . . . . . . . . . . . . . . . . . . . . . 3
ADDITIONAL IMPORTANT SAFEGUARDS . . . . . . . . . . . . . . . . . . . . 3
INTRODUCTION . . . . . . . . . . . . . . . . . . . . . . . . . . . . . . . . . . . . 5
PARTS & ASSEMBLY . . . . . . . . . . . . . . . . . . . . . . . . . . . . . . . . . . 6
HOW TO OPERATE . . . . . . . . . . . . . . . . . . . . . . . . . . . . . . . . . . 8
HELPFUL TIPS . . . . . . . . . . . . . . . . . . . . . . . . . . . . . . . . . . . . . 9
CLEANING & MAINTENANCE . . . . . . . . . . . . . . . . . . . . . . . . . . . . 9
RETURNS & WARRANTY . . . . . . . . . . . . . . . . . . . . . . . . . . . . . . . 10
SAFETY
Appliance Specications:
120 Volts, 60 Hz, 700 Watts
THIS PRODUCT IS FOR USE IN 120V AC OUTLET ONLY.
Refer to www.nostalgiaproducts.com/user-manuals/ for the most updated manual.
Your safety and the safety of others is very important.
We have provided many important safety messages in this manual and
on your appliance. Always read and obey all safety messages.
This is the safety alert symbol.
This symbol alerts you to potential hazards that can
cause serious injury to you and others.
All safety messages will follow the safety alert symbol.
All safety messages will tell you what the potential hazard is, tell you how to reduce the
chance of injury, and tell you what can happen if the instructions are not followed.

ENGLISH
3
IMPORTANT SAFEGUARDS
A person who has not read and understood all operating and safety instructions
is not qualied to operate this appliance. All users of this appliance must read and
understand this Instruction Manual before operating or cleaning this appliance.
When using electrical appliances, basic safety precautions
should always be followed, including:
1. Read all instructions before operating this appliance.
2. DO NOT TOUCH the hot surfaces. Use handles or knobs.
3. This appliance is NOT A TOY.
4. Unsupervised young children and cognitively challenged
individuals should never operate this appliance.
5. Close supervision is necessary when any appliance is used by or near children.
6. To protect against electrical shock do not immerse cord, plug
or any part of this unit in water or other liquids.
7. Unplug from outlet when not in use, before removing parts and before cleaning.
Allow to cool before putting on or taking o any parts, and before cleaning.
8. DO NOT operate any appliance with a damaged cord or plug, or after the appliance
malfunctions, or if the appliance has been damaged in any manner. Return the
appliance to the nearest repair shop for examination, repair or adjustment.
9. The manufacturer does not recommend the use of accessory attachments other than
what is provided by the manufacturer. Use of attachments may cause injuries.
10. DO NOT use the appliance for other than its intended use.
11. DO NOT use outdoors. FOR HOUSEHOLD USE ONLY.
12. DO NOT place on or near a hot gas or electric burner, or in a heated oven.
13. DO NOT let cord hang over edge of table or counter, or touch hot surfaces.
14. NEVER leave unit unattended while in use or when plugged into an outlet.
15. Extreme caution must be used when moving an appliance containing hot food.
ADDITIONAL IMPORTANT SAFEGUARDS
Operating Safety Precautions
1. WARNING: Burn hazard. Hot oil can cause severe burns. Please
use extra caution when handling this appliance.
2. Oil and water DO NOT mix. Before adding oil to the appliance,
ensure that all parts are COMPLETELY DRY.
3. Do not use any other liquids than cooking oil for deep frying.
4. Do not place the unit close to ammable materials, heating units, or wet environments.
5. Height of ingredients placed in the Fryer Basket should comply with
the directions - Do not ll more than the max ll line.
6. Do not replace with other parts that are not designed
specically for the Personal Deep Fryer.

ENGLISH
4
7. Do not put any other cooking pans in the Fryer Basket. Do
not replace any parts with other containers.
8. If a considerable amount of smoke is escaping from the air vent
during operation, unplug the unit immediately.
9. Do not move the unit while in operation. Only after the Deep Fryer
has completely cooled down should you attempt to move it. Always
wait for the Deep Fryer to cool down prior to handling it.
10. Never use a towel to block the vent.
11. If any troubles arise during operation, any necessary service must
be done by the an authorized professional for repairs.
12. Do not disassemble the unit on your own or replace any parts.
13. Do not use metal utensils with the Fryer Basket as this can damage the surface.
14. If the power cord is damaged, do not attempt to operate the unit.
15. Keep the unit out of reach of children when the unit is operating or cooling down.
16. Keep hands and face away from the venting outlet or where heat or steam is being released.
17. Make sure the DEEP FRYER is always clean prior to cooking.
18. It is normal for some smoke to escape the unit when heating for the rst time.
Instructions for the Electrical Cord and Plug
1. This appliance has a polarized plug (one blade is wider than the other). To reduce the
risk of electrical shock, this plug is intended to t into a polarized outlet only one way.
If the plug does not t fully into the outlet, reverse the plug. If it still does not t,
contact a qualied electrician. Do not attempt to modify the plug in any way.
2. A short power supply cord is provided to reduce the risk resulting
from becoming entangled or tripping over a long cord.
3. If a long detachable power-supply cord or extension cord is used:
• Extension cords can be used if care is exercised in their use.
• The marked electrical rating of the cord or extension cord should
be at least as great as the electrical rating of the appliance.
• When using a longer cord or extension cord, make sure that
the cord does not drape over a countertop or tabletop where
it can be pulled on or tripped over unintentionally.
4. The manufacturer does not recommend using this machine in countries that do not
support 120V AC even if a voltage adapter, transformer, or converter is in use.
5. This appliance utilizes a magnetic plug designed to detach easily from the
unit. As a result, if it is bumped or moved during use, the cord could detach
causing the unit to stop heating. Avoid contact with cord during operation.
If contact occurs, verify that the cord is still properly connected.
SAVE THESE INSTRUCTIONS!

ENGLISH
5
INTRODUCTION
Congratulations on your purchase of the MYMINI™ PERSONAL DEEP FRYER from Nostalgia™!
This deep fryer provides the perfect method for frying foods of all varieties. It has ts
up to 1.5 liters of your preferred oil for frying anything from french fries to chicken,
veggies, and more, letting you make delicious comfort food whenever you want.
Here are the features of your Deep Fryer:
• 1.5 liter interior capacity
• Fryer Basket with heat-resistant handle
• Temperature dial ranges from 120°F - 375°F
• Indicator light for pre-heat signaling

ENGLISH
6
PARTS & ASSEMBLY
Lid
Fryer Basket
Temperature
Dial
Indicator Light
Interior
Lid Handle
Heat-Resistant
Handle
MAGNETIC PLUG
Make sure that the Magnetic
Plug is properly attached before
powering on the Deep Fryer.

ENGLISH
7
ASSEMBLING THE FRYER BASKET
1. Press the ends of the Handle together
2. Insert the ends of the Handle into the two holes inside the basket
3. Press the Handle onto the rectangular metal part of the basket
4. Make sure the Handle ts rmly onto the basket.

ENGLISH
8
HOW TO OPERATE
IMPORTANT: Before any operation, make sure to read all important
safeguards. This appliance features hot surfaces and utilizes hot oil
which can cause severe injuries if not handled properly.
1. Before rst use, wipe down the fry basket, lid, and interior of the fryer body with a
damp cloth. Do not immerse the fryer in any liquid or use in a dishwasher.
2. Find a dry, level, and heat resistant surface near an electrical outlet.
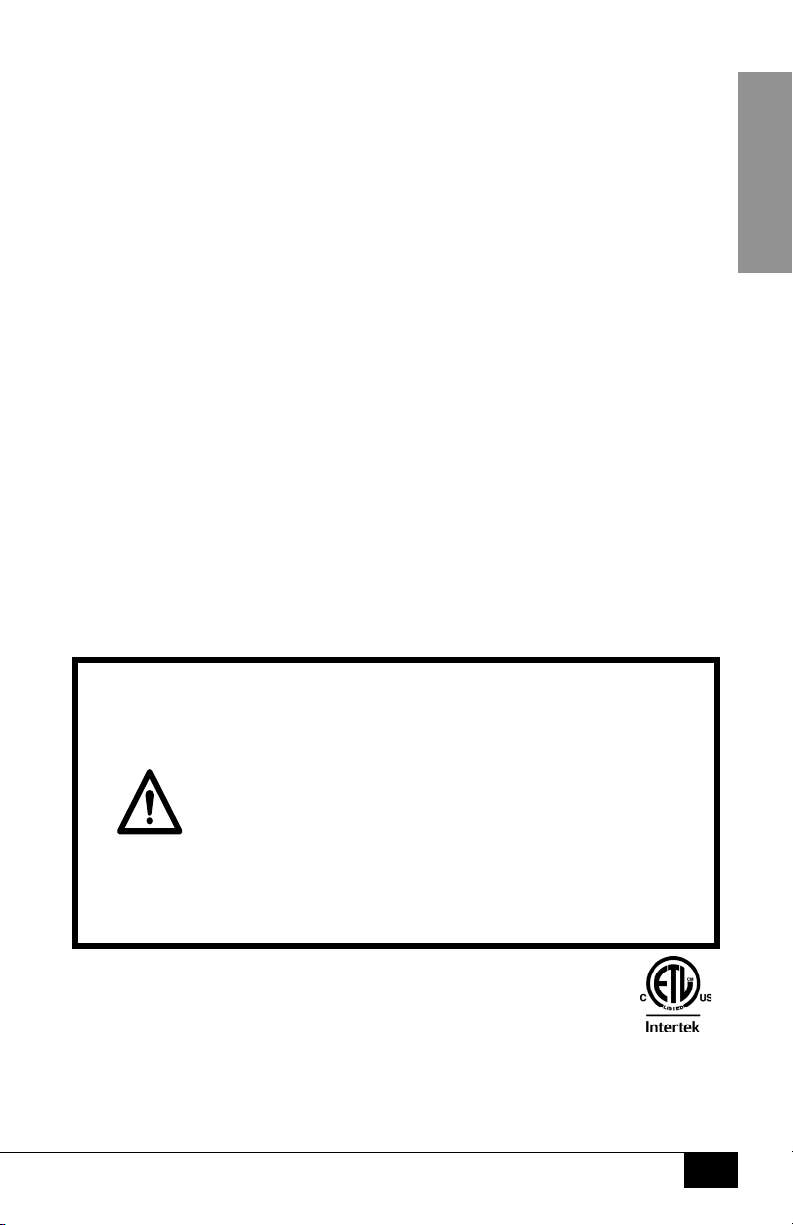
3. Open the Lid and remove the Fryer Basket from the Interior.
4. Fill the Interior with oil. DO NOT exceed the MAX oil level line.
5. Close the Lid.
6. Make sure the Magnetic Cord is properly attached to the unit by aligning the end of the
cord to the electrical pins on the unit. Then, plug the power cord into a working wall outlet.
7. Turn the Temperature Dial to your desired temperature. At this time, the
Indicator Light will turn on, signalling that your Fryer is pre-heating.
8. Prepare your food while your Fryer pre-heats.
9. Wait until the Indicator Light turns o.
NOTE: The indicator light will turn on and o intermittently
while cooking to maintain a consistent temperature.
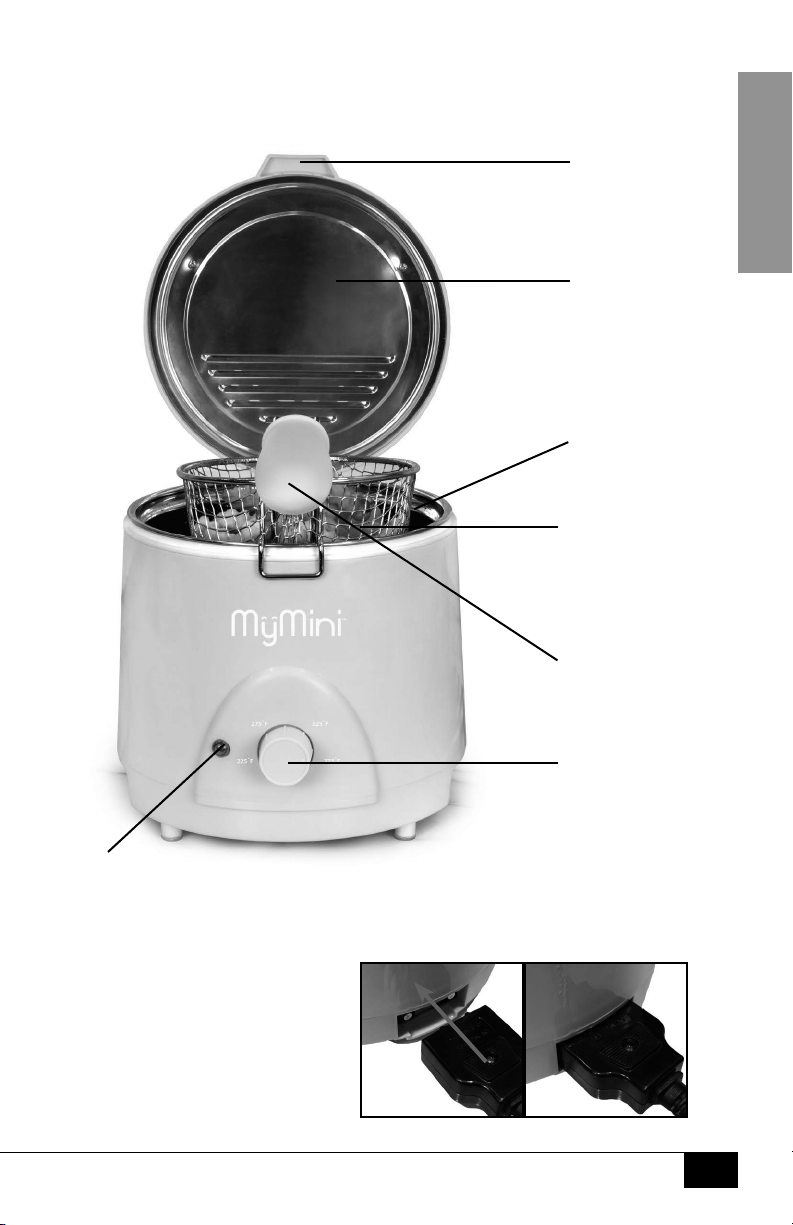
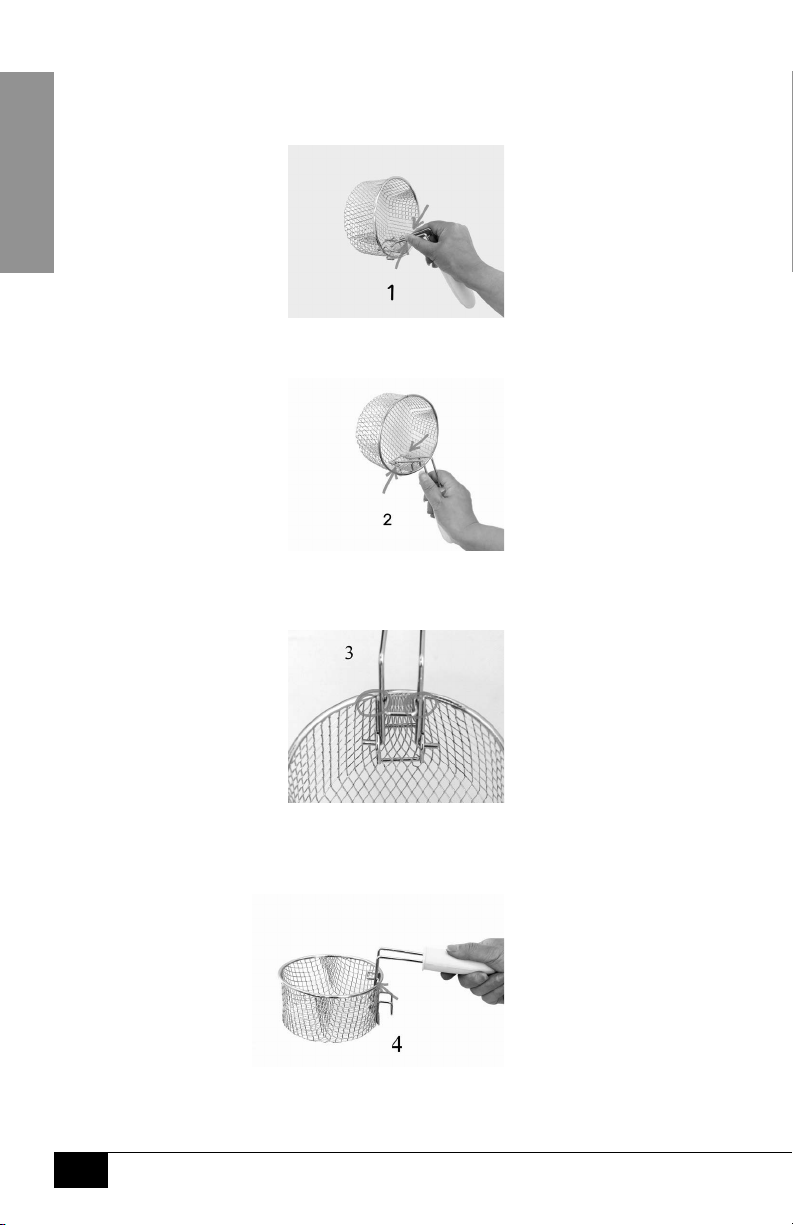
10. Place the Fryer Basket on a counter top and ll basket up to ¾ full.
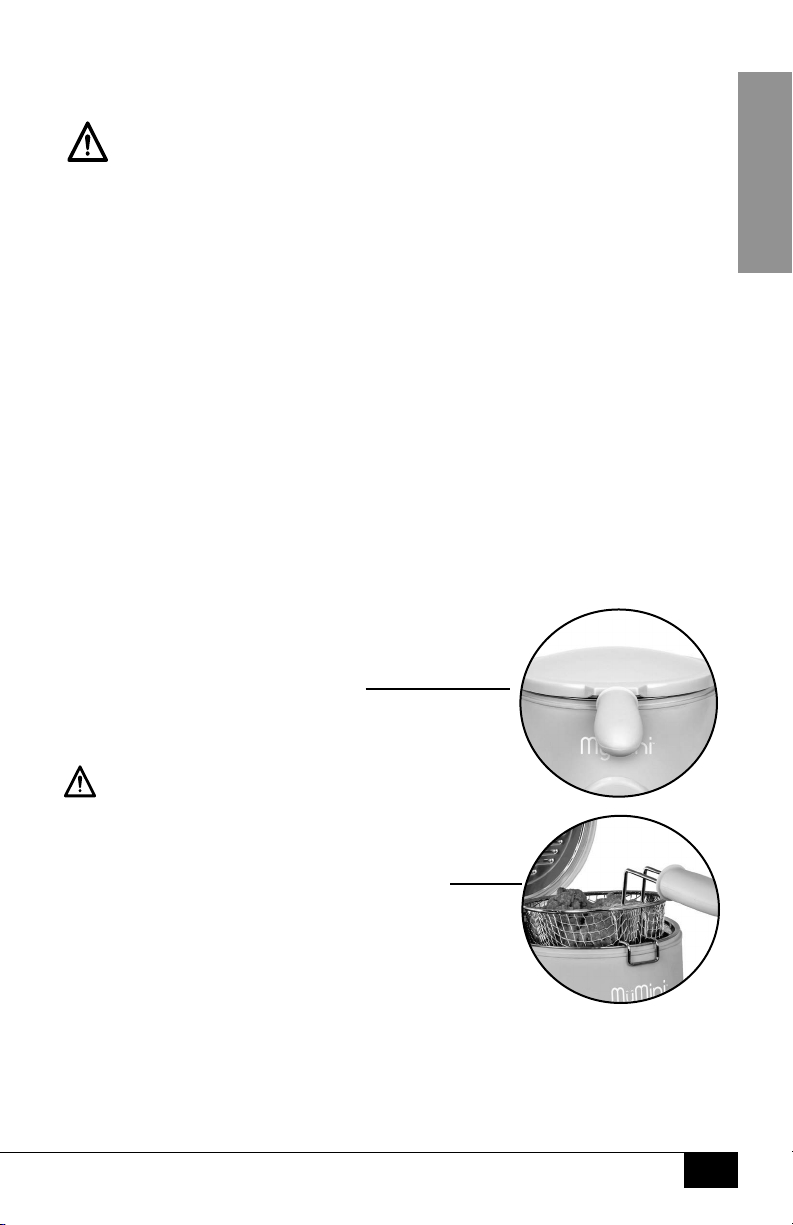
11. Open the Lid using the Lid Handle and carefully place the Fryer Basket inside the interior
so that the handle is positioned above the Temperature
Dial. Wear gloves or oven mitts to prevent any injuries.
12. Close the lid. The notches below the Lid Handle
will t over the Heat-Resistant Handle.
NOTE: DO NOT Remove the Handle
while cooking at any time.
13. Allow your food to cook for the amount
of time specied to your recipe.
CAUTION: Steam may rise from the Deep Fryer. To prevent
injuries, keep hands away from the top of the Deep Fryer.
14. When cooking is complete, open the Lid and carefully
lift the Fryer Basket using the heat-resistant handle.
Rest the Fry Basket on the edge of the interior using
the clip below the Heat-Resistant Handle for about
one minute to allow oil to drain from the basket.
15. Place your food onto paper towels or
a plate and allow to cool.
16. If cooking more food, allow 3 to 4 minutes
between batches to allow temperature
to recover. If done, turn the Temperature
Dial o, unplug, and let your Deep Fryer cool before cleaning.

ENGLISH
9
COOKING GUIDE
Your PERSONAL DEEP FRYER can be use to prepare a variety of crispy, tasty, comfort meals
quicker than oven baking.
Use the quick guide below for general settings to cook certain foods at. Keep in mind that
dierent recipes and brands of food cook dierently, so you may need to make adjustments
as you prepare your meals.
FOOD TIME (MINUTES) TEMPERATURE
(° F)
Cheese Curds (Frozen) 2 - 3 375
Chicken Nuggets
(Frozen)
8 - 10 375
Egg Rolls 4 - 5 350
Fish (Frozen & Breaded) 7 375
Onion Rings (Frozen) 3 - 4 375
French Fries (Frozen) 8 - 10 375
Vegetables (Raw,
Battered / Breaded)
1 - 3 350
HELPFUL TIPS
NEVER leave the unit unattended while operating.
Cooking Tips:
• Fry foods of equal size and thickness as they will fry evenly and at the same speed
• Before frying, remove moisture or ice from frozen foods
by patting down with dry paper towels.
DO NOT exceed the MAX ll line when adding oil to the interior. Doing
so may cause the deep fryer to overow when the basket is placed
inside, which can create res, injuries, or other serious risks.
• DO NOT ll the basket more than ¾ full.
• Battered foods may stick to the basket. To avoid this, lower the Fryer
Basket into the oil before placing in food. Then, use a heat-resistant
scoop or tongs to add or remove food to the basket.
• For crisper food, fry with the cover open.

ENGLISH
10
NO POWER
• Check that the magnetic plug is plugged in on both ends.
NOT HEATING
• Check if the thermostat is adjusted to the specied temperature.
• The heating element may be broken. Call a certied technician to repair.
CLEANING & MAINTENANCE
Please take care of your PERSONAL DEEP FRYER by following these simple directions.
• Clean the appliance after every use or in between a number of large batches.
OIL REUSE / DISPOSAL
Most oils can be reused a few times depending on the oil
type and food cooked. For reuse or disposal:
• Unplug your PERSONAL DEEP FRYER and allow to cool completely.
For Reuse
• Place a funnel into an airtight container, and line the funnel with a lter or
cheesecloth. Slowly pour oil into a funnel. Store oil in a cool, dark area.
For Disposal:
• Carefully pour into a non-recyclable container. Cover the container, and place into a garbage.
CLEANING
IMPORTANT: DO NOT use a dishwasher to clean any part of the PERSONAL DEEP FRYER.
1. Unplug your PERSONAL DEEP FRYER and allow to cool. Make sure that
oil in the Interior has been removed for reuse or dispoal.
2. Wipe down the exterior of the fryer with a damp cloth.
3. Clean the fryer Interior and Lid with warm, soapy water with
a soft cloth or sponge. Rinse and dry thoroughly.
4. Wash the Fryer Basket in warm soapy water. Use a scouring pad if necessary. Rinse and dry.
Before next use, make sure that every part of your PERSONAL DEEP FRYER has dried completely.
STORAGE
• Unplug the appliance and let it cool down completely.
• Make sure that all the parts are cleaned and dry.
• Store in a clean, dry location.

ENGLISH
11
RETURNS & WARRANTY
SHOULD YOUR UNIT NOT WORK OR IF DAMAGED WHEN YOU FIRST TAKE IT OUT OF
THE BOX, PLEASE RETURN IT TO THE PLACE OF PURCHASE IMMEDIATELY.
2 QT. DEEP FRYER / NMDFWM15AQ
Should you have any questions, please contact us via email or at the customer service number listed
below between the hours of 9:00 AM and 4:00 PM, Monday through Friday, Central Standard Time.
Distributed by:
Nostalgia Products LLC
1471 Partnership Dr.
Green Bay, WI 54304-5685
Customer Service
Phone: (920) 347-9122
Web: www.nostalgiaproducts.com
Customer Service Inquiry
To submit a Customer Service inquiry, go to www.nostalgiaproducts.com and ll
out the Customer Service Inquiry form and click the Submit button.
A representative will contact you as soon as possible.
Product Warranty Terms
Nostalgia Products LLC (the“Company”) hereby warrants that for a period of one (1) year from the
date of original purchase, this product will be free of defects in material and workmanship under
normal home use, provided that the product is operated and maintained in accordance with the
operating instructions. As the sole and exclusive remedy under this warranty, the Company will
at its discretion either repair or replace the product found to be defective, or issue a refund on the
product during the warranty period. This warranty is only available to the original retail purchaser of
the product from the date of initial retail purchase, and is only valid with the original sales receipt, as
proof of purchase date is required to obtain warranty benets. All warranty claims must be brought
to the attention of the Company within the warranty period and no later than 30 days of the failure
to perform. This warranty does not cover normal wear or damage caused by shipping, mishandling,
misuse, accident, alteration, improper replacement parts, or other than ordinary household use.
You may be required to return the product (with shipping prepaid by you) for inspection and
evaluation. Return shipping costs are not refundable. The Company is not responsible for returns
damaged or lost in transit. Unless otherwise specically permitted by the operating instructions, this
warranty applies to indoor household use only. In order to obtain service under this warranty, please
contact the Company at the telephone number listed above or by lling out the Customer Service
Inquiry Form located at www.nostalgiaproducts.com. Warranty valid only in USA and Canada.
This warranty is in lieu of all other warranties, expressed or implied, including warranties of
merchantability and tness for a particular purpose, which are hereby excluded to the extent
permitted by law. In no event shall the Company be liable for any indirect, incidental, consequential,
or special damages arising out of or in connection with this product or the use thereof. Some
states, provinces or jurisdictions do not permit the exclusion or limitation of incidental or
consequential damages, so the foregoing exclusion or limitation may not apply to you.
This warranty does not apply to re-manufactured merchandise.
Please read the operating instructions carefully. Failure to comply
with the operating instructions will void this warranty.
For more information, visit us online at www.nostalgiaproducts.com.
Like us on Facebook at www.facebook.com/NostalgiaElectrics.
Follow our boards on Pinterest at www.pinterest.com/nostalgiaelctrx.
Tweet along with us on Twitter at www.twitter.com/NostalgiaElctrx.

12
ESPAÑOL
12
¡Que cada día sea una esta!
Visite www.nostalgiaproducts.com y
encuentre más productos agradables.
CONTENIDO
SEGURIDAD . . . . . . . . . . . . . . . . . . . . . . . . . . . . . . . . . . . . . . . 12
PROTECCIONES IMPORTANTES. . . . . . . . . . . . . . . . . . . . . . . . . . . 13
PROTECCIONES IMPORTANTES ADICIONALES . . . . . . . . . . . . . . . . .14
INTRODUCCIÓN . . . . . . . . . . . . . . . . . . . . . . . . . . . . . . . . . . . . 15
PARTES Y ENSAMBLAJE . . . . . . . . . . . . . . . . . . . . . . . . . . . . . . .16
CÓMO UTILIZAR . . . . . . . . . . . . . . . . . . . . . . . . . . . . . . . . . . . . 18
CONSEJOS ÚTILES . . . . . . . . . . . . . . . . . . . . . . . . . . . . . . . . . . . 19
LIMPIEZA Y MANTENIMIENTO . . . . . . . . . . . . . . . . . . . . . . . . . . .20
GARANTIA DE DEVOLUCIÓN . . . . . . . . . . . . . . . . . . . . . . . . . . . .21
SEGURIDAD
Especicaciones del aparato:
120 voltios, 60 Hz, 700 vatios
ESTE PRODUCTO SÓLO DEBE USARSE CON UN TOMACORRIENTE DE 120 V CA.
Visite www.nostalgiaproducts.com/user-manuals/ para que vea el manual
más actualizado.
Su seguridad y la seguridad de los demás son muy importantes.
Hemos dado muchos mensajes de seguridad importantes en este manual y
en su aparato. Siempre lea y obedezca todos los mensajes de seguridad.
Este es el símbolo de alerta de seguridad.
Este símbolo le avisa de los peligros potenciales que
pueden provocar lesiones graves a usted y a otros.
Todos los mensajes de seguridad seguirán tras el símbolo de alerta de seguridad.
Todos los mensajes de seguridad le dirán cuál es el peligro potencial, cómo reducir
la probabilidad de lesiones, y qué puede ocurrir si no se siguen las instrucciones.

13
ESPAÑOL
13
PROTECCIONES IMPORTANTES
Las personas que no hayan leído ni comprendido todas las instrucciones
de funcionamiento y seguridad no están capacitadas para usar este
aparato. Todos los usuarios de este aparato deben leer y comprender
este manual de instrucciones antes de operarlo o limpiarlo.
Cuando se usan aparatos eléctricos, siempre se deben seguir las
precauciones básicas de seguridad, incluidas las siguientes:
1. Lea todas las instrucciones antes de operar este aparato.
2. NO toque las supercies calientes. Use los mangos o perillas.
3. Este aparato NO ES UN JUGUETE.
4. Sin supervisión, los niños pequeños ni las personas con discapacidades
cognitivas no deben operar nunca este aparato.
5. Una estrecha supervisión es necesaria cuando cualquier
aparato es usado por niños o cerca de ellos.
6. Para protegerse contra descargas eléctricas no sumerja el cable, el enchufe
ni ninguna parte de esta unidad en agua ni en ningún líquido.
7. Desconecte del tomacorriente cuando no lo esté usando, antes de
remover piezas y antes de limpiarlo. Déjelo enfriar antes de colocar
o retirar cualquiera de las piezas y antes de la limpieza.
8. NO opere ningún aparato que tenga el cable o el enchufe deteriorado, o después de que
el aparato no funcione correctamente, o si el aparato ha sido dañado de alguna manera.
Lleve el aparato al taller de reparaciones más cercano para su revisión, reparación o ajustes.
9. El fabricante no recomienda el uso de accesorios que no sean los proporcionados
por el mismo fabricante. El uso de aditamentos puede causar lesiones.
10. NO haga funcionar el aparato para un uso diferente del previsto.
11. NO lo use en exteriores. SOLO PARA USO DOMÉSTICO.
12. NO lo coloque sobre un quemador de gas o eléctrico caliente, ni
sobre un horno caliente, ni cerca de ninguno de estos.
13. NO permita que el cable cuelgue sobre el borde de la mesa o
del mostrador, ni que toque supercies calientes.
14. NUNCA deje desatendida la unidad durante el uso ni
cuando esté conectada a un tomacorriente.
15. Se debe tener extrema precaución al mover un aparato que contenga comida caliente.
PROTECCIONES IMPORTANTES
ADICIONALES
Precauciones de seguridad operativa
1. ADVERTENCIA: Peligro de quemadura. El aceite caliente puede causar
quemaduras graves. Tenga sumo cuidado cuando manipule este aparato.
2. El aceite y el agua NO se mezclan. Antes de añadir aceite al aparato,
asegure que todas las partes están COMPLETAMENTE SECAS.
3. No use líquidos diferentes de aceite de cocina para freír con mucha aceite.
4. No coloque la unidad cerca de materiales inamables,
unidades de calefacción o ambientes húmedos.

14
ESPAÑOL
14
5. La altura de los ingredientes colocados en la cesta de freír, debe cumplir
con las instrucciones - No llene más de la línea de llenado máximo.
6. No reemplace con otras piezas que no estén diseñadas
especícamente para la freidora personal.
7. No coloque ninguna otra cacerola de cocción en la cesta de freír.
No reemplace ninguna pieza con otros contenedores.
8. Si sale una cantidad considerable de humo de la salida de aire durante
el funcionamiento, desenchufe la unidad inmediatamente.
9. No mover la unidad mientras esté en funcionamiento. Debe intentar
moverla solo después de que la freidora se haya enfriado por completo.
Espere siempre a que la freidora se enfríe antes de manipularla.
10. Nunca use una toalla para bloquear la ventilación.
11. Si surge algún problema durante el funcionamiento, cualquier servicio necesario
debe ser realizado por un profesional autorizado para hacer reparaciones.
12. No desmonte la unidad por su cuenta ni reemplace ninguna pieza.
13. No utilice utensilios metálicos con la cesta de freír, ya que esto puede dañar la supercie.
14. Si el cable de alimentación está dañado, no intente utilizar la unidad.
15. Mantener la unidad fuera del alcance de los niños cuando la
unidad esté en funcionamiento o enfriándose.
16. Mantener las manos y la cara alejadas de la salida de
ventilación o de donde se libera calor o vapor.
17. Asegúrese de que la FREIDORA esté siempre limpia antes de cocinar.
18. Es normal que algo de humo escape de la unidad cuando se calienta por primera vez.
Instrucciones para el cable y el enchufe eléctricos
1. Este aparato tiene un enchufe polarizado (una patilla es más ancha que la otra). Para
reducir el riesgo de descarga eléctrica, este enchufe está diseñado para encajar de una
sola manera en un tomacorriente polarizado. Si el enchufe no encaja completamente
en el tomacorriente, invierta el enchufe. Si todavía no encaja, póngase en contacto
con un electricista calicado. No intente modicar el enchufe de ninguna manera.
2. Se proporciona un cable de alimentación corto para reducir el
riesgo de enredarse o tropezar con un cable largo.
3. Si se utiliza un cable de alimentación desmontable largo o un cable de extensión:
• Los cables de extensión se pueden usar si se tiene cuidado en su uso.
• La clasicación eléctrica marcada del cable o cable de extensión debe
ser al menos tan alta como la clasicación eléctrica del aparato.
• Cuando utilice un cable más largo o un cable de extensión, asegúrese
de que el cable no cuelgue sobre una encimera o mesa en donde
se pueda jalar o hacer tropezar involuntariamente.
4. El fabricante no recomienda el uso de esta máquina en países que no admiten 120
V CA, inclusive si se utiliza un adaptador, transformador o convertidor de voltaje.
5. Este aparato utiliza un enchufe magnético diseñado para quitarlo fácilmente de la
unidad. Por eso, si se golpea o se mueve durante el uso, el cable podría separarse y la
unidad dejaría de calentar. Evite el contacto con el cable durante el funcionamiento.
Si se produce un contacto, verique que el cable sigue conectado correctamente.
¡GUARDE ESTAS INSTRUCCIONES!

15
ESPAÑOL
15
INTRODUCCIÓN
¡Felicitaciones por su compra de la FREIDORA PERSONAL MYMINI™ de Nostalgia™!
Esta freidora brinda el método perfecto para freír alimentos de todas las variedades.
Le caben hasta 1.5 litros de su aceite preferido para freír todo, desde papas fritas hasta
pollo, vegetales y más, y le permite preparar deliciosos platos cada vez que desee.
Estas son las características de su freidora:
• 1.5 litros de capacidad interna
• Cesta de freír con asa resistente al calor
• El dial de temperatura varía de 120 °F a 375 °F
• Luz indicadora para indicar el precalentamiento

16
ESPAÑOL
16
PIEZAS Y ENSAMBLAJE
Tapa
Cesta de freír
Dial de
temperatura
Luz indicadora
Interior
Asa de la tapa
Asa resistente
al calor
ENCHUFE MAGNÉTICO
Asegúrese de que el enchufe
magnético esté conectado
correctamente antes de
encender la freidora.

17
ESPAÑOL
17
ASSEMBLAGE DU PANIER FRITEUSE
1. Appuyez sur les extrémités de la poignée ensemble
2. Insérez les extrémités de la poignée dans les deux trous à l'intérieur du panier
3. Appuyez la poignée sur la partie métallique rectangulaire du panier
4. Assurez-vous que la poignée s'adapte fermement au panier.

18
ESPAÑOL
18
CÓMO UTILIZAR
IMPORTANTE: Antes de cualquier operación, asegúrese de leer todas las
protecciones importantes. Este aparato tiene supercies calientes y utiliza aceite
caliente que pueden provocar lesiones graves si no se maneja correctamente.
1. Antes del primer uso, pase un paño mojado a la cesta de freír, la tapa y el interior del cuerpo
de la freidora. No sumerja la freidora en ningún líquido ni la ponga en un lavavajillas.
2. Busque una supercie seca, nivelada y resistente al calor cerca de un tomacorriente.
3. Abra la tapa y retire la cesta de freír del interior.
4. Llene el interior con aceite. NO sobrepase la línea MÁX de nivel de aceite.
5. Cierre la tapa.
6. Asegúrese de que el cable magnético está jado correctamente a la unidad
alineando su extremo con las patillas eléctricas en la unidad. Después,
conecte el cable de alimentación a un tomacorriente energizado.
7. Gire el dial de temperatura a la temperatura que desee. En ese momento, la luz
indicadora se encenderá, con lo que indica que la freidora está precalentando.
8. Prepare los alimentos mientras la freidora se precalienta.
9. Espere hasta que se apague la luz indicadora.
NOTA: La luz indicadora se encenderá y apagará intermitentemente
mientras cocina para mantener una temperatura estable.
10. Coloque la cesta de freír en una encimera y llene la cesta hasta ¾ de su capacidad.
11. Abra la tapa usando el asa de la tapa y coloque la cesta de freír dentro del
interior de manera que el asa quede encima del dial de temperatura. Use
guantes o mitones para que evite lesiones.
12. Cierre la tapa. Las muescas debajo del asa de la tapa
encajarán sobre el asa resistente al calor.
NOTA: NO retire el asa en ningún
momento mientras cocina.
13. Deje que el alimento se cocine el tiempo
especicado para la receta.
PRECAUCIÓN: Puede subir vapor de la freidora. Para evitar
lesiones, mantenga las manos alejadas de la parte sobre la freidora.
14. Cuando se complete la cocción, abra la tapa y
levante con cuidado la cesta de freír por el asa
resistente al calor. Apoye la cesta de freír en un
borde del interior usando la guía debajo del asa
resistente al calor durante cerca de un minuto
para que se escurra el aceite de la cesta.
15. Coloque su alimento sobre toallitas de
papel o en un plato y déjelo enfriar.
16. Si cocinará más alimentos, espere 3 o
4 minutos cada vez para dejar que se
recupere la temperatura. Cuando termine, gire el dial de temperatura hasta
apagado, desconecte la freidora y déjela enfriar antes de limpiarla.
Table of contents
Languages:
Other Nostalgia Fryer manuals
Popular Fryer manuals by other brands

Clatronic
Clatronic FR 3195 instruction manual

NUTRIBULLET
NUTRIBULLET Nutricook AF9204S user guide

Lotus
Lotus F18-74ETD Installation and operating instructions

Chef Tested
Chef Tested 452543 instruction manual

ohmex
ohmex FRY 1180 instruction manual

Blue Seal
Blue Seal GT60HPO Installation and operation manual

George Foreman
George Foreman GSF026B Use and care book

Prima
Prima PDF006 Instruction book

GIGA
GIGA IFTE1 Installation, Operating and Maintenance Instructions for the Installer and the User

Philips
Philips HD9243 user manual

BCC
BCC AF22-01 instruction manual

Ninja
Ninja Foodi SMART DZ275 Series quick start guide