Not Only TV iScanner User manual

Docking Scanner
User Guide
Work with
The "Made for iPad" logo means
that an electronic accessory
has been designed to connect
specifically to iPad and has been
certified by the developer to meet
Apple performance standards.
Apple is not responsible for
the operation of this device or
its compliance with safety and
regulatory standards. Please note
that the use of this accessory
with iPad may affect wireless
performance.
Works with
-
Scanner App
All trademarks are the property
of their respective owners and all
rights are acknowledged.
v1.1

2
Important Safety Instructions
• Keep away from water or moisture and dusty areas.
• Never store in hot and very cold areas.
• Ambient temperature ranges from 0°C to +35°C (32°F~+95°F).
• Only use attachments/accessories specified by the manufacturer.
• Avoid dust contamination when the scanner is not in use.
• When left unused for a long period of time, the unit should be disconnected from the power supply.
• Avoid environments where the scanner would be exposed to direct sunlight (or any other source of excessive heat)
for long periods of time.
• Protect the scanner from potential liquid spills such as soda, coffee, tea, etc.
• Be carefully to keep it without dropping it or strong impact.
• Operate the scanner on a level, well-grounded work surface, free of excessive vibration.
• Don’t open the scanner case alone without technical support because there is danger of electrical shock.
FCC notice:
This device complies with Part 15 of the FCC Rules. Operation is subject to the following two
conditions: (1) this device will not cause harmful interference, and (2) this device must accept any
interference received, including interference that may cause undesired operation.
Discarded electrical and electronic appliance are recyclable and should separate from the household waste.
Please actively support in conserving resources and protecting the environment by returning this appliance
to the collection centers (if available).

3
Table of Contents
Important Safety Instructions ............................................................................................................... 2
Table of Contents ................................................................................................................................. 3
Quick Getting Started ........................................................................................................................... 4
Unpack ................................................................................................................................................. 5
Overview .............................................................................................................................................. 6
Power Source ...................................................................................................................................... 7
Power On / Off ..................................................................................................................................... 8
Connect to iPad ................................................................................................................................... 8
Download & Install Scanner App (i-Scan App) ..................................................................................... 9
Scan ................................................................................................................................................... 10
Save ................................................................................................................................................... 10
App Launch Message on iPad iOS 5 .................................................................................................. 11
Tips & Hints ........................................................................................................................................ 12
Specifications ..................................................................................................................................... 14
Appendix 1: Calibrate ......................................................................................................................... 15
Appendix 2: Use the Photo Protective Sleeve ....................................................................................16
Appendix 3: Clean............................................................................................................................... 17
Appendix 4: Charging your iPad ......................................................................................................... 19

4
Quick Getting Started
1. Attach USB Cable
iPad supplied USB
Power Adapter
2. Turn on Power 3. Dock iPad
4. Install i-Scan App
from App store
5. Insert Photo and Scan 6. Preview and Save

5
Unpack
The following items should include in your packaging:
Scanner USB Cable Calibration Sheet Roller Cleaner
5"x7"
Quick
Start
Guide
Lens Cleaner Photo Protective Sleeve Quick Start Guide

6
Overview
iPad Dock Connector
Feed Slot
Exit
Slot
Stand
Mini USB
port
(for power
input only)
Paper
Guide
Power
Button
Front Rear
Paper
Guide
Power
LED

7
Power Source
• The scanner incorporates a mini USB port
which is designed for power input only.
• The scanner requires 10.5 watts (5V 2.1A) of
power via iPad USB Power Adapter that came
with your iPad packaging.
1. Connect the small end of the USB cable to the
mini USB port of the scanner.
2. Connect the other end of the USB cable to the
iPad supplied USB Power Adapter.
3. Connect the iPad supplied USB Power Adapter
to a power outlet.
• Do not connect the iPad scanner to the USB port of a PC or any other device for power input.
The USB Power
Adapter is the
accessory of
iPad.

8
Connect to iPad
• Turn on your iPad and
connect it carefully to the
iPad dock connector of the
scanner. Make sure it sits
firmly in place.
Power On / Off
• Press the Power
button to turn on
the scanner. To turn
off, long press for a
few seconds then
release the button.
Description Power LED Status
Power On Blinking, then steady blue
Power Off Off
• Do not dock/un-dock iPad to the scanner when
the power LED is blinking. Wait until the blinking
stops.
• Check the battery level in the upper-right corner
of your iPad Home screen. Make sure it is above
20% at least when docked. If not, please charge
the battery prior to docking.
• To avoid the possible interruption during
scanning, please turn off the Notification function.
In iPad Settings, tap Notifications, then turn
Notifications off. Refer to your iPad User Guide
for more details.
• The scanner will turn off automatically after
iPad locks and sleeps for about 1.5 minutes.
To turn on the scanner, press the Power
button. Then wake iPad.

9
Power on the iPad, the message on the right will
prompt on the iPad screen guiding you to the
App store for i-Scan App download.
Follow the on-screen instructions to complete the
installation.
Upon completion, the i-Scan App icon will
then appear on the iPad Home screen.
•
Make sure that your iPad is connected to a Wi-Fi network before you download and install
applications. Refer to iPad user guide to activate the WiFi connection on your iPad.
•
Download one App at a time and do not do anything else while you download an App.
Download & Install Scanner App (i-Scan App)
* The message appears only if the
i-Scan App is not installed on your
iPad Scanner
10
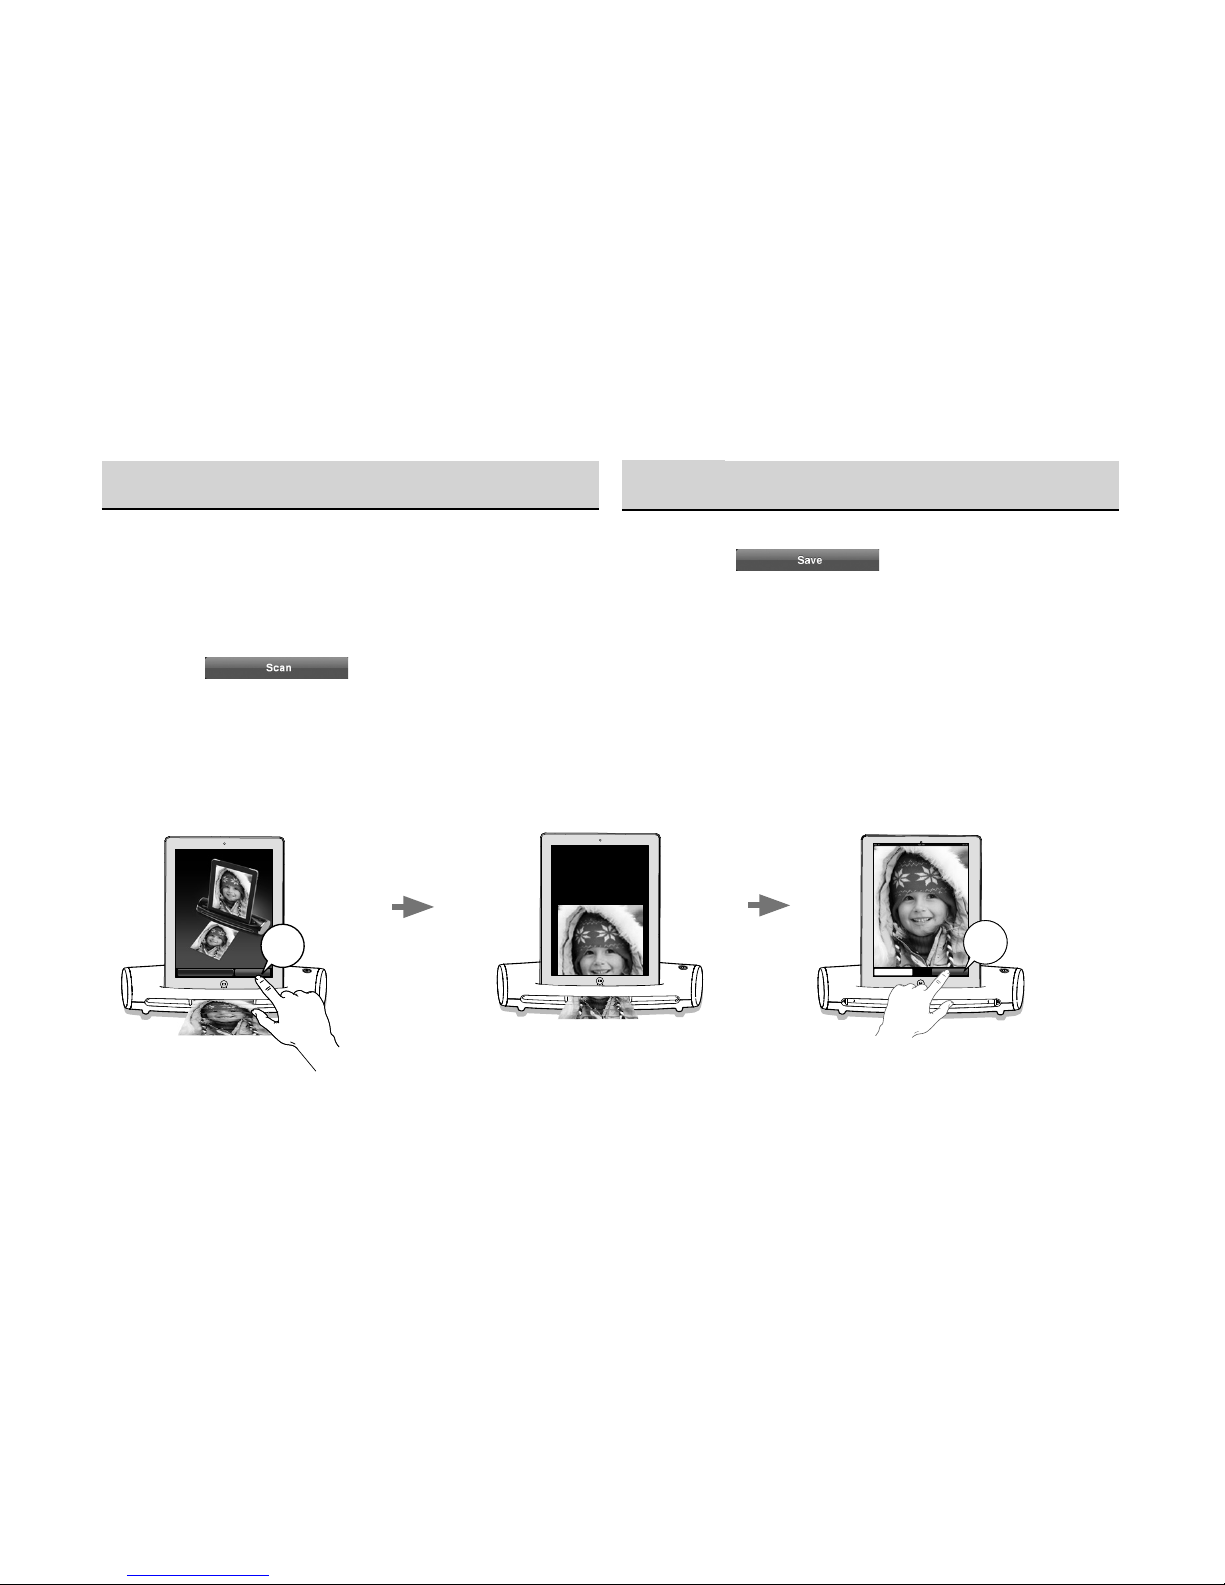
Scan
Press “Scan” button to scan
Scan
Scan
1. Insert a photo/document facing UP into the feed
slot until it is gripped by the roller.
2. Adjust the paper guide against the edges of the
photo/document.
3. Tap the button. The scan starts
with the real-time preview on the iPad's screen.
4. When the photo/document is displayed fully on
the iPad's screen, the scan is completed.
Save
Tap the button. The image will
be saved to your iPad accordingly.
• To start a new scan, follow the steps 1-3 in the
Scan section.
• To view your scanned photos/documents, tap
Photos application icon on iPad Home screen.
Tap Scan button Start scanning Tap Save button
Save
Cancel
Save

11
The scanner includes the ability to auto launch
the i-Scan app when your iPad is docked and
turned on.
If your iPad is running on iOS 5, the message on
the right will pop up asking if you want to launch
the app, tap Allow.
App Launch Message on iPad iOS 5

12
Tips & Hints
No power.
• The USB cable is not plugged into the mini USB port on the unit and/or USB power adapter properly.
• Make sure you have turned on the Power button on the unit.
iPad scanner does not response when iPad is docked.
• Make sure you have installed i-Scan app and docked iPad to the unit correctly.
• iPad is off or locked. Check the documentation that came with your iPad for instructions.
• Make sure the unit is securely holds your docked iPad in place when in use.
Cannot charge my iPad.
• Make sure the unit is securely holds your docked iPad in place while charging.
• Make sure the unit is turned off. Once the power is turned off, the docked iPad starts charging.
The scanned image is poor.
• Please clean and calibrate the scanner if the scan result is poor.
• Refer to the Appendix 1: Calibrate and Appendix 3: Clean for further indication.
Cannot auto feed the paper.
• Make sure the document/photo is gripped and slightly pulled into the feed slot prior to scanning.
• Remove the paper from the feed slot and insert it again.
Cannot scan or save.
• iPad is low in battery (under 20%) when docked to the scanner. Charge your iPad and then try again.
• Close other running apps on iPad to release memory. (Refer to the latest iPad User Guide on the
"Force an app to close" section to close an app.)

13
iPad scanner is slow or hung up.
• When the power LED is flashing and/or a busy icon (" " ) appears, do not press any buttons, nor
unplug iPad and the power source.
• If the scanner is not working properly (e.g. the busy icon " " remains for a long time), try forcing
i-Scan app to close, reconnect the power and then restart iPad and the scanner.
(Refer to the latest iPad User Guide on the "Force an app to close" section to close i-Scan app.)

14
Specifications
Scanner Type Color CIS Sheet-fed scanner
Light Source LED (R, G, B)
Scan Size Up to Legal (8.5" L x 14" W) size
Scan Mode Color
Scan Resolution: 300 dpi
Scan Speed 6 ppm @ A4 color 300 dpi
Ports USB mini-B ; iPad 30-pin connector
Power Source Input: 100-240V~ 0.45A (0,45A) 50-60 Hz
Output: 5.1V --- 2.1A
by iPad supplied USB Power Adapter
Power Consumption 10.5W (Maximum) 5V, 2.1A
File Format JPEG
Dimensions 308 x 111 x 72 mm ; 12.1" x 4.4" x 2.8" (W x D x H)
Weight 655g (1.44lbs)
Minimum System Requirements iPad 2 or iPad with iOS 4.3.5 or later
The i-Scan app requires minimum 30MB of free space in
RAM on iPad for best performance
An iTunes Store account (for i-Scan App download)
Internet access (for i-Scan App download)
__

15
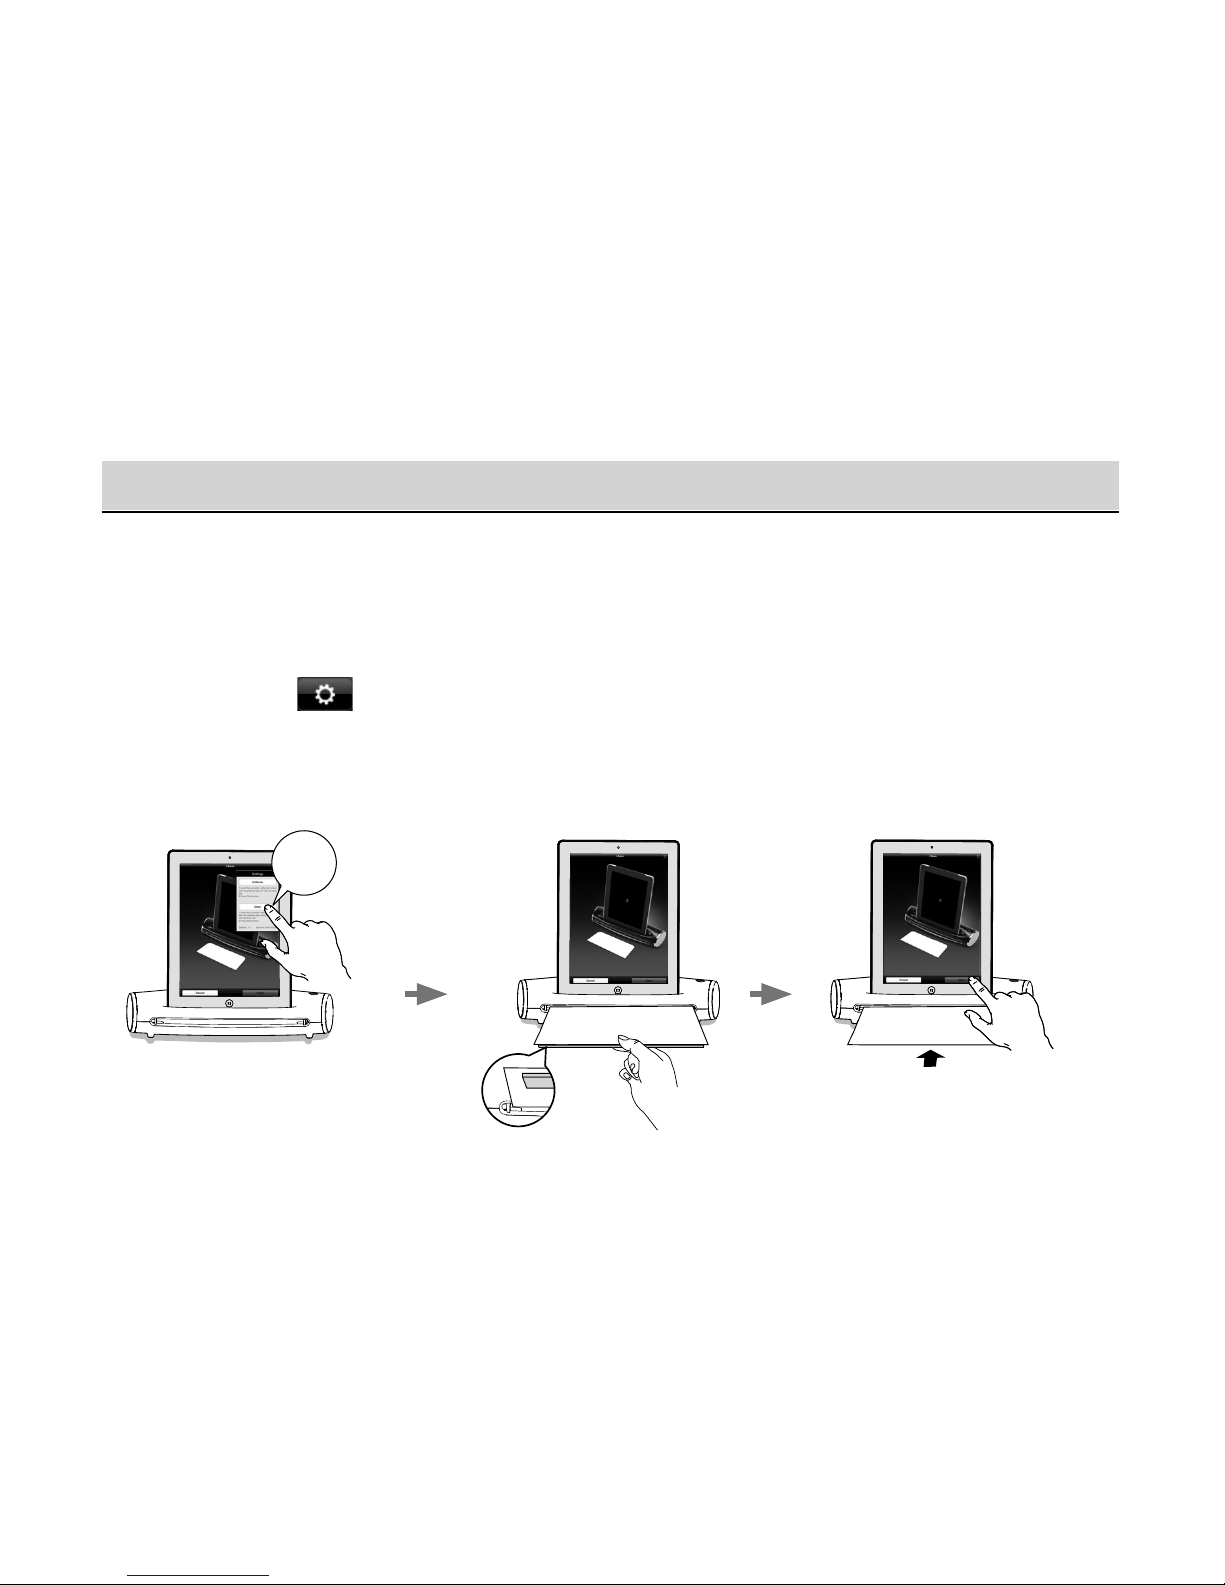
Appendix 1: Calibrate
• To get the best scan quality, please perform the steps below from time to time.
• Remove the film on the calibration sheet before use.
• Make sure the calibration sheet is clean and free of dust before use.
1. Tap the screen.
2. Choose Settings > Calibrate.
3. Insert the calibration sheet with the printing side facing UP into the feed slot.
4. Tap the Calibrate button.
Calibrate

16
Appendix 2:
Use the Photo Protective Sleeve
• Some old photos or documents might become fragile. To protect them from possible
damage during scanning, use a photo protective sleeve to help.
• Remove the film on the photo protective sleeve before use.
• Place the photo inside the protective sleeve as illustrated below.
• Make sure the sealed end of the protective sleeve goes first
into the feed slot for scanning.
• Do not place the photo into the protective sleeve if it has been laminated.
Sealed End
17
Appendix 3: Clean
• To get the best scan quality, please perform the steps below from time to time.
• Make sure the roller cleaner and lens cleaner are clean and free of dust before use.
Use a roller cleaner
1. Tap the screen.
2. Choose Settings > Clean.
3. Hold the grip handle of the roller cleaner with the sponge side facing DOWN.
4. Insert the roller cleaner into the front side of the feed slot.
5. Tap the Clean button.
Clean
sponge side
facing down

18
OFF
Use a lens cleaner
1. Power off the scanner.
2. Hold the grip handle of the lens cleaner with the
sponge side facing DOWN.
3. Insert firmly the lens cleaner with the fabric side
facing UP into the exit slot.
4. Pull the lens cleaner all the way to the end of
the exit slot.
5. Move the lens cleaner from one side to the
other slightly a few times, then remove it.
Rear side

19
Appendix 4: Charging your iPad
• The docked iPad starts charging when the iPad Scanner is turned-off and the power is supplied to
the mini USB port constantly.
Power LED indicator Scanner Status USB Power Adapter
On Steady Blue Ready for use Pluged
Off No light iPad Charging Pluged
OFF
The USB Power
Adapter is the
accessory of
iPad.
• In case of insufficient battery power, charge your iPad when the battery level drops to 20% or
under
.
Table of contents


