Notilo Plus Seasam User manual

Quick Start Guide
Seasam with Gripper
December 2022

Content
I - GRIPPER INSTALLATION
●Installation of the Gripper
II - STARTING UP
●Connecting the battery
●Connecting the WiFi Reel to the drone
●Starting up the equipment
●Connecting to the WiFi Reel
○Delivery after September 2021
○Delivery before September 2021
●Connection of the controller
●Choice of configuration
●Checking the connections
●Seasam Control
●Set up and calibration
●Adding the gripper to the interface
III - USING SEASAM WITH THE GRIPPER
●Drone launching
●Using the gripper during your dive
●At the end of the exploration

I - GRIPPER
INSTALLATION


Installation of the Gripper
I - GRIPPER INSTALLATION
Place the drone on its back and open the battery compartment
and pass on the gripper cable from the front of the drone to the
battery compartment
Recover the cable from the drone
The battery must not be connected to the drone during this step
5

Installation of the Gripper
I - GRIPPER INSTALLATION
Connect the gripper cable with the connecter inside the drone.
The two white dots must face each other and the two caps
closed together The battery must not be connected to the drone during this step
Store the two connectors and the caps on the side of the battery
compartment under the hull
6

Installation of the Gripper
I - GRIPPER INSTALLATION
Position the foam around the gripper arm
●Smallest part of the foam must face the front of the drone.
●The open part of the foam should face you when the drone
is upside down
Insert the cubic part of the cable inside the drone’s hull until it gets
close to the battery compartment
7
The battery must not be
connected to the drone during
this step

Installation of the Gripper
I - GRIPPER INSTALLATION
Position the ring with the two nuts around the gripper arm
●Unscrew the two silver screw
●Screw the blue screw to maintain the ring around
the arm
Place the drone on its feets
Position the foam on the metallic plate on the drone
Slide the ring under the metallic plate and screw the 2 silver screw
8

Installation of the Gripper
I - GRIPPER INSTALLATION
You can now connect the battery.
Make sure the battery is never connected when
you connect or disconnect the gripper connector
under the drone.
9

II - STARTING
UP THE DRONE

Connecting the battery
Make sure the battery compartment is properly closed.
Use the dedicated tool.
Ensure that the emergency stop on the underside of the drone is
properly inserted.
Make sure that the safety guide is aligned in the right direction
II - STARTING UP THE DRONE
11

Connecting the WiFi reel to the drone
Attach and lock the carabiner on the
drone to secure the Drone
Standard Connector
Subconn Connector
II - STARTING UP THE DRONE
12

Starting up the equipment
Press the "On" button once. After
several seconds the LED flashes
quickly blue
Place the magnet on the "Power" icon on top of the drone.
The drone will turn on and test all its components. It will make
sounds and activate its lights.
Make sure that nothing is in the way and that the motors are
not jammed.
When this process is complete, the green front LED will be solid.
Turn on the controller.
II - STARTING UP THE DRONE
13

Connecting to the WiFi Reel
Delivery after September 2021
Connect the tablet to the WiFI signal of the WiFI Reel.
The wifi network is: "Seasam-WiFiReel-XXXX".
The password is @Notilo+
Continue directly to page 16
II - STARTING UP THE DRONE
14

Delivery before September 2021
The wifi network is: “notilo-beacon-XXXX”
●Connect the tablet to the WiFi network of the drone "Seasam-XXXX".
●In the configuration part choose "Drone".
●Go to the application settings
●Select "WiFi Reel".
●The network name and password are displayed
●Copy the password
●Connect the tablet to the notilo-beacon-XXX WiFi network
II - STARTING UP THE DRONE
Connecting to the WiFi Reel
15

Choice of configuration
Start Seasam Control or select "Choice of Configuration" if you have already opened the application.
In the configuration menu, select "Basic Configuration".
II - STARTING UP THE DRONE
16

Check that the indicated steps have been completed and select "Next".
Checking the connections
II - STARTING UP THE DRONE
17
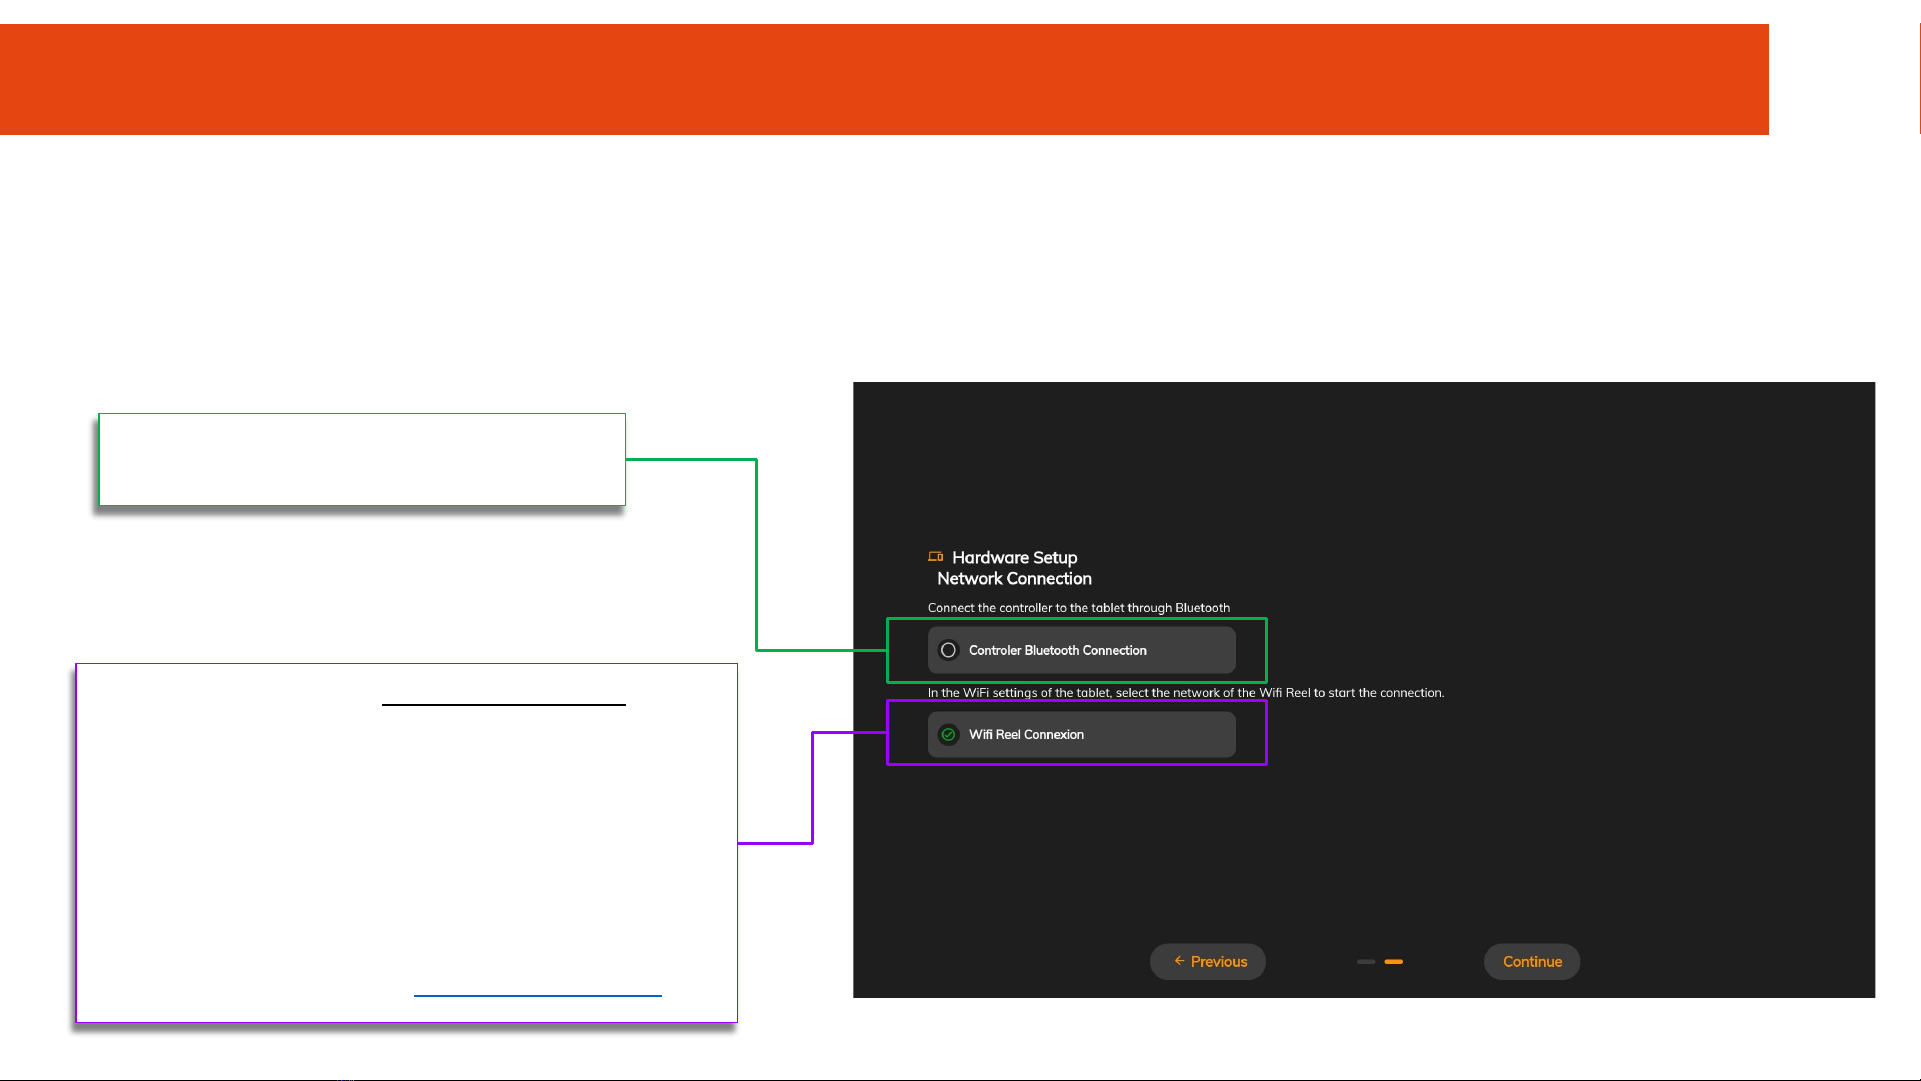
Checking the connections
This screen checks that all the equipment is connected correctly.
Once both connections are checked, click on "Continue" to access the control screen.
Move a joystick on the controller to have the
connection checked.
The system checks that the drone AND the WiFi Reel are
switched on and physically connected together.
If the green tick takes a long time to appear :
- Wait a few seconds
- Check the physical connections
- Make sure the drone is turned on
- Make sure the tablet is connected to the WiFi reel
network
- Go back to the previous page and press "Next" again
If the problem persists contact [email protected]
II - STARTING UP THE DRONE
18

Adding the gripper to the interface
Go in the Settings menu by clicking on the Notilo Plus button
Seasam Control App View
19
II - STARTING UP THE DRONE

Go to “Interface” tab and check the gripper case. Then save.
Seasam Control App View
Adding the gripper to the interface
20
II - STARTING UP THE DRONE
Other manuals for Seasam
4
Other Notilo Plus Drone manuals


