Notis NT-1000X30IR User manual

IR Intelligent High-Speed Dome
Installation and User’s manual
English
V3.01
Please read the manual carefully before installing and using the unit.
Catalogue
Welcome.......................................................................................................................... 1
I Important Safeguards...............................................................................................2
II Installation Guide......................................................................................................4
2.1 PR PARATION FOR INSTALLATION.........................................................................4
2.2 INSTALLATION......................................................................................................5

III Description of Functions.........................................................................................12
3.1 P RFORMANC CHARACT RISTIC.......................................................................12
3.2 FUNCTION D CLARATION....................................................................................13
IV Technical parameter...............................................................................................26
V Functional Instructions............................................................................................27
5.1 COMMON FUNCTION QUICK INSTRUCTION LIST.....................................................27
5.2 M NU OP RATION GUID ...................................................................................33
Simple Trouble Shooting Table......................................................................................59
Lightning and Surge Protection.....................................................................................60
Propositional preventive maintenance...........................................................................60

IR Intelligent High-Speed Demo Installation and User Manual
Wel ome
Thank you for purchasing IR intelligent high-speed dome.
This manual is used for operating and programming the unit as your reference. You can find
relevant information of functions and commands, as well as detailed menu tree and fast operating
instructions in this manual. The section of installation provides the needed information for setting and
installing the unit. Before installing and using the unit, please read the information in this manual
carefully.
1

IR Intelligent High-Speed Dome Installation and User Manual
I Important Safeguards
This manual is the basic instruction about IR intelligent high-speed dome. This manual consists
of important information about security and warning, function specification, performance characteristic
and parameter, installation step, general faults and the solution to get out of
them, maintenance and others need to know when using the IR intelligent high-speed dome.
If you first use the IR intelligent high-speed dome or ever used the similar products, you had better
read this manual before using this unit.
If possible, please start reading from the first page in sequence. If you just hope to see the needed
parts, you also can select them from catalogue. Please refer page 27 to get the function list of the
unit. This unit uses special presets to realize some function operation.
Careful transportation
During the course of transportation and storage, the product should be avoided from incorrect
operations such as heavy pressing, strong vibration, soaking,,etc. which may cause damage to the unit.
This unit must adopt parts packing transportation regardless of delivery or return to factory
maintenance. The damage which caused by assemble packing transportation is not covered y the
warranty.
Careful installation
During the course of installation, the product should e handled properly, and should e
avoided from incorrect operations such as squeeze the structure parts, heavy press, strong
vi ration etc, which may cause mechanical pro lem and reflect the overall performance of the
unit. The dome cover of the unit which elongs to advanced optical products should e avoided
from incorrect operations such as directly touch y hand which may scratch the cover and
affect image quality. When installed, please follow all electrical standards for safety and adopt the
particular power supply which is provided with the unit. Control signal and video signal should be kept
enough distance from high voltage equipments and cables when they are in transmission, and
necessary steps should be taken to prevent lightning damage or power surge. Don’t turn on power
2

IR Intelligent High-Speed Demo Installation and User Manual
before finish installation.
Don’t dismantle
Don’t dismantle the unit. There are no parts inside the unit which can be repaired by the users
themselves. When mechanical problems arise, do not be in a haste to do any repairing, please refer to
the user’s manual to find the trouble. If causes can not be located, please refer servicing to qualified
professionals. All servicing must be done by authorized personnel.
Set in pla e far from ele tri and magneti fields
If the unit is set near MI source such as television, wireless transmitter, electromagnetic device,
motors, transformers, speakers etc which may create electromagnetic field, the electromagnetic field will
influence images. Please keep sufficient distance.
Don't aim the amera at light obje ts
No matter the unit is running or not, the camera should never be aimed at the sun or object with
extremely bright light, and never be aimed at or monitor immobile light object for a long time. Otherwise,
the camera’s CCD might be permanently damaged.
Careful maintenan e
The camera should be carefully used and avoided form impact or vibration, otherwise, it will be
damaged. Don't use strong or corrosive detergent to clean dome camera’s body. You should clean it
with dry cloth. When the dirt is not easy cleared, you can wipe it by neutral detergent. If the camera lens
is dirty, please wipe it by the special paper.
Please use this product in the required working environment:
Working nvironment IR intelligent high-speed dome
nvironmental Temperature -35~40 ℃
nvironmental Humidity <95%
Atmospheric Pressure 86~106KPa
Power Supply AC24V/2.5 A
NOTE: Don’t install the indoor unit for outside. Please be sure the outdoor installation meet to
waterproof demand.
3

IR Intelligent High-Speed Dome Installation and User Manual
II Installation Guide
2.1 Preparation for Installation
1. Basic demand
Before installing and using this unit, please read the following warning information:
1) Installation and maintenance should be carried out by professional personnel as per relative
regulation. All electrical work must obey the latest electrical regulations, fire regulations and
relevant regulation. Check whether the accessories of the unit are complete according to
packing list and confirm the place whether the method of installation is correct in accord with
required, if not, please contact your supplier. Please use this product in required environment.
2) Indoor IR intelligent high-speed dome only designs for house supply. It can’t be installed
exposed to rain or in very humid place.
3) After re-installation or repair, you need to measure the resistance between the circuit and shell
to check whether the insulation is good, and ensure there is no short-circuit between the
circuit and shell.
4) Confirm there is enough place to contain the product and its structure components. Confirm
the ceiling, wall and bracket for installation can take the total weight of the product and its
structure components, and materials used to support the weight can sustain four times the
weight of the product.
2. Cable preparation
1) Select cables according to transmission distance: the minimum specification requirements of
vision coaxial-cable is as below:
75Ω impedance;
Copper wire;
95% braided copper mesh shielding.
4

IR Intelligent High-Speed Demo Installation and User Manual
Domestic Model International Model Maximum distance (meters
/feet)
RG59/U RG59/U 229m(750ft)
5C-2V RG6/U 305m(1000ft)
7C-2V RG11/U 457m(1500ft)
The same type of video cables may be different depending on manufacturer. The data shown in
above table is the transmission distance of general vision cable.
2) The following data is recommended maximum distance for application of 24VAC or 24VDC,
the distance is calculated from 10% voltage drop. (For AC or DC electric driving equipment,
the maximum allowable voltage drop is 10 %.)
Ca le diameter
0.5mm²(20AW
G)
1mm²(18AWG)
1.5mm²(16AW
G)
2.5mm²(14AW
G)
Power 23W 38m(123ft) 60m(196ft) 95m(311ft) 151m(495ft)
Power 72W 12m(39ft) 19m(62ft) 30m(98ft) 48m(156ft)
3. Toggle switch setting
Set the toggle switch according to the control protocol, baud rate and address. (Refer to the third
chapter<Description of Functional >)
2.2 Installation
A series of IR intelligent high-speed dome dimension figure
5

IR Intelligent High-Speed Dome Installation and User Manual
B series of IR intelligent high-speed dome dimension figure
6

IR Intelligent High-Speed Demo Installation and User Manual
C series of IR intelligent high-speed dome dimension figure
7

IR Intelligent High-Speed Dome Installation and User Manual
E series of IR intelligent high-speed dome dimension figure
8

IR Intelligent High-Speed Demo Installation and User Manual
IR intelligent high-speed dome is designed for wall mounted and pendent mounted installation
Conditions of wall mounted installation:
Wall mounted unit can be used in the rigid wall structure of indoor and outdoor.
1) The wall thickness should be enough to install setscrews.
2) The wall can withstand at least 4 times the weight of the unit.
Pun h holes for wall mounted bra ket
Take the wall mounted bracket from the packing box, and use the open holes at the bottom of
bracket as template and draw punch positions on the wall. (As shown in the following figure)显示
对应的拉丁字符的拼音
9

IR Intelligent High-Speed Dome Installation and User Manual
Punch holes and drive in four M8 setscrews. (As shown in the following figure)
Conditions of pendent mounted
installation:
Pendent mounted unit can be
used indoor in the rigid wall structure.
1) The thickness of ceiling should be enough to install setscrews.
2) The ceiling can withstand at least 4 times the weight of the unit.
Pun h holes for pendent mounted bra ket
Take the pendent mounted bracket from the packing box, and use open holes at the bottom of
bracket as template and draw punch positions on the ceiling. (As shown in the following figure)显
示对应的拉丁字符的拼音
10

IR Intelligent High-Speed Demo Installation and User Manual
Punch holes in punch positions and drive in four M6 setscrews. (As shown in the following figure)
A series of IR
intelligent high-speed
dome installation
11
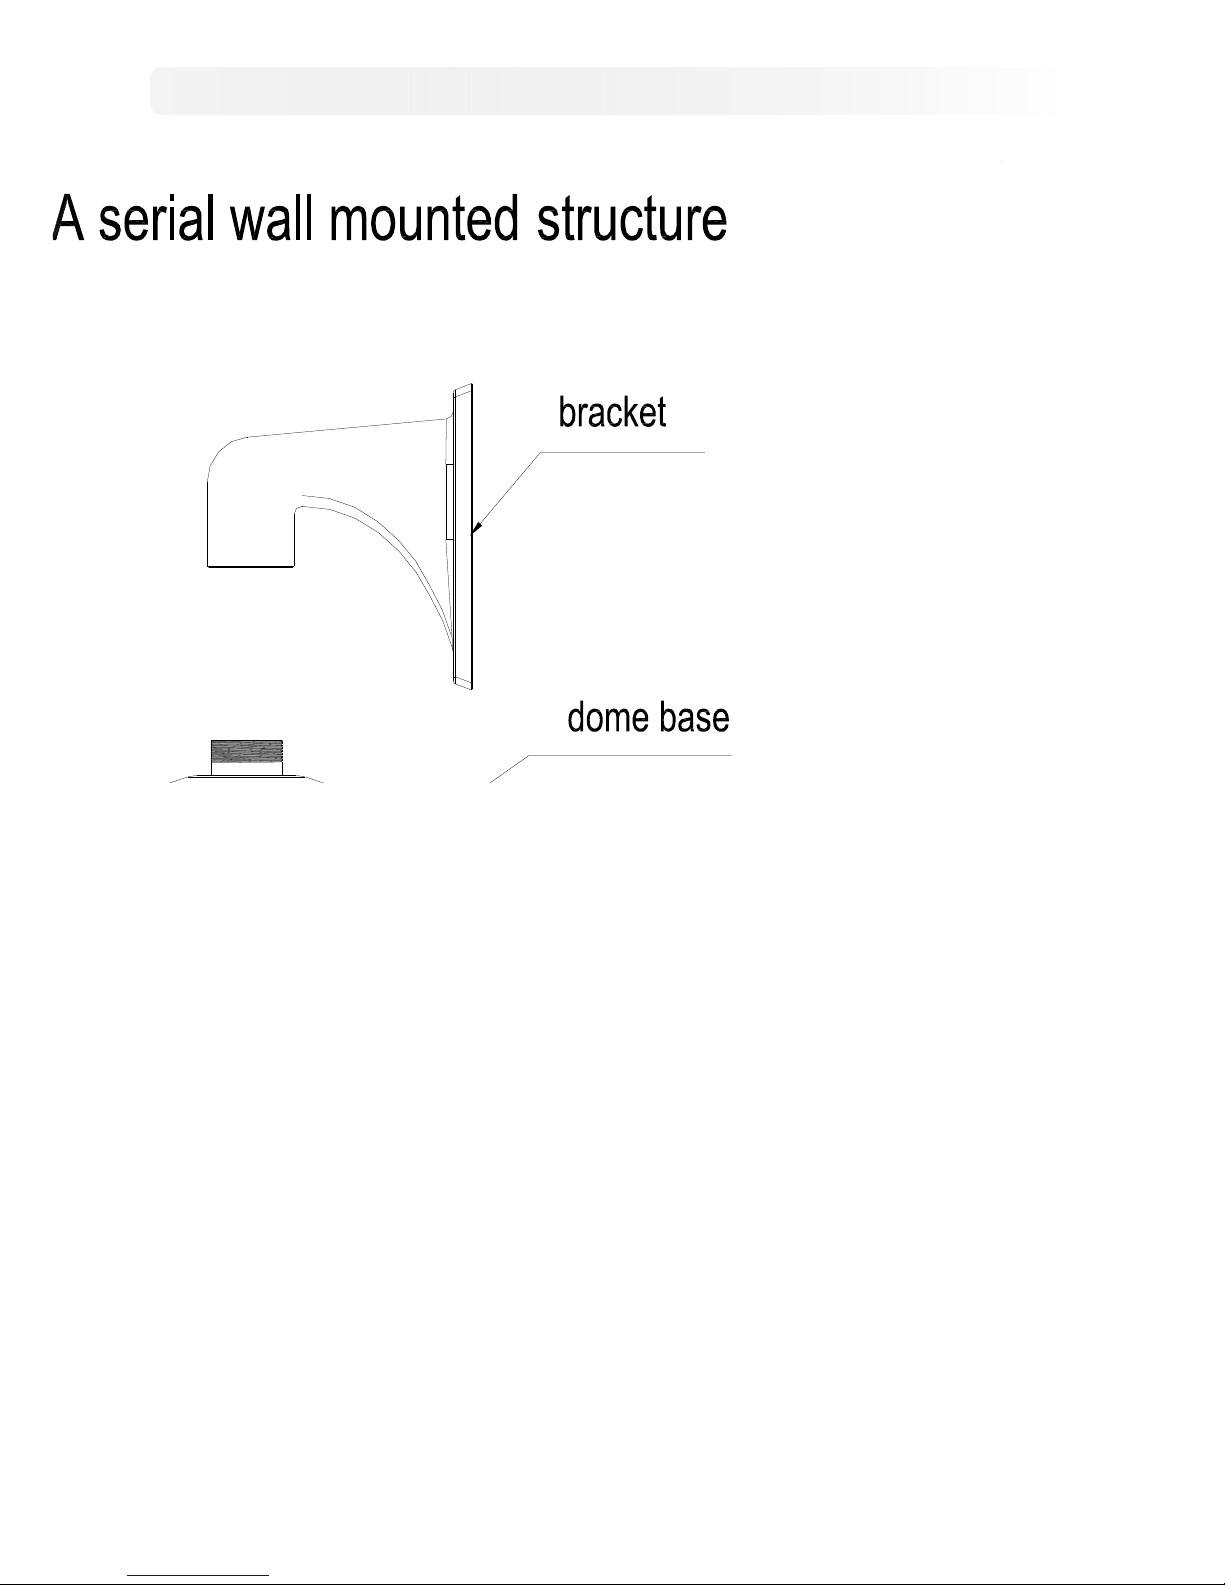
Installation steps of wall mounted unit:
1) Take dome base from the packing box. Pull the wire and cables
out through the bracket, and than aim at four open holes and fix
the bracket firmly to the pre-installed setscrews with four M8
nuts. (As shown on the left)
2) Install the dome base onto the bracket.
3) Please refer the instruction to connect the power supply, video
and controlling cables.
4) Take out IR dome body from the packing box. Setup
communication protocol, baud rate and address through SW1
and SW2 at the bottom of the IR dome body. When install the IR
dome body, IR dome body’s socket need to correspond with the
dome base’s socket. Hold the camera with both hands, aim the
IR dome body’s clip at the dome base’s bayonet (Note the
corresponding red marks ), put the clip into bayonet slowly, and
then press the top of clip with a little force, you can confirm the
installation is set at positions after heard two crisp voice of a
combined bump.
Note: Confirm the IR dome body was completely stuck, or else
the IR dome body may cover off or the dome cover may be
fretted. Pull down the IR dome body lightly to check whether the
IR dome body is completely stuck.
5) Install demo cover onto demo base and fix them.
Installation steps of pendent mounted unit:
1) Take dome base from the packing box. Pull the wire and cables
out through the bracket, and than aim at four open holes and fix
the bracket firmly to the pre-installed setscrews with four M6 nuts
.(As shown on the left)
2) Refer to the installation steps of wall mounted unit.朗读
显示对应的拉丁字符的拼音
IR Intelligent High-Speed Dome Installation and User Manual
12

IR Intelligent High-Speed Demo Installation and User Manual
13

IR Intelligent High-Speed Dome Installation and User Manual
14

IR Intelligent High-Speed Demo Installation and User Manual
15

IR Intelligent High-Speed Dome Installation and User Manual
B series of IR intelligent high-speed dome installation
16
Installation steps of wall mounted unit:
1) Take IR dome camera from packing box, set up dome camera
protocol, baud rate and address. Pull the wire and cable out
through the bracket, and then aim at four open holes on the
bracket and fix the IR dome camera firmly to bracket with M6
socket head screws which are along with the unit.( As shown on
the left)
2) Aim at four open holes on the wall and fix the bracket firmly to the
pre-installed setscrews with four M8 nuts.
3) Please refer to the instruction to connect the power supply, video
and controlling cables.
Installation steps of pendent mounted unit:
1) Take IR dome camera from the packing box, setup
communication protocol, baud rate and address through SW1
and SW2 at the bottom of the IR dome camera. Pull the wire and
cable out through the bracket, and then aim at four open holes on
the bracket and fix the IR dome camera firmly to the bracket with
M6 screws. (As shown on the left)
2) Aim at four open hole on the ceiling and fix the bracket firmly to
the pre-installed setscrews with four M6 nuts
3) Please refer to the instruction to connect the power supply, video
and controlling cables.

IR Intelligent High-Speed Demo Installation and User Manual
C series of IR intelligent high-speed dome installation
17
Installation steps of wall mounted unit:
1) Take dome base out from the packing box. Pull the wire and
cable out through the bracket, fix the IR dome body firmly to the
bracket with M6 socket head screws which are along with the
unit.(As shown on the left)
2) Fix the bracket firmly onto the pre-installed setscrews on the wall
with four M8 nuts.
3) Take out IR dome body from the packing box. Setup
communication protocol, baud rate and address through SW1
and SW2 at the bottom of the dome body. When install the dome
body, dome body’s socket need to correspond with the dome
base’s socket. Hold the camera with both hands, aim the dome
body’s clip at the dome base’s bayonet (Note the red marks
correspond), put the clip into bayonet slowly, and then press the
top of clip with a little force, you can confirm the installation is set
at positions, after heard two crisp voice of a combined bump.
Note: Confirm the dome body was completely stuck, or else the
dome body may cover off or the dome cover may be fretted. Pull
down the dome body lightly to check whether the dome body is
completely stuck.
4) Install dome cover onto dome base and fix them
Installation steps of pendent mounted unit:
1) Take dome base out from the packing box. Pull the wire and
cable out through the bracket, and fix the IR dome base firmly to
the bracket with M6 screws. (As shown on the left)
2) Aim at four open holes on the ceiling and fix the bracket firmly to
the pre-installed setscrews on the ceiling with four M6 nuts.
3) Refer to the installation steps of wall mounted unit.朗读

IR Intelligent High-Speed Dome Installation and User Manual
18
Table of contents


