Nova Bidet Ultra-NOVA User manual

Owners manual for models:
Ultra-NOVA
Ultra-NOVA+
NOVA
U
l
t
r
a
BIDET
NOVA
®

Parts
Installation
Testing Before Use
Operation
Cleaning
Warranty
Technical Specifications
5-6
7-11
12
13-16
17
20
22
Warnings and Precautions 4
Troubleshooting 19-20
Features 3
Content:

3
Please confirm the model you purchased first, and then check the corresponding function.
The model and specification can be found on the nameplate at the rear of the machine.
Models
Functions
Ultra-NOVA
Ultra-NOVA+
Basic
functions
Seat heating
Water heating
Rear/Female Wash
Warm air drying
Additional
functions
Auto lid open/close
Lid slow close
Moving wash
H/C Massage
Auto flushing
Smart Remote
Control
Energy saving
E-Water
Sterilization
Antibacterial seat
External filter
Enema Wash
Features

4
Warnings and precautions
• Do not kink water hose
• Do not get the unit wet
• Unplug before cleaning
• Only use natural cleaners on unit
• Use with GFCI outlet only
• If extension cord is needed use 14 or 12 gauge
• This unit is only intended for use as described in this manual
• Do not use if the unit is damaged

5
Seat
Seating Sensor
Safety Instructions
Lid
Lid Bumper
Bidet Nozzle
Plug
Drying Air Outlet
Water Supply
Connector
Control Knob
Water Temperature
Button
Seat Temperature Button
Auto Flushing Controller
(Only for Ultra-NOVA+)
Parts

6
6
5
NO.
Bidet Seat Remote Control
Remote Mounting
Bracket & Guide
Expansion Tube
Wall Screw
Auto-Flush Module
Mounting Plate
Locking Bracket
Top Mounting Bolts
T-Connector Rubber O Ring
Rubber Sleeve
Bolt
Supply Hose
Filter
Owners Manual
Cardboard
Installation Guide
3
Name Sketch
1
2
Quantity
1pcs
4
1pcs
2pcs
2pcs
2pcs
1pcs
2pcs
2sets
1pcs
1pcs
1pcs
1pcs
1pcs
NO. Name Sketch
Quantity
7
1pcs
1pcs
1pcs
1pcs
4pcs
These parts are only for Ultra-NOVA+
Small Clamp Collar
Top outer diameter of fittings
from 2½in to 2¾in.
Large clamp collar
Top outer diameter of fittings
from 2¾in to 3⅛in.
Push Rod Extension
(Only use if Push Rod is
too short)
Clamp Screw
Parts list
Parts
Mounting Plate
Dryer
Seat Bumper
Mounting Plate
Release Button
Ownersmanual for models:
Ultra-NOVA
Ultra-NOVA+
NOVA
U
l
t
r
a
BIDET
NOVA
®

.
7
1. Preparation before installation
Size requirements of bidet seat
A
BD
C
Before installing the bidet seat:
A. Remove the existing toilet seat
and turn off the Water Supply
Valve.
B. Flush the toilet and hold down
the flush lever or button for 5 to
10 seconds.
C. Place a sponge, rag, or bucket
under the toilets water inlet.
D. Disconnect toilets Water Supply
Hose from the Toilets Water
Inlet.
Installation
Flush Button
Toilets Water Inlet
Water Supply Valve
Water Supply Hose
A. Distance from water tank to the front of
toilet: 19.9” - 21” (505-535mm).
B. Distance from mounting holes to the back
edge of toilet bowl: >2.75” ( 70mm).
C. Spacing between two mounting holes:
4.6” - 7.2” (118-182mm).
D. Distance from mounting hole to water
tank: >1.2” (30mm).
8
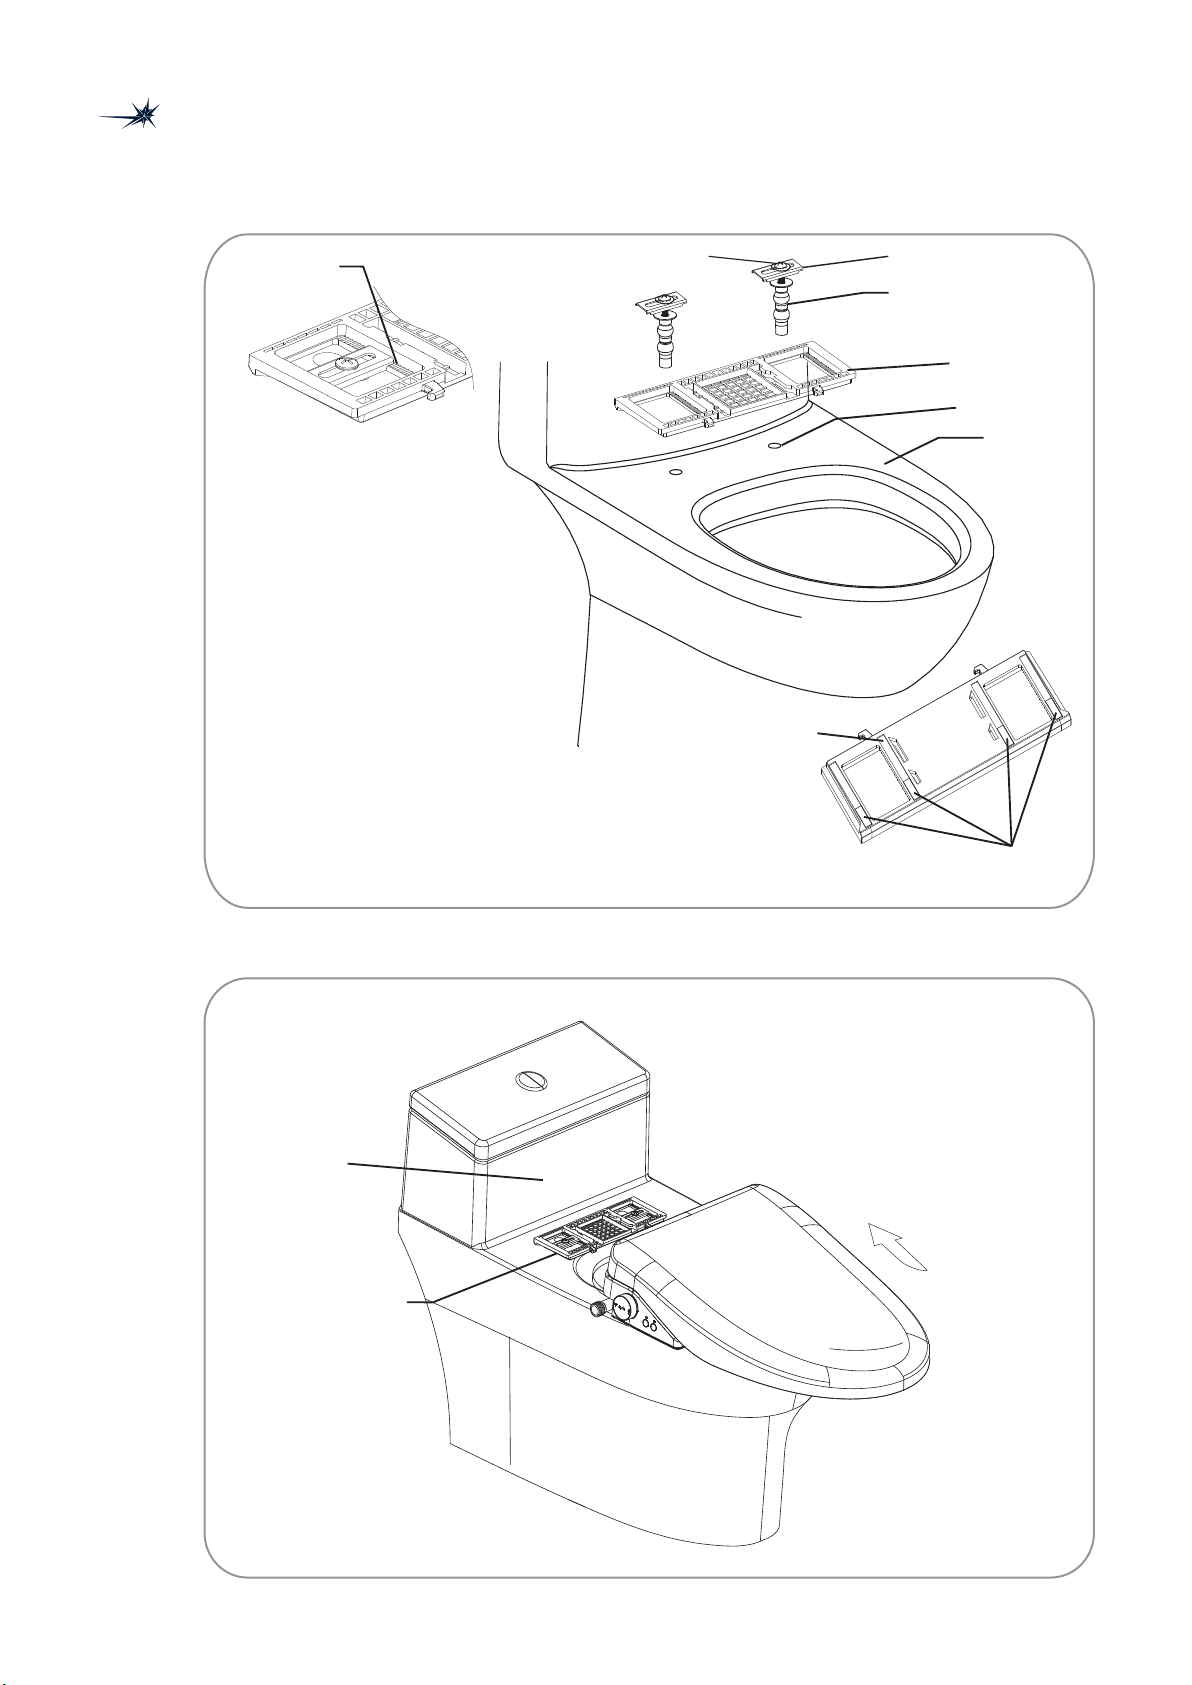
3. Secure Ultra NOVA Seat
2. Install the Mounting Plate
Rubber Sleeve
Mounting Plate
Toilet
Mounting Hole
Mounting Plate Groove Locking Bracket
Bolt
Installation
Mounting Plate
Toilet Tank
Align the bottom of the Seat with the
Mounting plate, and push toward the
Toilet Tank.
When you hear the "click" sound, it
indicates that it is locked in place.
Anti-skid pad
Note: For uneven ceramic, add 2mm thick pad at the rear end of the Mounting Plate.
A. Push the Rubber Sleeve into the
Mounting Hole of the Toilet.
B. Place Mounting Plate over the
Mounting Holes on the Toilet and
align it using the Cardboard
Installation Guide.
C. Place Locking Brackets over
Mounting Holes.
D. Slide Bolts through the Locking
Bracket and into the Rubber
Sleeves.
E. Tighten Bolts.

9
1. Turn off the power and water.
2. Remove the Toilet Tank Cover
Toilet Tank Cover
Installation (Auto-Flush)
1. Place Automatic Flushing Module into the top of the fittings as shown in the figure.
2. Make sure the Push Rod is aligned with the Flush Button. If the Push Rod cannot press the
Flush Button, insert the Adjusting Block into the Push Rod.
3. Tighten the Wing Bolt to till secure then tighten 4 Clamp Screws.
4. Secure the power cord at the screw position with a tie (If there is a groove in the top of the
water tank, pass the wire thought the goove).
5. Turn on the water source, connect the power supply, and test the manual and automatic
flushing functions.
6. Close the water tank cover.
Wing Bolt
Collar Clamp
Flush Button
Automatic
Flushing Module
Cable Ties
3. Measure the outer diameter and height of the
top of the Top Flush Cylinder. The diameter should
be between 2½in and 3⅛in and the height should
be above ¾in otherwise the Automatic Flushing
Module is not usable.
Confirm Top Flush Cylinder diameter before installation
Automatic Flushing Module
Collar Clamp
Collar and Flushing Module connected
Install external automatic flushing unit
(
Installation and fixation of flushing module
Clamp
Screw Push Rod
Only for Ultra NOVA +)
4. Find the appropriate sized collar. The
collar should be able to fit around the flush
cylinder but it’s ends should not be able to
touch each other.
5. Secure the collar to the flushing module by
sliding it sideways with the screw holes on
the collar facing up, as shown below. (You
should hear a click)
2½in and 3⅛in
>¾in

10
4. Connect all water supply parts
5. Connect power
Plug into GFCI wall outlet.
Caution
Outlet must have GFCI (Ground-fault circuit interrupter).
Outlet must be on 15+ AMP dedicated circuit.
Cord is limited to 4 feet by law.
If extension cord is used, it must be 14 gauge or larger.
Ultra-NOVA
Supply Hose
Ultra-NOVA
Water Inlet
T-Connector
Water Filter
Water Supply Shutoff
Toilet Supply Hose
Alternate T can be purchased and used at the water
supply shutoff if underside of toilet is unaccessible.
Installation
A. Screw T-Connector onto toilet.
B. Screw Toilet Supply Hose onto bottom of
T-Connector.
C. Screw Water Filter onto side of T-Connector
D. Screw one side of Ultra-NOVA Supply Hose
onto filter and the other side to Ultra-NOVA
Water Inlet.
E. Turn on Water Supple Shutoff.
F. Check all connections for leaks.

11
6. Remote Control installation
Expansion Tubes
Screws
Wall Mount
Guide
Sticker Installation method
B. Secure Wall Mount
I. Remove the Adhesive Sticker on the back of the Wall
Mount (and Guide if desired).
II. Adhere Wall Mount (and Guide) to wall in desired
position.
A. Install Batteries
I. Remove Battery Door from back of remote by
pressing on the door and sliding away from
remote.
II. Insert 2 AAA Batteries and close Battery Door.
I. Place Wall Mount on wall in desired location and mark
locations of screws on the wall through the holes on the
Wall Mount.
II. Remove Wall Mount and drill holes in the marked
locations.
III. Insert Expansion Tubes into wall.
IV. Place Wall Mount (and Guide if desired) on wall and
thread Screws into Expansion Tubes the holes on the
Wall Mount.
(Use of the Guide is optional, but many people
find it helpful to find features on the top of the
remote easily while seated.)
Screw Installation method
C. Place Remote in Wall Mount
Adhesive Sticker
Battery Door
Installation

12
1. Check power supply is securely connected to wall outlet.
2. Activate seat Skin Sensor by placing a hand or wet rag on the seat where
indicated. (If hand or wet rag doesn’t work place bare bottom on the seat).
3. Press a wash button on the remote and place a hand or cup over the nozzle
as it comes out and wait until wash begins.
4. Press Stop or remove hand/rag from Skin Sensor.
SUCCESS!!!
Your Ultra-NOVA is ready for use.
Testing Before Use
13
Operation
Function
Stop
Rear Wash
Front Wash
Enema Wash
Hot/Cold Massage
Water Temperature
Seat Temperature
Water Pressure
Nozzle Position
User Modes
Dryer
Air Temperature
Flush*
Auto-Flush*
Nozzle Cleaning
Night Light
Lid Open/Close
*Only available on Ultra - NOVA+
Description
Press the stop button to end and function "rear wash", "front wash", "enema wash", and "air drying".
Long press for 2 seconds to turn on/off of beeping sound.
While seated, press the Rear, Front, or Enema button, corresponding wash function will start and run
for 90 seconds. If user leaves the seat during the wash, the function will be stopped. Rear & Front
washes default to oscillating wash, press again to turn into fixing position washing.
When the "rear wash" or "front wash" function is started, press the 'H/C Massage' button to start or
stop this massage function. When this function is running the water temperature changes alternately
from 90°F to 100°F
Press Water Temp button to increase the water temperature in the "rear wash", "front wash", and
“enema” modes. It has Low, Med, High, and Off.
Press Seat Temp button to change the temperature of the seat. The seat temperature has 3 levels
and off mode.
Use + and - buttons during a wash cycle to increase and decrease water pressure.
Press the Nozzle Position button to move the nozzle forward in the Rear, Front, and Enema modes.
It has three positions from 1 to 3 as indicated by the lights. Each time
you press it, the nozzle moves
forward one position till reaching position 3, then comes back towards position 1 with each press.
To set User modes, start a function and adjust the setting to your desired level, then press User 1 or
User 2 button for 2 seconds to memorize the current water temperature, air temperature, seat
temperature, nozzle position and water pressure. To use a User mode, press desired function (Rear,
Front, Enema, or Dry) then press the User 1 or User 2 button to use the memory setting.
When sitting on the seat, press the Air Dry button, the air drying function will run for 3 minutes. If the
stop button is pressed or user leaves the seat before the 3 minutes are up, the function will be
stopped automatically.
Press the Air Temperature button to change the air temperature in "air drying" mode. The air
temperature has 4 heat levels (low, medium, high, and off).
Press the Flush button to flush the toilet. Must wait 30 second between flushes. (Ultra-NOVA+ only)
After getting up from the toilet (deactivating the Seat Sensor) the unit will wait a few seconds and
flush the toilet. (Ultra-NOVA+ only)
Press the Nozzle Cleaning button (on Ultra-NOVA+ long press Nozzle Position button), the Nozzle
will come out and water will run over the Nozzle for 10 seconds. The Nozzle will stay out for cleaning.
Press Stop button to send the Nozzle back into the seat.
Turn on or turn off the decorative light of the Control Knob.
Press the Lid Open/Close button to open the toilet lid, and then press the button again to close it.
Press for 3s to start or stop the auto lid open/close function.

14
Operation
Function
Sync Remote
Nozzle Oscillation
Slow Close
Seat Status Indication
Anti-scald System
Nozzle Self-cleaning
Description
With the seat unplugged from the electrical outlet, press and hold the "Font Wash" button for 3
seconds. At this time the three LED indicators on the remote will flash red. When this happens, plug
the seat into the electrical outlet. If pairing is successful, the seat will make a multi-beep tune.
Otherwise, start the process over again.
Nozzle will oscillate (move forward and back) by default with Rear and Front washes. A second press
of a wash button will stop the oscillation (keep the nozzle stationary).
Whether using Auto Open/Close or manually closing the lid, the lid has a damper that makes it close
softly. The Seat also has a slow close damper for soft, quiet close.
Night light will glow white when no one is seated, it will glow red during rear wash, and blue during
front wash. If a malfunction is detected the light we flash red.
If a user seated for more than 15 minutes, the seat will turn heat to Low setting in order to reduce
prolonged heat exposure.
Before and after each use, the nozzle will run self-cleaning cycle. This self-cleaning cycle runs water
over the nozzle to remove debris.

15
Turn backward to start a Rear Wash.
Turn forward to start Front Wash
Long press (2 seconds) to start Enema Wash.
Once a wash has started:
Turn knob forward to increase pressure and back-
ward to reduce pressure.
Press in on Knob to stop Wash.
When stopped, press Knob to start Dry.
Short press the button to switch the
water temperature.
Long press during wash to switch nozzle
from oscillation to stationary and back.
Water
Temp
Seat
Temp
Operation
Control Knob
Side Controls
Water Temperature Button
Seat Temperature Button
Forward
Press
Backward
Short press to switch the seat temperature.
Long press during wash to switch nozzle position.
(positions cycle 1,2,3,2,1,2,3...)

16
Remote for Model Ultra-NOVA+
Air TempDryFlush Nozzle
Position
Night
Light
Lid
Open/Close
Air TempDry
Nozzle
Cleaning
Nozzle
Position
Night
Light
Lid
Open/Close
Front
Rear
Stop
Enema
H/C
Massage
+
Pressure
-
User 2
Water
Temp
Seat
Temp
User 1
Front
Rear
Stop
Enema
H/C
Massage
+
Pressure
-
User 2
Water
Temp
Seat
Temp
User 1
Remote for Model Ultra-NOVA
Operation
Remote Control button layout

17
Supply Hose
Filter screen
Water Inlet
External Cleaning
Clean the filter screen
If you feel that the water flow is less than original
during normal use, clean the Filter Screen. To
clean the Filter Screen, turn off water supply,
flush toilet, and disconnect the Supply Hose from
the side of the seat. Remove Filter Screen from
Water Inlet and scrub with soft bristled brush.
After cleaning reassemble and turn on water
supply.
Remove seat to clean toilet
If you need to access the under side of the seat
for cleaning, turn off water and power first. Then
push the release button on the right side (while
facing the toilet) and pull the seat forward.
Seat can be reinstalled by sliding it back into the
mounting plate until it click into place.
Nozzle Cleaning
Press the "nozzle cleaning" button on the remote
and the nozzle will automatically come out. Use
cleaner and a soft cloth or soft bristled brush to
clean nozzle.
When done cleaning, pres Stop button and nozzle
will go back into seat.
Clean the product with a soft cloth and natural
cleaners. Do not use strong chemicals on the seat
as they can damage the anti-bacterial coating on
the unit.
Push rod
1
2
Cleaning

18

Water Supply Shutoff
If leaking, immediately shut off water supply and unplug the unit!
19
Problem
Seat not responding
No water
Water pressure low
Water temperature low
Seat temperature low
Air temperature low
Wash stops running
Dry stops running
Remote control not responding
Water connection leaking
Flashing red light
Test
Are lights on seat turned off
Check water supply shutoff valve
Is the supply hose kinked
Are you covering the seat sensor with skin
to activate it?
Is water pressure setting low
Check filter
Is the water temperature set to low
Is the seat temperature set to low
Is the air temperature set to low
Has it run for more than 90 seconds
Has it run less than 90 seconds
Has it run for more than 3 minutes
Has it run less than 3 minutes
Is the connection lose
If the connection missing a rubber washer
Flashes red once: seat temp sensor alert
Flashes red twice: air temp sensor alert
Flashes red three times: Water temp
sensor alert
Solution
Check wall power outlet for power and
plug seat in to wall outlet.
Open if closed
Adjust the hose to unkink it
Move your body to fully cover skin sensor
Press Pressure + button on remote
Replace filter every 6 months
Press Water Temp button to adjust temp
Press Seat Temp button to adjust temp
Press Air Temp button to adjust temp
Not a malfunction (cycle runs for 90 sec)
Move your body to fully cover skin sensor
Not a malfunction (cycle runs for 3 min)
Move your body to fully cover skin sensor
Tighten the connection
Replace the rubber washer
Sensor open or short circuit seat will beep
and stop heating
Sensor open or short circuit seat will beep
and stop heating
Water temp above 113°F (After 3 beeps it
returns to normal).
CAUTION
Close the valve
Troubleshooting

For more Troubleshooting or to view the warranty for this product, scan
this QR code or go to: https://NovaBidet.com/Warranty/
20
Troubleshooting / Warranty
This manual suits for next models
1
Table of contents
Popular Bathroom Fixture manuals by other brands


Kallista
Kallista P21654 installation instructions

OVE
OVE BEL 34 installation manual

Alterna
Alterna NICE DAY Assembly instructions

Williams-Sonoma
Williams-Sonoma Hughes Towel Ring Assembly instructions

Kohler
Kohler K-712-H2 Homeowner's guide

Franke
Franke AQUATIMER A3000 Installation and operating instructions

Bradley
Bradley Advocate AV Series Installation

Franke
Franke CAMPUS CMPX538E Installation and operating instructions

Sanela
Sanela SLA14 Mounting instructions

Miomare
Miomare WC-SITZ Assembly instructions

URIDAN
URIDAN ADMIRAL KH-10 installation instructions

Welltime
Welltime Texas 216782-1021896 Installation instruction