nova hüppe Novetta Plus H User manual
Installation Instructions – Instructions de pose
Nova Hüppe: Novetta Plus H
Montageanleitung
Montage Novetta plus H Nova Hüppe
2 08/12
Zu dieser Anleitung
Die Montage der Novetta darf nur
nach dieser Anleitung und den dazu-
gehörigen Dokumenten erfolgen.
Arbeitschritte, die nur für einen be-
stimmten Novetta-Typ gelten, sind
an den entsprechenden Stellen be-
schrieben bzw. gekennzeichnet.
Diese Anleitung an den Nutzer
weitergeben.
Dieses Symbol weist auf Ge-
fährdungen hin.
Dieses Zeichen kennzeichnet
wichtige Hinweise.
Sicherheitshinweise
Markisen haben Sonnenschutzfunk-
tion und sind bis Windstärke 5
(8m/s) belastbar. Markisen bei größe-
ren Windstärken und Regen einfah-
ren.
Unsachgemäße Umbauten oder Ver-
änderungen der Novetta sind verbo-
ten!
Halten Sie die Vorschriften der Her-
steller von Dübel- und Befestigungs-
materialien ein!
Die Montage darf nur von quali-
fizierten Fachbetrieben mit ein-
schlägiger Montageerfahrung
erfolgen.
Beachten Sie die Unfallverhütungs-
vorschriften der Berufsgenossen-
schaft!
Stellen Sie sicher, daß bereits verleg-
te Elektroanschlüsse während der
Montage vom Stromnetz getrennt
sind!
Sperren Sie die Montagestelle groß-
räumig ab!
Vor der Montage
Die Lieferung der Markise erfolg-
te ohne Befestigungsmaterial!
Halten Sie für die Montage bereit:
–Prüfkabel für Elektromotor:
mit Schukostecker 3623.38.0000
od. FI-Schutzschalter
3623.49.0000
–Werkzeug z.B:
Inbus-Schlüssel SW 6/8/10mm
Ring-/Gabelschlüssel
SW 10/13/17/19 mm
Kreuzschlitzschraubendreher
Novetta-Teile geschützt lagern!
Lieferung prüfen
•Schutzhüllen und Transportsiche-
rungen erst bei dem jeweiligen
Montageschritt entfernen!
•Verpackungsmaterial sachgerecht
entsorgen.
•Lieferung auf Vollständigkeit prü-
fen.
•Bei Transportschäden umgehend
IhrenFachhändler benachrichtigen!
Concerning these instructions
The Novetta may only be assembled
in accordance with these instructions
and the related documents.
Operations which only apply for a
certain type of Novetta are de-
scribed or identified at the appropri-
ate points.
Pass these instructions onto the
end user.
This symbol indicates haz-
ards.
This symbol identifies impor-
tant instructions.
Safety instructions
Awning are intended to provide pro-
tection from the sun and can with-
stand winds up to force 5 (8 m/s).
Retract awnings at higher wind
speeds and when it is raining.
Improper conversions or modifica-
tions to the Novetta will render any
warranties or guarantees invalid.
Observe the specifications of the
manufacturers of dowels and fasten-
ing materials.
The Novetta may only be assem-
bled by qualified specialist firms
who have the relevant installa-
tion experience.
Observe all health and safety regula-
tions for prevention of accidents.
Ensure that electrical connections al-
ready laid are disconnected from the
power supply during Installation.
Shut off a large area around the in-
stallation site.
Before Installation
The awning is supplied without
mounting hardware!
Have the following ready for the in-
stallation work:
–Test cables for electric motor
with earthed connector
3623.38.0000 or
earth leakage circuit breaker
3623.49.0000
–Tools, e.g.:
hex wrenches 6/8/10 mm AF
ring/open ended spanners
10/13/17/19 mm AF
cross head screwdriver
Store Novetta parts so as to
protect them.
Check consignment
•Protective packaging and trans-
port securing devices should only
be removed at the appropriate in-
stallation stage.
•Dispose of packing material in an
appropriate fashion
•Check completeness of consign-
ment.
•If there is any transport damage
notify distributer without delay.
Concernant le présent manuel
La pose des Novetta doit être ef-
fectuée en respectant scrupuleuse-
ment les présentes instructions ainsi
que les documents correspondants.
Les travaux s’appliquant à un modèle
bien précis de Novetta sont décrits
ou spécialement marqués aux en-
droits correspondants.
Veuillez faire parvenir ces ins-
tructions à l’utilisateur final.
Ce symbole indique tout
risque de danger.
Ce symbole précède des in-
formations importantes.
Consignes de sécurité
Les stores bannes ont une fonction
de protection contre le soleil et résis-
tent à des vents allant jusqu’à la
force 5 (8m/s). Elles doivent être en-
roulées en cas de vents plus forts et
de pluie.
Il est interdit de procéder à toute
modification non conforme sur les
Novetta!
Prière d’observer les prescriptions
des fabricants de chevilles et maté-
riaux de fixation!
Veiller à ce que la pose soit ef-
fectuée par des spécialistes
ayant d’une bonne expérience
dans ce domaine.
Veuillez respecter les prescriptions
de prévention contre les accidents.
Assurez-vous que les câbles
d’alimentation électrique déjà rac-
cordés soient débranchés du secteur
pendant la pose!
Veuillez également protéger le lieu
de pose en prévoyant suffisamment
d’espace pour les travaux!
Avant la pose
Le store banne est livrée sans
matériel de fixation!
Veuillez préparer pour la pose:
–câbles d’essai pour moteur électrique
avec fiche étanche 3623.38.0000
ou protection FI 3623.49.0000
–outils, par ex.
clé mâle coudée pour vis à six pans
creux de 6/8/10 mm
clé plate
de 10/13/17/19 mm
tournevis cruciforme
Protéger les pièces des No-
vetta lors de l’entreposage!
Vérification de la livraison
•Enlever les enlever les protections et
l’emballage au fur et à mesure des
étapes de pose!
•Eliminer le matériau d’emballage
conformément aux prescriptions en vi-
gueur.
•Assurez-vous à l’aide de la nomencla-
ture accompagnant la livraison que
cette dernière est intégrale.
•Si vous constatez des dommages de
transport, informez immédiatement
revendeur spécialisé!
Nova Hüppe Montage Novetta plus H
08/12 3
Montieren Sie keine be-
schädigte Anlagen!
Montageort prüfen
–Stimmen die Angaben in der
Zeichnung bei objektbezogener
Montage mit den Gegebenheiten
vor Ort überein?
–Ist der Platzbedarf bauseits einge-
halten worden?
–Sind die Breiten- /Ausfall- /X-Maße
eingehalten?
Wenn Sie Abweichungen fest-
stellen, halten Sie Rücksprache
mit Ihrem Fachhändler.
Bei Anlagen mit Elektroantrieb:
–Sind die elektrischen Anschlüsse
vorbereitet?
–Falls die Anschlußleitungen noch
nicht nach außen geführt sind,
müssen Sie dem Endkunden die
Lage der notwendigen Anschlüsse
zeigen.
Lebensgefahr! 230V
Elektroanschlüsse dürfen
nur von ausgebildetem
Fachpersonal gelegt wer-
den!
Montageschritte 1-15
befolgen
•Konsole aufteilen.
•X-Maße anzeichnen.
•Konsolen montieren.
•Markise einhängen und sichern.
Bei gekuppelter Markise:
•Zuerst Antriebsmarkise,
dann Markise ohne Antrieb
einhängen und sichern.
•Dann beide Markisen kuppeln.
•Schlitztuch montieren.
Bei Bedarf:
•Neigungswinkel einstellen.
•Getriebeabgang einstellen.
•Elektroantrieb einstellen.
•Funktion prüfen.
Die Montage erfolgt prinzipiell nach
diesen Arbeitsschritten.
Nach örtlichen Gegebenheiten oder
bei objektbezogenen Montagen kann
davon abgewichen werden, wenn
eine andere Abfolge einzelner Ar-
beitsschritte günstiger scheint.
Das Ziel muß immer sein, einen op-
tisch einwandfreien Eindruck zu er-
reichen.
Do not assemble damaged
installation.
Check place of installation
–Do the details in the drawing
match the on-site situation in the
case of an object-specific installa-
tion ?
–Is the space requirement allowed
for on site?
–Have the main dimensions been
observed?
If you notice any deviations,
notify distributer immedi-
ately.
For electrically driven installa-
tions:
–Have the electrical connections
been prepared?
–If the connecting cables have not
yet been laid to the outside onto
the facade, you must mark the
position of the necessary connec-
tions for the customer.
Danger! 230V
Electrical connections may
only be laid by trained,
skilled personnel.
Observe installation sequence
•Distribute brackets.
•Mark dimension X.
•Fit brackets.
•Hang awning and secure.
On coupled awning:
•First fit and secure the drive
awning, then the awning without
drive.
•Then couple the two awnings.
•Fit gap covering fabric.
If necessary:
•Adjust tilt angle.
•Adjust drive eye position.
•Adjust electric drive.
•Check function
Installation proceeds in principle ac-
cording to these steps.
Variations are possible according to
local circumstances or if installation
is tailored to a particular object,
where a different sequence may be
advisable. The aim must always be to
create a visually perfect impression.
Prière de ne pas poser des
produits endommagés!
Contrôle du lieu de pose
–Les indications du dessin au niveau du
montage du store coïncident-elles
avec les conditions prévalant sur
place?
–L’espace nécessaire a-t-il été respecté?
–Les dimensions des principaux élé-
ments ont-elles été respectées?
Si vous constatez des anoma-
lies, veuillez en informer im-
médiatement votre reven-
deur spécialisé.
Pour les installations avec mo-
teur:
–Les raccordements électriques ont-ils
été préparés?
–Si les câbles de raccordement n’ont
pas encore été tirés vers l’extérieur sur
la façade, la position des raccords né-
cessaires doit être communiquée à
l’électricien.
Danger de mort! 230 V
Veiller à ce que les raccor-
dements électriques soient
effectués uniquement par
un personnel qualifié!
Respecter l’ordre de pose
•Placer les éléments porteurs.
•Marquer les cotes X.
•Poser les éléments porteurs.
•Suspendre le store banne et le fixer.
Pour les installations accouplées
•Suspendre et fixer d’abord le store
banne motorisé, puis le store à
accoupler.
•Accoupler les store bannes.
•Poser la toile.
Si nécessaire:
•Régler l’angle d’inclinaison.
•Régler la sortie treuil.
•Régler le moteur électrique.
•Vérifier le fonctionnement.
La pose se fait en principe dans
l’ordre décrit ci-dessus.
On peut cependant y déroger en
fonction des conditions locales ou
pour des adaptations spéciales
quand un odre différent semble être
plus judicieux.
L’ objectif doit toujours être la
l’obtention d’un aspect visuel par-
fait.
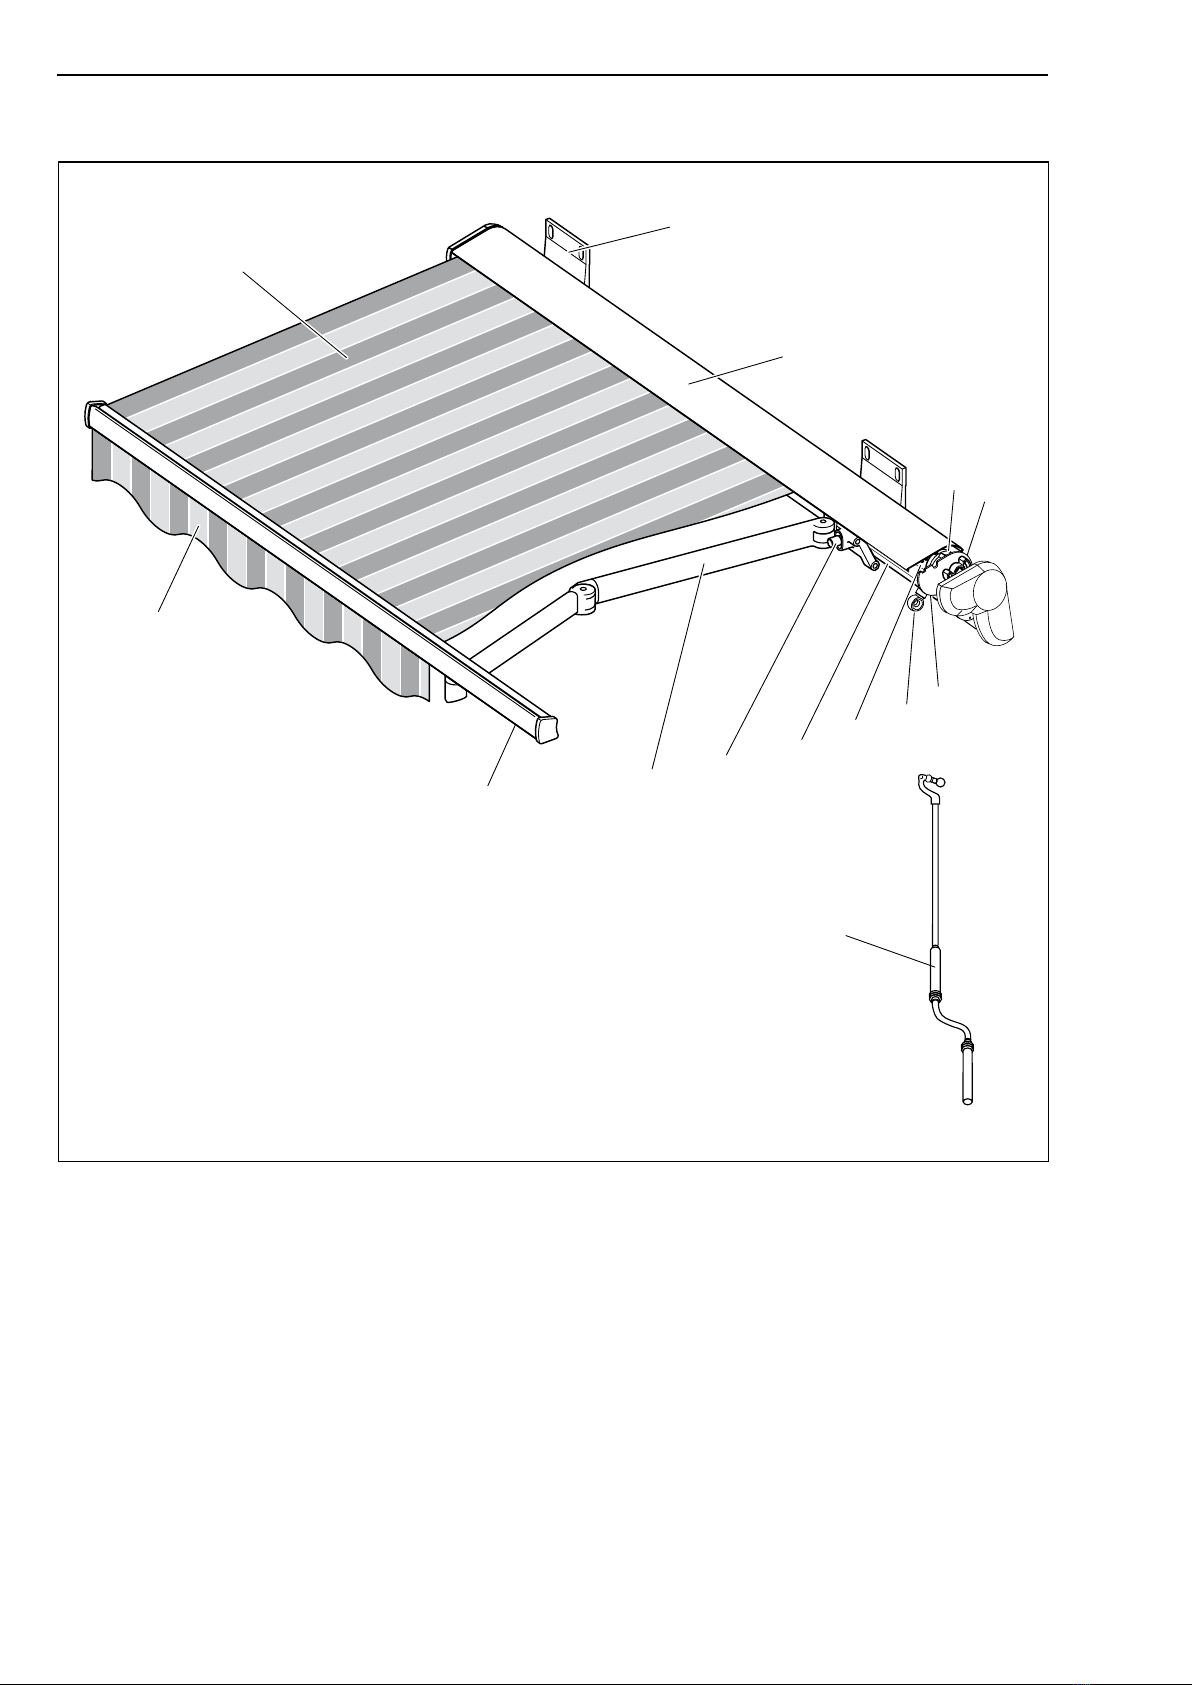
Bauteileübersicht – Components diagram – Vue d’ensemble des éléments
Montage Novetta plus H Nova Hüppe
4 08/12
1 Volant
2 Markisenstoff
3 Konsolen
4 Tuchwellenkonsole
5 Getriebe
6 Kurbelantrieb
7 Tuchwelle
8 Tragrohr
9 Neigungsverstellung
10 Gelenkarm
11 Ausfallprofil
12 Kurbel
13 Hülse-Oberteil
14 Hülse-Unterteil
1 Valence
2 Awning Fabric
3 Brackets
4 Awning Shaft Brackets
5 Drive
6 Crank Drive
7 Awning Shaft
8 Support Tube
9 Tilt Adjustment
10 Jointed Arm
11 Bottom bar
12 Crank
13 Top Part of Casing
14 Bottom Part of Casing
1
2
3
4
10
5
614
7
8
9
11
13
12
1 Lambrequin
2 Toile du store banne
3 Supports
4 Embout d’axe
5 Treuil
6 Anneau du treuil
7 Axe d’enroulement
8 Tube-support
9 Réglage de l’inclinaison
10 Bras articulé
11 Barre de tension
12 Manivelle
13 Gaine partie haute
14 Gaine partie basse
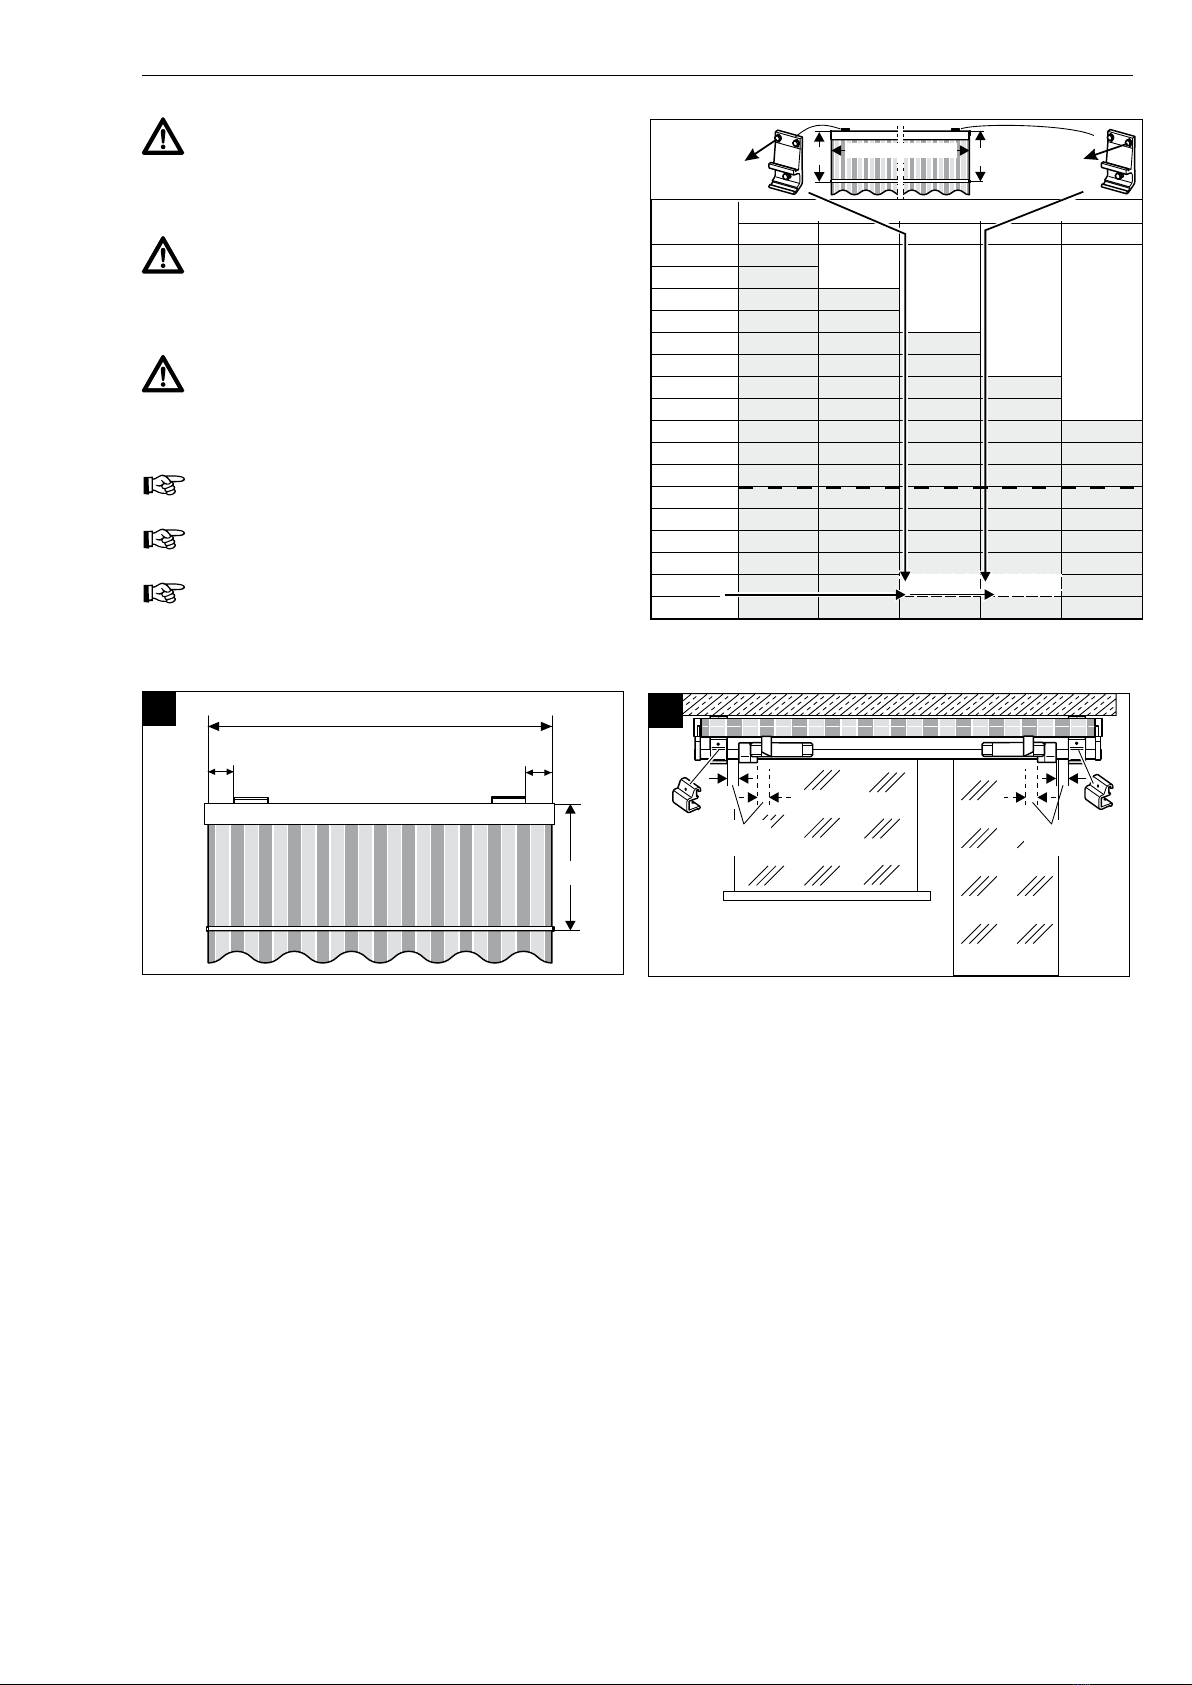
Nach Markisengröße laut Tabelle die Mindest-
Auszugskraft F / Schraube bestimmen und
hierfür Dübel und Schraube gemäß den techn.
Daten der Dübel- und Schraubenhersteller aus-
wählen.
As a function of the size of the awning, deter-
mine the minimum pull out force F per bolt us-
ing the table; select wall plugs and bolts in ac-
cordance with technical data from the wall plug
and bolt manufacturer.
En fonction de la grandeur du store banne,
déterminer la force portante minimale F / la
visserie et choisir à cet effet les vis et les che-
villes en fonction des données techniques du
fabricant.
Mindestauszugskräfte F / Schraube in der Tabelle
gelten auch für Decken- und Dachsparrenmontage.
Minimum pull out force per bolt in the table also valid
for celling mounting or in the case of rafter mounting.
Force portante minimale F / la visserie de la table pose
la plafond ou en cas de pose sur chevrons de comble.
Konsolenabstände messen – measure bracket elements – mésure l’éléments porteurs
Nova Hüppe Montage Novetta plus H
08/12 5
F = 1850N F = 2660N
A = 3000 mm
A = 2500 mm
AA
B = 5750 mm
A
B
mm
2000 F=230
F=260
F=290 F=510
F=320 F=570
F=350 F=620 F=970
F=380 F=670 F=1050
F=410 F=720 F=1130 F=1620
F=430 F=770 F=1210 F=1740
F=460 F=820 F=1290 F=1850
F=2520
F=490 F=880 F=1370 F=1970
F=2680
F=520 F=930 F=1450 F=2080
F=2840
F=550 F=980 F=1530 F=2200
F=2990
F=580 F=1030 F=1610 F=2320
F=3150
F=610 F=1080 F=1690 F=2430
F=3310
F=640 F=1130 F=1770 F=2550
F=3470
F=670 F=1180
F=3630
F=690 F=1240 F=1930
F=3780
1500 2000 2500 3000 3500
2250
2500
2750
3000
3250
3500
3750
4000
4250
4500
4750
5000
5250
5500
5750
6000
Mm
F=2780
F=1850 F=2660
X15 mm X15mm
B mm
A mm
12
max.
10 cm
max.
10 cm
2
Sondermontage Dachsparre
oder Einschubkonsole
+
–+
–
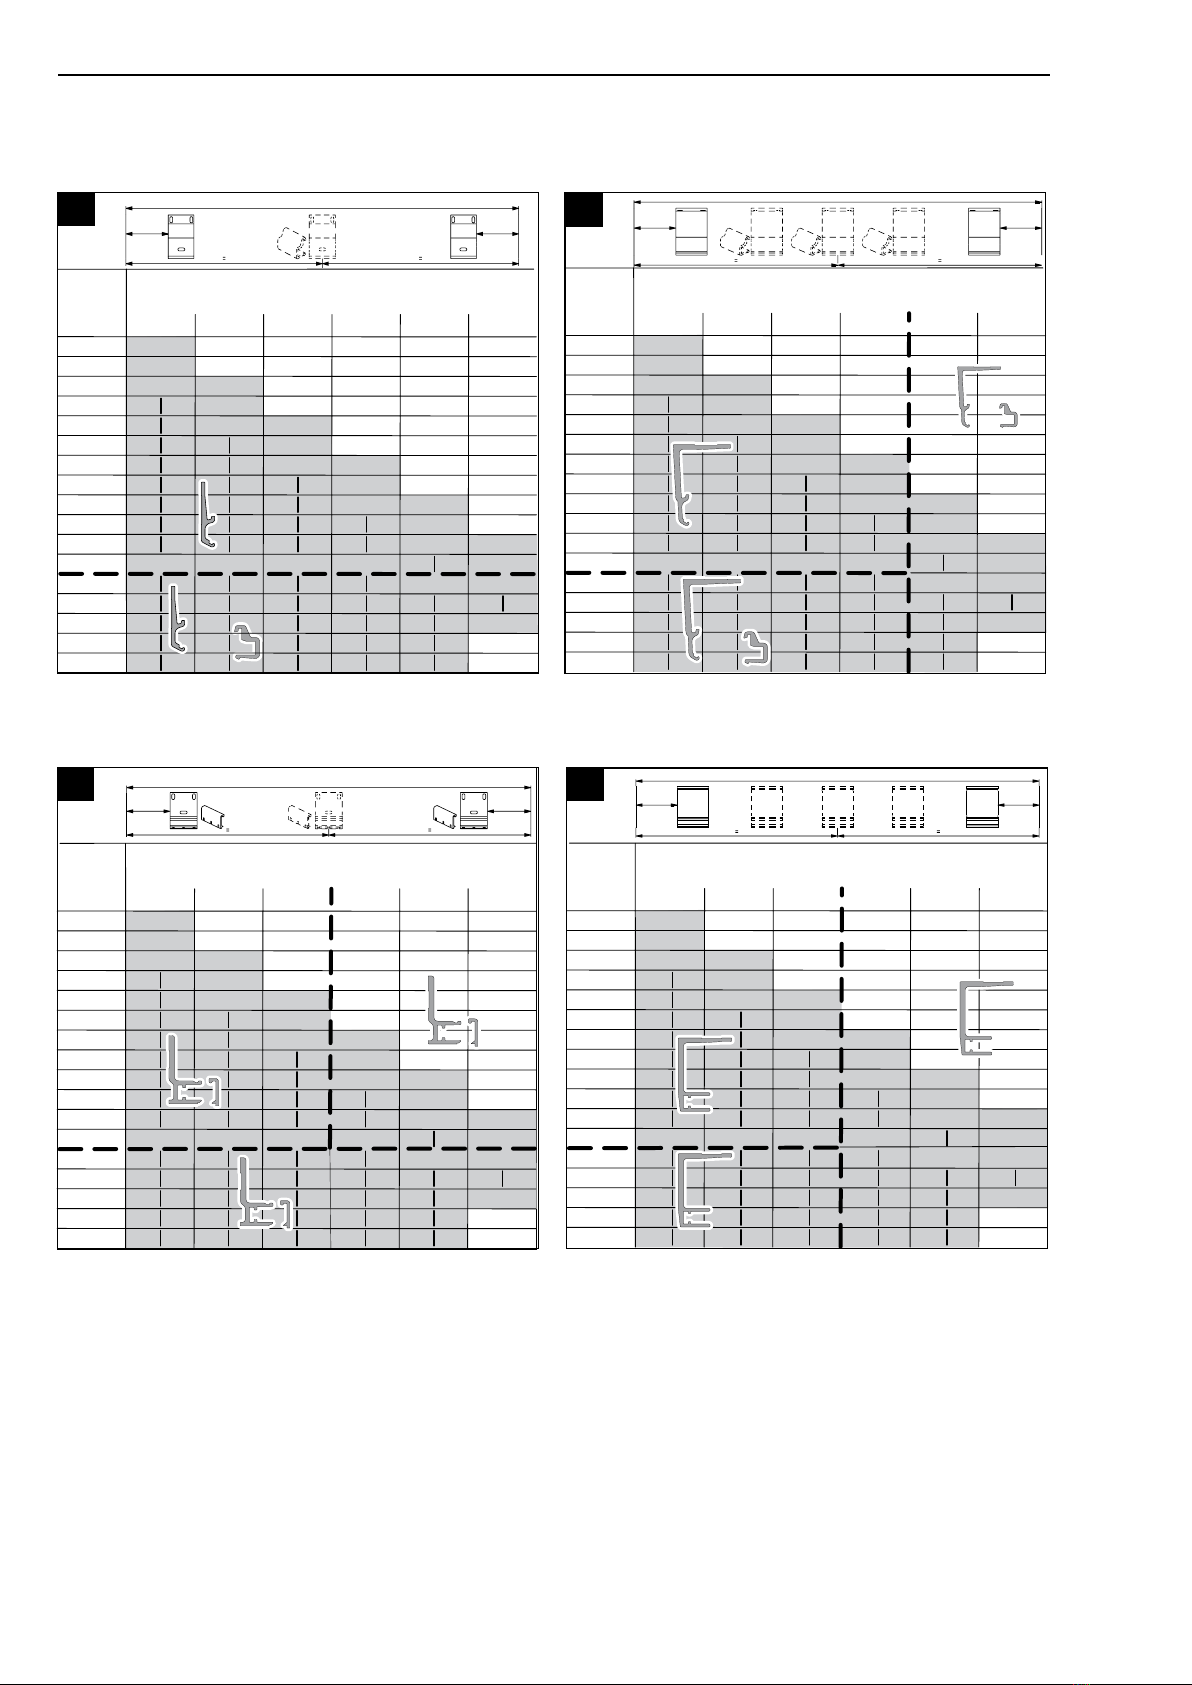
Konsolen aufteilen – Distribute bracket elements – Répartition des éléments porteurs
Wand Einhakkonsolen – Wall snag bracket – Decke Einhakkonsolen – Ceiling snag bracket –
Console accrocher en facade Console accrocher en plafond
Wand Einschubkonsolen – Wall slide bracket – Decke Einschubkonsolen – Ceiling slide bracket –
Console fourrer en facade Console fourrer en plafond
Montage Novetta plus H Nova Hüppe
6 08/12
B(mm)
Breite
1500 2000 2500 3000 3500 4000
100
100
100
100
100
240
240
240
240
240
240
360
360
360
360
360
360
600 600 600 600
600
600
Ausfall mm
6000
5700
5500
5250
5000
4750
4500
4250
4000
3750
3500
3250
3000
2750
2500
2250
2000
2x
3x
1x
130
130
130
3a
mm
X=100
Breite
1500 2000 2500 3000 3500 4000
X=240
240
240
240
240
240
100
100
100
100
100
100
220
220
220
220
220
220
460 460 460 460
460
460
Ausfall mm
mm
6000
5700
5500
5250
5000
4750
4500
4250
4000
3750
3500
3250
3000
2750
2500
2250
2000
3x
2x
2x
130
130
75
3c
B (mm)
X 15mm
3x
4x
2x
150
150
150
3d B (mm)
Breite
1500 2000 2500 3000 3500 4000
X=240
240
240
240
240
240
100
100
100
100
100
100
220
220
220
220
220
220
460 460 460 460
460
460
Ausfall mm
mm
6000
5700
5500
5250
5000
4750
4500
4250
4000
3750
3500
3250
3000
2750
2500
2250
2000
3x
2x
1x
4x
2x
150
150
130
150
130
3b
B(mm)
Breite
1500 2000 2500 3000 35004000
X=100
100
100
100
100
100
240
240
240
240
240
240
360
360
360
360
360
360
600 600600 600
600
600
Ausfall mm
6000
5700
5500
5250
5000
4750
4500
4250
4000
3750
3500
3250
3000
2750
2500
2250
2000
mm
+
–
X 15mm
+
–
X 15mm
+
–
X 15mm
+
–
X 15mm
+
–
X 15mm
+
–
X 15mm
+
–
X 15mm
+
–
6a
1.
2.
90ϒ
B
X
min.
1 cm
5 mm 18 mm
90°
1.
2.
B
X
3. 4.
90ϒ
B
X
90ϒ
1.
2.
3.
4.
90ϒ
X
B
Abstände siehe 8b
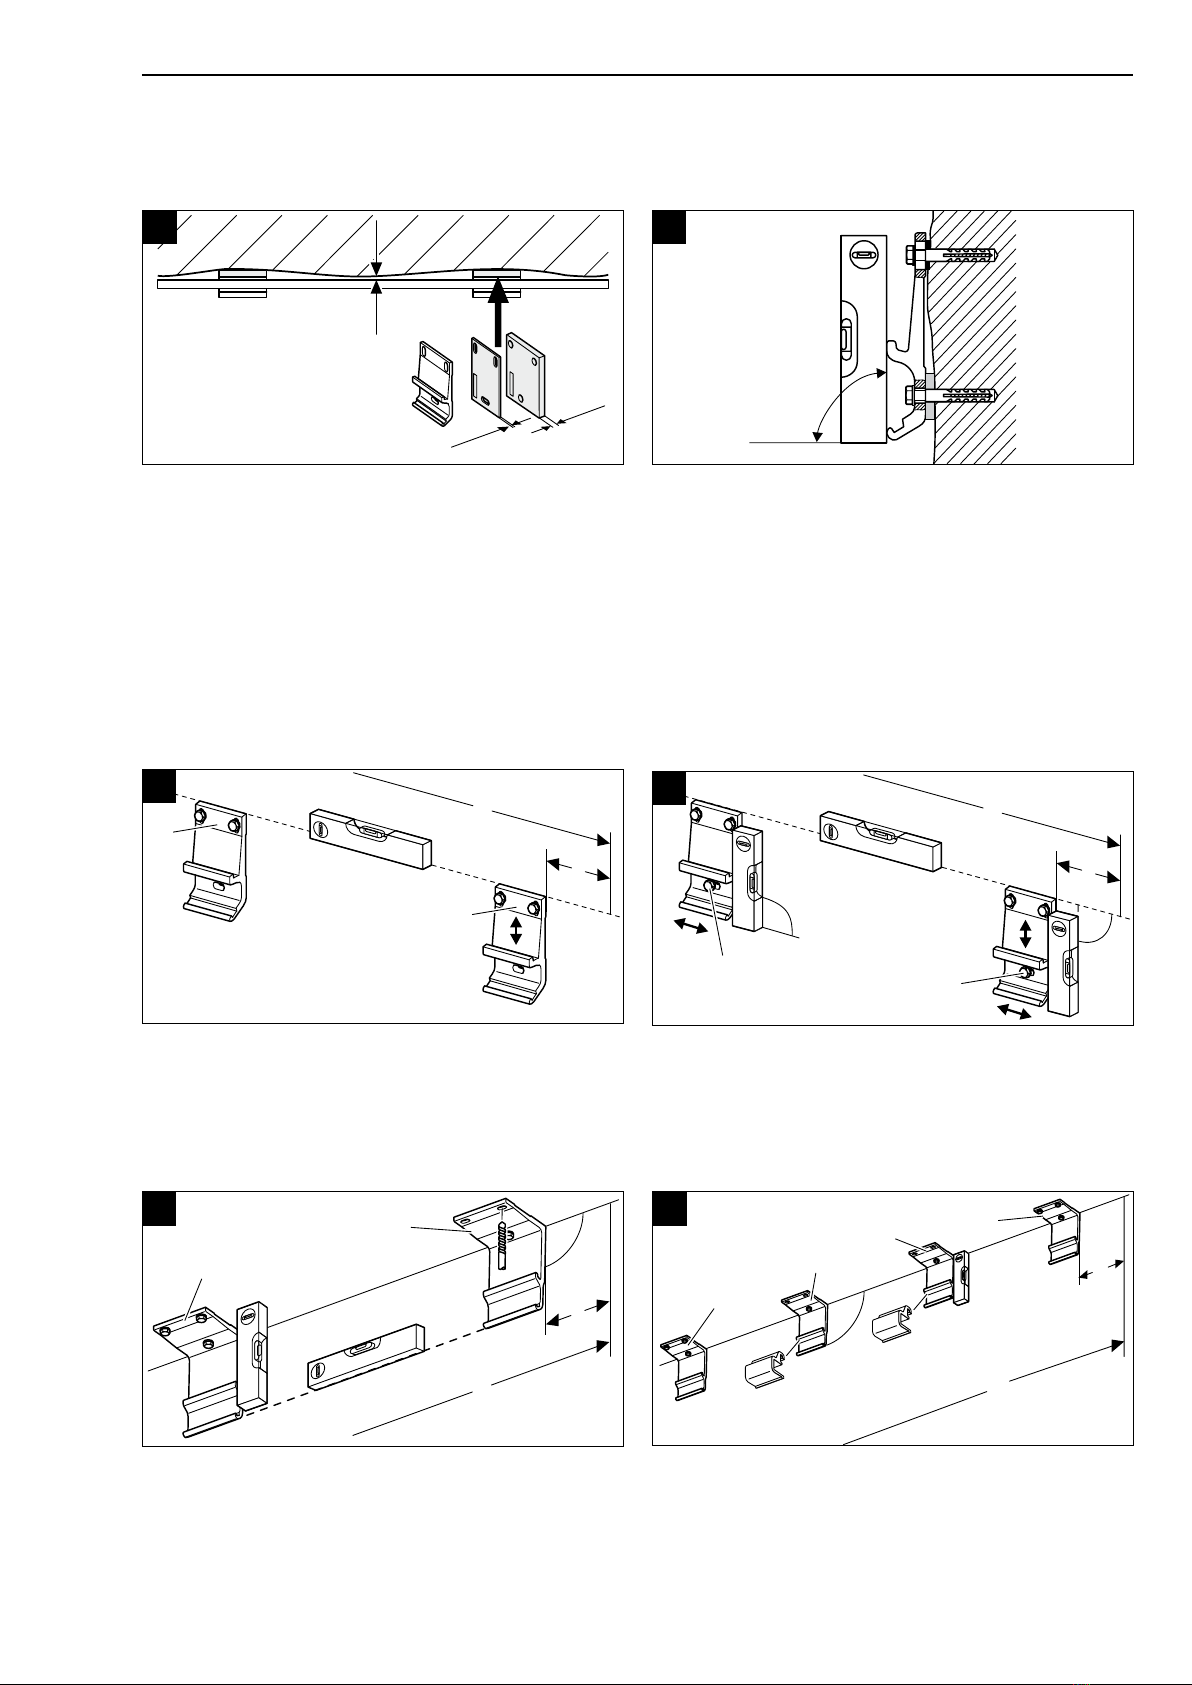
Flucht der Fassade prüfen/ausgleichen
Check/compensate for evenness in the facade.
Rattraper l’alignement de la façade
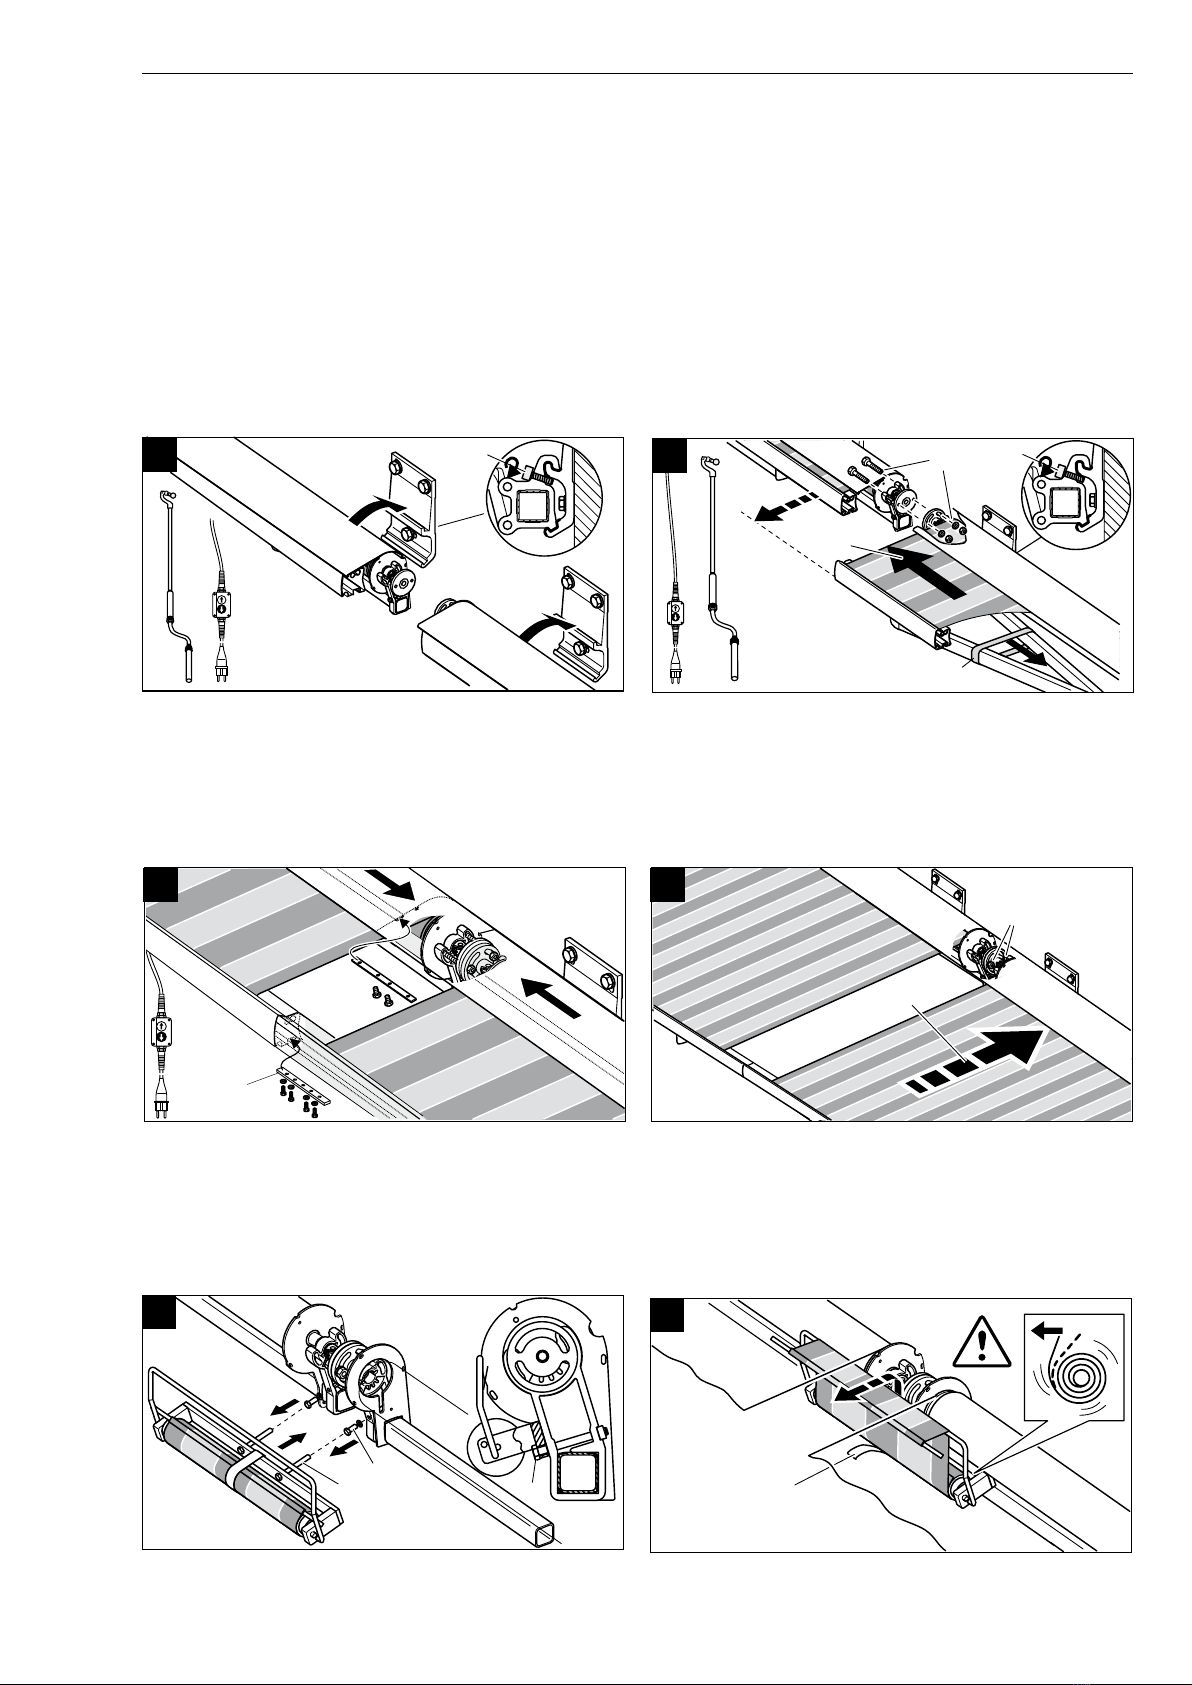
Montagefolge 1./2./3. ....beachten Observe the installation sequence 1./2./3. ...
Respecter l’ordre des étapes 1./2./3. ... de la pose
Bei Wandmontage – In the case of wall mounting – En cas de pose en facade
Wandkonsole anzeichnen/ausrichten/befestigen Mark/align/fit wall brackets
Marquer/ajuster/fixer les éléments porteurs muraux
Bei Deckenmontage – In the case of ceiling mounting – En cas de pose en plafond
Deckenkonsole anzeichnen/ausrichten/befestigen - Mark/align/fit ceiling brackets
Marquer/ajuster/fixer les éléments supports en plafond
Nova Hüppe Montage Novetta plus H
08/12 7
4a 4b
5b
5a
6b
4.
1.
2.
3.
a
a= min. 8 cm
1.
3.
2.
4.
1.
2. a!
b!
3.
max.
10 cm
3.
2.
1.
50 cm
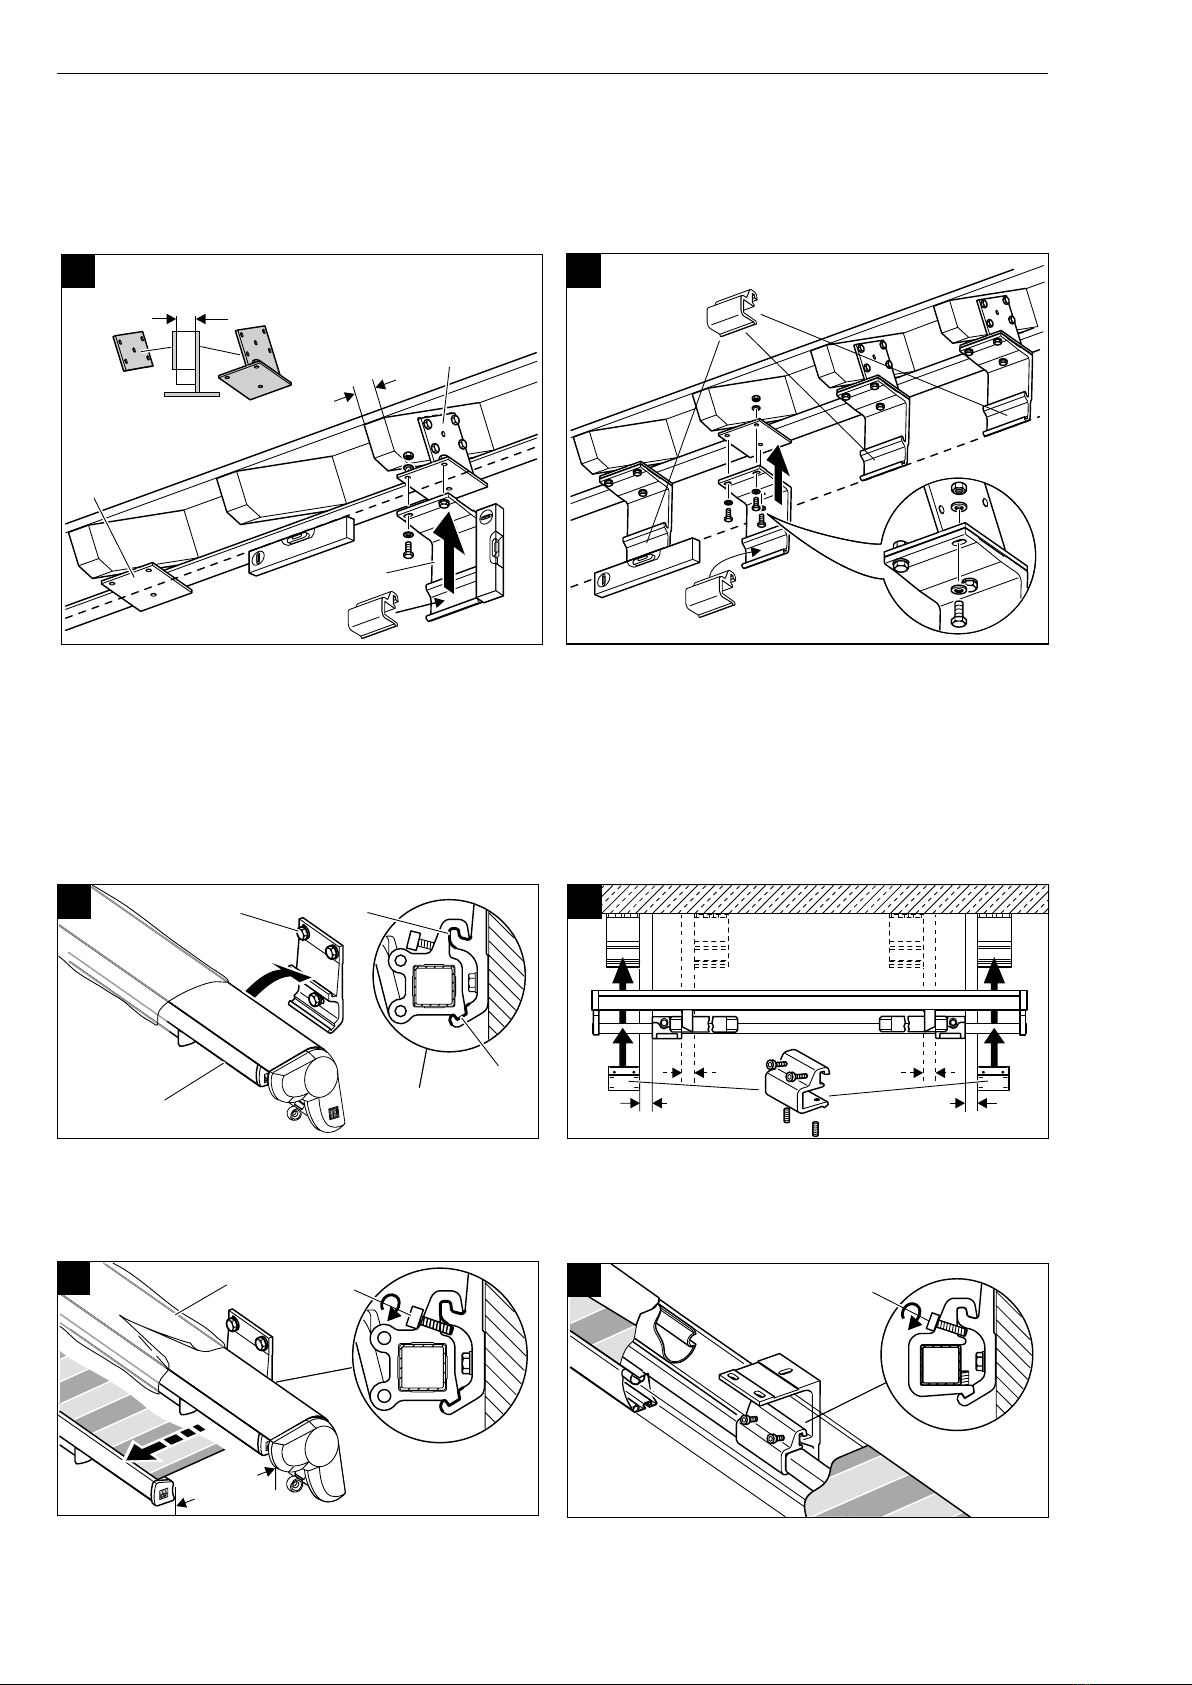
Bei Dachsparrenmontage – In the case of rafter mounting – En cas de pose sur
chevrons de comble
Erst Dachsparrenhalter am Dachsparren anzeichnen/ausrichten/befestigen, dann Deckenkonsole befestigen.
First mark/align/fit the rafter brackets on the rafters, then fit the ceiling brackets.
D’abord marquer/ajuster/fixer les butées aux chevrons de comble, puis fixer les éléments support en plafond.
Markise einhängen, Auflage a! und b! sicherstellen! Deckenmontage mit Zusatzmarkisenhalter.
Hang awning, ensure correctly seated at points a! and b! Ceiling mounting with additional awning
brackets.
Suspendre le store banne, positionner correctement les supports a! et b! Pose en plafond avec sup-
port de store banne.
Markise ca. 50 cm ausfahren u. mit Schraube (3.) und (4.) befestigen
Extend awning approx. 50 cm and fix in place with bolts (3.) and (4.)
Dérouler le store banne d’env. 50 cm et serrer les vis (3.) et (4.)
Montage Novetta plus H Nova Hüppe
808/12
8c
7a
8a 8b
7b
8d
max.
10 cm
max.
10 cm
max.
10 cm
2.
3.
1.
1.
2. 2. 5.
1.
3.
2.
8.
5.
6.
4.
7.
Bei gekuppelten Anlagen
Antriebsmarkise (1.) einhängen u. befestigen (2.), gekuppelte Markise (3.) einhängen, Antriebsmarkise aus-
richten (4.), Wellen kuppeln (5.), Muttern (6.) noch nicht festziehen, gekuppelte Markise befestigen (7.),
Armsicherungen (8.) zur Mitte schieben.
In the case of linked awningse
Hang drive awning (1.) and fix in place (2.), hang in linked awning (3.), align drive awning (4.), link shafts (5.), do not
fully tighten nuts (6.), fix linked awning in place (7.), slide arm securing strap (8.) to the middle.
Pour les stores accouplès
Suspendre le store banne motorisé (1.) et la fixer (2.), suspendre le store banne à accoupler (3.), ajuster le store banne
motorisé (4.), accoupler les axes (5.), ne pas encore procéder au serrage des écrous (6.), fixer le store banne à ac-
coupler (7.), pousser les sécurités des bras (8.) au milieu.
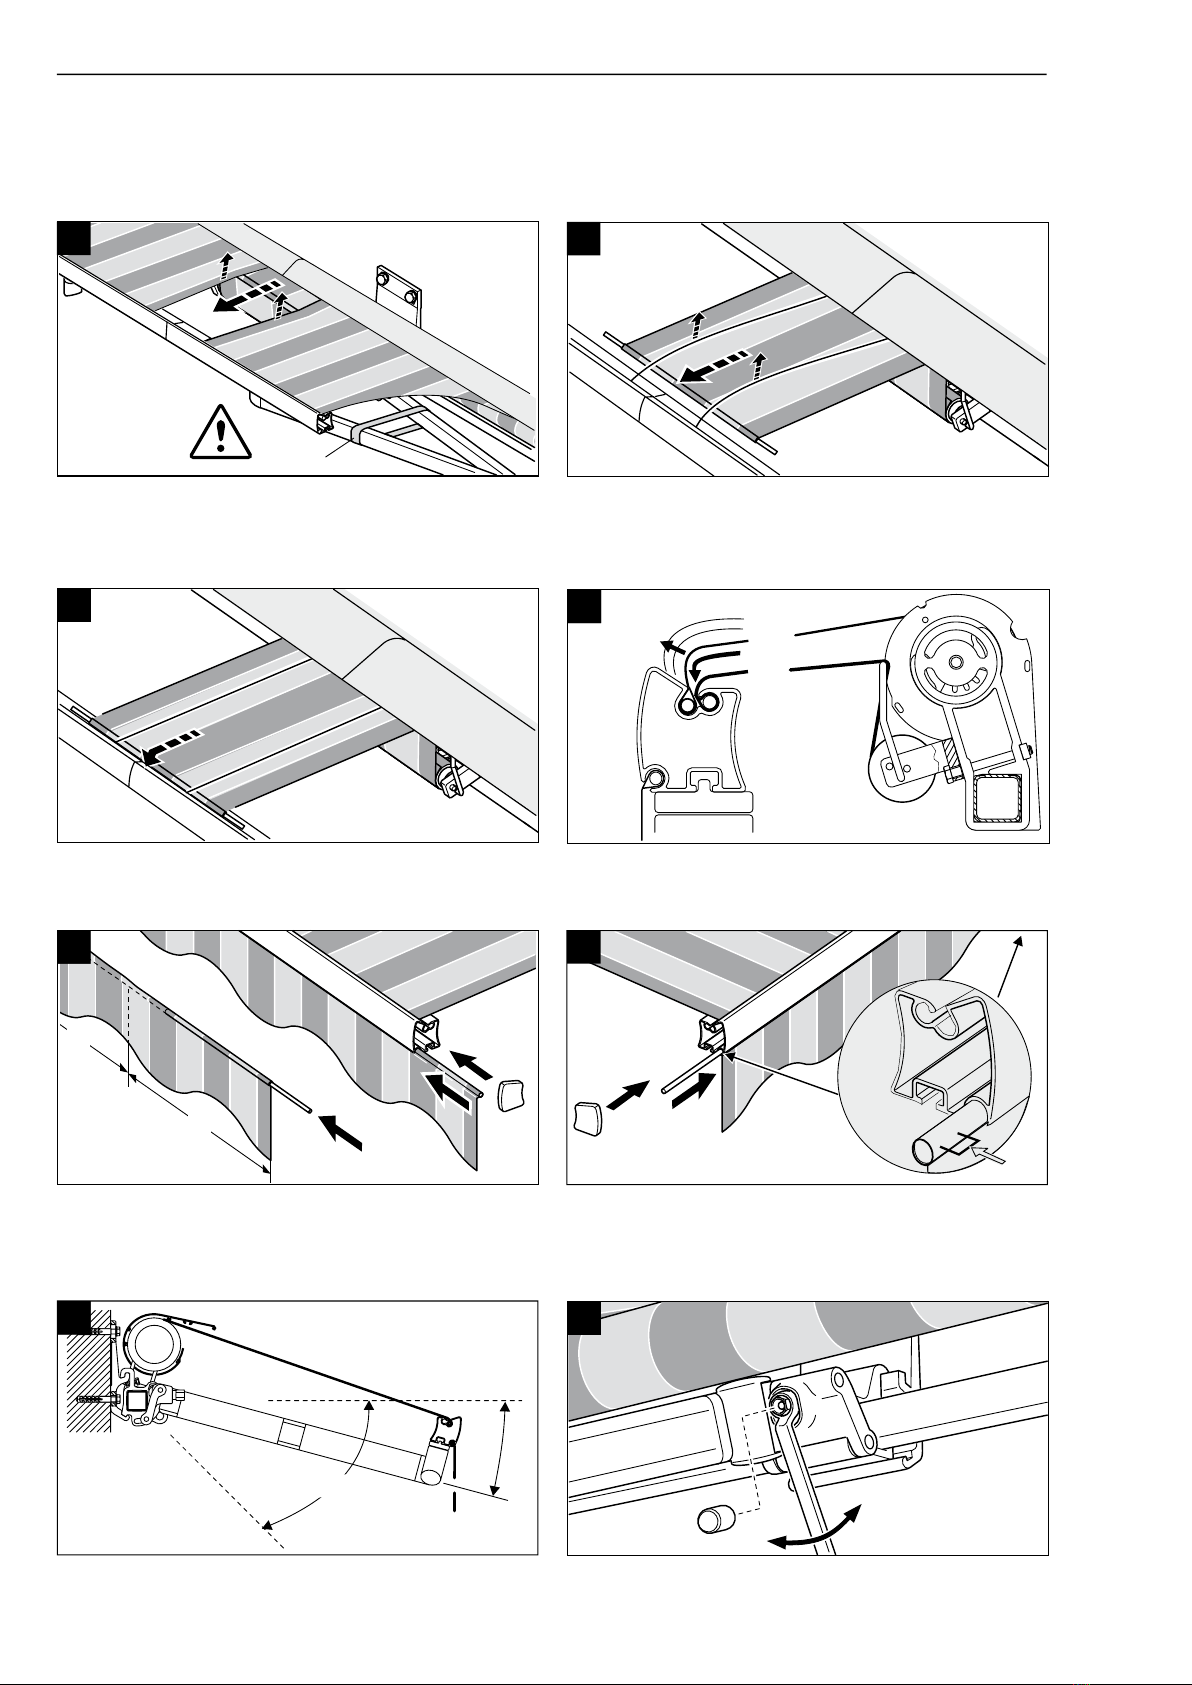
Ausfallprofile kuppeln (1.), Markisen ausfahren, lockeres Tuch (2.) an Tuchwelle nachspannen, Schrauben
festziehen (3.)
Connect the bottom bars (1.), extend the awnings, tension slack awning fabric (2.) at the awning shaft,
tighten the bolts (3.)
Combiner les profilés (1.), dérouler le store banne, retendre la toile lâche (2.) sur l’arbre de la toile, serrer
les vis (3.)
Lasche u. Schlitztuch montieren (1.-4.) . Band (5.) trennen. Vorsicht! Schlitztuch ist vorgespannt!
Fit the strap and gap covering fabric (1.-4.), cut the tape (5.). Caution the gap covering fabric is un-
der tension!
Poser la barre de liaison et la toile d’assemblage (1.-4.). Enlever la bande adhésive (5.). Attention! La toi-
le d’assemblage est prétendue!
Nova Hüppe Montage Novetta plus H
08/12
9
9a 9b
9d
10a 10b
9c
4.
2.
1. 2.
1.
3.
2.
2.
2.
2.
3.
3.
2.
1.
3.
4.
5.
6.
max. 45°
Alle Markisenarme durch Festbinden sichern (1.), T
uch dadurch entspannen, Stoff anheben (2.)
Secure all awning arms by tying straps around them (1.), by this means remove the tension from the aw-
ning fabric, lift fabric (2.)
Assurer toutes les stores bannes par des bandes de liaison (1.), soulever la toile au-dessus de l’étoffe tendue (2.)
Schlitztuch vorziehen (3.) Schlitztuch einschieben (4.)
Pull the gap covering fabric forward (3. Slide in the gap covering fabric (4.)
Etirer préalablement la toile d’assemblage (3.Insérer la toile d’assemblage (4.)
Volant montieren und befestigen – Fit valence and fix in place – Poser le lambrequin et le fixer
Bei Bedarf
Neigung verändern –
If necessary
change tilt –
Si nécessaire
modifier l’inclinaison
10
08/12
Montage Novetta plus H Nova Hüppe
10e
10d
12b
12a
10f
10c
11b
11a
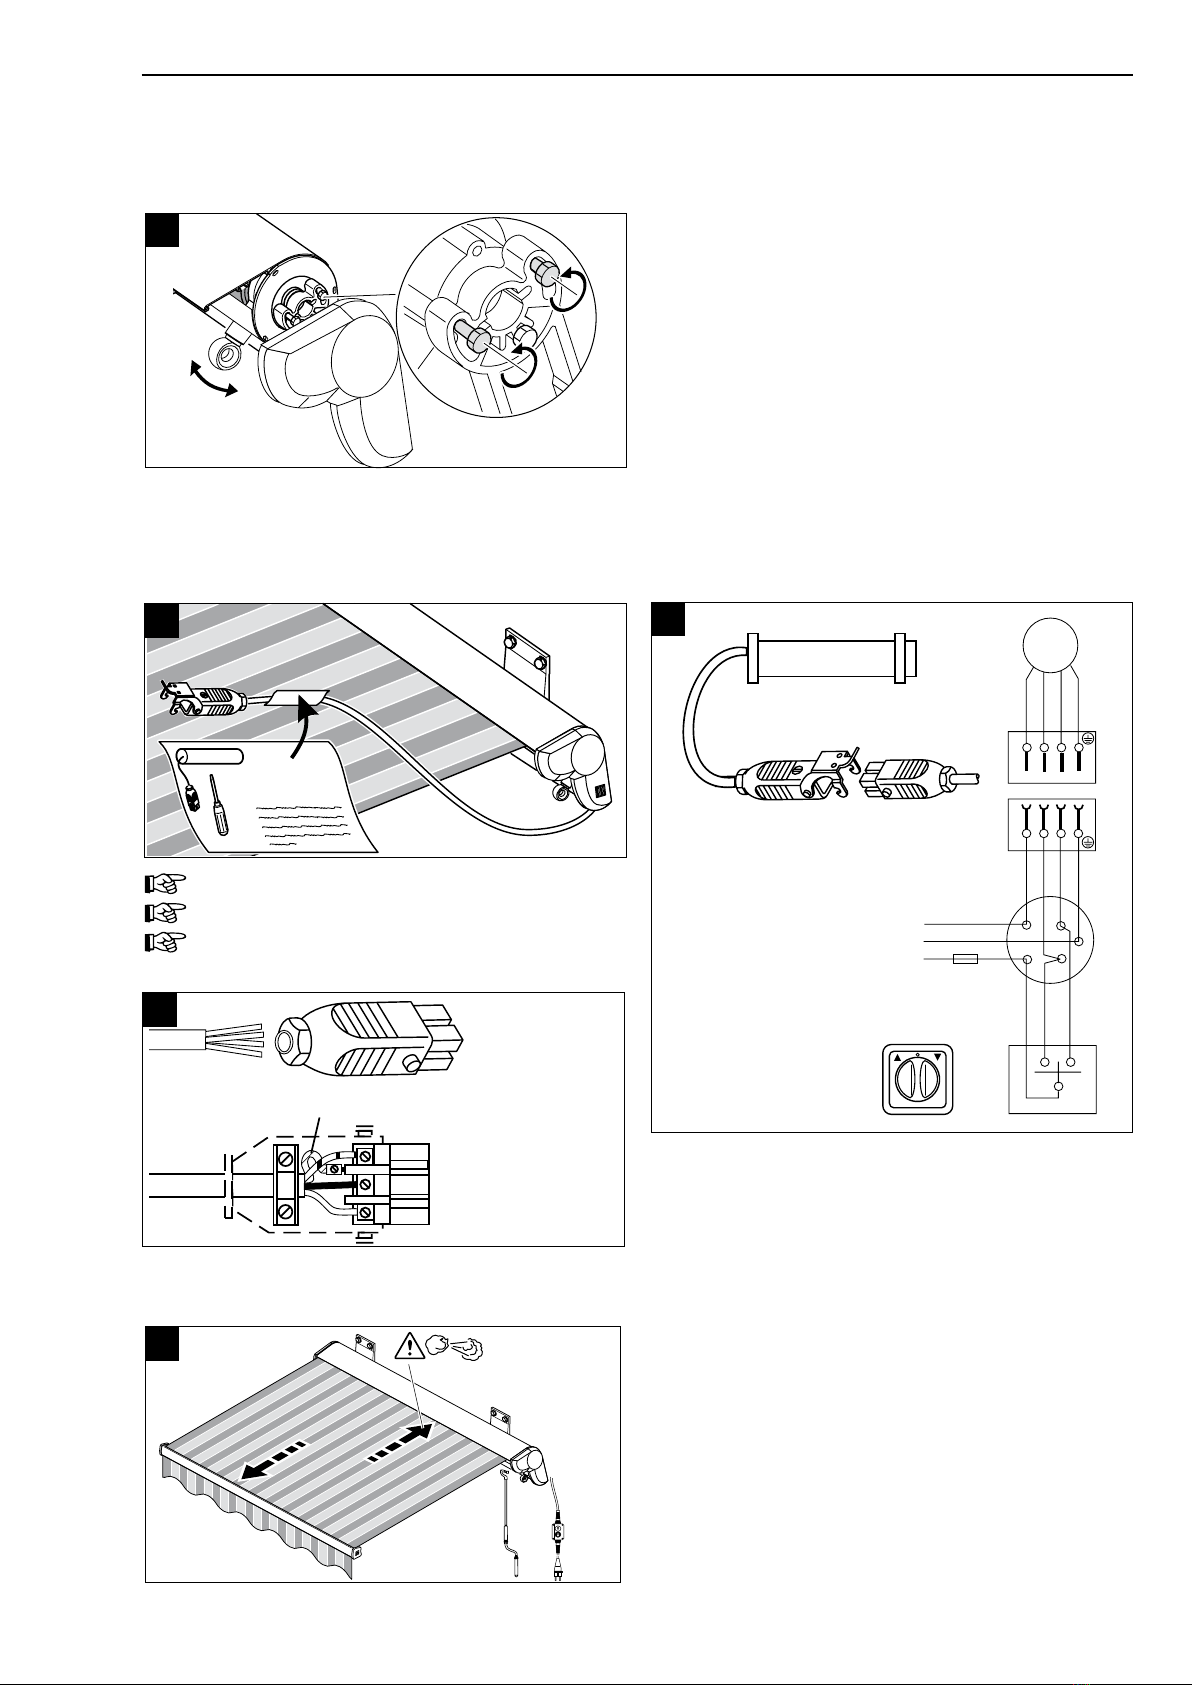
Bei Bedarf Getriebe einstellen
If necessary adjust drive
Si nécessaire régler la sortie treuil
Bei Elektroantrieb Motor anschließen
In the case of electrical drive connect motor
Pour un manœuvre motorisée, raccorder le moteur
Nova Hüppe Montage Novetta plus H
08/12 11
1
1
2
2
3
P
N
PE
L1
M
1~
123
10 A max.
230 V
3 x 1,5 mm -J
3 x 1,5 mm -O
4 x 0,75 mm -J
14b
1
3
2
blau/blue/bleu
schwarz/black/noir
braun/brown/brun
grün-gelb/green-yellow/vert-jaunir
14c
13
Funktion prüfen – Check function – Vérifier le fonctionnement
> 8 m/s = WS 5
15
14a
Setupinstructions
Setupinstructions
Einstellanleitung
Separate Einstellanleitung beachten!
Note separate setting intructions!
Noter instruction de réglage!

www.novahueppe.de
Technische Änderungen vorbehalten. 0714.18.0003 (2/08.12) • The right is reserved to make technical changes. 0714.18.0003 (2/08.12) • Tous droits de modifications techniques réservés. 0714.18.0003 (2/08.12)
Nova Hüppe GmbH
Sonnenschutzsysteme
Schmiedeweg 4 + 6
26135 Oldenburg
Telefon +49 441 39036-0
Fax +49 441 39036-36
Table of contents


