NovaTec NV BLINDS eclectics User manual

Bottom-up Roller Blind Fitting Instructions
Your blind will be supplied with universal wall (face) or bottom fix brackets.
3. Fixing the pulley guides and cleat hook
cleat (plus screw
pull cord
s)
top fix
wall
fix
knotholder detail
on reverse of blind
1. Components
2 x Pulley guides
(and screws capable
of being top or wall
fixed)
inside recess fixing outside recess fixing
cleat
2. Fixing the Headbox.
Face or Bottom Fix.
Universal Brackets are supplied.
Place the brackets on the cill or the wall, positioning them 50mm from
either end of the recess or the end of the cassette.On blinds over
90cm you will be provided with anextra bracket for every 80cm of
width, these are to be spaced and fitted equally across the width of
the blind.
Pencil through the fixing holes, drill and screw. Place the front of the
headbox into the bracket and snap the blind back into position.
PLEASE SEE OVER FOR FURTHER FITTING INSTRUCTIONS
Young children can be strangled by loops in pull cords, chains, tapes and inner
cords that operate the product. To avoid strangulation and entanglement, keep cords
out of the reach of young children. Cords may become wrapped around a child’s neck.
Move beds, cots and furniture away from window covering cords. Do not tie cords
together. Make sure cords do not twist and create a loop.
Universal Brackets
max. 800 mm
max. 50mm max. 50mm
a) The 2 pulley guides supplied can be fixed inside the recess
(to the ceiling) or outside the recess (to the wall) depending
on how you fixed your headbox - see opposite.
Please ensure that when attaching pulleys they align with the
knot holders on the reverse of the blind. This will prevent the
blind rolling up unevenly.
b) Drill and screw the pulley guides at 50mm in from the ends
of the cassette to the first hole of the pulley guide.
c) Installing the supplied cleat reduces the the hazards of
strangulation and entanglement of young children by limiting
access to the control cord. Fix the cleat on the pull cord side at
a minimum of 1.5m off the floor either inside or outside the
recess. Please ensure that suitable fixings are used so the cleat
cannot become detached.
Bottom-up Roller Blind Fitting Instructions
41
2 3
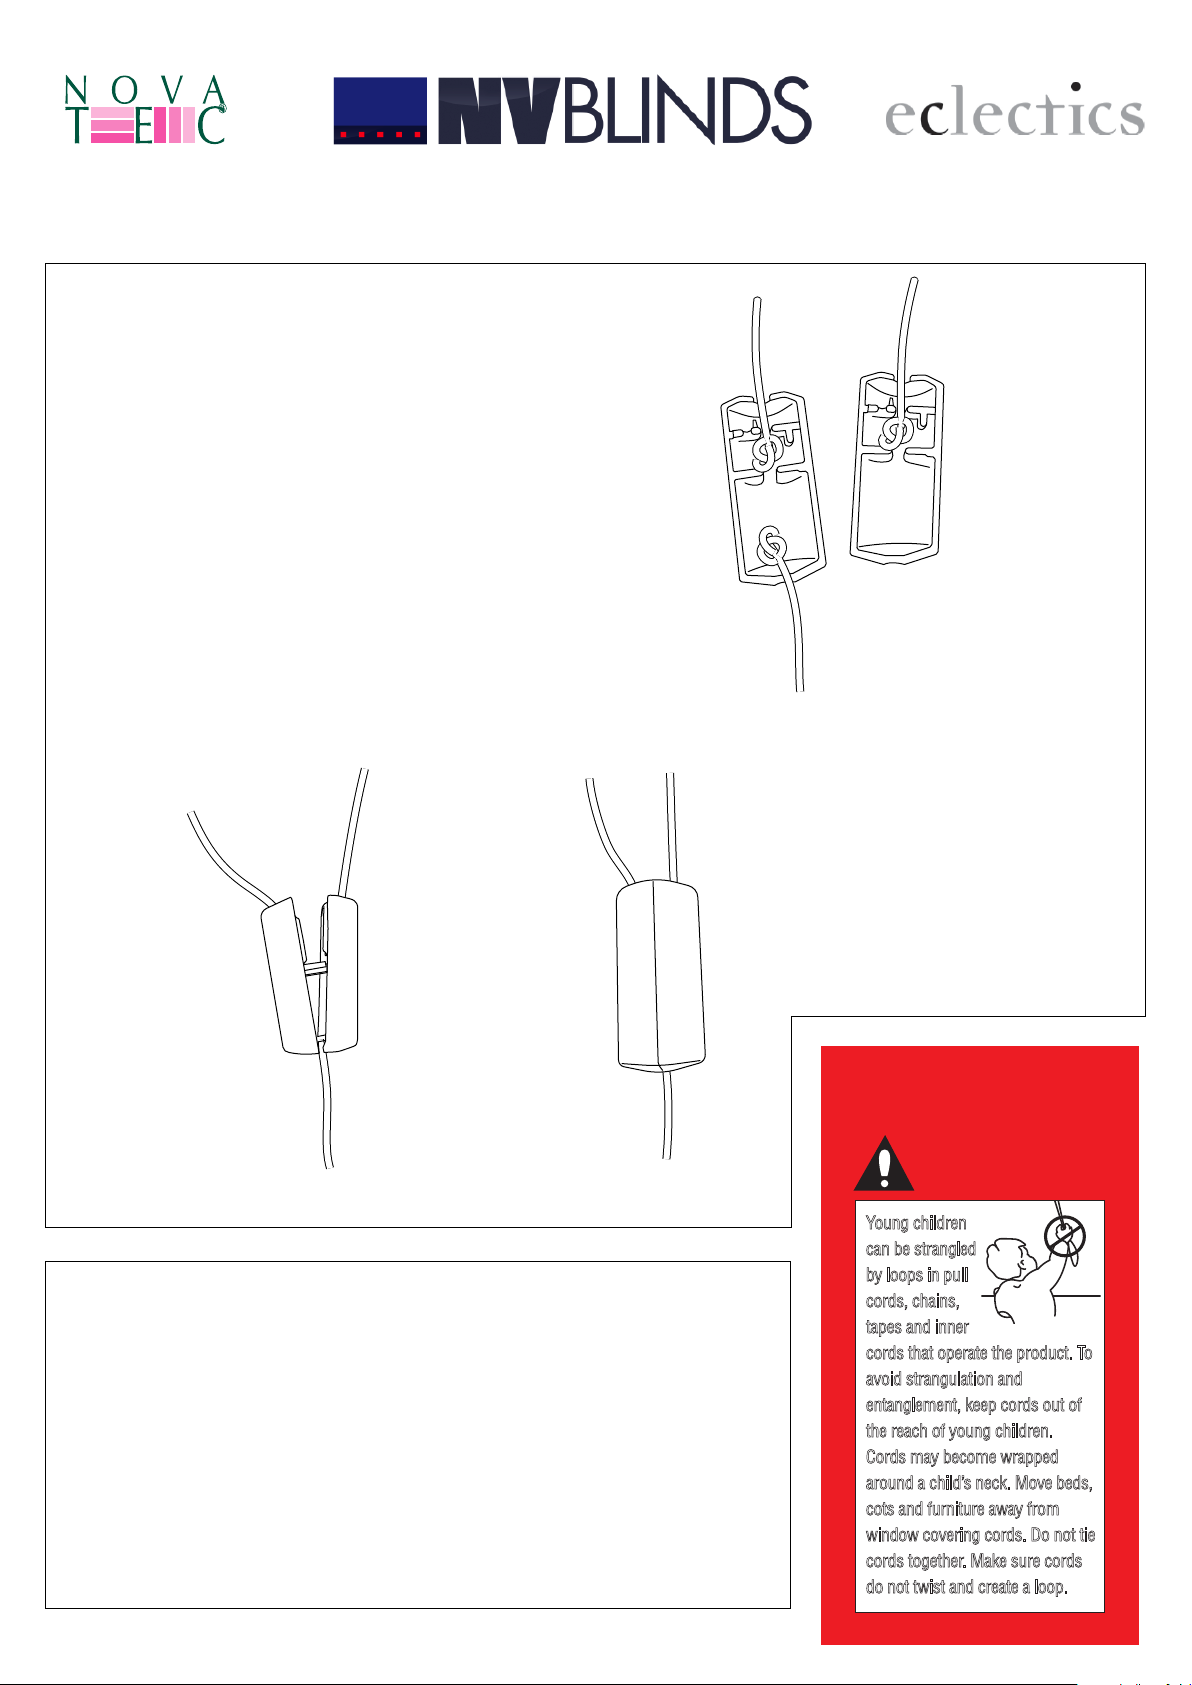
. Cording th
cord breakway device
e blind (for right hand controlled blinds)
5.To re-tension the blind (should not be necessary)
The spring in the headbox should already be tensioned.
If adjustment is required, follow these instructions.
If the blind rolls down too quickly, remove the LH cassette end
cap and you will see a hole in the centre of the bracket with a cross
in a plastic pin use a screwdriver in an anti clockwise direction to
decrease the tension . If the blind rolls down too slowly or not far
enough, press and turn the screw in a clockwise direction.
The blind will come with the pull cords attached the to the
blind within the knotholders. To cord up the blind pass the
left hand cord through the left hand pulley and across and
through the Right Hand pulley. Once this is through connect
to one half of the cord breakaway device as per diagram 1.
Then pass the right hand cord through the right hand pulley
and connect to the other half of the break away device. Now
clip the two halves together, see diagram 2.Now you should
be able to pull the blind up and down. If the blind is not level
when it goes up and down alter the cord lengths by moving
the position of the knot within the breakaway device.
Cording the blind (for LH controlled blinds).
Follow the instructions for a right hand blind but cord the
blind in the opposite direction, replacing the word left with
right and vice versa.
WARNING
Young children
can be strangled
by loops in pull
cords, chains,
tapes and inner
cords that operate the product. To
avoid strangulation and
entanglement, keep cords out of
the reach of young children.
Cords may become wrapped
around a child’s neck. Move beds,
cots and furniture away from
window covering cords. Do not tie
cords together. Make sure cords
do not twist and create a loop.
Popular Window Blind manuals by other brands

SelectBlinds
SelectBlinds S-300 installation instructions

rollease acmeda
rollease acmeda SS38 Assembly manual

MHZ
MHZ LOOK_2 04-1621 Installation and operating instructions

LuxaFlex
LuxaFlex RecessFix Installation

Rollo Rieper
Rollo Rieper Nano Rollo K1 Assembly and operating instructions

Seiki
Seiki SCREEN SYSTEMS MX-0710E installation manual

MaxxMar
MaxxMar MAXX MOTORS Domlux Operation and Programming Instructions

Isotra
Isotra Vivera CONTROL AND MAINTENANCE MANUAL

Dometic
Dometic FlyTec FT100 Installation and operating manual

Louvolite
Louvolite R1705 Setup and operation

Mottura
Mottura Rotary 439 manual

Bali
Bali Horizontal Blinds How to install


