Covatutto 7/16/16L analogica - Beschreibung der dargestellten Schritte / Description des passages illustrés
FRDE
1 Den Brutapparat auspacken.
Den Brutapparat auf eine stabile Abstelläche, ca. 80 cm vom Boden in einer
Umgebung mit einer Temperatur zwischen 17°C und 25°C
(62°F-77°F) und einer Feuchtigkeit zwischen 55% und 75%, aufstellen.
Es wird empfohlen, den Brutapparat weit weg von Wärmequellen, Luftzügen und
Fenstern aufzustellen, um somit schädliche Temperaturschwankungen zu vermeiden.
2 Das Anweisungshandbuch aufmerksam durchlesen. (Anhang A)
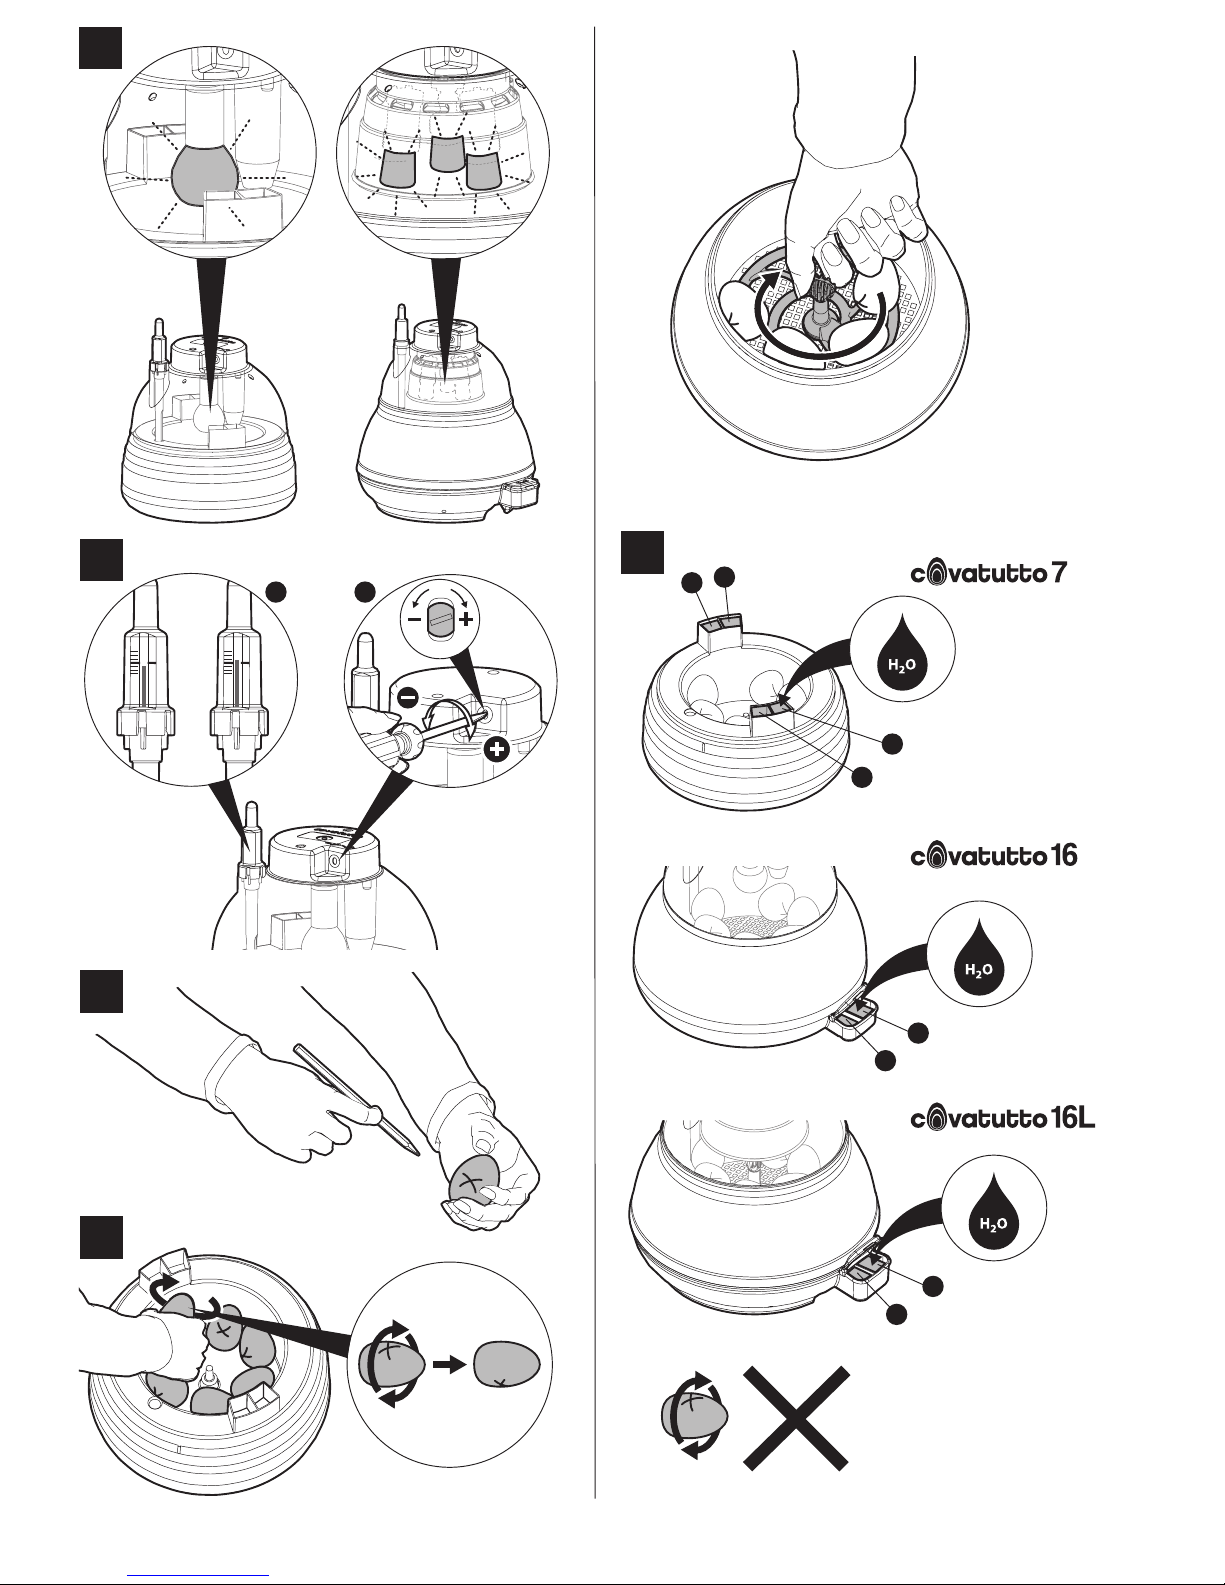
3 Die mitgelieferten Zubehörteile anbauen. Das Thermometer, ohne es
aus seiner Schutzhülle (a) herauszunehmen, positionieren, in dem man sich
vergewissert, dass sich die Anzeigeskala auf der Höhe der “Linse” (b) bendet.
Den manuellen Eierdreher montieren (covatutto 16L).
4Das Becken mit lauwarmem Wasser füllen (in den Fächern “u” und “x” für
COVATUTTO 7) oder das dafür vorgesehene Becken, zum Wasser füllen“ im Fach
“1” (COVATUTTO 16 und 16L) verwenden.
Nicht vergessen diesen Vorgang ungefähr alle 2 Tage oder wenn erforderlich,
durchführen.
5Den Stecker in die Steckdose stecken (der Brutapparat muss geschlossen
sein und es durfen sich keine Eier darin benden). Eine 3/4 Stunde warten bis die
Lampe/Lampen, die zuvor leuchtet/leuchteten, beginnt/beginnen zu blinken
und somit meldeten, dass die Innentemperatur dabei ist sich zu stabilisieren.
6 Prüfen, dass die Flüssigkeit im Thermometer die rote Bezugslinie oder 100°F
(a) erreicht hat; ansonsten die Temperatur erhöhen (im Uhrzeigersinn) oder
senken (gegen den Uhrzeigersinn), in dem man die Einstellschraube langsam mit
einem kleinen Schraubenzieher (b) in dem man sich dabei auf die Lampe/Lampen
bezieht/beziehen die am Anfang fest leuchtet/leuchten oder sich ausschaltet/
ausschalten und nach dem die Temperatur den “eingestellten” Wert erreicht hat,
blinkt/blinken. Es empehlt sich, diesen Vorgang nur falls wirklich erforderlich und
mit Sorgfalt durchzuführen.
7Mit einem Bleistift auf der Eierschale eine Stelle markieren, um somit beim
Drehen des Eies einen Bezugpunkt zu haben.
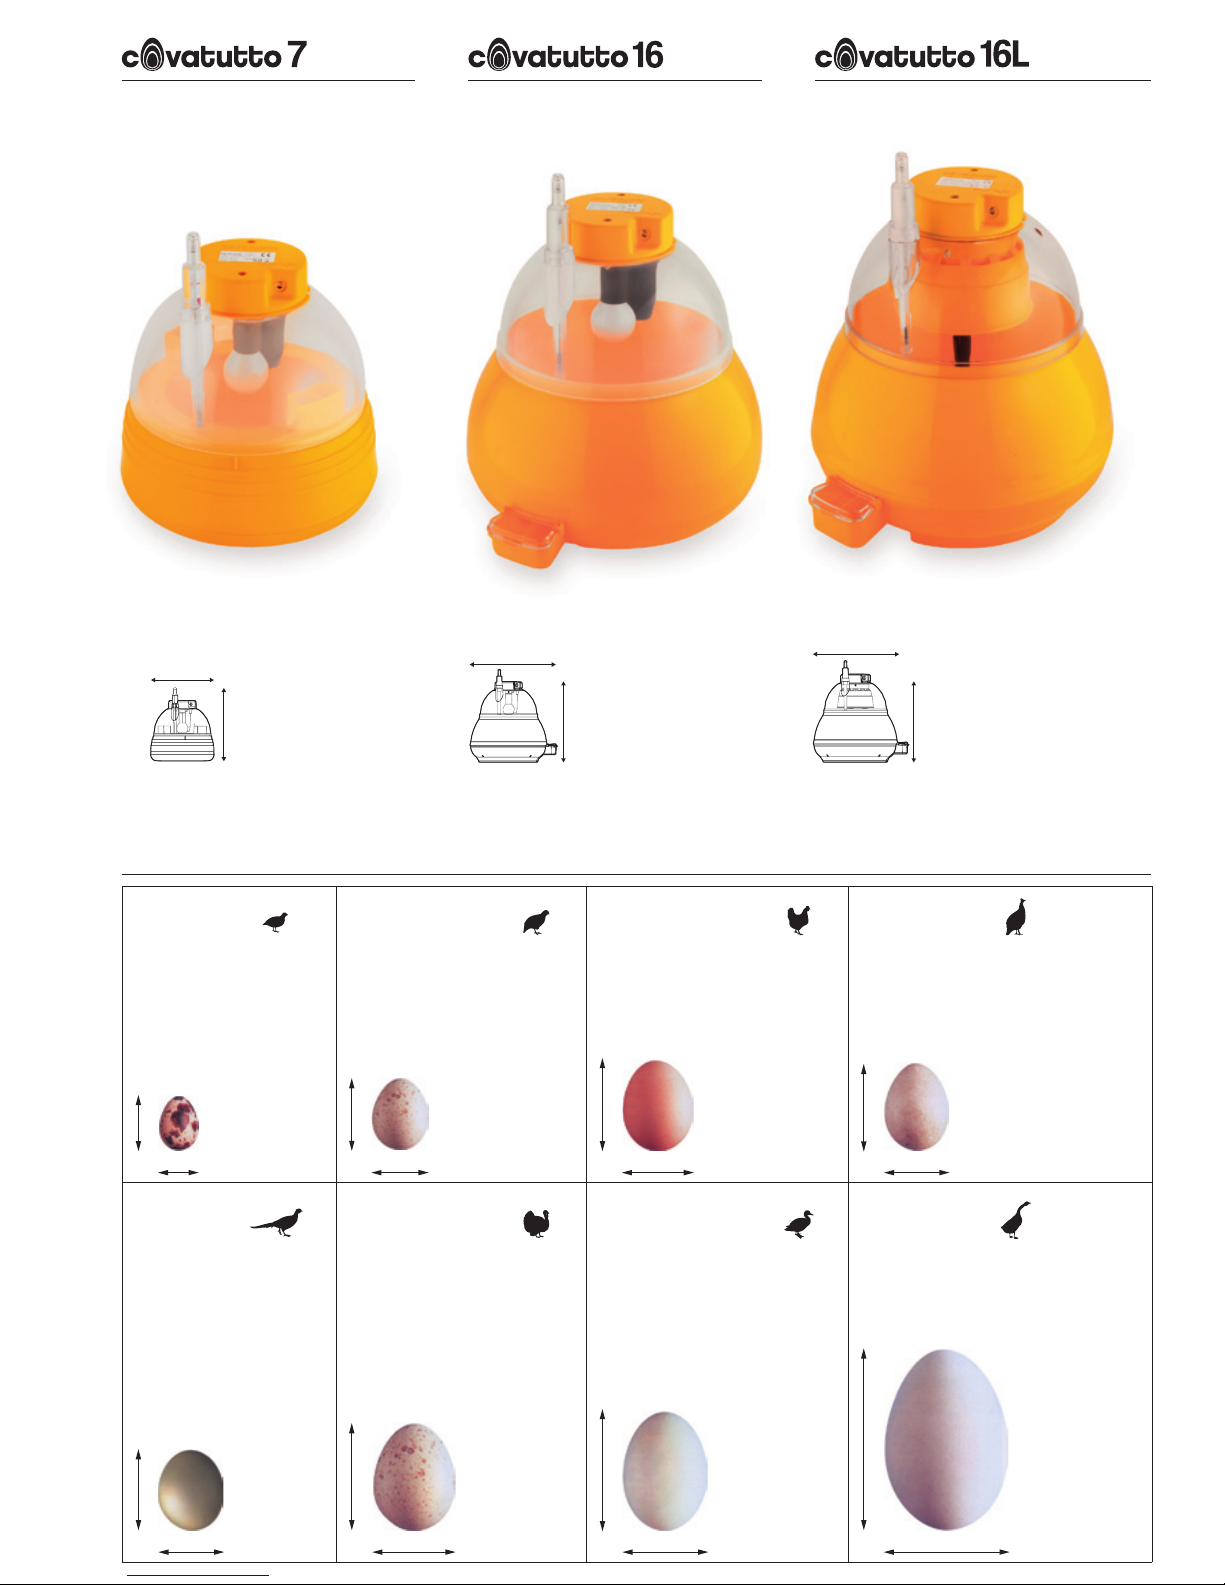
8Die Eier in den dafür vorgesehenen Eierhalter legen (siehe Eiertabelle); besitzt
man keine ausreichende Menge an Eiern um das Eigerhalterfach vollständig zu
füllen, muss man die Eier auf der Ablageäche verteilen und nicht in die Mitte
oder die Ecken legen, damit man die Luftzirkulation nicht beeinträchtigt. Den
Brutapparat schließen, in dem man den Deckel in den dafür vorgesehenen Sitz
positioniert.
Es empehlt sich auf dem Kalender den Bebrütungstag aufzeichnen.
Per Hand sollte man sorgfältig alle Eier mindestens 2 mal täglich (morgens
– abends) um eine halbe Drehung wenden, bis die Markierung nicht mehr
ersichtlich ist. Wenn mit manuellem Eierdreher ausgestattet, sorgfältig so lange
im Uhrzeigersinn drehen bis alle Eier bewegt wurden (dies hängt von der Art
der bebrüteten Eier ab). Noch bevor man den Brutapparat aus jeglichem Grund
önet, immer den Stecker aus der Steckdose ziehen, um Temperaturschwankungen
zu verhindern; es empehlt sich jedoch den Brutapparat nur falls wirklich erforderlich
und nur für kurze Zeit zu önen.
9 Während den letzten 3 Tagen vor dem Ausschlüpfen den Brutapparat
vorbereiten: - das Becken in allen Fächern vollständig mit Wasser füllen (a)
(COVATUTTO 7 “u”,“x”,”y”,”z”, COVATUTTO 16 / 16L “1” e “2”).
Eier nicht mehr drehen.
Während diesen 3 Tagen den Brutapparat nur falls unbedingt erforderlich, önen. Die
Die Geburten können 1 Tag zuvor beginnen und 2 Tage nach dem bestimmten
Datum zustande kommen (z.B. 21 Tage für die Hühner).
HAFTUNGSAUSSCHLUSS
Nach Neubearbeitungen, Änderungen und / oder technischen Innovationen, könnte
ein Teil der in dieser Dokumentation enthaltenen Anleitungen, Spezikationen
und Bilder abweichen. Die darin beschriebenen Elemente sind nur für illustrative
Zwecke bestimmt, und könnten nicht auf Sie zutreen. Es bestehen keine Rechte oder
Anspruchsrechte durch die in diesem Handbuch enthaltene Beschreibung.
1 Retirer la couveuse de son emballage.
Poser la couveuse sur une surface plane et solide à une hauteur d’environ 80 cm
et dans un milieu à température comprise entre 17°C et 25°C (62°F-77°F) et un
taux d’humidité compris entre 55 % et 75 %. Maintenir la couveuse loin de toute
source de chaleur, courant d’air ou fenêtre an d’éviter les écarts de température.
2 Lire attentivement le livret d’instructions. (Annexe A)
3Monter les accessoires fournis. Positionner le thermomètre sans le retirer de
son étui (a), en s’assurant que l’échelle de lecture se trouve bien en face de la
“loupe” (b).
Monter le dispositif de retournement manuel (covatutto 16L).
4Verser de l’eau tiède en remplissant les bacs (dans les compartiments “u” et “x”
pour COVATUTTO 7) ou en utilisant le bac de chargement de l’eau préposé à cet
eet dans le compartiment “1” (COVATUTTO16 et 16L).
Penser à eectuer cette opération tous les deux jours environ ou selon les besoins.
5Brancher la che a la prise de reseau (la couveuse doit alors etre fermee et
sans oeufs). Attendre 3-4 heures jusqu’a ce que la/les ampoule/ampoules, qui au
depart restera/resteron toujours allumée/allumees, commence/commenceront a
clignoter, signalant que la temperature interieure commence a se stabiliser.
6 Vérier sur l’échelle du thermomètre que le liquide contenu arrive à proximité
de la ligne de référence rouge ou des 100°F sans nécessairement coïncider
avec celle-ci (a) ; sinon, régler la température en l’augmentant (dans le sens des
aiguilles d’une montre) ou en la diminuant (sens contraire des aiguilles d’une
montre) en tournant la vis de réglage lentement avec un petit tourne-vis (b),
en faisant reference a la/les ampoule/ampoules qui au debut restera/resteron
toujours allumee/allumees ou toujours eteinte puis commencera/commenceron
a clignoter lorsque la temperature interieure aura atteint la valeur au-dela de
celle correspondant au “reglage”. Nous conseillons d’eectuer cette opération
uniquement en cas de nécessité et avec la plus grande délicatesse.
7Avec un crayon de type graphite, faire un marquage de la zone de la coquille
des oeufs pour avoir une référence au moment de les tourner.
8Poser les oeufs dans le compartiment à oeufs approprié (voir tableau type
d’œufs) ; si l’on ne dispose pas d’une quantité d’œufs susante pour remplir le
compartiment à oeufs, ces derniers devront être répartis sur la surface même de
façon équilibrée pour assurer la circulation de l’air. Noter sur un calendrier le jour
d’incubation. Refermer la couveuse en mettant en place le couvercle.
Il est conseillé de noter sur un calendrier la date d’incubation.
Retourner manuellement et délicatement tous les oeufs au moins deux fois
par jour (matin et soir) en eectuant un demi-tour jusqu’à ce que le marquage
indiqué plus haut se retrouve en dessous. Si munis de dispositif de retournement
manuel, tourner délicatement le dispositif de retournement dans le sens des
aiguilles d’une montre un nombre de fois susant à déplacer tous les œufs (cela
dépendra de la typologie des œufs incubés). N.B. : avant d’ouvrir la couveuse, pour
quelque motif que ce soit, il faut toujours débrancher la prise an d’éviter tout écart
de température ; il est conseillé toutefois de n’ouvrir la couveuse que pour eectuer les
opérations nécessaires et pour de courtes durées.
9 Durant les 3 jours qui précèdent l’éclosion, préparer la couveuse : remplir
complètement les bassines d’eau dans tous les compartiments (a) (COVATUTTO 7
“u”,“x”,”y”,”z”, COVATUTTO 16 / 16L “1” e “2”).
Ne pas retourner les oeufs.
Ne pas ouvrir la couveuse durant ces 3 jours sauf en cas de nécessité absolue.
Les naissances peuvent commencer un jour avant et se terminer deux jours après
la date pré-établie (ex. : 21 jours pour les poulets).
EXCLUSION DE RESPONSABILITÉ
Pour des raisons de mises à jour, de modications et/ou d’innovations techniques,
certaines parties des instructions contenues dans ce livret pourraient être modiées.
Les éléments ci-dessus sont fournis à titre purement indicatif et pourraient ne pas
s’appliquer à Votre cas spécique. Il n’est pas possible d’obtenir des droits légaux ou
des revendications portant sur la description mentionnée dans le présent livret.