NT-MDT NTEGRA Spectra User manual


Read me First!
Observe safety measures for operation with devices containing sources of laser radiation.
Do not stare into the beam. A label warning about the presence of laser radiation is
attached to the laser sources (Fig. 1).
Fig. 1
Before you start working with the instrument, get acquainted with the basic safety
measures and the operation conditions for the instrument!
If you are a beginner in scanning probe microscopy, we recommend you to familiarize with
basic SPM techniques. “Fundamentals of Scanning Probe Microscopy” by V.L. Mironov
gives a good introduction to the subject. This book is available free of charge at
https://www.ntmdt-si.com/customer-support/manuals/textbook.
Feedback
Should you have any questions, which are not explained in the manuals, please contact the
give you comprehensive answers. Alternatively, you can contact our staff on-line using
the ask-on-line service (http://online.ntmdt-si.com/online).


User’s documentation set
The following manuals are included into the user’s documentation set:
-Instruction Manual – is the guidance on preparation of the instrument and other
equipment for operation on various techniques of Scanning Probe Microscopy. The
contents of the user’s documentation set may differ depending on the delivery set of the
instrument.
-SPM Software Reference Manual – is the description of the control program
interface functions, all commands and functions of the menu and, also a description of
the Image Analysis module and the Macro Language “Nova PowerScript”.
-Control Electronics. Reference Manual – is the guide to SPM controller,
Thermocontroller and Signal Access module.
Some equipment, which is described in the manuals, may not be included into your
delivery set. Read the specification of your contract for more information.
The manuals are updated regularly. Their latest versions can be found in the site of the
company (http://www.ntmdt-si.com/support).


Table of Contents
NTEGRA Spectra Probe NanoLaboratory. SNOM
Measuring Head. Instruction Manual
Table of Contents
1. BASIC INFORMATION......................................................................................................................... 2
1.1. OVERVIEW........................................................................................................................................ 2
1.2. PRINCIPLE OF OPERATION ................................................................................................................ 2
1.3. DESIGN ............................................................................................................................................. 4
1.3.1. Optical Measuring Head................................................................................................... 5
1.3.2. Optical Tube...................................................................................................................... 9
1.3.3. Laser beam delivery system............................................................................................. 11
1.3.4. Photomultiplier Module .................................................................................................. 12
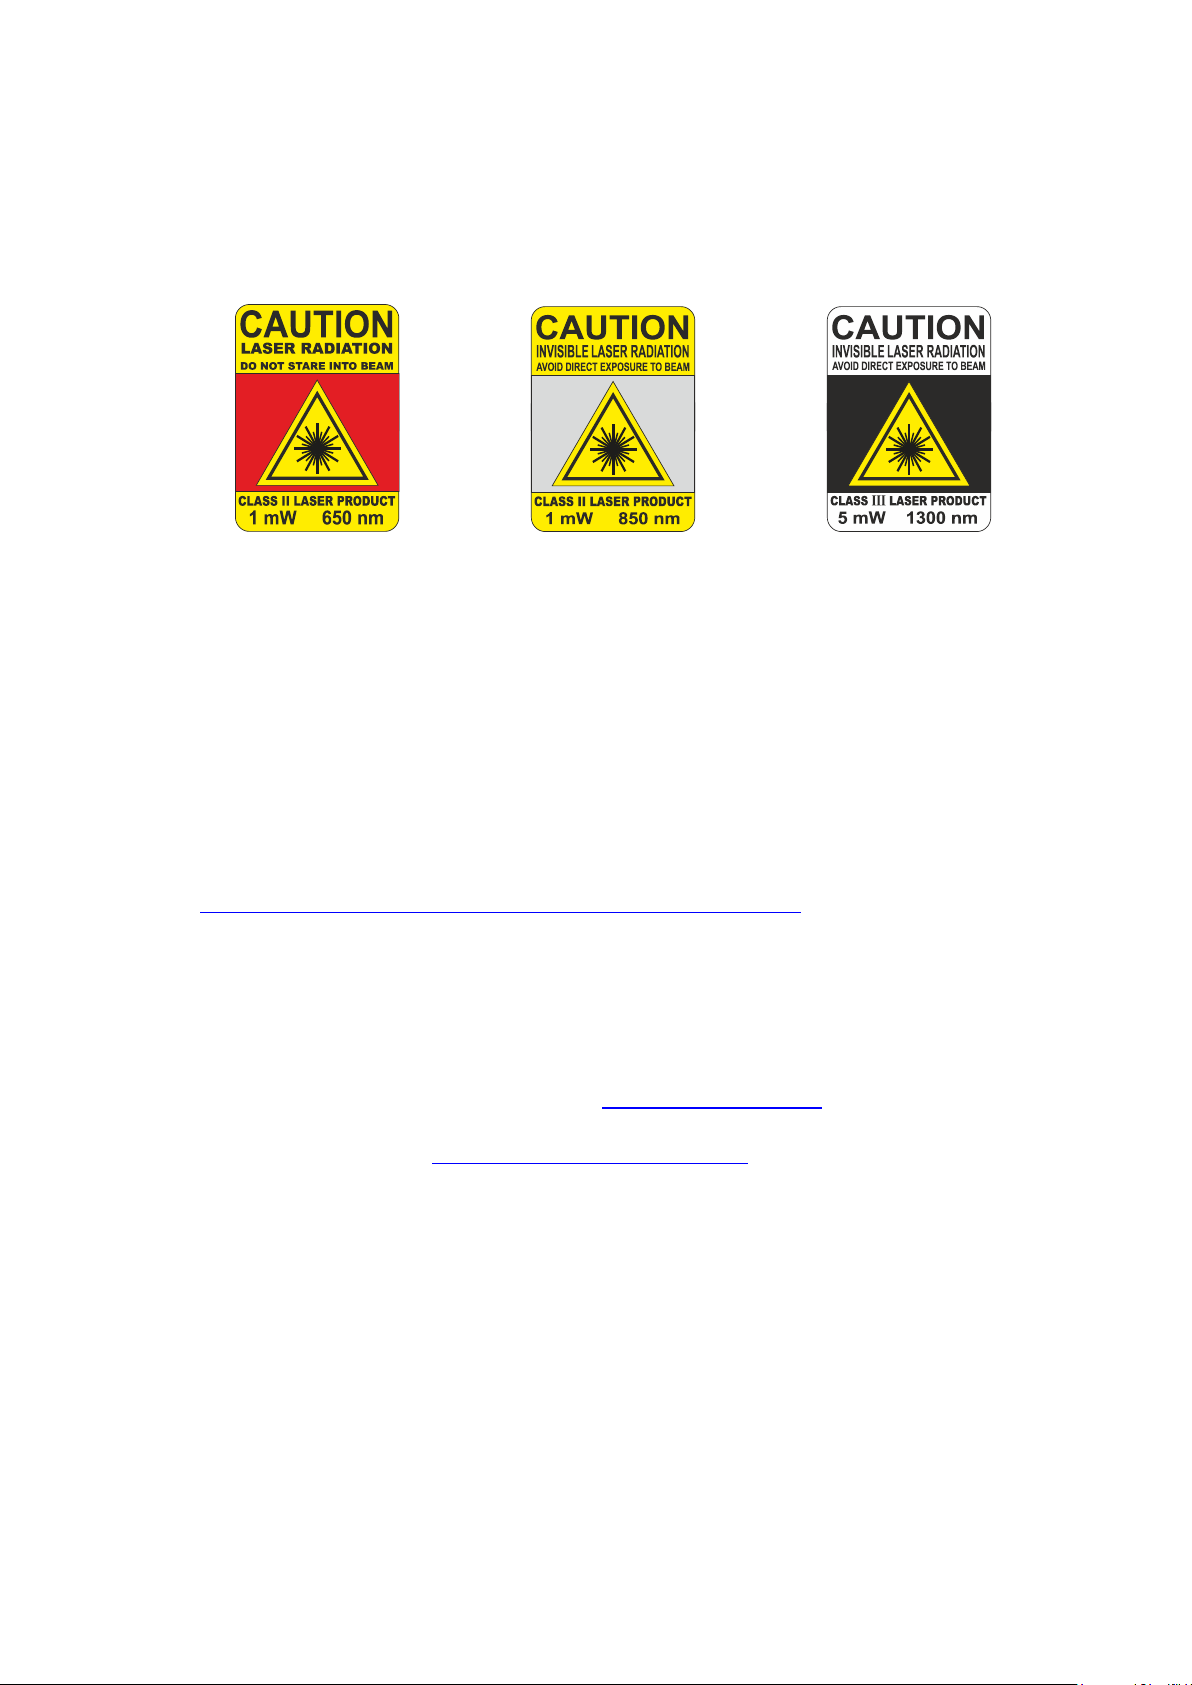
1.4. BASIC SAFETY MEASURES ............................................................................................................. 13
1.5. OPERATING CONDITIONS................................................................................................................ 15
1.6. STORAGE AND TRANSPORT INSTRUCTIONS .................................................................................... 16
2. ASSEMBLING OF THE SNOM MODULE........................................................................................ 17
2.1. EXCHANGING THE REPLACEABLE PANEL OF THE BASE UNIT ......................................................... 17
2.2. MOUNTING THE OPTICAL TUBE...................................................................................................... 18
2.3. MOUNTING THE LASER BEAM DELIVERY SYSTEM ........................................................................... 21
3. PREPARING FOR OPERATION........................................................................................................ 23
3.1. PREPARING AND INSTALLING THE SAMPLE..................................................................................... 23
3.2. PREPARING AND INSTALLING THE APERTURE PROBE ..................................................................... 26
3.3. INSTALLING THE PROBE HOLDER................................................................................................... 28
3.4. INSTALLING THE MEASURING HEAD .............................................................................................. 28
3.5. PRELIMINARY APPROACHING AND SELECTING SCAN AREA ........................................................... 30
3.6. PRIMARY ADJUSTING THE DETECTION CHANNEL........................................................................... 31
3.7. LAUNCHING THE CONTROL PROGRAM ........................................................................................... 33
3.8. ADJUSTING THE OPTICAL CANTILEVER DEFLECTION DETECTION SYSTEM .................................... 34
4. PERFORMING MEASUREMENTS ................................................................................................... 38
4.1. APPROACHING THE SAMPLE AND FINE ADJUSTING THE DETECTION CHANNEL.............................. 39
4.2. ADJUSTING THE DELIVERY CHANNEL ............................................................................................ 40
4.3. SCANNING ...................................................................................................................................... 47
4.4. SAVING DATA ................................................................................................................................ 50
4.5. FINISHING THE WORK .................................................................................................................... 51
1

NTEGRA Spectra Probe NanoLaboratory. SNOM Measuring Head. Instruction Manual
1.Basic Information
1.1. Overview
SNOM measuring head serves for measurements with the scanning near-field optical
microscopy (SNOM) with the instrument NTEGRA Spectra PNL (configuration
Upright)1. This head is an optional part of the instrument.
SNOM functionality is enabled by aperture probes which operates both as microsized
apertures and as SPM cantilevers. Optical resolution of data is determined by diameter
(50÷150 nm) of an aperture.
SNOM technique provides study of surface optical properties (spatial distribution of
reflectivity and transmittivity over the sample surface, distribution of fluorescent
characteristics, etc.) of various objects with resolution several times higher the diffraction
limit. For high resolution, the probing radiation is focused on an aperture of size much
less than the radiation wavelength, passes through it as an evanescent electromagnetic
wave, and reaches the sample located in the near field vicinity of the aperture. The
operating aperture-sample distance is of order of several nanometers and so the light spot
on the sample is approximately of the size of the aperture. This eliminates diffraction
smearing of images taken with scanning the sample with the SNOM probe.
1.2. Principle of Operation
SNOM measuring head used with the NTEGRA Spectra PNL (Upright configuration)
operates in the optical scheme of the Transmission Illumination Mode, which is used for
transparent or semitransparent samples.
1For details on design and operation of the PNL, refer to manual NTEGRA Spectra Probe NanoLaboratory
(Upright Configuration with Renishaw Spectrometer)
2

Chapter 1. Basic Information
Fig. 1-1. Transmission Illumination Mode
The primary laser beam is focused by the objective on the probe aperture. The sample
surface stays as close to the probe as to be in the near field of the aperture.
Radiation emitted by the aperture and scattered by the sample is collected with the optical
system and directed to the PMT detector. The PMT output serves for formation of the
sample optical bitmap.
The instrument can perform the following scanning modes:
−scanning-by-sample;
−scanning-by-laser.
In the scanning-by-sample mode, the sample is moved in the XY plane with the tubular
XYZ-scanner. It is important for SNOM techniques that the probe aperture stays on the
axis of radiation delivery and detection.
In the scanning-by-laser mode, the sample and the probe are fixed. Scanning is provided
by the mirror scanner of the radiation delivery and recording system.
Scanning-by-laser is used for fine adjustment of the instrument that implies alignment of
directions of the primary beam and of the detector. Analytical measurements use the
mode of scanning-by-sample.
3

NTEGRA Spectra Probe NanoLaboratory. SNOM Measuring Head. Instruction Manual
1.3. Design
Fig. 1-2 shows the delivery set of the SNOM measuring head:
−Optical measuring head;
−Probe holder.
Fig. 1-2. SNOM measuring head
1 – measuring head;
2 – probe holder
Fig. 1-3 shows parts of the SNOM module:
1. Replaceable panel;
2. Optical tube;
3. Positioning device;
4. Laser beam delivery system KineFlex;
5. Photomultiplier module (PMT);
6. Hollow sample holder;
7. Set of substrates;
8. Fixing screws.
4

Chapter 1. Basic Information
Fig. 1-3. Parts of the SNOM module
1 – replaceable panel; 2 – optical tube; 3 – positioning device;
4 – laser beam delivery system KineFlex;5 – PMTmodule;
6 – hollow sample holder; 7 – set of substrates; 8 – fixing screws
1.3.1. Optical Measuring Head
The optical measuring head (hereafter, measuring head) consists of the following parts:
−Optical detection system;
−Universal objective;
−Universal objective holder;
−Probe holder.
The optical cantilever deflection detection system 1 is mounted on the objective holder 2
(Fig. 1-4). The objective is suspended in an arrangement of elastically deformed arms.
This arrangement provides high accuracy of focusing and mechanical stability of the
device. The head mount 3 is equipped with microscrews for positioning the probe.
Fig. 1-4. Basic parts of the measuring head
1 – optical detection module; 2 – objective holder;
3 – base unit with the probe holder and positioning mechanisms
5

NTEGRA Spectra Probe NanoLaboratory. SNOM Measuring Head. Instruction Manual
Basic parts of the measuring head are shown in Fig. 1-5.
Fig. 1-5. Measuring head
1, 2 – screws for XY probe adjusting; 3, 4 – photodiode mirror adjusting screws;
5 –screw for fine focusing of the lens; 6, 7 –screws for XY lens adjusting;
8 – lens positioning device spring stop; 9 – entrance aperture; 10, 11, 12 – screw legs;
13 – lens; 14 – probe holder; 15 –spring stop of the probe holder positioning device
The main functional component of the measuring head is the Mitutoyo M Plan Apo 100
lens (pos. 13). The numerical aperture of the lens is 0.7 and the focal length is 2 mm
while the working distance is 6 mm. The lens provides the following options along with
conventional AFM techniques:
−Viewing the sample with resolution limited by 0.4 μm (at wavelength 550 nm);
−Delivery and focusing the exciting laser radiation;
−Aiming the laser beam at the probe aperture;
−Detecting the probe deflection (needs an additional semiconductor laser diode to
generate radiation of 650 nm or 830 nm wavelength).
The screw for fine focusing of the lens 5 is located in front of the lens. The
microscrews 1 and 2 move the probe holder relative to the lens. Moving the probe holder
provides directing the laser beam of the optical cantilever deflection detection system
(hereinafter referred to as detection system) to the cantilever reflective surface. The
photodiode mirror is adjusted with the screws 3 and 4 so that the beam reflected from the
probe could come directly to the centre of the photodiode. For adjusting the measuring
head in angle and height, three screw legs 10, 11, and 12 are used. The microscrews 6 and
7 provide positioning of the lens against the probe and external optical devices.
ATTENTION! Height adjustment of the legs 10, 11, and 12 is not
recommended as this can misalign the optical system.
Cantilever deflection in AFM modes is detected with the detection system operating a
semiconductor laser (with λ =830 nm or 650 nm) that supplies radiation through the lens.
The system dichroic mirror selectively reflects the radiation of the semiconductor laser. It
6

Chapter 1. Basic Information
provides a wide spectral range (400 <λ < 800 nm for the laser with λ =830 nm) thus
allowing for observing the sample through the optical microscope and for optical exciting
the sample surface. High sensitivity of the detection system is due to a special design of
the laser formation system.
This measuring head is distinct in design from others in that its cantilever deflection
detection system operates with a nearly horizontal probe. For SNOM measurements, the
probe stays at low angle to horizontal (2÷3°).
Specification of the measuring head is presented in Table 1-1.
Table 1-1. Specification of the optical measuring head
Parameter
Value
Scanning type
By sample
Objective numerical aperture
0.7
Optical resolution
0.4 µm (at wavelength
550 nm)
Objective focal distance
2 mm
Visual field
~70 µm
Laser wavelength of the cantilever deflection
detection system
830 nm
650 nm
Dimensions (L×W×H)
150×130×130 mm
Weight
1.5 kg
Aperture probe
Structurally, the aperture probe is an elastic beam or cantilever (see pos. 2 in Fig. 1-6)
fixed on a silicon base (probe chip). The sensitive element of the probe is located in the
free end of the probe.
Mostly, probes of two following types are used:
−with a straight rectangular cantilever (Fig. 1-6 a);
−with a triangular cantilever formed by two beams (Fig. 1-6 b).
7

NTEGRA Spectra Probe NanoLaboratory. SNOM Measuring Head. Instruction Manual
a) triangular cantilever
b) triangular cantilever
Fig. 1-6. AFM probe
1 – chip; 2 – cantilever; 3 – tip (sensitive element)
The aperture probe tip is a hollow pyramid with a hole at its apex that serves as aperture
(Fig. 1-7). The desired size of the aperture can be manufactured with a focused ion beam.
a) diagram
1 – cantilever; 2 – tip; 3 – aperture
b) SEM image
Fig. 1-7. Tip of the aperture probe
Probe holder
The aperture probe holder (Fig. 1-8) is exchangeable. It can be installed on the measuring
head and later replaced with another one.
Fig. 1-8. Aperture probe holder
The aperture probe is equipped with a magnetic substrate that fixes the probe on the
magnet of the holder (Fig. 1-9).
8

Chapter 1. Basic Information
Fig. 1-9. Fastening magnet for mounting the aperture probe
The aperture probe holder is placed in the mount of the measuring head and then secured
with the spring stop 1 (see Fig. 1-10). The screws 2 and 3 serve to move the probe holder
for adjusting the optical cantilever deflection detection system. The aperture probe holder
is connected electrically to the slot 4 in the measuring head.
Fig. 1-10. Aperture probe holder installed on the measuring head
1 – spring stop; 2, 3 – screws for X and Y movement of the probe; 4 – probe holder connector
1.3.2. Optical Tube
The optical tube (Fig. 1-11) serves either for redirecting the transmitted radiation and
delivering it to the laser beam delivery system or for delivering the exciting radiation
coming from the laser beam delivery system to the sample.
9

NTEGRA Spectra Probe NanoLaboratory. SNOM Measuring Head. Instruction Manual
Fig. 1-11. Optical tube
Diagram of the optical tube is shown in Fig. 1-12. For measurements, the sample surface
is located in the focal plane of the lens 1. The reflecting prism 2 redirects the laser beam
to the objective for delivering radiation to the tube or to the laser beam delivery system
for collecting the transmitted radiation.
Fig. 1-12. Diagram of the optical tube
1 – lens; 2 – reflecting prism
Positioning device
The positioning device (Fig. 1-13) is a mount of the optical tube. It can move the tube in
three coordinates to position the tube so that the sample surface is in the focus of the lens.
Fig. 1-13. positioning device
1 – X movement screw; 2 – Y movement screw;
3 – Z movement screw; 4 – supporting bracket
10

Chapter 1. Basic Information
The screws 1, 2, and 3 provide displacement of the optical tube in the ranges of 11 mm
for corresponding degrees of freedom.
The supporting bracket 4 is screwed on the replaceable panel of the base unit thus fixing
the positioning device.
1.3.3. Laser beam delivery system
Laser beam delivery system (hereinafter – LBDS) (Fig. 1-14) is designed for easy, safe
and secure transfer of the laser radiation to the entrance of the PMT module or to the
sample.
Fig. 1-14. Overall view of LBDS
1 – «Input» socket; 2 – polarization key,
3 – «Output» socket; 4 – cover plugs
Polarization plane of the radiation is defined by the line mark on the Output socket of
LBDS (see Fig. 1-15). Rotate the socket to the desired position when installing LBDS.
Fig. 1-15. Output socket.
Line mark indicates the polarization plane
Table 1-1. LBDS technical characteristics
Parameter
Value
Fiber type
single-mode
Pigtail length
2÷3 m
Beam diameter at entrance
0.65 mm
Transmission efficiency
> 65 %
Output beam divergence
diffraction limit
Maximum input power
≤ 100 mW
11

NTEGRA Spectra Probe NanoLaboratory. SNOM Measuring Head. Instruction Manual
1.3.4. Photomultiplier Module
Photomultiplier module (PMT module) (Fig. 1-16) serves for converting optical radiation
acquired fromthe sample into electrical signals.
Fig. 1-16. PMT module
ATTENTION! The photomultiplier is highly sensitive to light. Never
illuminate the PMT (even when it is off) with high intensity to prevent its
damage or degradation. Avoid overloading the PMT.
The detected radiation comes to the PMT module through the laser beam delivery system
that connects with the slip bushing 1 (Fig. 1-17). The module is equipped with an
adapting bushing that corresponds to design of the laser beam delivery system in use.
Spectrum of the radiation acquired by the PMT can be transformed (by suppression,
extraction, or shifting of the desired band) with filters. For example, the fluorescent
component of the scattered radiation can be detected if the primary wavelength is
suppressed. The desired filter (diameter 25.4 or 25.0 mm) is placed in the cartridge 2 and
secured with the fixing nut 3.
Fig. 1-17. PMT module
1 – slip bushing; 2 – cartridge; 3 – fixing nut
12
Other manuals for NTEGRA Spectra
1
Table of contents
Popular Industrial Equipment manuals by other brands

Kidde
Kidde K-R Series Installation and operation guide

STAUFF
STAUFF RH Series Translation of the original operating manual

SPI Lasers
SPI Lasers redPOWER QUBE Instructions for use

Bosch
Bosch T10296 Original instructions

Magnum Industrial
Magnum Industrial MI-31662 operating manual

Witt
Witt ECO 2-L Installation and operating instructions